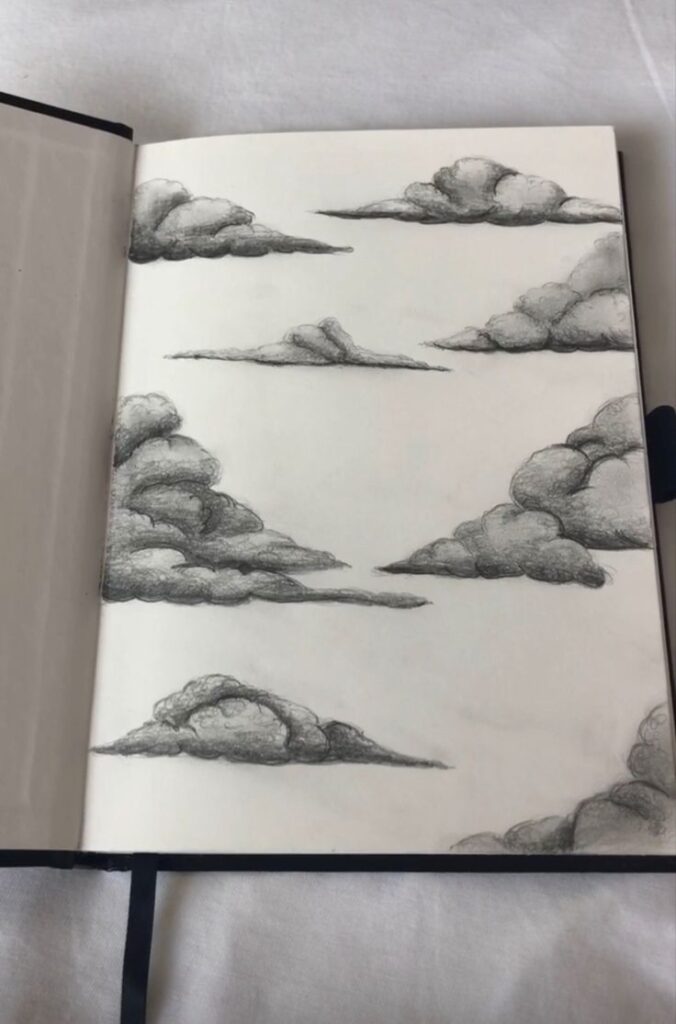
Drawing clouds is a fundamental skill that can elevate your artistic creations from simple sketches to breathtaking landscapes. Whether you’re a beginner just starting your artistic journey or an experienced artist looking to refine your technique, understanding how to capture the ethereal nature of clouds can transform your work. Learning to draw realistic clouds requires understanding their basic shapes, textures, and the way light interacts with them, allowing you to create depth and dimension in your artwork.
Cloud drawing encompasses various techniques across different mediums, from pencil sketches to digital illustrations. You can start with simple cumulus clouds—those fluffy, cotton-like formations—before advancing to more complex types like cirrus or stratus clouds. Professional illustrators recommend beginning with light, loose strokes to establish the general shape, then gradually building layers to create volume and shadow.
Key Takeaways
- Master the basic cloud shapes and light patterns before attempting more complex cloud formations to build a strong foundation for realistic results.
- Use layering techniques and varying pressure to create depth and dimension in your cloud drawings, making them appear more three-dimensional.
- Regularly practice drawing different cloud types under various lighting conditions to develop versatility in your landscape and weather scene illustrations.


Fundamentals of Cloud Drawing
Creating realistic clouds requires understanding their basic structure and how light interacts with their forms. Mastering cloud drawing combines observation, technique, and the right application of highlights and shadows.
Essential Tools and Materials
To start drawing clouds effectively, gather the right supplies. A quality sketchpad with medium to heavy paper works best as it can handle multiple layers and erasing. Bristol vellum is an excellent choice for detailed cloud studies.
For pencils, have a range of graphite hardness – HB for outlines, 2B-4B for mid-tones, and 6B for deep shadows. A kneaded eraser is essential for lifting graphite to create highlights and wispy edges.
You’ll also want blending tools like tortillons or cotton swabs to create smooth transitions in your cloud textures. For more advanced work, white charcoal or a white gel pen can add brilliant highlights against darker skies.
Techniques for Sketching Clouds
When drawing clouds, resist the urge to create symmetrical, cartoon-like bumps. Real clouds have irregular, organic shapes with varying densities.
Start by lightly sketching the general outline and mass of your clouds. Focus on the overall shape before details. Think of clouds as three-dimensional forms, not flat objects.
Study different cloud types to understand their unique characteristics. Cumulus clouds are puffy with flat bottoms, while cirrus clouds appear thin and wispy.
Use varied pencil strokes to create texture. Short, curved marks can indicate puffy edges, while longer, horizontal strokes work well for stretched clouds. Layer your marks to build depth gradually.
Understanding Light, Highlights, and Shadows
Clouds are essentially visibility indicators of water vapor, and their appearance depends heavily on how light interacts with them. The brightest highlights appear where sunlight directly hits the cloud tops or edges.
Mid-tones occupy most of a cloud’s body. Create subtle gradations between your highlights and shadows to give clouds volume. Remember that shadows in clouds aren’t solid black but rather darker versions of the cloud’s color.
The bottom portions of clouds often contain the darkest shadows, especially in cumulus formations. When drawing rain clouds, increase the contrast between highlights and shadows.
Use your eraser as a drawing tool to pull out highlights after laying down base tones. This technique creates the illusion of light passing through thinner sections of the cloud. Soft transitions between values will make your clouds appear more realistic and three-dimensional.


Step-by-Step Guide to Drawing Realistic Clouds
Creating lifelike clouds requires understanding their structure and mastering specific pencil techniques. The following methods will help you achieve luminous, dimensional clouds in your graphite drawings.
Planning Cloud Placement in Your Composition
Begin by lightly sketching the overall shapes of your clouds. Use loose, curved lines to outline where each cloud will appear in your composition. Remember that clouds are rarely perfectly symmetrical or evenly distributed across the sky.
Consider the light source in your drawing. Clouds closer to the sun will appear brighter, while those farther away may have more shadow. Leave plenty of white space for highlights.
Weather conditions influence cloud formations. Cumulus clouds have flat bottoms with puffy tops, while stratus clouds appear as horizontal layers. Study reference photos to understand various cloud types before finalizing your placement.
Blending Methods for Soft Edges
Successful cloud drawings rely on effective blending techniques. Start by shading the sky around your cloud outlines rather than the clouds themselves. This negative space approach helps preserve the whiteness of the paper for cloud highlights.
Use a soft graphite pencil (4B-6B) for the sky, applying light pressure. Blend with tools like tortillons, blending stumps, or even tissue paper for smooth transitions. Move in small circular motions to avoid streaking.
For cloud edges, use your eraser as a drawing tool. A kneaded eraser shaped to a fine point can create wispy edges by gently lifting graphite. Cotton swabs can also soften transitions between light and dark areas.
Adding Dimension With Layering
Clouds gain realism through strategic layering of light and shadow. Identify three values for your clouds: bright highlights (untouched paper), mid-tones (light graphite), and shadows (darker graphite).
Apply the darkest shadows at the bottom of cumulus clouds or inside folds where less light reaches. Use a harder pencil (2H-HB) for subtle shading and a softer pencil (2B-4B) for deeper shadows.
Build up layers gradually, working from light to dark. Add texture by varying your pencil pressure and stroke direction. For dramatic clouds, increase the contrast between highlights and shadows.
Leave the brightest areas completely untouched for maximum luminosity. Remember that even shadows in clouds are relatively light compared to other elements in your drawing.


Cloud Drawing in Digital Art
Digital art offers unique advantages for cloud drawing that traditional mediums can’t match. The flexibility of digital tools allows for endless experimentation with cloud shapes, lighting, and atmospheric effects without the permanence of physical media.
Using Vectors for Scalable Cloud Illustrations
Vector-based cloud drawing provides exceptional versatility for digital artists. When you create clouds using vector tools like Adobe Illustrator or Inkscape, your artwork remains crisp at any scale – perfect for projects that might appear across different media sizes.
The process typically begins with simple shapes. You can use the pen or blob tool to outline the general cloud form, then build layers of transparency to create depth.
Vector clouds benefit from a methodical approach:
- Start with a base silhouette shape
- Add highlight areas as separate white or light shapes
- Create shadow areas with darker shapes beneath
- Use gradients to soften transitions between elements
The clean, stylized aesthetic of vector clouds works particularly well for graphic design, logos, and illustrations where a more abstract representation is desired. You can easily adjust colors, opacity, and blur effects non-destructively.
Leveraging Stock Photos and Reference Images
Reference images dramatically improve your digital cloud drawings. You can study cloud photos to understand the complex light behavior that makes clouds appear dimensional and realistic.
Many artists begin by collecting a personal library of cloud reference images. This practice helps you recognize different cloud types and their distinctive features. Cirrus, cumulus, and stratus clouds all have unique characteristics worth studying.
Stock photo sites offer extensive cloud collections that can serve as direct references or even as elements to incorporate into your work. When using stock photos:
- Study the lighting direction and how it affects cloud edges
- Notice how clouds fade toward their edges
- Observe color variations within seemingly white clouds
Digital painting programs like Procreate or Photoshop let you create custom brushes that mimic cloud textures. This approach combines the organic feel of traditional media with digital flexibility.


Creative Cloud Drawing Techniques
Adobe Creative Cloud offers powerful tools for digital cloud drawing that can transform basic sketches into dynamic visual elements. These techniques allow you to create realistic or stylized cloud formations while leveraging the full potential of digital art applications.
Incorporating 360° Panoramic and Panoramic Images
When working with panoramic cloud imagery in Creative Cloud, start by importing your 360° or standard panoramic photos as reference layers. You can use the Pen Tool to trace cloud formations or the Brush Tool with varying opacity to build depth gradually.
For more realistic results, utilize layer masks to blend different cloud elements seamlessly. The Liquify filter helps reshape clouds to match your artistic vision without losing their natural appearance.
Try the Perspective Warp tool when adapting clouds to fit specific scenes or viewpoints in your panoramic compositions. This maintains proper spatial relationships across the expanded canvas.
Remember to adjust highlight and shadow dynamics using Curves or Levels adjustments. This enhances the three-dimensional quality of your clouds, especially important in wide panoramic scenes where lighting consistency matters.
Animating Clouds in Videos
Cloud animation in Creative Cloud begins with establishing keyframes for movement patterns. Use the Timeline panel to set cloud position, opacity, and transformation points at different intervals.
The Puppet Warp tool offers precise control over cloud deformation, allowing you to create natural billowing effects. Apply subtle warping to avoid mechanical-looking movement in your cloud animations.
For realistic cloud development, utilize layer opacity changes combined with masked reveal techniques. This mimics how real clouds form and dissipate gradually over time.
Try incorporating blur effects that increase and decrease strategically throughout your animation. This simulates the changing density of clouds as they move through different atmospheric conditions.
Wind effects can be achieved by applying directional motion blur filters with varying intensities. Combine this with controlled displacement maps to create complex, realistic cloud behavior in your video projects.


Applications and Inspiration for Cloud Drawing
Cloud drawing can be applied across various artistic contexts and draws inspiration from both natural phenomena and artistic representations. The techniques you learn can enhance landscape art, add emotional depth to compositions, and help you develop a unique artistic style.
Common Artistic Styles for Clouds
Realistic cloud renderings focus on accurately depicting cloud formations with proper shading and dimension. This style requires careful observation of light sources and shadow placement to create volumetric effects that make clouds appear three-dimensional.
Impressionistic approaches use looser strokes and color variations to capture the feeling and movement of clouds rather than precise details. This style works well for conveying weather conditions and atmospheric moods.
Stylized cloud drawings simplify forms into recognizable patterns, popular in illustration and animation. These often use repeated shapes and consistent line work to create visually appealing skies.
Abstract interpretations use cloud forms as starting points for non-representational art, focusing on texture and shape rather than literal depiction.
Inspiration From Nature and Media
Direct observation remains the most valuable source of inspiration. Spending time watching clouds in different weather conditions and times of day will significantly improve your understanding of their forms and behaviors.
Reference photos can help you study cloud formations that may be fleeting in nature. Creating a digital collection of cloud images across seasons provides a valuable resource for your drawings.
Master artworks offer excellent study opportunities. Examining how artists like John Constable or J.M.W. Turner depicted clouds can provide insights into effective techniques and approaches.
Contemporary media, including film and digital art, frequently showcase innovative cloud renderings that can inspire your work. Animation studios often develop unique stylistic approaches to clouds worth studying.
- 4shares
- Facebook0
- Pinterest4
- Twitter0


