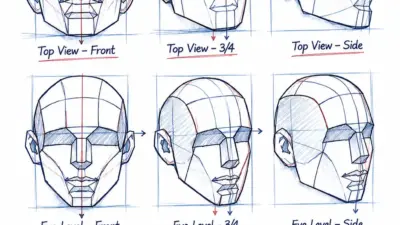
I once watched a portrait critique where an instructor pointed at a perfectly constructed ear — helix, anti-helix, tragus, all technically correct — and said “this ear is right, and it’s still wrong.” The student had drawn it like a reference study, floating slightly off the side of a head that had turned three-quarters away from the viewer. The ear hadn’t turned with it.
- Why a well-drawn ear can still look wrong
- The isolated-object problem
- What actually determines an ear's angle
- How to draw an ear step by step (construction method)
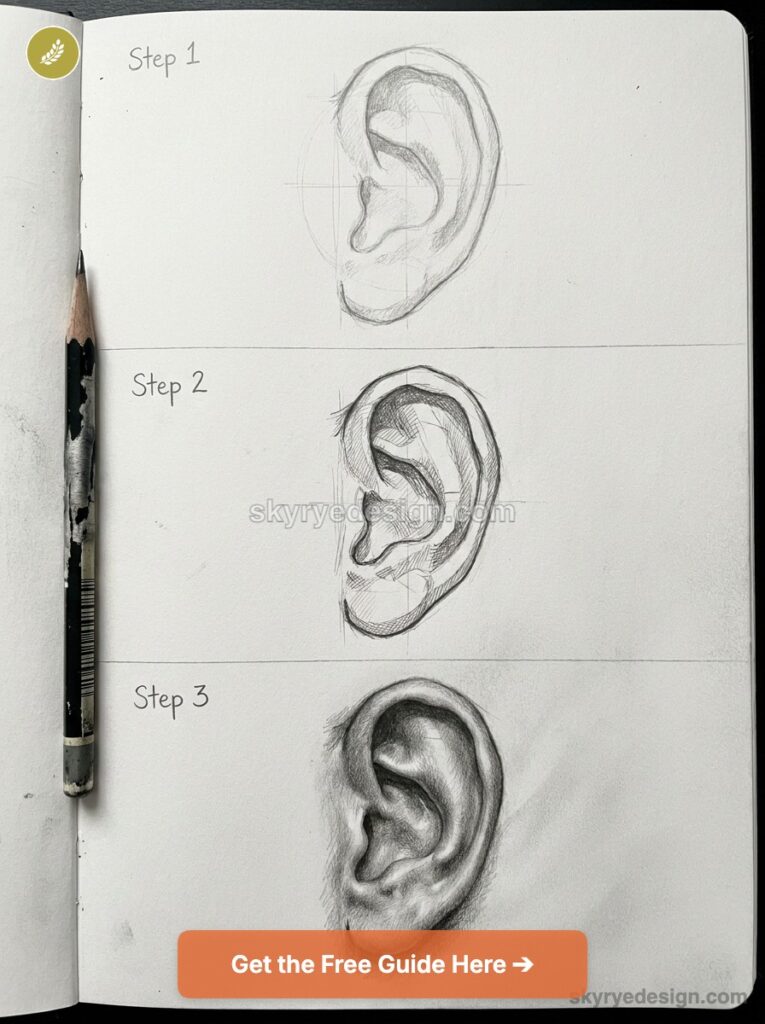
- Step 1 — the basic wedge shape and tilt
- Step 2 — helix and anti-helix
- Step 3 — tragus, antitragus, and concha
- Step 4 — lobe and final contour
- How ear angle changes with head rotation
- Front view — the ear as a side-facing plane
- Three-quarter view — foreshortening the near ear
- Profile view — full visibility, easiest to get wrong anyway
- Tilted head — why the ear's angle isn't just “along the jawline”
- Realistic ears vs. anime/stylized ears
- What stays the same
- What simplifies in stylized work
- Common ear-drawing mistakes (and the fix)
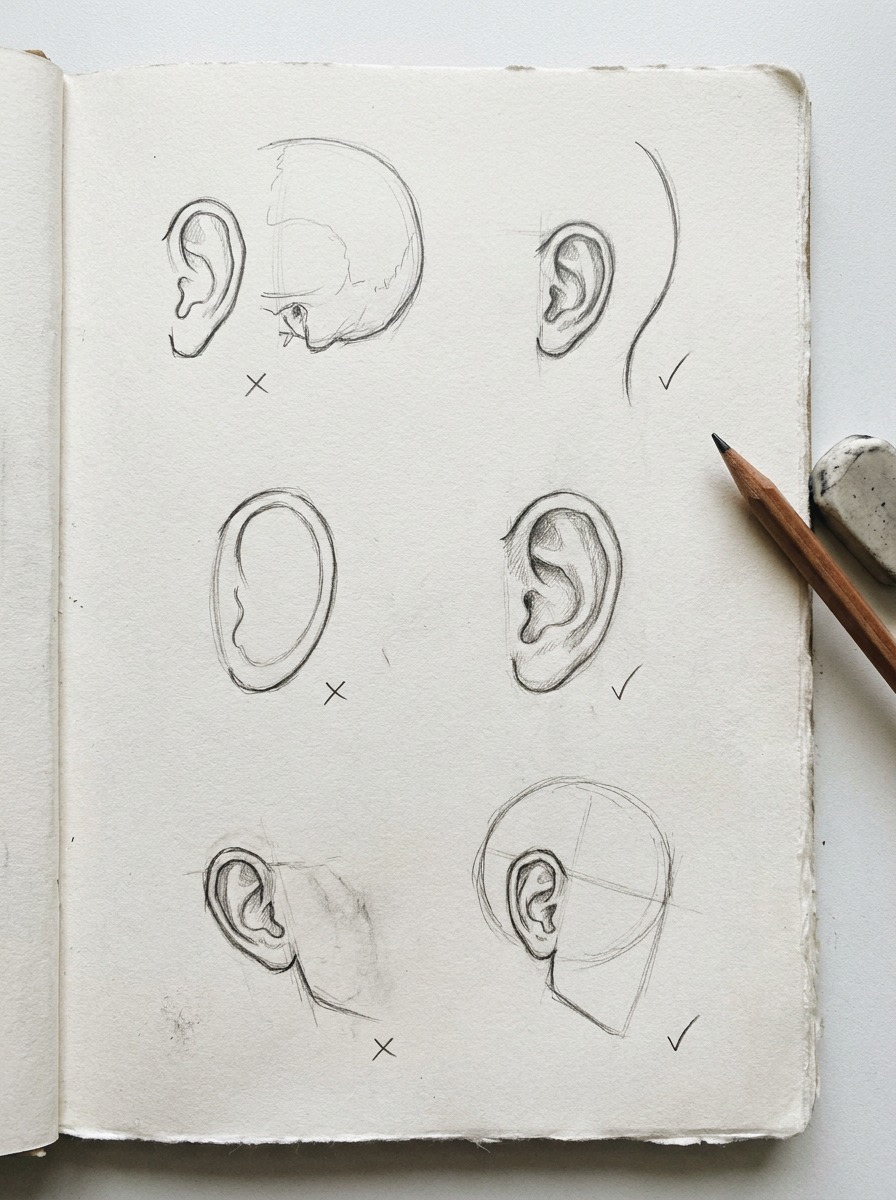
- Ears floating off the skull
- Flat, feature-less inner ear
- Wrong angle for the head's tilt
- Materials that actually matter
- Pencil grades for the inner-ear folds
- Final Thoughts
- Frequently Asked Questions
- Is it hard to draw ears?
- What is the hardest body part to draw?
- How do you draw an ear from the front?
- How do you draw ears on a turned or tilted head?
- What's the easiest way to draw ears for beginners?
- How is drawing anime ears different from realistic ears?
- What are the parts of the ear called (for labeling a diagram)?
That’s the part almost every ear tutorial skips, including the genuinely good ones. Plenty of resources teach the anatomy — helix, anti-helix, tragus, lobe — competently. Almost none of them address what happens to that anatomy once the head it’s attached to rotates, tilts, or turns away from a flat front view. An ear that’s perfect in isolation can still look pasted-on the moment it’s placed on an actual head at an actual angle.
This guide covers both: the construction method, and — the part that actually trips people up in real portrait work — how an ear’s angle and visible shape change as the head turns.
Why a well-drawn ear can still look wrong
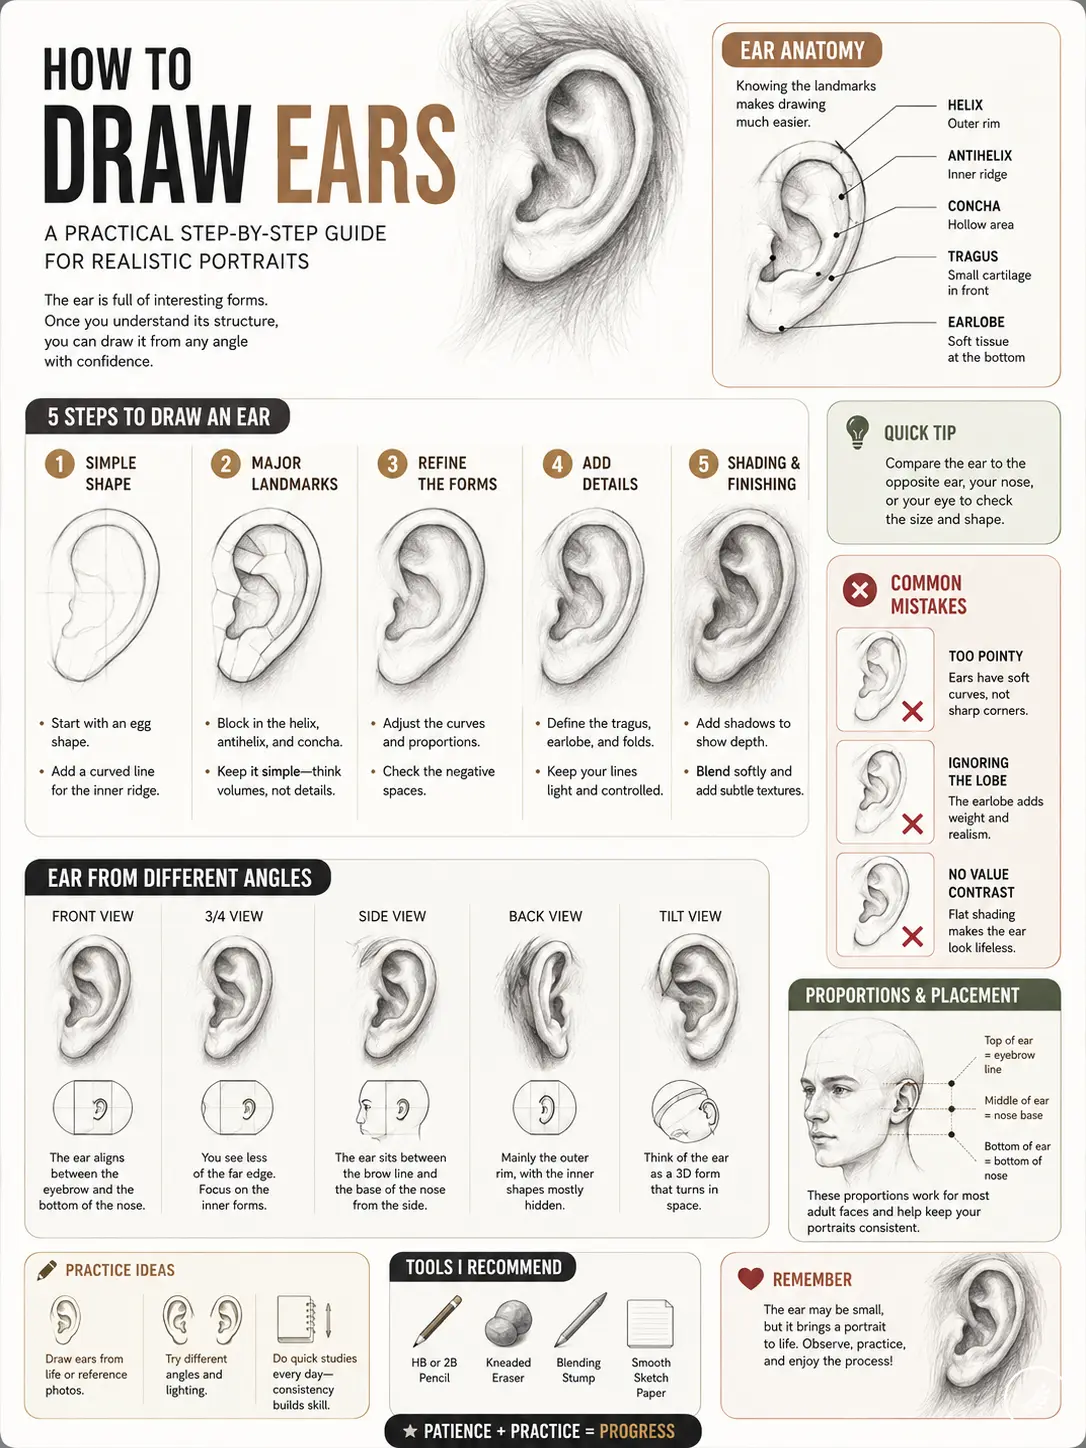
Search “how to draw ears” and you’ll find real anatomical instruction, not just circles and scribbles — helix, anti-helix, tragus, concha, all correctly named and constructed. That’s genuinely useful. It’s also incomplete in a way that doesn’t show up until you try to use it.
The isolated-object problem
Every one of those tutorials, however good, teaches the ear the same way you’d study a shell on a table: as a standalone object with its own proportions, viewed from one angle, disconnected from anything it might be attached to. That’s fine for learning the anatomy. It falls apart the moment you try to place that same construction on a head that isn’t facing directly forward — which, in any actual portrait or figure drawing, is most of the time. An ear study and an ear on a head are two different drawing problems, and only the first one usually gets taught.
What actually determines an ear’s angle
An ear isn’t glued flat against the side of a skull — it sits on a curved surface and tilts backward relative to a vertical line down the side of the head, usually somewhere around 15 degrees, though that varies by individual.
More importantly, as the head rotates — turning toward three-quarter view, tilting up or down — the ear’s visible angle and foreshortening change along with it, exactly the way any form mounted on a rotating volume changes as the volume itself turns.
I think about this the same way I’d think about a wheel well on a car body: the wheel well’s shape doesn’t change, but how much of it you see, and at what angle, depends entirely on how the surrounding body panel is oriented in space. An ear works the same way relative to the skull.
How to draw an ear step by step (construction method)
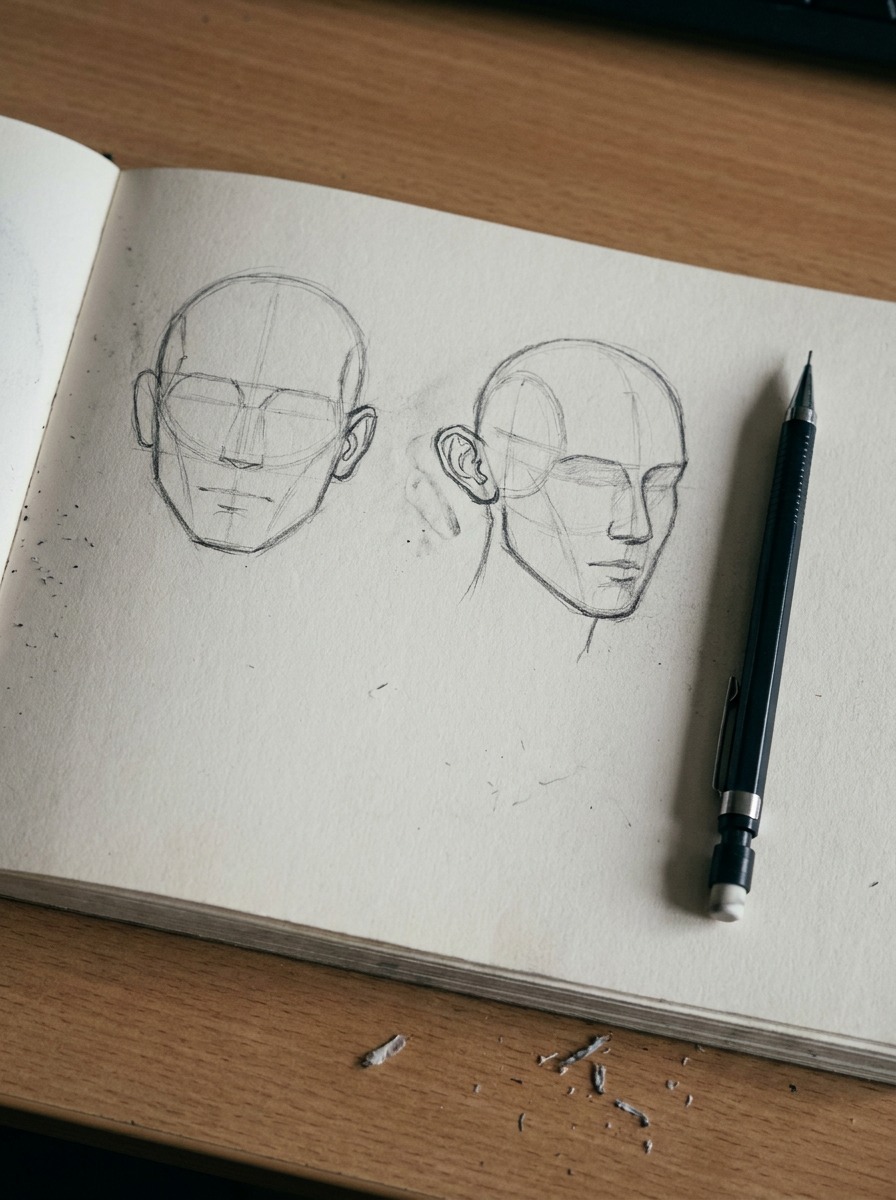
Four steps, same order every time — this covers the ear as an isolated construction before Section 3 addresses what happens when you attach it to a turning head.
Step 1 — the basic wedge shape and tilt
Start with a rough, slightly curved wedge shape, wider at the top and narrowing toward the bottom — not an oval, and not symmetrical top to bottom. Tilt the whole shape back slightly from vertical, the same 15-degree-ish lean mentioned earlier. This single decision matters more than people expect: an ear built on a perfectly vertical wedge reads as subtly artificial even before any detail goes in, the same way a rabbit built on two perfectly round circles reads as artificial before any fur texture gets added.
Step 2 — helix and anti-helix
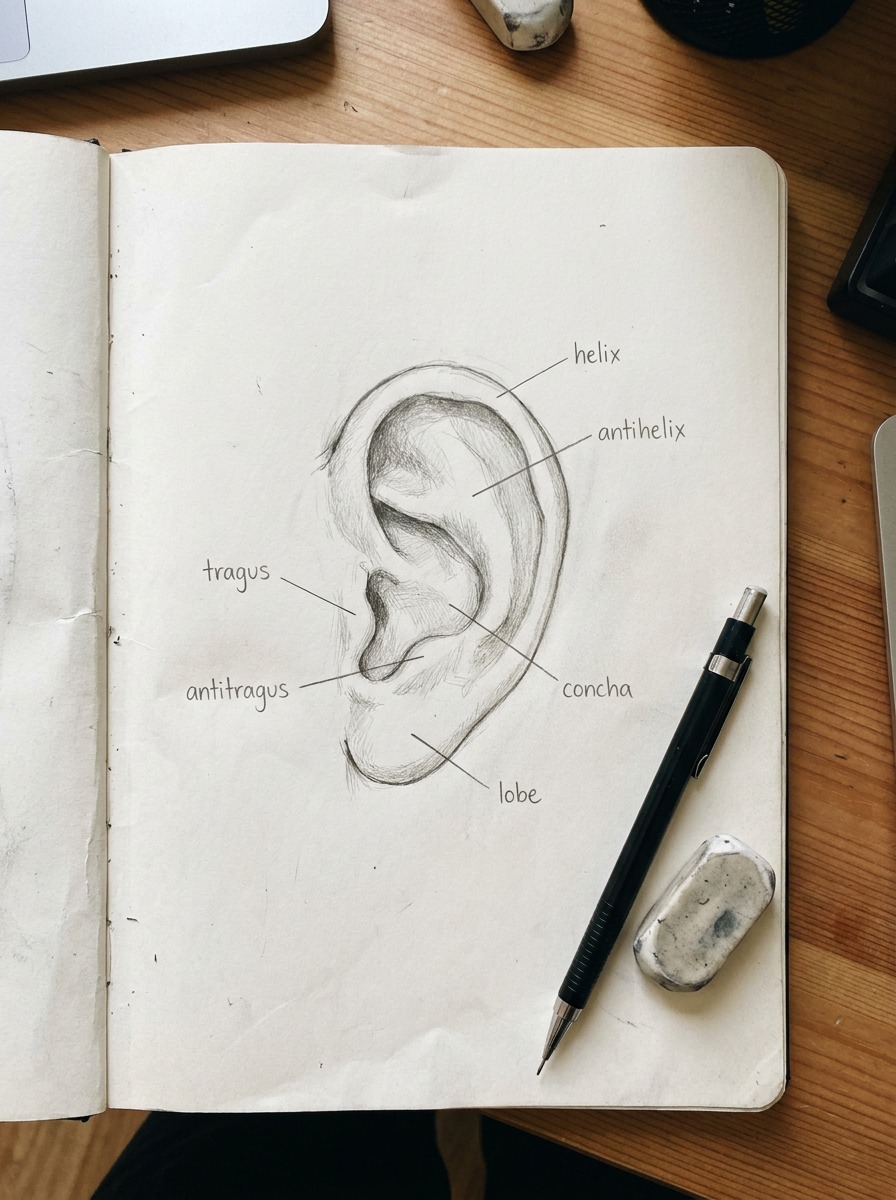
The helix is the outer rim — a single continuous curve running from the top of the ear down around the outside edge to the lobe. Inside it, sketch a rough Y-shape or forked line for the anti-helix, the ridge that runs roughly parallel to the helix before splitting into two branches toward the top. Don’t aim for precision here; these are structural guide shapes, not final line-work. What matters is getting the relationship right — the anti-helix sits inside and roughly parallel to the helix, creating the shallow channel between them that catches shadow in almost every ear regardless of the specific individual’s shape.
Step 3 — tragus, antitragus, and concha
Add three small shapes near the center-bottom of the ear: the tragus (a small flap that partially covers the ear canal, pointing backward), the antitragus (a small bump roughly opposite it, where the anti-helix’s lower branch ends), and the concha (the deep bowl-shaped hollow between them, which becomes one of the darkest shadow areas in the whole ear once you shade).
These three features are small, but they’re doing more identification work than anything else in the drawing — get the tragus and concha relationship right and the ear reads as anatomically observed rather than symbolically drawn.
Step 4 — lobe and final contour
Finish with the lobe at the bottom — genuinely variable between individuals, ranging from fully attached (blending directly into the jaw with no visible separation) to fully detached (hanging free below the point of attachment). Check a reference photo for this detail specifically, since guessing wrong here is one of the fastest ways to make an otherwise solid ear construction stop resembling the actual person or reference you’re working from.
Clean up the construction lines into confident final contours, and shade the concha and the channel between helix and anti-helix darkest, since those are the deepest recessed areas relative to the light.
How ear angle changes with head rotation
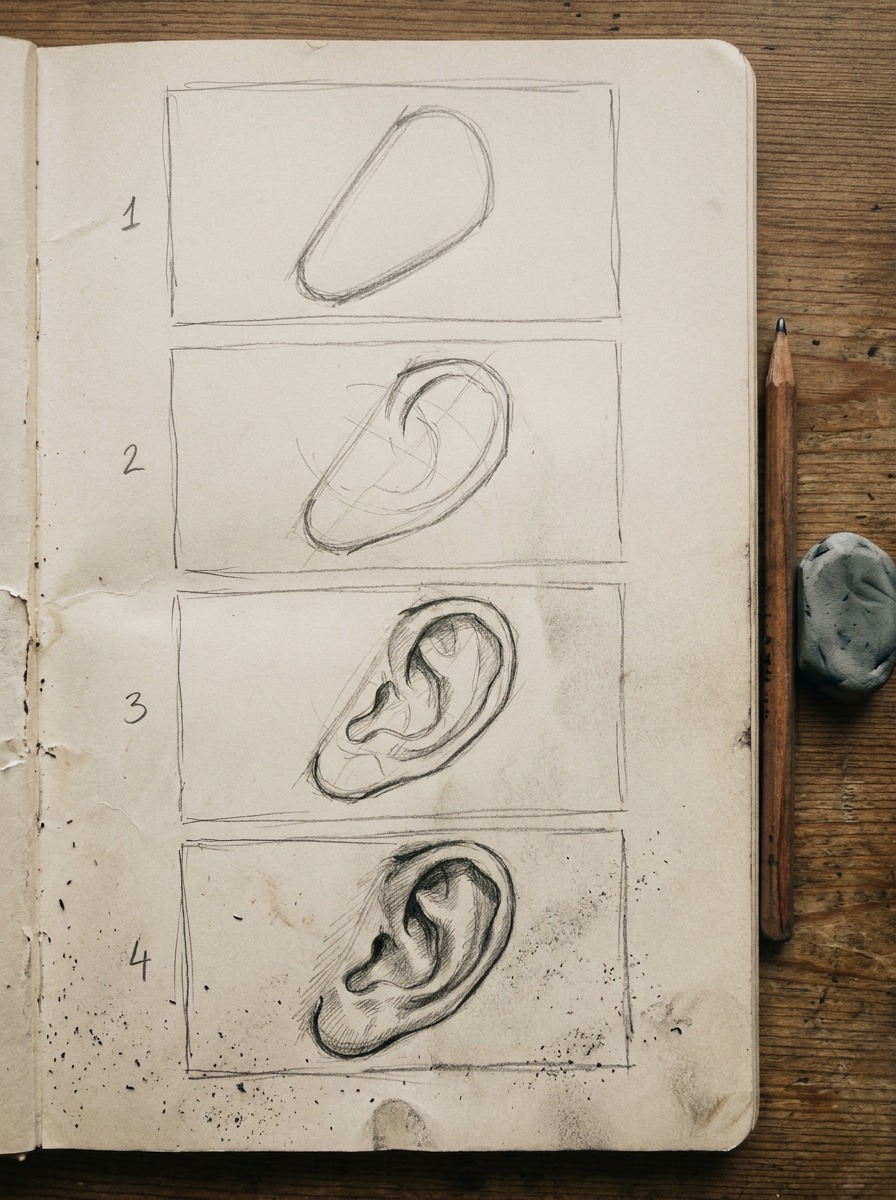
This is the section that actually separates a good ear study from an ear that works in a real portrait. The construction from Section 2 doesn’t change — what changes is how much of it you see, and at what angle, depending on where the head is turned.
Front view — the ear as a side-facing plane
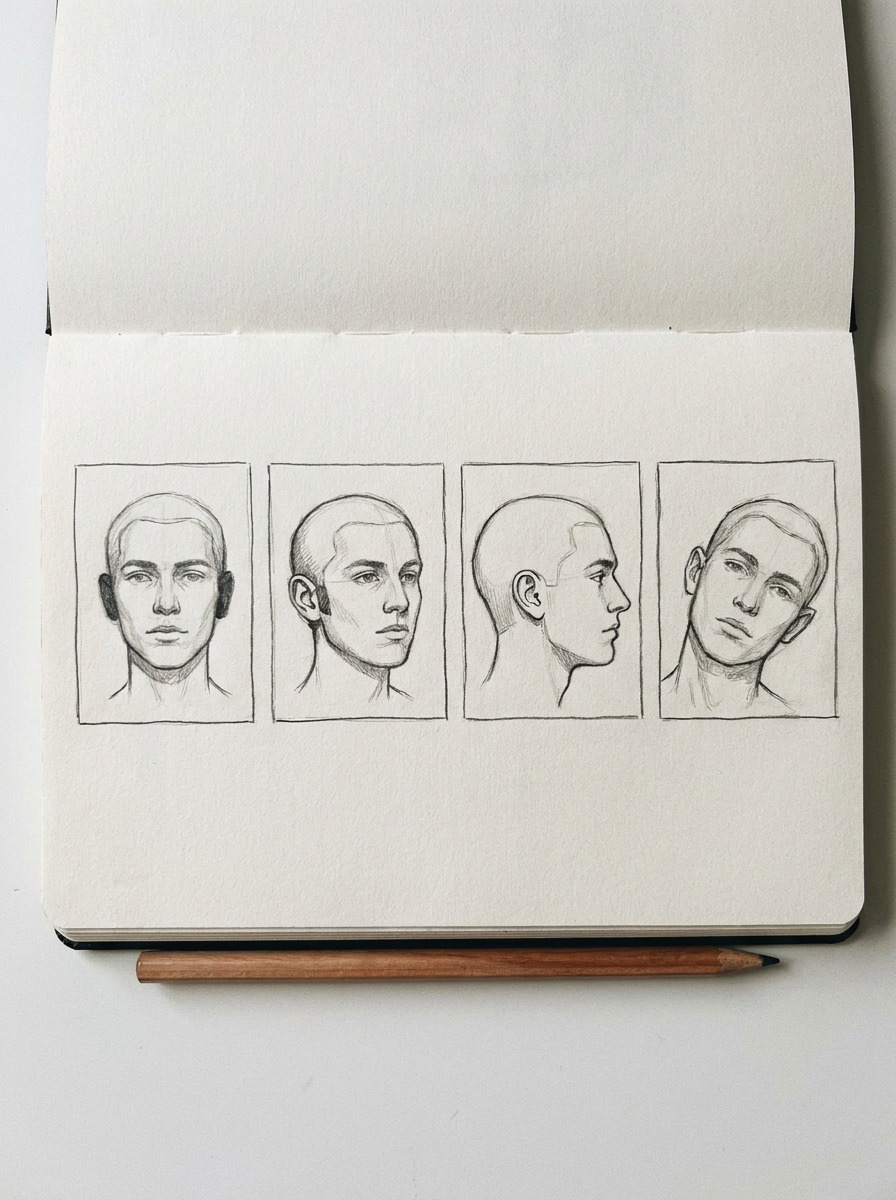
In a direct front view, you’re looking at the ear from the side even though the face itself is facing you — the ear’s actual front surface is turned almost 90 degrees away from your eye. This means you’re seeing it in a kind of natural profile, compressed against the side of the skull, with the helix’s outer curve as the most visible landmark and the inner details (anti-helix, tragus, concha) partially obscured by the angle.
A common mistake here is drawing the ear as if it’s facing the viewer the same way the face is — flattened and fully open — when it should read as a narrow, side-facing shape.
Three-quarter view — foreshortening the near ear
In a three-quarter turn, the near-side ear (closer to the viewer) foreshortens significantly — you’re seeing more of its front-facing plane than in a straight front view, which means more of the inner structure (anti-helix, tragus, concha) becomes visible, while the far-side ear, if visible at all, compresses down to little more than a sliver of helix at the edge of the head.
Getting this asymmetry right — near ear more open, far ear nearly hidden — is one of the fastest ways to sell a convincing three-quarter head.
Profile view — full visibility, easiest to get wrong anyway
counter-intuitively, profile view is where the ear is most fully visible and also where mistakes are most obvious, because there’s nowhere for an inaccurate proportion or angle to hide.
The full wedge tilt from Step 1 reads clearly here, and the ear’s vertical placement — roughly between eyebrow and nose-base level, though this varies — becomes immediately checkable against the rest of the profile. If an ear looks wrong in profile, it’s almost always a placement or tilt problem rather than a detail problem.
Tilted head — why the ear’s angle isn’t just “along the jawline”
When a head tilts up, down, or to the side, people often rotate the ear construction along with the jawline, assuming that’s the whole adjustment needed. It isn’t. The ear tilts with the skull’s actual rotation, which doesn’t always match the jaw’s apparent angle, especially in an upward or downward tilt where the jawline’s visible angle and the skull’s actual rotation diverge. Think about the ear as attached to the skull, not to the jaw, and check the tilt against the eye line and the top of the skull rather than against the jaw alone.
Realistic ears vs. anime/stylized ears
Once the construction and rotation logic from Sections 2 and 3 are solid, the same underlying structure pushes cleanly into a more stylized rendering — the skeleton doesn’t change, only how much of it stays visible on the surface.
What stays the same
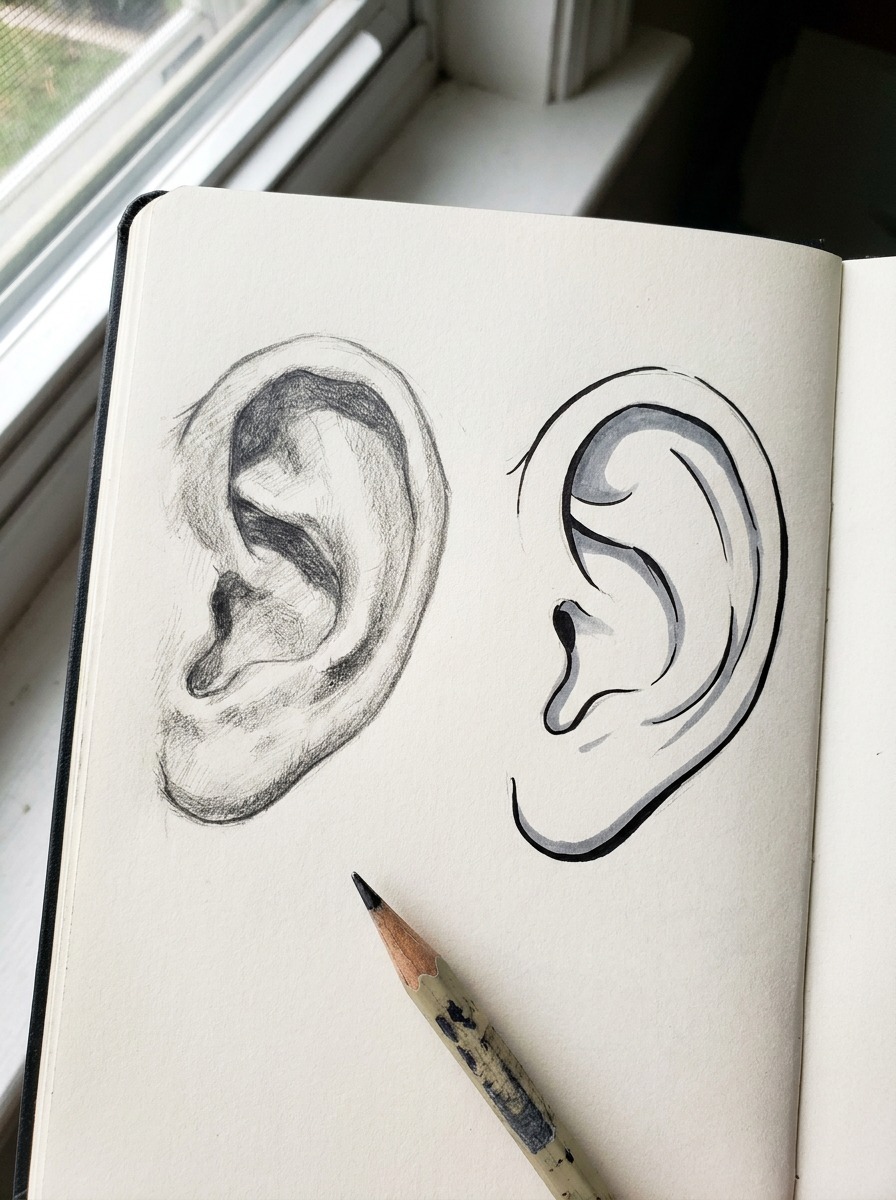
The wedge tilt, the basic helix-to-lobe proportion, and — critically — the rotation logic from Section 3 all carry over directly into stylized and anime-style ears. A stylized ear on a three-quarter-turned head still needs to foreshorten the same way a realistic one does, which is exactly the detail that makes some anime and stylized portraits feel subtly “off” even when the individual features are well drawn: the artist simplified the ear’s internal detail correctly, but forgot the ear still has to rotate with the head the same way a realistic one would.
What simplifies in stylized work
What changes is internal detail, not structure. Anime and stylized ears typically compress the anti-helix, tragus, and concha down into one or two simplified curved lines rather than the fuller construction from Step 3, and the outer helix often becomes a single clean, confident line rather than a carefully observed curve. The lobe, similarly, tends toward a simplified rounded shape rather than the more variable attached-versus-detached distinction that matters in realistic work. None of this simplification is wrong — it’s a legitimate stylistic choice — but it only reads as intentional simplification, rather than as a beginner skipping steps, when the underlying wedge shape and head-rotation logic are still correct underneath it.
Common ear-drawing mistakes (and the fix)
Ears floating off the skull
The mistake: an ear drawn as if it’s attached to nothing, sitting slightly apart from the head’s actual surface with a visible gap or a seam where it meets the skull. This happens when the ear is constructed as a fully separate shape and placed on top of a finished head rather than built with the skull’s curve already in mind. The fix: sketch a light guideline for the skull’s actual curve at the ear’s location before placing the wedge shape from Step 1, so the ear’s inner edge follows that curve rather than sitting on a flat assumed surface.
Flat, feature-less inner ear
The mistake: a correctly-shaped outer helix with little to no anti-helix, tragus, or concha detail inside it — essentially a hollow outline. This is the ear equivalent of a coconut drawn with an outline but no coir texture logic underneath: technically the right silhouette, missing the structure that makes it read as observed rather than symbolic. The fix: even in a quick sketch, include at least a simplified suggestion of the anti-helix’s Y-shape and the concha’s shadow — leaving them out entirely is a bigger loss than simplifying them.
Wrong angle for the head’s tilt
The mistake: an ear rotated to match the visible angle of the jawline rather than the actual rotation of the skull, which — as covered in Section 3 — aren’t always the same thing, especially on an upward or downward head tilt. The fix: check the ear’s tilt against the eye line and the crown of the skull, not just the jaw, particularly whenever the head is doing anything other than a level, straight-ahead pose.
Materials that actually matter
Pencil grades for the inner-ear folds
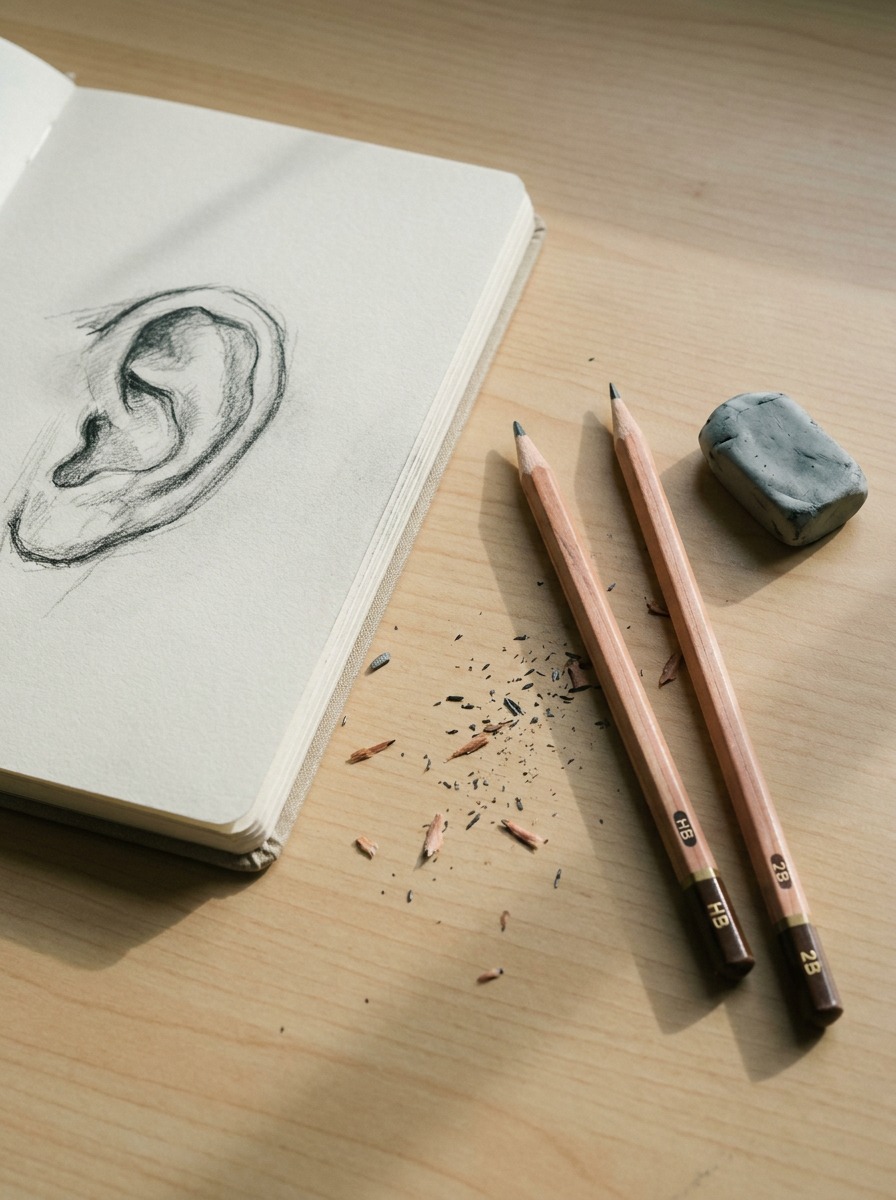
The inner-ear detail from Step 3 — the channel between helix and anti-helix, the concha’s shadow, the small recess around the tragus — benefits from the same two-pencil approach used across the other guides on this site: an HB for the controlled, precise line-work defining those small folds, and a softer 2B for building up the darker shadow values in the concha and the helix-anti-helix channel without the waxy build-up a harder pencil produces when pushed too dark. A kneaded eraser is worth keeping nearby specifically for lifting soft highlights along the helix’s outer curve, where the form catches the most light relative to the shadowed folds beneath it.
Final Thoughts
An ear is never really “correct” in isolation — it’s only correct relative to the head it’s attached to, at the specific angle that head happens to be turned. Construction gets you an anatomically sound ear. Checking that construction against the skull’s actual rotation, at front, three-quarter, profile, and every tilt in between, is what makes it belong to the head rather than sit next to it. If you’re building out facial-feature studies more broadly, I’ve covered similar construction-to-detail reasoning in my dragon eyes guide.
Try building the same ear construction at three different head angles — straight on, three-quarter, and tilted — before moving on to a full portrait. That comparison does more to fix the “floating ear” problem than any amount of practice on the ear alone.
Ears and hands both look strange when the small forms are guessed, so pair this ear lesson with the hand drawing easy method when you need a slower structure-first study.
Frequently Asked Questions
Is it hard to draw ears?
Ears have a reputation for being difficult, but the anatomy itself — helix, anti-helix, tragus, concha, lobe — is learnable through straightforward construction steps. What actually makes ears hard is placing them correctly on a head at an angle, since the ear’s visible shape changes with head rotation in a way most tutorials never address. Master the construction and the rotation logic together, and ears stop being the mysterious feature they’re often made out to be.
What is the hardest body part to draw?
Hands and ears are the two most commonly cited, and for similar reasons — both have complex internal structure that changes significantly depending on angle and position, and both are easy to oversimplify into something that reads as “wrong” even when it’s hard to say exactly why. Ears specifically trip people up because the construction can be technically correct and still look off once placed on a turned or tilted head.
How do you draw an ear from the front?
In a direct front view, the ear is actually seen almost in profile, since its front-facing surface points roughly 90 degrees away from the viewer. The outer helix curve becomes the most visible landmark, while inner details like the anti-helix and tragus are partially compressed by the angle. Avoid drawing the ear as if it’s facing the viewer the same way the face is — it should read as a narrow, side-facing shape.
How do you draw ears on a turned or tilted head?
On a three-quarter turn, the near ear foreshortens and shows more internal detail, while the far ear compresses to a sliver of visible helix. On a tilted head, check the ear’s angle against the eye line and the crown of the skull rather than the jawline, since the jaw’s visible angle and the skull’s actual rotation don’t always match on an upward or downward tilt.
What’s the easiest way to draw ears for beginners?
Start with a slightly tilted wedge shape rather than a symmetrical oval, add a simplified Y-shape for the anti-helix, mark the tragus and concha as small shapes near the center, and finish with the lobe. Even a simplified version needs at least a suggestion of that inner structure — a hollow outline with no interior detail is the most common beginner mistake.
How is drawing anime ears different from realistic ears?
The underlying wedge shape and head-rotation logic stay the same. What changes is internal detail — anime and stylized ears typically simplify the anti-helix, tragus, and concha into one or two clean curved lines instead of the fuller realistic construction, and the outer helix becomes a single confident line. The simplification only reads as intentional, rather than as skipped steps, when the basic structure and rotation are still correct underneath.
What are the parts of the ear called (for labelling a diagram)?
The main external parts are the helix (the outer rim), the anti-helix (the inner ridge running roughly parallel to it), the tragus (the small flap partially covering the ear canal), the antitragus (the small bump near the lobe, roughly opposite the tragus), the concha (the deep bowl-shaped hollow at the center), and the lobe (the soft lower portion, which varies between attached and detached).
- 44shares
- Facebook0
- Pinterest44
- Twitter0
- Reddit0