My first attempt at a Loomis head looked like someone hit a beach ball with a snow shovel. The cranium was tiny, the jaw did all the heavy lifting, and the whole thing read as vaguely human at best. That’s the most common mistake I see in student sketchbooks, too — people draw the circle, then squeeze a full head’s worth of jaw and chin onto it like an afterthought.
- What the Loomis method actually is (and who Andrew Loomis was)
- Why the Loomis method actually works (not just "follow the steps")
- How to draw a head with the Loomis method, step by step (front view)
- The 3/4 view: the angle that trips up almost everyone
- Common Loomis method mistakes (and exactly how to fix them)
- Beyond the head: Loomis for figure drawing
- How to actually get good at this (practice plan)
- Conclusion
- FAQ
- Q: What is the Loomis method?
- Q: Is the Loomis method good for beginners?
- Q: Why does my cranium always come out too small?
- Q: How is the Loomis method different from the Reilly or Asaro head methods?
- Q: Does the Loomis method work for anime or stylized art?
- Q: How long does it take to get good at the Loomis method?
- Q: Is there a Loomis method app or PDF worth using?
Here’s what changed things for me: understanding that the circle is the cranium, not the whole head. Everything else — the jaw, the side-plane, the guideline grid — hangs off that one correction. I picked this up properly during my academic drawing training, years before I ever touched a car design brief, and the same logic showed up again later blocking out automotive forms: primitive volumes first, surface detail after.
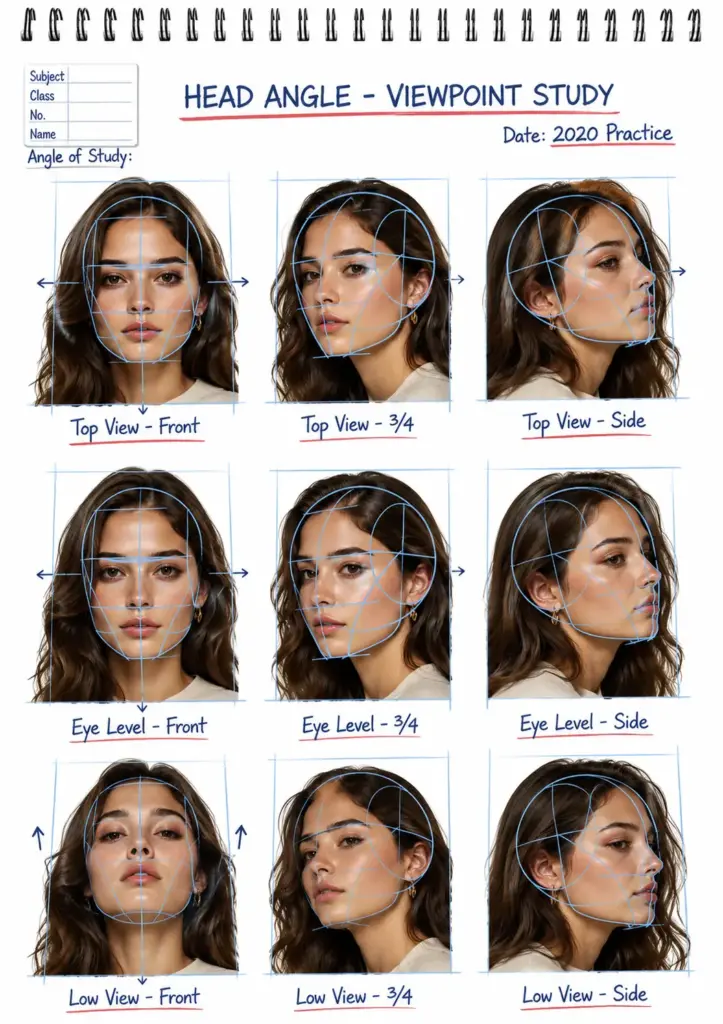
By the end of this, you’ll have the actual construction steps, a fix for the angle that stalls almost everyone (the 3/4 view), and the short list of mistakes that show up in nearly every beginner’s sketchbook — plus why the method still holds up in 2026, with every AI reference generator promising to skip the thinking for you.
What the Loomis method actually is (and who Andrew Loomis was)
Andrew Loomis was an American illustrator working through the 1930s to 1950s, best known today for two books: Drawing the Head and Hands (1956) and Figure Drawing for All It’s Worth (1943). Before he wrote either, he’d spent decades doing commercial illustration — magazine covers, ads, the kind of work where you don’t get to wait for inspiration. That practical pressure shows in the method: it’s built for speed and repeatability, not for looking impressive on its own.
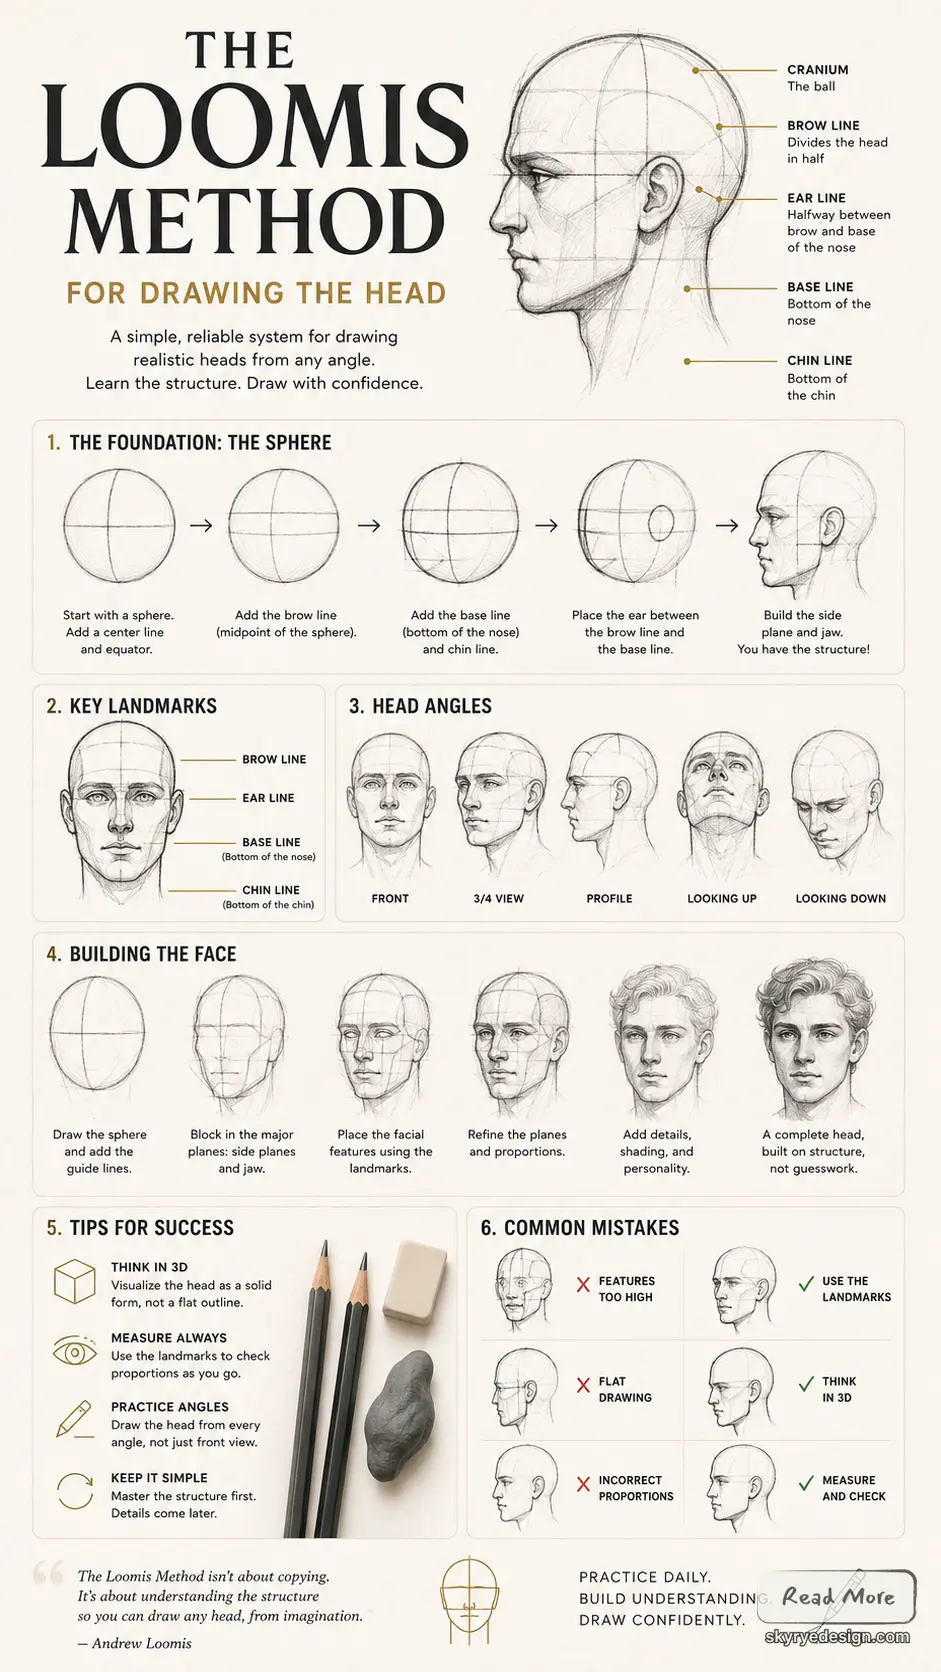
The Loomis method breaks the head down into simple forms — a sphere for the cranium, a set of guideline crosses for the features — so you can construct a face from any angle without guessing. You start with the ball, add a vertical and horizontal center line, then use those lines to place the hairline, brow, nose, and chin.
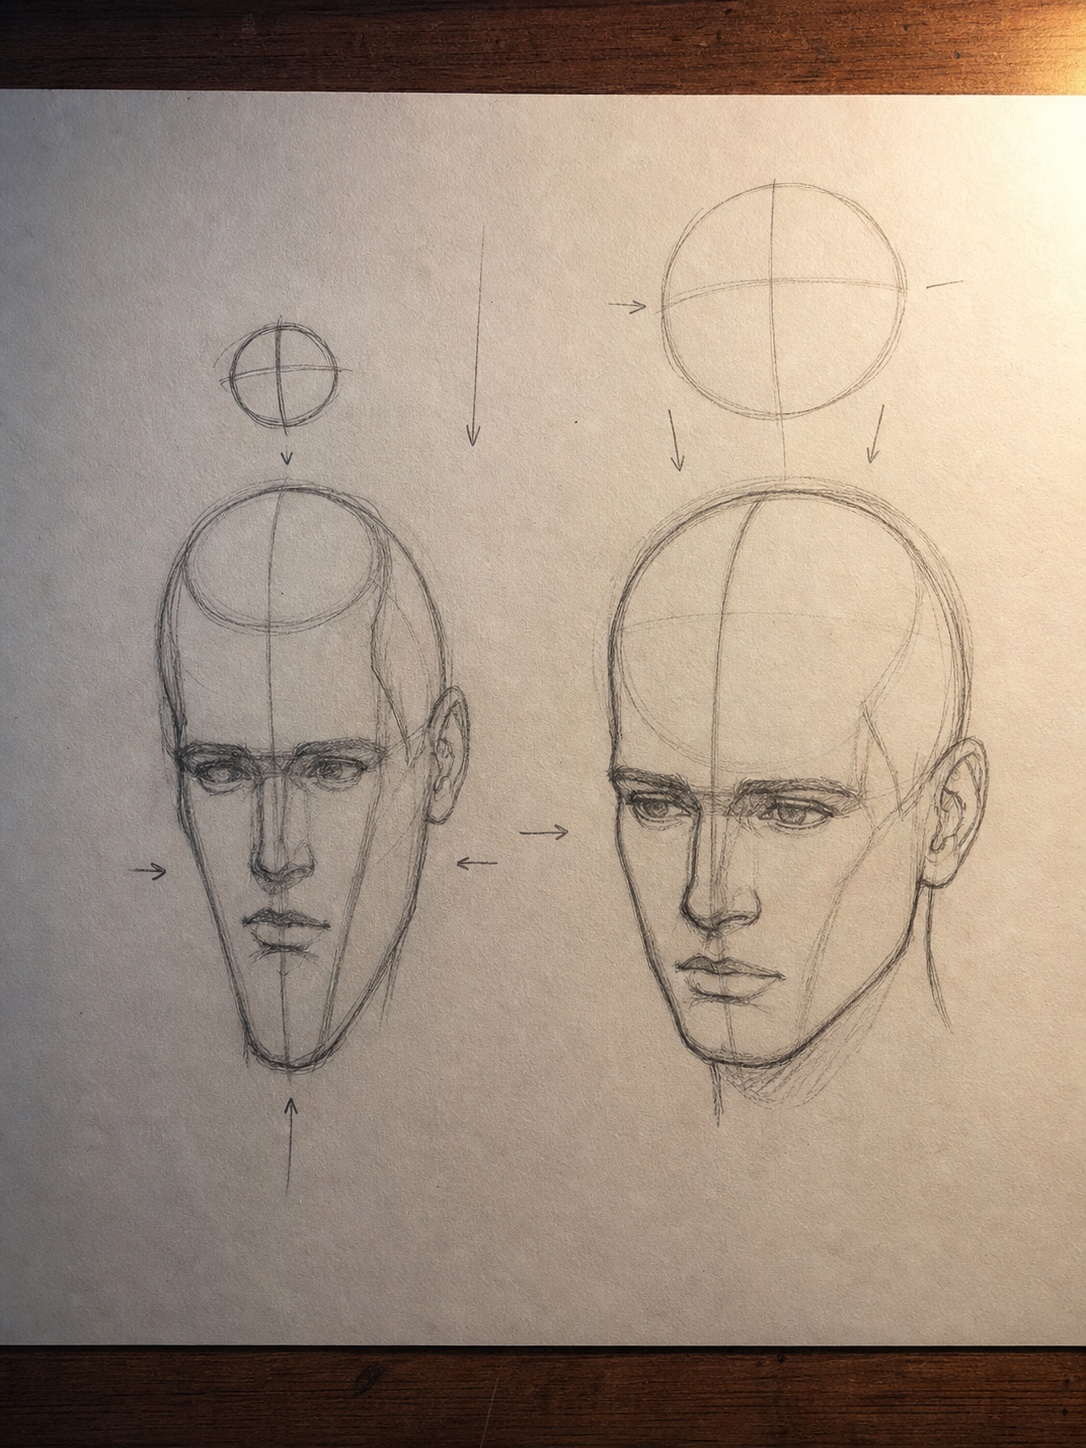
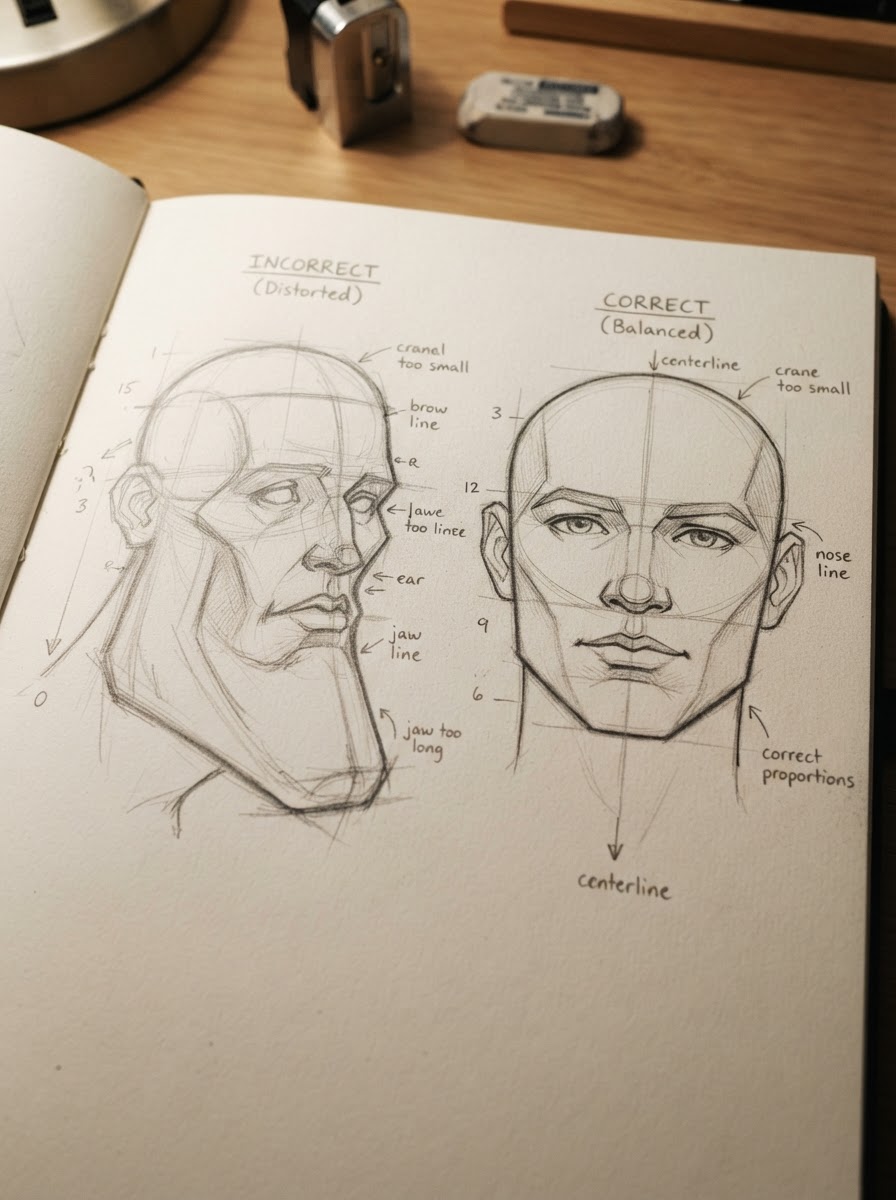
Here’s the part almost every beginner gets wrong on the first try: the circle is the cranium, not the entire head. The jaw and chin hang below it, extending down and often forward from the bottom edge of the sphere. Draw the circle too small, and you’ll unconsciously stretch the jaw to compensate — which is exactly how you end up with that oddly elongated, horse-like face shape.
I remember this clicking for me in a life-drawing class, staring at a model’s skull structure and realizing the actual brain case takes up more room than most people instinctively draw. Once you internalize that the sphere needs to be generous, not tidy, the rest of the construction stops fighting you.
Why the Loomis method actually works (not just “follow the steps”)
Most tutorials hand you the steps and stop there. Sphere, cross, guidelines, done. That’s fine for a front-view head staring straight at the camera — but the moment you try to turn that head to a 3/4 angle, the whole thing falls apart if you don’t understand why the steps work.
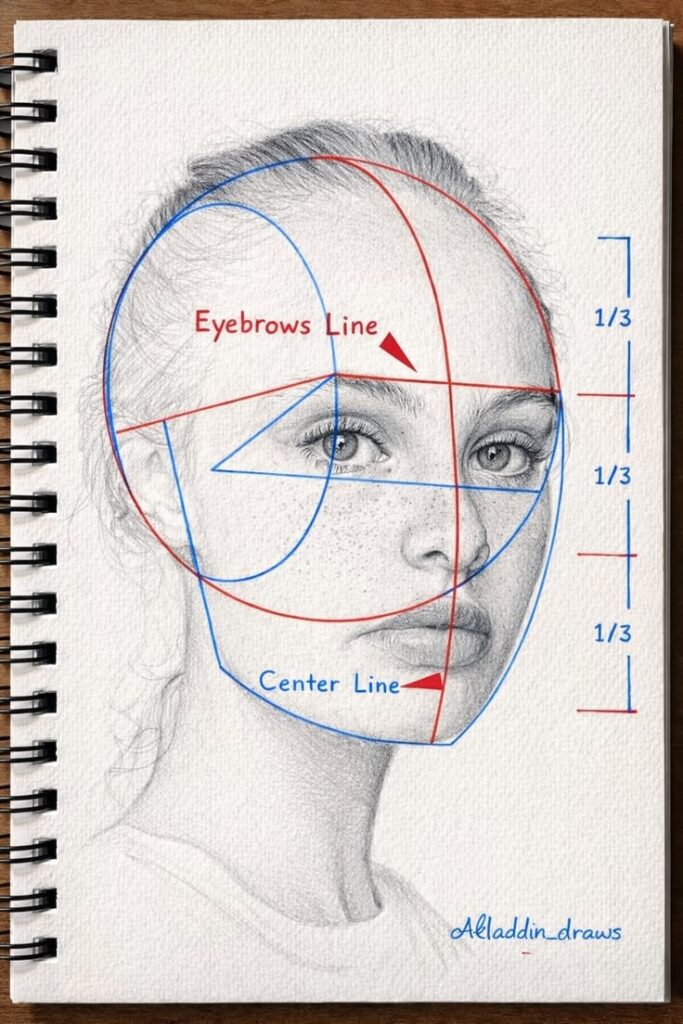
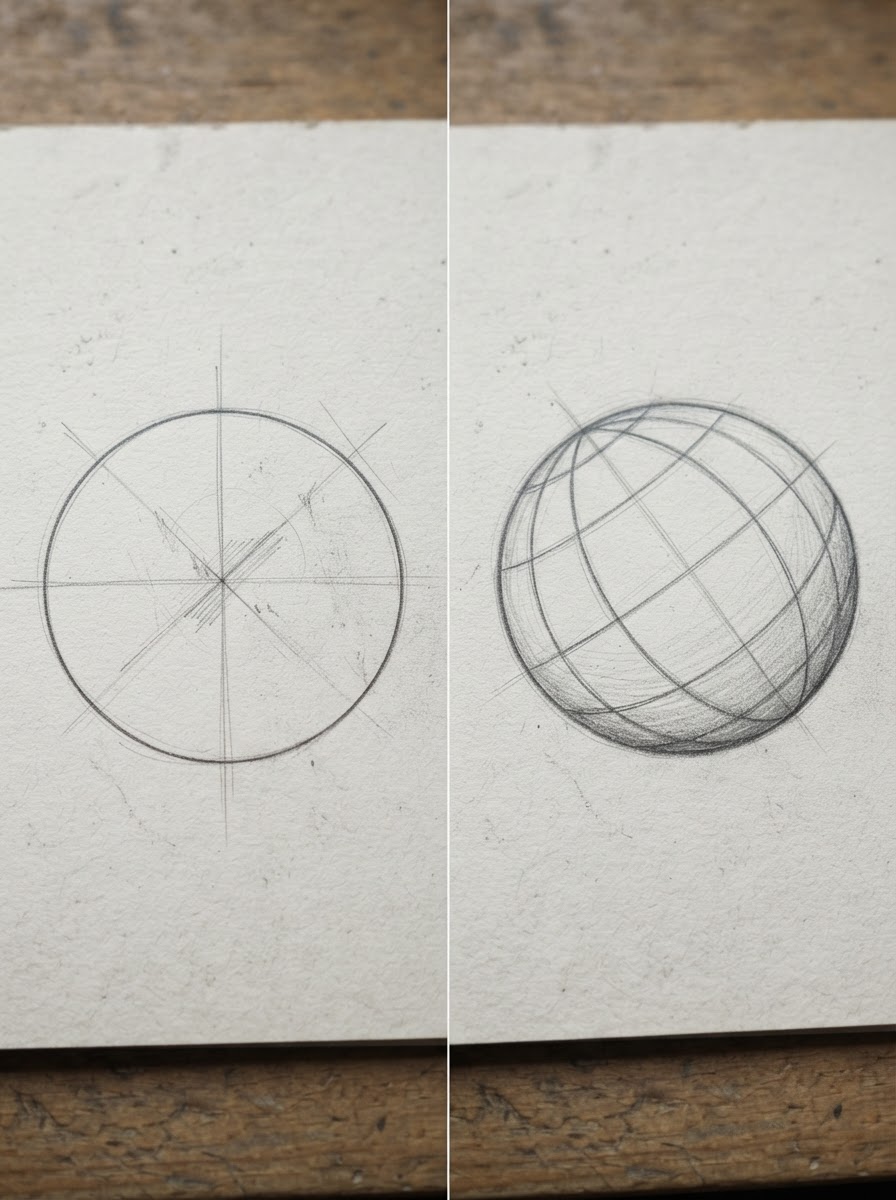
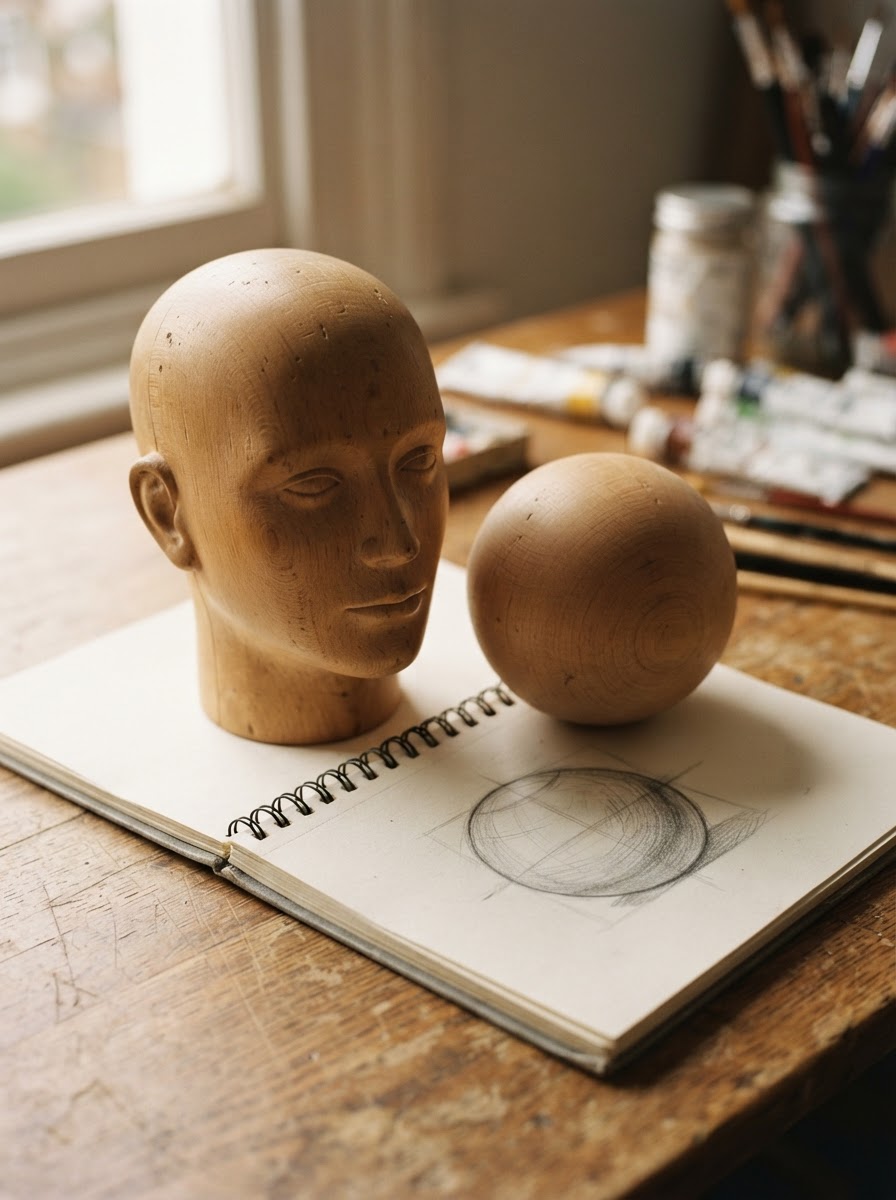
The real skill underneath Loomis isn’t memorizing where the brow line goes. It’s understanding the sphere in perspective — how a circle stops being a circle and becomes an ellipse the moment you rotate it in space, and how the cross-lines have to curve to follow that rotation instead of staying flat. Skip this, and you’ll draw a technically correct front view, then hit a wall on every other angle. This is the single biggest reason people plateau with Loomis after a few weeks.
I didn’t fully get this from drawing books, honestly. I got it later, blocking out surfaces for the first Ukrainian electric car concept I worked on. A car body doesn’t start as a finished surface — it starts as primitive volumes: a rough box for the cabin, cylinders for the wheel arches, wedges for the hood line. You establish those volumes in three-dimensional space first, rotate them, check them from every angle, and only then do you start carving in the actual panel lines and character creases. The Loomis sphere works on exactly the same principle.
Once you stop treating the sphere as a flat template to trace and start treating it as a 3D object you have to rotate in your head first, the guideline logic makes a lot more sense: the cross doesn’t sit on a flat disc, it wraps around a ball, the same way a racing stripe wraps around a fender instead of floating flat above it.
How to draw a head with the Loomis method, step by step (front view)
The front view is where everyone starts, and for good reason — it’s the most forgiving angle to learn the construction on. Get comfortable here before you touch anything else.
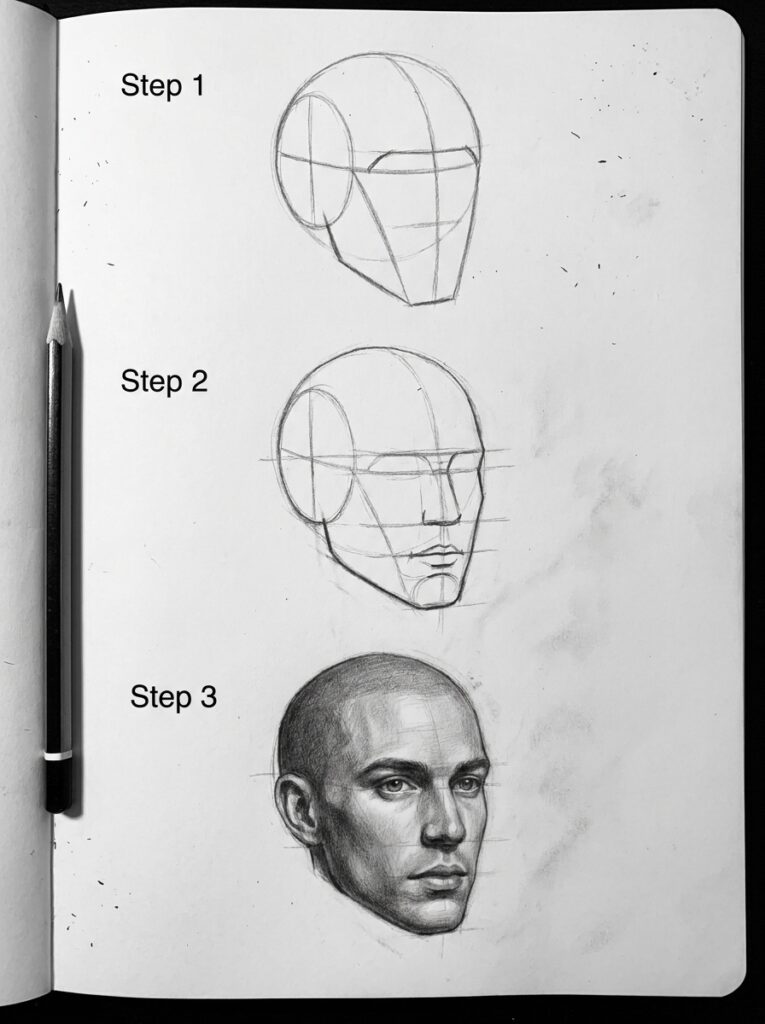
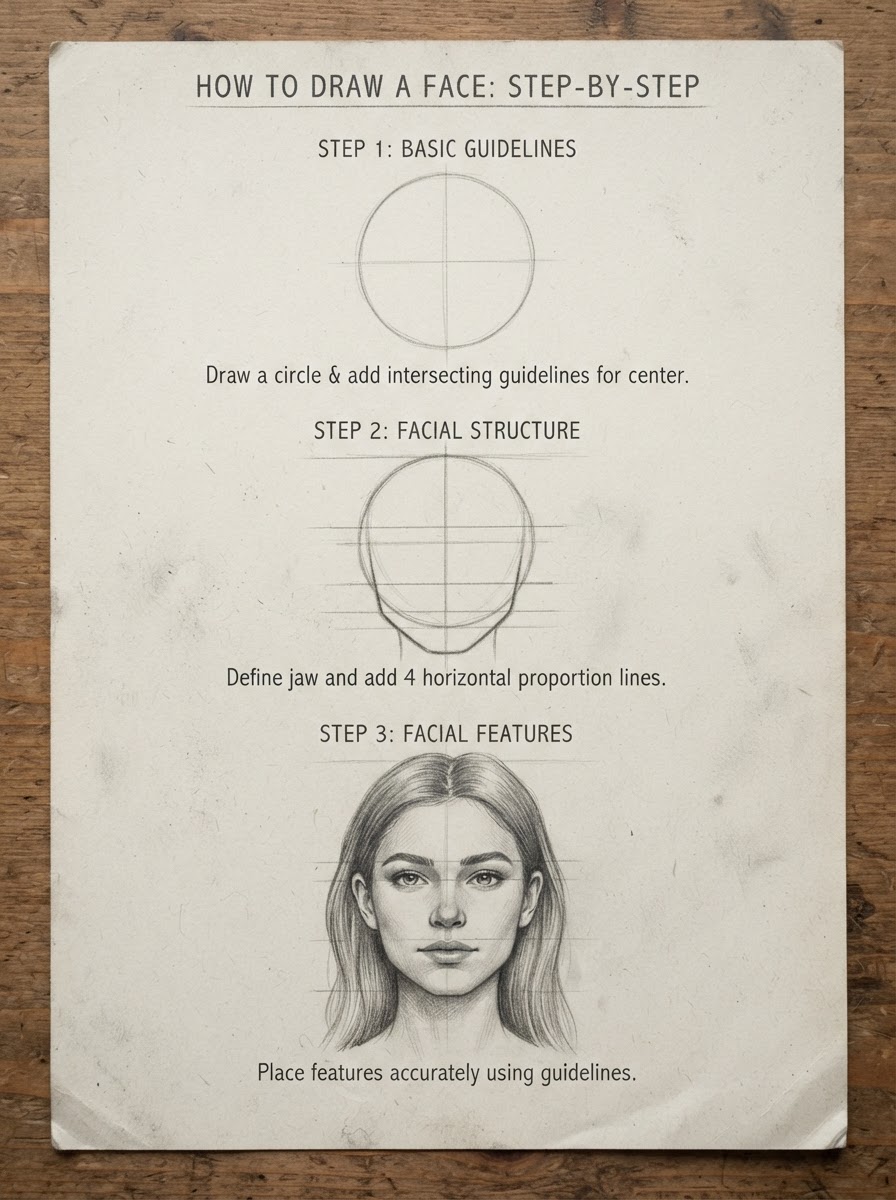
Step 1: The sphere, the cross-lines, the side-plane
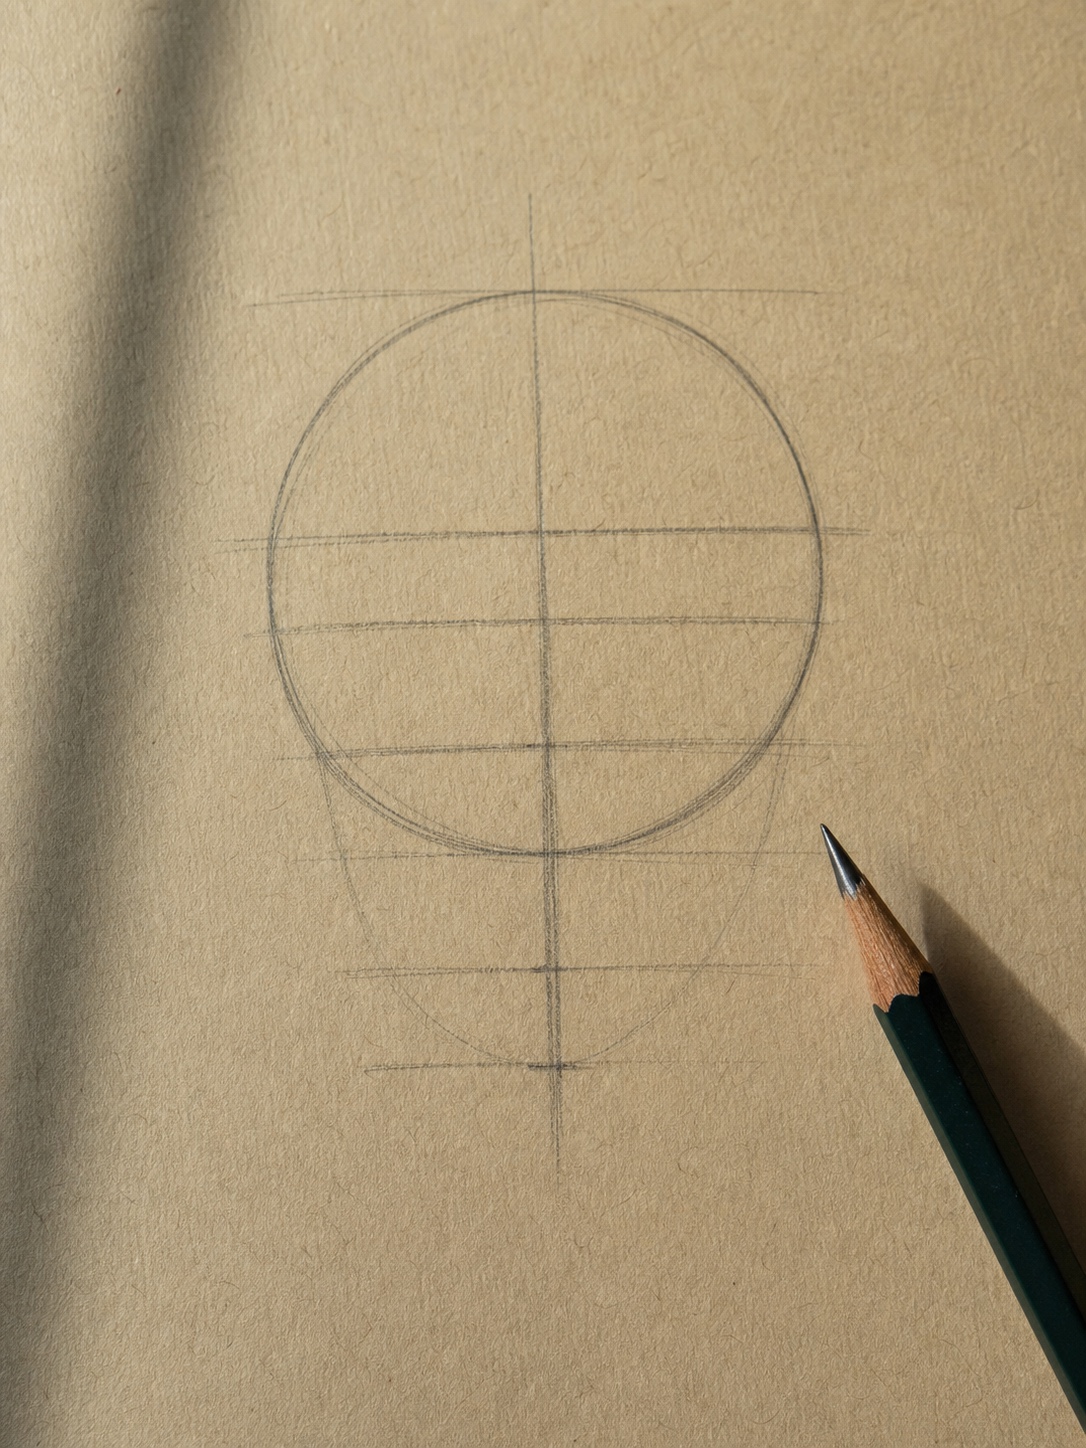
Start with a circle. Doesn’t need to be perfect — a compass helps if you’re worried about it, but drawing it freehand by moving from the elbow, not the wrist, gets you a rounder result with practice. This circle represents the cranium only, so err on the generous side.
Next, draw a vertical line down the center of the circle and a horizontal line across it, roughly through the middle. These two lines form your cross — they’re the anchor for every feature you’ll place later, and they’re the one part of the construction that stays fixed no matter what angle you’re working from.
Then add the side-plane: a smaller vertical curve inside the circle, offset toward one side, marking where the front of the face turns into the side of the skull. On a straight front view this sits close to center, barely visible — it becomes much more important once you start turning the head.
Step 2: Guidelines and the jaw
Below the circle, extend the vertical center line down and add the jaw and chin. This is where that earlier warning matters — measure the jaw length against the circle’s own radius rather than eyeballing it, or you’ll shrink it out of habit.
Now add four horizontal guidelines: hairline, brow line, base of the nose, and chin line. In Drawing the Head and Hands, Loomis treats the distance from brow to nose-base and nose-base to chin as roughly equal — a useful starting ratio, not a law. Real faces vary; this just gives you something to check against instead of guessing blind.
Step 3: Placing the features
Eyes sit on the brow line, not above it — a mistake I still see constantly, even from people who’ve read the theory. Across that line, five eye-widths fit: one width of space on each outer edge, then the two eyes with one eye-width of gap between them. It’s a simple rule and it fixes drooping, too-high, or too-wide eye placement almost instantly once you apply it.
The nose base sits on its guideline, roughly as wide as the distance between the inner corners of the eyes. The mouth goes about a third of the way between the nose base and the chin line, generally a touch wider than the nose itself.
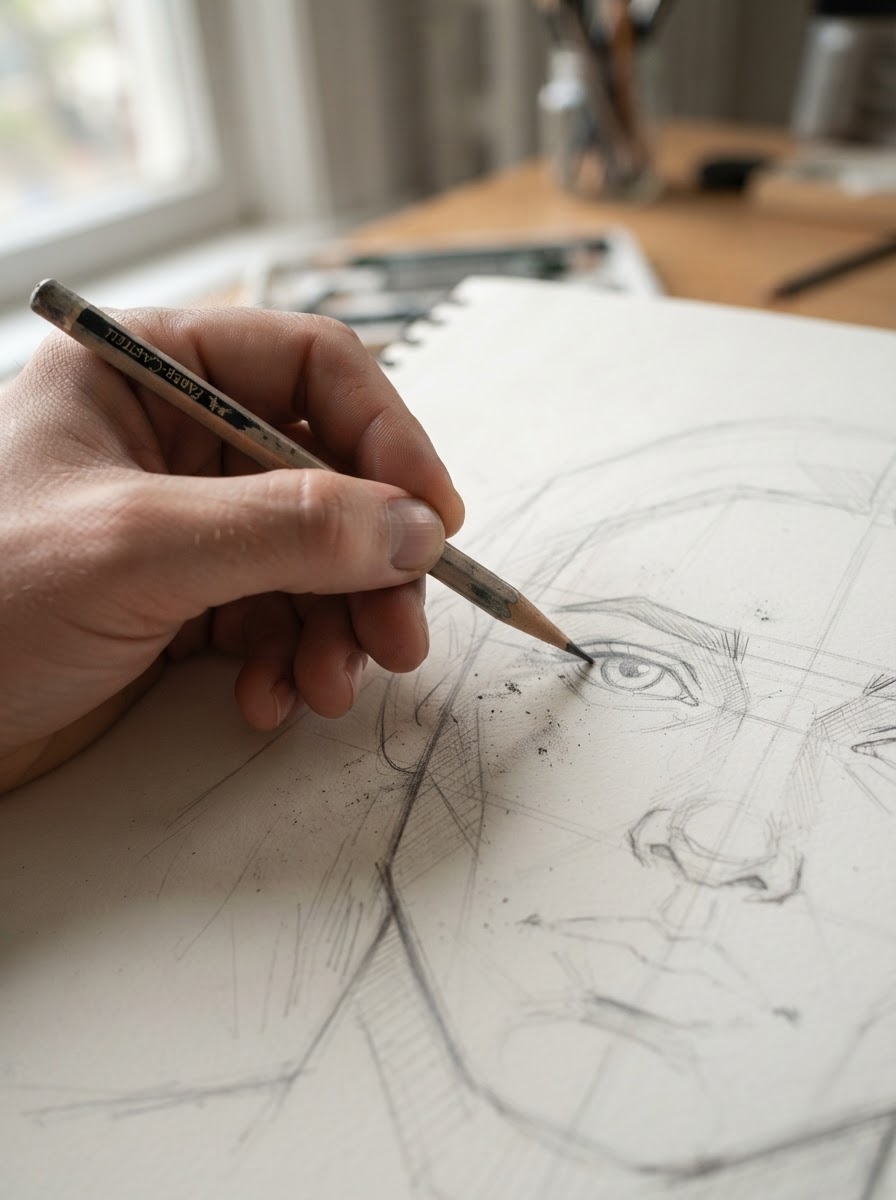
Once you can do this cleanly on a blank page without a reference photo propped next to you, you’re ready for the angle that trips almost everyone up: the 3/4 view.
The 3/4 view: the angle that trips up almost everyone
Every drawing forum has the same thread eventually: “front view is fine, but my 3/4 heads look wrong and I can’t figure out why.” It’s not a coincidence. The 3/4 view is where the sphere-in-perspective problem from earlier stops being theoretical and starts wrecking your drawings if you haven’t actually internalized it.
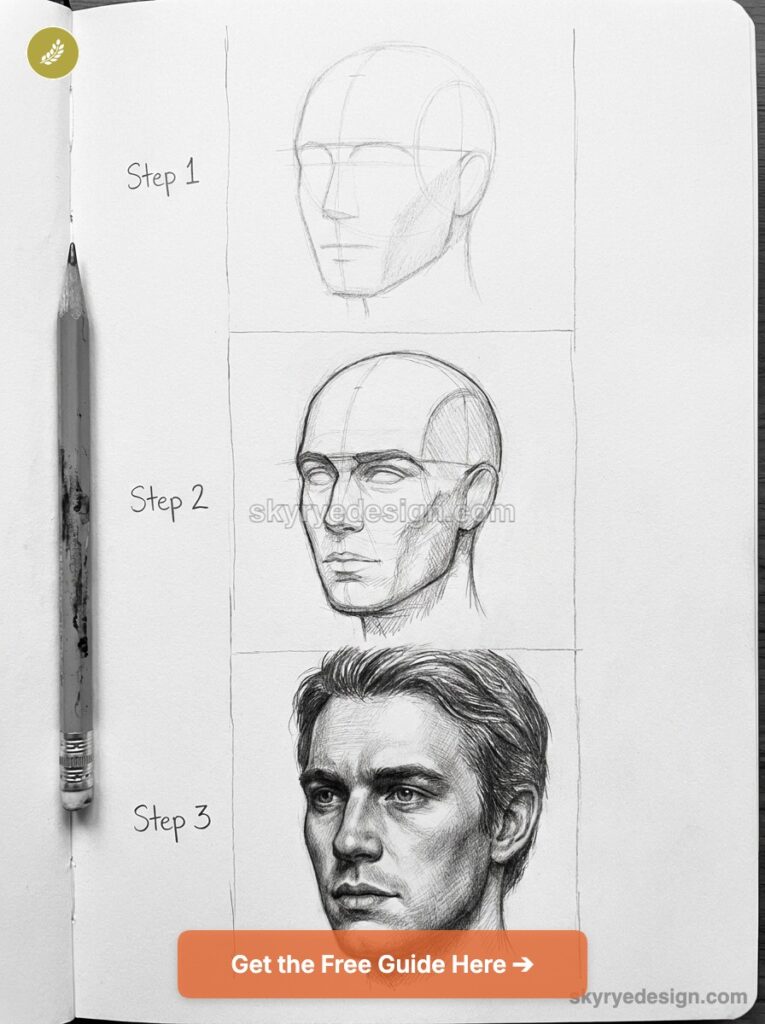
Here’s the construction, adapted from straight-on:
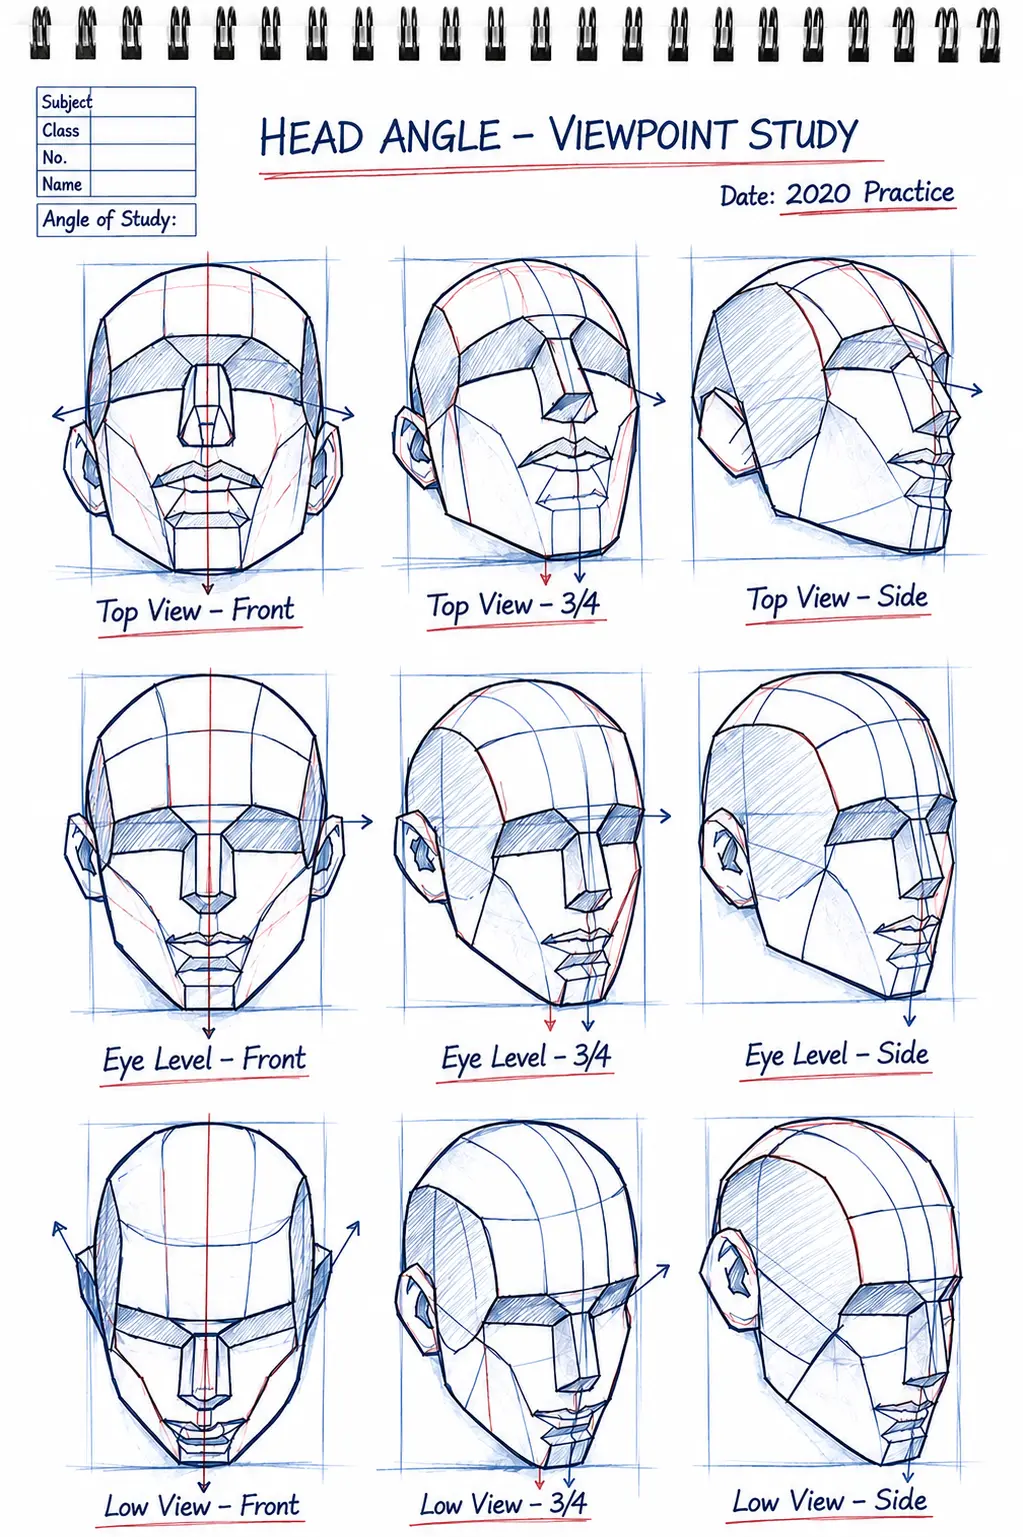
Start with the same sphere, but now the vertical center line curves instead of running straight down — it follows the rotation of the head, bulging slightly toward the side you’re turning away from. The horizontal brow line curves too, in the opposite direction, like a line wrapped around the equator of a tilted globe.
The side-plane is where most people get it wrong. It’s tempting to place it right at the eye, because that’s roughly where you perceive the face turning. But the actual structural corner — where the front plane of the face meets the side plane of the skull — sits further back, closer to the temple. Drop a vertical line down from the temple in your reference or your head, and that’s your side-plane edge. Place it at the eye instead, and the whole face reads as flattened, like it’s been pressed against glass.
The near side of the face (the side turned toward the viewer) shows more of its width; the far side compresses and partially disappears behind the bridge of the nose and the side-plane edge. Your guideline crosses have to compress along with it — the far-side eye is narrower and closer to the center line than the near-side eye, not just smaller.
One thing I tell students who’ve worked in any 3D or CAD software: this is exactly the same problem as rotating an object and watching its silhouette compress in one axis. If you’ve ever rotated a box in a modeling program and watched the far face foreshorten, you already have the intuition for this — you just haven’t applied it to a sphere with a face drawn on it yet.
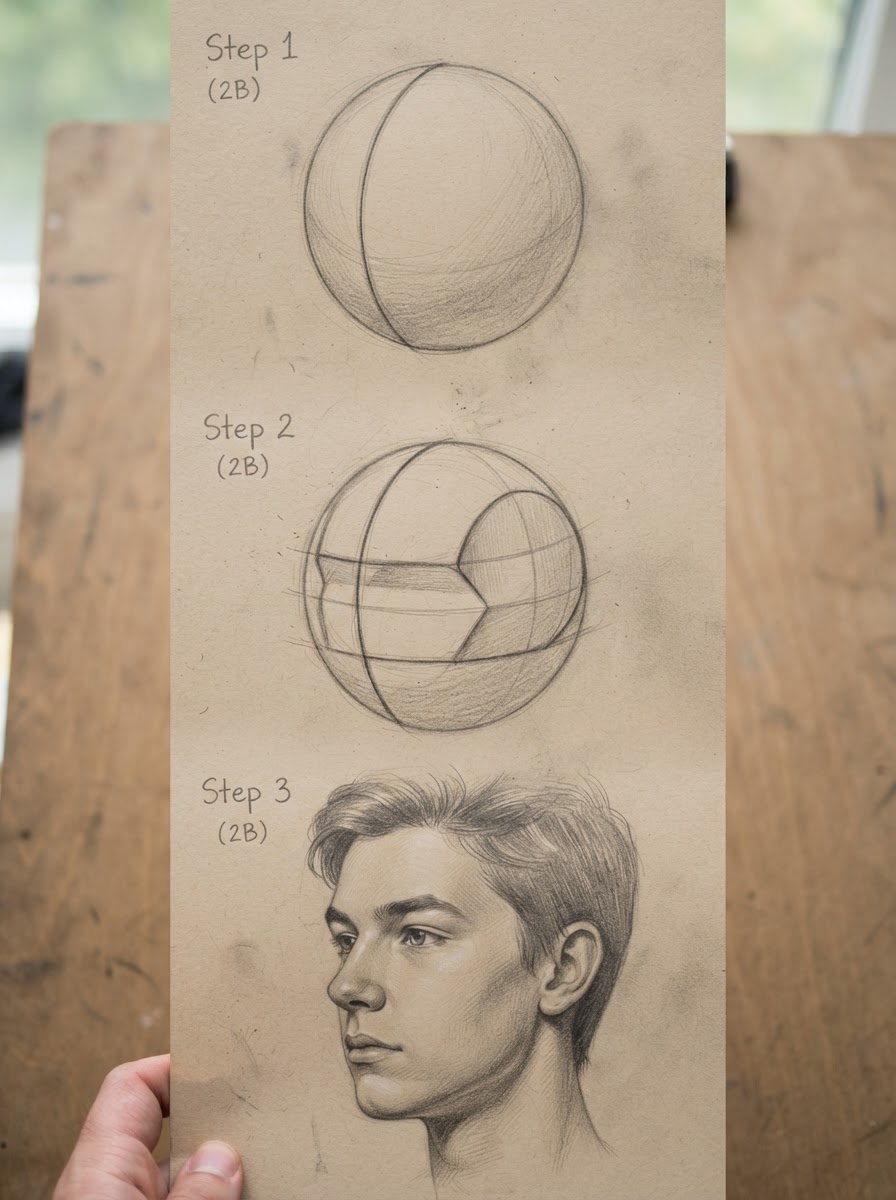
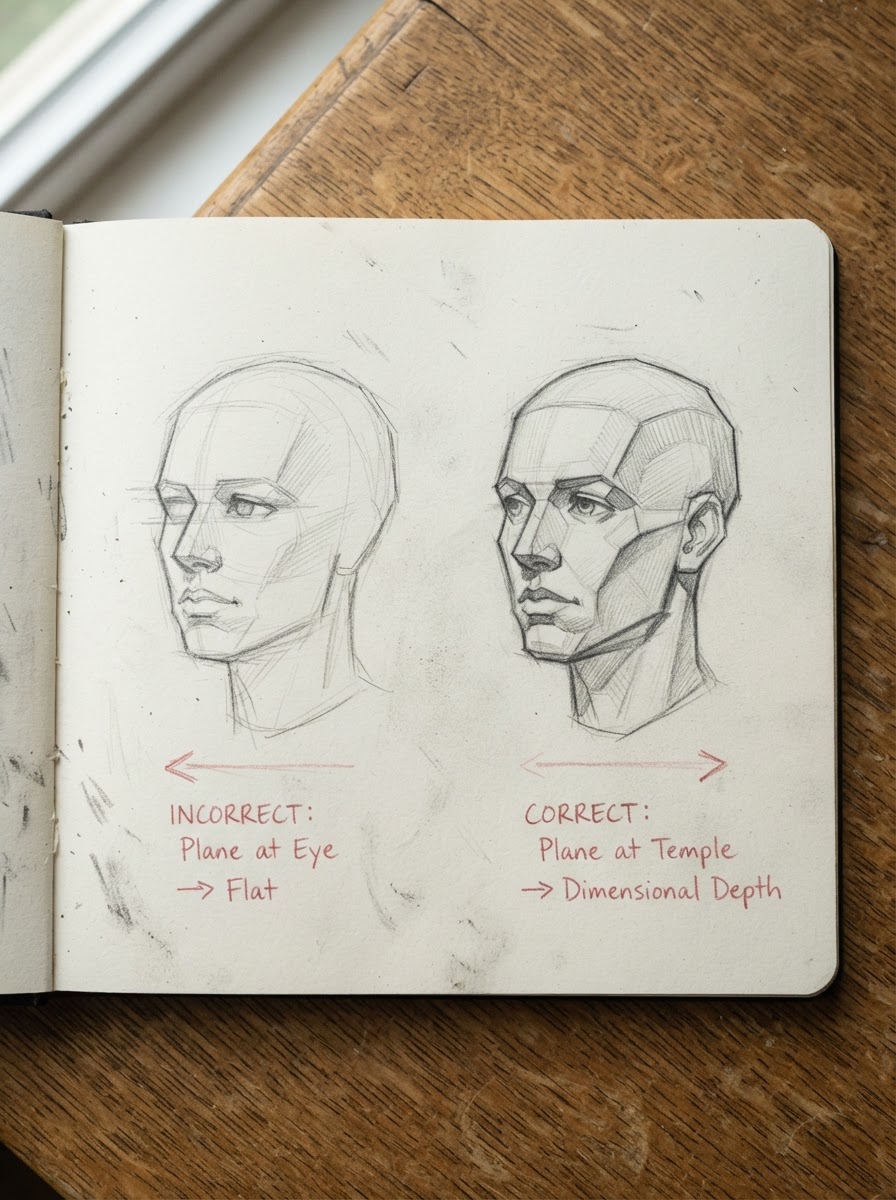
Get the side-plane placement right and roughly 80% of your 3/4 view problems disappear on their own. For a deeper breakdown of individual feature placement once your construction is solid, I go through that in my portrait feature placement guide.
Common Loomis method mistakes (and exactly how to fix them)
Most Loomis problems trace back to a small handful of repeat offenders. Here are the ones I see most often, in students and in my own early sketchbooks.
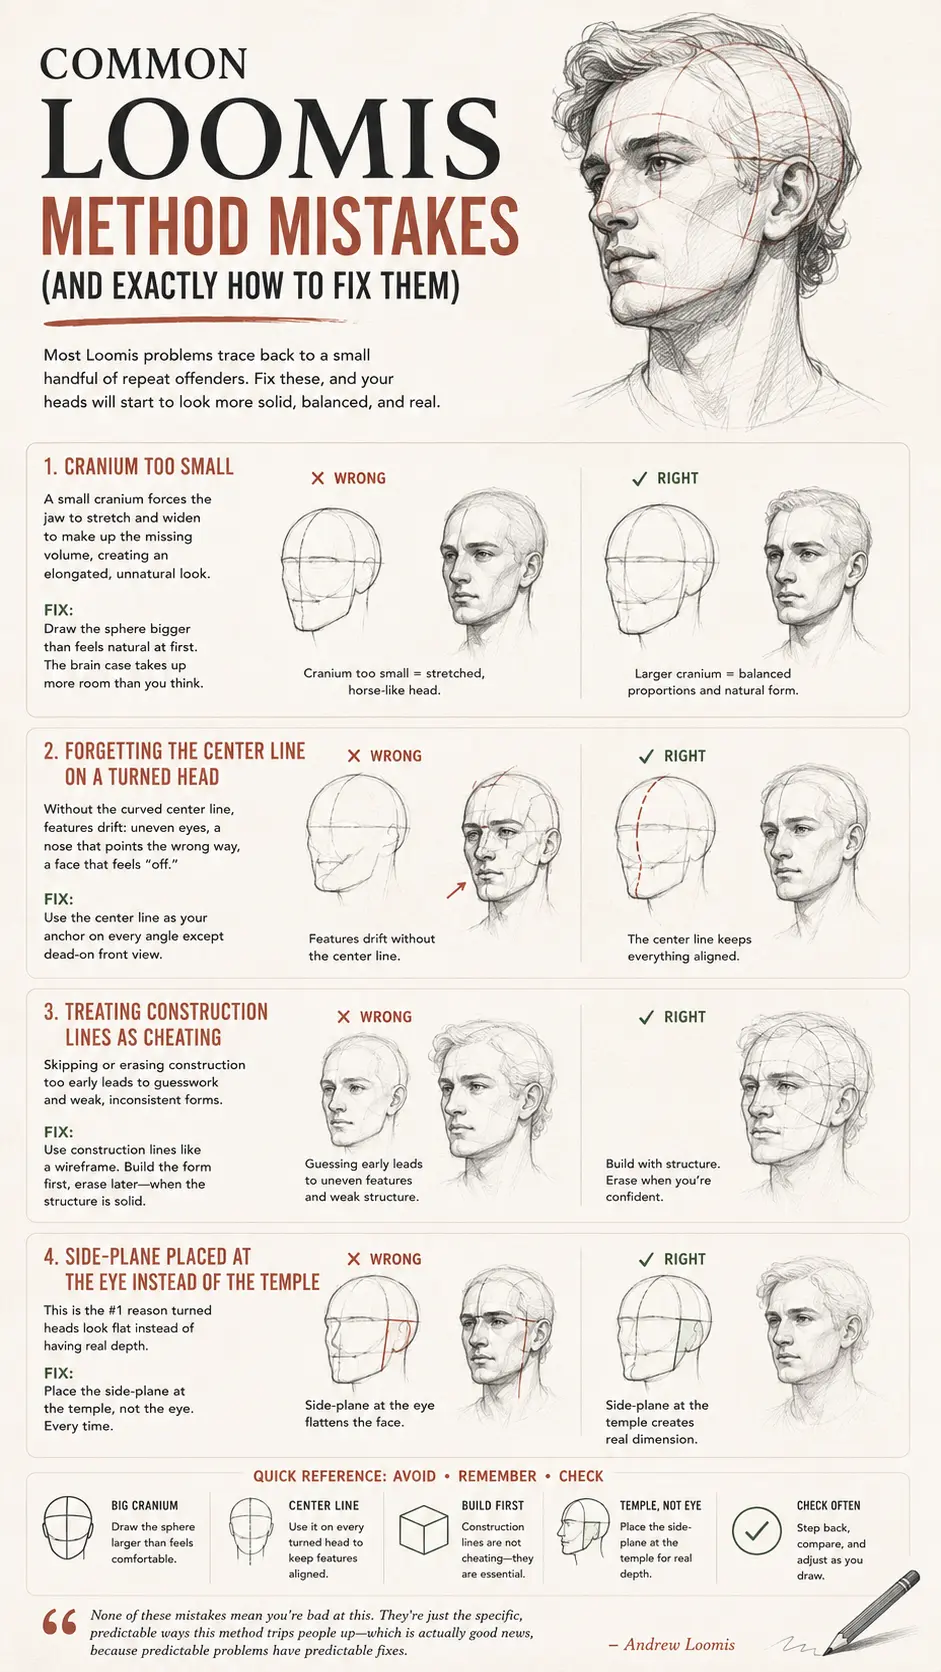
Cranium too small. The one nearly everyone gets wrong early on. A tight, tidy little circle feels safer to draw, but it forces the jaw to stretch and widen to make up the missing volume — and that’s what gives beginner heads their oddly elongated, almost horse-like look. The fix is almost embarrassingly simple: draw the sphere bigger than feels natural at first. The brain case takes up more room than instinct suggests.
Forgetting the center line on a turned head. On a straight front view you can get away with sloppy guidelines because everything’s symmetrical anyway. Turn the head, and skip the curved center line, and features start drifting — eyes that don’t sit level with each other, a nose that points slightly off from where the face is actually facing. The center line is your anchor on every angle except dead-on front view; don’t skip it just because the head “already looks right” without it.
Treating construction lines as cheating. I used to think this too — that real artists just draw the face directly, no scaffolding. They don’t, not when they’re building something from imagination rather than copying a reference stroke for stroke. Construction lines are closer to a car designer’s underlying wireframe than a crutch: essential while you’re building the form, removable once you trust your eye. Erase them too early and you’re just guessing again, only now without admitting it to yourself.
Side-plane placed at the eye instead of the temple. Covered in the 3/4 view section, but worth repeating here because it’s the single most common reason a turned head looks flat instead of dimensional. Temple, not eye. Every time.
None of these mistakes mean you’re bad at this. They’re just the specific, predictable ways this particular method trips people up — which is actually good news, because predictable problems have predictable fixes.
Beyond the head: Loomis for figure drawing
Everyone talks about Loomis and heads in the same breath, but Drawing the Head and Hands was really the second half of his teaching. The earlier book, Figure Drawing for All It’s Worth (1943), applies the exact same logic — primitives before detail — to the entire body.
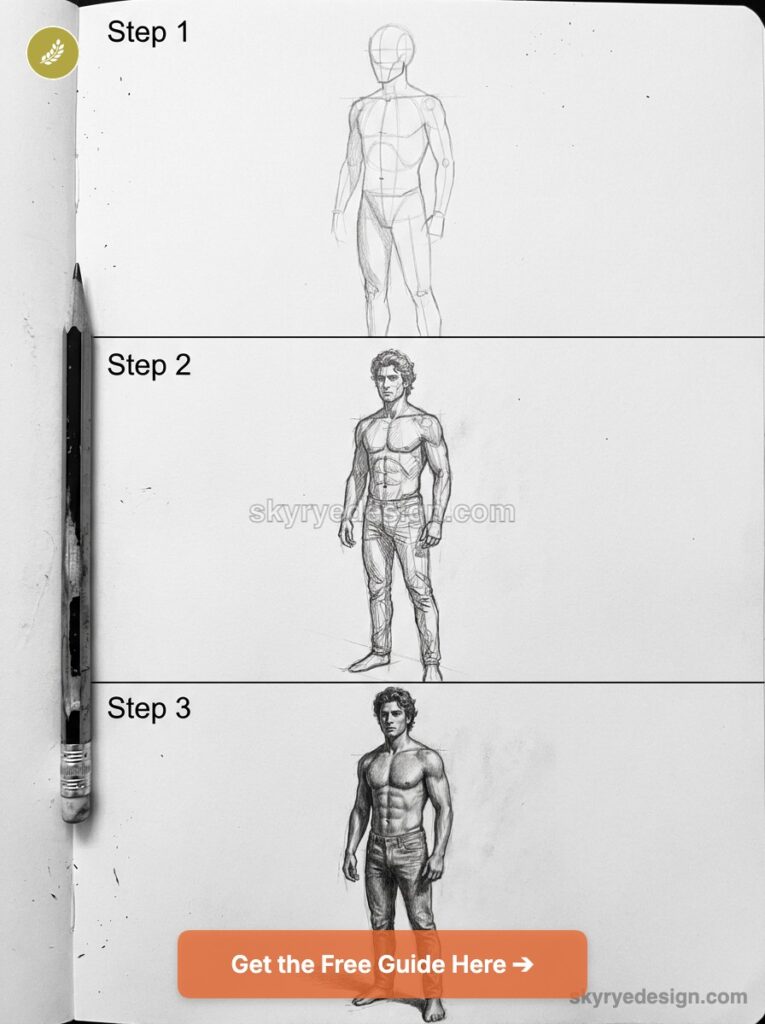
The rib cage becomes a rounded, egg-like form, tilted depending on the pose. The pelvis is a shallow bowl, angled against the ribcage to establish the figure’s overall lean or twist. Limbs become simple cylinders, tapered slightly at the joints. None of it looks anatomically finished at this stage, and it isn’t supposed to — you’re locking in proportion and gesture before you touch a single muscle group.
This is the same shift in thinking that makes the head construction click, just scaled up. I use this constantly outside of figure work, too — blocking a jewelry piece or a dashboard layout starts the same way: rough volumes, checked from multiple angles, refined only once the big relationships are right. Skip straight to detail on a figure the way beginners skip straight to detail on a face, and you get the same result — a drawing that looks fussy in places and wrong in its bones.
If heads feel solid to you now, the figure is a natural next step, and it uses muscles you’ve already built practicing the sphere.
When that next step is the full body, use this human figure drawing base to map head units, rib cage, pelvis, limbs, and gesture before facial detail pulls focus.
How to actually get good at this (practice plan)
Reading about the Loomis method and being able to draw a head from imagination are two very different skills. The gap between them closes with repetition, not more theory.
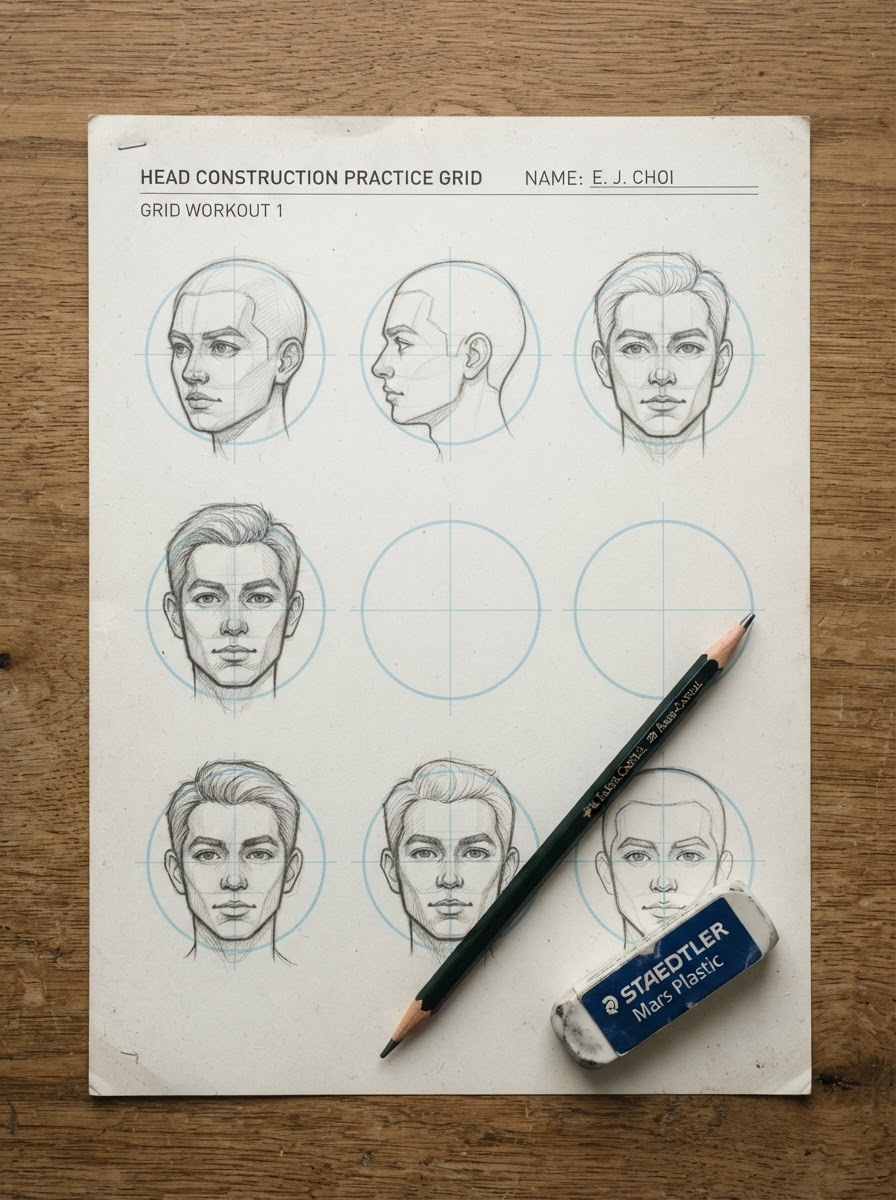
Short, frequent sessions beat occasional long ones. Fifteen to twenty minutes a day of sphere-and-cross construction does more for your instincts than a single three-hour weekend binge, because you’re training pattern recognition, and pattern recognition needs regular, spaced repetition to actually stick.
Draw the same front-view head five or six times in a row before moving to a new angle. It’ll feel repetitive. That’s the point — you’re building the kind of automatic recall that lets you stop thinking about where the brow line goes and start thinking about the actual drawing.
Drop the construction lines only once you can place features correctly without them most of the time — not on your third attempt, but somewhere past your thirtieth. I still lightly block in a cross on quick sketches now, years past needing the full sphere construction, just because it costs three seconds and saves a redo.

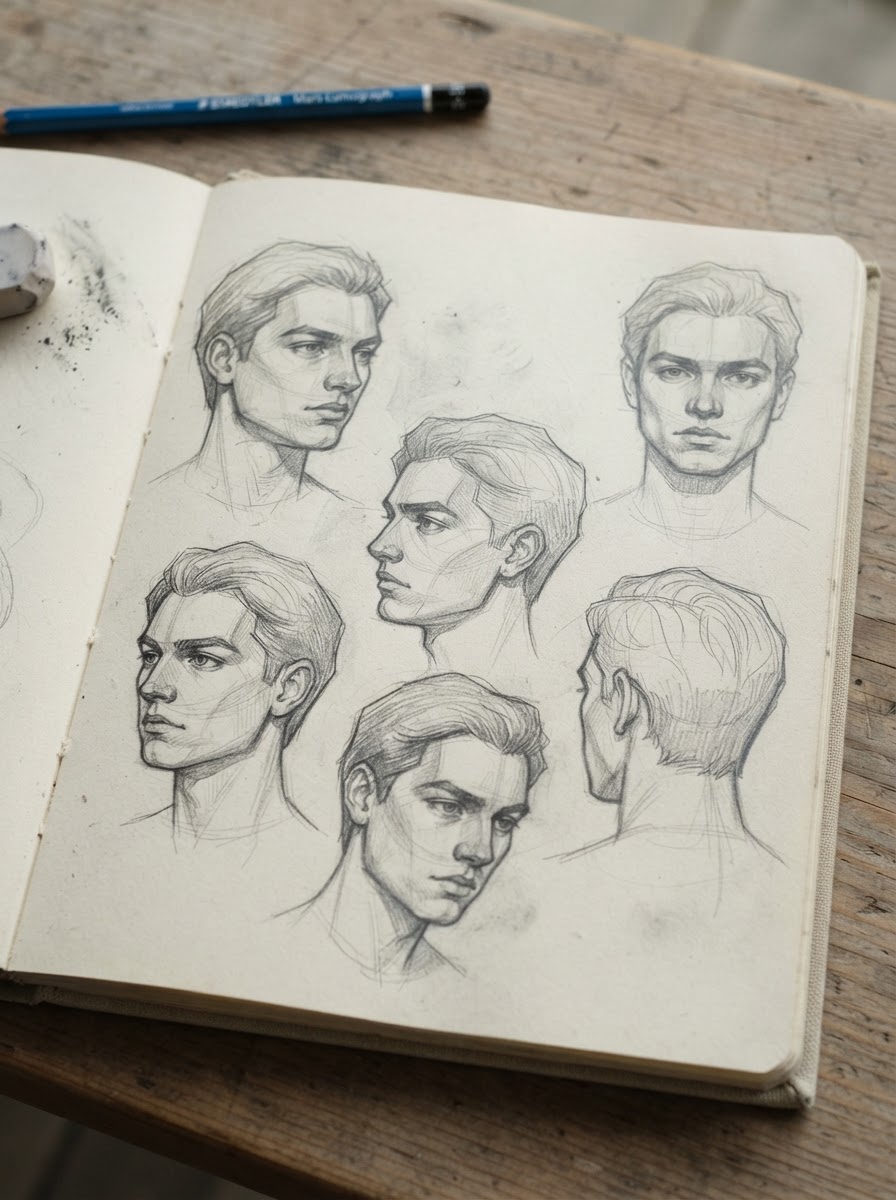
A rough timeline to expect: most people get a passable front view within two to three weeks of daily practice. The 3/4 view takes noticeably longer — budget another month before it stops feeling like a fight. That’s normal. It’s the hardest angle in the set for a reason, not a sign you’re doing something wrong.
Conclusion
The Loomis method works because it teaches you to see structure before you see detail — not because there’s a formula to memorize. The sphere, the cross, the guidelines: none of it matters as much as understanding you’re building a 3D form in space, not tracing a flat diagram. That single shift is what separates a front view that works from a 3/4 view that keeps fighting you.
Start with the front view. Draw it until it’s boring. Then take the same construction into the 3/4 angle, watch for the side-plane at the temple instead of the eye, and give yourself the month it actually takes rather than the week you’re hoping for.
Pick one head. Draw it today.
FAQ
Q: What is the Loomis method?
The Loomis method is a head-construction technique developed by illustrator Andrew Loomis, first published in Drawing the Head and Hands (1956). It breaks the human head down into simple forms — a sphere for the cranium, a cross of guidelines for the features — so you can draw a proportionally accurate face from any angle without guessing. Most portrait and character-drawing tutorials use some version of it as a starting point.
Q: Is the Loomis method good for beginners?
Yes, it’s one of the most beginner-friendly head-construction systems out there, precisely because it reduces a complicated anatomical structure to a handful of simple shapes. That said, it works best as a scaffold, not a shortcut — beginners who skip understanding the sphere in perspective tend to plateau once they move past the front view.
Q: Why does my cranium always come out too small?
It’s the single most common Loomis mistake. Drawing the circle too small forces the jaw to stretch to compensate, which gives the head an elongated, horse-like look. The fix is to draw the sphere more generously than feels natural — the brain case takes up more room than instinct suggests.
Q: How is the Loomis method different from the Reilly or Asaro head methods?
Loomis starts from a sphere and a set of guideline crosses, prioritizing simplicity and speed. The Reilly method uses more abstracted “rhythms” and lines of force to capture gesture and structure together, while the Asaro head breaks the skull into flat geometric planes, which some artists find easier for extreme angles like looking straight up or down. All three are compatible — many artists layer Asaro-style planes on top of a Loomis sphere for tricky angles.
Q: Does the Loomis method work for anime or stylized art?
It does, though you’ll need to adjust the proportions. Loomis’s original guidelines assume roughly realistic proportion ratios, while anime and stylized styles often exaggerate eye size, chin shape, or head-to-body ratio. The underlying construction logic — sphere, cross, guidelines — still holds; you’re just changing where the guidelines fall.
Q: How long does it take to get good at the Loomis method?
Most people can draw a passable front-view head within two to three weeks of daily practice, roughly fifteen to twenty minutes a session. The 3/4 view takes longer, often another month, since it requires understanding the sphere in perspective rather than just following flat steps.
Q: Is there a Loomis method app or PDF worth using?
Several apps and generator tools exist that overlay a 3D Loomis head you can rotate for reference, which can help with visualizing angles you’re struggling with. They’re useful as a reference aid, but they don’t replace practicing the actual construction by hand — the skill you’re building is in drawing the sphere and guidelines yourself, not in looking one up.
- 4.1Kshares
- Facebook0
- Pinterest4.1K
- Twitter0
- Reddit0