A gorilla is a rewarding subject because its power shows in the silhouette before you add a single hair. If you’re figuring out how to draw a gorilla, start by forgetting the fur. Think of a heavy, tilted mass with very long arms, a low head, and weight pressed into the knuckles. Get that structure right and the details almost place themselves.
This tutorial takes you through four steps, from a loose gesture to a finished silverback with grouped values. After that you’ll find anatomy cues, six viewpoints, and five media. You’ll also see the mistakes that most often make a gorilla drawing look like a bear, a chimp, or a man in a costume.
- Materials and setup for a gorilla drawing
- How to draw a gorilla in 4 steps
- Gorilla anatomy and proportion cues to check
- Drawing a gorilla from different angles
- Drawing techniques for a gorilla: graphite to digital
- What gorillas in film, animation, and logos teach about design
- Common gorilla drawing mistakes and how to fix them
- A one-week practice plan for gorilla drawing
- Gorilla drawing FAQ
- Your next gorilla drawing
You don’t need zoology training. You need a few pencils, two or three good reference photos, and the patience to measure before you shade.
Materials and setup for a gorilla drawing
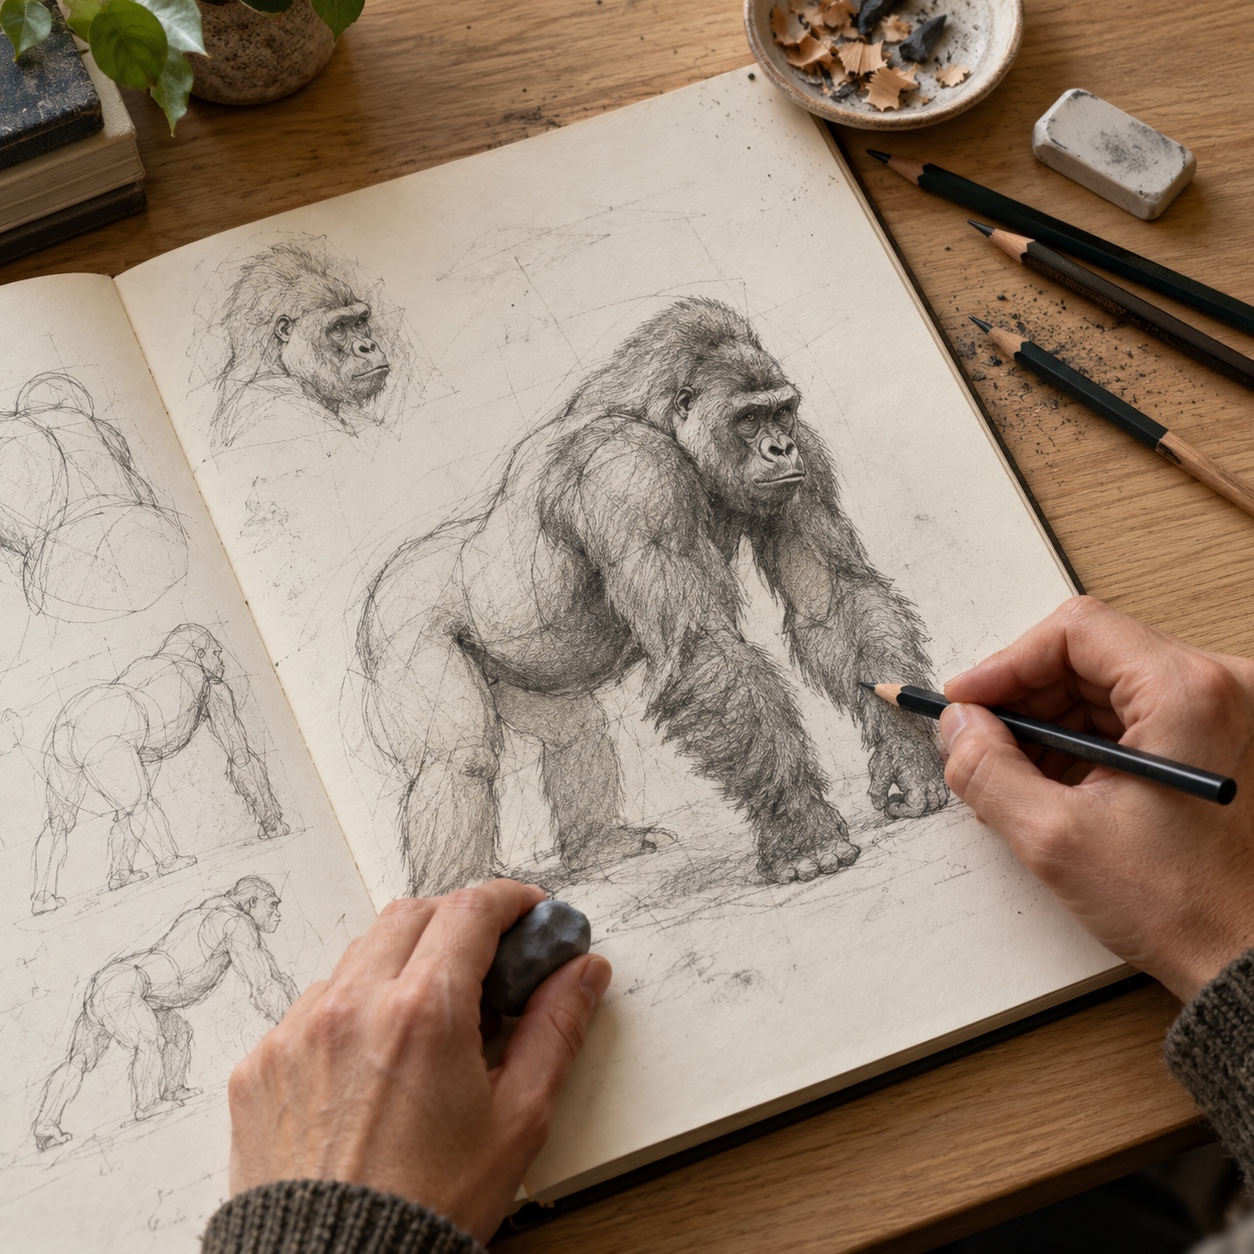
A small graphite range covers everything. Use an HB or 2H for construction lines, a 2B for the first tone layer, a 4B for shadows, and a 6B for the darkest accents under the brow, in the nostrils, and where the body meets the ground. Keep the harder pencil sharp and light so your construction lifts easily later.
Bring two erasers. A kneaded eraser lifts graphite gently and can be pinched to a point to pull highlights out of fur. A vinyl eraser or a pen-style eraser cuts cleaner, sharper lights, which helps with single strands catching rim light on a silverback’s back.
Paper matters more than people expect. A smooth-to-medium tooth drawing paper (around 90 lb / 150 gsm or heavier) takes layered graphite without polishing too fast. Bristol vellum works if you want crisp detail. Very smooth paper turns shiny once you push 6B, and that glare flattens dark fur.
Put your reference at eye level beside the drawing so your eyes travel a short distance between them. Tilt your board or sketchbook, because drawing flat on a table stretches proportions toward the bottom of the page. One habit I kept from life-drawing classes is standing up and stepping back every 10 minutes. Errors in mass and tilt are invisible at 12 inches and obvious at six feet.
Use reference photos you’re allowed to work from, such as your own zoo shots or images with clear usage rights. Gather at least one full-body view and one face close-up.
How to draw a gorilla in 4 steps
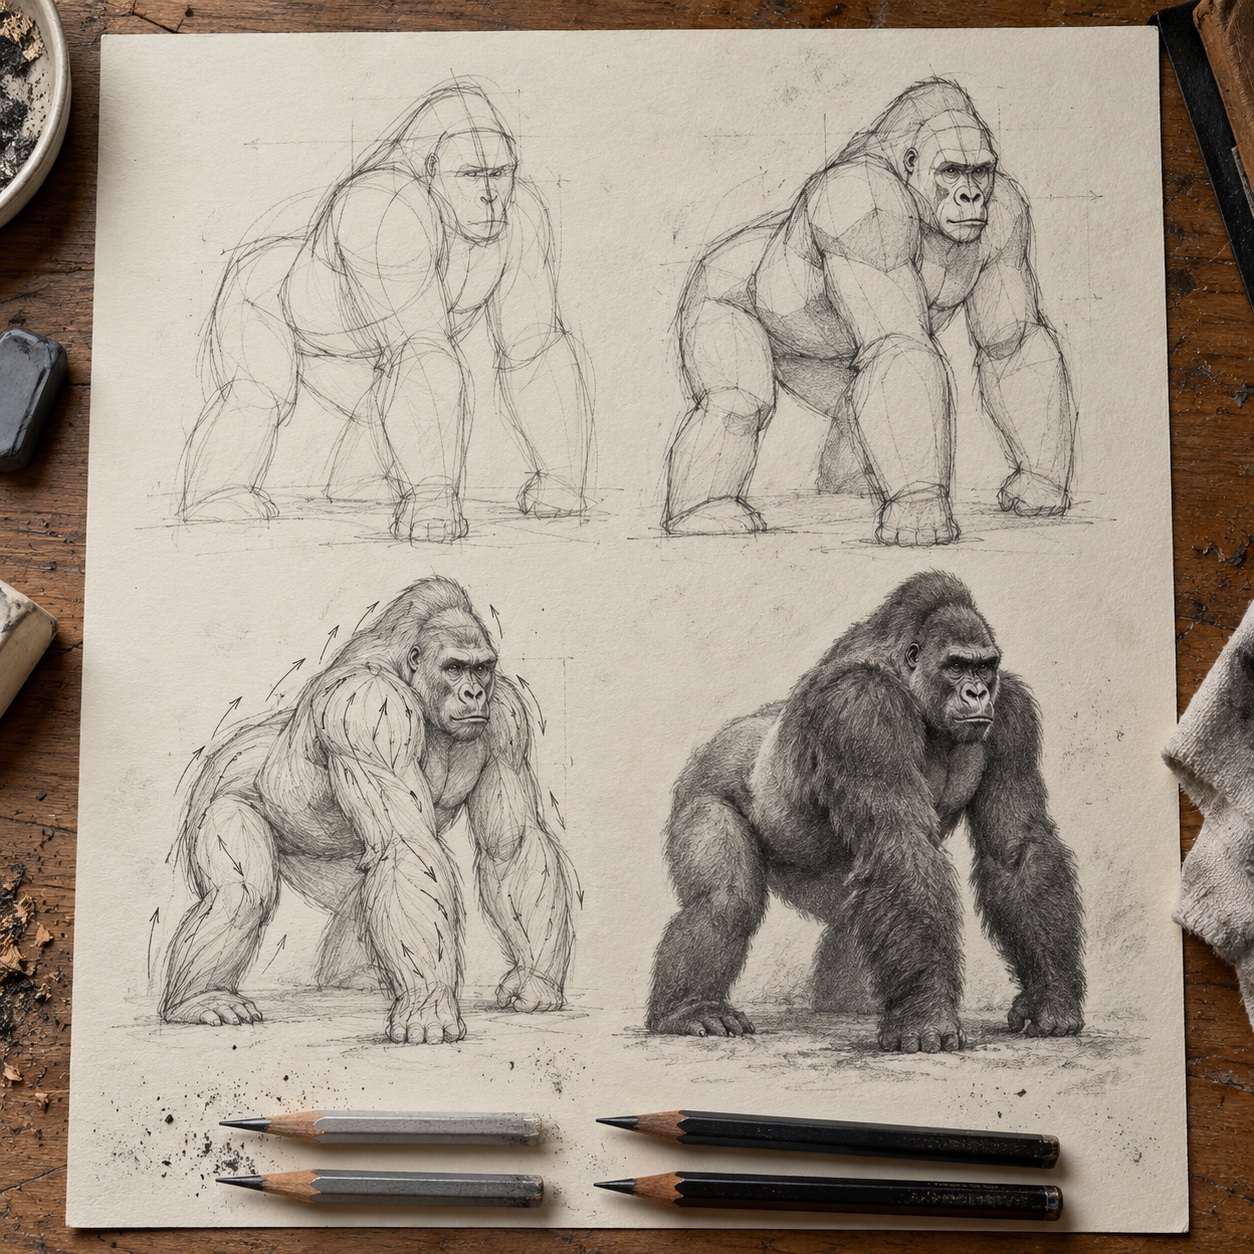
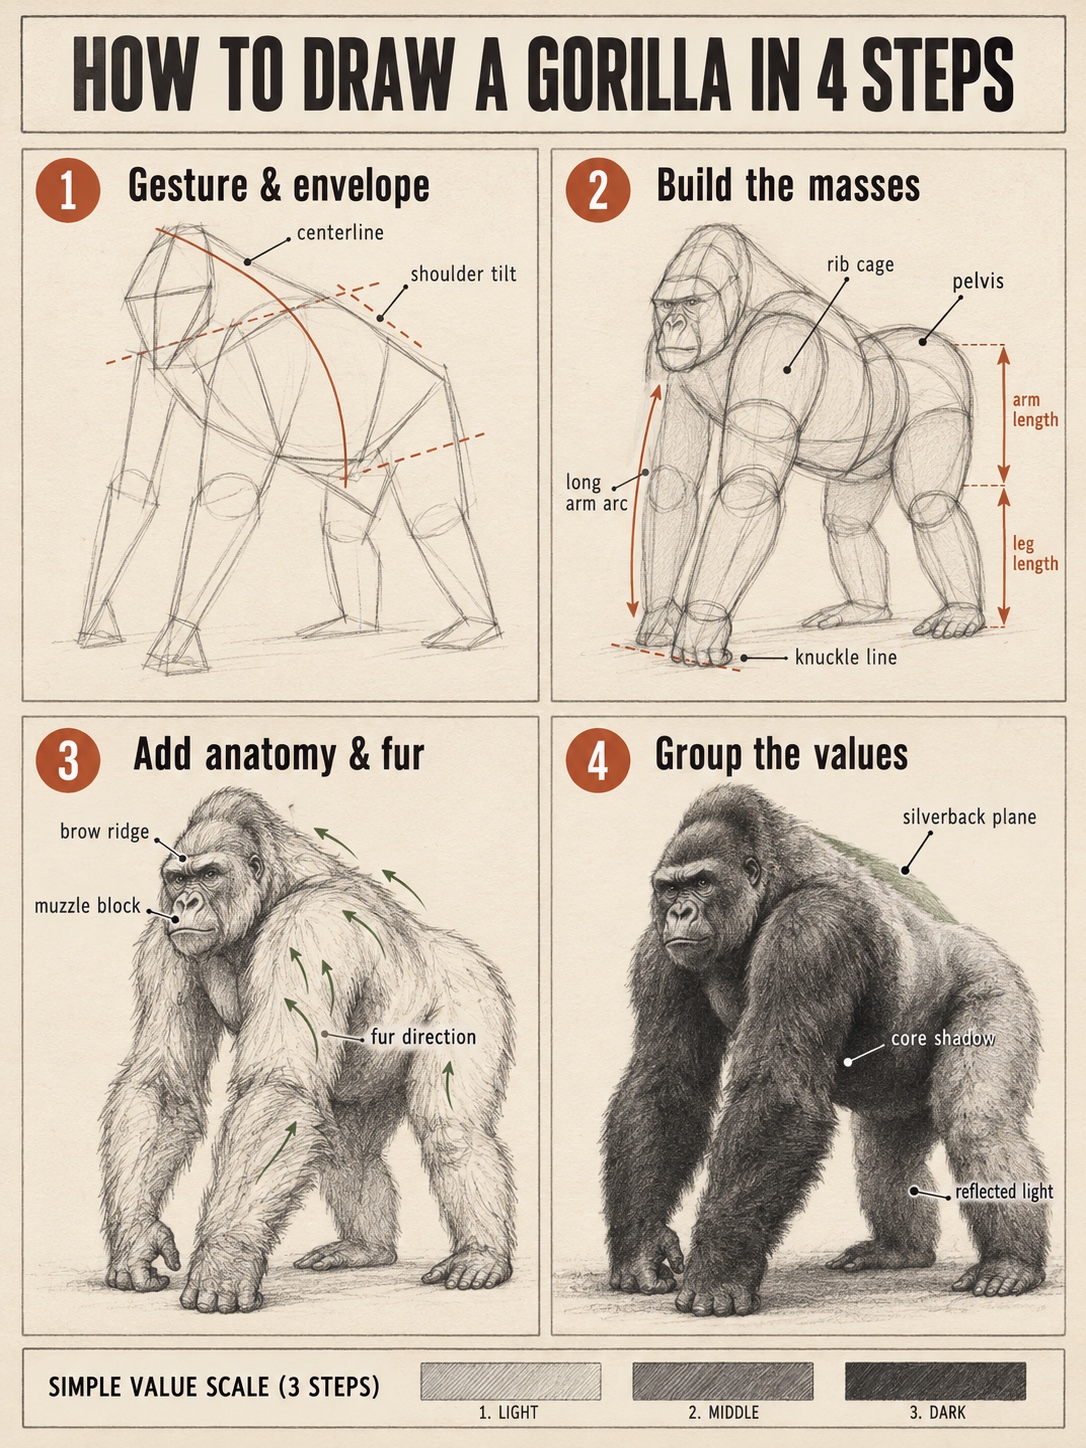
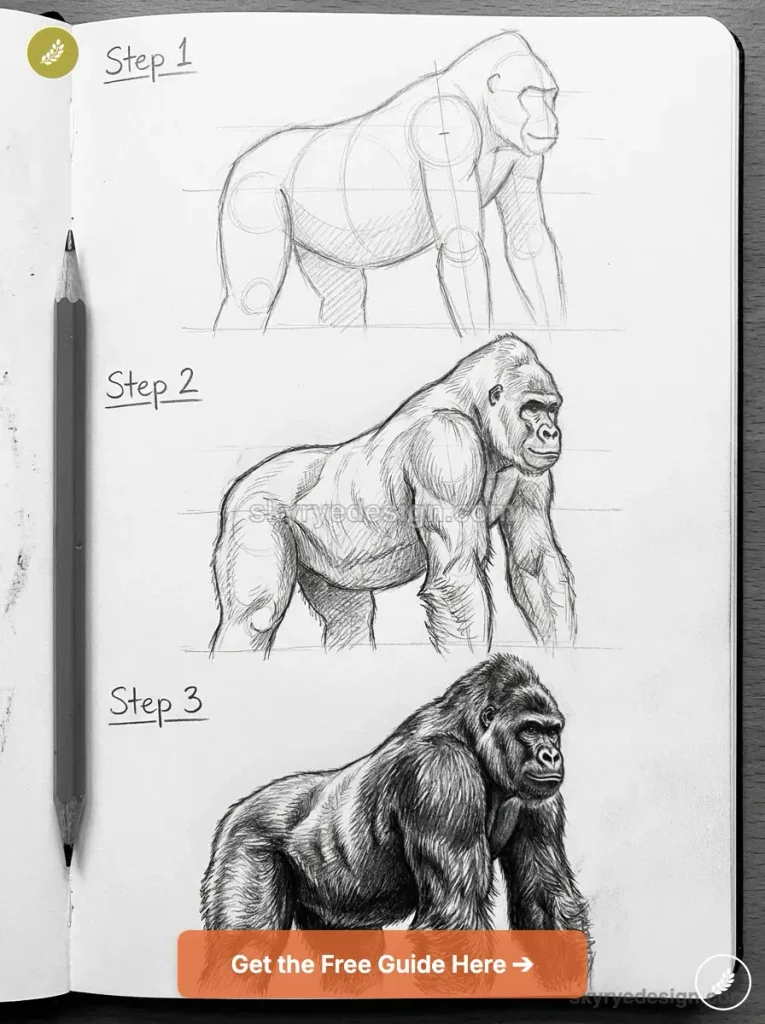
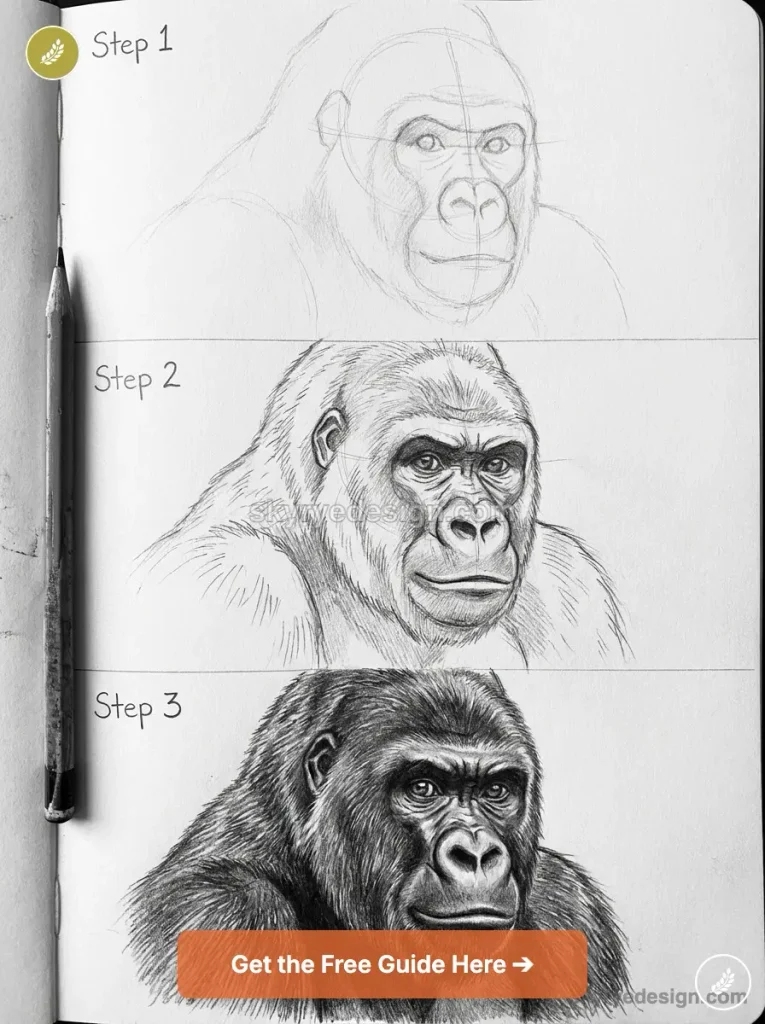
If you want to learn how to draw a gorilla step by step, follow the order an academic drawing class would use: movement, then masses, then anatomy, then light. Finish each step before starting the next. That discipline is the difference between a drawing you correct and a drawing you restart.
The example pose is an adult gorilla knuckle-walking, seen in three-quarter front view.
Step 1: Map the gesture, envelope, and tilts
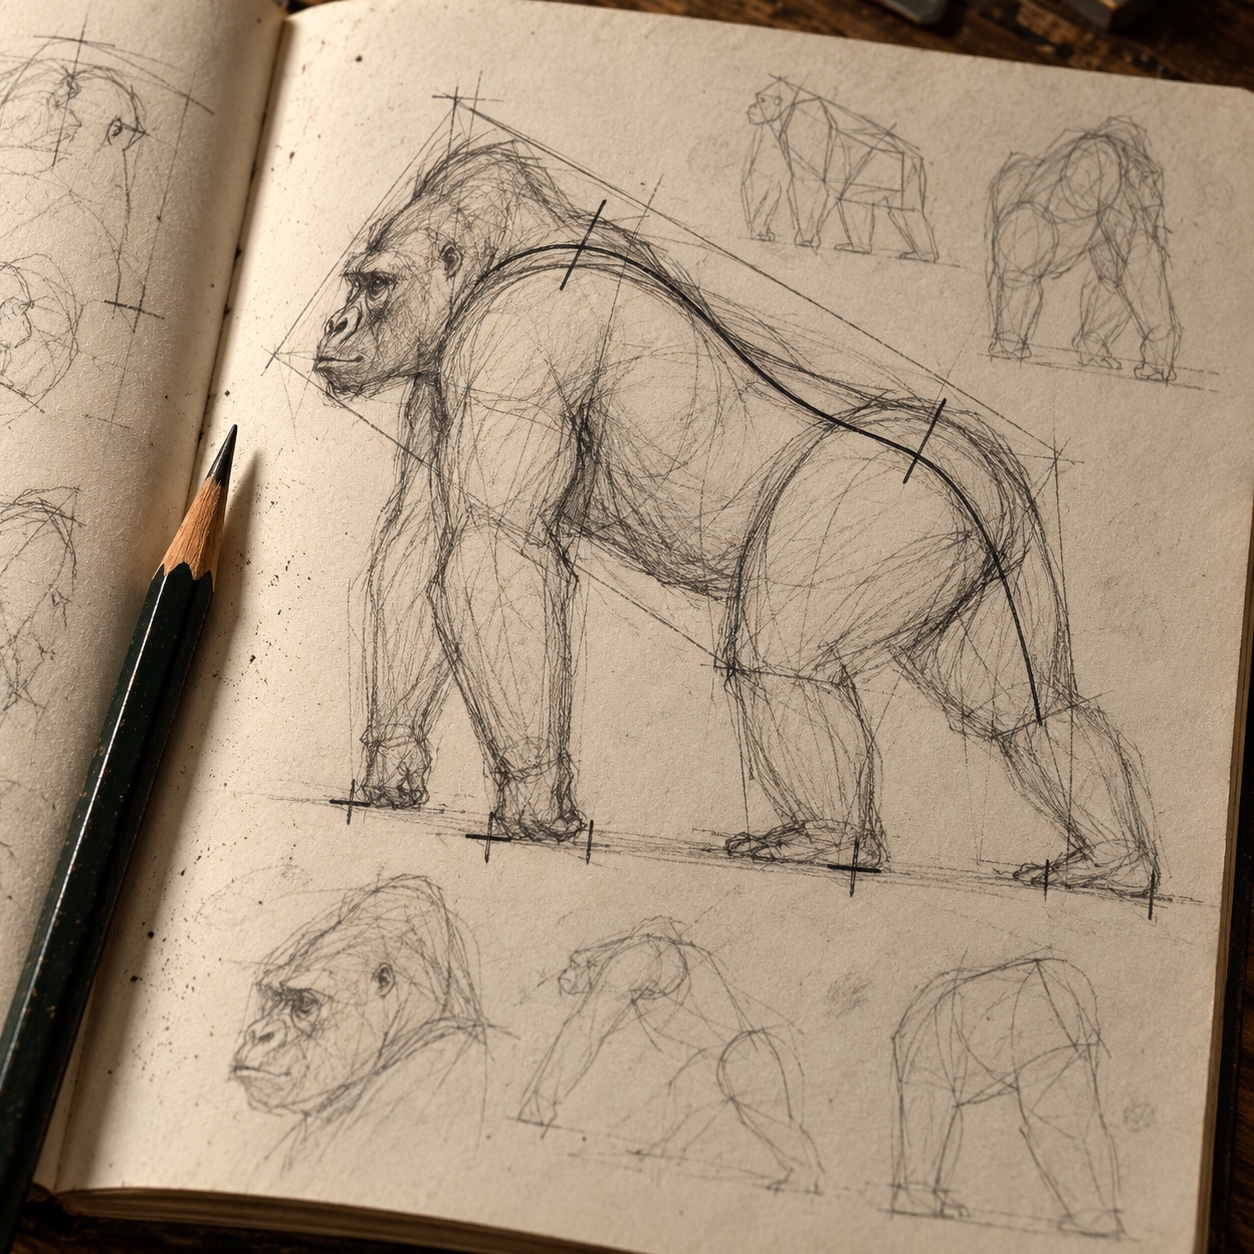
Start with one curved stroke for the action line. Run it from the top of the head, over the shoulders, along the spine, and down to the rump. In a knuckle-walking pose, this line rises to the shoulders and then slopes down toward the hips, because the long arms lift the front of the body.
Next, draw the envelope. Use five to seven straight lines to enclose the whole animal, arms and feet included. For this pose you’ll usually get a wedge: tall at the shoulders, lower at the rump, sitting on four contact points. Don’t round anything yet. Straight lines make angles easier to judge and fix.
Now place the tilts. Draw a short line across the shoulders and another across the hips. In three-quarter view, both lines converge slightly as they recede. Add a centerline down the chest and belly to show which way the torso turns.
Finally, mark the contact points: two knuckle positions and two feet. I check the envelope as a filled shape before moving on. In industrial design, a product that doesn’t read at thumbnail size rarely gets rescued by surface detail, and animals behave the same way. Squint at it. If it already looks heavy and forward-leaning, you’re ready.
Step 2: Build the head, rib cage, pelvis, and limbs
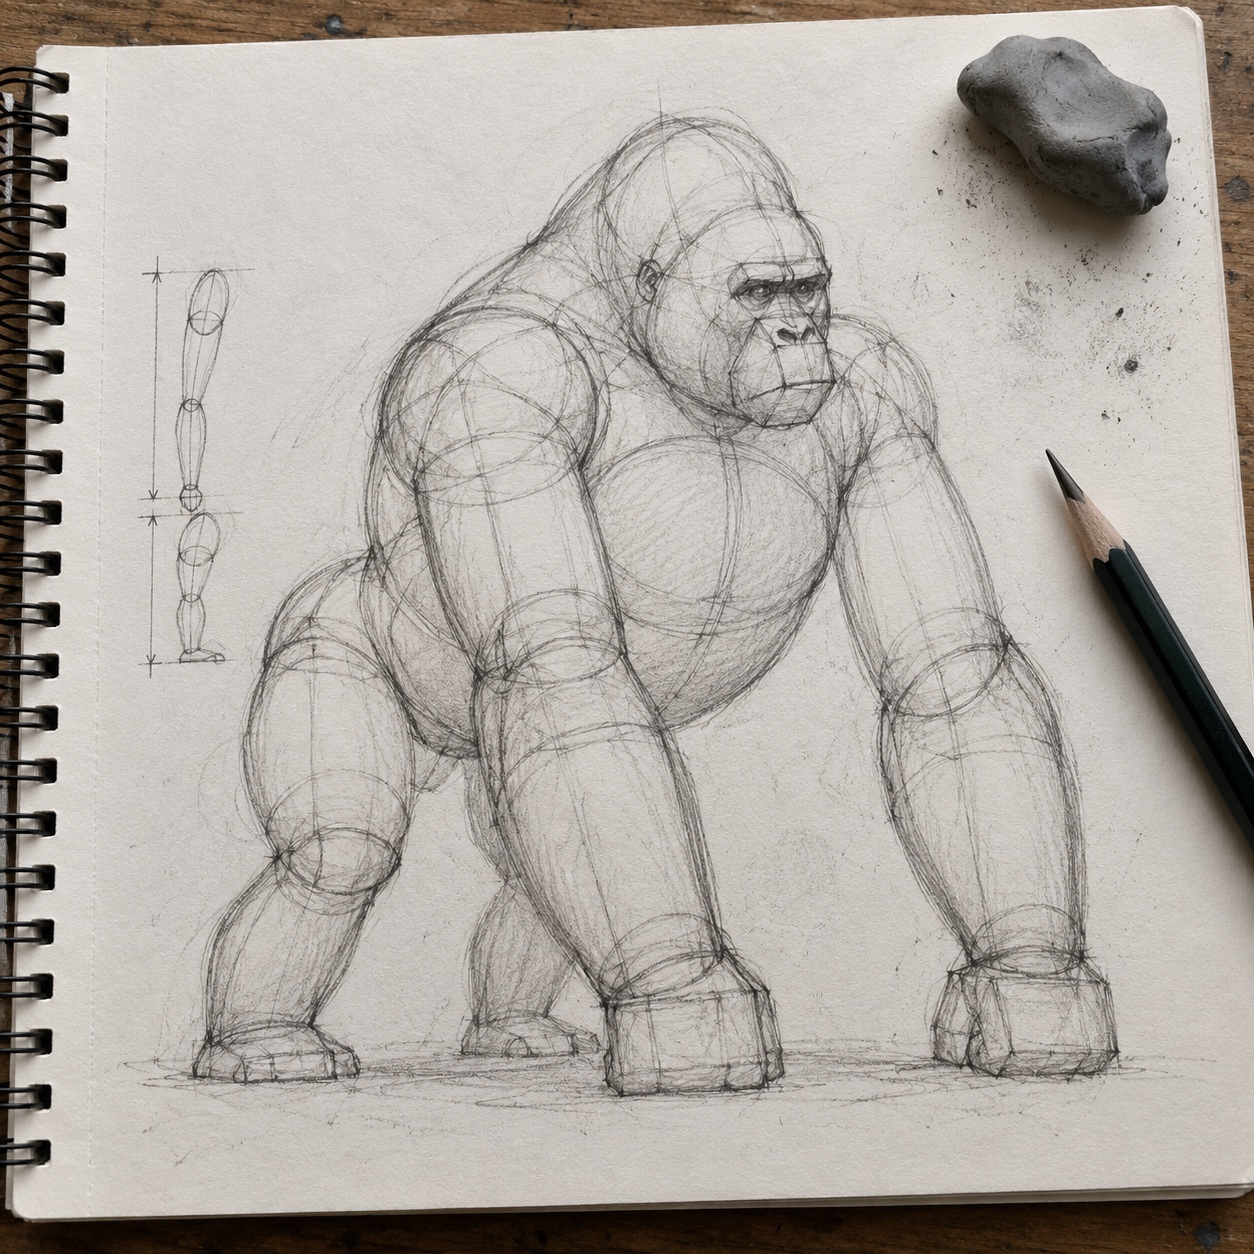
Draw the rib cage first, since it’s the largest mass. Make it a big, slightly flattened egg that fills the front half of the envelope. Gorillas read as barrel-chested, so give it real depth, not just width.
Place the pelvis as a smaller box or egg behind it, tilted along your hip line. Connect the two with a thick belly mass. Adult gorillas often carry a rounded abdomen that fills the space between the masses instead of pinching into a waist.
Set the head low and forward on the front of the rib cage. It’s smaller than beginners expect, and the neck nearly disappears behind the heavy muscle rising from the shoulders. A sphere with a box for the muzzle is enough for now.
Draw the arms as tapered cylinders starting high on the shoulders. Upper arms are thick, and forearms stay heavy all the way to the wrist. Mark each elbow with a small sphere so the bend is clear. Then compare the front arm with the hind leg: the arm should be clearly longer. The legs are shorter, bent, and thick through the thigh.
End each arm with a flattened block for the curled hand. The weight rests on the backs of the middle finger segments, so the knuckle line sits flat on the ground with the wrist fairly straight above it. Feet are broad wedges planted flat.
Step 3: Add the face, hands, feet, and fur direction
Refine the head. Draw the brow ridge as a heavy shelf across the top of the face, then tuck the eyes into the shadow beneath it. The eyes are small and set fairly close together. Below them, the nose is broad, with flared nostrils and a padded shape that varies from one gorilla to the next.
The muzzle projects forward as a rounded box. Run the mouth line wide across it and keep the lips thick. On an adult male, the top of the skull rises into a peak toward the back, giving the head a conical silhouette. A female or juvenile has a rounder crown.
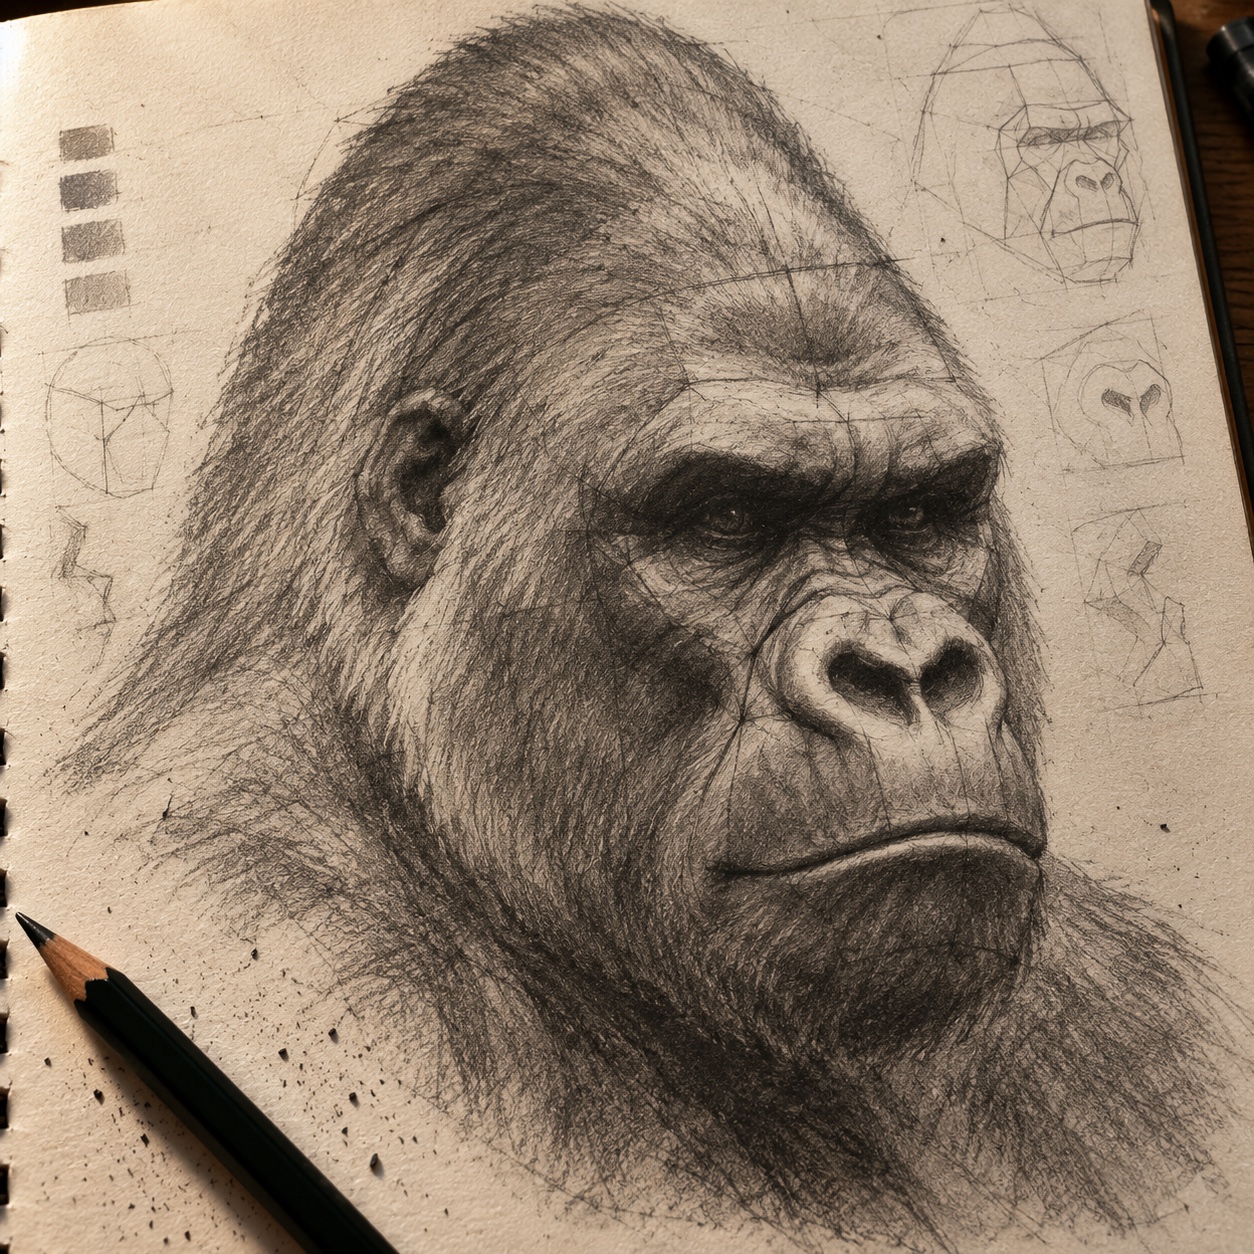
For the hands, divide the curled block into thick fingers and add a short thumb. For the feet, show a wide sole and a big toe angled away from the others. Keep both in scale with the limbs; dainty hands on a massive arm are a classic giveaway.
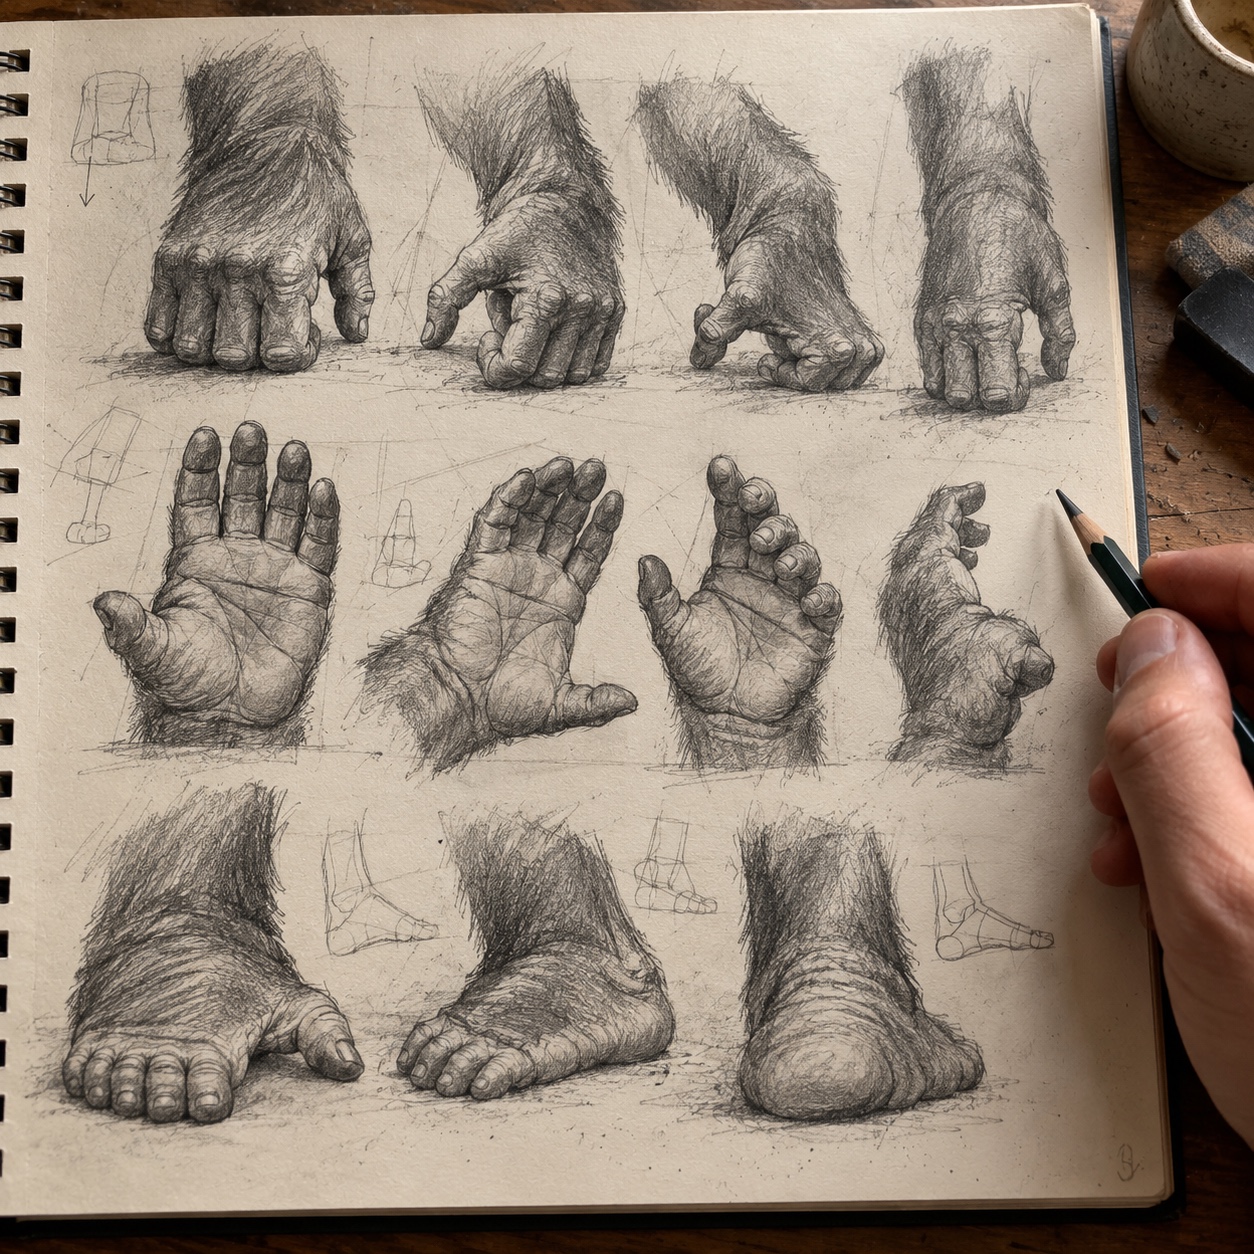
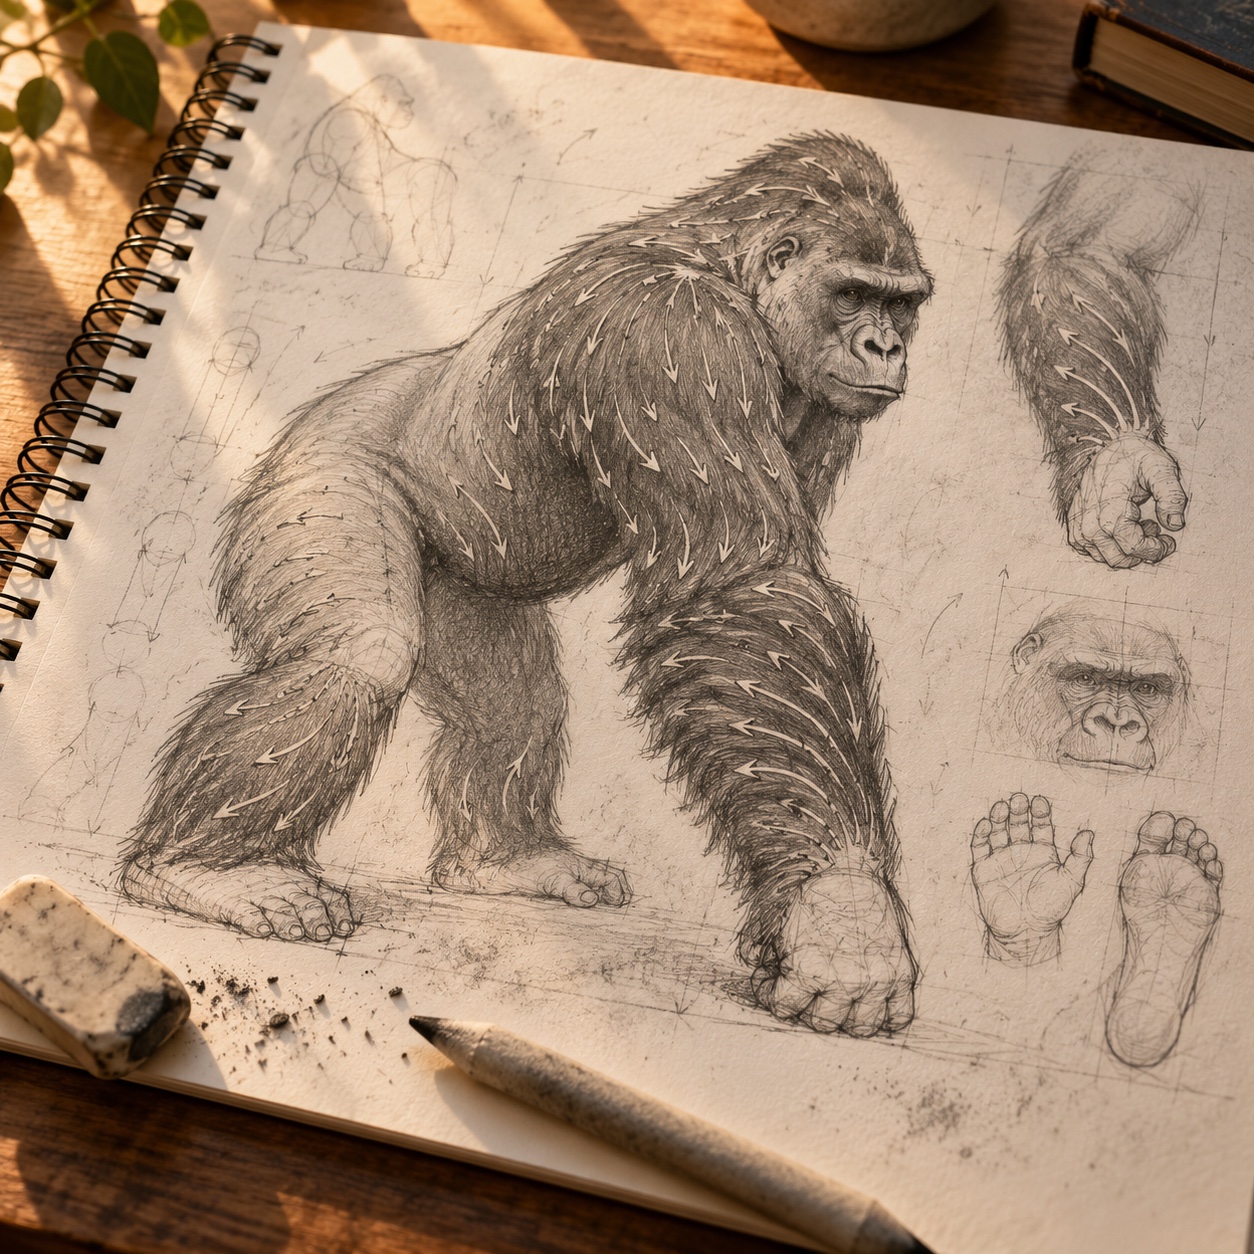
Now map fur direction with light arrows, not individual hairs. Hair generally falls downward from the shoulders and along the arms. Many great apes have forearm hair pointing back toward the elbow, so check your reference rather than guessing. The face, palms, and soles are bare skin, and adult males often show a less hairy chest. That change in texture is what sells realism later.
Step 4: Group values, light the silverback, and clean up
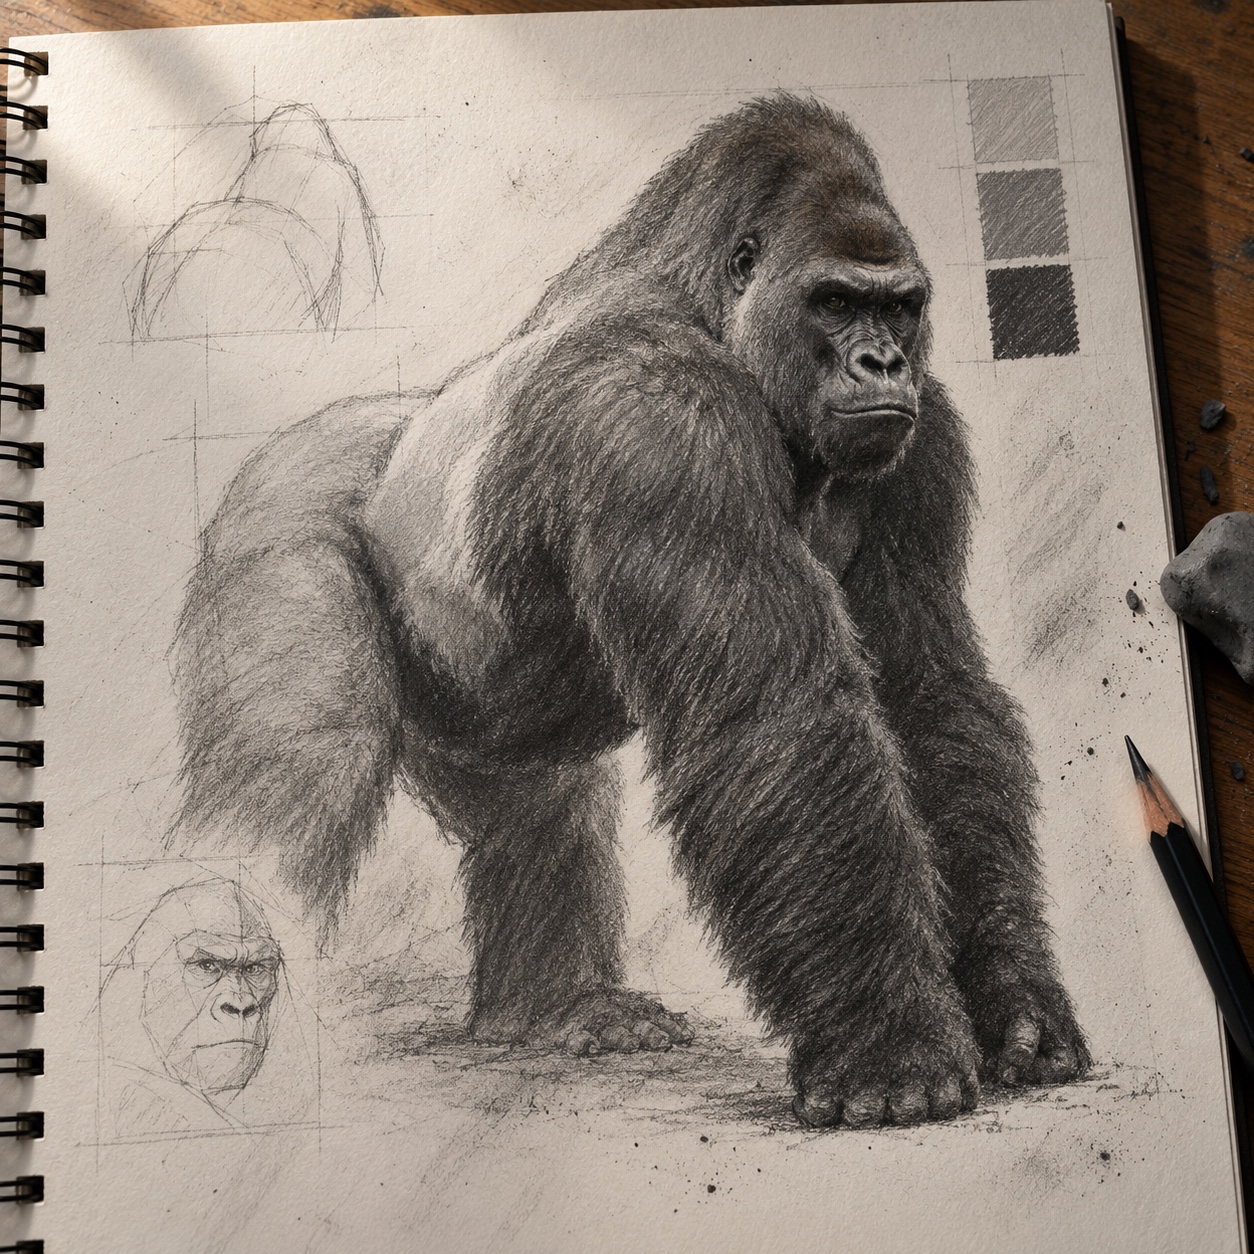
Squint at your reference until it collapses into three values: light, middle, and dark. Gorilla fur is dark, so most of the animal lives in the lower half of the scale. That’s fine. Your lights are relative.
Lay an even 2B tone across the whole body, leaving bare paper only where the strongest light hits. Use 4B for the shadow side, stroking along your fur arrows. Save 6B for accents: under the brow ridge, inside the nostrils, the armpit, the underside of the belly, and the contact shadows under knuckles and feet.
For a silverback, treat the back as one large plane facing the light. It reads as a lighter saddle of gray, but it’s still darker than white paper. Tone it with a soft 2B, then lift a few streaks with the kneaded eraser in the direction of the hair.
Decide edges on purpose. Keep them soft where fur turns away from the light and where the silhouette meets the background. Make them hard where one mass overlaps another, like an arm crossing the chest, and in the cast shadow under the hand.
Cleanup comes last. Lift leftover construction with the kneaded eraser, add a tiny highlight in each eye, and break the outer edge with a few short strands. Step back once more before calling it done.
Gorilla anatomy and proportion cues to check
Gorillas aren’t built from one template. Proportions shift with species, sex, age, and the individual, and an adult male looks very different from a juvenile. Treat these cues as starting points, not fixed measurements, and let your reference win every argument.
The barrel chest is the visual anchor. The rib cage is broad and deep, and in most poses it outweighs the pelvis. Draw a narrow, human-style chest and the figure loses its weight.
The shoulders sit high, and the muscle between neck and shoulder builds up so much that the head seems to rest directly on the torso. That’s why a visible neck almost always looks wrong.
The head mass is conical in adult males, with a crest peaking toward the back of the skull. Females and young gorillas have smoother, rounder heads. Either way, the brow forms a strong horizontal shelf and the muzzle pushes forward below it. That brow-to-muzzle relationship is one of the fastest ways to separate a gorilla from other apes.
The arms are longer than the legs. On all fours, that difference lifts the shoulders above the hips. Sitting upright, the hands can rest on the ground beside the body without much reach.
Hands are broad, with thick fingers and a short thumb. Feet are wide, with the big toe set apart. In knuckle-walking, the hand folds so the middle finger segments carry the weight, which gives the front contact a flat, padded look instead of a palm-down print.
Fur follows gravity and form. Map it as broad currents, the way you’d draw water around a rock, and you’ll avoid the scribbled-hair look.
Drawing a gorilla from different angles
Most tutorials show only the three-quarter view. Draw several angles and the gorilla starts to feel like a solid object you understand. I lean on an academic habit here: compare every angle against a vertical or horizontal instead of guessing it.
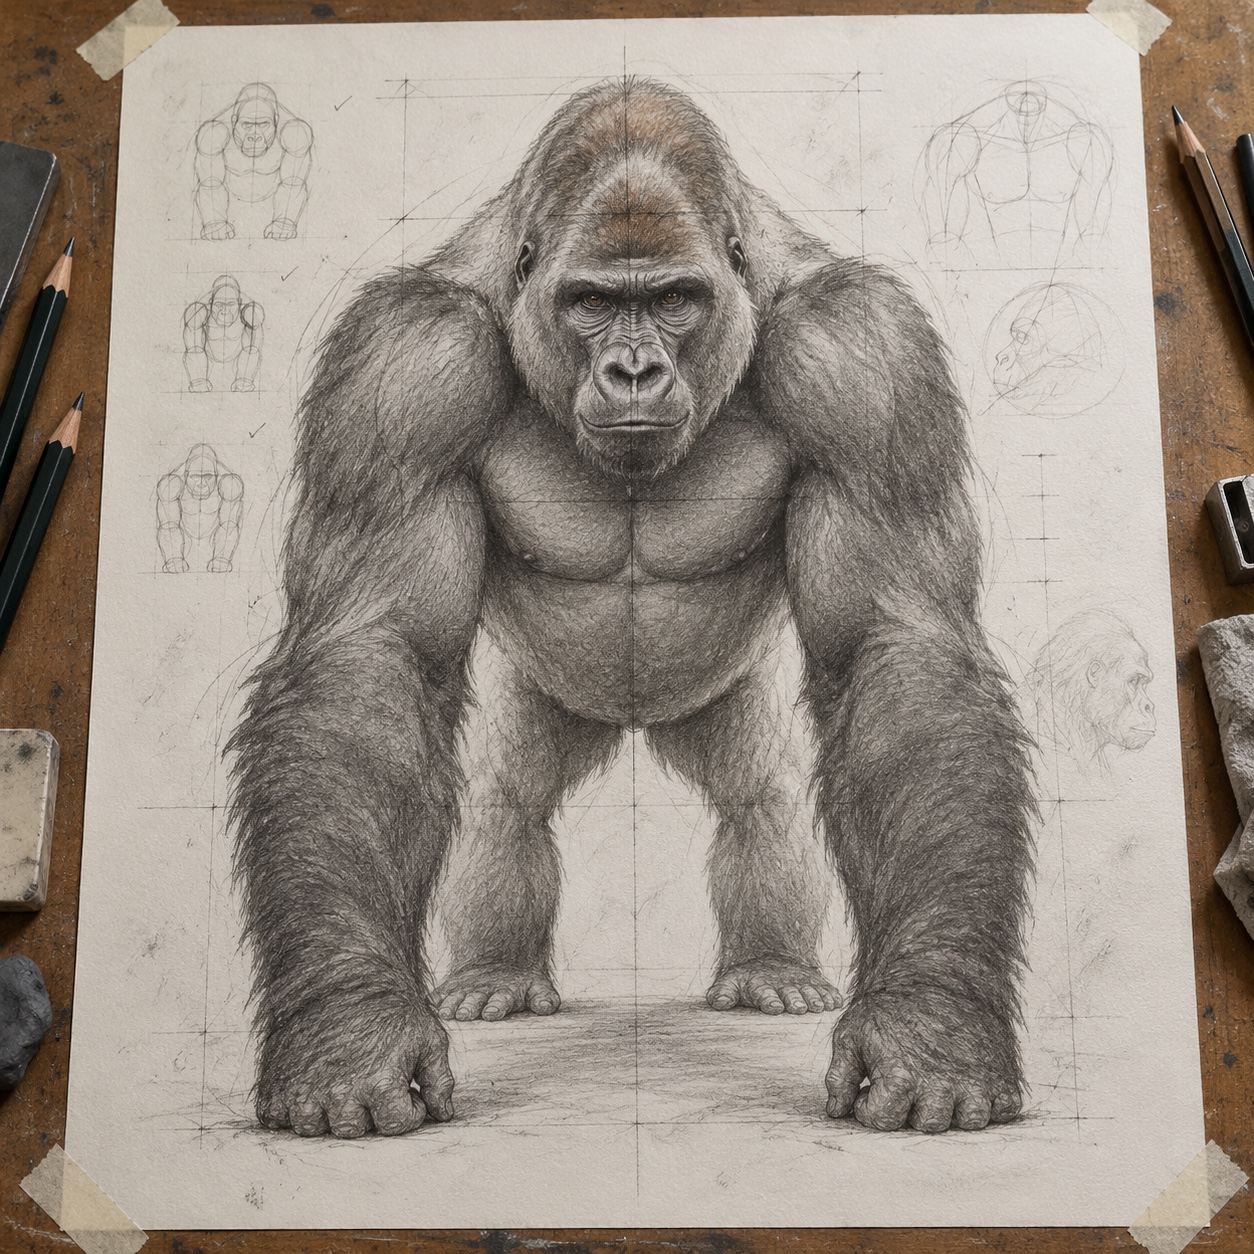
Front view
The front view is symmetrical, so the centerline does most of the work. The rib cage looks very wide, the head sits low between the shoulders, and the arms frame the body like columns. Keep the foreshortened muzzle short and use the brow shadow to push the eyes back.
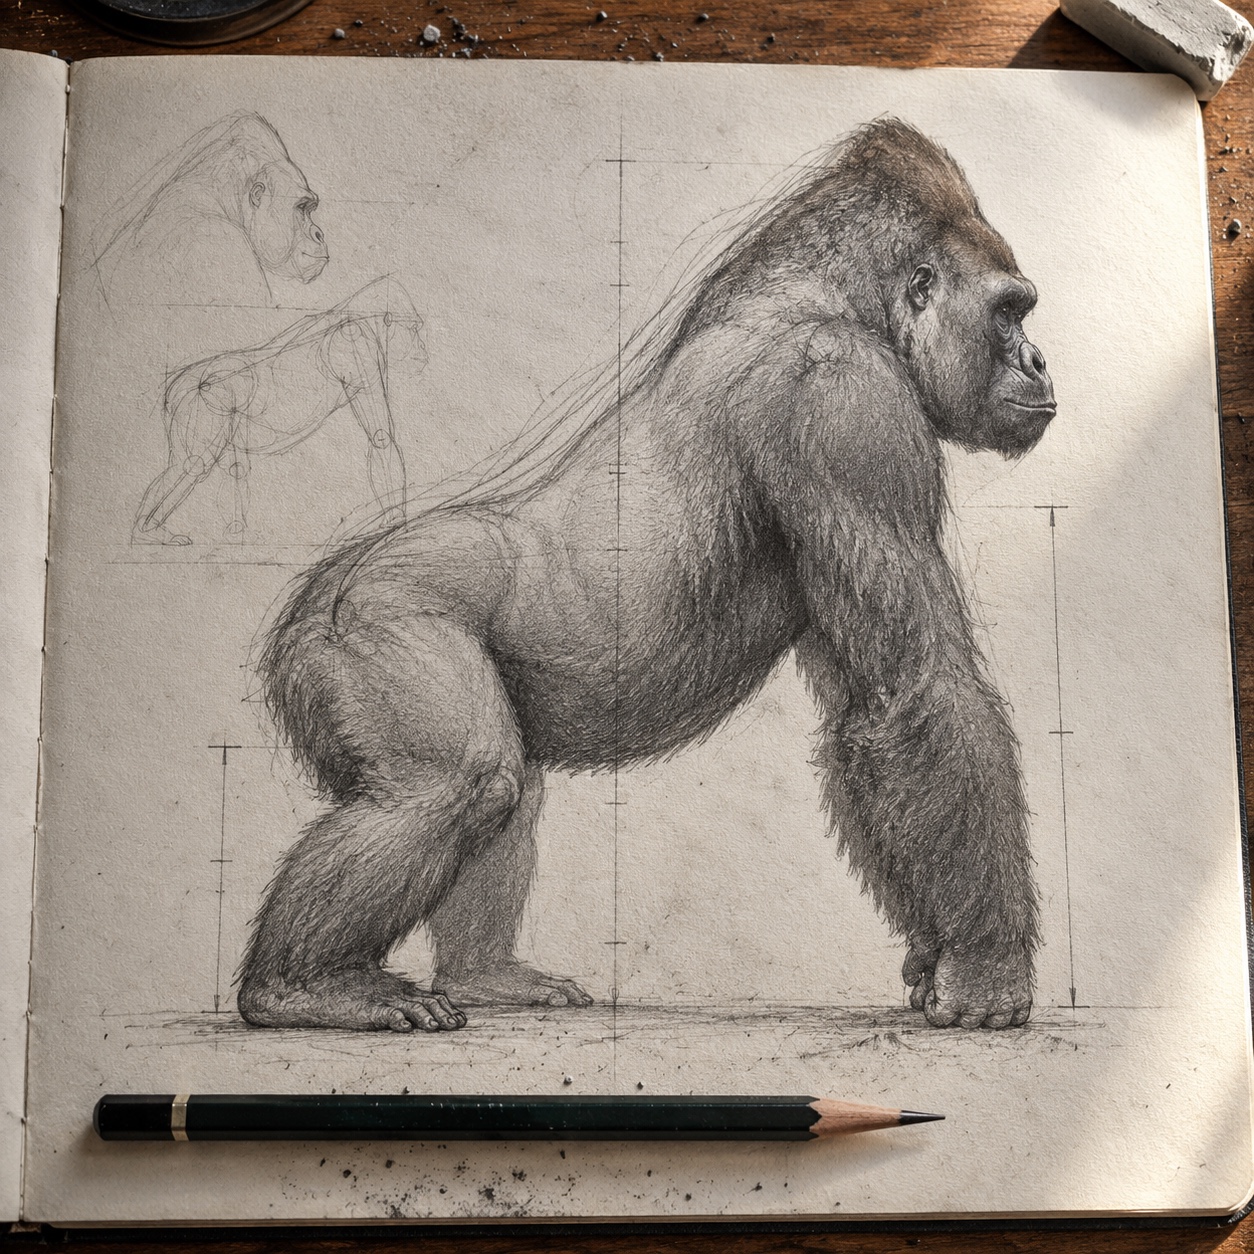
Profile
Profile gives the most readable silhouette. You’ll see the full slope from shoulder to hip, the projecting muzzle, and the conical head of an adult male. Arm length is obvious here, so measure it against the leg carefully.
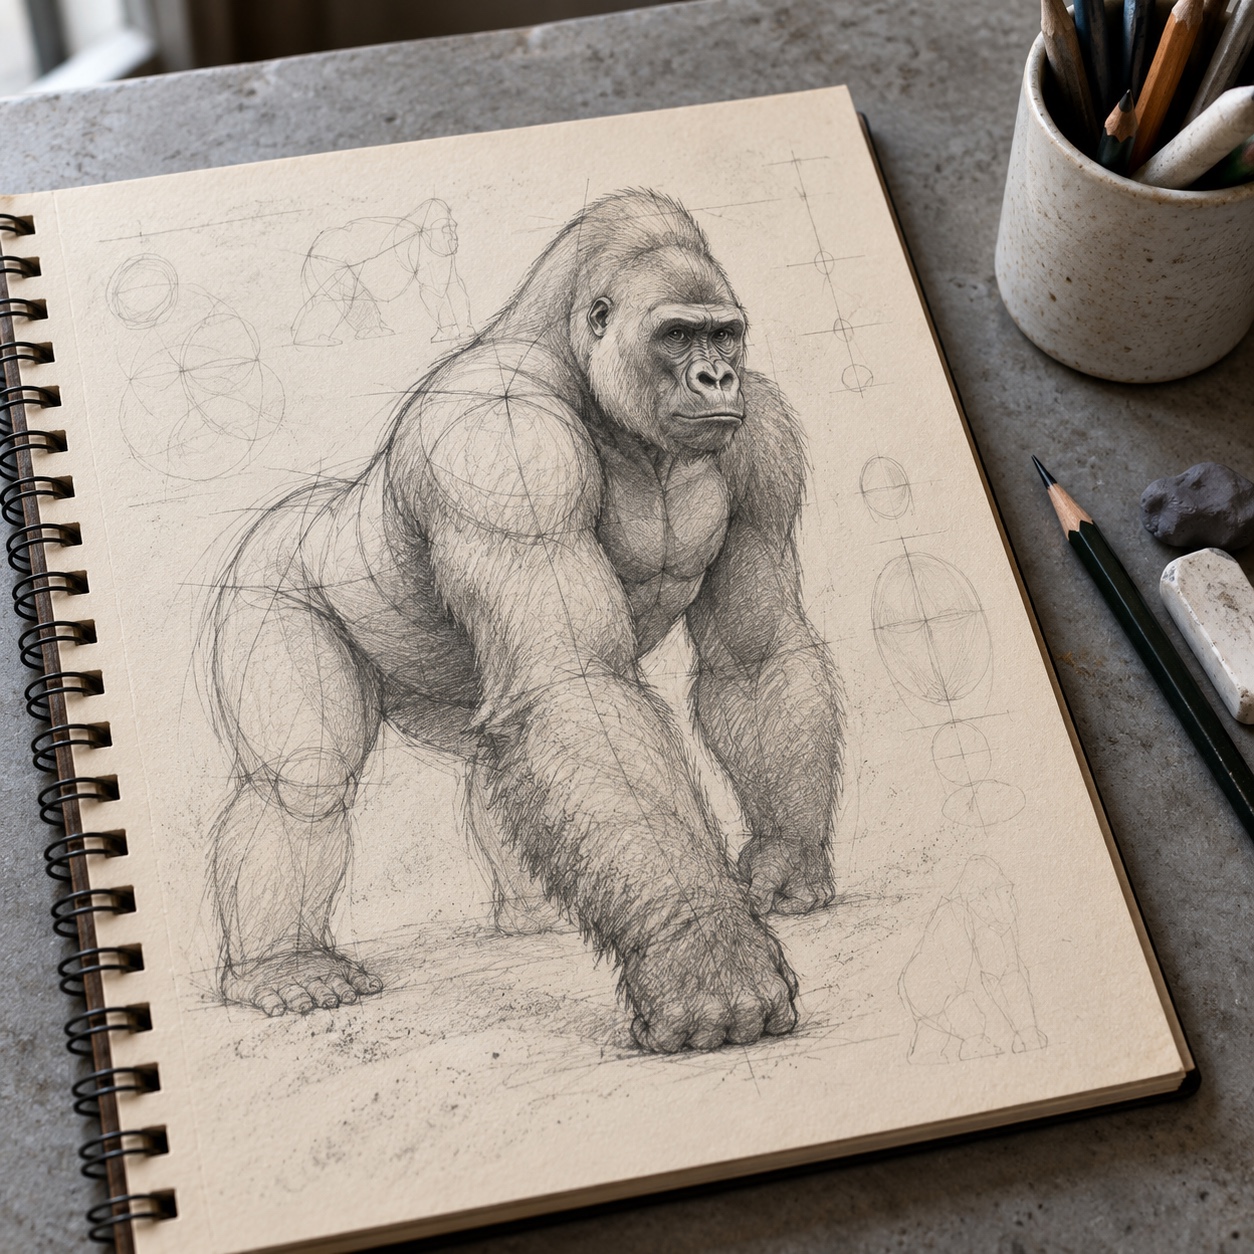
Three-quarter view
This view combines width and depth, which is why it’s the default for most artists. Watch the far side: the far arm and far eye shorten and get partly overlapped. The centerline curves around the chest instead of running straight down the page.
Rear view
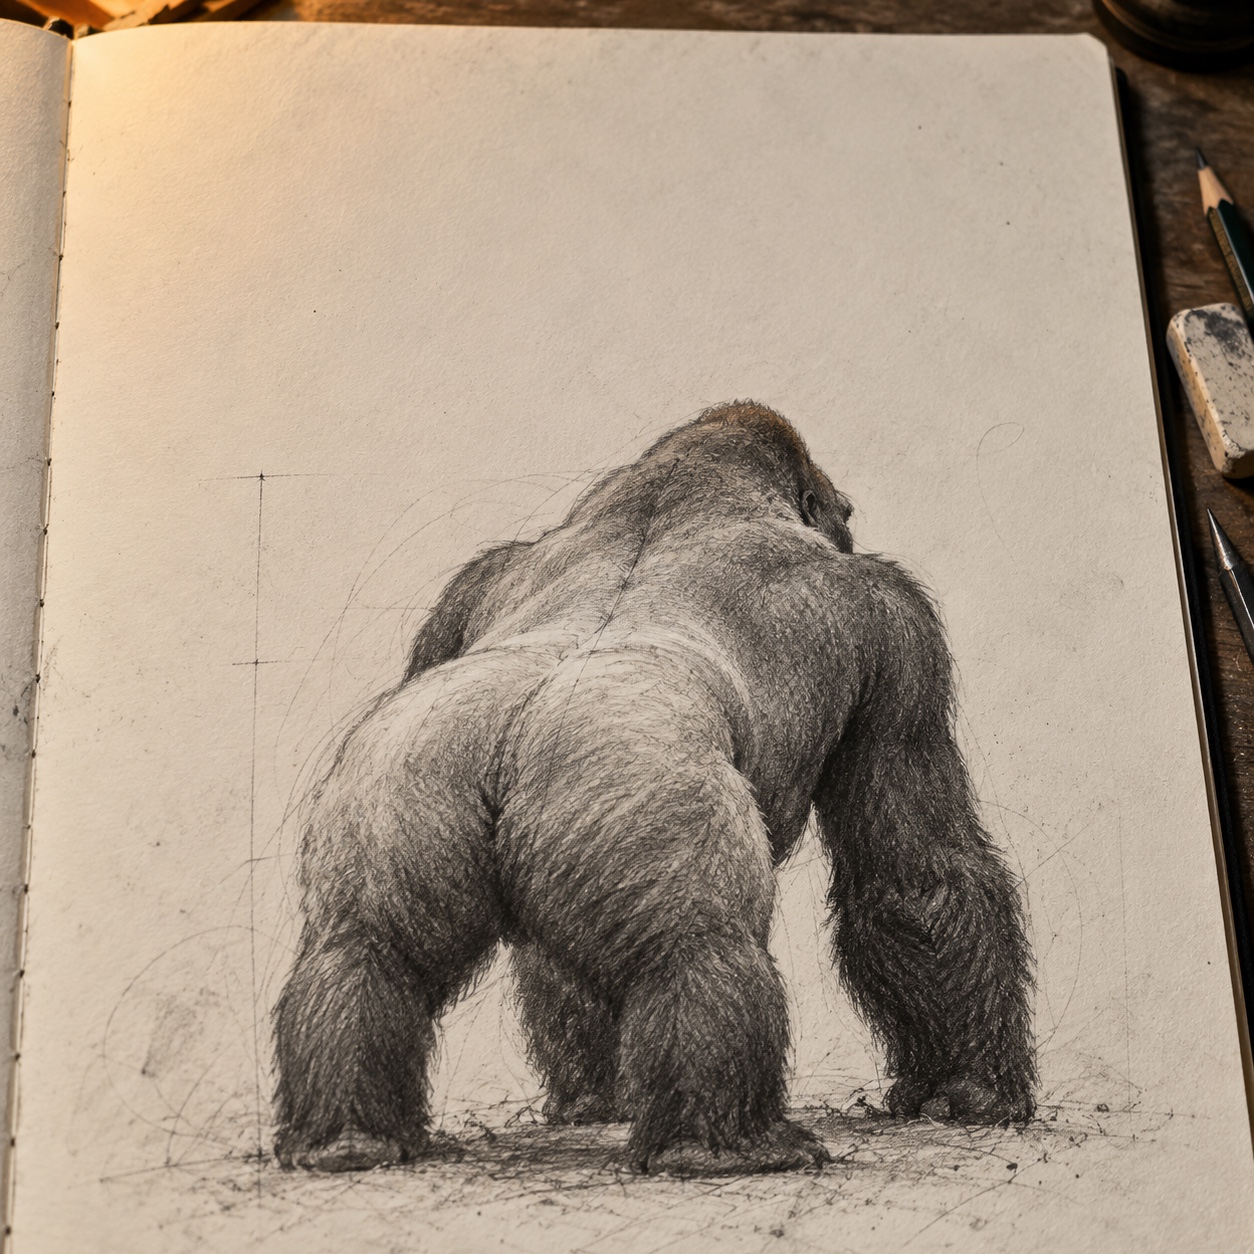
The back view is where a silverback earns the name. The silvery saddle spreads across the back, and the shoulders form a broad, rounded mound. The head may be partly hidden, so the silhouette rests on the shoulders and bent legs.
Knuckle-walking
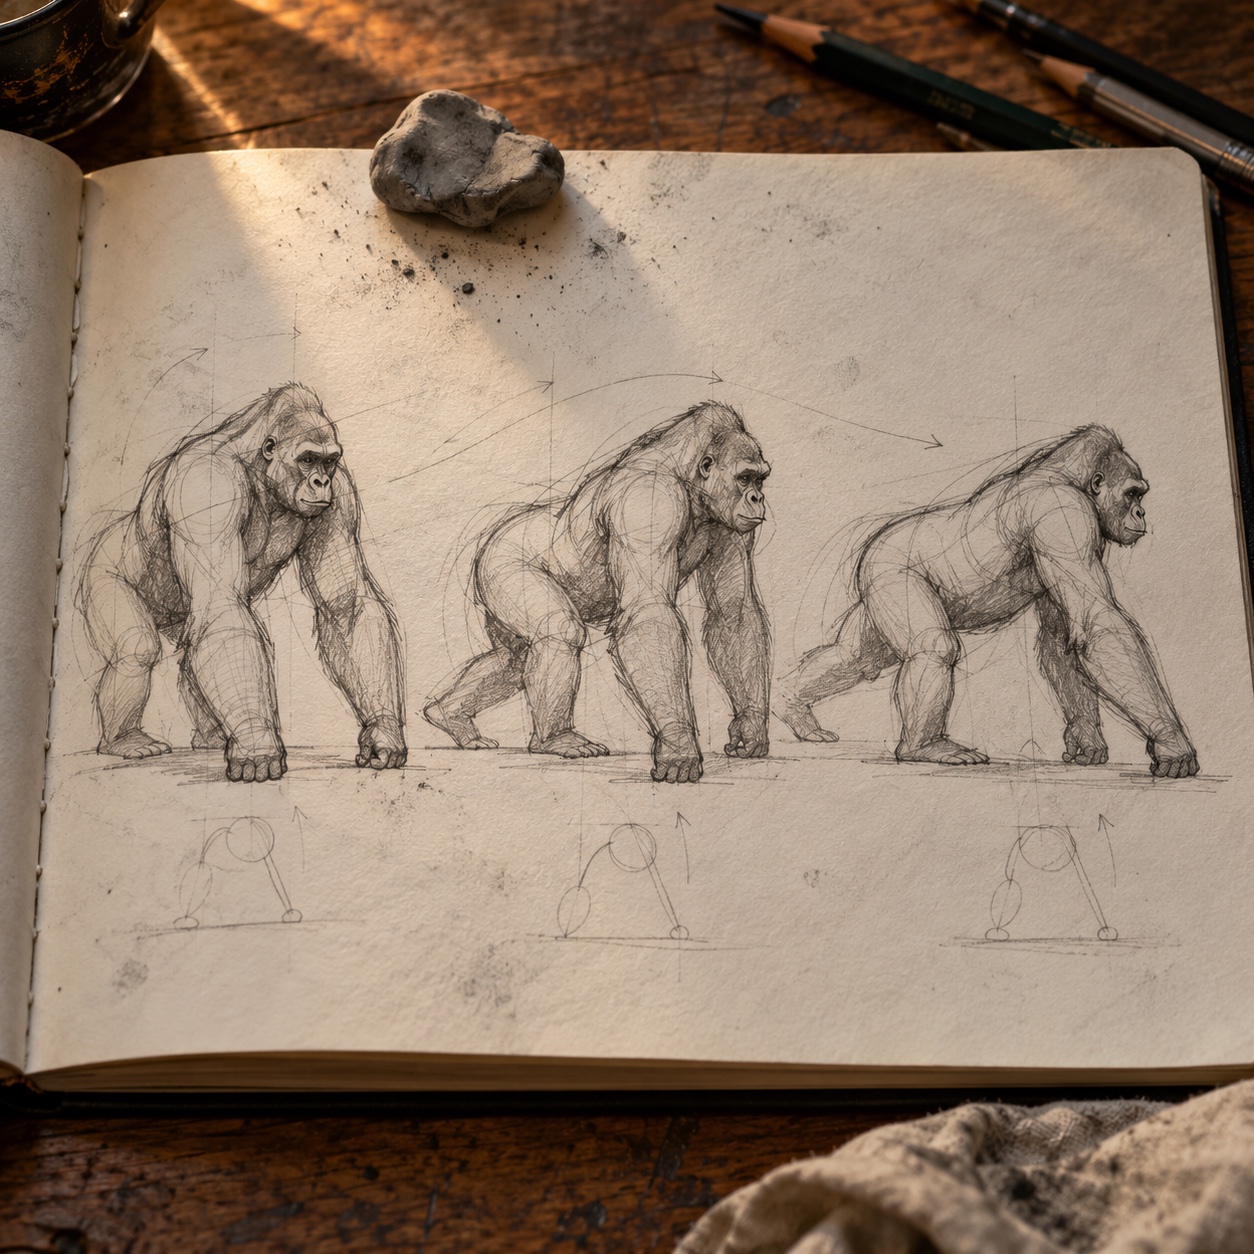
For a walking gorilla, think about rhythm. Limbs move in a sequence, so check your reference for which arm and leg are planted rather than mirroring them. Keep the knuckle line flat, the wrists fairly straight, and tilt the body slightly toward the supporting arm.
Low and high camera angles
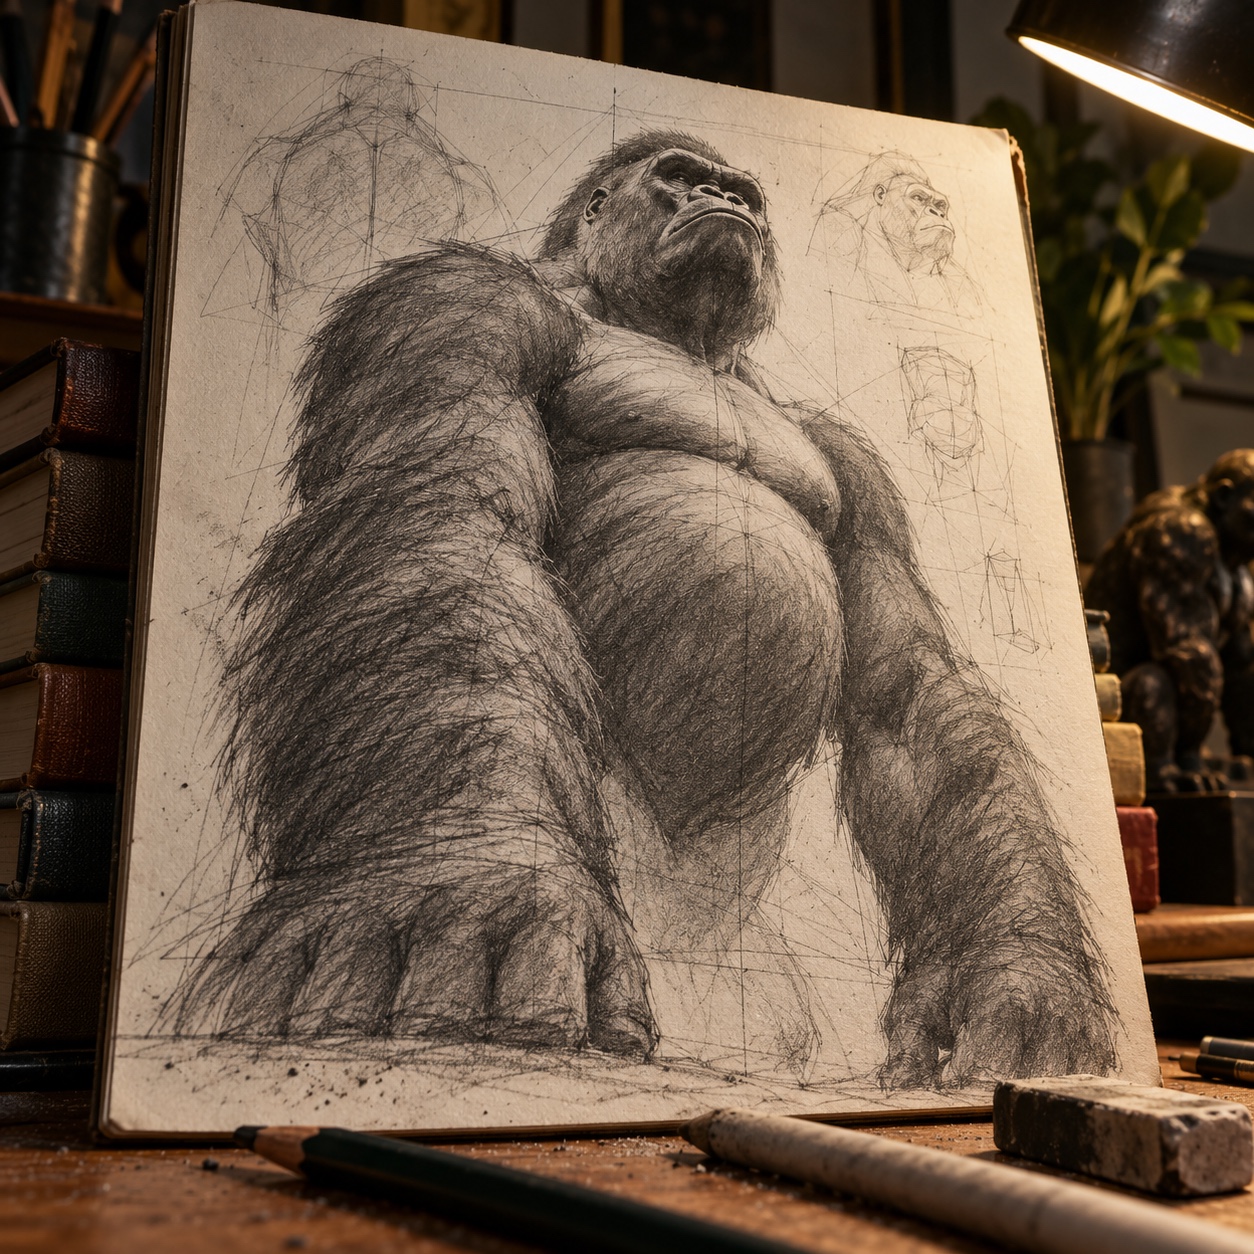
A low camera near ground level makes the gorilla look monumental. The chest and arms loom, the head shrinks, and the underside of the brow and jaw comes into view. Draw near forms first and let them overlap the far ones.
A high camera looks down on the head and back, compressing the legs. The shoulder mass and top plane of the back dominate, which suits a silverback study. Draw the arm cylinders with visible ellipses to show you’re looking down on them.
Drawing techniques for a gorilla: graphite to digital
Each medium changes how you handle dark fur and soft edges. Choose the one that matches what you want to practice.
Graphite
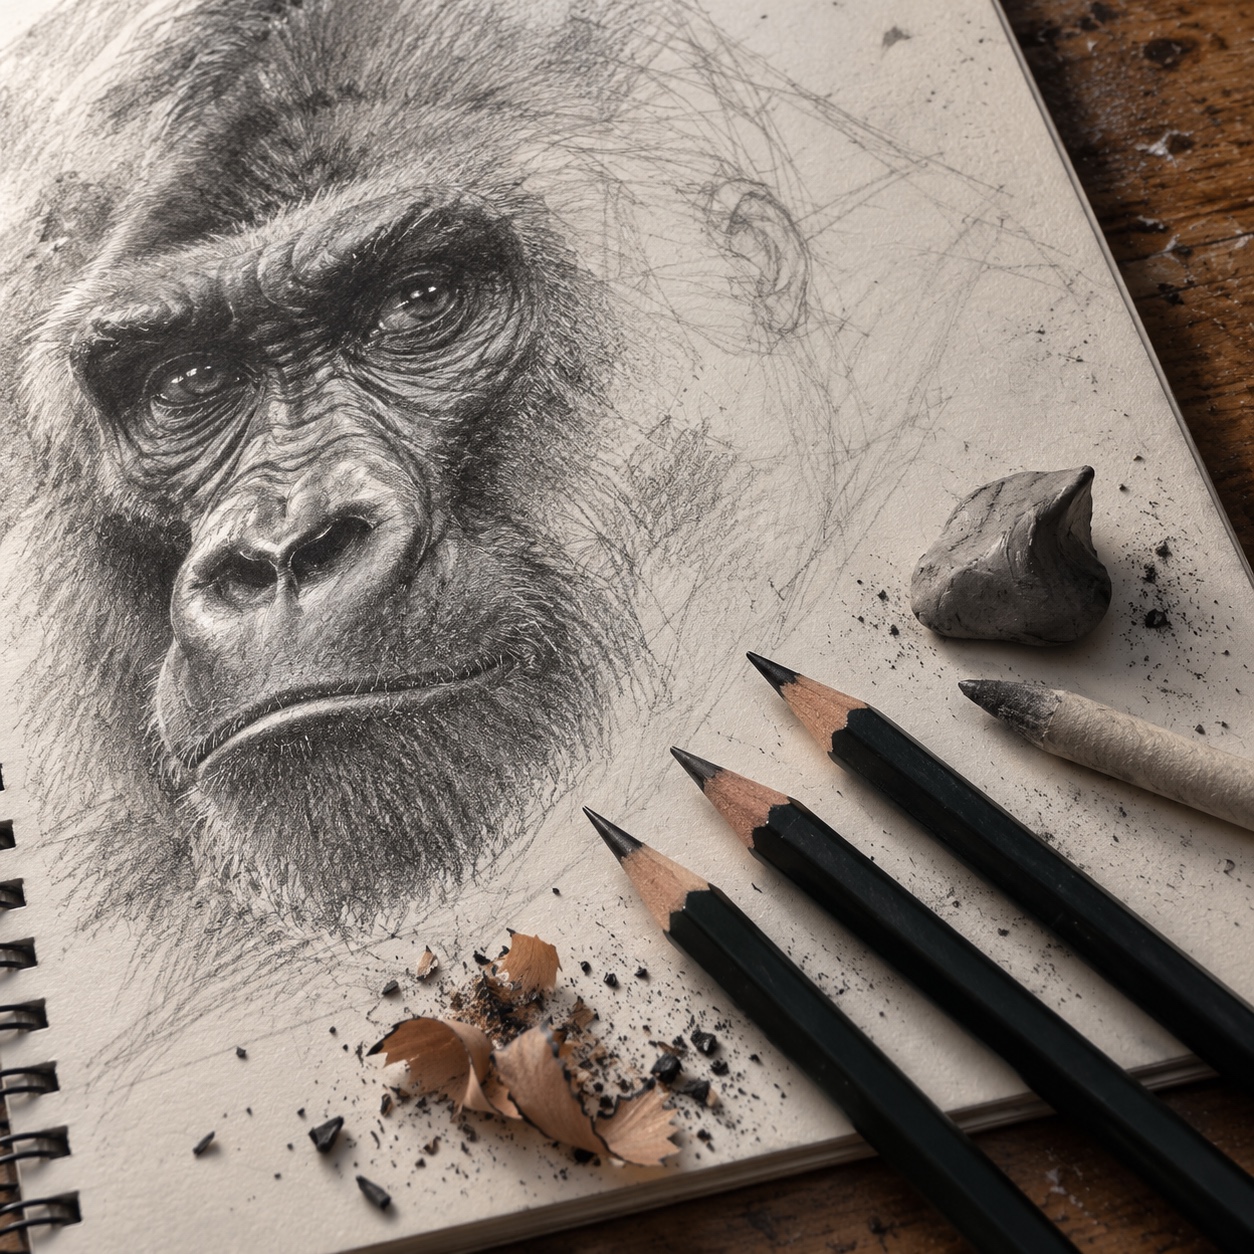
Graphite gives the most control and the cleanest detail. With 2B through 6B, you can build gradual tone and sharp strands in the same drawing. Its weakness is the dark end, since heavy graphite turns shiny and never reaches a true black. Use it for studies, face close-ups, and learning edges.
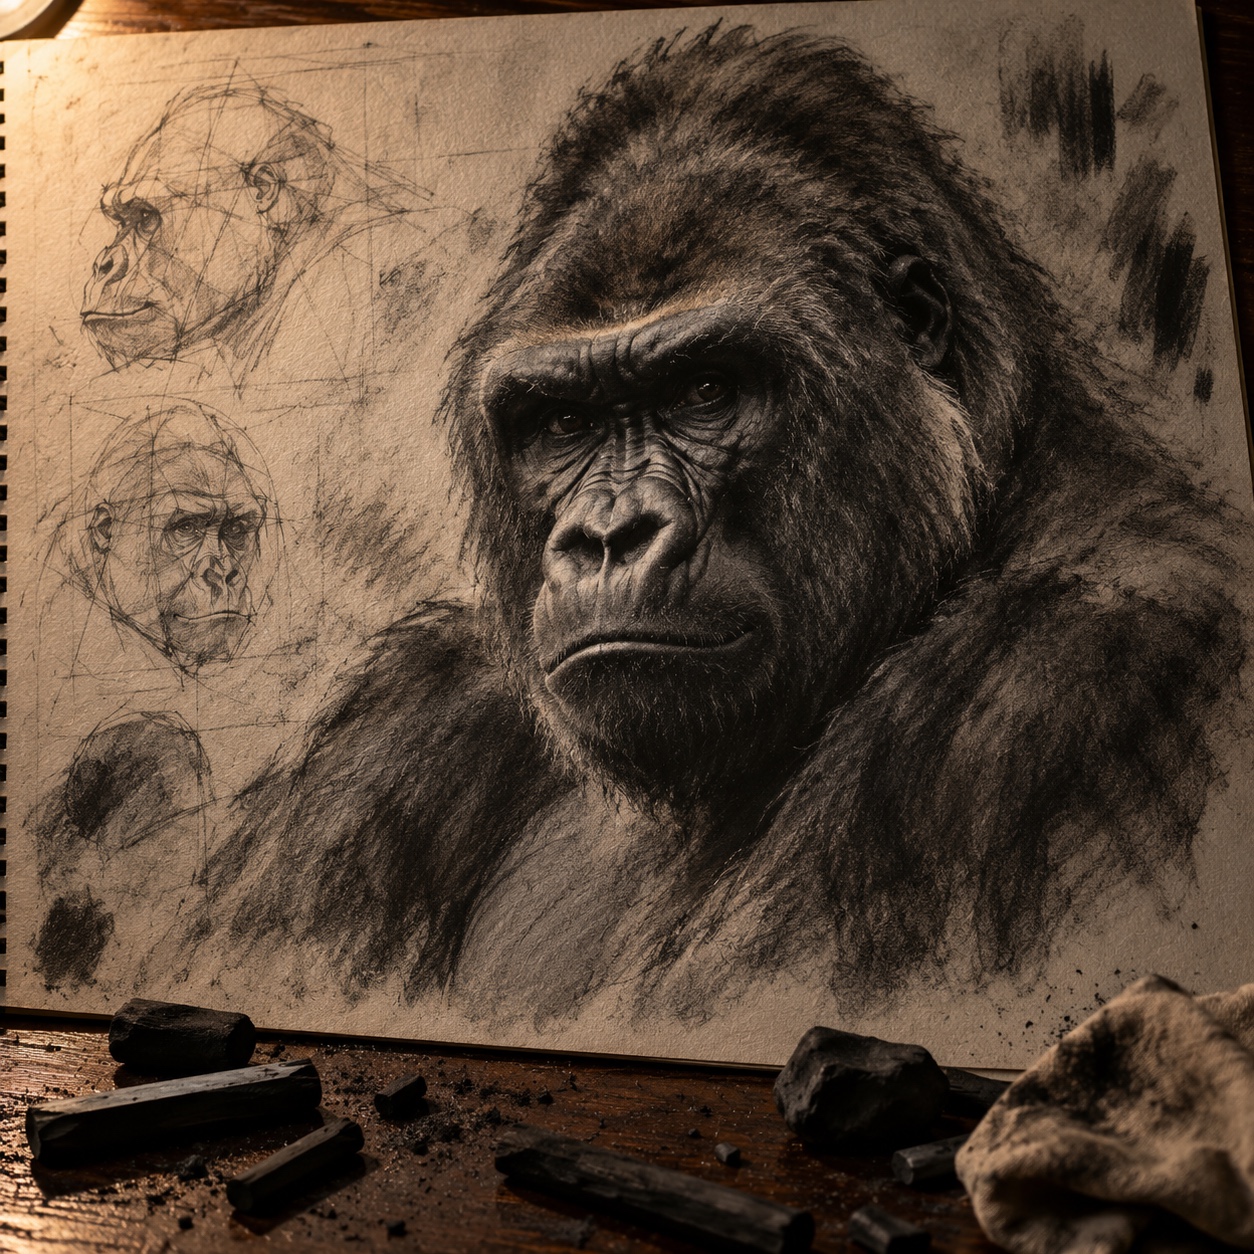
Charcoal
Charcoal suits a gorilla naturally. Willow charcoal lays in big shapes fast and erases easily, while compressed charcoal or a charcoal pencil delivers rich, matte blacks. Edges move from fog-soft to razor-sharp with a finger or a sharpened stick. It smudges, so work top to bottom and use workable fixative between layers.
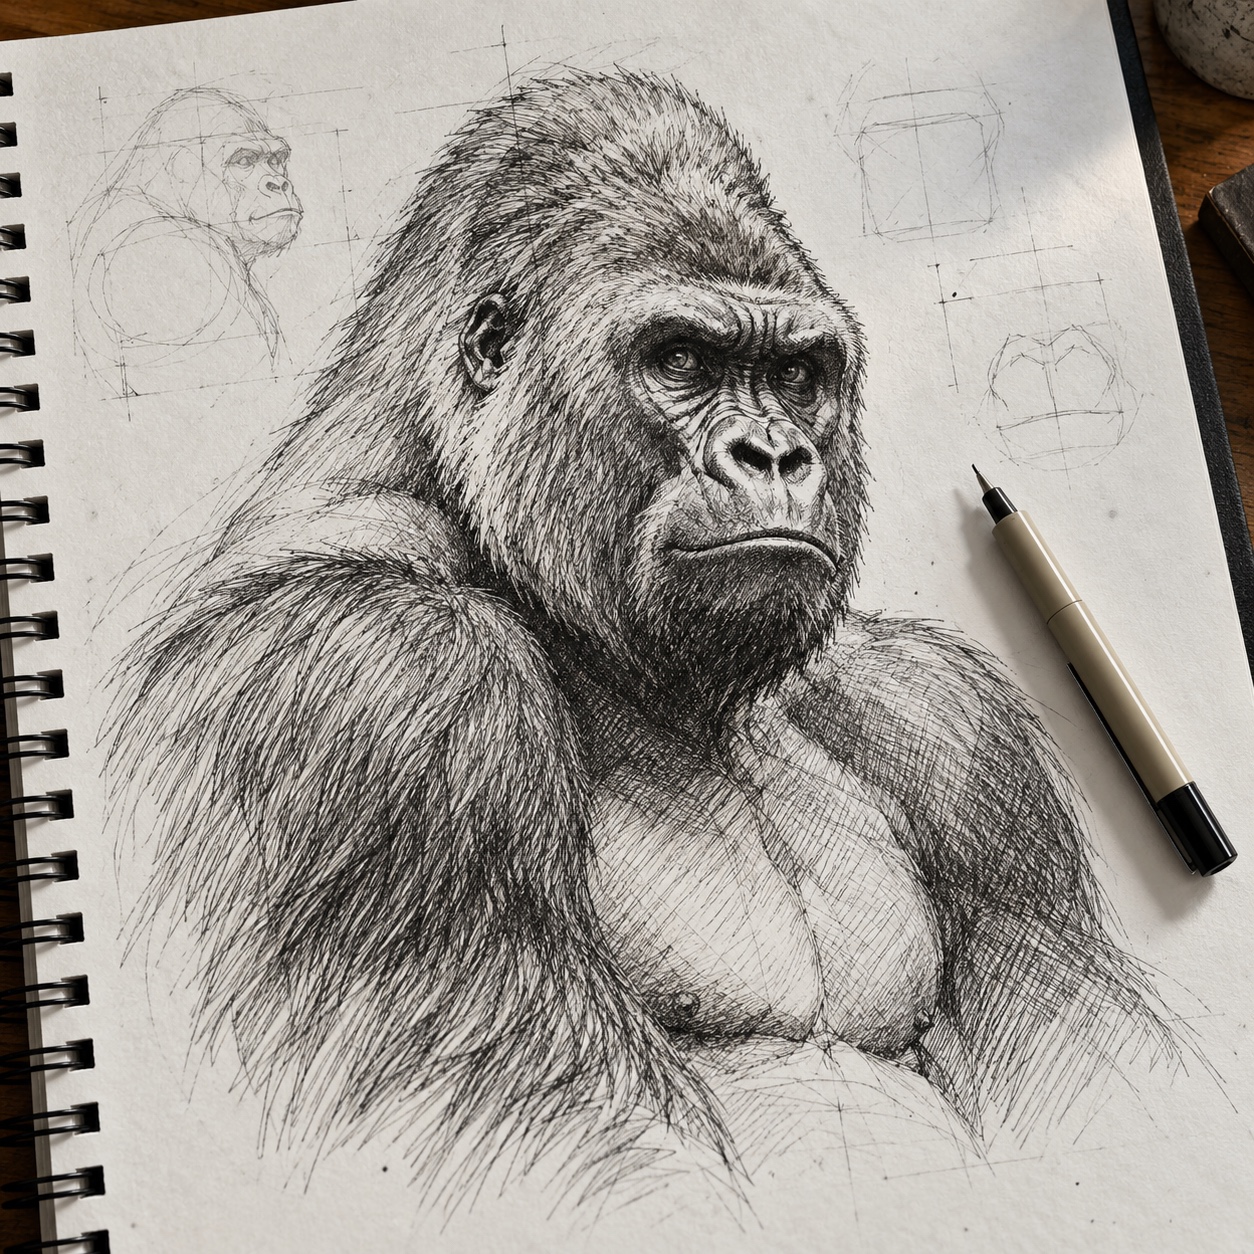
Ink and cross-hatching
Ink forces decisions. With a Micron 03, nothing erases, so plan values first in light pencil. Build tone with parallel hatching that follows the fur arrows, then cross-hatch only the shadow side, leaving white paper for lights. It’s excellent for stylized illustration and economy, though soft edges take patience.
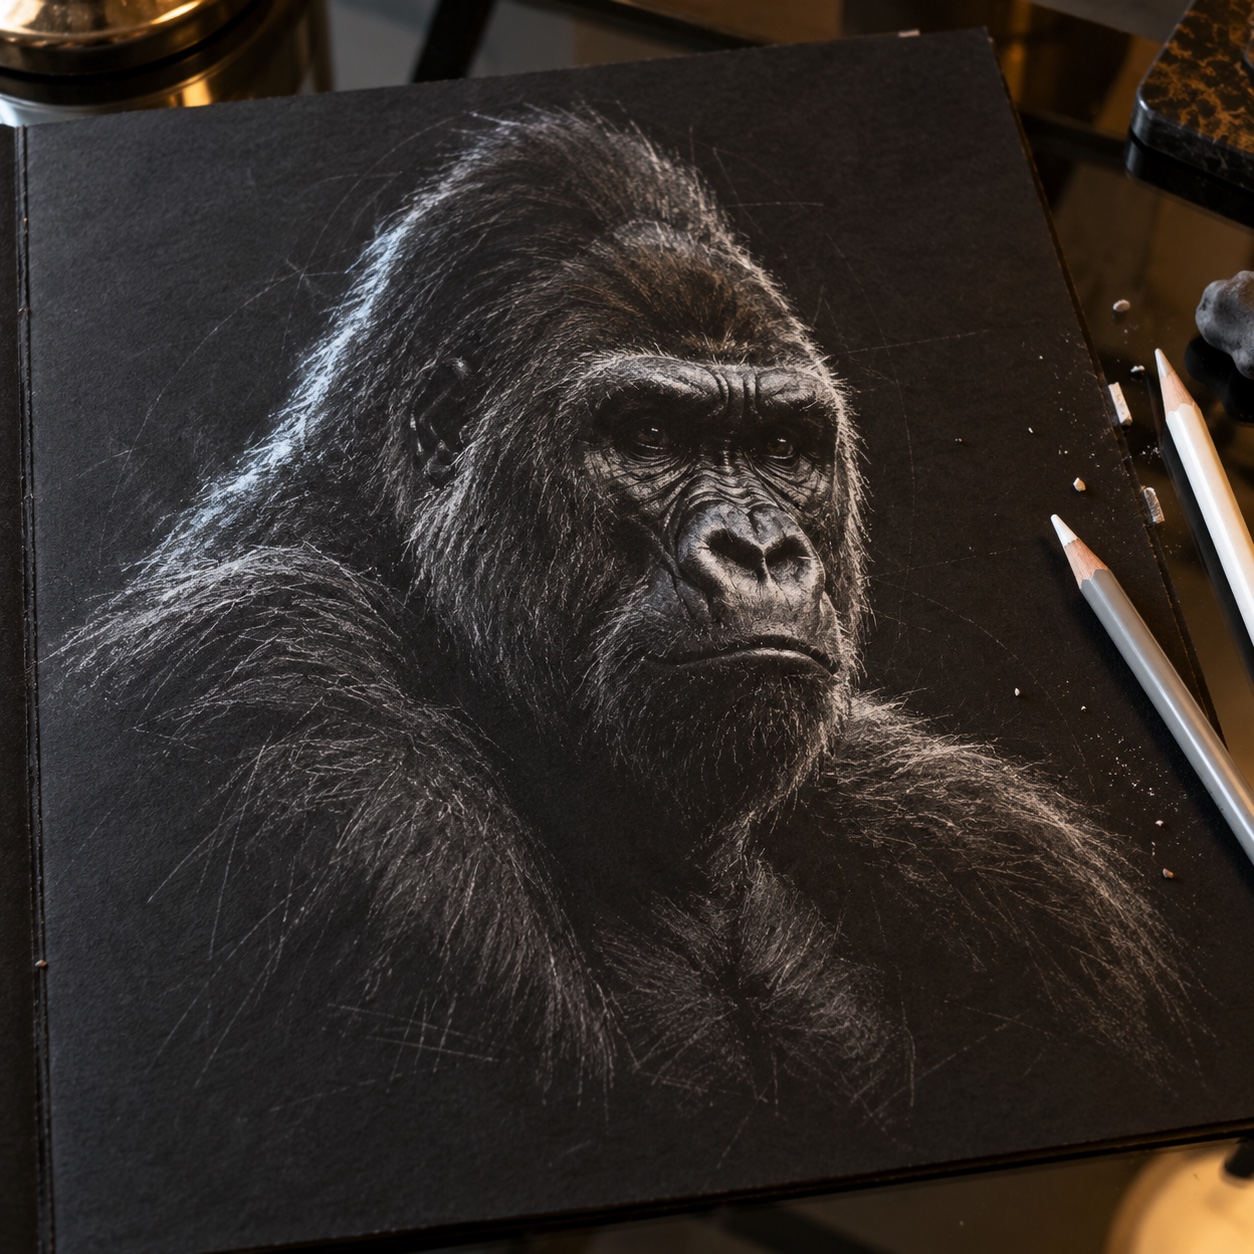
Colored pencil on toned or black paper
On gray or tan paper, the paper becomes your middle value. You add darks with black or dark brown and lights with a white pencil. On black paper, flip it and draw only the light. That forces you to see rim light, the silverback plane, and brow highlights as separate shapes. Value range is narrower, but the drama is high.
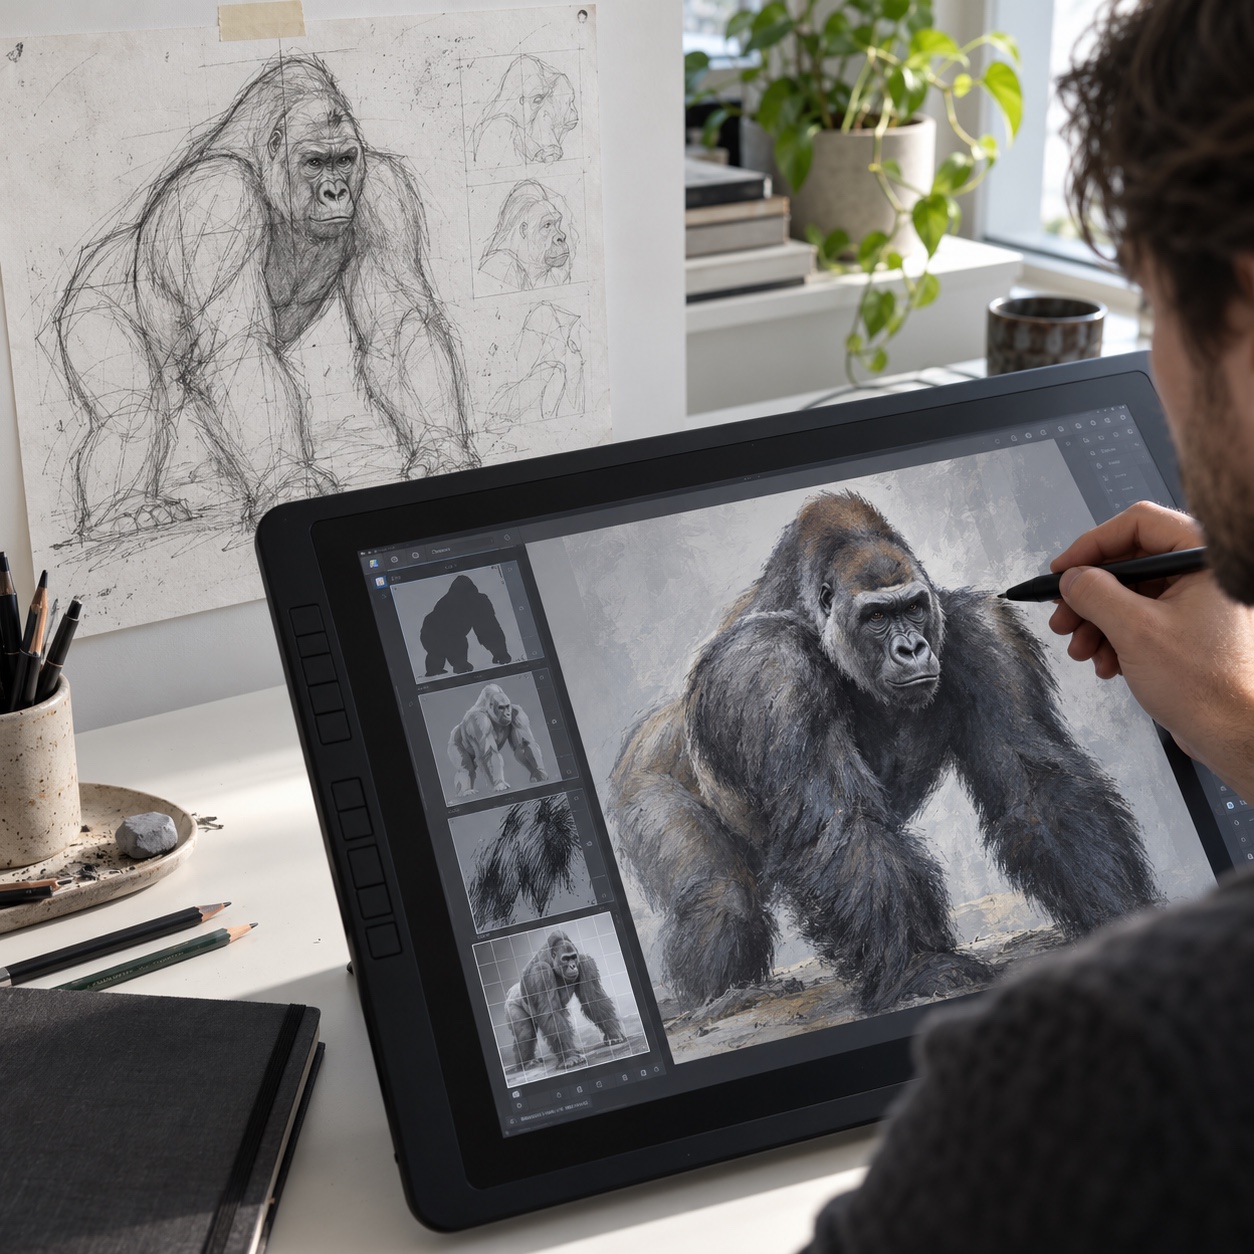
Digital painting
Digital gives you undo, layers, and a full value range. Block the silhouette on one layer, values on another, and fur texture on a third at reduced layer opacity. Use a hard round brush for overlaps and a soft brush for turning fur. The risk is overworked texture, so zoom out often and check in grayscale.
What gorillas in film, animation, and logos teach about design
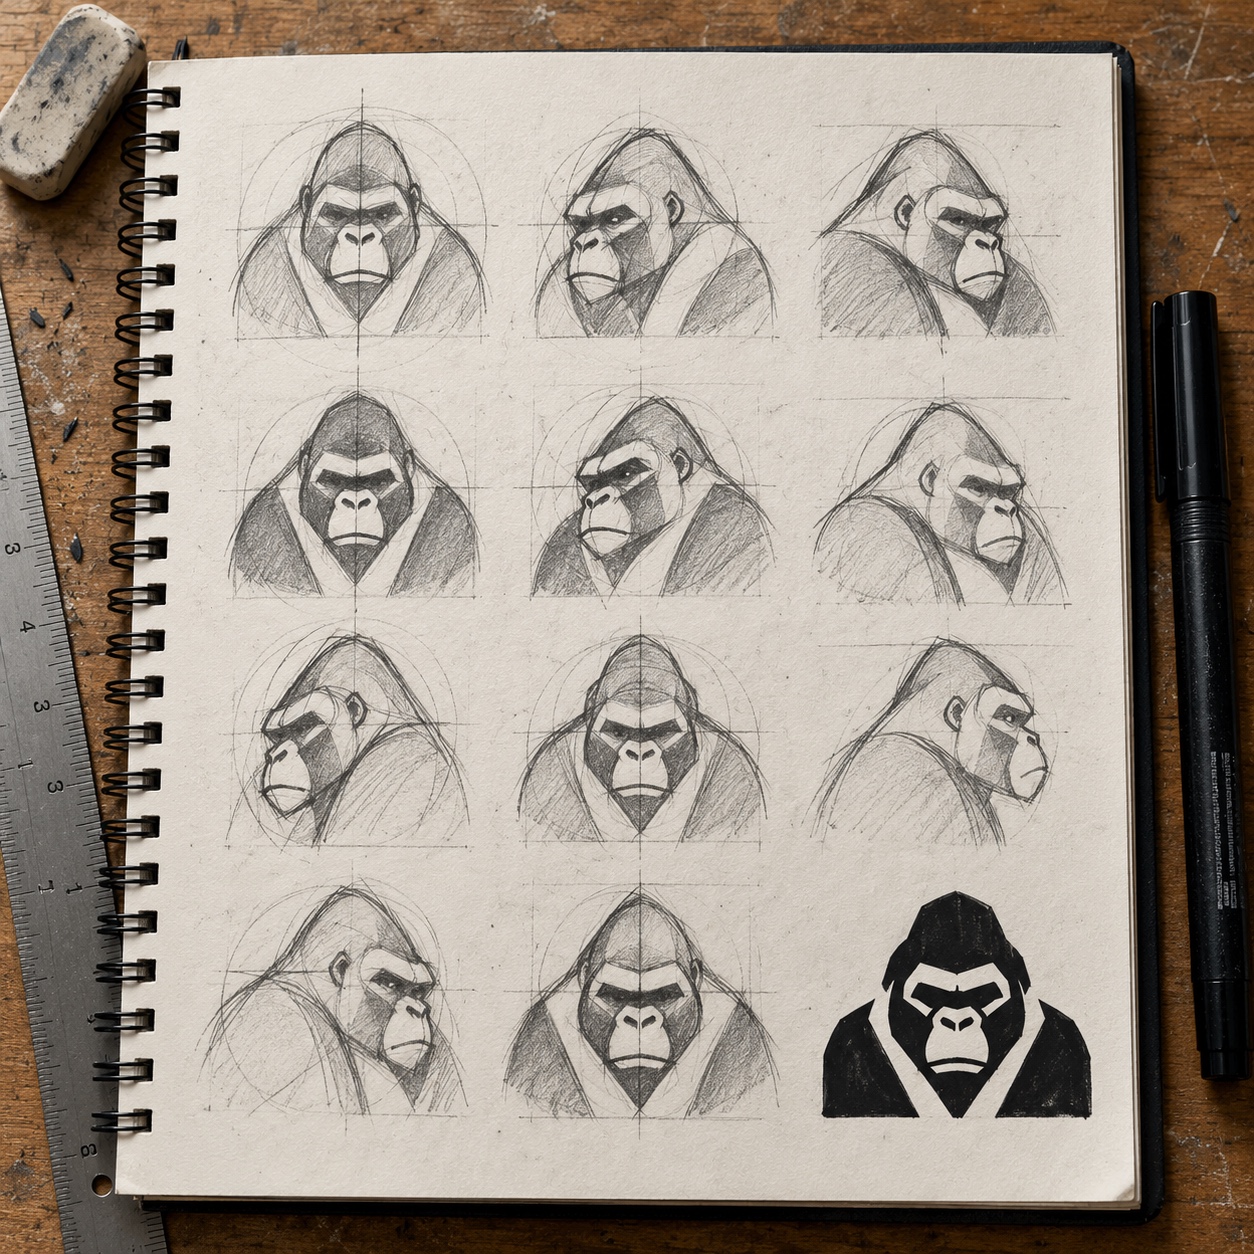
Screen and brand gorillas show how far you can push a shape before it stops reading as a gorilla. Study the principles, not the character art, and draw your own animal rather than copying protected characters or trademarks.
King Kong is a fictional giant ape, gorilla-like in many versions. Those designs rely on scale cues: a low camera, a small horizon, and a silhouette so heavy at the shoulders that the legs nearly vanish. Posture and camera angle carry size better than detail does.
Kerchak, the gorilla leader in Disney’s Tarzan, pairs a massive upper body with a small head and a wide, simplified brow. Johnny from Illumination’s Sing is a mountain gorilla meant to feel young and sympathetic, so his shapes are rounder and his brow is softer. Compare them and you’ll see how the brow-to-muzzle ratio sets personality: a heavy, low brow reads stern, a softer one reads approachable.
DC’s Gorilla Grodd is a stylized fictional gorilla whose design often exaggerates the skull and posture to suggest intelligence and menace. Exaggeration works best when it grows from a real feature, like the head crest or shoulder mass.
Logos push simplification furthest. Gorilla Glue, for example, uses gorilla imagery in its branding to suggest strength. For an original mark, keep the head or upper body readable at tiny sizes, use negative space to separate brow, muzzle, and arms, and test it in solid black.
Keep the species straight. Caesar from the Planet of the Apes films is a chimpanzee, Maurice is an orangutan, and King Louie in Disney’s 1967 animated The Jungle Book is an orangutan. Chimps are leaner, with more prominent ears. Orangutans have reddish hair and very long arms. Gorillas carry the heaviest mass and the strongest brow.
Common gorilla drawing mistakes and how to fix them
Most problems appear in the first ten minutes and get harder to fix once you shade.
- The head is too big. Shrink it and drop it lower on the chest so the shoulders rise around it.
- There’s a visible neck. Fill that space with muscle running from the shoulders to the back of the skull.
- The arms are too short. Measure arm against leg with your pencil and lengthen until the arm clearly wins.
- The chest looks human. Widen and deepen the rib cage, and let the belly fill the waist.
- The hands look delicate. Thicken the fingers and shorten the thumb to match the forearm’s weight.
- Fur is scribbled everywhere. Group values first, then add strands only along edges and transitions.
- Everything is the same dark. Separate bare skin and the silver back from the fur with value and texture.
- It looks like a chimp. Strengthen the brow, broaden the nose, and add shoulder mass.
A one-week practice plan for gorilla drawing
Short, focused sessions beat one long struggle. Spend 20 to 30 minutes a day.
- Day 1: Ten 2-minute gesture and envelope sketches from different photos.
- Day 2: Construction only (rib cage, pelvis, head, limbs) in three poses.
- Day 3: Five heads in front, profile, and three-quarter view, focused on brow and muzzle.
- Day 4: A page of hands and feet, including knuckle-walking hands.
- Day 5: A small three-value study with no texture allowed.
- Day 6: The same pose in a medium you haven’t tried.
- Day 7: A full drawing using all four steps, compared against Day 1.
Gorilla drawing FAQ
What is the easiest way to draw a gorilla?
Use simple shapes: a large egg for the chest, a smaller one for the hips, a sphere for the head, and long cylinders for the arms. Lean the body forward onto the knuckles. For an easy gorilla drawing, skip detailed fur and use a few direction strokes.
How do you draw a gorilla face?
Draw a heavy horizontal brow ridge and tuck small eyes beneath it. Add a broad nose with flared nostrils, a forward muzzle, and a wide mouth line. Shade under the brow darkly, because that shadow does most of the work.
How do I draw a silverback gorilla?
Use the same construction, then make the head conical and the shoulders extra broad. In the value stage, treat the back as one lighter plane of gray. Keep it toned, since it’s still darker than white paper.
What pencils are best for drawing a gorilla?
A 2H or HB for construction, 2B for base tone, 4B for shadows, and 6B for accents. Add a kneaded eraser for lifting highlights.
How do I make a gorilla drawing look realistic?
Fix proportions and value groups before texture. Realism comes from heavy mass, long arms, a strong brow, and contrast between bare skin and fur, not from drawing every hair.
How is a gorilla different from a chimpanzee in a drawing?
A gorilla is bulkier, with a stronger brow, broader nose, smaller-looking ears, and a heavier upper body. A chimpanzee is leaner, with more prominent ears and a lighter build.
Your next gorilla drawing
Pick one full-body reference photo, set a 20-minute timer, and complete only Steps 1 and 2. No face, no fur. Hold the drawing beside the photo, compare the arm-to-leg length and shoulder tilt, and redraw it once with those fixes. When the masses look right on the second attempt, you’ve learned the part of how to draw a gorilla that most tutorials skip.
- 11shares
- Facebook0
- Pinterest11
- Twitter0
- Reddit0