Most guides to how to draw Santa start with a cute face and a red hat, and that works until you try a bigger or more realistic version. Then the drawing slides into a generic bearded man in a costume. The fix is a diagnostic you can run in the first two minutes: Santa has to read through silhouette and facial relationships before any detail goes on the page.
- Materials and reference setup
- Read the Santa silhouette before details
- How to draw Santa step by step
- Step 1: Gesture and big body masses
- Step 2: Head circle, centerline and eye line
- Step 3: Nose, cheeks, moustache and face placement
- Step 4: Beard silhouette as one large form
- Step 5: Hat brim first, then cone and pom-pom
- Step 6: Coat, belt, arms, gloves and boots
- Step 7: Refined contour, overlaps and line weight
- Step 8: Three-value map before graphite or color
- Taking the same construction realistic
- Santa face drawing: keep the features inside the beard
- Hat, beard and white trim
- Graphite workflow for a Santa Claus pencil drawing
- Colored-pencil workflow for the red suit and warm face
- Four correction cases
- Practice drills and a seven-day plan
- How to draw Santa FAQ
- Final takeaway
This tutorial builds one figure twice. First you’ll draw Santa step by step as an easy construction: gesture, head, face, beard, hat, suit. Then you’ll carry the same structure into a realistic Santa drawing in graphite or colored pencil, with correction cases for when it goes wrong.

A shape that doesn’t read from across the room won’t be saved by detail. That’s true of a product sketch, and it’s true of Santa. If the big shape is wrong, no amount of beard texture will rescue it.
Materials and reference setup
You don’t need much. A small kit you understand beats a drawer full of pencils you never sharpen.
- Graphite: HB for construction, 2B for midtones and contour, 4B for the darkest accents in the boots, belt and eye sockets.
- Erasers: a kneaded eraser for lifting beard highlights, plus a hard eraser for clean edges.
- Paper: smooth to medium tooth. Strathmore 400 Series Drawing is a common choice that takes graphite and light colored-pencil layering well.
- Colored pencils: oil-based sets such as Faber-Castell Polychromos layer firmly and resist wax bloom; wax-based Prismacolor Premier is softer and burnishes quickly. Both work. Pick the one whose handling you prefer, not the one with the louder reputation.
- Extras: tracing paper for value maps and a pencil or ruler for measuring.
Reference matters more than the kit. Choose one clear photo or figure with a visible face, a defined light direction and a readable hat shape. Before drawing, check:
- How many head heights tall is the figure? A cartoon Santa often sits around three or four; a realistic adult is closer to seven.
- Where does the beard end relative to the chest or belt?
- How wide is the hat brim compared with the face?
- Which side holds the darkest shadow?
Write those answers in the margin.
Read the Santa silhouette before details
Santa is easy to recognize, and almost all of that recognition comes from mass, not line. Strip away the face and you still have a pointed, drooping hat, a large pale beard shape, a round coat, a dark belt band, heavy boots and, often, a lumpy sack over one shoulder.
The silhouette-fill test
This test works on any character sketch. Trace your rough drawing onto tracing paper, fill the whole outline with solid graphite or marker, and look at it from about six feet away. Ask one question: could a stranger name this figure from the black shape alone?

If the answer is no, the problem lives in the masses. The hat might be too short to droop, the beard might be a thin chin strap, or the body might be a straight rectangle with no belly curve.
Bearded man vs Santa
A generic bearded man has a beard that follows the jaw and a head that sits on normal shoulders. Santa’s shapes are exaggerated and stacked. The beard is a big inverted teardrop or shield that covers the neck and spills onto the chest.
The hat adds height and a diagonal tip, which breaks the symmetry of the head. The coat is wider than the shoulders and the belt cuts it in half.
Notice the value pattern too. Light beard and trim against mid-dark red, then a dark belt and boots. That alternation reads at thumbnail size even in a simple Santa drawing for kids.
How to draw Santa step by step
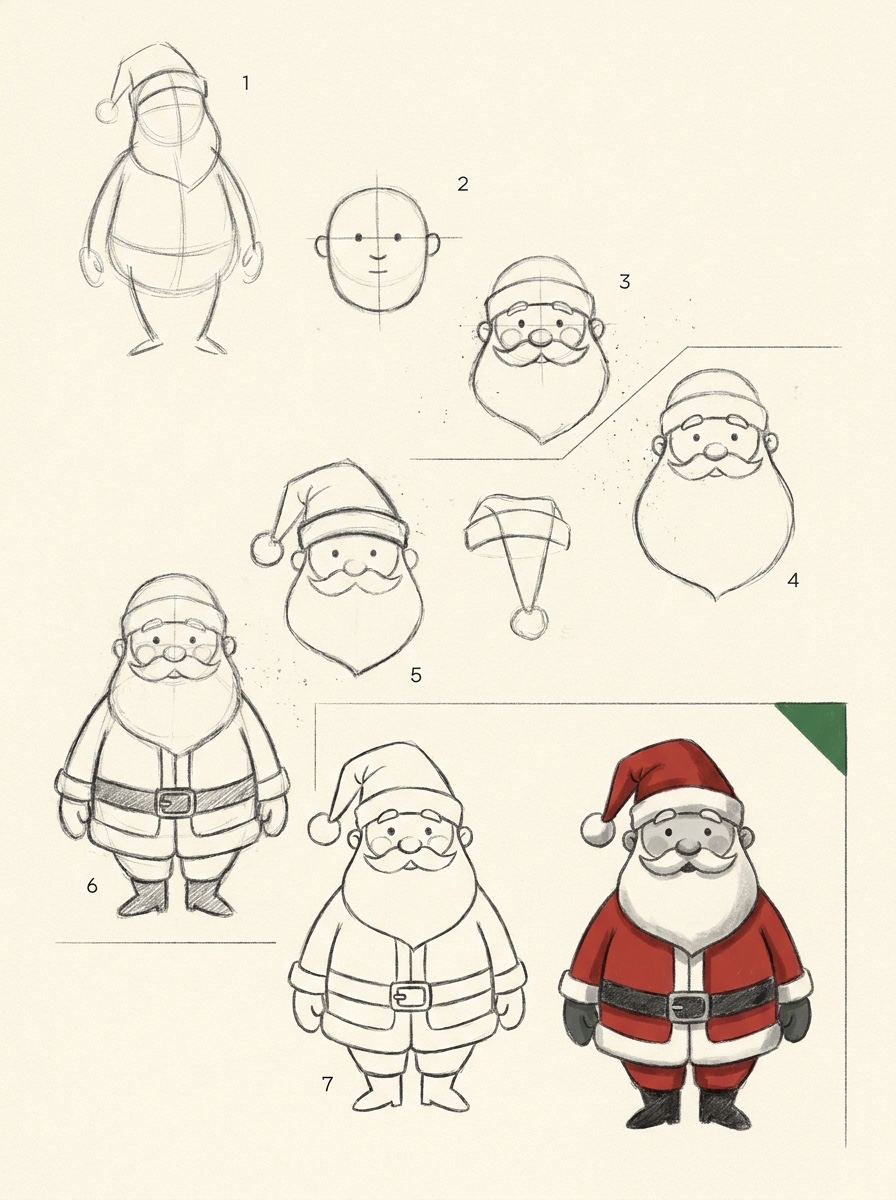
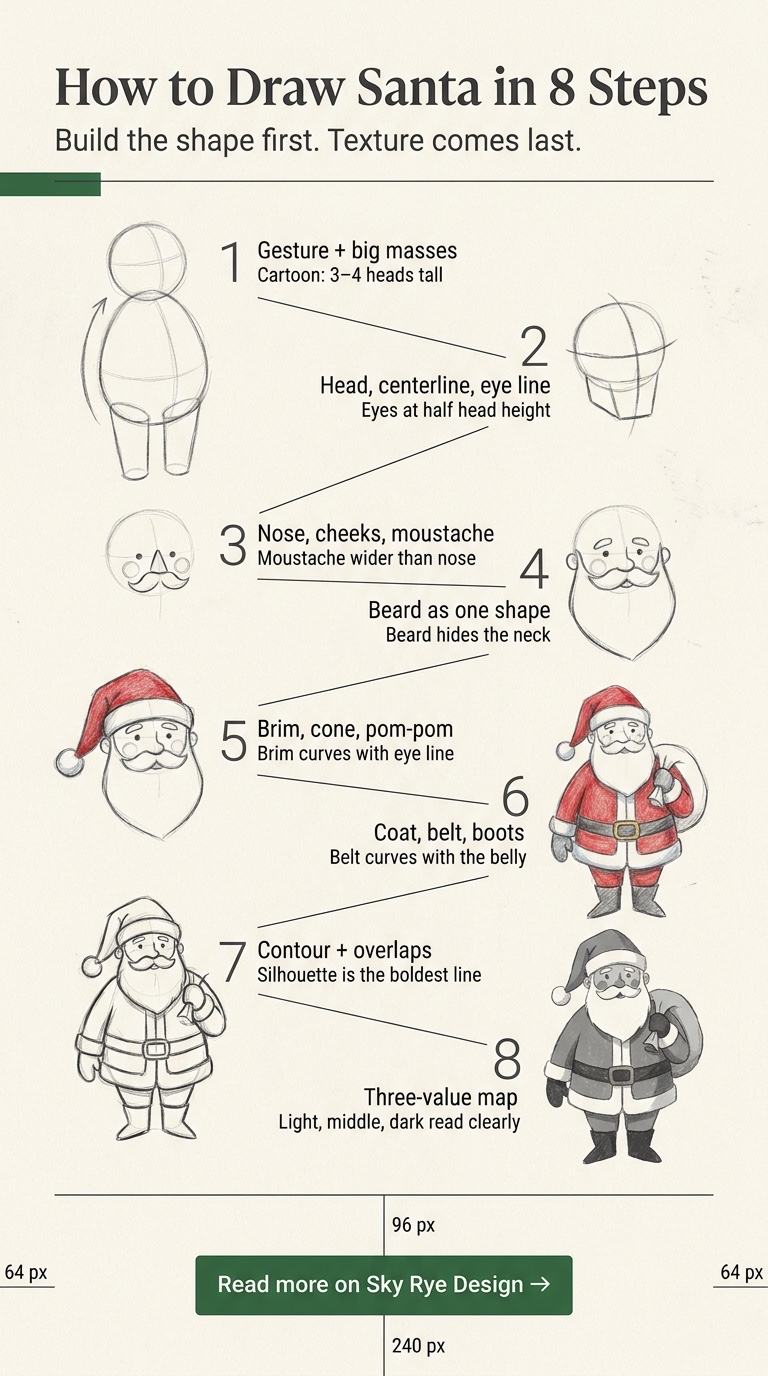
The eight steps below make an easy cartoon Santa if you stop at step 7 and ink it. Keep going and the same skeleton supports a realistic Santa drawing. Keep HB pressure light until step 7.
Step 1: Gesture and big body masses
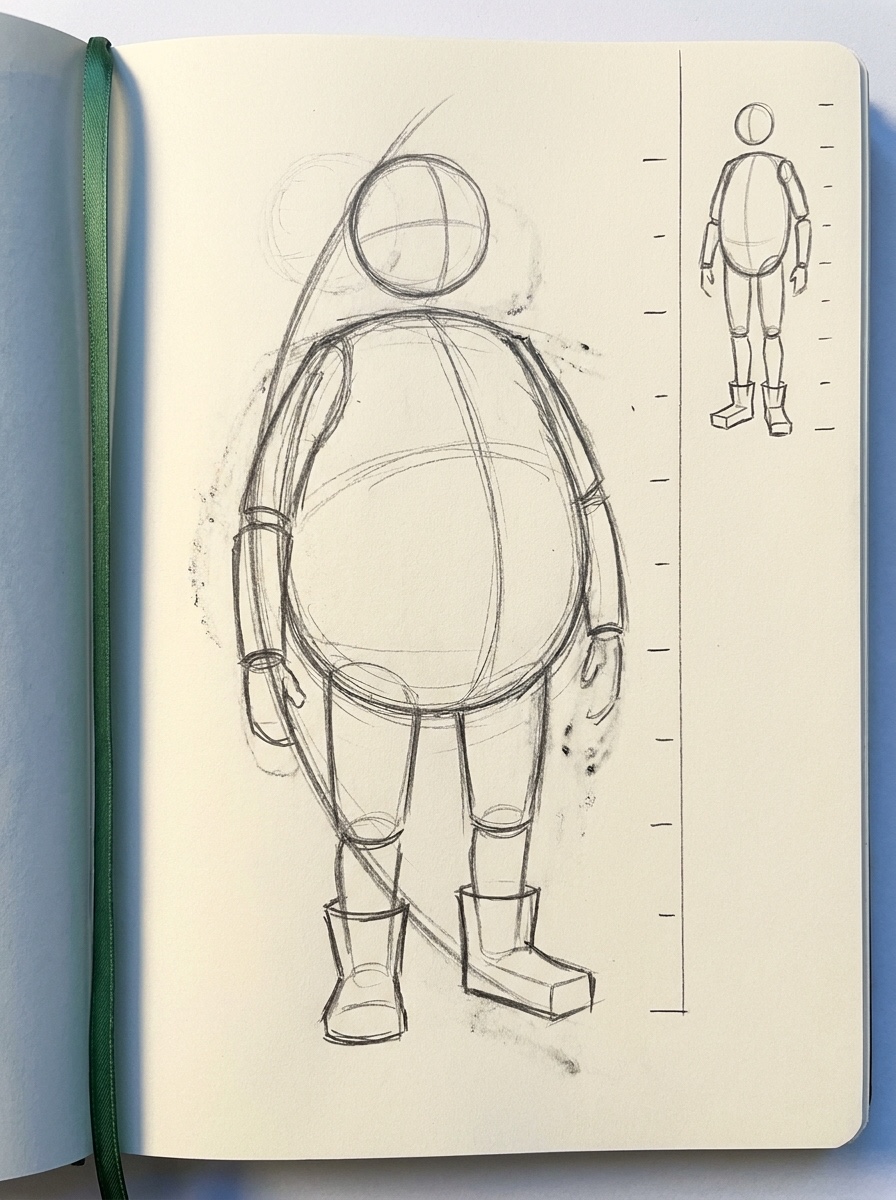
Draw one curved gesture line from the top of the head to the planted foot. Let it arc back slightly to balance the belly. Then block in three masses: a circle for the head, a large egg for the torso and belly, and two short cylinders for the legs. For a cute Santa drawing, make the egg nearly as wide as it is tall.
Checkpoint: the full figure measures three to four head heights for a cartoon, or six and a half to seven for a realistic figure.
Step 2: Head circle, centerline and eye line
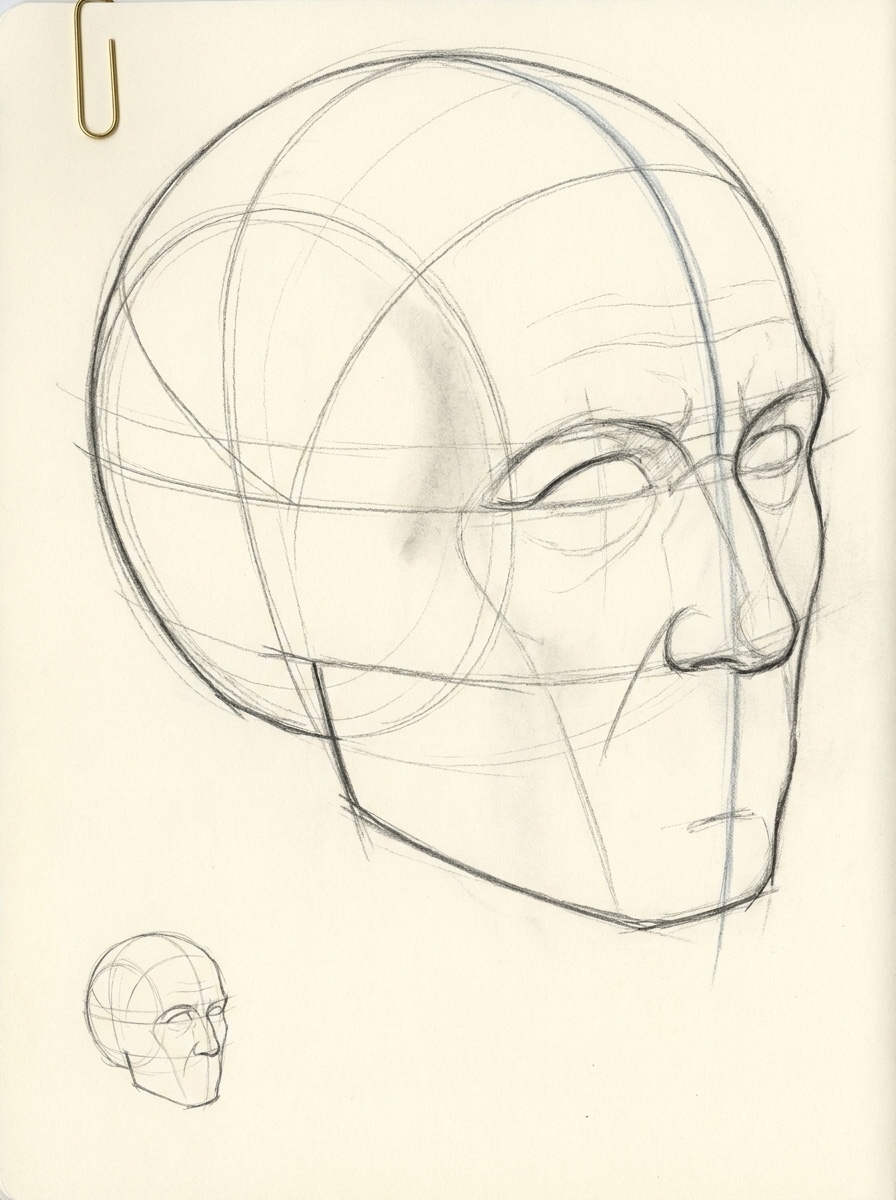
Draw the cranium as a ball with a short jaw block hanging below, then wrap a centerline around both to show which way the head turns. Add the eye line as a curve across the middle of the whole head, not the middle of the ball. On a three-quarter view both lines bend; that bend makes the head round.
Think of these lines as section lines, the cross-contours product sketches use to show a form’s volume. Every feature you place later sits on these two curves.
Checkpoint: the eye line sits roughly halfway between the top of the skull and the chin. Most beginners place it too high.
Step 3: Nose, cheeks, moustache and face placement
Place the nose as a rounded wedge that starts at the eye line and ends roughly halfway to the chin. Put two cheek circles beside it, level with the lower half of the nose. The rosy cheeks push up into the lower eyelids and create Santa’s smiling squint.
Now draw the moustache as two heavy commas starting under the nose and sweeping out across the cheeks. It sits on top of the upper lip and partly covers the mouth.
Checkpoint: the moustache’s widest point is wider than the nose but stays inside the outer edge of the face on an easy Santa face drawing.
Step 4: Beard silhouette as one large form
Start at the sideburns in front of the ears, run down the jaw, and drop into a broad U or shield that ends on the upper chest. The beard has thickness, so let its outer edge sit outside the jaw, not on it.
Break the outline with four to six large wavy clumps rather than dozens of little ones. Big clumps read as volume; tiny scallops read as a cloud.
Checkpoint: the beard covers the neck completely, and its bottom edge is lower than the shoulders.
Step 5: Hat brim first, then cone and pom-pom
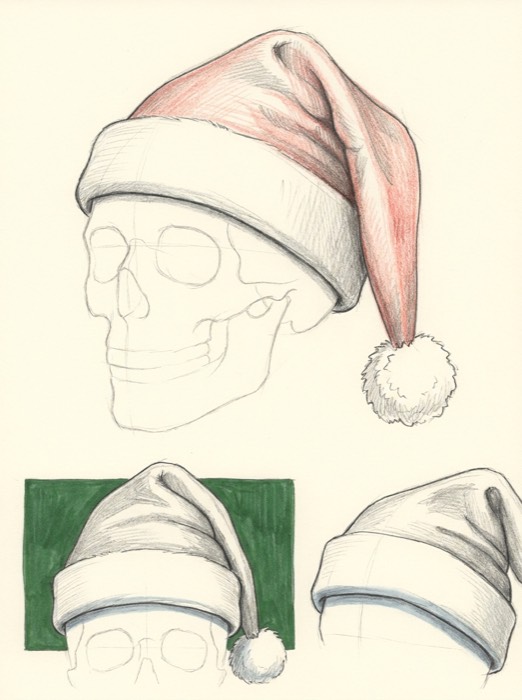
The hat is where a lot of Santa drawings go wrong. People draw a triangle on top of the head. Instead, draw the brim as a thick band that wraps around the skull, roughly across the upper forehead.
Then build the floppy hat cone from the top of the brim, let it rise, and fold it over to one side so the tip hangs near the shoulder. Add the pom-pom as a soft ball with a broken edge.
Checkpoint: the hat wrap rule. The brim’s bottom edge curves the same direction as the eye line, and it hides the top of the ears or sits just above them.
Step 6: Coat, belt, arms, gloves and boots
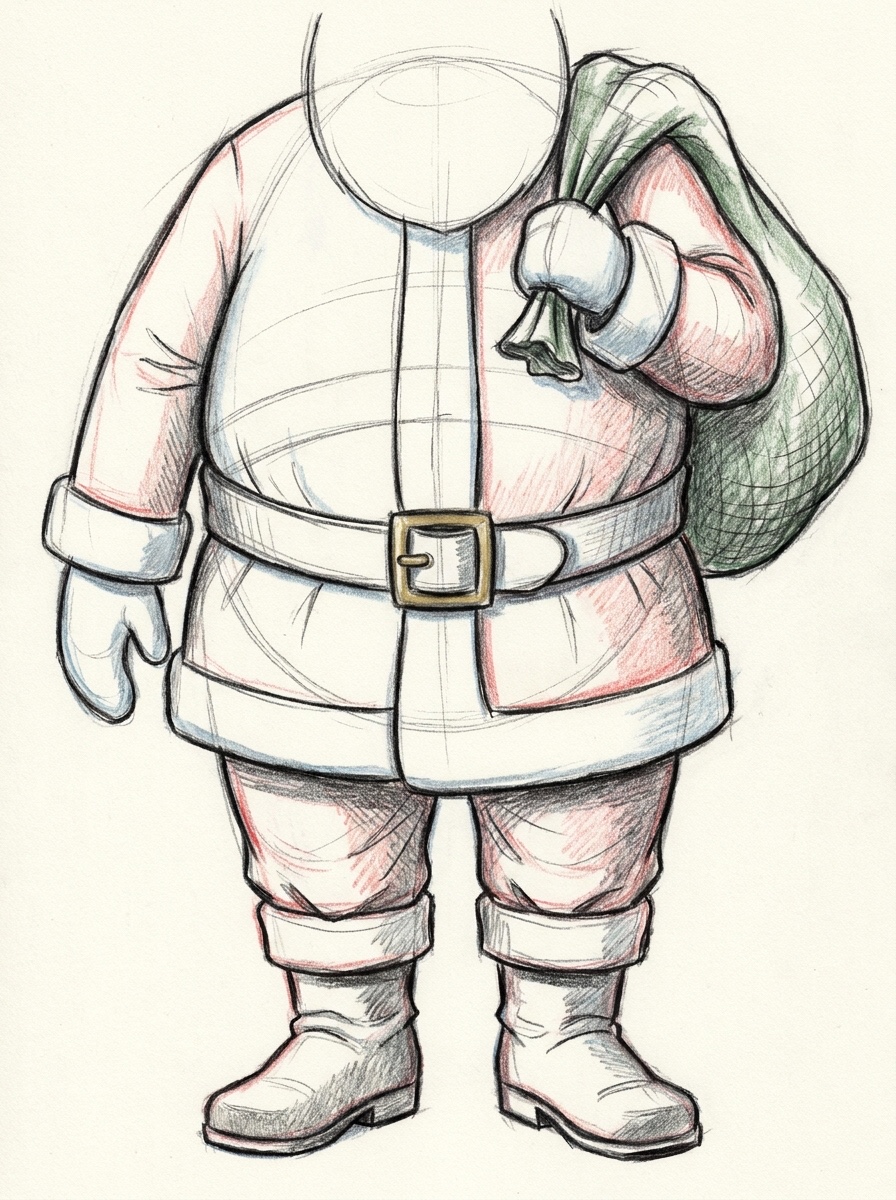
Wrap the belt around the torso egg as a curved band near the widest part of the belly, with a square buckle on the centerline. Add the white trim down the front of the coat and around the hem, cuffs and boot tops. Arms are tubes that taper into mitten-shaped gloves, and the boots are short, heavy wedges with flat soles.
An optional gift sack goes over one shoulder as a lumpy pear shape. It adds a strong diagonal.
Checkpoint: if you’re looking slightly down on Santa, the belt curves down at the front like a shallow smile.
Step 7: Refined contour, overlaps and line weight
Now switch to a 2B and choose your final lines. Make overlaps explicit: the moustache over the beard, the beard over the coat, the arm over the sack. The front line runs through; the back line stops at it.
Use heavier lines on the shadow side and under forms, lighter lines on top planes and inside the beard. For an easy cartoon Santa, this is where you ink and erase the construction.
Checkpoint: squint at the drawing. The outer silhouette should be the strongest line on the page.
Step 8: Three-value map before graphite or color
Lay tracing paper over the drawing and sort every shape into three groups: light (beard, trim, pom-pom), middle (skin, red suit in light) and dark (belt, boots, suit in shadow, eye sockets). Shade them flat with no blending. If the three groups don’t read clearly here, rendering won’t fix it.
Checkpoint: the beard and the coat trim are separated by a thin band of middle value, usually the shadow under the beard.
Taking the same construction realistic
For a realistic Santa, keep every step but adjust the proportions. Shrink the head relative to the body and lengthen the face below the eye line. Then add structure: brow ridge, cheekbones, a slight sag under the eyes and nasolabial folds that disappear into the moustache. The construction lines stay identical.
Santa face drawing: keep the features inside the beard
A Santa face drawing fails in a specific way: the eyes and nose float on a white blob, and the beard looks pasted on like a costume. The cause is drawing the beard first and fitting the face into whatever space is left.
The face-within-the-beard method
Draw the full head as if Santa were clean-shaven: jaw, chin, mouth corners and the line where the jaw meets the neck. Keep those lines faint. Then draw the beard as a thick layer over that skull, about half a nose-length beyond the jaw at the sides and two or more below the chin.
Hair sits on top of bone, so the skull has to exist before the beard can wrap it. The hidden jaw tells you where the beard bends and how far the moustache can droop. Our portrait construction guide covers the skull in more depth.
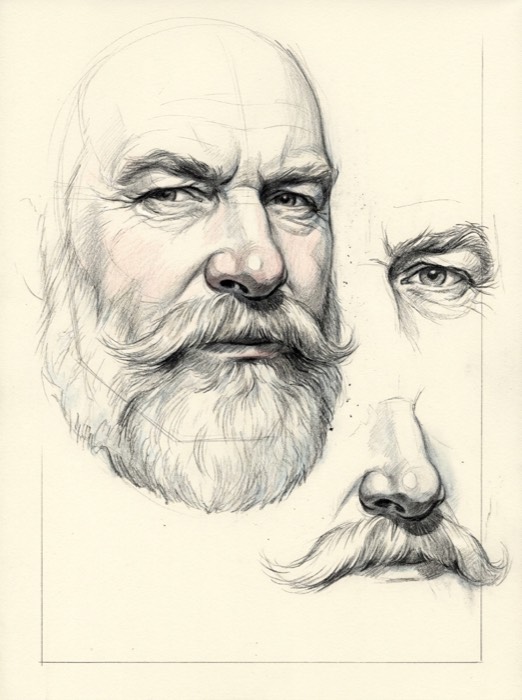
Santa’s eyes sit deep under a heavy brow. Draw the upper lid as a soft arch, then let the lower lid lift with the cheek so the eye narrows. Eyebrows are thick, bushy and angled down at the outer ends; they can overlap the hat brim’s shadow.
The nose is broad and fleshy with a round tip. Keep the nostrils small and dark, and shade under the tip rather than outlining it.
The moustache grows from the upper lip, so it sits in front of the beard and casts a small shadow onto it. Shade a thin dark band directly under the moustache’s lower edge. That one shadow fixes a pasted-on look faster than hair texture ever will.
Hat, beard and white trim
An easy Santa hat drawing still needs volume. The brim is a padded tube, so give it a top plane, a front plane and a soft shadow underneath where it presses into the forehead. The cone is fabric with weight; it should bend under gravity, with one main fold where it flops over and smaller compression folds on the inside of the bend.
The beard direction map
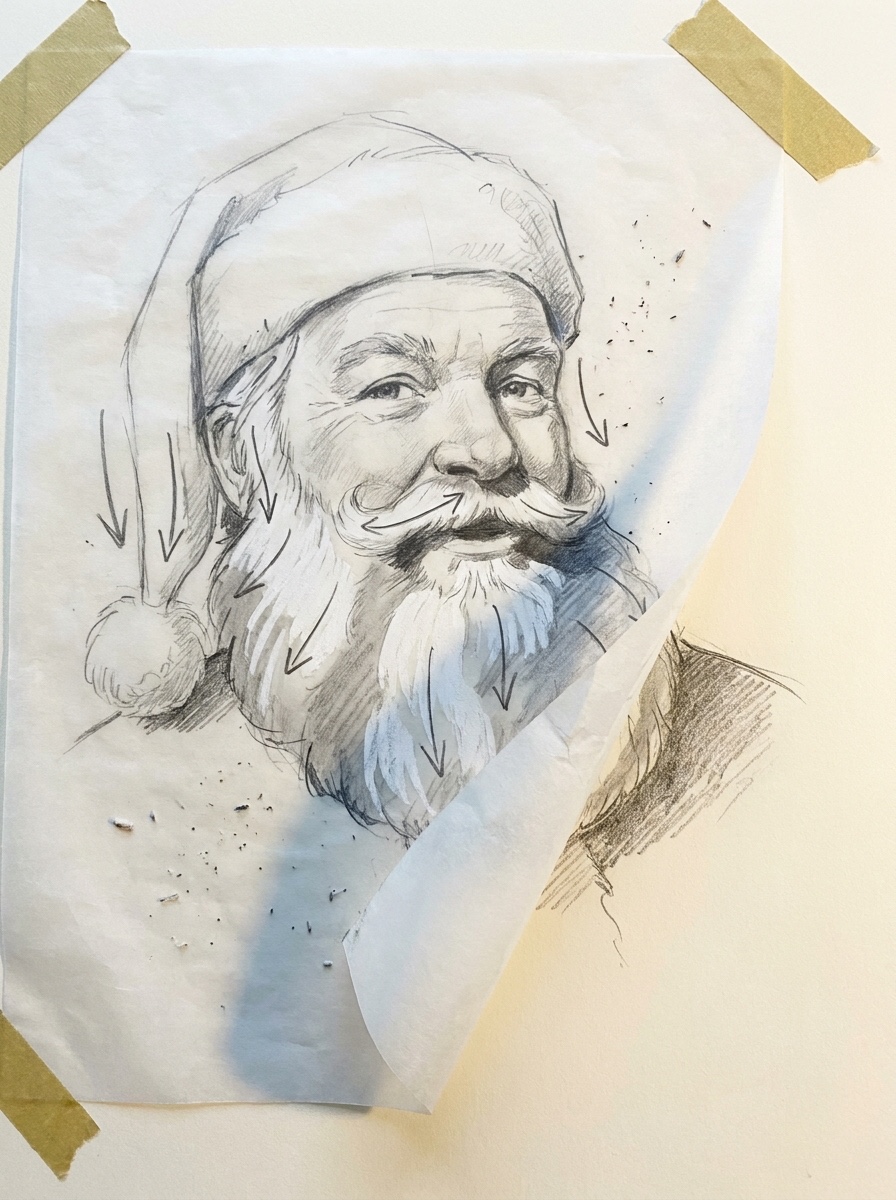
Before rendering hair, draw arrows on tracing paper showing which way the beard flows. Hair runs down from the sideburns, then out and down from the chin. The moustache flows outward from the center, a different direction from the beard below it, so it separates visually.
Shade the beard as an under-mass first: a soft middle value in the lower half and where it turns away from the light. Then add selective sharp hairs only at the edges of clumps, the silhouette and the light side. If every hair is sharp, nothing is.
White material still has shadows. The trim, beard and pom-pom need at least two values each, and their edges should vary: soft where fur turns away, crisp where it overlaps red fabric.
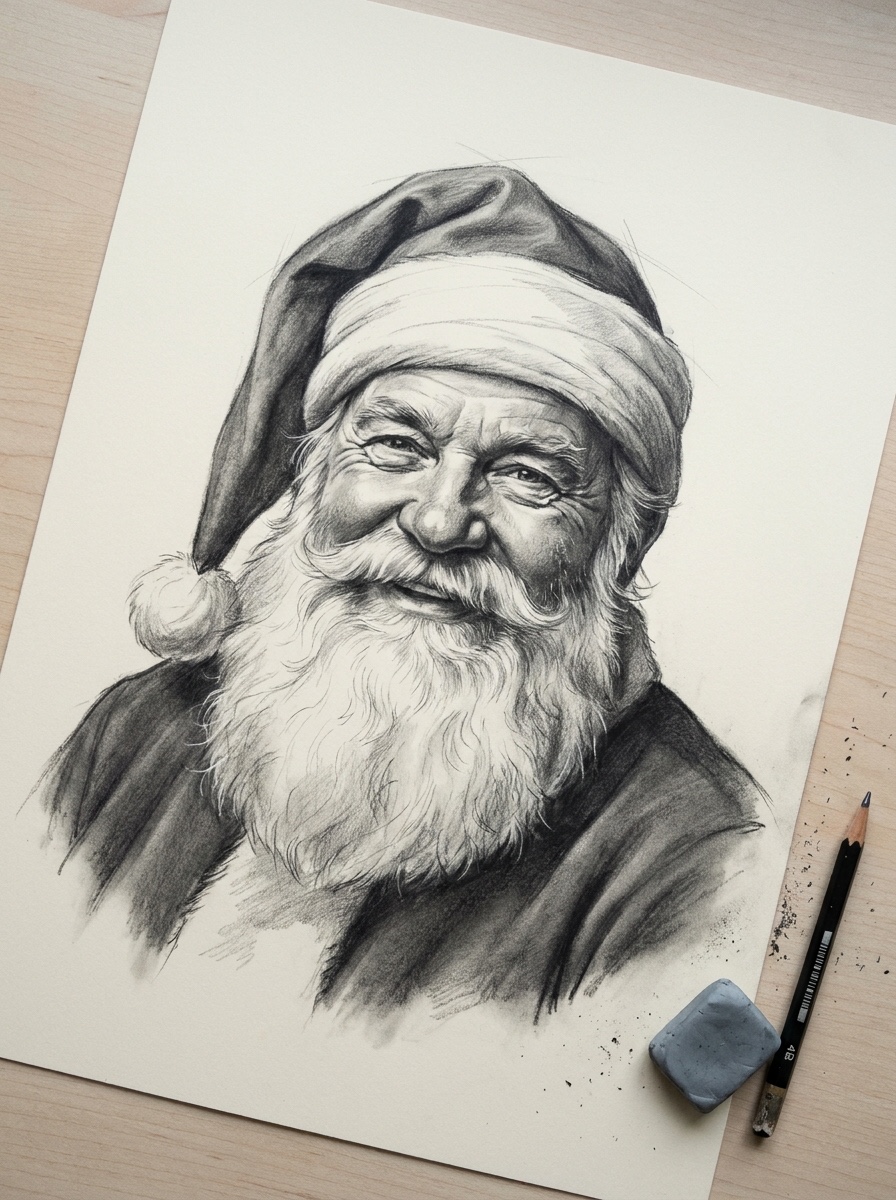
Graphite workflow for a Santa Claus pencil drawing
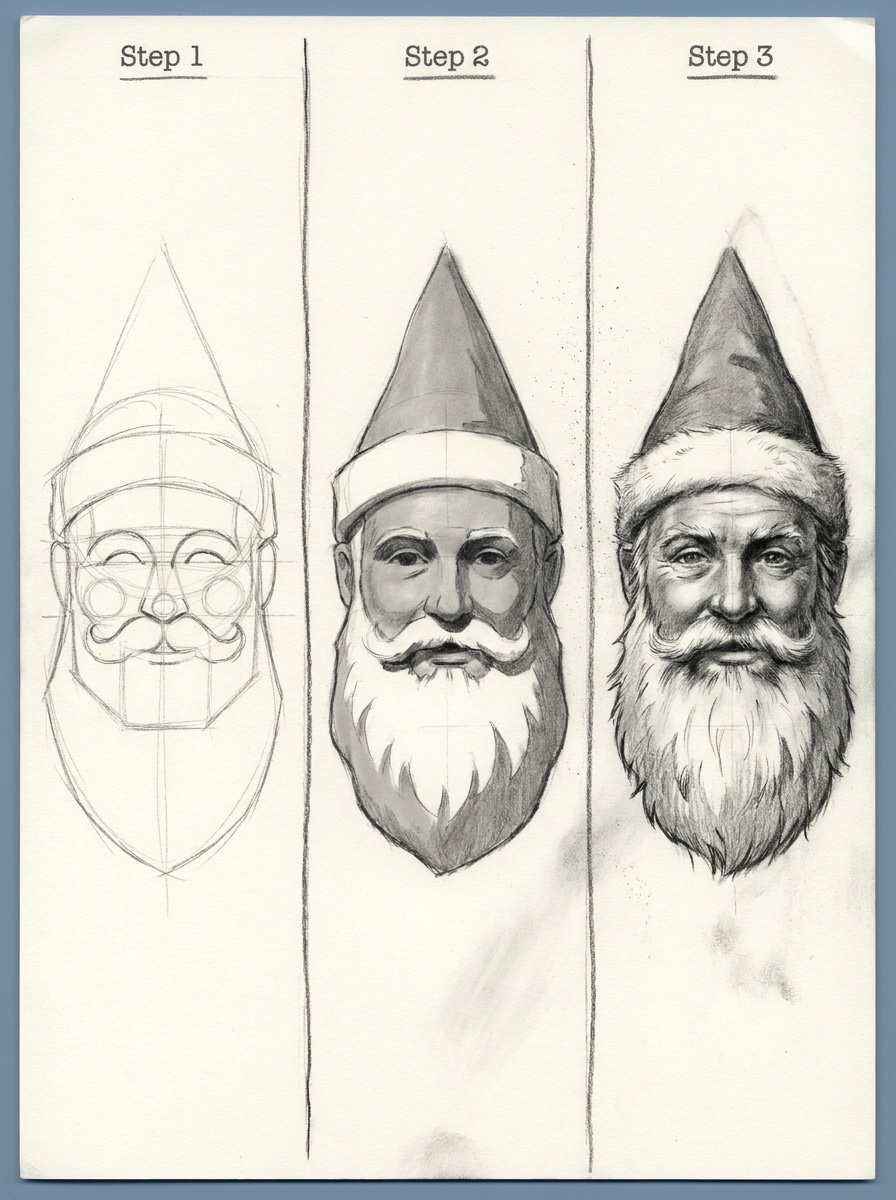
Work from your three-value map. Lay the middle group first with an HB in light, even layers: the suit, skin and shadow side of the beard. Then build the dark group with 2B and 4B, focused on belt, boots, eye sockets, nostrils and the core shadows in the coat folds. If layering still feels uneven, our guide to pencil shading techniques covers pressure control.
The beard’s light group should mostly stay paper. Shape it with the values around it: darken the suit right where the beard edge meets it, and the white reads brighter without you touching it. Lift highlights in the moustache and trim with a kneaded eraser pinched to a point.
Use lost edges where the beard meets similar values, like the soft shadow under the chin, and found edges where the white crosses the dark suit or the belt. A useful rule for portraits: keep the sharpest edge and the strongest contrast near the face, then let both relax toward the boots.
Final check: photograph the drawing and view it at thumbnail size. You should see exactly three clear value groups, and the face should hold the highest contrast in the frame.
Colored-pencil workflow for the red suit and warm face
Use a restricted palette: cream, peach, light pink, scarlet, crimson, burnt sienna, warm gray, indigo, dark brown and white. Names vary by brand, so match by hue rather than label.
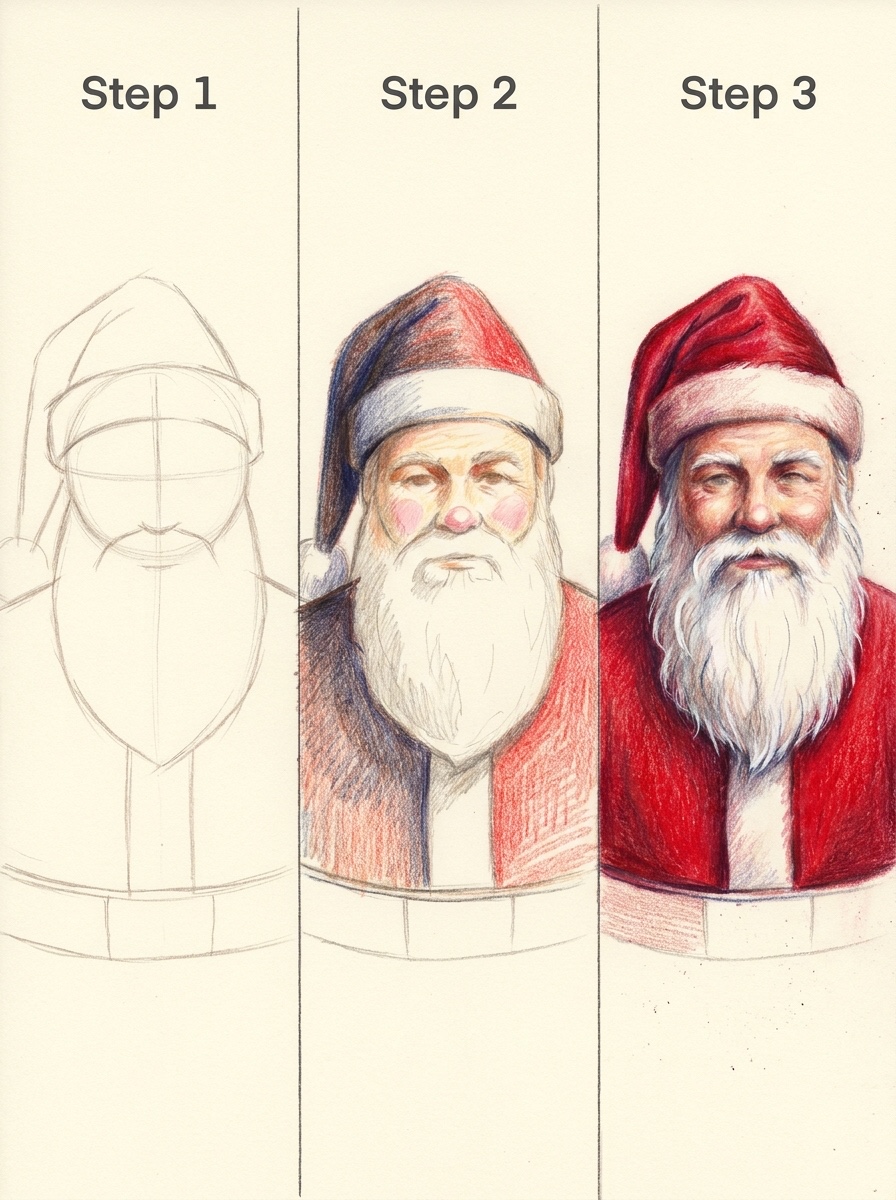
Start the face with cream and peach, then light pink on the cheeks, nose tip and lower lids. Shadow the eye sockets and under the nose with a light burnt sienna. Keep pressure low; early layers should look pale.
For the red suit, avoid flat red by layering temperature. Underpaint the shadow side with indigo or dark brown, then lay scarlet over the lit planes and crimson into the turning edges and folds. The dark underlayer gives depth without black, which tends to deaden red.
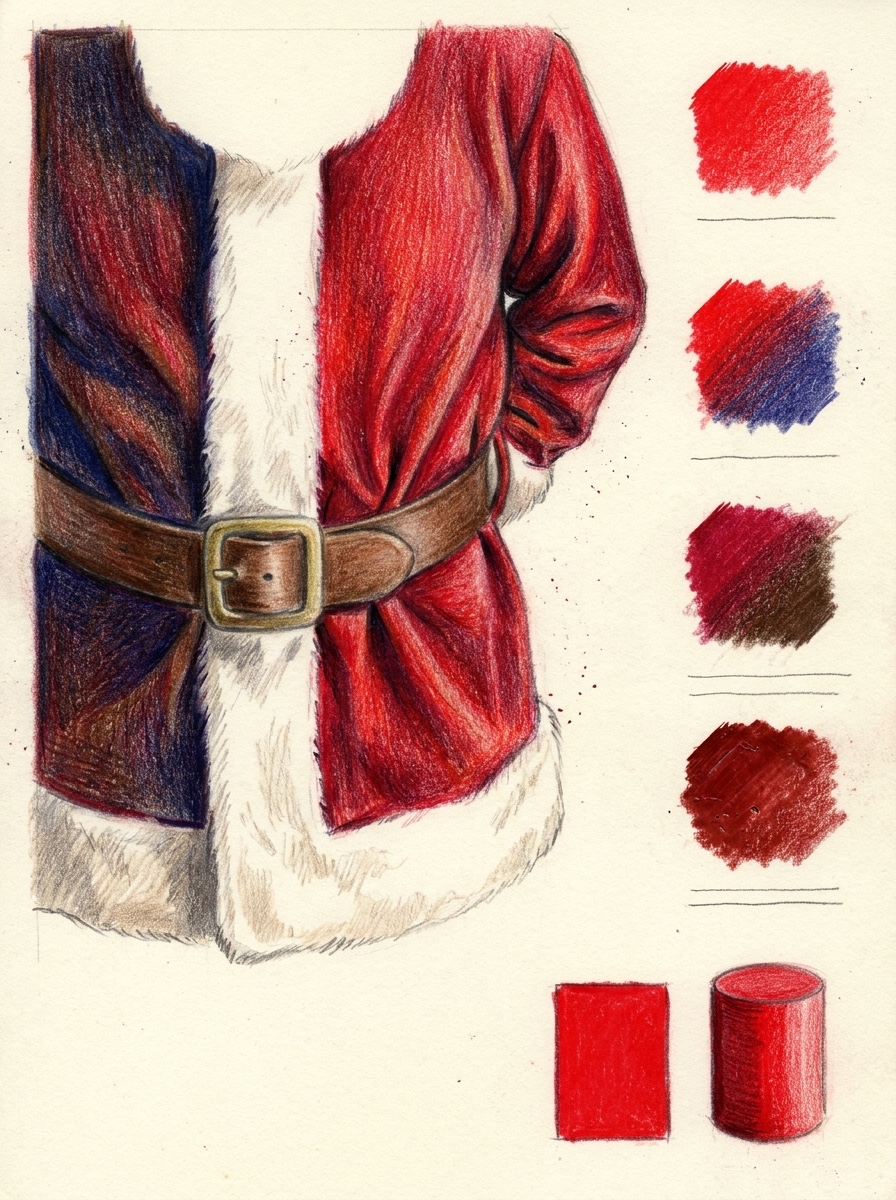
Leave the beard, trim and highlights as paper for as long as possible. Model the white areas with warm gray in the shadows and a whisper of indigo where they turn away from the light. Don’t press white over a gray patch to fix it; that’s how white turns dirty.
Burnish last: once the suit has enough layers, go over the red with firm scarlet or a colorless blender to fill the paper tooth. With wax-based pencils, stop when the surface turns glossy, then touch white lightly onto the beard’s lit edges. Our colored pencil blending guide covers burnishing in more detail.
Four correction cases
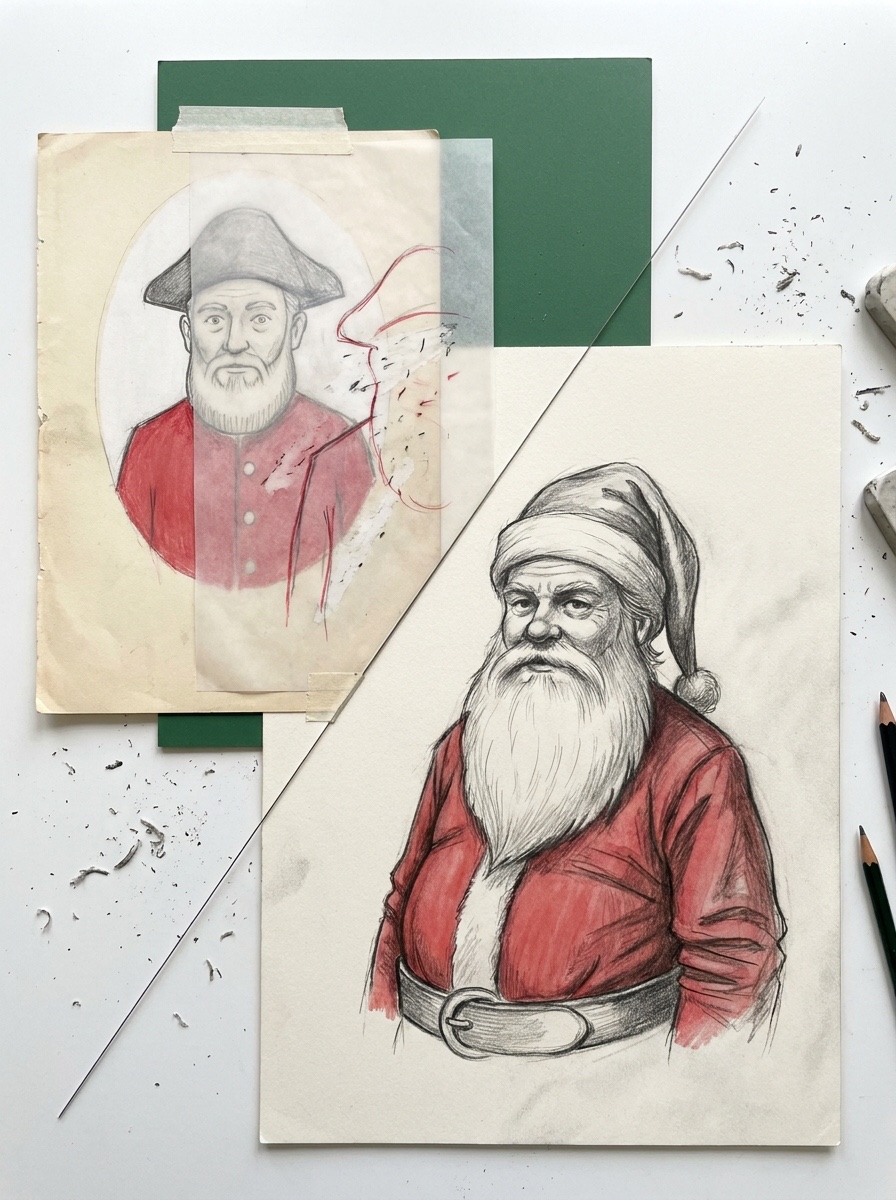
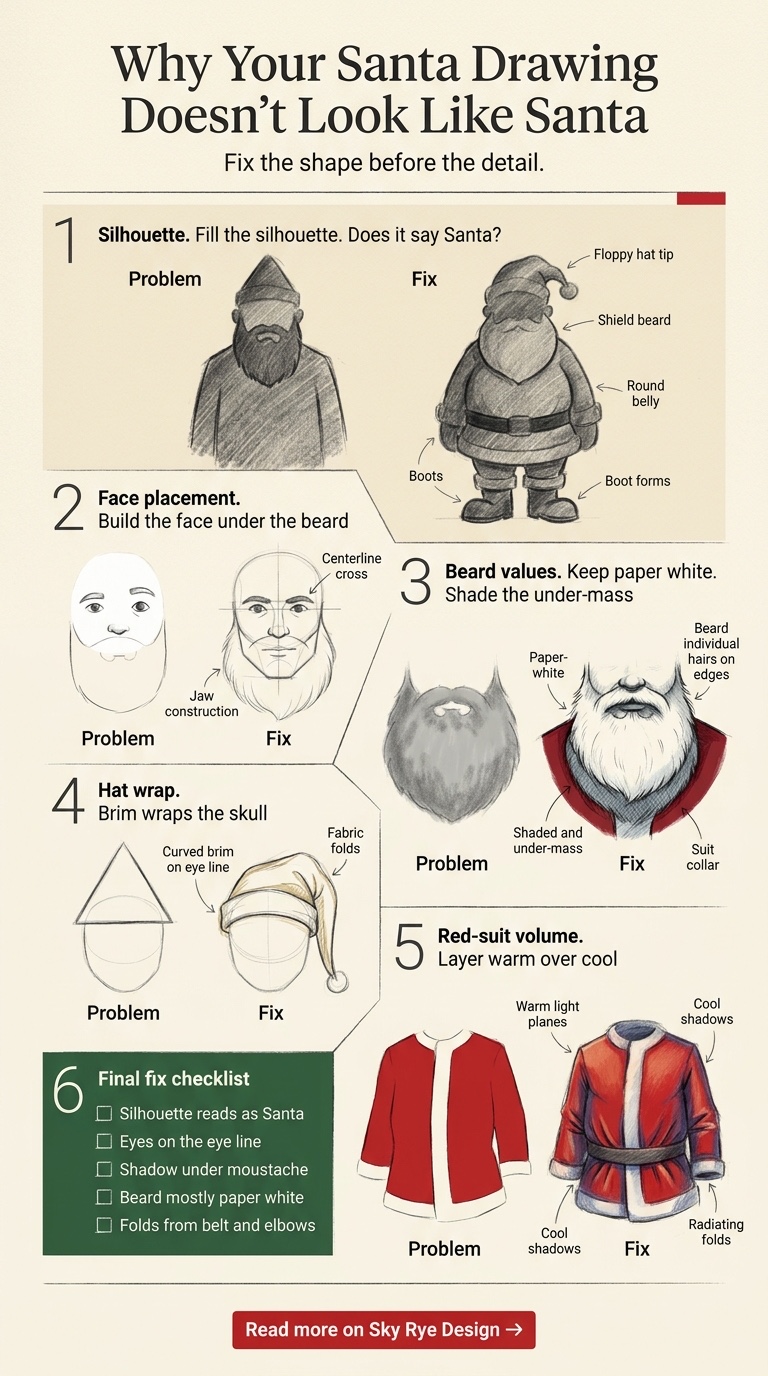
Case 1: Santa looks like a generic bearded man
Symptoms: a friendly old man in a red hat, but nobody would name him Santa from a distance. Likely cause: the beard follows the jaw, the hat sits flat and the body is a straight column. Fix: run the silhouette-fill test, then enlarge the beard into a chest-length shield, flop the hat tip to one side and widen the belly so the belt can curve.
Case 2: Facial features float inside the beard
Symptoms: eyes and nose look stuck on a white oval, with no sense of a head underneath. Likely cause: the beard was drawn first, and the eye line doesn’t follow the head’s turn. Fix: redraw the clean-shaven skull lightly, re-place the eye line on the centerline cross, and add the shadow under the moustache and in the eye sockets.
Case 3: The white beard turns into gray mud
Symptoms: the beard is evenly gray, smudged, and darker than the skin. Likely cause: too much blending, a soft pencil used across the whole mass and no paper left white. Fix: lift the light group back with a kneaded eraser, keep shading only in the under-mass and push darker values into the suit around the beard edge instead.
Case 4: The red suit looks flat
Symptoms: Santa’s coat reads as a red cutout with no form. Likely cause: one red pressed at even pressure, with no shadow side and no folds. Fix: mark the light direction, put dark underlayers on the shadow side, and draw three or four folds that radiate from the belt, elbows and shoulders. Our guide to drawing fabric folds shows the main fold types.
Practice drills and a seven-day plan
Four drills, each ten to fifteen minutes:
- Silhouette thumbnails: twelve Santas at two inches tall, filled solid.
- Head rotation: six head constructions turning left to right, each with centerline and eye line.
- Beard clumps: one beard drawn three times, with four, eight and sixteen clumps.
- Red swatches: a cylinder in red colored pencil, once flat and once layered over indigo.
- Day 1: drills 1 and 2.
- Day 2: steps 1 to 7, cartoon proportions.
- Day 3: drill 3 and the face-within-the-beard method.
- Day 4: hat studies from three angles, checking the wrap rule.
- Day 5: a realistic Santa sketch with a three-value map.
- Day 6: graphite finish of the Day 5 drawing.
- Day 7: drill 4, then a colored-pencil Santa drawing from your Day 2 construction.
On Day 7, pin your Day 2 drawing beside the Day 6 graphite and fill both silhouettes on tracing paper. If the newer one reads as Santa faster and its face sits inside the beard, the construction is sticking. If not, repeat Days 3 and 4 before adding more rendering.
How to draw Santa FAQ
Is learning how to draw Santa Claus hard for beginners?
No. An easy Santa Claus drawing uses circles, an egg, a U-shaped beard and a bent cone, so beginners can get a recognizable result in one sitting. The harder part comes with realism, where proportions and white-on-white values matter. Start with the cartoon version and only move on once your silhouette passes the fill test.
How do I draw Santa’s face so it looks friendly?
Push the cheeks up into the lower eyelids so the eyes narrow into a smile, and angle the eyebrows down at the outer ends. Keep the eyes on the eye line, not above it. A curved mouth isn’t required; the cheeks and squint carry most of the expression, especially when the moustache hides the lips.
How do I draw a white beard on white paper?
Let the paper be the lightest value and build the beard with what surrounds it. Shade the under-mass with HB or warm gray, darken the suit and skin right against the beard edge, and add sharp hairs only at clump edges. Lift graphite highlights with a kneaded eraser instead of adding white on top.
Which pencils do I need for a Santa sketch?
An HB, a 2B and a 4B cover a full Santa sketch. Add a kneaded eraser and smooth or medium-tooth drawing paper. For color, any artist-grade set with the ten hues listed above will do; Polychromos and Prismacolor Premier are two common options with different handling.
How do I color Santa’s suit without it looking flat?
Layer temperature instead of pressing one red harder. Put indigo or dark brown under the shadow side, scarlet on the lit planes and crimson in the folds and turning edges. Leave the white trim as paper, then burnish the red last so the layers fuse into one deep, varied red.
What makes a drawing read as Santa instead of an old man?
Exaggerated, stacked masses. Santa needs a beard that covers the neck and reaches the chest, a hat that wraps the skull and flops to one side, a round belly with a curved belt, and alternating light and dark bands from hat to boots. Get those right and even a classroom Santa directed drawing reads instantly.
Final takeaway
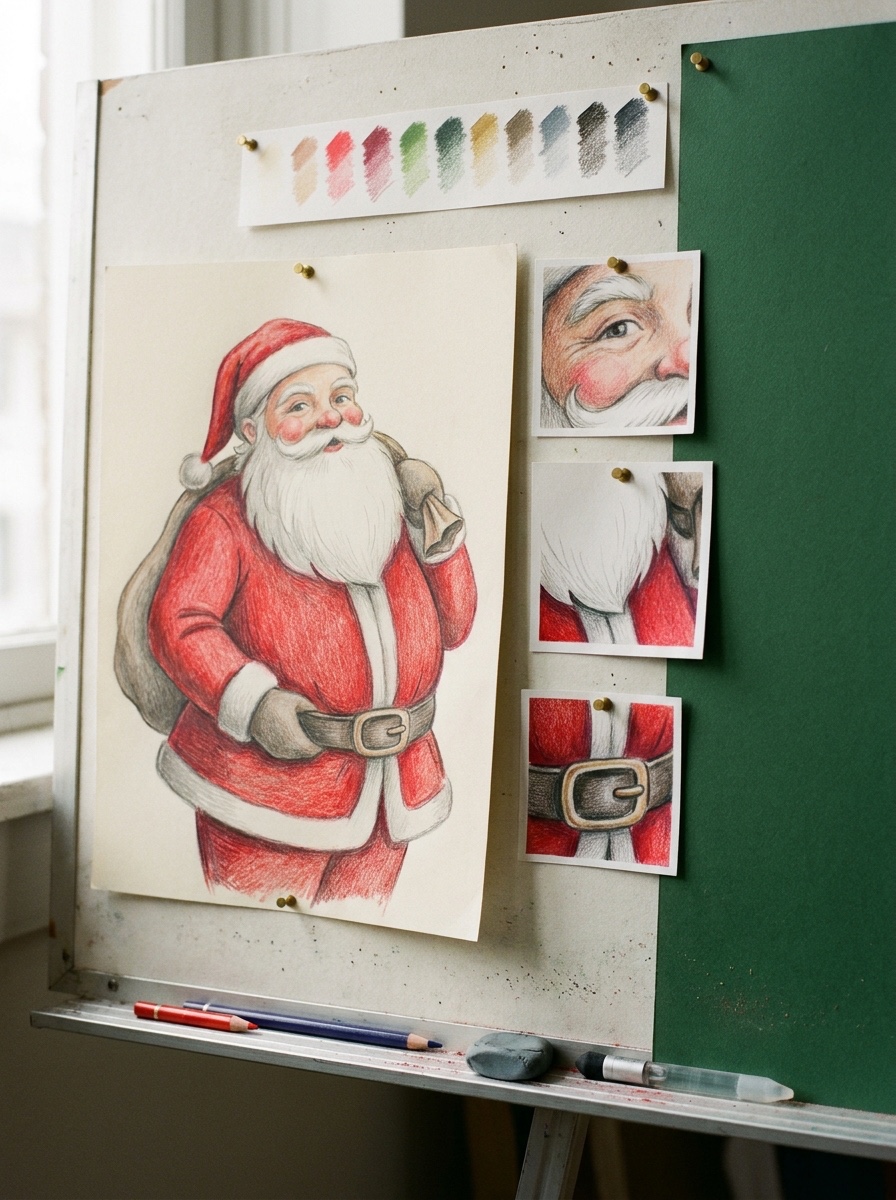
Your next drawing: one Santa, cartoon proportions, HB only. Stop after step 6 and run the silhouette-fill test before you refine a single line. If the black shape says Santa, finish steps 7 and 8, then pick graphite or colored pencil. If it doesn’t, fix the beard, hat and belly masses first; texture can wait.
Once that version holds up, carry the same construction into a realistic Santa drawing, or branch out with our easy Christmas drawing ideas.
- 0shares
- Facebook0
- Pinterest0
- Twitter0
- Reddit0