Camaro drawing works best when you build the car the way it sits on the road. Start with the ground line, then add a perspective box, a centerline, two shared axles, and four wheels that match. Only after the silhouette reads as a Camaro should you add the grille, headlights, and reflections. Once the stance and wheels are right, the details almost place themselves.
- What Makes a Camaro Recognizable
- Tools and Setup
- How to Draw a Camaro in 7 Steps
- Easy Camaro Drawing: The Side-View Method
- Perspective and Wheels: Why Camaro Drawings Float
- 1969 Camaro vs. Sixth-Generation ZL1: Same Name, Different Construction
- Graphite Workflow: From Light Guides to Dark Accents
- Colored-Pencil Workflow for Glossy Paint
- Studio Exercises You Can Repeat
- Troubleshooting: Symptom, Cause, Fix
- A Realistic Practice Plan
- Common Mistakes and Corrections
- Camaro Drawing FAQ
- Keep Drawing, Diagnosing, and Repeating
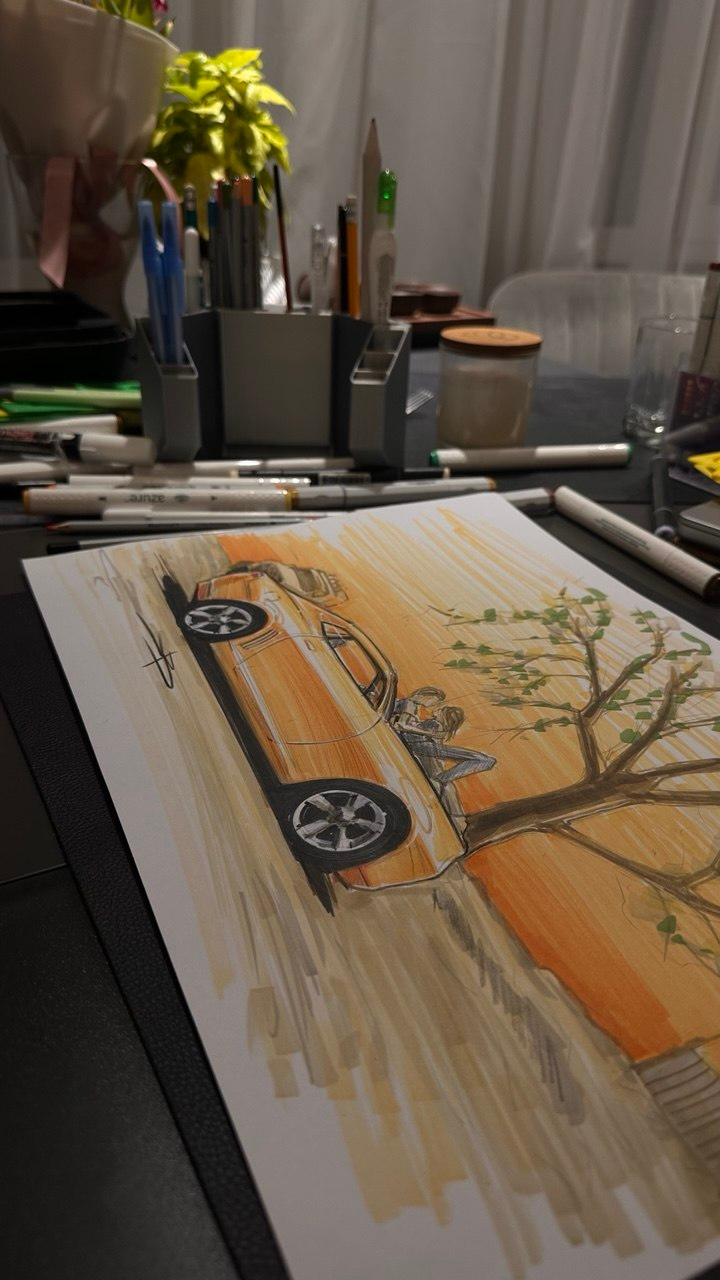
I’m Vlad, a Kyiv-based designer and art director. I trained in academic drawing and have worked professionally for more than 15 years, including on automotive concepts and on the first Ukrainian electric-vehicle concept. That work left me with one habit I use on every car sketch: before a car is anything else, it is a box sitting on wheels. This guide applies that habit to the Camaro, from a quick side view to a glossy colored-pencil finish.
A note on references. Chevrolet announced that sixth-generation Camaro production would end, which made the 2024 model year the last of that generation. In this guide, “modern Camaro” means the sixth generation, such as the ZL1, not any future model. Chevrolet’s Camaro legacy page is a good starting point for generation references.
What Makes a Camaro Recognizable
Before you pick up a pencil, decide what you’re trying to capture. A Camaro reads through a small set of relationships. Get those right, and even a rough sketch is recognizable from across a room.
Proportion and planted stance
The Camaro sits low and wide, with its wheels pushed toward the corners. Stance describes how the body relates to the ground and wheels: how much tire shows and how closely the body sits over it. A planted stance makes the wheels look like they carry weight. Flatten the tire contact slightly, keep the body close to the tire tops, and avoid big empty gaps in the wheel arches.
Long hood, short deck
This is the classic pony-car layout. The hood runs long ahead of the cabin, the cabin sits back toward the rear axle, and the trunk is comparatively short. When a Camaro sketch looks like a family sedan, the cabin is almost always too far forward. Compare hood length to cabin length before drawing anything else.
Shoulder line and body side
The shoulder line is the main horizontal crease or highlight along the upper body side. On Camaros it tends to swell over the rear wheel, giving the car a muscular hip. Draw it as one confident stroke. A shaky shoulder line makes the whole car look soft.
Grille and headlight relationship
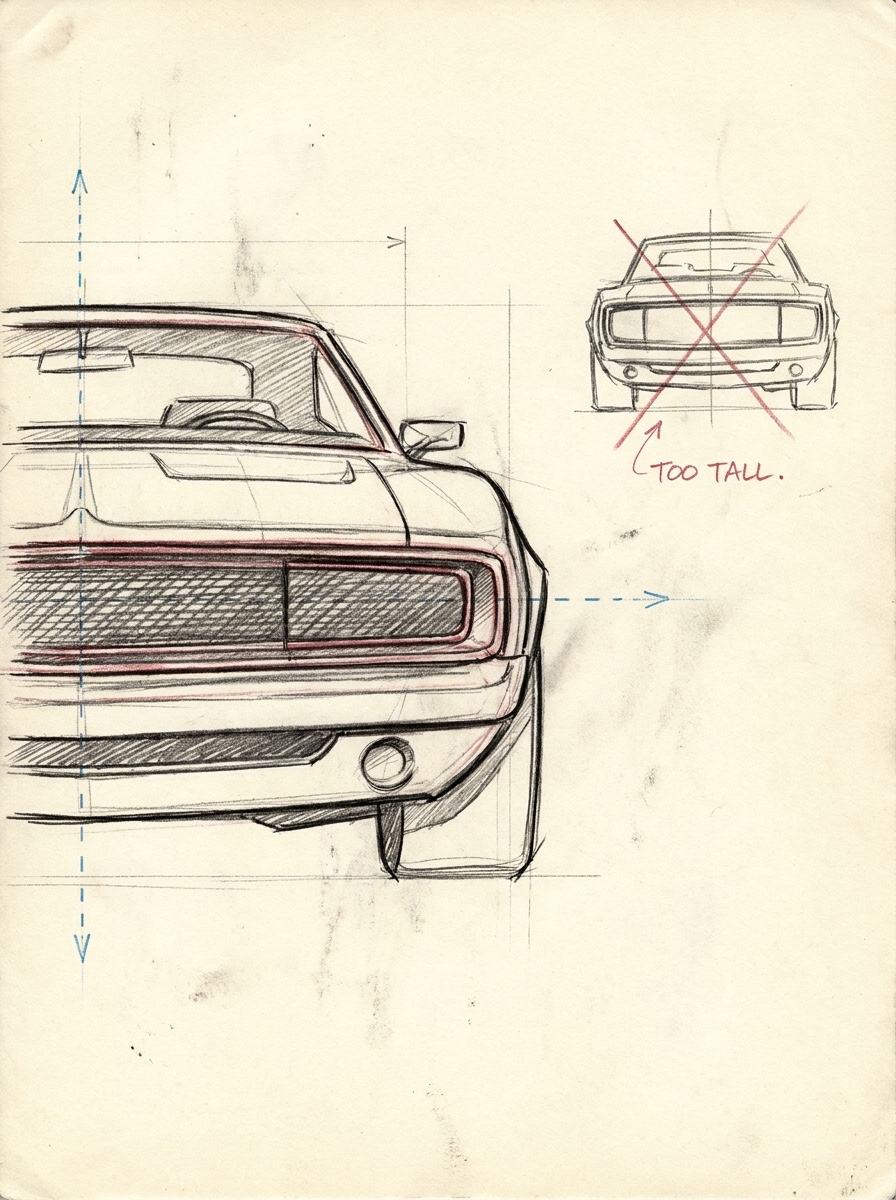
From the front three-quarter view on many Camaros, the headlights and grille read as one wide horizontal band rather than separate features. Keep that band low and wide. If the lights drift upward or the grille grows tall and narrow, the face loses its character.
Wheel-to-body balance
Wheel size relative to body height changes a lot between eras. Classic Camaros show more sidewall and more body above the wheel. The sixth generation fills its arches with large wheels on low-profile tires. There’s no single Camaro template, so choose one generation per drawing and stay with its proportions.
Tools and Setup
You need a few reliable tools and one good reference.
Graphite and paper
I use three pencil grades: a 2H for construction, an HB for structure, and a 2B or 4B for dark accents. Harder leads stay light and erase cleanly, which matters because the first lines exist to be corrected. Choose a smooth or medium-tooth drawing paper of roughly 150 gsm or heavier. Very rough paper breaks up reflections, and very slick paper makes graphite shiny and hard to layer.
Erasers and guides
Keep a kneaded eraser for lifting tone and a precision eraser pen for crisp highlights. A ruler helps with the ground line and perspective box. An ellipse guide is optional. Learn to draw ellipses freehand first, or the guide becomes a crutch that hides axis errors.
Colored pencils
Wax-based and oil-based colored pencils both work. You’ll want a red family (light warm red, primary red, deep crimson), a few cool and warm grays, black, a white for burnishing, and a colorless blender if you have one. For another paint color, use the same structure: light, mid, and deep versions plus neutrals.
Choosing a reference
Look for a photo with a clear three-quarter angle, both near-side wheels visible, and simple lighting. Avoid wide-angle shots taken close to the car; they distort the nose and make the wheels mismatch. A photo taken from a distance at roughly standing height gives the most honest proportions. Chevrolet’s newsroom also has a June 2023 Camaro release worth reading for context.
How to Draw a Camaro in 7 Steps
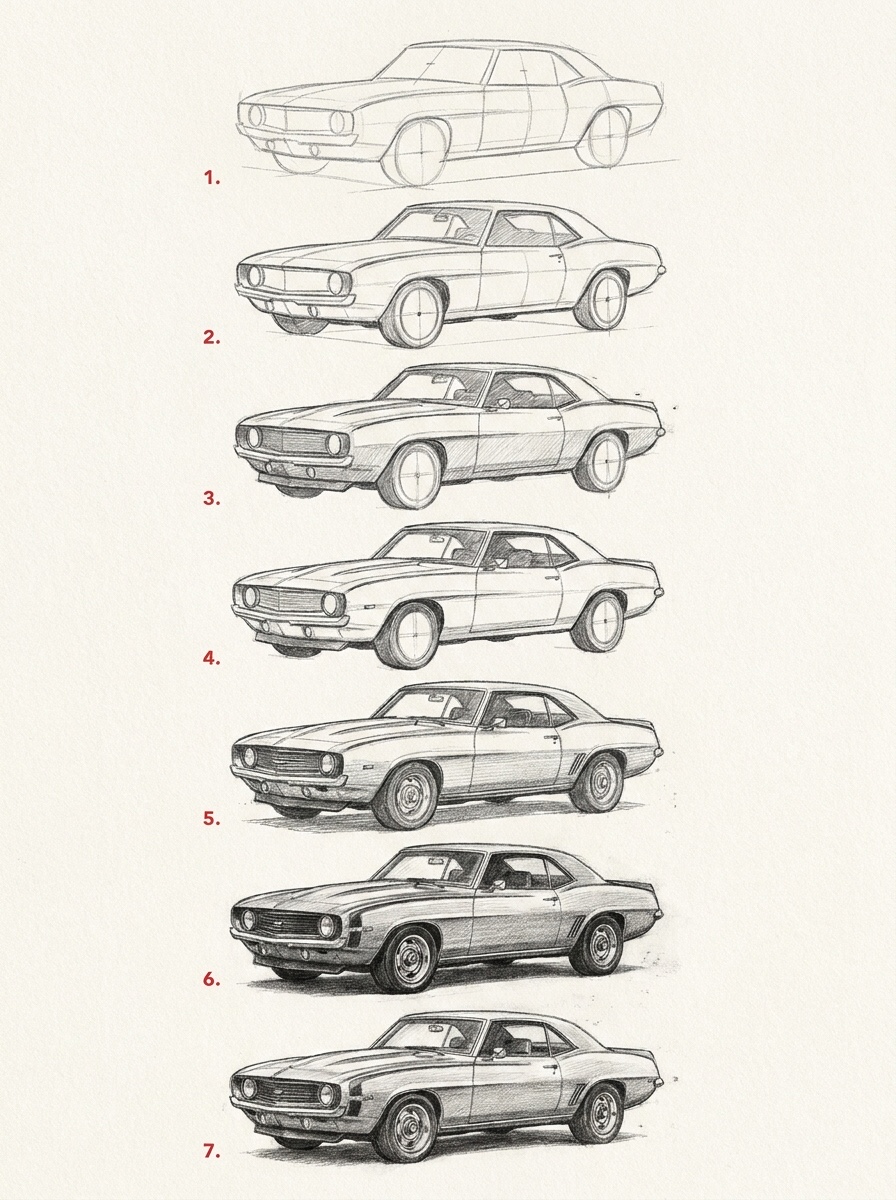
This is the core construction. Keep your pressure light through Step 5, and darken only after the structure passes its checks.
Step 1: Gesture and ground line
Draw a horizontal ground line, then one loose gesture line for the car’s sweep from nose to tail. Mark the front and rear limits with small ticks. Check: Does the car fit the page with margin on both sides? Fix the length now, because everything else scales from it.
Step 2: Perspective box
Draw a simple box for the car to sit inside. For a three-quarter view, use two-point perspective with both vanishing points well off the page, so the car doesn’t look stretched. Keep the box low, because a Camaro is much longer than it is tall. Check: Do the box edges converge toward their vanishing points consistently?
Step 3: Centerline
Draw a centerline down the top and front of the box. In perspective, the near half looks wider than the far half. This line will place the grille, hood bulge, and roof. Check: Does the centerline split the front face in perspective, not by ruler measurement of the flat page?
Step 4: Axles and wheels
Draw two axle lines across the box, front and rear, each running toward the same vanishing point as the box’s width edges. Mark hub points where the axles meet the body sides, then draw the wheels as ellipses around those hubs. Check: Compare the two near-side wheel diameters. They should be close, with the farther one slightly smaller. Then measure the wheelbase in relative units, such as how many wheel diameters fit between the hubs, and compare it to your reference.
Step 5: Body masses
Carve the body out of the box. Block in the hood, the cabin (designers call it the greenhouse), and the rear deck as simple planes. Add the shoulder line and wheel arches, keeping each arch concentric with its wheel. Check: Measure the overhangs, the body length ahead of the front axle and behind the rear axle, as fractions of a wheel diameter. Then run the silhouette test: squint, or imagine the outline filled solid. Does it read as a Camaro?
Step 6: Generation-specific details
Now add the face, lights, vents, mirrors, and wheel design. Anchor each detail to the construction: headlights on the front plane, grille on the centerline, mirrors at the base of the A-pillar. Put the most detail near the viewer and simplify toward the far side.
Step 7: Values, reflections, and cleanup
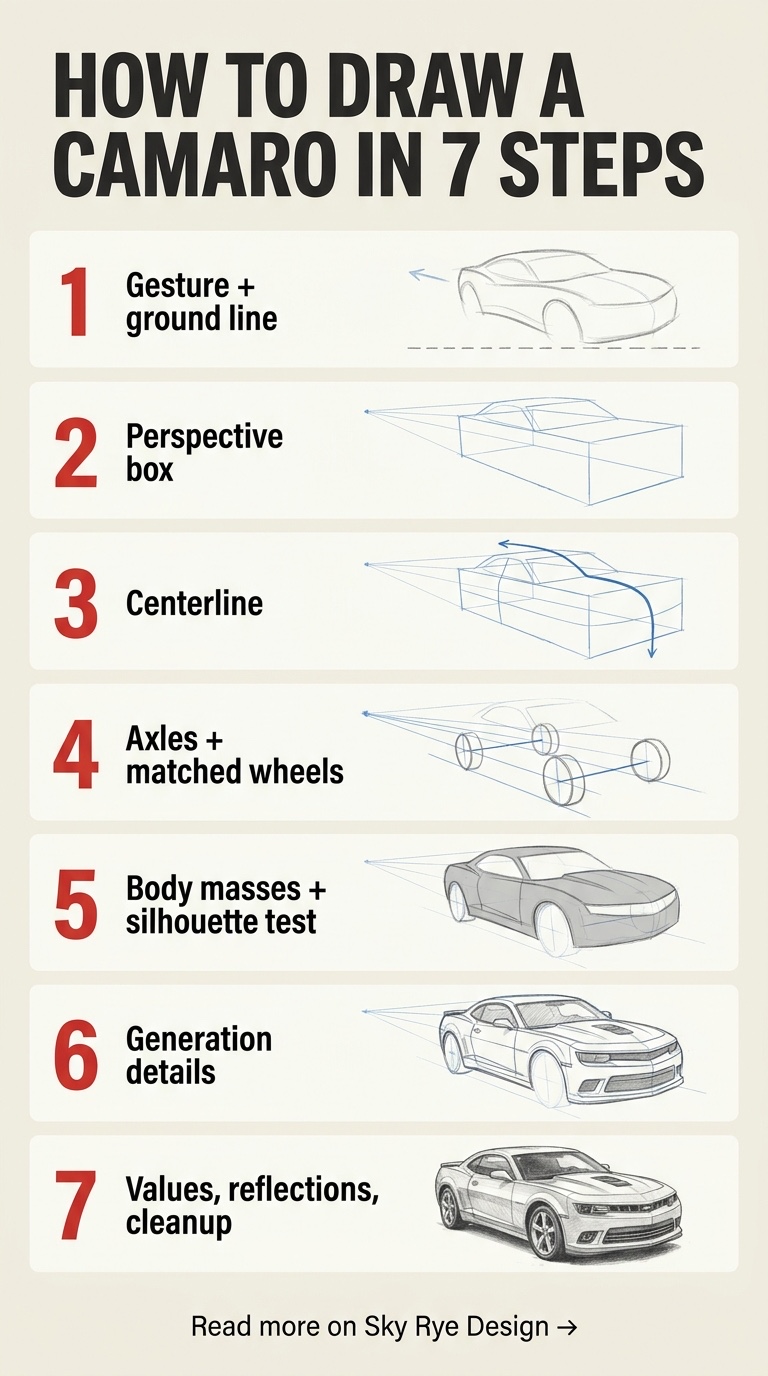
Separate the drawing into three values: light on top planes facing the sky, mid on the body sides, and dark on tires, openings, and the underbody shadow. Add the reflection band along the body side, then darken the accents, including tire shadows and the ground contact shadow. Erase leftover construction, except faint lines that add energy. Check: Does the car still read from across the room?
Easy Camaro Drawing: The Side-View Method
If perspective feels like too much, start with a side view. It removes ellipses entirely and lets you focus on proportion.
- Draw the ground line and two equal circles for the wheels. A coin or circle template works fine.
- Measure the gap between them in wheel diameters and match it to a side-view reference.
- Draw a long, low rectangle overlapping the top third of the wheels. This is the body.
- Shape the nose and tail overhangs, keeping both short compared with the wheelbase.
- Place the cabin toward the rear, with the windshield starting well behind the front wheel.
- Add the shoulder line, wheel arches, a door cut, and the mirror.
- Shade the tires dark and the body side mid-gray, leaving a light band for the reflection.
Then flip the page or hold it up to a mirror. Reversed, the proportion errors you’d stopped noticing become obvious.
Perspective and Wheels: Why Camaro Drawings Float
Most flat or awkward car drawings fail at the wheels. When I review a car sketch, I check the wheels first, because viewers notice wheel errors before anything else.
Shared axles
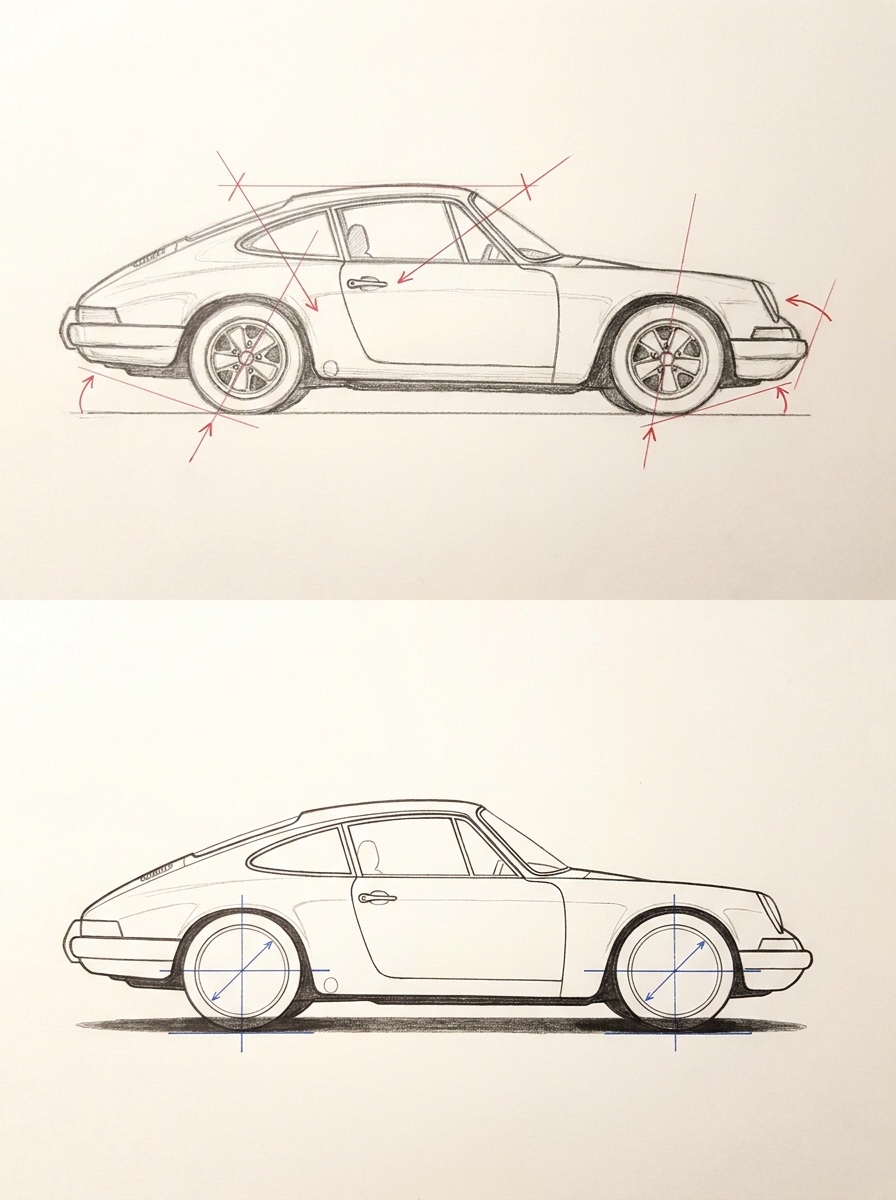
The front wheels share one axle and the rear wheels share another. Because the axles are parallel on the real car, in perspective they converge toward the same vanishing point. Draw them as straight guides through the hubs. If a hub sits off its axle line, the car looks broken.
Ellipse degree
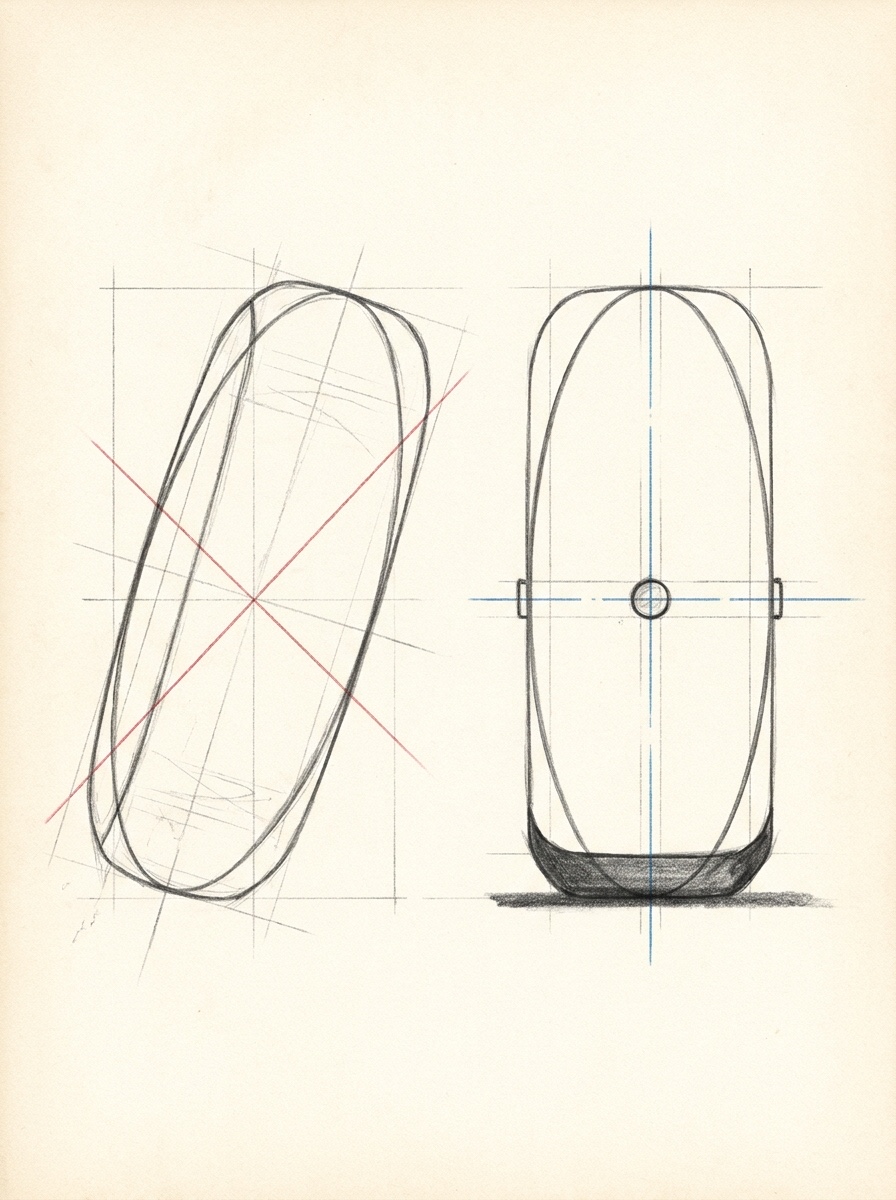
An ellipse’s degree describes how open it is. A wheel seen nearly edge-on is a narrow ellipse; one seen more directly is fuller. In a three-quarter view, wheels on the same side get slightly narrower as they recede toward the vanishing point. Keep that progression gradual. Each ellipse’s minor axis, its short axis, should line up with the axle. That one check fixes most wheels that look tilted.
Far-side wheels
You usually see only a sliver of the far-side wheels, often just a tire bottom under the body. Don’t leave them out. Extend the axle lines across the car and draw only the part that shows. Without them, the car looks like it’s balancing on two legs.
Contact patches
Tires flatten slightly where they meet the road. Draw a short, dark shadow at each contact point and a soft cast shadow under the body, or the car will hover.
Why wheels look mismatched
The usual causes are ellipses misaligned with their axles, near and far wheels narrowing in the wrong direction, a distorted photo, or a ground line that misses the tire bottoms. Quick test: draw a line touching the bottom of every visible tire. It should follow the ground plane in perspective.
1969 Camaro vs. Sixth-Generation ZL1: Same Name, Different Construction
Both cars are Camaros, but their visual logic is very different. I treat them as two separate construction problems.
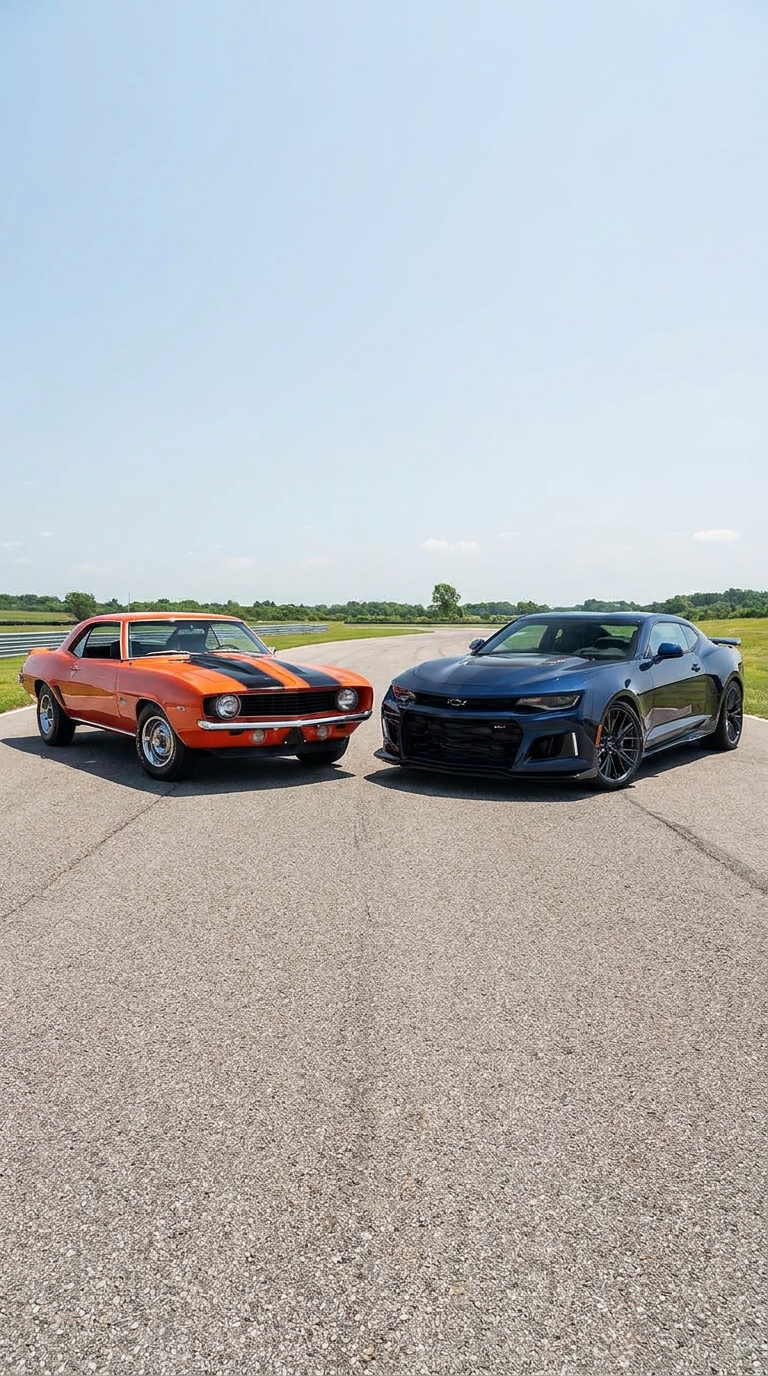
The 1969 Camaro
The first generation reads as slimmer and more open. Look for these cues:
- More glass and thinner roof pillars, so the cabin looks lighter.
- Calmer body sides with a defined hip over the rear wheel.
- A slim bumper and horizontal grille band, with round headlights on many versions (some trims hide them behind the grille).
- Smaller wheels with taller sidewalls, leaving more body visible above the tire.
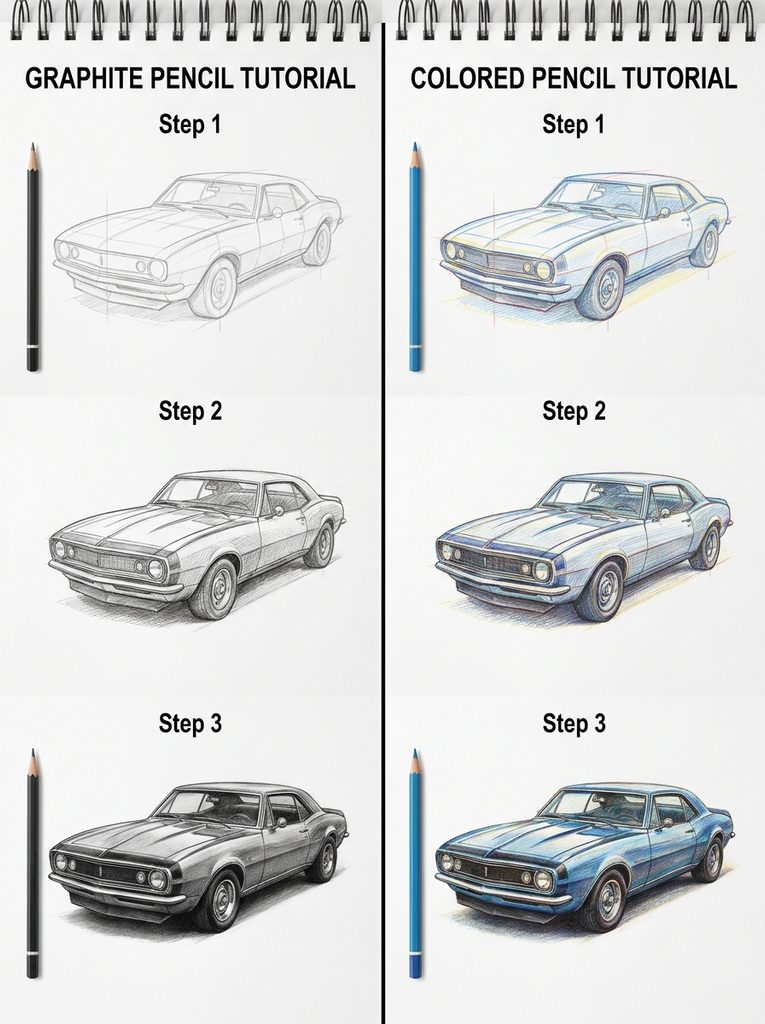
How the construction changes: use a slightly taller box relative to the wheels, and leave more space between the tire tops and the shoulder line. Keep lines crisp and fairly straight, since the surfaces are calmer than modern ones.
The sixth-generation ZL1

The ZL1 reads as compressed and aggressive. Look for these cues:
- A high beltline and short side glass, which make the cabin look chopped.
- Narrow headlights in a low, wide fascia with large lower openings.
- Sculpted surfaces with sharp creases and a pronounced rear hip.
- Large wheels on low-profile tires that fill the arches.
- Performance details such as hood venting and aero elements, which vary by model year, so confirm them on your reference.
How the construction changes: drop the greenhouse lower within the box, push the wheels out to fill the arches, and build the front as several stacked planes instead of one face. Expect more time on value shifts across the creases.
A conservative note on dimensions
I’m deliberately leaving out exact measurements, because proportions shift between trims, model years, and photographs. Measure your own reference in wheel diameters rather than trusting a number you can’t verify.
Graphite Workflow: From Light Guides to Dark Accents
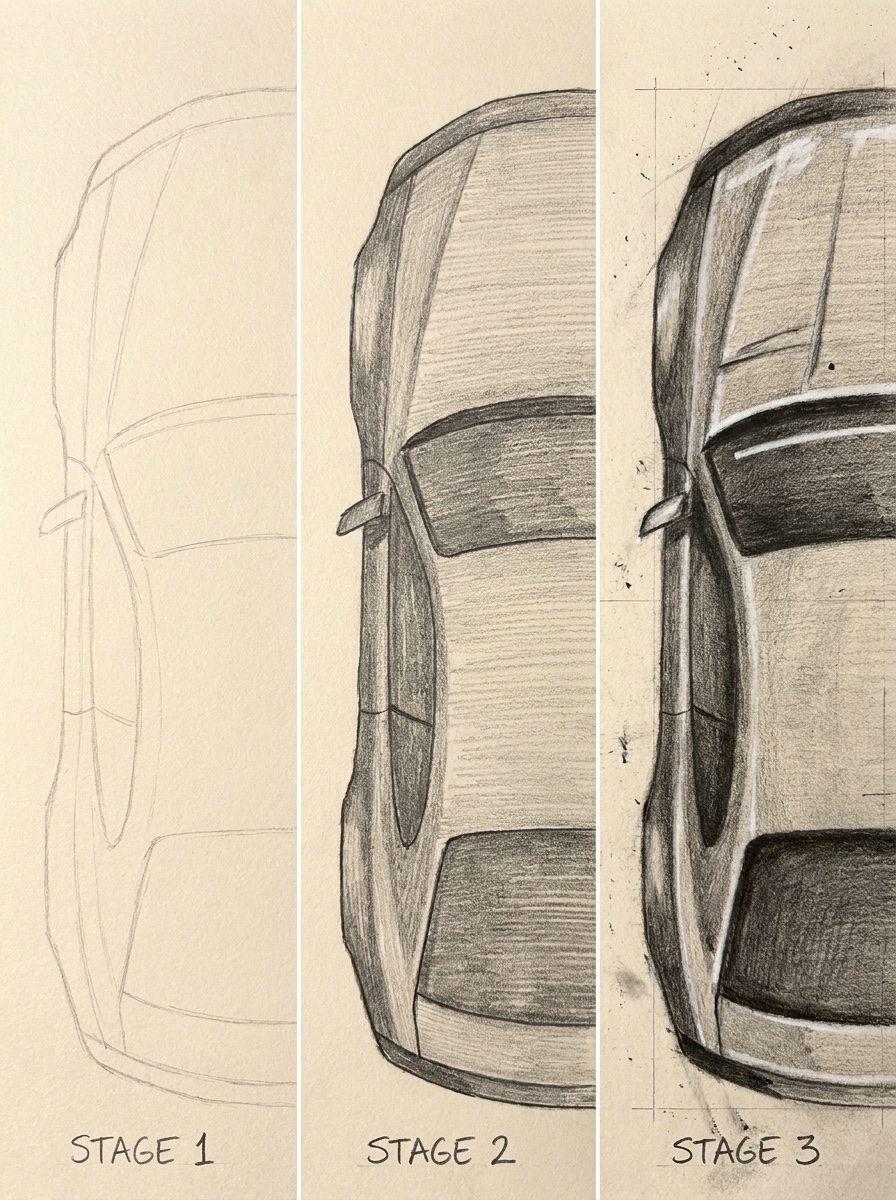
Stage 1: Light guides
Hold the 2H with almost no pressure and draw the box, centerline, axles, and ellipses. The lines should erase without leaving a ghost. Draw through the forms, including hidden edges, so you understand the full volume.
Stage 2: Structure and values
Switch to the HB. Firm up the silhouette and main lines with varied weight: heavier on bottom edges and near the viewer, lighter on top edges catching light. Then lay mid tones on the body sides with even, directional strokes. On flat sides, stroke horizontally. On curved hips, follow the curve.
Stage 3: Controlled accents and cleanup
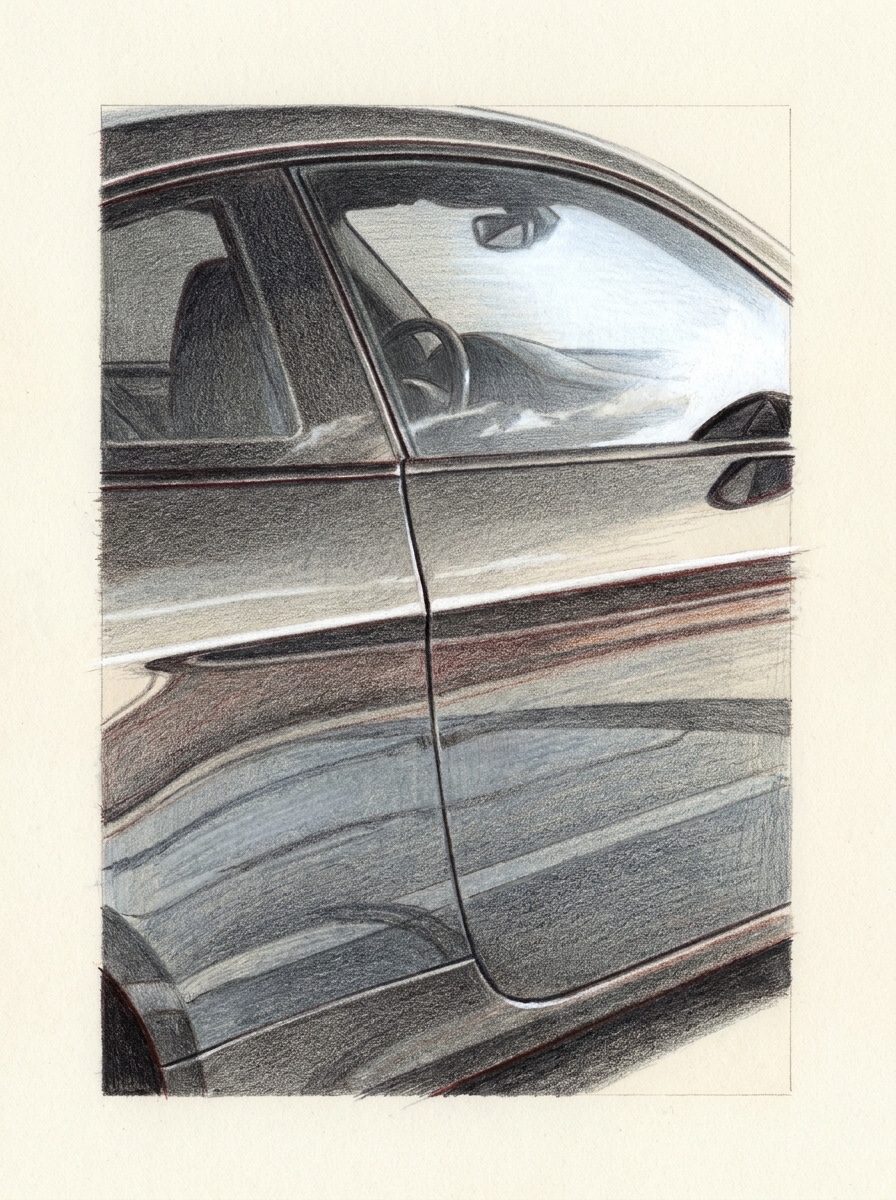
Save the 2B or 4B for the darkest areas: tires, wheel wells, grille openings, window interiors, and the contact shadow. Lift highlights with the kneaded eraser, then cut the sharpest ones with the eraser pen. Clean up the background. A few construction lines near the wheels can stay if they make the drawing feel engineered.
Colored-Pencil Workflow for Glossy Paint
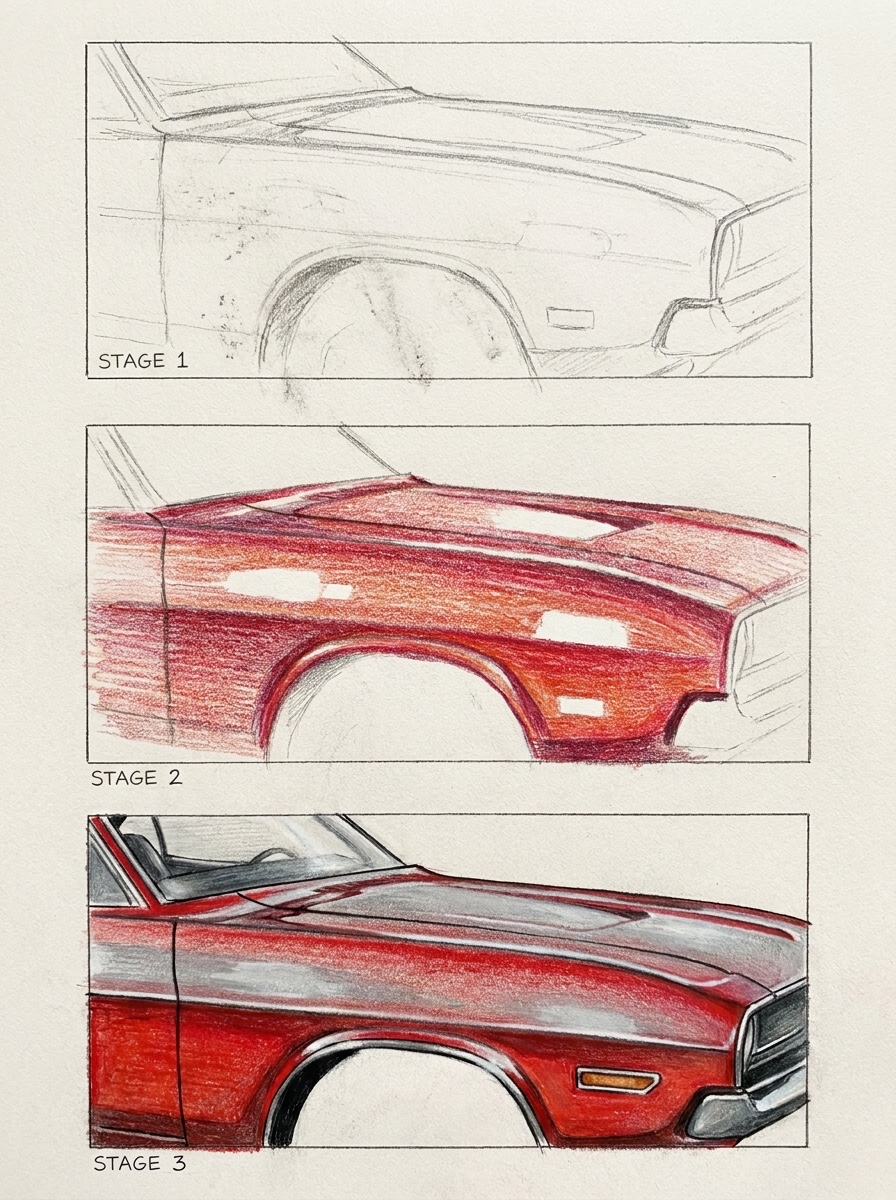
Glossy paint is mostly reflection. You aren’t coloring a red object; you’re drawing what the red surface reflects.
Stage 1: Underdrawing
Start with a light graphite drawing, or a light line in gray or your lightest red. Heavy graphite turns color muddy, so knead it back until it’s barely visible.
Stage 2: Controlled layers
Work in light layers. Lay the lightest red over every painted area except the brightest highlights, which stay paper white. Add primary red on the mid planes, then crimson on planes turning away from the light. Keep strokes directional, following each panel. Add cool gray reflections along the lower body sides, where the paint mirrors the road, and a darker band just below the shoulder line.
Stage 3: Reflections, accents, and burnishing
Add black to the tires, openings, and deepest reflections. Sharpen the horizon reflection line along the body side and keep it continuous across the door gaps. Only at the very end, burnish with white or a colorless blender to fuse the layers into gloss. Burnishing seals the paper tooth, so little can be added afterward.
Studio Exercises You Can Repeat
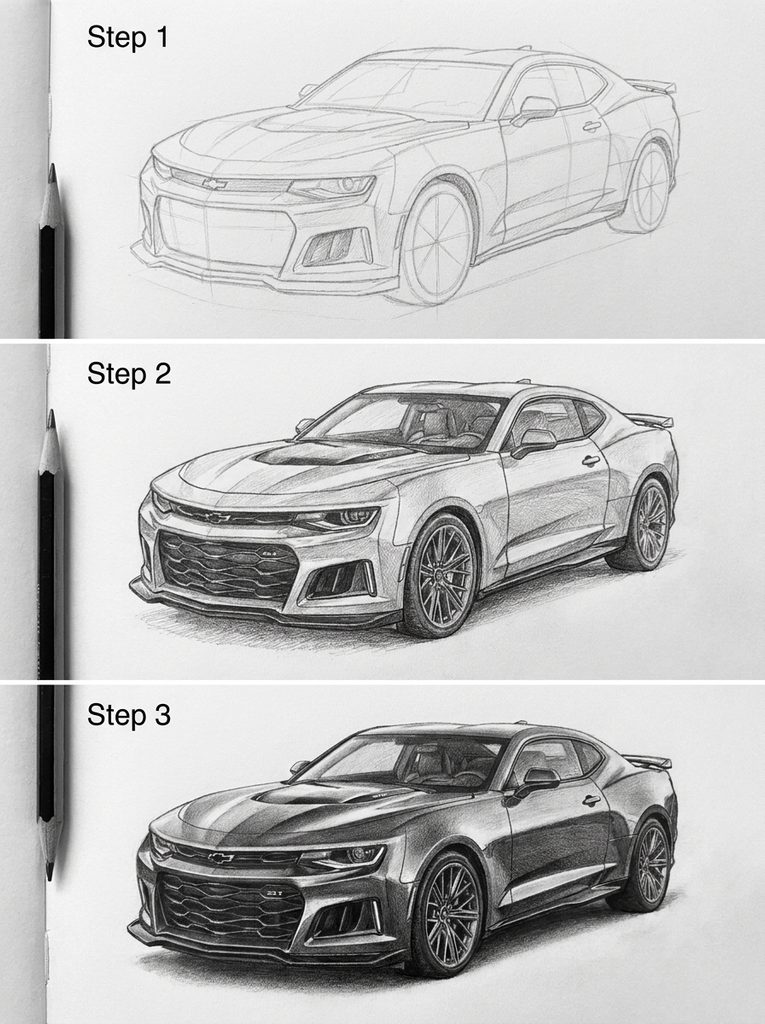
I use these drills to retrain my own eye. Each has a setup, an action, a check, and a learning outcome.
Exercise 1: The Two-Minute Silhouette Test
Setup: A side-view reference, a timer, and a soft pencil.
Action: In two minutes, draw only the filled silhouette of the car, with no interior lines or details.
Check: Put the reference aside. Does your shape read as a Camaro? Compare hood length, cabin position, and overhangs.
Outcome: You learn to see proportion as one shape rather than a collection of parts.
Exercise 2: Transparent-Box Wheel Alignment
Setup: A three-quarter reference, tracing paper, a ruler, and a 2H pencil.
Action: Draw a transparent box around the car, hidden edges included. Run both axles through it and place all four ellipses, including the far-side wheels you can’t see.
Check: Do both axles converge toward the same vanishing point? Is each ellipse’s minor axis aligned with its axle?
Outcome: You learn that the wheels belong to the box, not to the body outline.
Exercise 3: Three-Value Reflection Study
Setup: A close crop of a Camaro body side or hood, plus 2H, HB, and 4B pencils.
Action: Reduce everything to three values, light, mid, and dark, without blending.
Check: Squint at your study and the reference side by side. Do the big shapes of light and dark match?
Outcome: You learn that gloss comes from sharp value contrast, not from detail.
Exercise 4: Mirror Proportion Check
Setup: Any finished Camaro sketch and a mirror or phone camera.
Action: Look at the drawing reversed.
Check: List every proportion that suddenly looks wrong, such as tilted wheels, a heavy nose, or a cabin drifting forward.
Outcome: You build the habit of auditing your work before adding detail.
Troubleshooting: Symptom, Cause, Fix
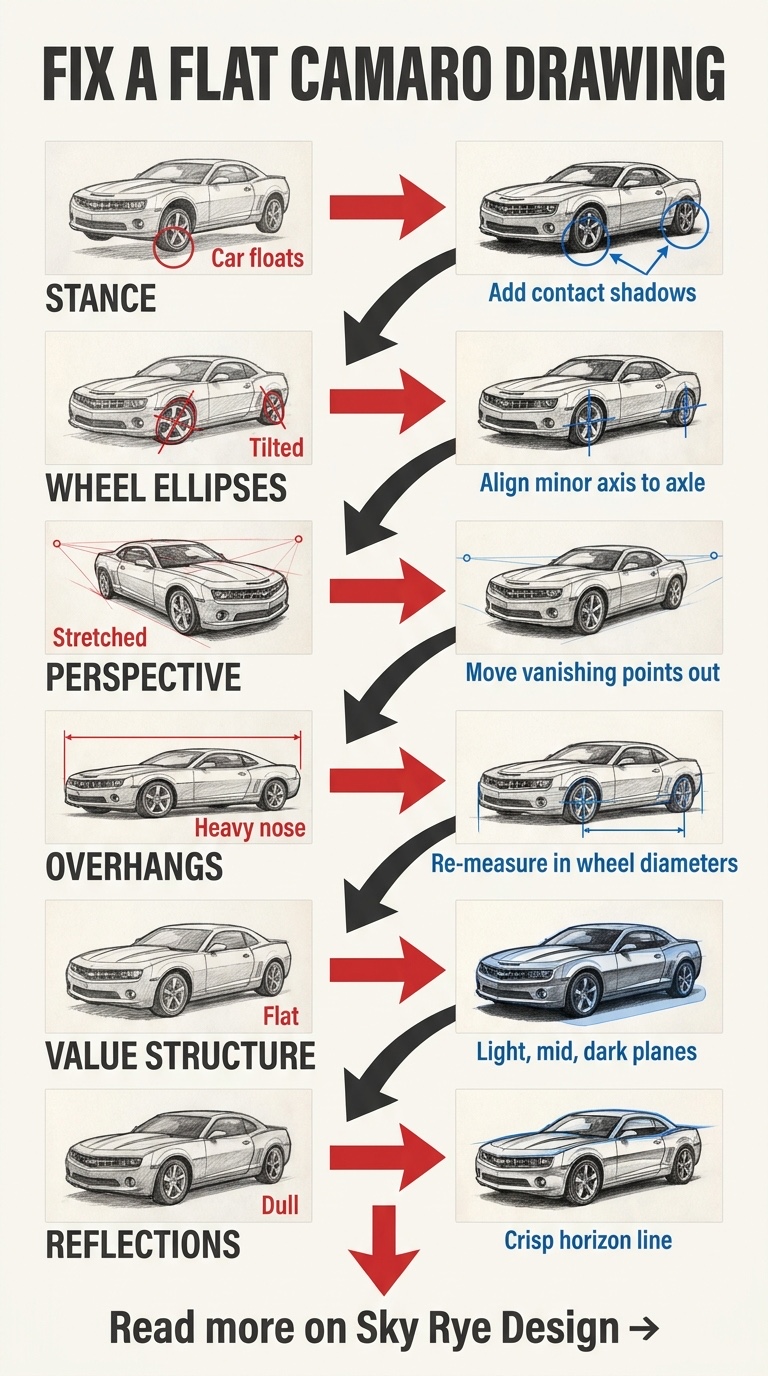
| Symptom | Likely cause | Fix |
|---|---|---|
| Car looks flat | No value separation between planes | Tops light, sides mid, openings dark |
| Wheels look tilted | Ellipse minor axis off the axle | Redraw axle guides and realign ellipses |
| Car floats | Missing contact shadows | Add contact patches and a soft cast shadow |
| Looks like a sedan | Cabin too far forward or tall | Move the greenhouse back and lower the roof |
| Nose looks huge | Wide-angle reference distortion | Use a distant photo and re-measure overhangs |
| Wheels mismatched | Unequal sizes or wrong ellipse progression | Compare diameters and check axle convergence |
| Paint looks dull | Overblending, no sharp reflection line | Add a crisp horizon line and keep white highlights |
| Drawing looks stiff | Uniform line weight | Go heavier underneath and near the viewer |
A Realistic Practice Plan
Short, regular sessions work better than one long weekend. This two-week plan builds on the exercises above:
- Days 1–3: Side-view method, three drawings per session, plus the silhouette test.
- Days 4–6: Perspective boxes and transparent-box wheel alignment, with no body yet.
- Days 7–9: The full seven-step construction in graphite, one generation only.
- Days 10–11: Three-value reflection studies.
- Days 12–14: One colored-pencil drawing across two or three sessions.
After each drawing, run the mirror check and write down one thing to fix next time.
Common Mistakes and Corrections
- Drawing details first. Headlights placed before the box will drift. Build the box and wheels first.
- Mixing generations. A 1969 grille on a modern body confuses the eye. Choose one reference and stay with it.
- Tracing every line from a photo. Tracing copies the lens distortion too. Take proportions from the photo, then construct.
- Overblending. Smudged graphite kills gloss. Keep the edges between values crisp.
- Uniform darks. When everything is dark, nothing stands out. Save the deepest values for tires and openings.
Camaro Drawing FAQ
Is a Camaro hard to draw?
It’s moderately challenging because of the low stance and the wheels in perspective. Starting with the side view makes it very manageable.
How do you draw a Camaro easily?
Use the side-view method: two equal circles, a long, low rectangle, a cabin set toward the rear, then simple shading.
How do you make wheels look round?
Draw the axle guides first. Align each ellipse’s minor axis with its axle, and compare diameters before adding rims.
Which Camaro generation is easiest for beginners?
Many beginners find the first generation easier because its surfaces are calmer and flatter. The sixth generation has more creases and layered fascia planes.
How do you color glossy car paint?
Build from light to dark in controlled layers, keep highlights as untouched paper, add a sharp reflection line, and burnish only at the end.
Can you draw from a photo?
Yes. Choose a distant, low-distortion photo, measure proportions in wheel diameters, and construct the drawing instead of tracing it.
Keep Drawing, Diagnosing, and Repeating
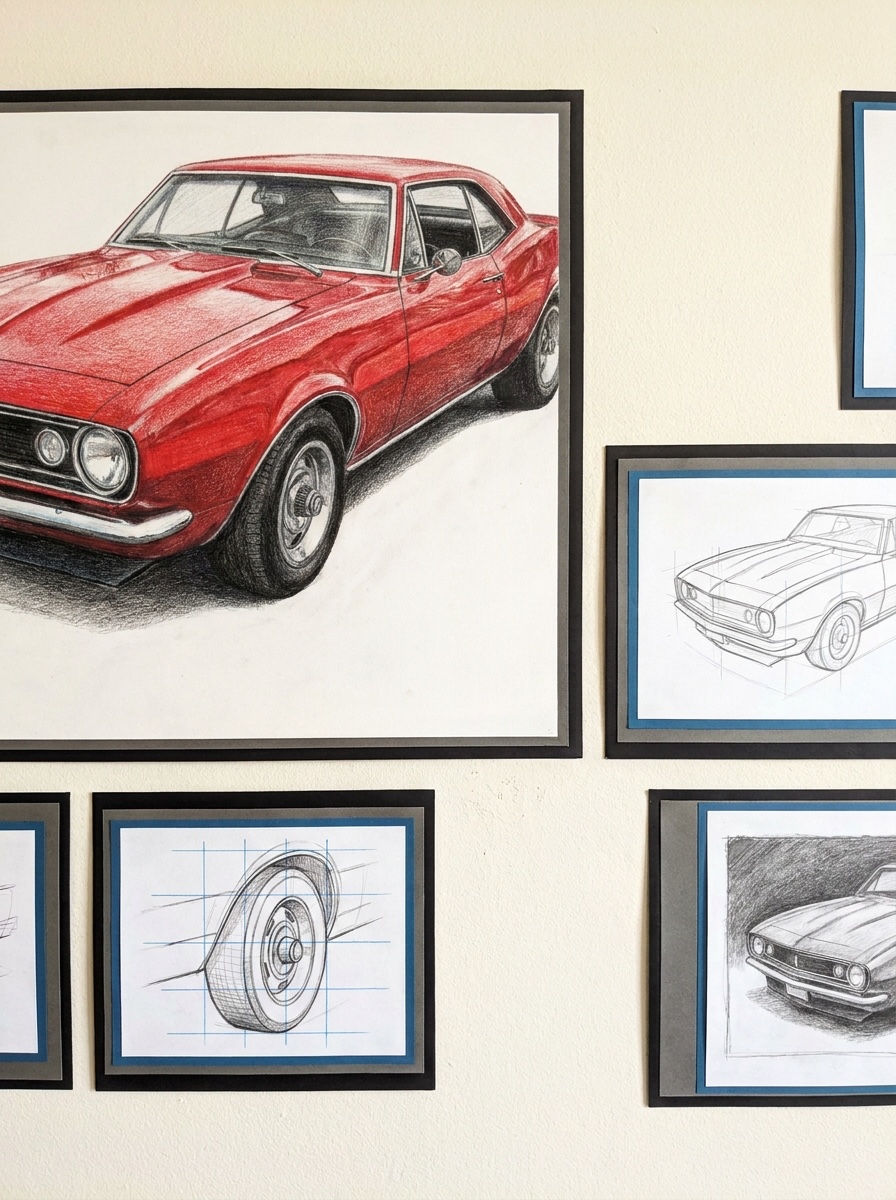
A good Camaro drawing doesn’t depend on a perfect first line. It comes from a loop: build the box, place the wheels, test the silhouette, check the values, and fix one thing at a time. This week, draw the same car three times. Compare the first drawing with the last, and you’ll see exactly where your eye has improved. Then pick a different generation and run the loop again.
- 0shares
- Facebook0
- Pinterest0
- Twitter0
- Reddit0