I used to think a banana was the least interesting thing you could put in front of an easel — until an instructor made our still-life class spend an entire session on nothing but bananas. Turns out it’s one of the better subjects for practicing form and color precisely because it looks so simple. There’s nowhere to hide a construction mistake behind the details.
Every online tutorial gives you the same thing: two curved lines, a stem, and a few brown dots. That’s an outline, not a drawing. What actually makes a banana read as solid and real has almost nothing to do with the outline and everything to do with the underlying cylindrical form, a genuinely tricky color gradient, and a faceted cross-section most people never notice is even there.
- How to Draw a Banana in 5 Steps
- Why a Banana Is a Genuine Form Exercise, Not a Trivial Subject
- The Faceted Cross-Section Nobody Draws Correctly
- The Color Gradient — Green to Yellow to Brown
- Drawing a Peeled Banana
- Drawing a Bunch Without Every Banana Looking Identical
- Common Mistakes That Make a Banana Look Flat
- Conclusion
- FAQ
- How do you draw a banana step by step for beginners?
- How do you make a banana look 3D instead of flat?
- How do you draw a realistic banana peel?
- What colors do you use to shade a banana?
- How do you draw a bunch of bananas?
- What's the easiest way to draw a banana?
- What mistakes make a banana drawing look fake?
This isn’t another two-line tutorial. It’s a full construction method built from form, the color transition explained properly, how to handle a peel and a bunch without everything looking identical, and the specific mistakes that make most banana drawings look flat no matter how much detail gets added on top.
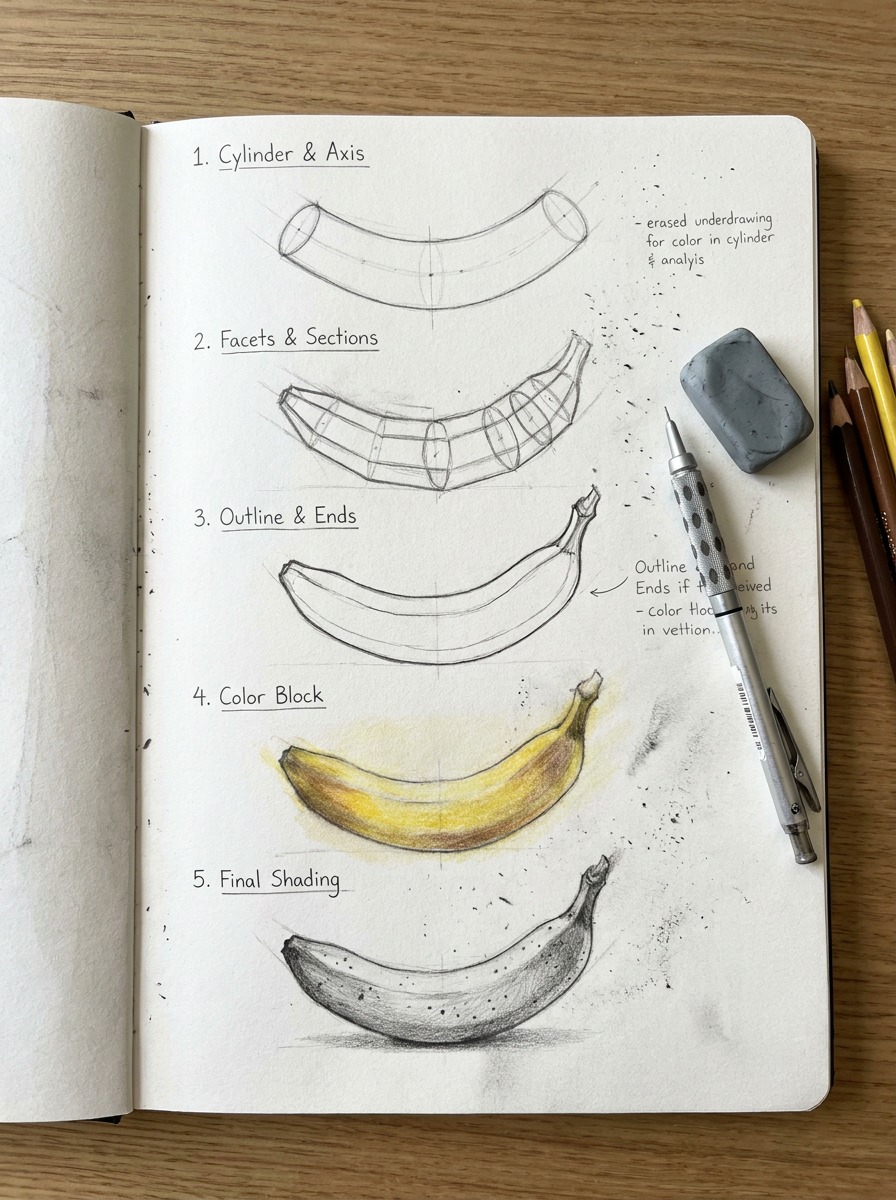
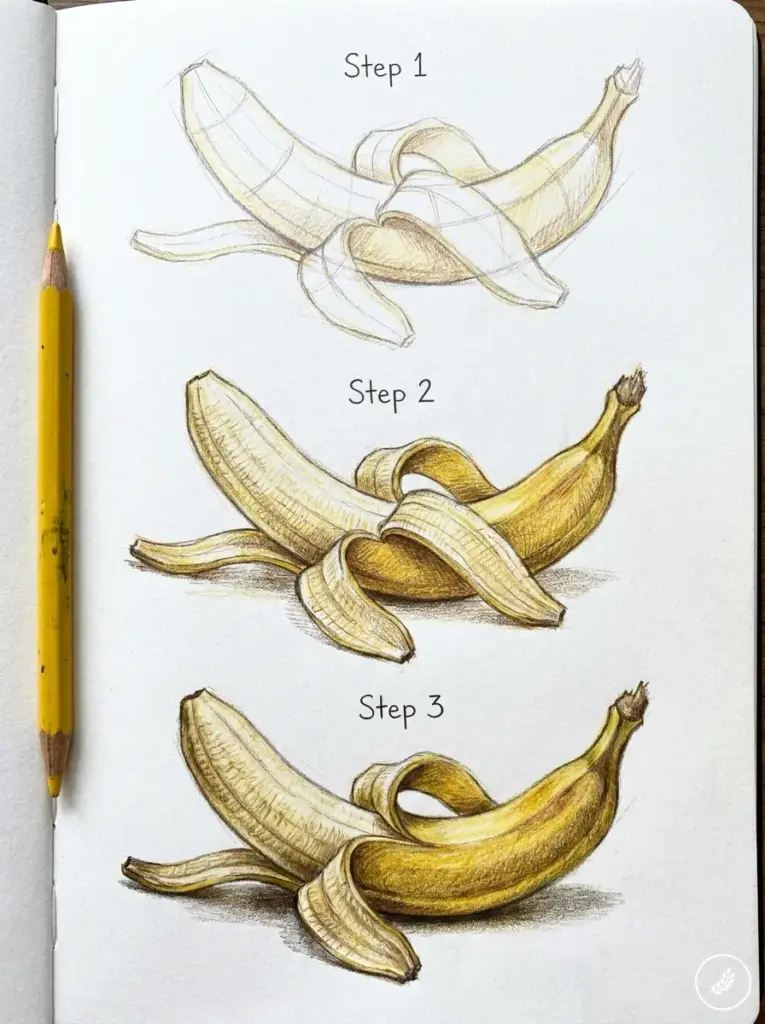
How to Draw a Banana in 5 Steps
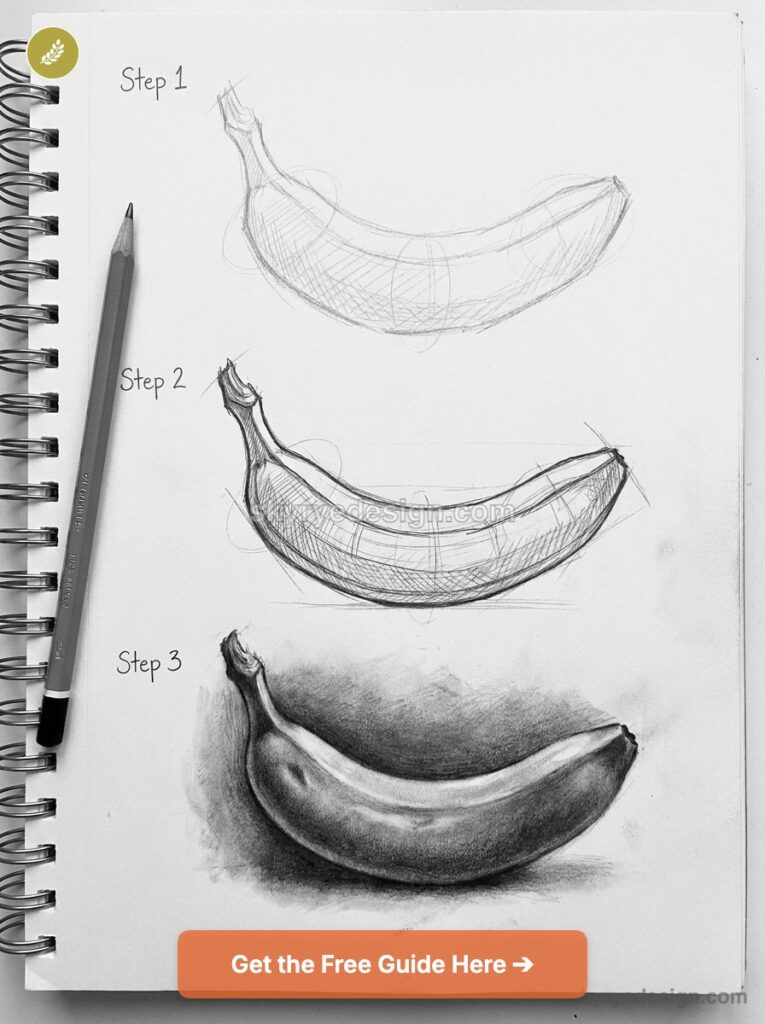
Skip the two-curved-lines method. Here’s the version that treats a banana as an actual three-dimensional form instead of a flat cartoon shape.
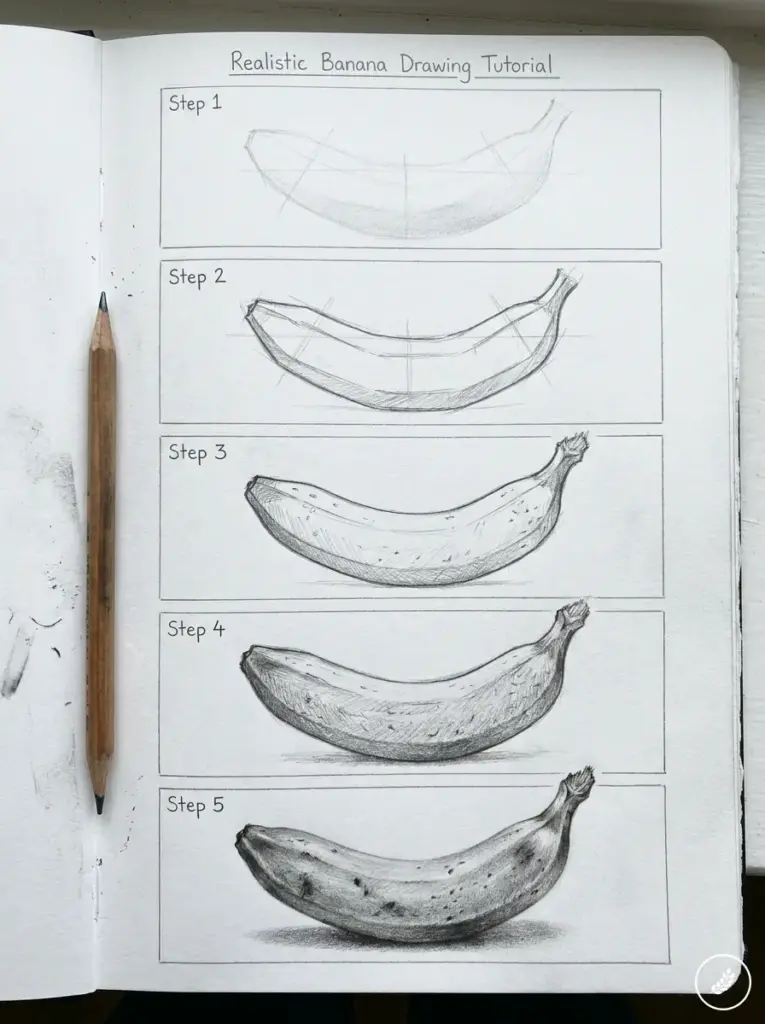
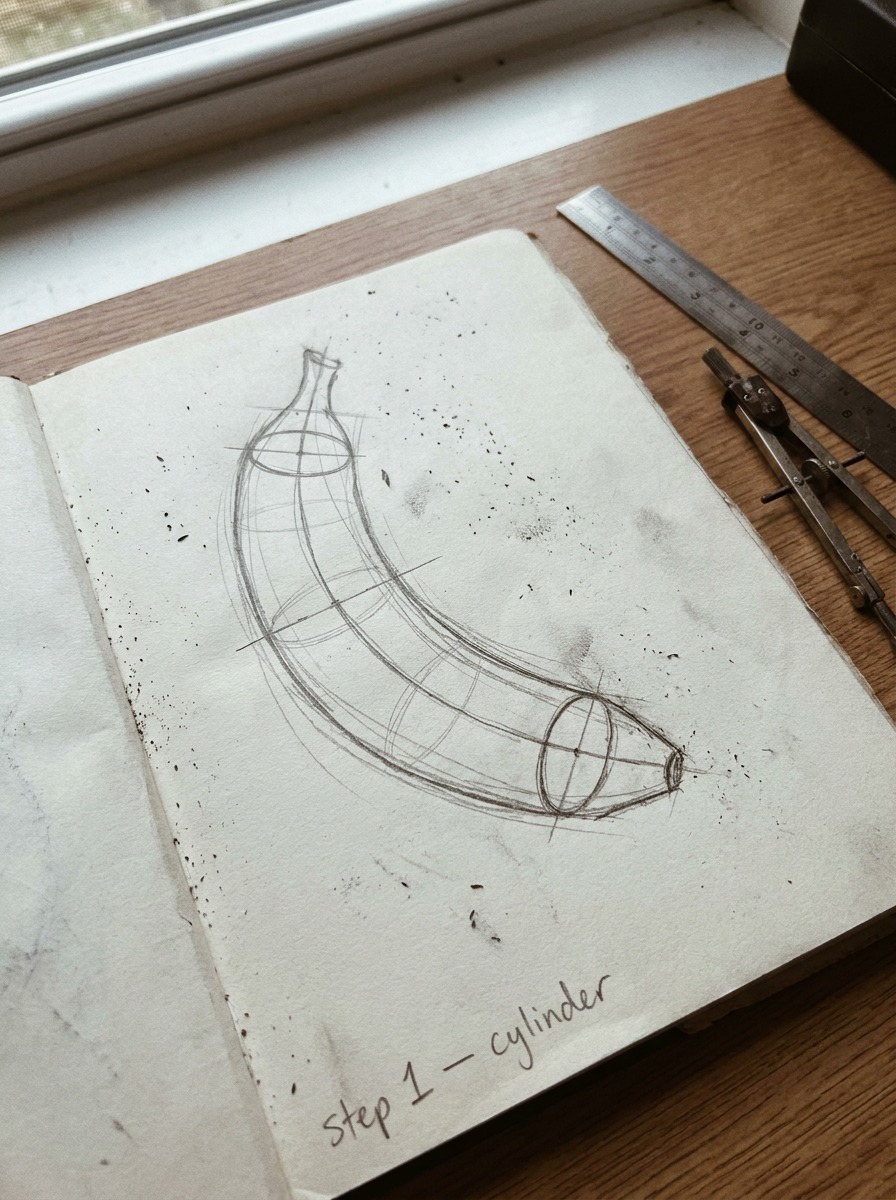
Step 1: Build the underlying curved cylinder
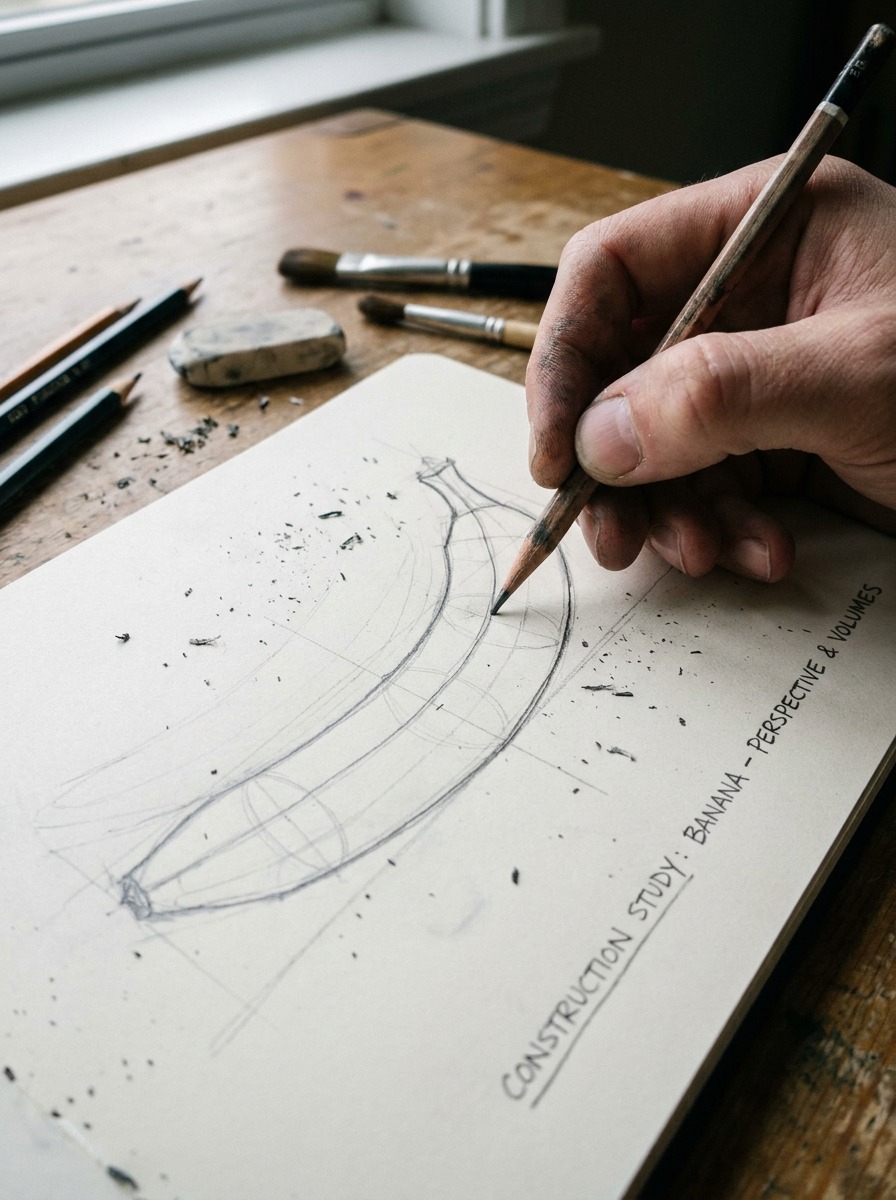
Before any outline goes down, sketch a simple curved cylinder — think of it as a tube bent along a gentle arc, exactly the way you’d block in a curved pipe or a bent arm before adding surface detail.
Draw the centerline of the curve first, then two ellipses at each end to establish the cylinder’s thickness. This step feels almost too simple to matter, but it’s the single most important one: every banana drawing that ends up looking flat skipped this stage entirely and went straight to outline.
Keep this stage light — a 2H pencil works well, barely pressing. You want the freedom to adjust the curve’s arc before committing to anything final.
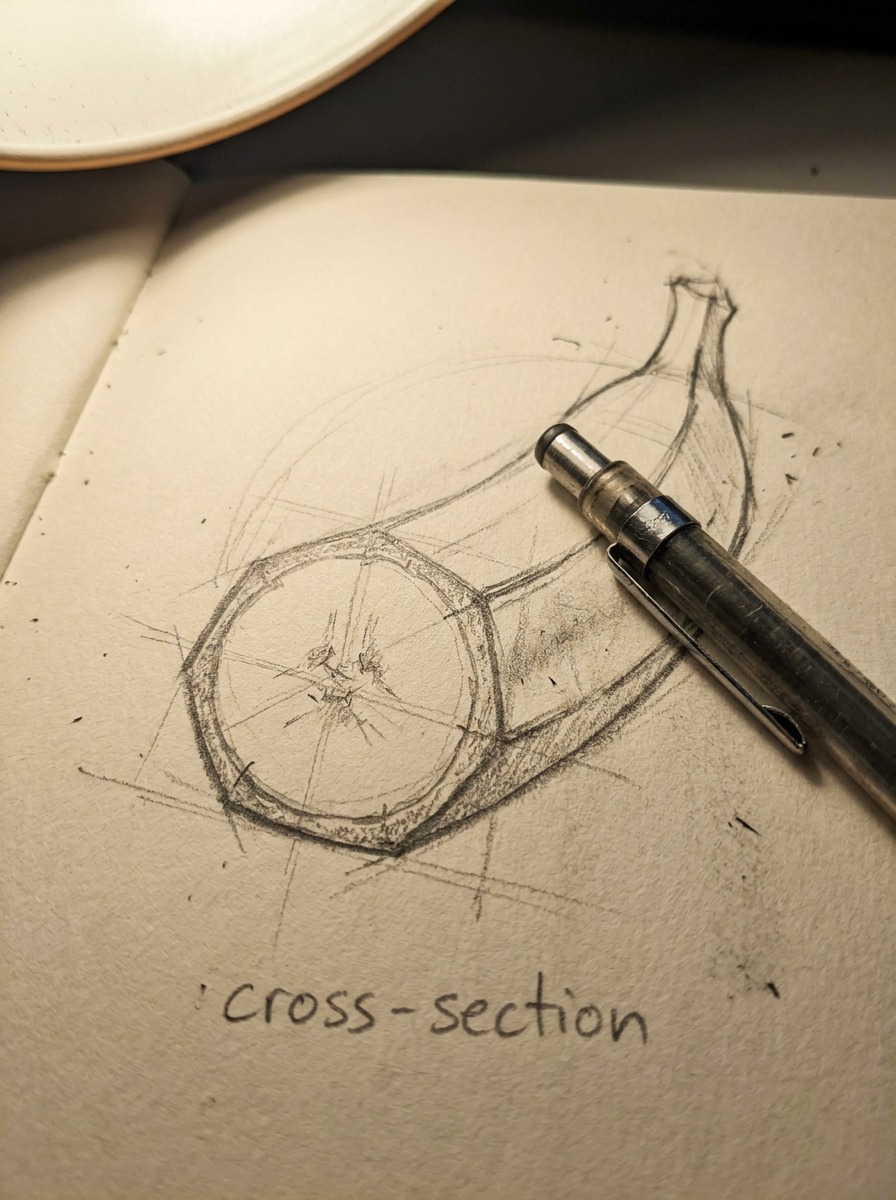
Step 2: Establish the faceted cross-section
Here’s what almost no tutorial mentions: a banana isn’t a smooth cylinder. Its cross-section has subtle flat facets running along its length, usually three to five of them, which is why a real banana has faint ridge lines rather than a perfectly round profile. Sketch two or three long, gently curved ridge lines running the length of the cylinder, following the same arc as the centerline from Step 1.
This detail matters more than it seems like it should. Skip it, and even a well-shaded banana will read as a smooth sausage instead of a banana, because the ridges are exactly what your eye uses to recognize the shape at a glance.
Step 3: Refine the outline and stem/tip
Now trace the actual outline over your cylinder construction, letting the outline bulge slightly outward at the ridges and tuck slightly inward between them — this is what gives the silhouette its characteristic gentle undulation instead of a smooth curve. Add the stem at one end (a short, slightly angled cylinder of its own) and the dry, darker tip at the other end.
I keep the stem and tip proportionally small relative to the body — a mistake I see constantly is an oversized stem that throws off the whole banana’s proportion and makes it read as a toy rather than real fruit.
Step 4: Block in the color gradient
This is where most banana drawings fall apart. A real banana isn’t uniform yellow — it shifts from a slightly green tone near the stem, through the main yellow body, toward small brown speckling and occasional darker patches near the tip. Block in these three zones loosely first, keeping the transitions soft rather than sharp bands of color.
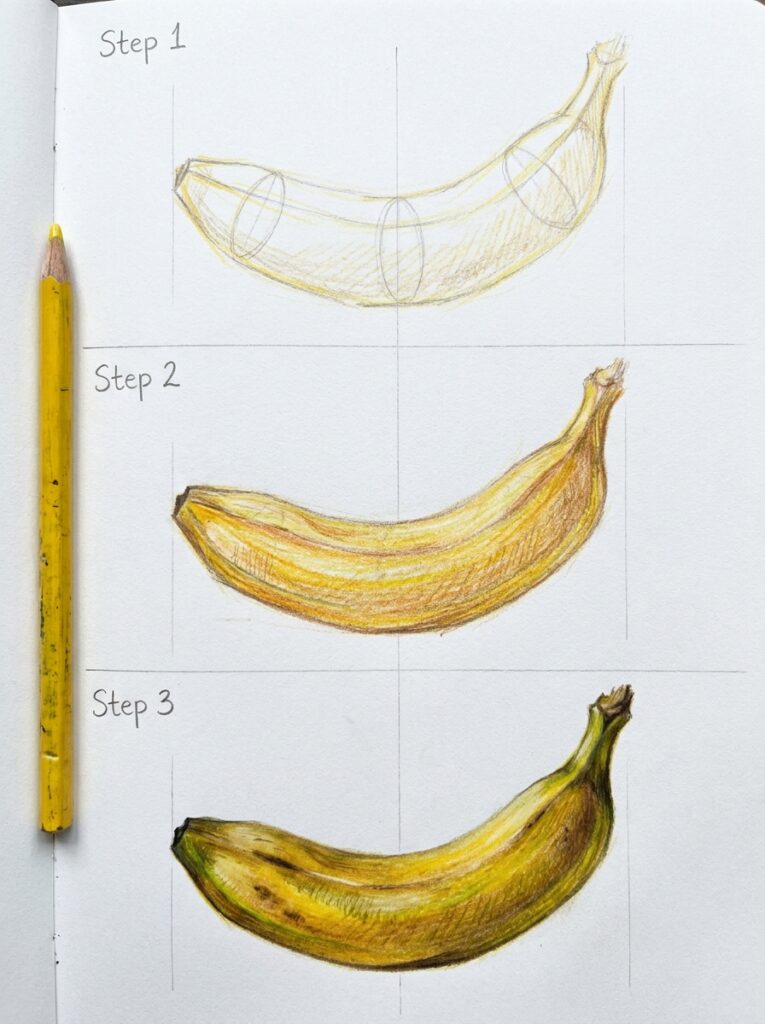
Layer thin coats rather than trying to get the gradient right in one pass. Colored pencil in particular rewards patience here — several light layers of yellow with small touches of green and brown blended in read as far more convincing than one heavy application.
Step 5: Add shading and speckle detail
Once the base gradient is down, add your shadow side following the cylinder’s form from Step 1 — the shadow should curve around the banana’s rounded cross-section, not sit as a flat dark patch on one side. Add a cast shadow beneath the banana on whatever surface it’s resting on; skipping this is one of the fastest ways to make a banana look like it’s floating rather than sitting on something.
Finish with speckle detail — small, irregular brown dots concentrated more heavily near the tip and stem, sparser through the middle. Vary their size and spacing; perfectly even speckles read as a pattern rather than natural ripening marks.
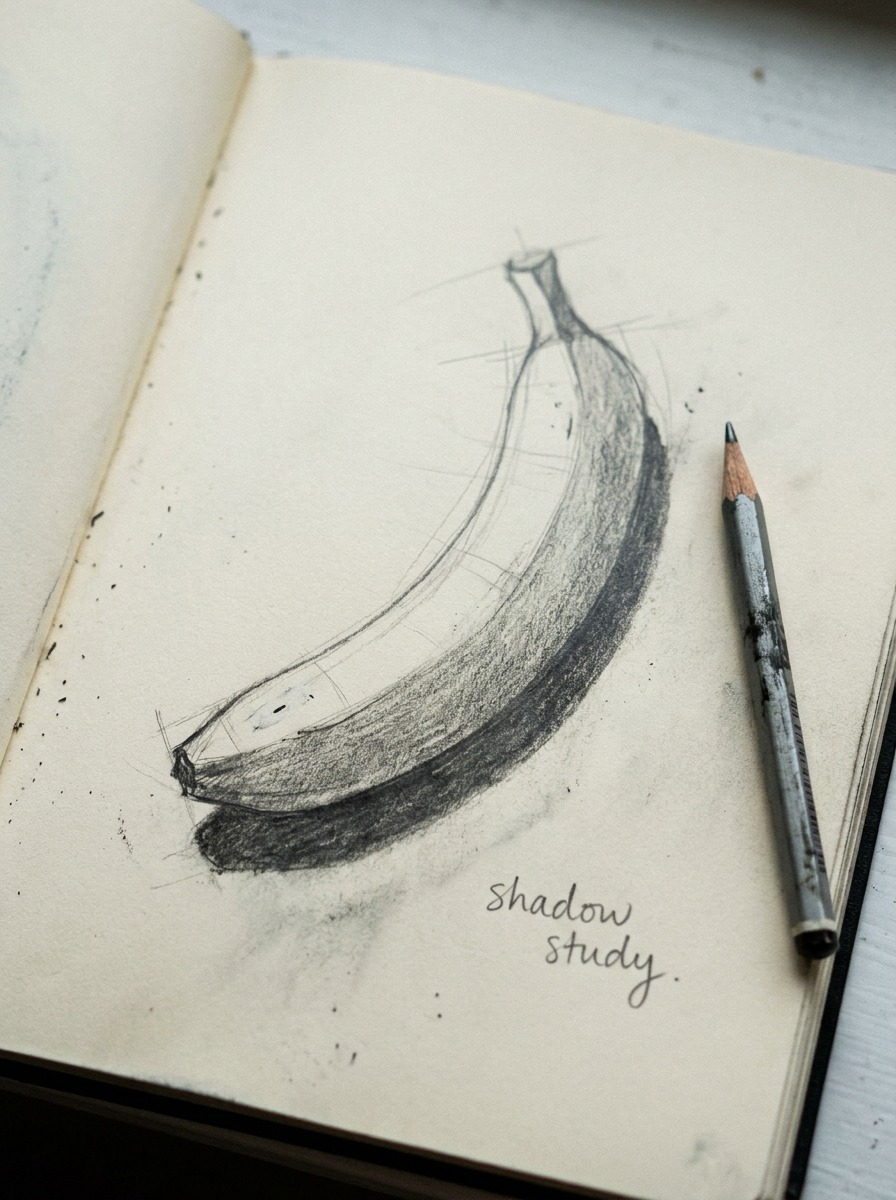
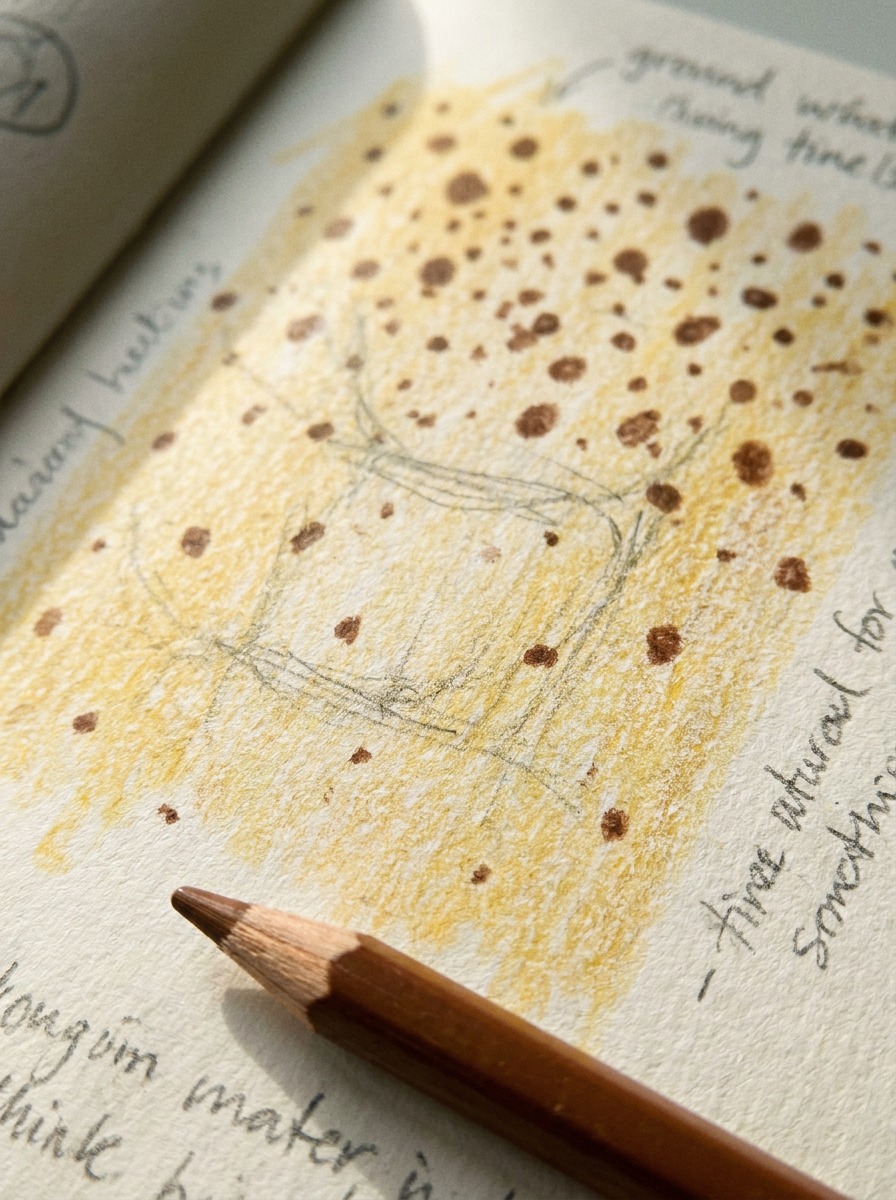
TIP: step back and squint at the drawing periodically. If the banana still reads as a flat yellow shape from a distance, the shading isn’t following the cylinder’s curve strongly enough — go back and push the shadow side darker where it wraps around the form.
Why a Banana Is a Genuine Form Exercise, Not a Trivial Subject
It’s easy to dismiss a banana as a boring subject. That dismissal is exactly why so many banana drawings look wrong — nobody takes the construction seriously enough to get the form right first.
The cylinder underneath — why flat outlines fail
Every convincing drawing of a rounded object starts from an understanding of the volume underneath the surface, and a banana is one of the purest examples of this principle because its curve is so pronounced. Skip the cylinder construction from Step 1 and jump straight to outline, and you lose the information your shading needs later — there’s no underlying form to wrap the shadow around, so the shading ends up sitting on top of the shape instead of describing it.
This is the same reasoning that applies to drawing a car body, a bottle, or a limb — the surface detail is only convincing if it’s built on an accurate sense of the volume beneath it. A banana just makes the consequences of skipping that step more obvious than most subjects, because its curve is so exaggerated that a flat construction immediately reads as wrong.
What still-life training teaches about “boring” subjects
I’ve noticed that the subjects students dismiss as too simple to bother constructing properly are almost always the ones that expose bad habits fastest. A complex subject has enough visual noise to hide a construction error. A banana has nowhere to hide one — a single simple form, a specific color transition, and almost no detail to distract from a mistake in the underlying volume.
That’s exactly why it’s worth taking seriously as practice. Getting comfortable building convincing volume on a subject this simple makes every more complex subject easier, because the fundamental skill — seeing form before surface — doesn’t change based on how interesting the object looks.
The Faceted Cross-Section Nobody Draws Correctly
This is the detail that separates a banana that looks studied from one that looks traced off a cartoon. Almost nobody draws it, and almost nobody notices why their banana looks slightly off as a result.
Why a banana isn’t a perfect cylinder
Cut a real banana in half and look at the cross-section: it’s not a circle. It’s a soft, rounded triangle or slight pentagon shape, with a few gentle flat facets rather than one continuous curve. That faceted structure runs the entire length of the fruit, which is why a real banana has faint ridge lines visible along its body if you look closely — they’re the edges where those facets meet.
Most tutorials render a banana as a smooth tube because a smooth tube is easier to draw and easier to shade. It’s also wrong, and the wrongness shows up specifically in how light behaves on the surface.
How the ridges affect where highlights and shadows fall
A perfectly round cylinder has one smooth gradient from light to shadow. A faceted form has subtle steps in that gradient — each facet catches light slightly differently than its neighbor, creating faint bands of tone rather than one continuous smooth transition. This is a small effect, but it’s exactly the kind of small effect that makes a shaded object look like it was observed rather than assumed.
Once you know to look for it, you’ll notice the ridge lines create slightly brighter highlight bands right along their length, with the shadow settling into the shallow grooves between them. Rendering this — even subtly — is what pushes a banana drawing from “recognizable” to “convincing.”
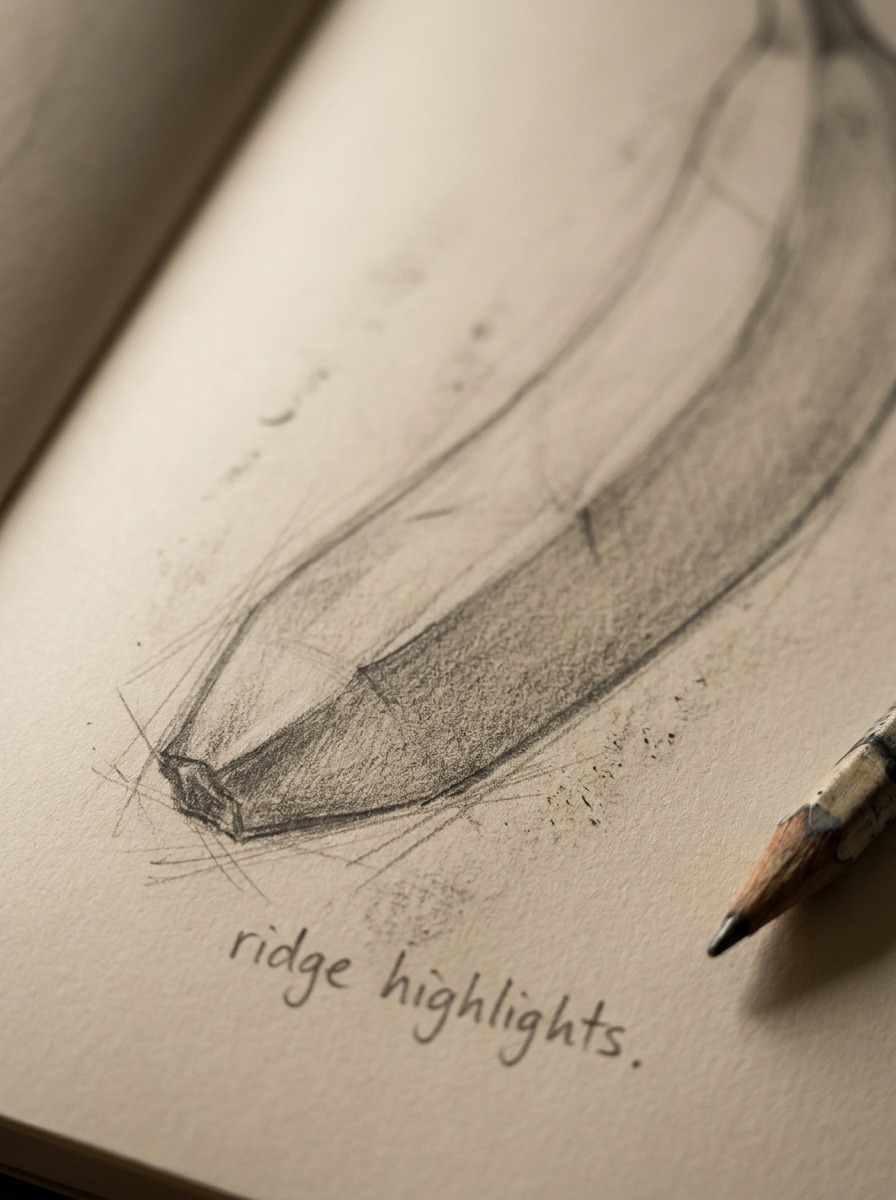
TIP: don’t overdo the facet lines in your final linework — they should read as subtle tonal shifts in the shading, not as hard black lines running down the banana. Two or three soft ridge lines are usually enough; more starts to look like a segmented toy.
The Color Gradient — Green to Yellow to Brown
Color is where most banana drawings quietly fail, even ones with decent construction underneath. A flat, uniform yellow undoes all the work put into the form.
Why uniform yellow is the most common mistake
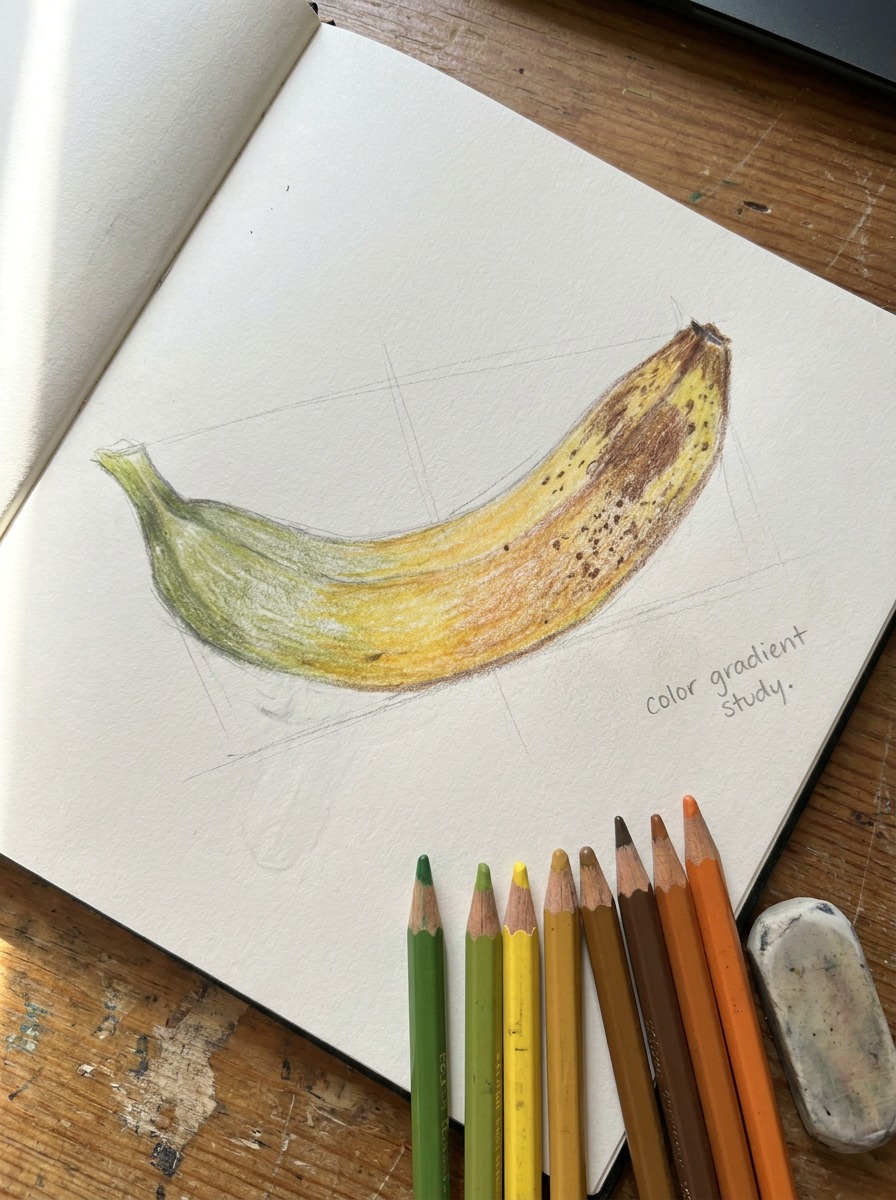
A ripening banana runs through a real color progression, not a single hue: a slightly green cast near the stem end, the main body settling into a warm yellow, and small brown speckling appearing as the fruit ripens further, concentrated more heavily toward the tip. Reach for a single yellow and apply it evenly across the whole form, and the banana immediately reads as a plastic prop rather than actual fruit, no matter how accurate the construction underneath is.
The green isn’t just at the very tip — it usually fades gradually into the yellow over an inch or two, and there’s often a subtle warmer, almost golden undertone through the center of the body where the fruit is most ripe. None of this needs to be exaggerated. It needs to be present, even faintly, for the color to read as real rather than flat.
Blending the transition and adding speckle without overdoing it
Build the gradient in thin layers rather than trying to nail the transition in one pass. Lay down the palest yellow first across the whole form, then work the green in at the stem end, blending it into the yellow rather than leaving a hard edge. Add a touch of warm orange-yellow through the mid-body highlight area last, since ripe bananas often carry a slightly warmer tone right where the light hits directly.
Speckling comes last, after the base gradient is established, and it should follow the same logic as any texture applied over a form: denser and darker where the surface has aged more (typically the tip and stem areas), sparser and lighter through the middle. Vary the dot sizes and avoid placing them in any kind of regular pattern — real ripening marks cluster unevenly, and a too-even speckle pattern is one of the fastest tells of a rushed drawing.
TIP: if you’re working in colored pencil, keep your green and brown pencils sharp and use them sparingly on top of the yellow base rather than trying to blend large areas of green pencil directly — a little color goes a long way in a gradient this subtle.
Drawing a Peeled Banana
A peeled banana isn’t just a whole banana with the skin removed in your drawing — it’s a genuinely different construction problem, because you’re now rendering two distinct surfaces instead of one.
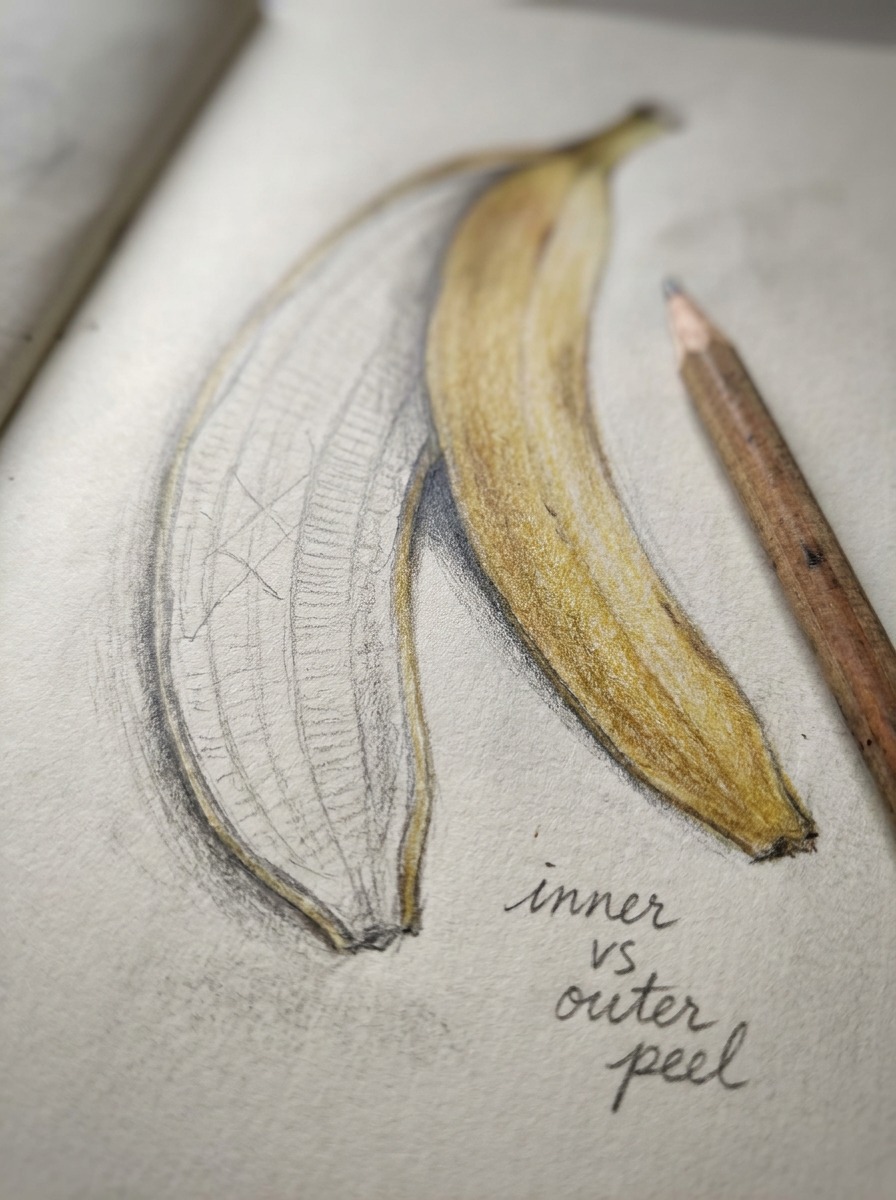
The peel’s inner and outer surface — two different textures
The outer peel, once pulled back, shows its exterior color and texture on the convex side and a completely different pale, slightly fibrous inner surface on the concave side where it curls away from the fruit. That inner surface is close to white with a faint yellow-green cast, and it has a subtle ribbed texture running along its length — visually distinct from both the fruit itself and the peel’s outer skin.
Getting this contrast right is what sells a peeled banana as convincing. If the inside of the peel gets colored the same yellow as the outside, the whole drawing reads as confusing rather than dimensional, because there’s no visual logic separating “this is skin” from “this is fruit.”
Construction differences from the whole banana
Structurally, a peeled banana still starts from the same underlying cylinder as Step 1 of the main method, but now you’re drawing two forms instead of one: the fruit itself, slightly narrower and smoother than the whole banana’s silhouette, and the curled-back peel sections, which behave almost like ribbon or fabric peeling away — each peeled strip has its own curve and thickness independent of the fruit’s cylinder.
I treat each peeled strip as its own small construction problem: a thin, curved form with a clear front (colored) and back (pale) surface, curling away from the central fruit at a slightly different angle for each strip so they don’t look identical or mechanically symmetrical.
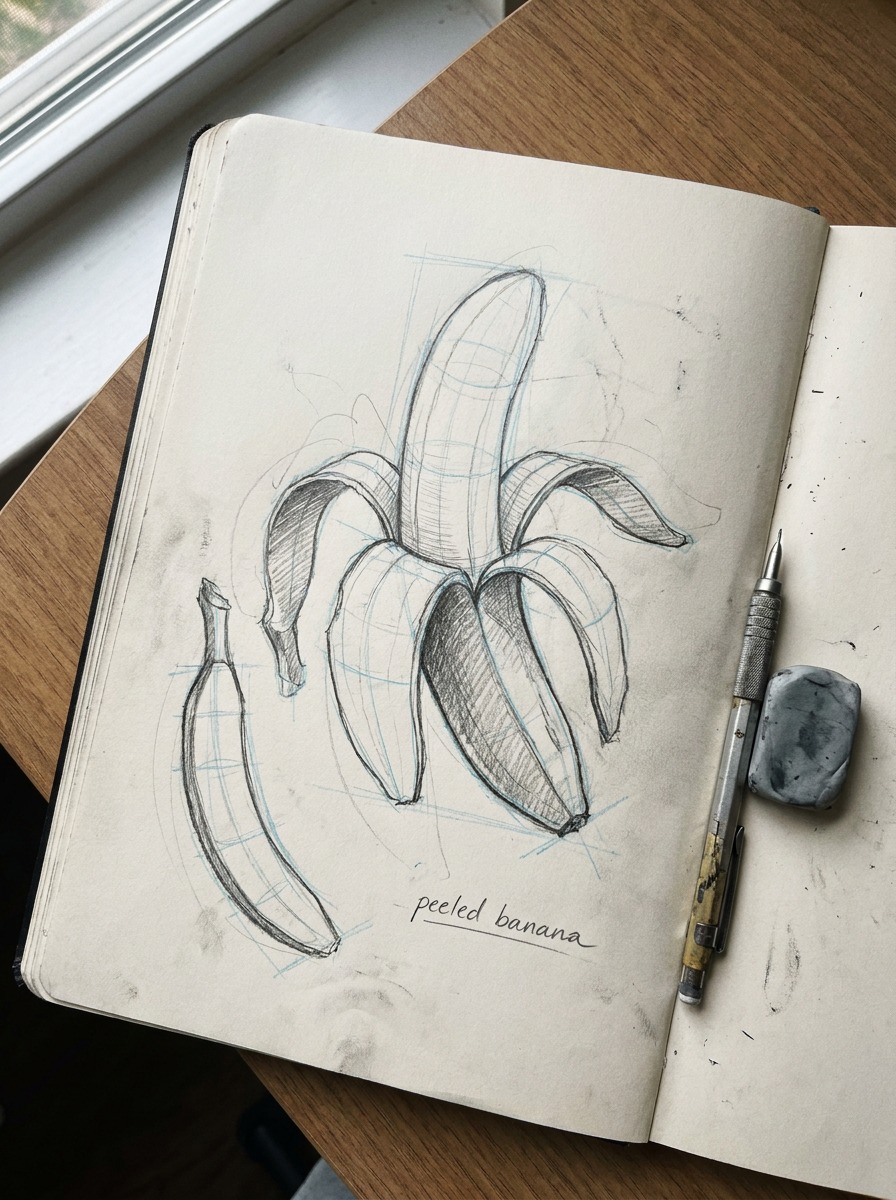
TIP: stagger how far back each peel strip curls — real peeled bananas rarely have perfectly symmetrical, evenly-spaced strips. A little asymmetry between the strips reads as far more natural than a neatly divided, evenly spaced peel.
Drawing a Bunch Without Every Banana Looking Identical
A single banana is a form exercise. A bunch is a variation exercise — and it’s where a lot of otherwise decent individual banana drawings fall apart, because every fruit in the bunch ends up looking like a copy-pasted clone of the first one.
Varying curve, rotation, and overlap
Real bananas in a bunch don’t share identical curves. Each one grows at a slightly different angle relative to the stem, curving with a bit more or less arc, twisting slightly around its own axis so you’re seeing a different amount of its faceted profile than its neighbor. Before drawing any individual banana in a bunch, vary three things deliberately: the tightness of the curve, the rotation (how much of the flat facet versus the rounded side is facing you), and how much each one overlaps its neighbors.
I usually block in the whole bunch’s rough silhouette first — a loose cluster shape — before committing to any single banana’s construction, so the group reads as a natural cluster rather than a row of identical shapes lined up next to each other.
Light source consistency across multiple forms
The part that’s easy to lose track of once you’re managing several forms at once: every banana in the bunch needs to respect the same light source. If the light is coming from the upper left, every single banana’s highlight and shadow needs to sit on the same relative side, even as each one rotates and curves differently. Inconsistent lighting across a bunch is one of the fastest ways to make a multi-object drawing feel wrong even when each individual form is constructed correctly.
Overlapping bananas also need cast shadows onto each other, not just onto the surface below the whole bunch — a banana partially behind another should have a soft shadow falling across it from its neighbor, which is what actually sells the sense of them occupying real space together rather than being individually drawn and pasted into the same frame.
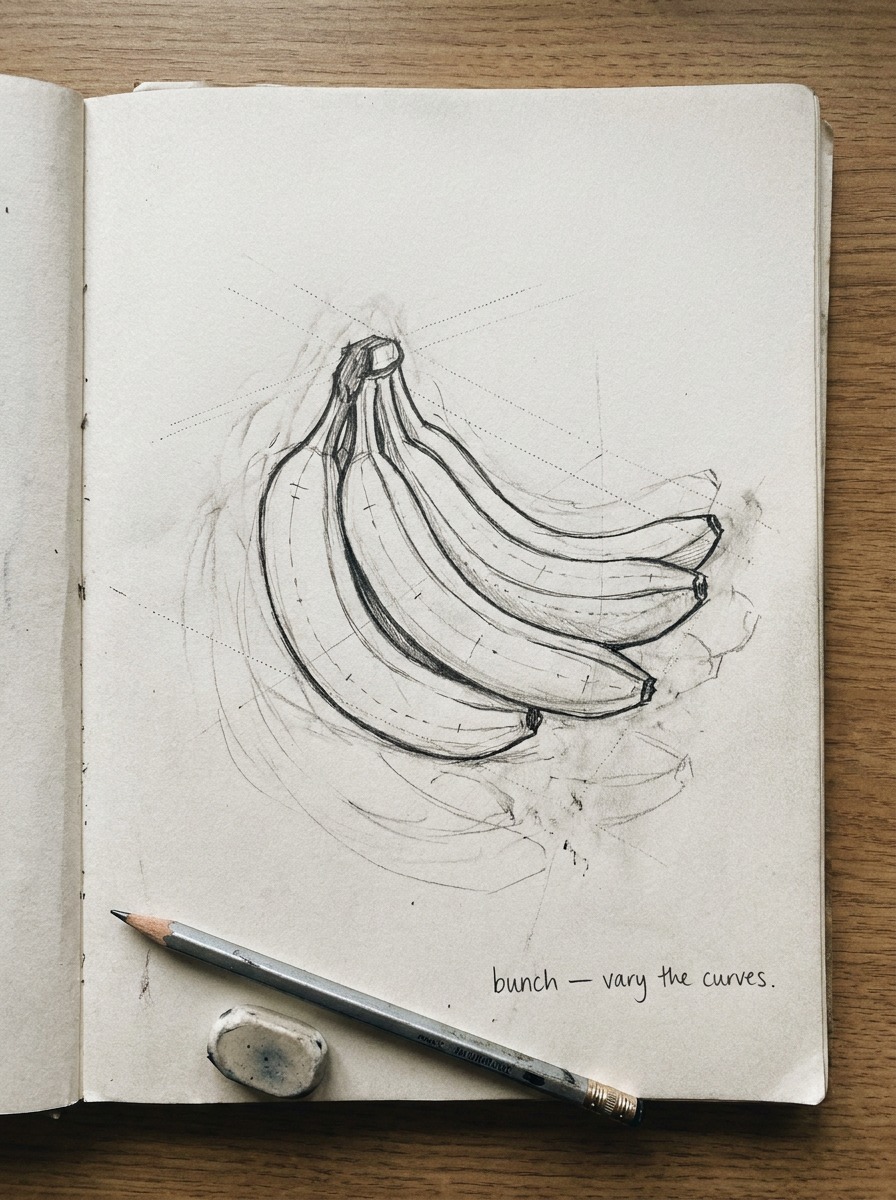
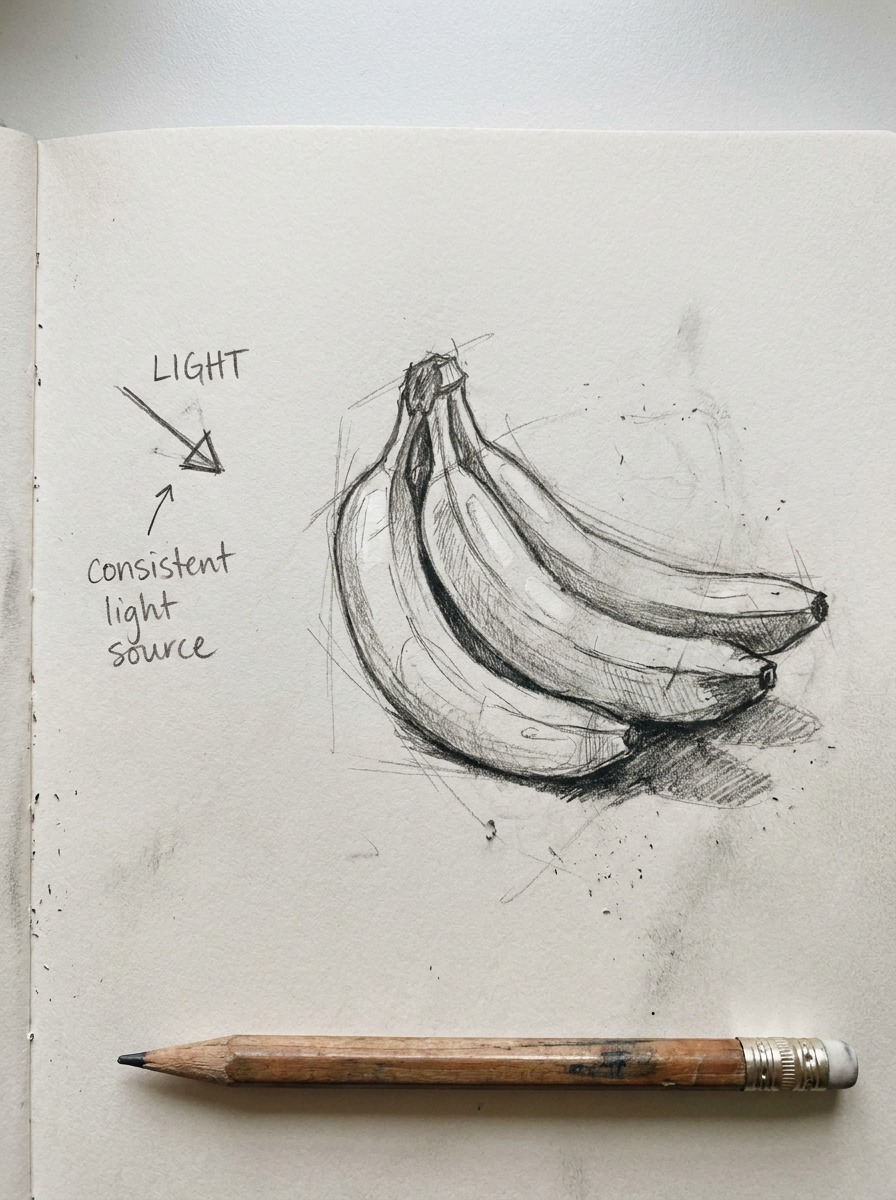
TIP: pick one banana in the bunch to be your most detailed, fully rendered focal point, and let the others recede slightly with less contrast and softer edges. Treating every banana with identical intensity is what makes a bunch feel busy instead of cohesive.
Common Mistakes That Make a Banana Look Flat
Most banana drawings that read as “off” trace back to one of three fixable problems. Here’s what to check before adding more detail.
Flat outline vs. built-from-volume
The mistake: drawing the banana as a simple two-line silhouette with detail added directly on top, skipping the cylinder-and-facet construction entirely.
The fix: go back to Step 1’s underlying curved cylinder before touching outline. Every shading decision that follows needs an actual form to wrap around — without it, shading gets applied as a flat gradient across a flat shape rather than following real volume, which is exactly what makes a banana read as a sticker instead of an object.
Uniform color vs. gradient
The mistake: coloring the entire banana one shade of yellow, sometimes with a single darker line for “shading” added afterward as an afterthought.
The fix: build the green-to-yellow-to-brown gradient from Section 4 before adding any shadow work, and let the shadow side of the form shift the existing color darker and slightly cooler rather than just adding gray or black on top of flat yellow. Shadows on a colored object are a darker, often slightly different-hued version of the local color — not a neutral gray laid over it.
Missing cast shadow (banana floating vs. grounded)
The mistake: rendering the banana itself carefully but leaving the surface underneath empty, with no shadow connecting the fruit to whatever it’s resting on.
The fix: add a cast shadow beneath the banana that follows the actual contact point and light direction established during shading. Even a simple, soft cast shadow immediately grounds the object in space — its absence is one of the fastest tells that a drawing was built without thinking about the object’s actual physical presence in a scene.
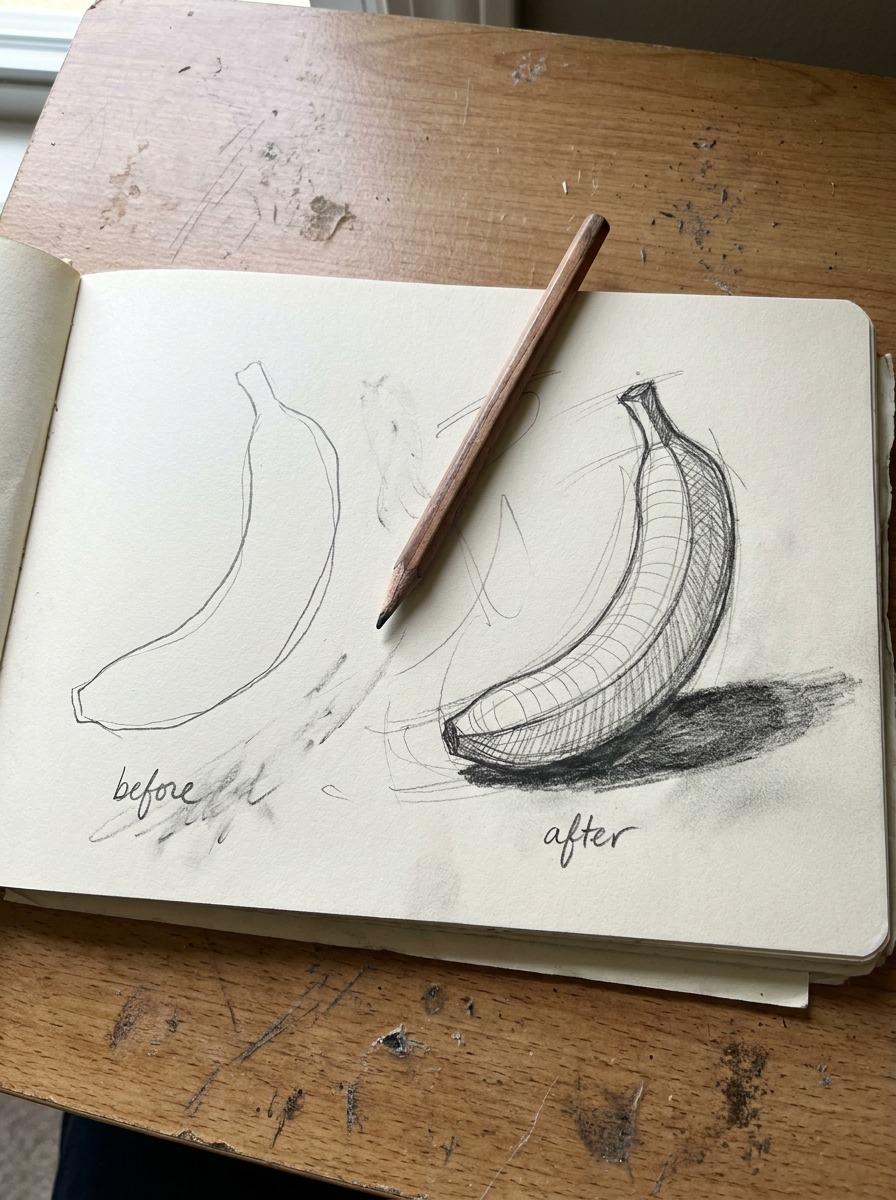
TIP: if a finished banana still looks slightly wrong and you can’t identify why, check these three things in order — underlying form, color gradient, cast shadow — before adding any additional surface detail. They account for most of the gap between a banana that looks studied and one that looks like a quick sketch.
Conclusion
A banana looks convincing when it’s built the way any rounded object should be — from an underlying cylindrical form, through a real color gradient rather than flat yellow, finished with shading and a cast shadow that ground it in space. Skip any of those three things and no amount of speckle detail or outline refinement will fix the result. It’s a deceptively simple subject that rewards exactly the kind of careful observation most people assume it doesn’t need.
You don’t have to master the color gradient, the faceted cross-section, and cast shadows all in one sitting.
Pick one banana — real or from a reference photo — and do just the construction and color gradient pass this week. Skip the fine detail entirely and focus on getting the form and the color transition right. That’s the actual difference between a banana drawing that looks studied and one that looks like it was copied from a cartoon tutorial.
FAQ
How do you draw a banana step by step for beginners?
Start with the underlying form rather than an outline — sketch a curved cylinder using a centerline and end ellipses, then add two or three subtle ridge lines along its length to establish the faceted cross-section. Trace your final outline over this construction, letting it bulge slightly at the ridges. Block in a color gradient from green to yellow to brown before adding shading, then finish with a cast shadow and speckle detail.
How do you make a banana look 3D instead of flat?
The volume comes from building on an underlying cylindrical form before adding any surface detail, then shading that follows the curve of that form rather than sitting as a flat gradient across the shape. A cast shadow beneath the banana is equally important — without it, even a well-shaded banana can read as flat or floating rather than resting on a real surface.
How do you draw a realistic banana peel?
Treat the peel as two distinct surfaces: the outer skin, which keeps its familiar color and texture, and the inner surface, which is pale with a faint yellow-green cast and a subtle ribbed texture. Each peeled strip curls away from the fruit at its own angle and thickness, so avoid making them perfectly symmetrical or evenly spaced — real peeled bananas have some natural variation between strips.
What colors do you use to shade a banana?
A ripe banana moves through a real gradient rather than one flat yellow: a slightly green cast near the stem, a warm yellow through the main body, and brown speckling concentrated more heavily near the tip. Build this gradient in thin layers, and let your shadow side shift the local color darker and slightly cooler rather than adding flat gray or black on top.
How do you draw a bunch of bananas?
Vary the curve, rotation, and overlap of each banana so they don’t look identical — each one should show a slightly different amount of its faceted profile and curve at a different angle. Keep the light source consistent across every banana in the bunch, and add soft cast shadows where bananas overlap each other, not just onto the surface beneath the whole group.
What’s the easiest way to draw a banana?
Even a simplified banana benefits from starting with a loose curved cylinder rather than jumping straight to outline — it takes only a few extra seconds and immediately gives the shape a sense of volume. From there, a basic yellow-to-green gradient and a simple shadow underneath will read as far more convincing than a flat-colored outline, even without the full faceted cross-section or detailed speckling.
What mistakes make a banana drawing look fake?
The three most common issues are a flat outline built without any underlying volume, uniform flat-yellow coloring instead of a real gradient, and a missing cast shadow that leaves the banana looking like it’s floating rather than resting on a surface. Checking those three things, in that order, resolves most of what makes a banana drawing look like a quick sketch instead of a studied one.
- 769shares
- Facebook0
- Pinterest769
- Twitter0
- Reddit0