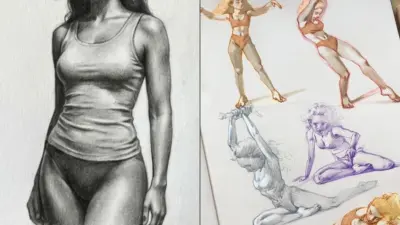
Drawing eyes can be a captivating and rewarding artistic endeavor. Many artists find eyes to be one of the most expressive features of the human face. Learning to draw eyes accurately can bring life and emotion to your portraits and character sketches.
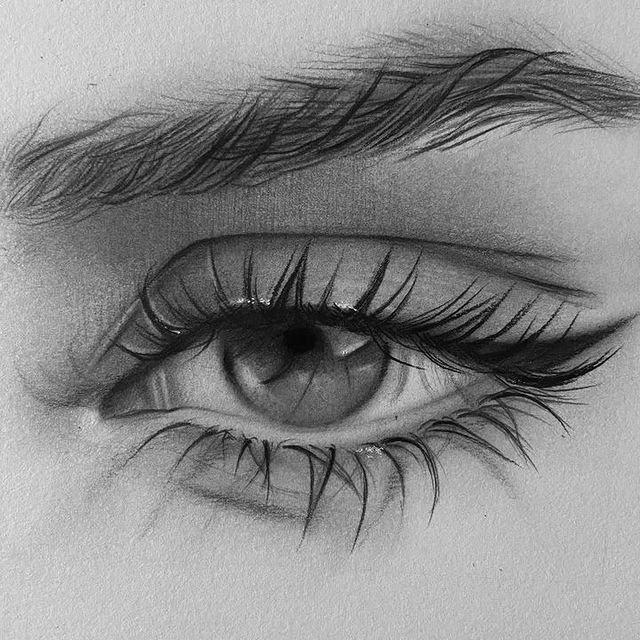
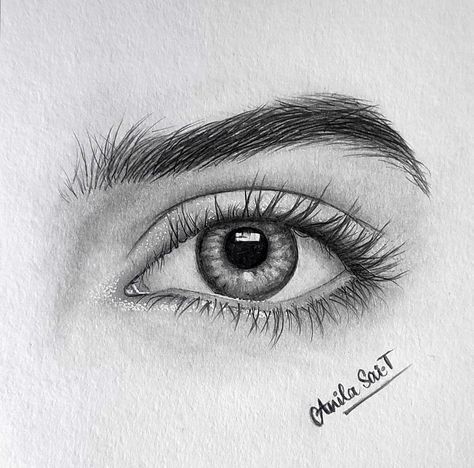
With practice and attention to detail, anyone can improve their eye-drawing skills. This guide will walk you through the process step by step, from understanding basic eye anatomy to adding final touches that make your drawings pop. Whether you’re a beginner or looking to refine your technique, you’ll find helpful tips to enhance your artwork.
Key Takeaways
- Eye anatomy knowledge is crucial for realistic drawings
- Proper shading techniques create depth and dimension
- Adding textures and details brings eyes to life in artwork
Understanding Eye Anatomy
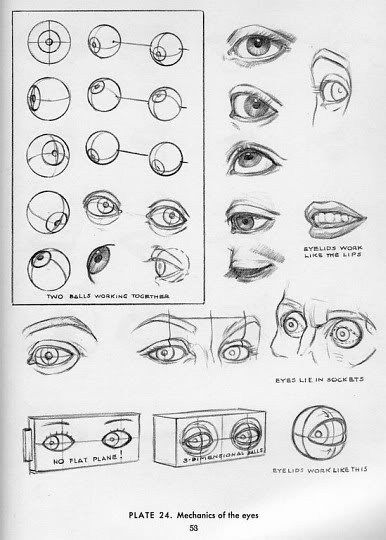
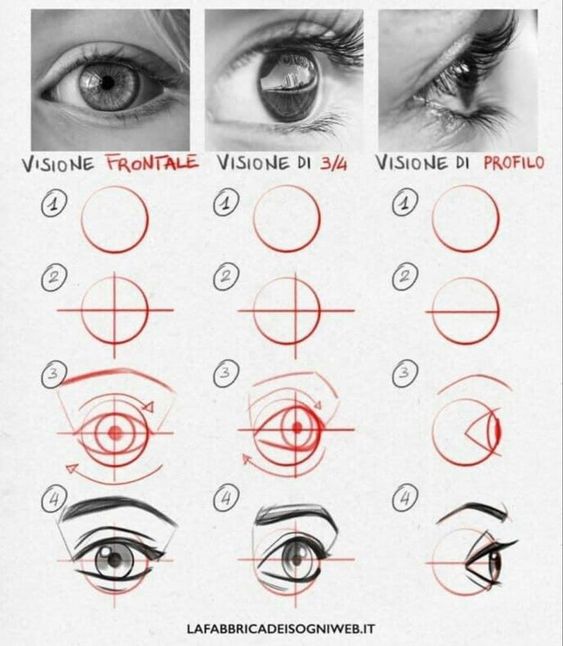
Drawing realistic eyes starts with knowing their parts and how they work together. Let’s look at the key elements that make up the eye and how to capture them on paper.
Components of the Eye
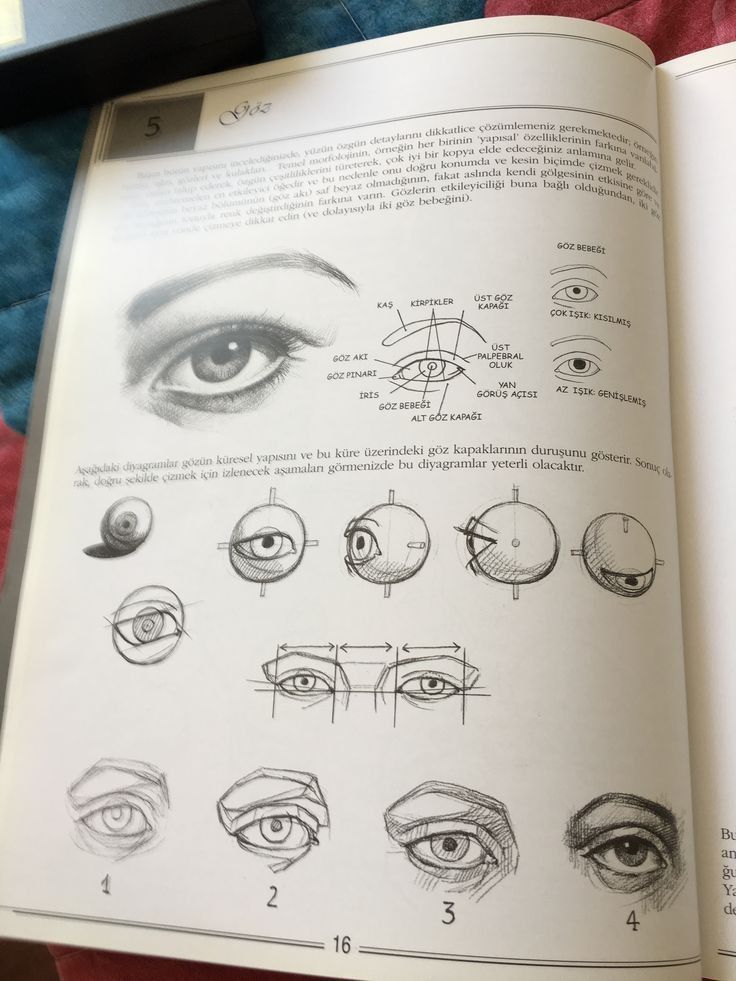
The eyeball sits in a protective socket in the skull. It has several important parts:
- Iris: The colored ring around the pupil
- Pupil: The black center that changes size with light
- Sclera: The white part of the eye
- Cornea: The clear outer layer that covers the iris and pupil
Eyelids protect the eye. They have lashes along the edges. Tear ducts in the corners keep eyes moist.
To draw eyes well, focus on these parts. Pay attention to how light hits them. Notice how they move and change with expressions.
Common Eye Shapes
Eyes come in many shapes. Some common types are:
- Almond: Oval with pointed corners
- Round: Circular with curved edges
- Hooded: Extra skin folds over the crease
- Monolid: No visible crease above the eye
Eye shapes vary by genetics and ethnicity. The shape affects how shadows fall on the eye. It changes how the iris and pupil look from different angles.
When drawing, match the eye shape to your subject. This helps create a likeness. Eye shape also adds character to your drawings.
Perspective and Angles
Eyes change based on the angle you see them from. From the side, you might only see part of the iris. From above, the upper lid may hide some of the eye.
Perspective affects how much of the eye is visible. It changes the shape of the iris and pupil. The whites of the eye show more or less depending on the angle.
To draw eyes at different angles:
- Sketch the basic eye shape
- Add the iris and pupil
- Draw in eyelids and lashes
- Adjust based on the viewing angle
Practice drawing eyes from many angles. This skill helps create more dynamic and interesting portraits.
Preparing for Your Drawing
Getting ready to draw eyes involves choosing the right tools, paper, and workspace. These steps set you up for success before you start sketching.
Choosing the Right Tools
Pick graphite pencils in different hardness levels. Softer pencils (B, 2B, etc.) make darker lines. Harder pencils (H, 2H, etc.) create lighter lines. A mechanical pencil works well for fine details.
Get a kneaded eraser. It’s soft and moldable, perfect for lifting graphite off the paper. A blending stump helps smooth out shading. It’s a tightly rolled paper tool with a pointed tip.
Make sure your pencils are sharp. Dull pencils can’t make precise lines needed for eye details.
Selecting Paper Quality
Use smooth bristol paper for eye drawings. It has a flat surface that’s great for detailed work. The paper should be thick enough to handle multiple layers of graphite.
Avoid paper with too much texture. Rough paper can make it hard to draw smooth lines and even shading. Test your paper before starting a big project.
Setting up Your Workspace
Find a spot with good lighting. Natural light is best, but a desk lamp works too. Make sure the light doesn’t cast shadows on your drawing area.
Keep your tools close by. Arrange your pencils, eraser, and blending stump within easy reach. Have a clean cloth nearby to wipe your hands and keep the paper smudge-free.
Use a reference photo of an eye. Place it where you can see it clearly while drawing. This helps you capture the right shapes and details.
Clean your workspace. A tidy area helps you focus on your art. Remove items that might distract you or get in the way.
Sketching the Outline
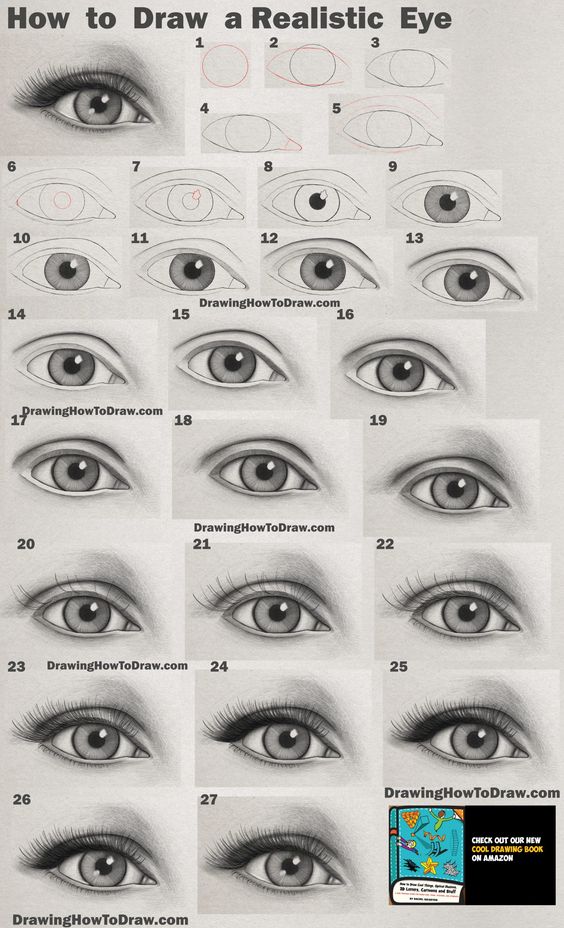
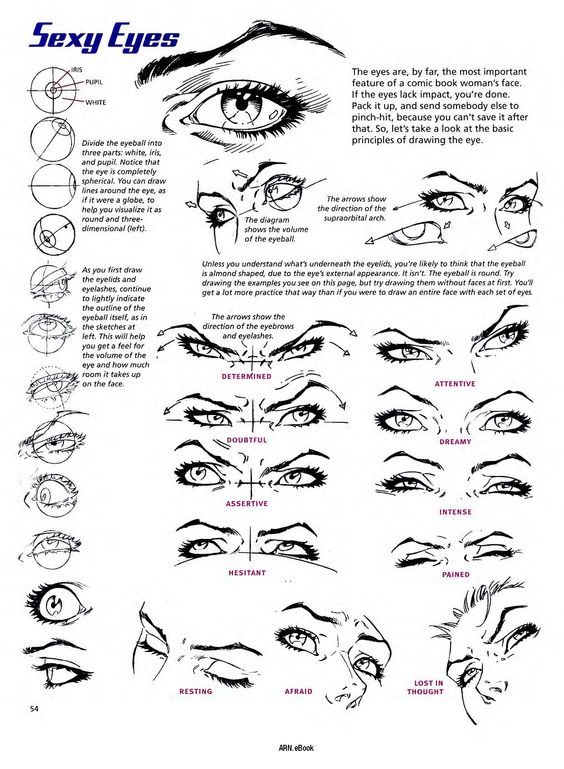
Drawing eyes starts with creating a basic outline. This process involves sketching simple shapes and adding key details to bring the eye to life.
Drawing Basic Shapes
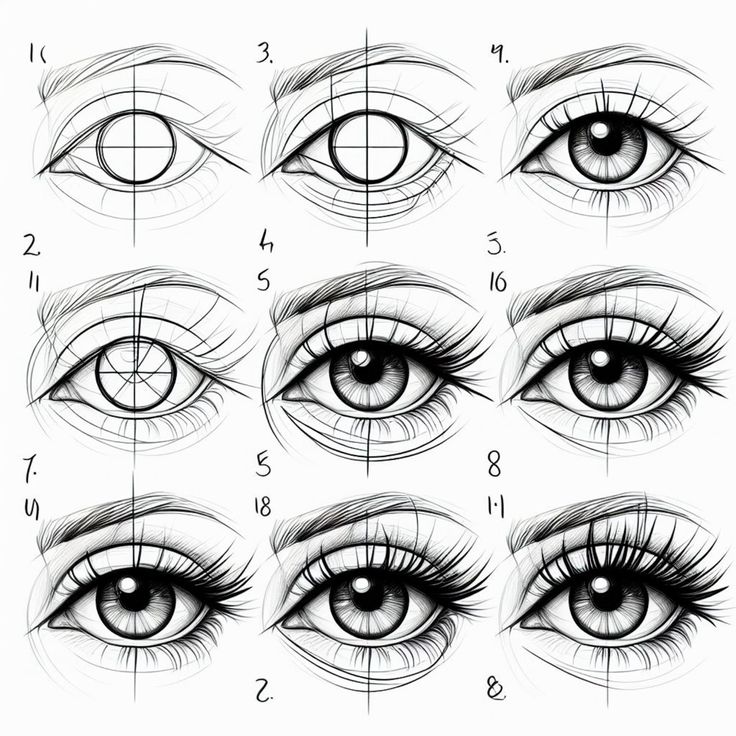
Begin by drawing a circle for the eye’s base shape. This circle represents the visible part of the eyeball. Next, sketch an almond shape that overlaps the circle. This forms the eye’s opening.
Make the almond wider at the center and narrower at the ends. The top curve is usually flatter than the bottom. Adjust the size and angle of the almond shape to create different eye expressions.
Adding Details to the Iris and Pupil
Inside the eye, draw a smaller circle for the iris. Place it slightly behind the upper eyelid for a natural look. In the center of the iris, add an even smaller circle for the pupil.
Shade the pupil solid black. For the iris, add lines radiating from the pupil to the edge. This creates texture and depth. Leave small white spots in the iris for light reflections.
Defining Eyelids and Lashes
Sketch the upper and lower eyelids along the almond shape. The upper lid is typically thicker than the lower lid. Add a slight curve to each lid to show its three-dimensional form.
For eyelashes, draw short curved lines extending from the lids. Upper lashes are usually longer and more numerous than lower lashes. Make the lashes thicker at the base and thinner at the tips.
Shading Techniques
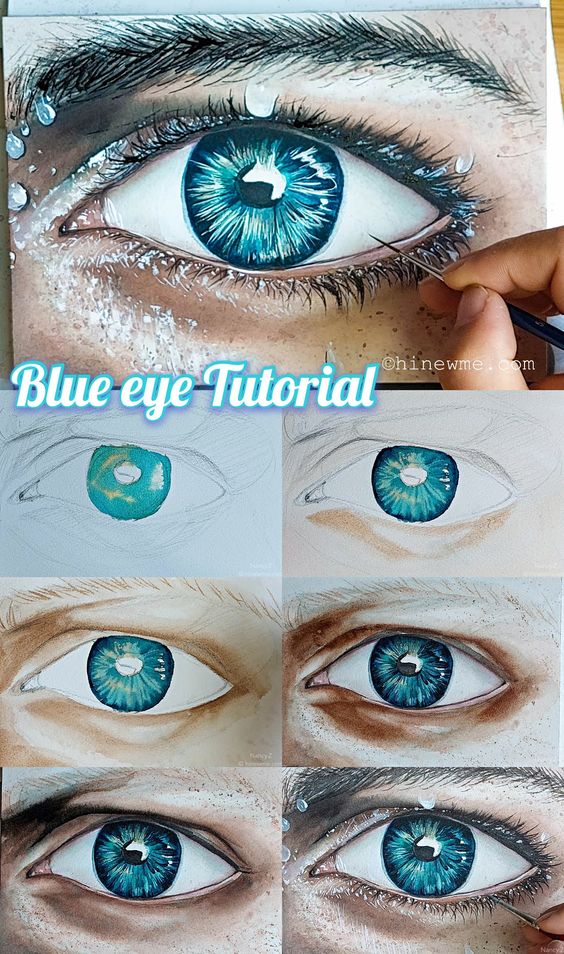
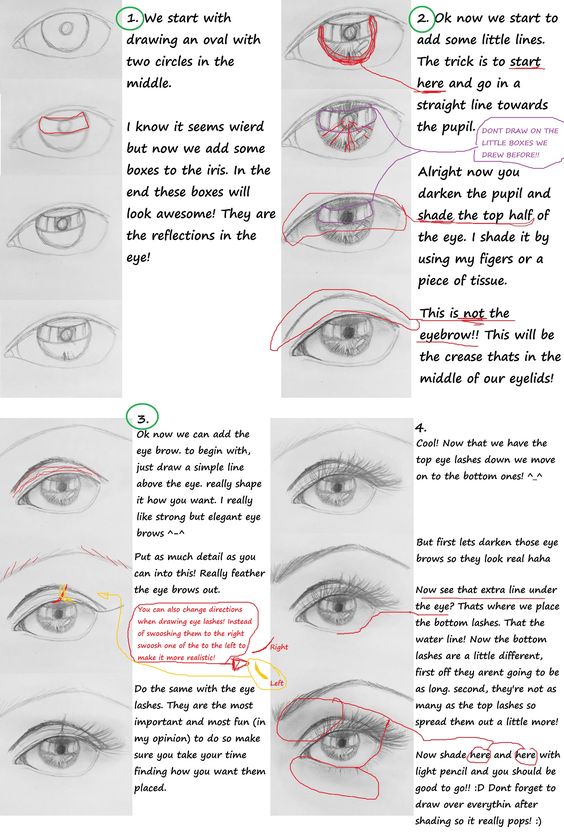
Shading brings eyes to life by adding depth and realism. It involves using light, shadow, and blending to create a lifelike appearance.
Understanding Light and Shadow
Light plays a key role in eye shading. Pick a light source direction to guide your shading choices.
Highlights are the brightest parts where light hits directly. These are often on the iris and cornea.
Shadows fall on areas furthest from the light. The upper eyelid usually casts a shadow on the eye.
Mid-tones bridge highlights and shadows. They help create a smooth transition between light and dark areas.
Creating Volume and Depth
Start with a base color for the iris. Add darker shades around the edges to create depth.
Use lighter tones near the pupil to make it pop. This mimics how light enters the eye.
Don’t forget the tear duct. A small highlight here adds realism.
Shade the whites of the eyes too. They’re not pure white – add subtle shadows for a natural look.
Blending for Realism
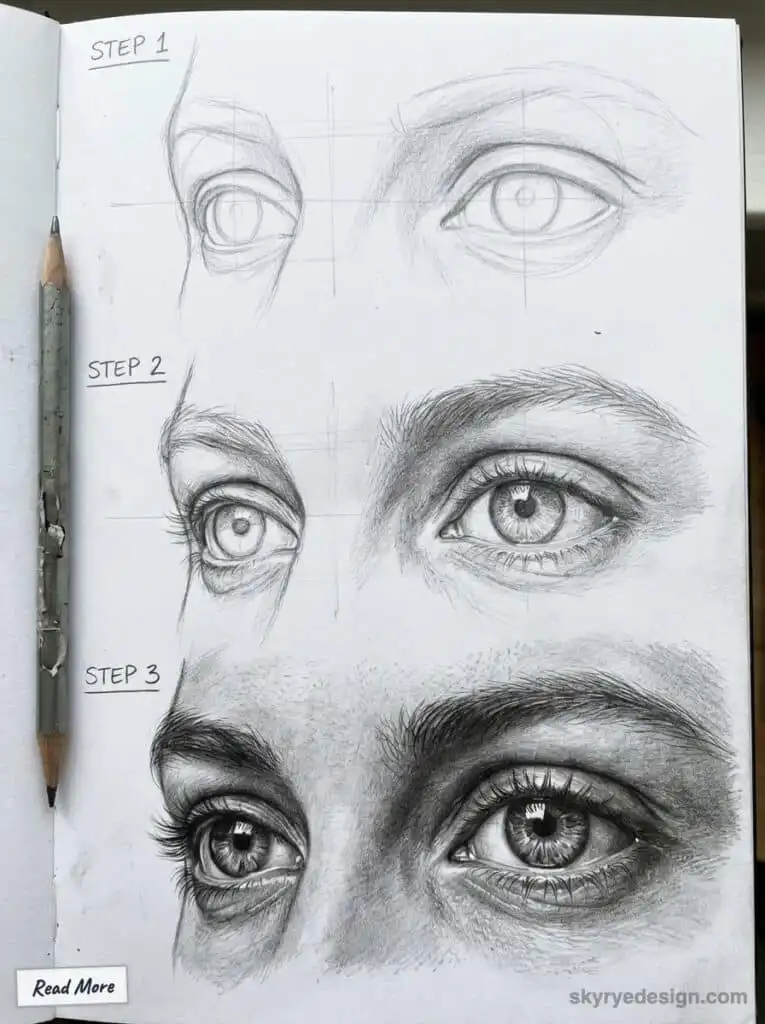
Blending is crucial for realistic eyes. Use tools like blending stumps or soft brushes.
Start with light layers and build up slowly. This gives you more control over the final look.
Blend edges between different shades. Harsh lines can make eyes look flat or cartoon-like.
For extra realism, add tiny blood vessels in the whites. Use a very light touch for this detail.
Try different textures in the iris. Some eyes have more defined patterns than others.
Adding Textures and Details
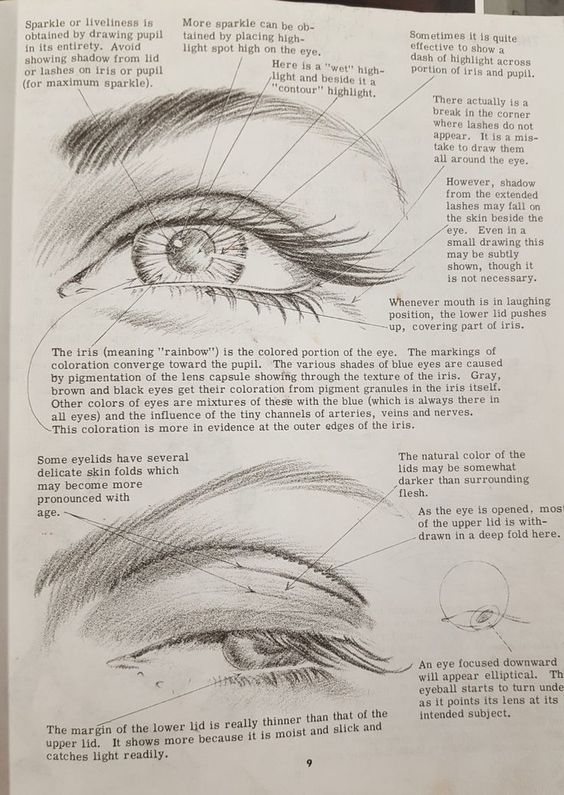
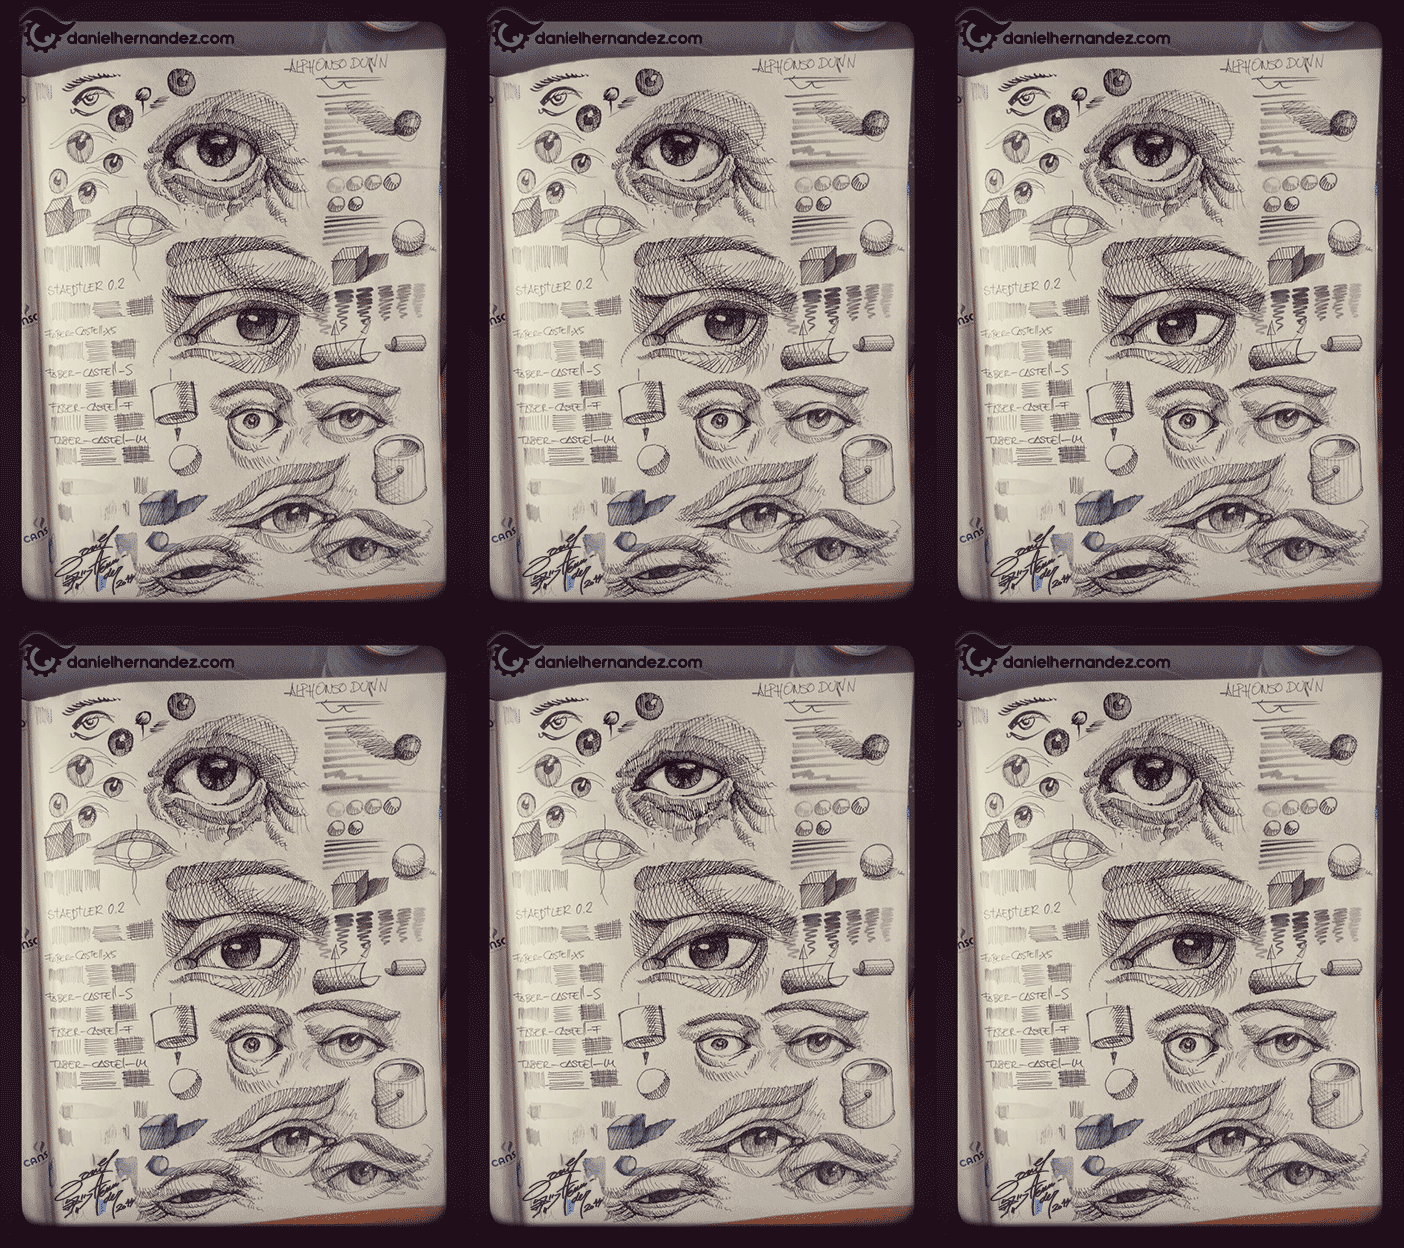
Eyes come to life through subtle textures and details. These elements add depth, realism, and expressiveness to your drawings.
Eyebrows and Skin Texture
Start with the eyebrows. Draw short, fine lines to mimic individual hairs. Vary the thickness and direction of strokes for a natural look.
For skin texture, use light shading and tiny dots around the eye area. This creates a soft, porous effect. Pay attention to the texture differences between the eyelid and surrounding skin.
Add small creases near the tear ducts and outer corners of the eyes. These subtle lines make the skin appear more realistic.
Expression Lines and Wrinkles
Expression lines help convey emotion and age. Draw faint lines radiating from the outer corners for a smiling or squinting effect.
Add a few gentle creases on the eyelids. This gives depth and realism, especially for mature eyes.
For older characters, include some wrinkles around the eye area. Use curved lines that follow the natural contours of the face.
Refining the Eye’s Highlights
Highlights bring sparkle to the eyes. Add a small white spot in the iris to represent light reflection.
Create depth by leaving tiny white areas along the edge of the iris. This mimics the way light interacts with the eye’s surface.
For extra shine, add a faint highlight on the lower eyelid. This subtle touch enhances the eye’s three-dimensional appearance.
Final Touches
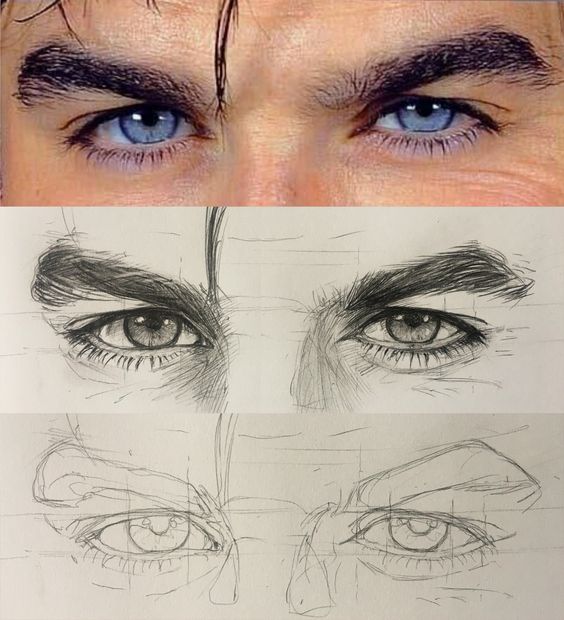
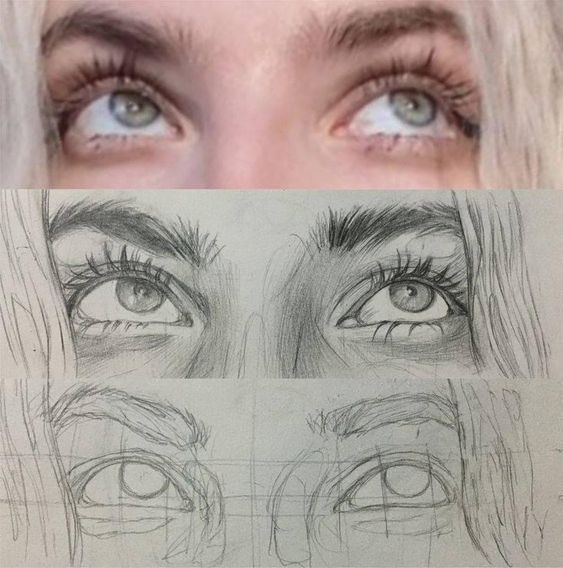
Adding the finishing touches brings your eye drawing to life. These steps refine details and enhance realism.
Reviewing Your Work
Step back and look at your drawing from a distance. Check if the eye shape looks natural. Make sure the iris and pupil are centered properly. Look for any areas that seem off or need more work.
Use a mirror to view your drawing in reverse. This helps spot mistakes you might have missed. Take a short break and come back with fresh eyes. You’ll often notice things you didn’t see before.
Adjusting Contrast and Details
Increase contrast to make the eye pop. Darken the darkest areas like the pupil and upper lash line. Lighten the brightest spots like highlights on the iris. This creates depth and makes the eye look more lifelike.
Add fine details with a sharp pencil. Draw tiny blood vessels in the white of the eye. Create texture in the iris with small lines or dots. Refine the eyelashes, making some overlap or cross each other.
Evaluating Realism
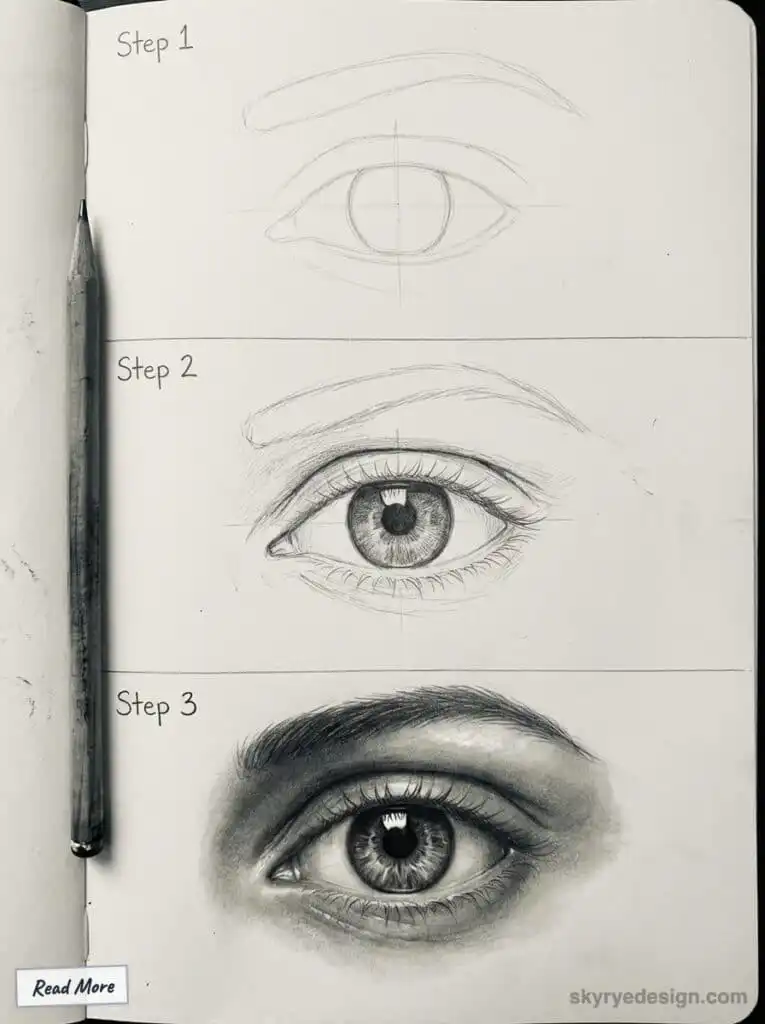
Compare your drawing to a real eye or reference photo. Check if the proportions look right. The iris should be a perfect circle. The white of the eye shouldn’t be too white – add some subtle shading.
Look at the direction of light in your drawing. Shadows should fall consistently. The highlight in the eye should match the light source. Make sure reflections in the eye make sense for the imagined scene.
Adjust your drawing based on these observations. Erase and redraw parts if needed. Keep refining until you’re happy with the result.
Different Portrayals of Eyes
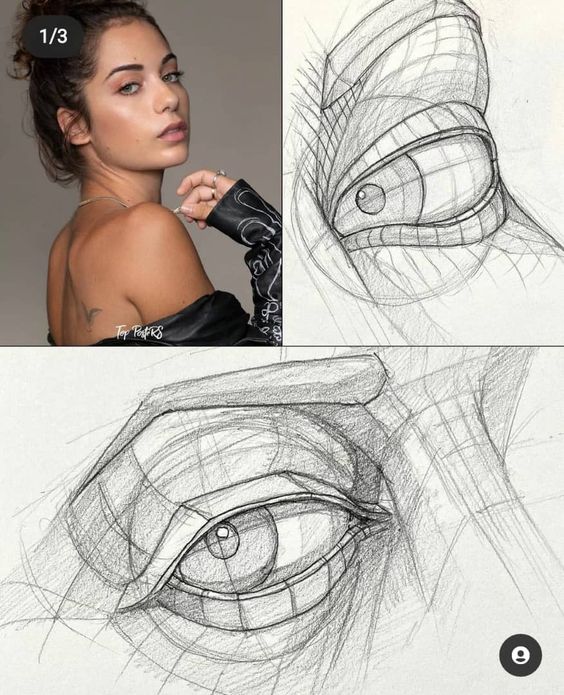
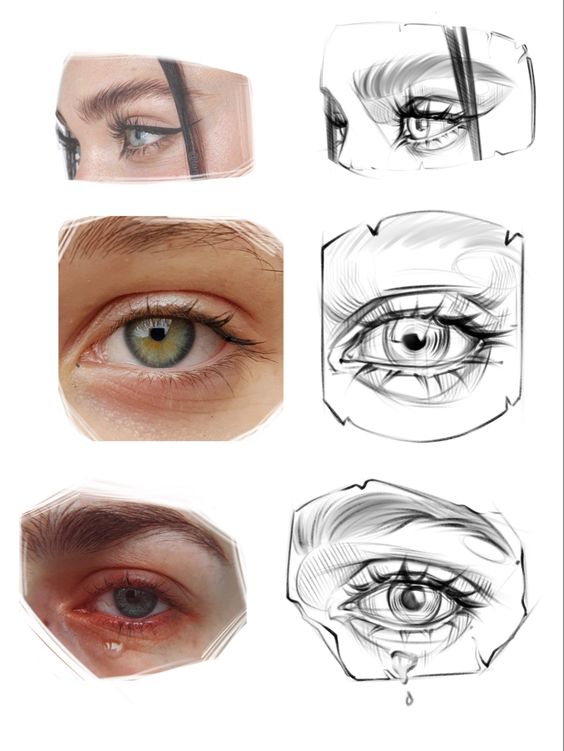
Eyes can be drawn in many styles and from various angles. Artists use different techniques to show emotion and character through eye illustrations.
Cartoon Versus Realistic Eyes
Cartoon eyes often use simple shapes and exaggerated features. They may have large pupils, thick eyelashes, or sparkles to show emotion. Realistic eyes have more detail and shading. Artists draw the iris, pupil, and sclera with careful attention to light and shadow.
Realistic eyes need precise lines and blending. Cartoon eyes can be made with basic circles and curves. Both styles can show feeling, but in different ways.
Eyes at Different Angles
Front view eyes are the easiest to draw. The eye is oval-shaped, with the iris and pupil in the center. Side view eyes show less of the eye’s round shape. Only part of the iris is visible.
Three-quarter view mixes front and side angles. It shows more of the eye’s curve than a side view. Drawing eyes from above or below changes how much of the lid and lower eye area is seen.
Cultural Interpretations of Eyes
Eye shapes and styles vary in art from different cultures. Anime and manga often show large, expressive eyes. Traditional Chinese paintings may use thin, angled eye shapes.
Some cultures view certain eye colors as lucky or special. Art might highlight these traits. Native American art sometimes uses eye symbols in spiritual contexts.
Eye makeup and decorations also change how eyes are portrayed in art. Egyptian art shows eyes with dramatic eyeliner. This affects how artists draw eyes in historical or cultural scenes.
Using Color Effectively
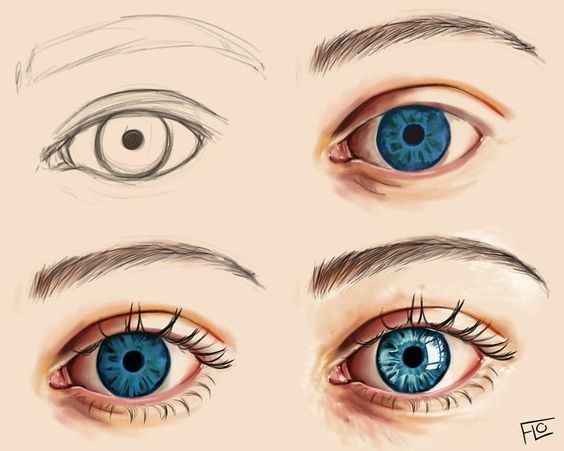
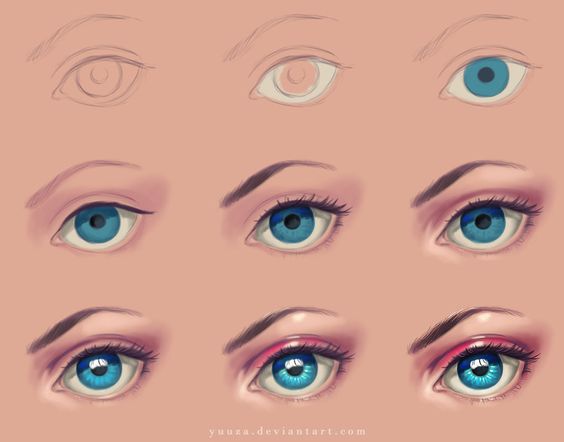
Color brings eyes to life in drawings. It adds depth, realism, and expression. The right colors make eyes pop off the page.
Choosing Color Palettes
Pick colors that match the eye’s natural tones. For blue eyes, use shades of blue, gray, and white. Brown eyes need browns, oranges, and golds. Green eyes work with greens, yellows, and browns.
Start with 3-5 main colors. Include a light, medium, and dark shade. Add 1-2 accent colors for spark.
Mix colors to create custom shades. Blend blue and brown for hazel eyes. Combine yellows and greens for cat eyes.
Layering with Colored Pencils
Build up color in thin layers. Start light and add darker shades slowly.
Use circular motions to blend colors smoothly. Press harder for darker areas, lighter for highlights.
Layer complementary colors to add depth. Put orange under blue irises or purple under brown.
Colored pencils work well for realistic eyes. They allow fine detail and smooth blending.
Adding Depth with Color
Use darker colors in the outer iris and pupil. This creates a 3D effect.
Add a light ring around the pupil for a lifelike glow. Use white or pale yellow.
Place highlights strategically. A small white spot shows reflected light.
Vary color intensity across the iris. Make some areas more vivid, others more muted.
Add flecks of color to mimic natural iris patterns. Use short, random strokes in accent shades.
- 10.7Kshares
- Facebook0
- Pinterest10.7K
- Twitter1
- Reddit0

