Drawing portraits gets easier when you stop chasing every eyelash and start building the head in layers. Block in the skull shape, place the eye line, nose, mouth, and ears, then use light and shadow to turn flat features into planes.
I like to keep the first pass almost boring: pale guidelines, simple value shapes, and no heavy outlines until the proportions feel right. That restraint gives you room to fix the likeness before the drawing becomes too dark to adjust.
How to start drawing portraits
To start drawing portraits, sketch a light oval or egg shape for the head, draw a center line, then mark the eye line about halfway down the head. Place the nose halfway between the eyes and chin, set the mouth about one third below the nose, and keep checking angles against your reference. Once the features sit correctly, build shading slowly with an HB or 2B pencil instead of pressing hard too soon.
| Portrait stage | What to check before moving on |
|---|---|
| Construction | Head shape, center line, eye line, nose line, mouth line |
| Feature placement | Eye spacing, ear height, nose length, mouth width |
| Value block-in | Main light side, shadow side, darkest accents |
| Refinement | Likeness, edges, hair masses, small highlights |


Key Takeaways
- Essentials for successful portrait drawing include proper tools and clear methods
- Knowing facial proportions is key to realistic results
- Practice with step-by-step tutorials to enhance your skills

Essential Tools and Materials for Drawing Portraits
Having the right supplies is key to developing your portrait drawing skills. Good paper, carefully selected pencils, and a well-organized workspace each play an important part.
Choosing the Right Paper
Good quality paper makes details stand out and helps you control your strokes. Look for heavyweight paper, generally at least 90–100 lb (190–210 gsm), to prevent smudging and tearing.
A smooth texture, called “hot press” or “plate” finish, works well for fine details and smooth shading. If you prefer more texture, a “cold press” surface gives tooth for expressive lines. Common choices include Bristol board (smooth or vellum), drawing pads, or sketchbooks designed specifically for pencil.
Paper size also matters. Large sheets offer space for realistic studies, while smaller pads are ideal for practice and on-the-go sketching. Always use acid-free paper to preserve your work over time.
Graphite and Other Drawing Supplies
A range of graphite pencils lets you achieve both light lines and deep shadows. Use harder pencils such as 2H or H for initial outlines, while softer grades like 2B–6B are perfect for shading and defining darker values.
Essential tools include:
- Graphite pencils: HB, 2B, 4B, 6B
- Kneaded eraser: Lifts graphite gently for highlights
- Plastic eraser: Erases cleanly without damaging paper
- Blending stumps or tortillons: Smooth out pencil lines
- Pencil sharpener: Keeps a fine point on your pencil
Compressed charcoal sticks and willow charcoal can be used for bold lines or dramatic effects, but graphite is generally preferred for smoother portraits. Use a fixative spray to help prevent smudging when your drawing is finished.
Setting Up Your Workspace
Arrange your drawing space so you can reach all your supplies easily. Good natural or adjustable artificial lighting is important to see your values and prevent eye strain. Position your light source to avoid casting shadows across your work.
Use a dusting brush to gently remove eraser bits or graphite dust without smearing your drawing. Keep a clean scrap sheet of paper under your hand while working, especially if you are left-handed, to protect your drawing surface.
Organize your tools with trays, containers, or small drawers so you can quickly find everything you need. A sturdy drawing board or desk gives your paper a firm backing and lets you work comfortably for long periods.


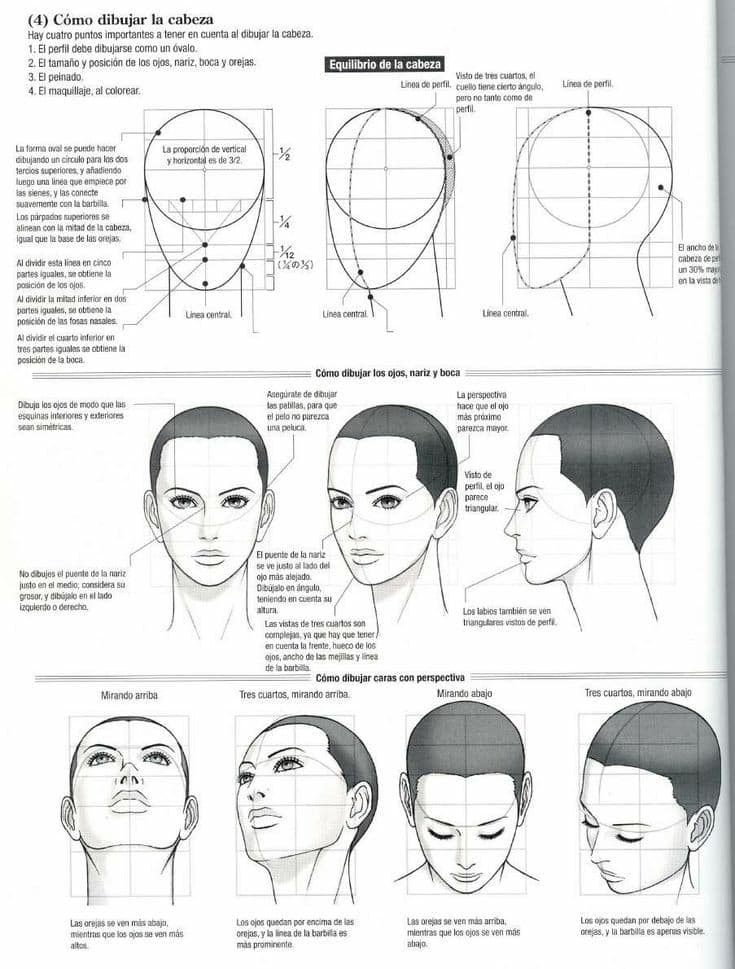
Understanding Facial Proportions
Accurate facial proportions are key for making portraits look realistic and balanced. By breaking the face down into simple shapes and consistent measurements, you set the stage for a strong likeness.
Mapping the Basic Structure
Start by drawing an oval for the head, as this shape helps you define the boundaries. Next, draw a vertical line down the center of the face—this acts as a useful symmetry guide.


Divide the face into three equal horizontal sections:
- Hairline to Eyebrows
- Eyebrows to the Bottom of the Nose
- Bottom of the Nose to the Chin
This three-part division helps place features at the right heights. Sketch gentle lines across these divisions to guide where you position the eyes, nose, and mouth.
When you’re ready for features, mark the eye line about halfway down the head. Place the bottom of the nose at roughly halfway between the eyes and chin. Keep features aligned by referencing these proportional guides.
Turn these ideas into real sketchbook practice
Drawing a Face from Different Angles
Faces look different when viewed from various angles, so it’s helpful to practice turning the head. For a profile (side view), the ear usually sits between the eyebrow line and nose line. The nose and chin extend farther out from the face’s central line.

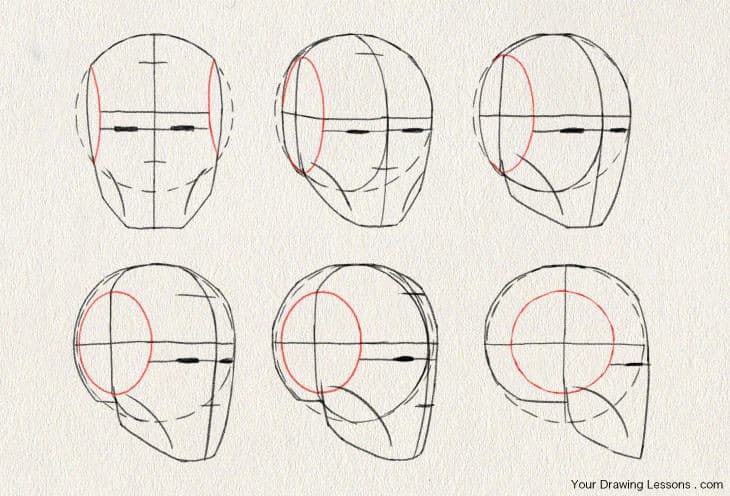

In a three-quarter view, the central vertical line will curve, and features on the far side appear smaller or partially hidden. Use curved guidelines to help you curve the placement of the eyes, nose, and mouth.
To check your proportions, compare distances closely. For example, the width between the eyes is typically about one eye-width. Adjusting these measurements as the head turns keeps your portraits consistent.
Proportion Guidelines for Realism


Use proven measurements to draw a face that looks natural:
- The eyes usually sit halfway between the top of the head and the chin.
- The width of the face is generally five eye widths.
- The bottom of the nose is placed halfway between the eyes and the chin.
- The mouth’s corners often align with the centers of the eyes.
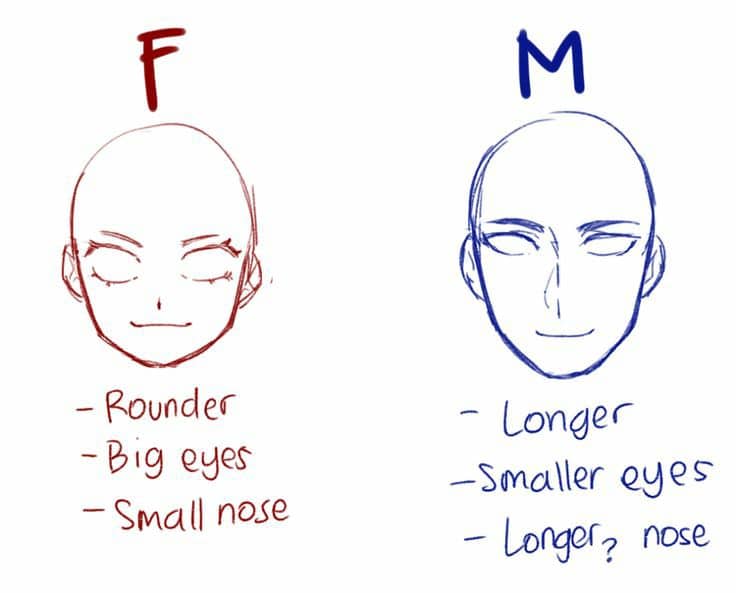
Men and women have subtle proportion differences—male faces might have broader jaws and flatter foreheads, while female faces often have more tapered chins and rounded features.
Checking these relationships can help you capture likeness and avoid common mistakes. Aim for accuracy, but remember each individual’s face will have its own unique variations.


Step-by-Step Tutorials for Drawing Portraits
When drawing portraits, breaking the process into clear steps helps you stay focused and build skills efficiently. Each stage—starting with the outline, refining individual features, adding light and shadows, and finishing with fine details—contributes to a more lifelike and balanced result.
Sketching the Outline
Begin with loose sketches to map out the general shape of the head and shoulders. Use light pencil strokes so you can adjust lines as you go. Common practice is to block in the basic head shape (oval or egg-shaped) and add guidelines for eye level, nose, and mouth position.
A simple table for head proportion guidelines:
| Landmark | Typical Placement |
|---|---|
| Eyes | Halfway down the head |
| Nose | About halfway from eyes to chin |
| Mouth | About a third below the nose |
| Ears | Aligned with eyes and nose |
Double-check overall width and height so your portrait won’t appear too stretched or condensed. Thumbnails and gesture sketches at this stage help you decide on composition and pose.
Refining Features
Once your outline feels accurate, move on to the specific facial features. Focus on basic shapes—eyes as almonds, nose as a wedge or trapezoid, lips as curves with subtle variation.

Work on placing features with symmetry and correct spacing. Use reference lines from your initial sketch to line up the eyes, nose, and mouth correctly. Pay attention to the underlying structure, such as skull shape, to anchor features where they belong.
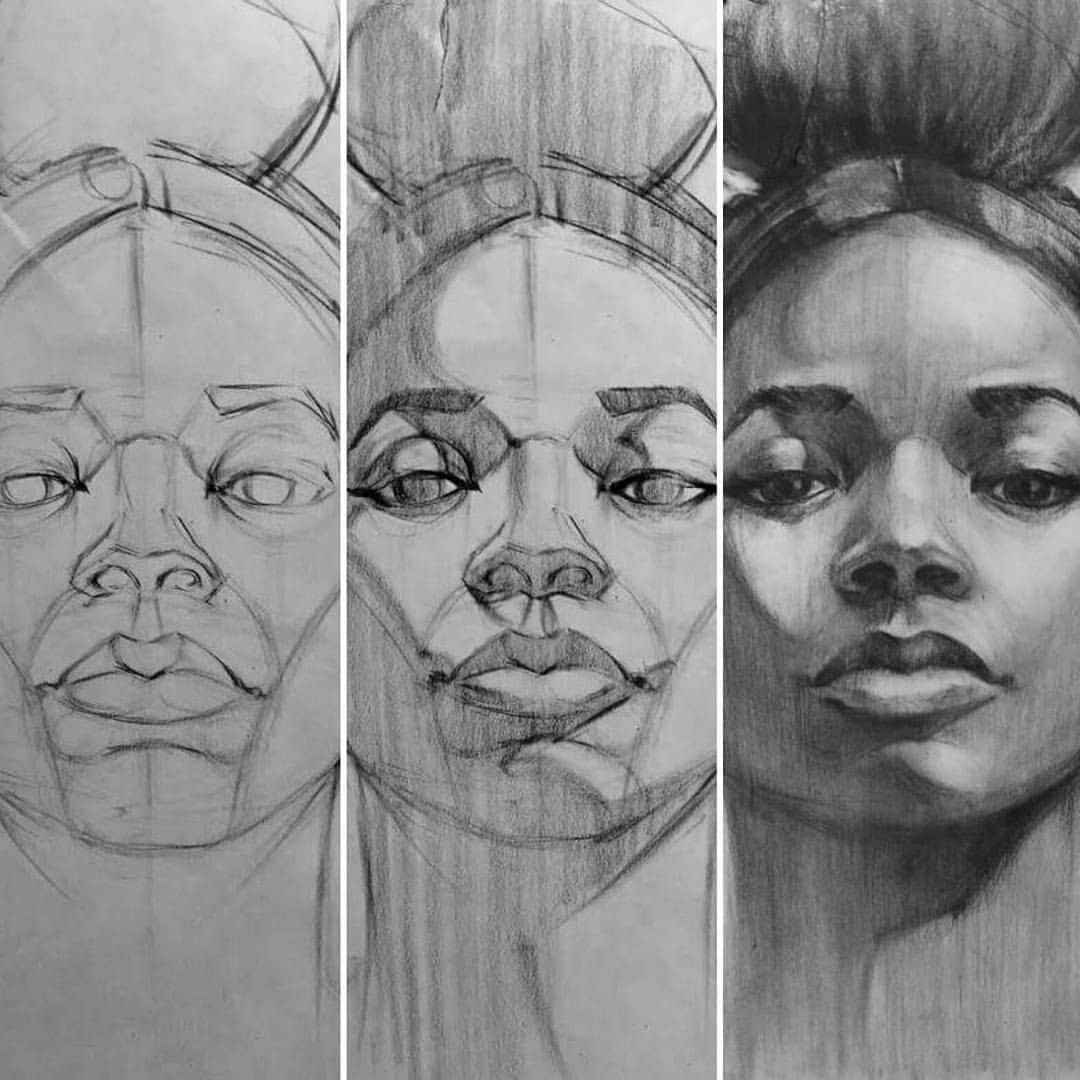
Draw lightly until you’re satisfied, then reinforce the forms gradually. This method lets you make corrections easily and keeps the face looking natural.
Adding Light and Shadows
Light and shadow give depth and realism to any portrait. Identify the main light source and observe how it interacts with the planes of the face. Use shading to develop volume on the cheeks, chin, and brow.
Common shading techniques include:
- Hatching: Lines in one direction
- Cross-hatching: Lines crossing over each other
- Blending: Softening graphite or charcoal with a stump or tissue
Highlight areas where light hits directly—often the forehead, nose bridge, and cheekbones. Shadows appear under the nose, lips, and jawline. Work slowly and build up values, always comparing the darks and lights as you go.
Final Touches and Details
In the last step, refine specific details that bring the portrait to life. Sharpen the contours of the eyes, add subtle textures to hair and skin, and deepen shadows for contrast. Softly indicate pores or wrinkles only where necessary; less is often more.
At this point, erase stray marks and clean up edges. Adjust minor asymmetries or proportions for a polished look. Carefully sign your work in a discrete corner when you’re finished. This attention to detail is what separates a simple sketch from a finished portrait.


Mastering Key Features in Portraits
Precise details in the eyes, mouth, nose, and hair give portraits their realism. Small adjustments in structure and shading can transform the overall likeness of your drawing.


Drawing Eyes and Eyebrows
Eyes are usually the first thing people notice in a portrait. Start by observing the shape of the eye, the placement of the iris, and the eyelid creases. Use light guidelines to map out distances and proportions.
When adding eyelashes, use quick, gentle strokes. Eyebrows have a direction to their hair growth—sketch these in the right direction with varying pressure for natural thickness.
Tips for Eyes and Eyebrows:
- Outline the eye oval gently; avoid harsh lines.
- Shade the sclera (white of the eye) lightly—never pure white.
- Add subtle shading to show the eyeball’s roundness.
- Highlight the tear duct and moist areas for lifelike effects.
Use a kneaded eraser to lift tiny highlights in the iris and brows, which creates depth and makes eyes look more convincing.
Capturing Likeness in Mouths and Noses
Mouths and noses often define a person’s unique appearance. Break down the forms: for mouths, look for the curve of the lips and the subtle shapes where they meet.


Noses aren’t drawn with lines as much as with soft shadows. Pay attention to the direction of light and use smooth, blended shading around the nostrils and bridge.
Steps for Drawing Mouths and Noses:
| Mouths | Noses |
|---|---|
| Lightly sketch the center line for the lips | Map nostril shapes with light marks |
| Indicate corners and curves | Shade under the nose for depth |
| Fill in highlight and shadows | Use soft gradients along sides |
Keep checking the angles and placements, because small changes here can shift the likeness dramatically.
Drawing Hair with Realism
Drawing hair isn’t about sketching every strand. Begin by blocking in the main mass and flow using sweeping motions that mimic the direction of the hair.
Divide the hair into sections based on how it falls—such as bangs, sides, or curls. Vary your pencil pressure for lighter and darker areas, following the natural highlights and shadows.
Key points to remember:
- Use a soft pencil for deep shadows; a hard pencil for lighter strokes.
- Pay attention to overlapping hair sections to create a sense of layering.
- Avoid drawing every hair; suggest texture and sheen with grouped lines and lifted highlights.
Use a blending stump for smoothing transitions, and lift out highlights with an eraser to capture shine and volume, giving hair a lifelike appearance.
Common portrait drawing mistakes to avoid
Most portrait problems start early, before the details look tempting. Slow down during the construction stage and check these points before you shade heavily.
- Placing the eyes too high: the eyes usually sit around the middle of the head, not near the top of the forehead.
- Outlining every feature: noses, cheeks, and lips often read better through soft value shifts than dark contour lines.
- Drawing hair strand by strand: block the hair as large shapes first, then add a few directional strokes and lifted highlights.
- Skipping angle checks: compare the tilt of the eyes, mouth corners, jaw, and shoulders. A small angle error can break the likeness.
Inspiration from Master Portrait Artists


Studying master artists helps because it gives you real decisions to copy, question, and adapt. Look at how Picasso breaks structure, how Matisse simplifies line and color, and how Degas uses cropped, candid poses. Museum collections from MoMA on Picasso, MoMA on Matisse, and The Met on Degas are useful references when you want to study those choices closely.
Pablo Picasso’s Approach
Pablo Picasso revolutionized portrait art with his ability to break convention. Rather than focusing on strict realism, he explored abstraction and multiple viewpoints in a single portrait.
You can observe how Picasso used geometric forms and sometimes fragmented facial features. For example, his Cubist portraits use shapes and angles to convey both the subject’s appearance and their inner experience. This approach lets you experiment with expressive line, color, and form to capture more than just the likeness of a person.
In your own work, consider moving beyond imitation. Try using bold outlines, overlapping perspectives, or simplified shapes. Study Picasso’s ability to blend emotional depth with an abstract visual vocabulary to challenge traditional expectations in portraiture.
Henri Matisse’s Techniques
Henri Matisse is known for his vivid colors and fluid line. Instead of mimicking the subject’s exact skin tones or details, Matisse simplified forms and prioritized expressive color choices.
He often used pure, unmixed hues and drew with an economy of line—sometimes relying on only a few strokes to define a face. This clarity creates portraits that feel open and inviting rather than overloaded with detail.
To learn from Matisse, experiment with reducing unnecessary details. Emphasize the essence of your subject by using bold colors and confident, continuous lines. Notice how this approach creates a sense of movement and energy, even in a still portrait, and helps you communicate mood without excessive information.
Edgar Degas’ Portrait Innovations
Edgar Degas brought a fresh perspective to portraiture by exploring candid poses and unusual viewpoints. Instead of formal settings, Degas often drew his subjects absorbed in everyday activities.
He paid special attention to capturing fleeting gestures, body language, and subtle facial expressions. Degas also experimented with compositions, using cropping and off-center placement to create a sense of spontaneity.
For your portraits, study how Degas used quick sketches and pastel work to build layers of color and texture. Aim to capture not just what a person looks like, but how they feel and move in a given moment. This can result in portraits that feel natural and lively, focusing on genuine emotion and unique personality.


After practicing front-view portraits, study side profile face proportions so the ear, nose, lips, chin, and back of the skull stay believable from another angle.
Drawing portraits FAQ
Q: What is the easiest way to start drawing portraits?
A: The easiest way to start drawing portraits is to use a light construction sketch before drawing details. Begin with an oval head shape, a center line, and horizontal guides for the eyes, nose, and mouth. Once those landmarks sit correctly, you can refine the features and build shadows without fighting major proportion problems later.
Q: What proportions should I use when drawing portraits?
A: A useful beginner setup is to place the eyes about halfway down the head, the nose halfway between the eyes and chin, and the mouth about one third below the nose. The face is often close to five eye-widths across. Treat these as starting guides, then adjust for the real person or reference photo.
Q: Which pencils are best for portrait drawing?
A: For portrait drawing, a small graphite range is enough: 2H or H for pale guidelines, HB for general sketching, and 2B to 6B for shadows and dark accents. A kneaded eraser is just as important because it lets you lift highlights from the eyes, nose bridge, cheekbones, and hair without damaging the paper.
Q: How do you make a portrait look like the person?
A: Likeness comes from spacing, angles, and value relationships more than tiny details. Compare the tilt of the eyes, the width of the mouth, the distance from nose to chin, and the shape of the jaw. Squint at your reference to see the big light and shadow pattern before adding eyelashes, skin texture, or hair strands.
Q: Why do my portrait drawings look flat?
A: Portraits often look flat when every feature has the same edge and value. Choose a clear light source, deepen the core shadows, soften turning edges on the cheeks and forehead, and keep highlights selective. Avoid outlining the nose and lips too heavily; soft transitions usually create more believable form.
Q: Should beginners draw portraits from photos or from life?
A: Beginners can use both. Photos are helpful because the pose stays still, but they can flatten values and distort proportions if the lens is wide. Drawing from life trains observation, depth, and gesture. If you use photos, choose clear lighting and avoid heavily filtered images until your construction skills are stronger.
Related portrait drawing practice
For a slower facial-expression walkthrough, use this step-by-step expressive faces guide. If your portrait includes eyewear, the glasses and face drawing guide covers bridge, temple, and lens placement without crowding the eyes.
Related face expression practice
Portraits feel more alive when the emotion is planned early, so pair this lesson with the expression drawing guide for brows, eyes, mouth tension, and subtle asymmetry.
- 12.2Kshares
- Facebook0
- Pinterest12.2K
- Twitter0
- Reddit0


