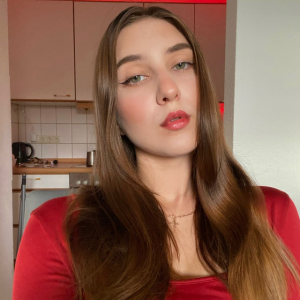
Learning how to draw eyebrows is mostly about structure: place the start, arch, and tail first, then build the brow with light strokes that follow the hair direction. If you jump straight into dark shading, the brow usually turns flat or heavy. A simple map keeps the eyebrow drawing believable whether you are sketching a realistic portrait, a makeup study, or a stylized character.
I like to treat eyebrows as small pieces of gesture drawing. The outside shape matters, but the rhythm of the hairs matters more: upward at the inner corner, flatter through the body, and cleaner at the tail. Once that flow is clear, shading becomes much easier.
This guide walks through eyebrow shapes, pencil tools, realistic hair strokes, beginner mistakes, and a short practice plan you can repeat in a sketchbook or digital drawing app.
How to draw eyebrows step by step
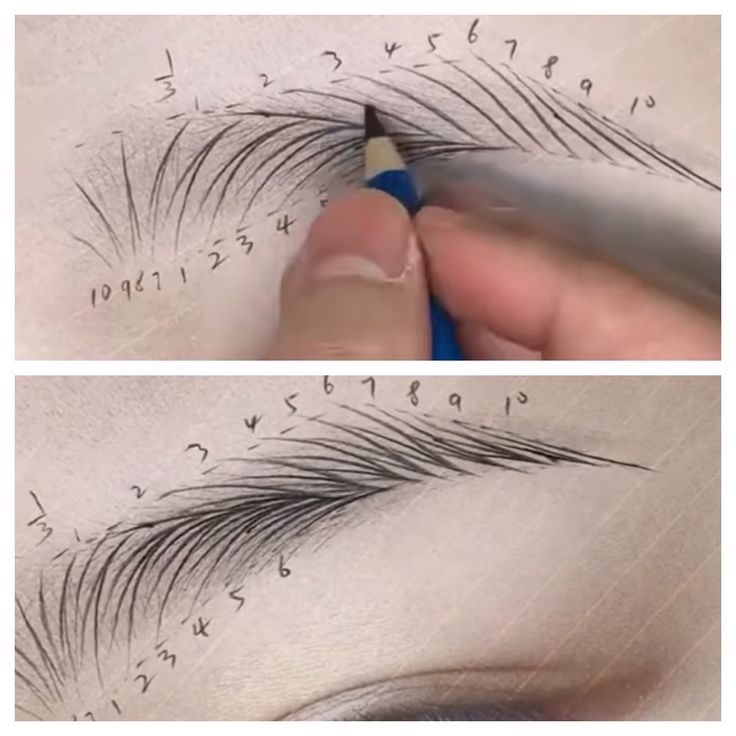
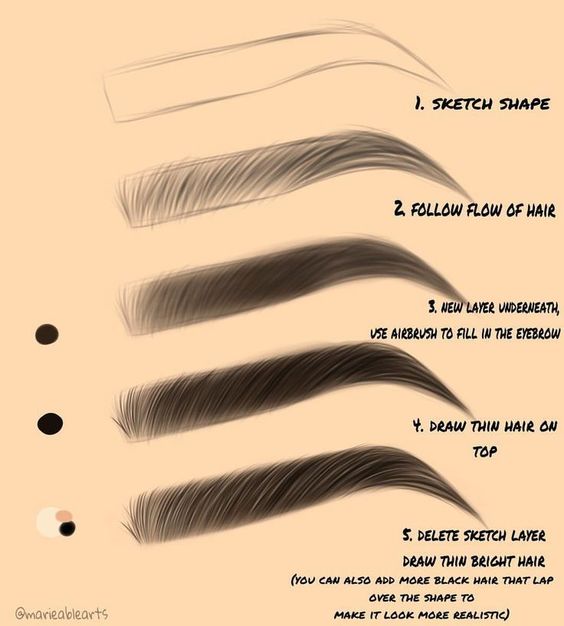
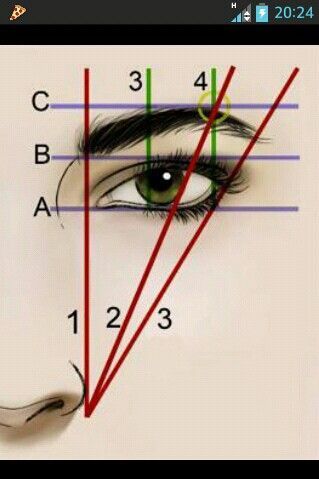
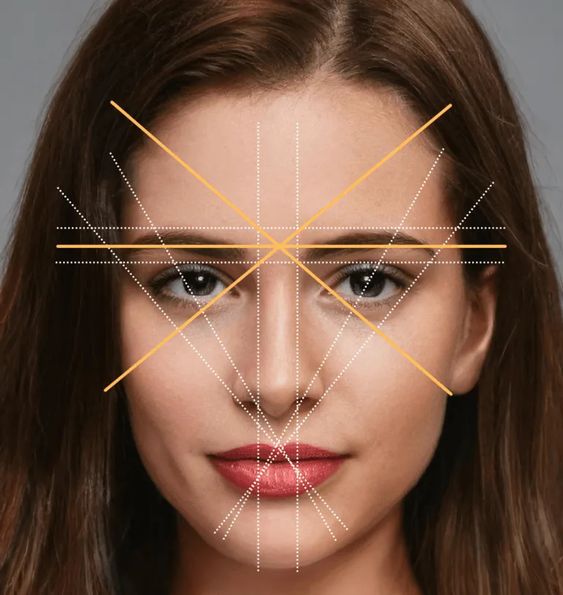
To draw eyebrows step by step, lightly mark the start of the brow above the inner corner of the eye, place the arch near the outer side of the iris, and taper the tail toward the outside corner. Sketch the lower edge first because it controls the expression. Fill the body with short strokes that follow the hair growth, keep the front lighter than the tail, then soften the shape with a clean brush, blending stump, or low-opacity eraser.
| Step | What to draw | What to watch |
| 1 | Mark the start, arch, and tail | Keep the brow aligned with the eye, not floating above it |
| 2 | Sketch a soft outer shape | Avoid a boxy front edge unless the style calls for it |
| 3 | Add the lower edge | This line controls the brow expression |
| 4 | Shade the middle value | Build slowly with light pencil pressure |
| 5 | Draw individual hairs | Change direction and length so the hairs look natural |
| 6 | Clean and soften | Lift extra graphite before adding final dark accents |
Understand eyebrow shape before shading
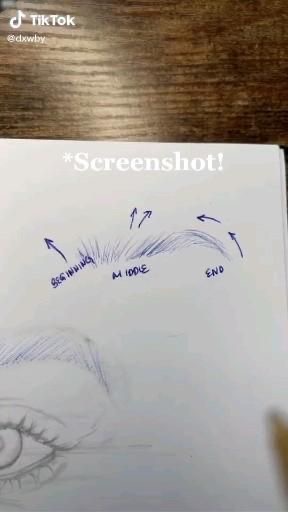
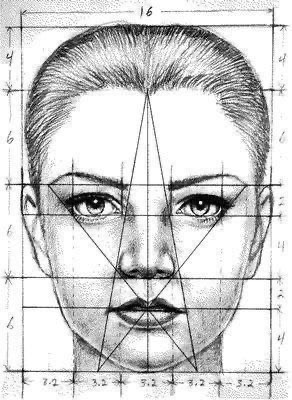
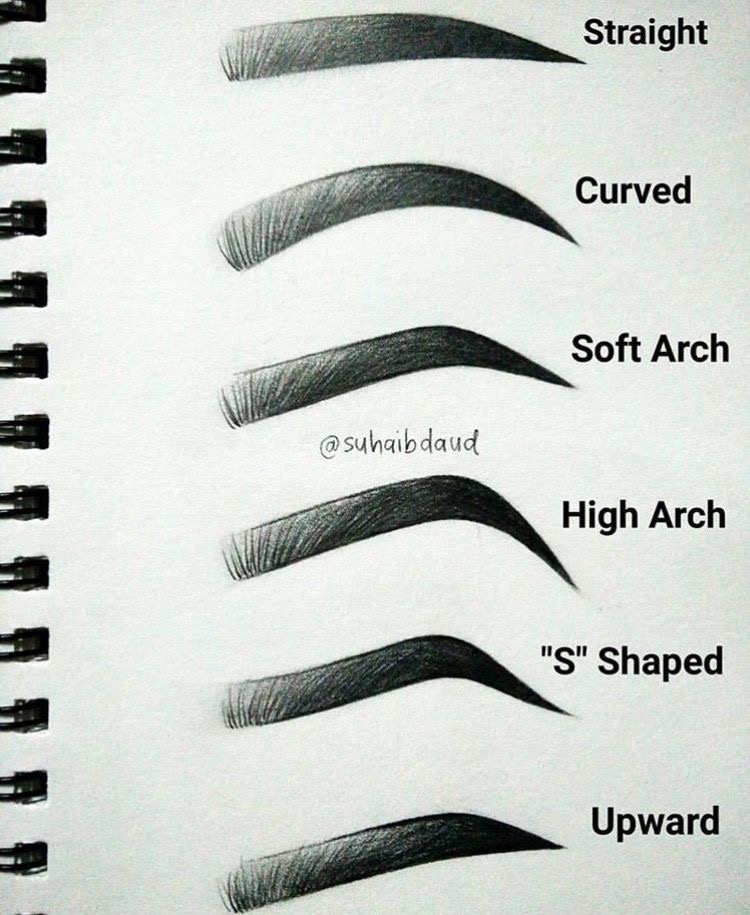
The best eyebrow shapes start with the face, not the pencil. A rounder face often looks better with a little lift in the arch, while a longer face may need a flatter brow so the features do not stretch vertically. In character art, a low, straight brow can make a face feel serious; a raised arch can add surprise or attitude.
For portrait work, check the brow against the eye line before you shade. If the brow sits too high, the face may look startled. If it sits too low and heavy, the expression can become angry even when the eyes are calm.


Materials for eyebrow drawing
You do not need a full makeup kit to practice eyebrow drawing. On paper, an HB pencil, a 2B pencil, a kneaded eraser, and a small blending tool are enough. HB is useful for the map. 2B gives richer hair strokes. The kneaded eraser lets you pull back heavy shading without tearing the paper.
For makeup-style brow studies, an eyebrow pencil, brow powder, angled brush, spoolie, and clear gel will help you understand how real brow products create shape. For digital art, use a small tapered brush and keep the sketch, shading, and hair strokes on separate layers.
| Tool | Best use | Beginner note |
| HB pencil | Light mapping | Easy to erase if the arch is wrong |
| 2B pencil | Hair strokes and dark accents | Sharpen often so strokes stay thin |
| Kneaded eraser | Soft corrections | Press and lift instead of scrubbing |
| Spoolie or blending stump | Softening the fill | Do not blur every hair stroke away |
| Digital tapered brush | Clean layered strokes | Use pressure sensitivity if available |

Build the eyebrow drawing in layers
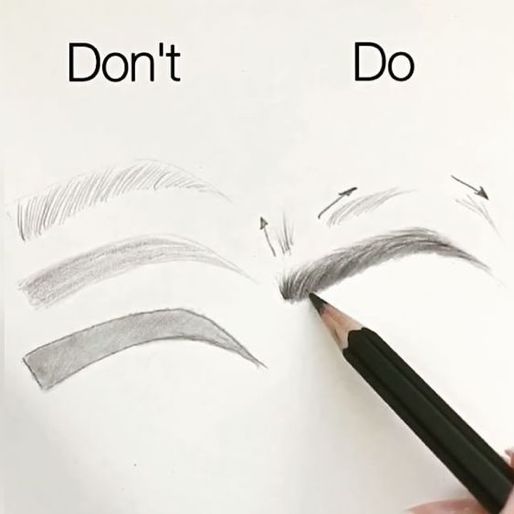
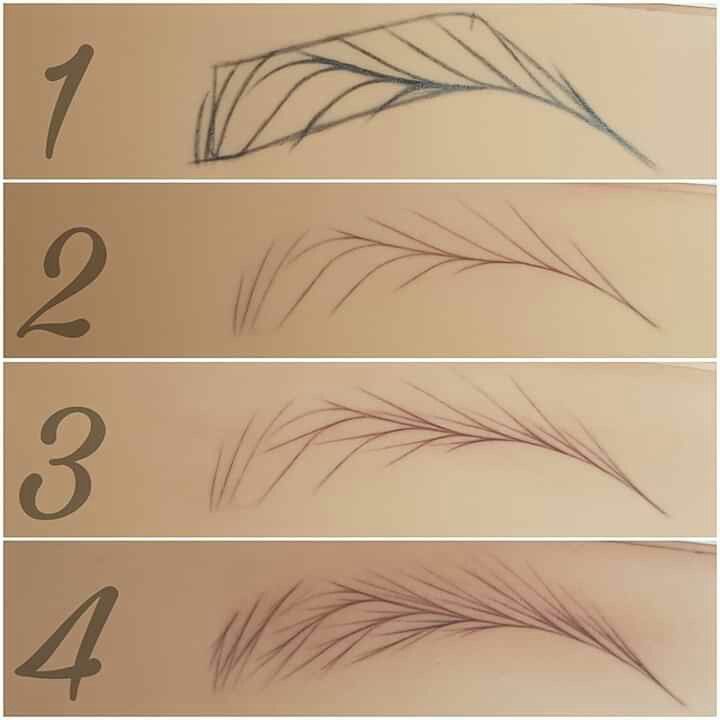
Start with the simplest version of the brow: a pale line for the bottom edge and a loose shape for the top. Do not close the outline like a sticker. Real brows have broken edges, especially at the front and upper side.
Next, add a middle value. Shade lightly through the body of the brow, leaving the front softer. Then draw individual hairs over the value layer. The strokes should overlap in small groups, not sit evenly spaced like fence posts.
The final pass is only for accents. Darken tiny clusters along the lower edge, a few turns near the arch, and the tail. If every part of the brow is equally dark, the drawing loses depth.

Realistic eyebrow texture and hair direction
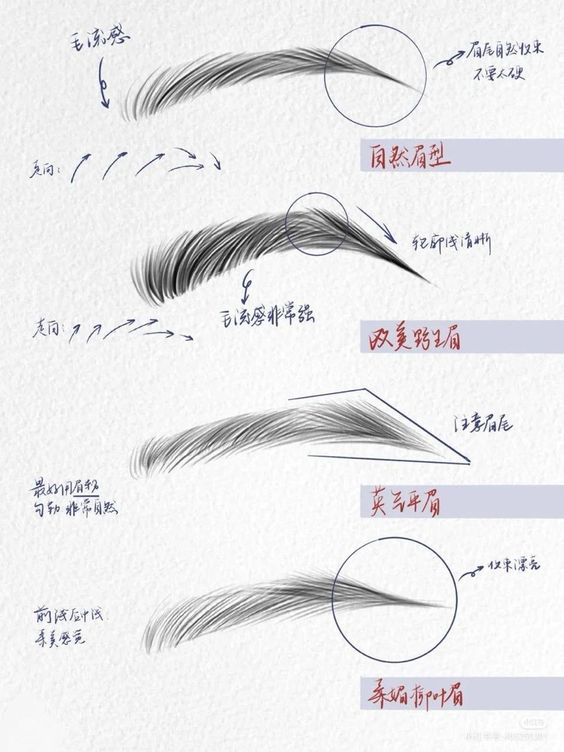
Realistic eyebrow drawing depends on hair direction more than perfect symmetry. The inner hairs usually lean upward. The middle hairs travel across the brow. The tail hairs become shorter, tighter, and more angled. Draw those changes with your wrist, not by pressing harder.
If you are also practicing eyes, compare the brow shadow with the upper eyelid shadow. The two values should work together. A useful next study is how to draw eyes, because the brow and eye shape share the same expression line.


Eyebrow shapes for characters and stylized faces
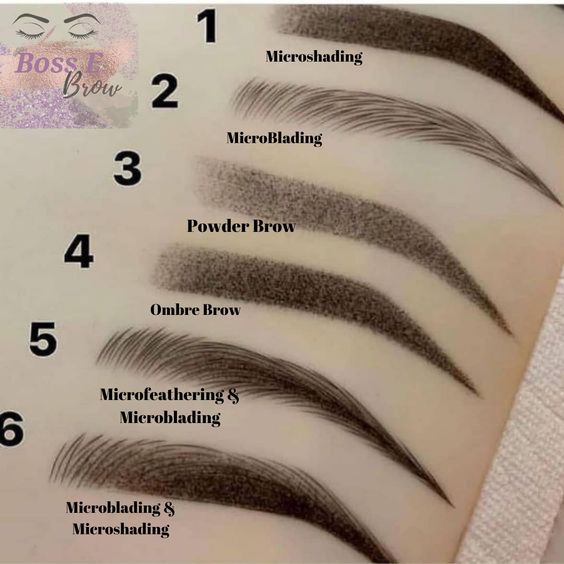
For stylized characters, eyebrows can be simpler but still need direction. Anime eyebrows often use fewer strokes, stronger silhouettes, and clearer angles. A soft curve can make the face open and friendly; a flat heavy brow can make the same eyes feel tired, serious, or suspicious.
If you are building a full face, connect the brow decisions to the nose bridge, side profile, hairline, and eye shape. That keeps the eyebrow from looking pasted on after the portrait is already finished.

Common eyebrow drawing mistakes
| Mistake | Why it looks wrong | Quick fix |
| A dark rectangular front | It makes the brow look stamped on | Erase the inner edge and redraw a few soft upward hairs |
| Identical hair strokes | The texture becomes mechanical | Vary stroke length, angle, and pressure |
| Arch too close to the center | The face looks tense or surprised | Move the peak closer to the outer iris area |
| Tail too thick | The brow loses taper and direction | Narrow the last third and darken only a few accents |
| Over-blended shading | The hair texture disappears | Blend the base lightly, then redraw crisp hairs on top |
| Both brows copied exactly | The expression feels stiff | Match the structure, but let small pose differences remain |
A simple practice plan
For fast improvement, separate the problem into small drills. Spend five minutes drawing only brow outlines, five minutes drawing only hair direction, and five minutes adding value. Then do one complete eyebrow sketch using all three steps. This is less exciting than finishing a full portrait, but it fixes the exact problems beginners usually repeat.
- Draw five soft arches and five straight brows without shading.
- Add hair direction arrows inside each shape before drawing real strokes.
- Shade only the middle value, then stop and compare both sides.
- Use a kneaded eraser to soften the front edge of each brow.
- Redraw the best brow larger and add final hair accents.
Related drawing practice
Once the eyebrow drawing feels cleaner, use the brow as part of the whole face instead of a separate shape. These related Sky Rye Design lessons are the best next steps:
- How to draw eyes
- eye drawing ideas
- drawing face expressions
- side profile drawing
- how to draw anime eyes
- how to draw anime nose
- anime hair drawing
- female character design
- hyper realistic drawing
- how to draw on iPad
Eyebrow drawing FAQ
Q: What is the easiest way to draw eyebrows?
A: The easiest way to draw eyebrows is to map the start, arch, and tail first, then fill the shape with light hair strokes instead of one dark outline. Keep the front of the brow softer, build the middle slowly, and taper the tail so it does not look blunt.
Q: How do you draw realistic eyebrow hairs?
A: Use short strokes that follow the real growth direction. Brow hairs usually angle upward near the inner corner, flatten through the middle, and point slightly down or outward at the tail. Vary the length and pressure so the eyebrow drawing does not turn into a row of identical lines.
Q: What pencil is best for eyebrow drawing on paper?
A: For sketchbook practice, a sharp HB or 2B graphite pencil is enough. HB is good for the first map because it stays light, while 2B gives softer shading and darker individual hairs. If the brow gets muddy, lift the value with a kneaded eraser before adding more strokes.
Q: How do I choose an eyebrow shape for a face drawing?
A: Match the brow shape to the face angle and expression. A soft arch feels relaxed, a straighter brow can look calm or youthful, and a sharper angle adds tension. In portrait drawing, compare both brows to the eye line before you darken anything.
Q: Why do my drawn eyebrows look too harsh?
A: Eyebrows usually look harsh when the outline is too dark, the front edge is boxed in, or every hair stroke has the same pressure. Soften the start of the brow, break the outline with tiny gaps, and reserve the darkest value for the lower edge and small hair clusters.
Q: Should eyebrows be perfectly symmetrical in a drawing?
A: They should feel balanced, but they do not need to be identical. Natural eyebrows sit on a moving face, so one brow may lift or compress with the expression. Use the same start, arch, and tail logic on both sides, then allow small differences that support the pose.
Q: How can beginners practice eyebrow drawing?
A: Draw ten small brow shapes before doing a full portrait. Practice one straight brow, one soft arch, one high arch, one thick brow, and one sparse brow. Then repeat the set with different pressure so you learn shape, value, and hair direction separately.
Q: Can I use this eyebrow drawing method for digital art?
A: Yes. Use a low-opacity sketch layer for the brow map, then add hair strokes on a separate layer with a small tapered brush. Keep the front lighter, erase a few gaps between hairs, and avoid over-blurring the texture.
Conclusion
A good eyebrow drawing is controlled but not stiff. Map the brow first, keep the front edge lighter, follow the real hair direction, and save your darkest pencil pressure for small accents. If the brow changes the expression in the wrong way, do not keep shading over it. Lift the value, check the start, arch, and tail, then rebuild the strokes slowly.
- 5.8Kshares
- Facebook0
- Pinterest5.8K
- Twitter4
- Reddit0