Drawing the male body can feel challenging at first, but understanding the basic anatomy makes the process much easier. Knowing the correct proportions, muscle structure, and how different parts connect helps artists create realistic and dynamic male figures. This knowledge is key to improving any figure drawing, no matter your skill level.
Many artists focus on learning the spine, arms, legs, and torso shapes to capture movement and posture well. By practicing these core elements, they build a strong foundation that makes posing and detailing the male body more natural and accurate.
Exploring different body types, from tall to short, and studying how muscles shift with movement also adds variety and life to drawings. With some focused practice, anyone can learn to draw convincing male anatomy that expresses both strength and realism.
Understanding Male Body Proportions
Accurate male body drawing depends on understanding key proportions. Knowing how the head size relates to the body, the length of limbs, and the differences compared to female anatomy helps artists create realistic figures. Avoiding common mistakes in these areas improves overall drawing quality.
Classic Guidelines for Proportions
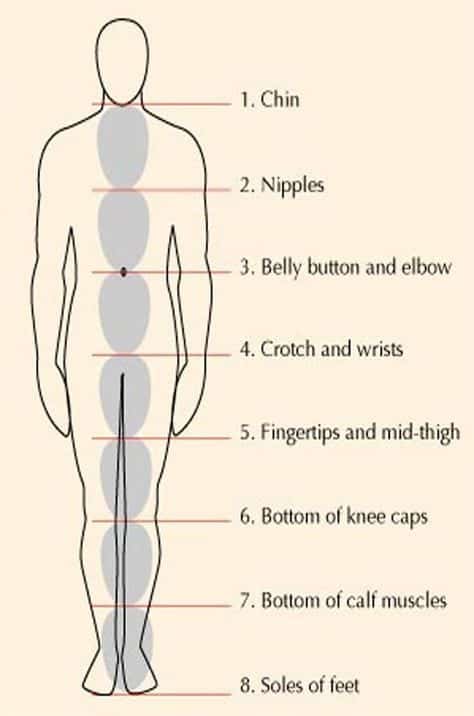
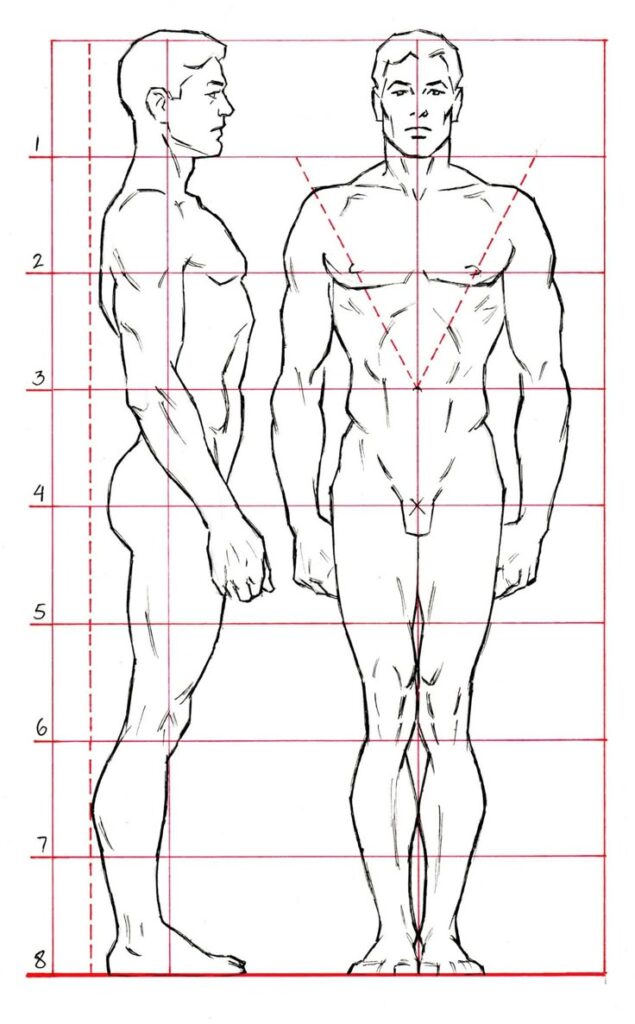
The male body is often measured using the head as a unit. A typical male figure is about 7.5 to 8 heads tall. The torso usually takes up about 3 heads, while the legs make up the remaining length.
Key points include:
- Shoulders are wider than hips.
- The chest is broad and muscular.
- Arms hang down to the mid-thigh.
These rules give a balanced and natural look. Artists might adjust them slightly based on style or the character’s build but understanding these basics creates a solid foundation.
Comparing Male and Female Anatomy
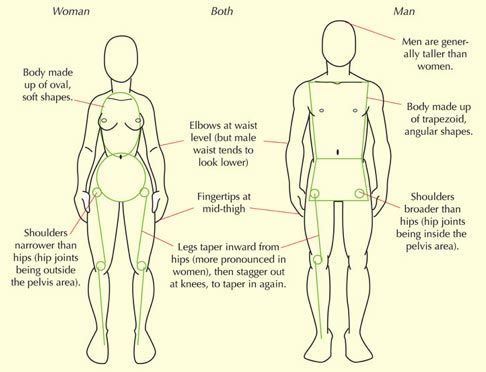
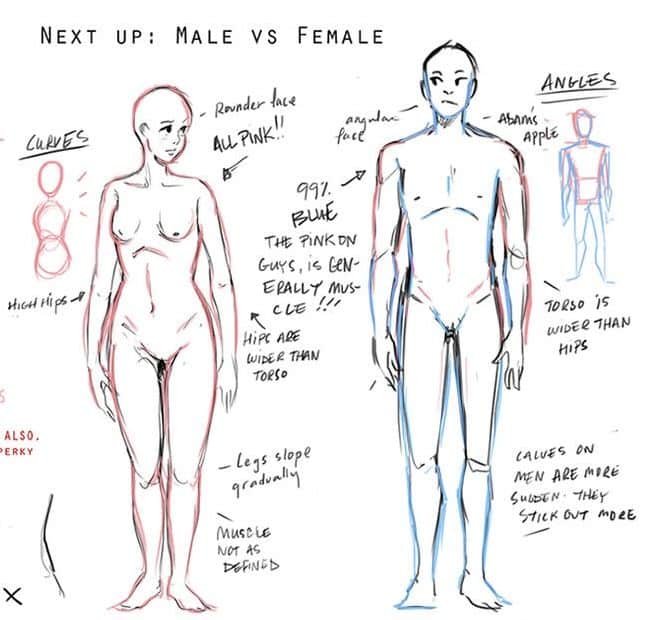
Males generally have broader shoulders and narrower hips than females. The waist tends to be less defined in males, resulting in a straighter torso shape.
Muscle mass is more pronounced in males, especially in the chest, arms, and legs. Females usually have softer curves and a wider pelvis to accommodate different body proportions.
When drawing, focusing on the differences in bone structure and muscle placement helps create clear male or female characteristics without relying on stereotypes.
Common Mistakes and How to Avoid Them
A frequent error is making the head too large or small in relation to the body. Beginners often draw heads that are about half the body length, which looks unnatural.
Another mistake is ignoring shoulder width. Male shoulders should be noticeably broader than hips; otherwise, the figure appears less masculine.
Avoid stiff or flat poses by paying attention to natural curves and joints. Using reference photos and sketching simple skeletons first can help maintain correct proportions and body flow.
Drawing the Male Torso
The male torso involves a mix of solid shapes and muscle groups that give it structure and form. Understanding the key areas helps in drawing a realistic and dynamic figure. Focus on the chest, abdominal area, and back muscles for a clear and strong torso.
Chest and Ribcage Structure
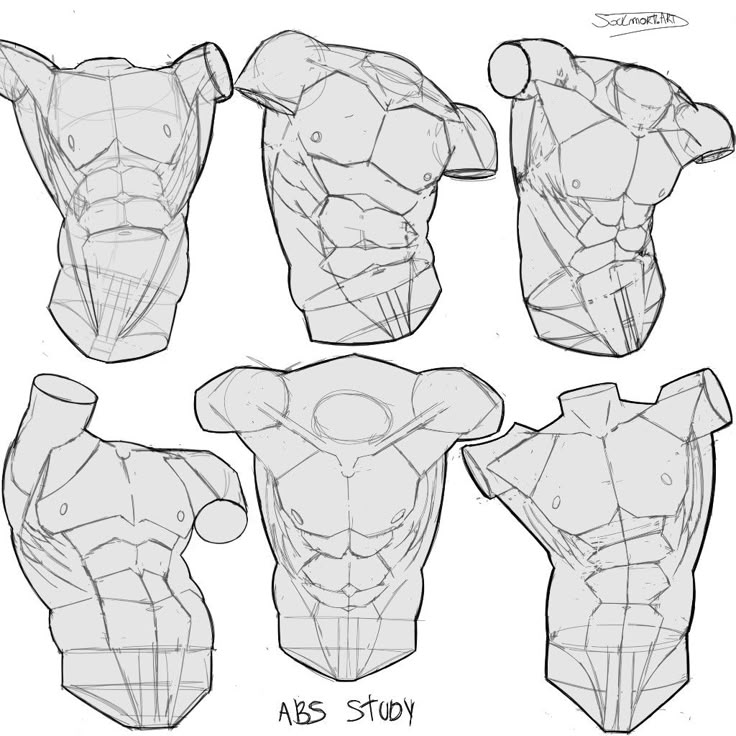
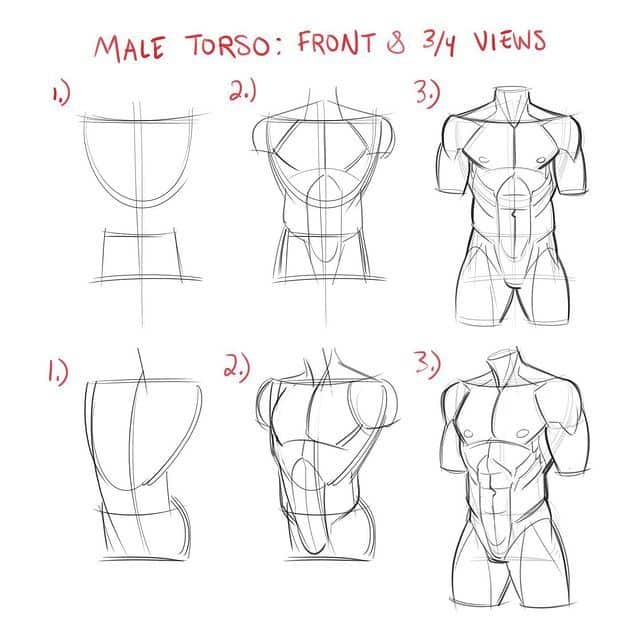
The chest is shaped mainly by the ribcage and the pectoral muscles. The ribcage forms a curved, barrel-like shape that supports the body and protects organs. When drawing, start with an oval or egg shape to represent the ribs.
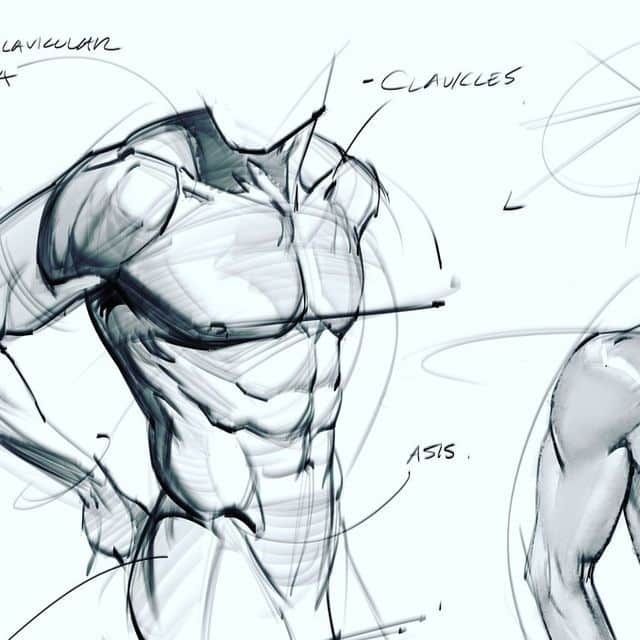
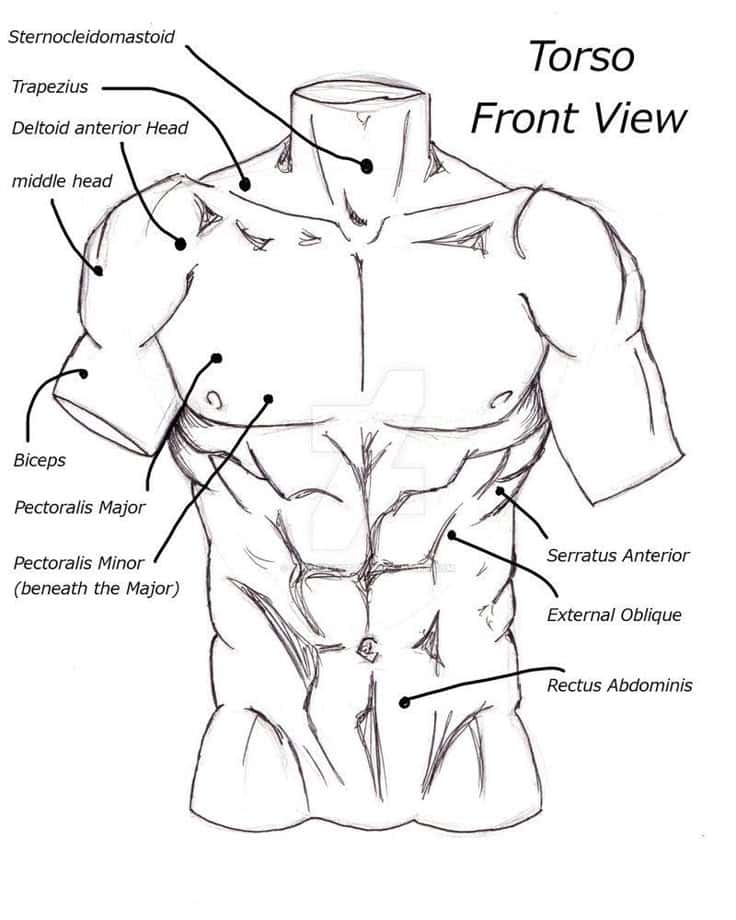
Pectoral muscles sit on top of the ribcage, attaching at the shoulder and sternum. These muscles create a thick, rounded look on the upper torso. Remember, they change shape based on arm position and muscle tension.
Look for clear lines where the pectorals connect to the arms and sternum. This helps show volume and depth. Use light shading to suggest muscle form without making it too blocky.
Abdominal Muscles Overview
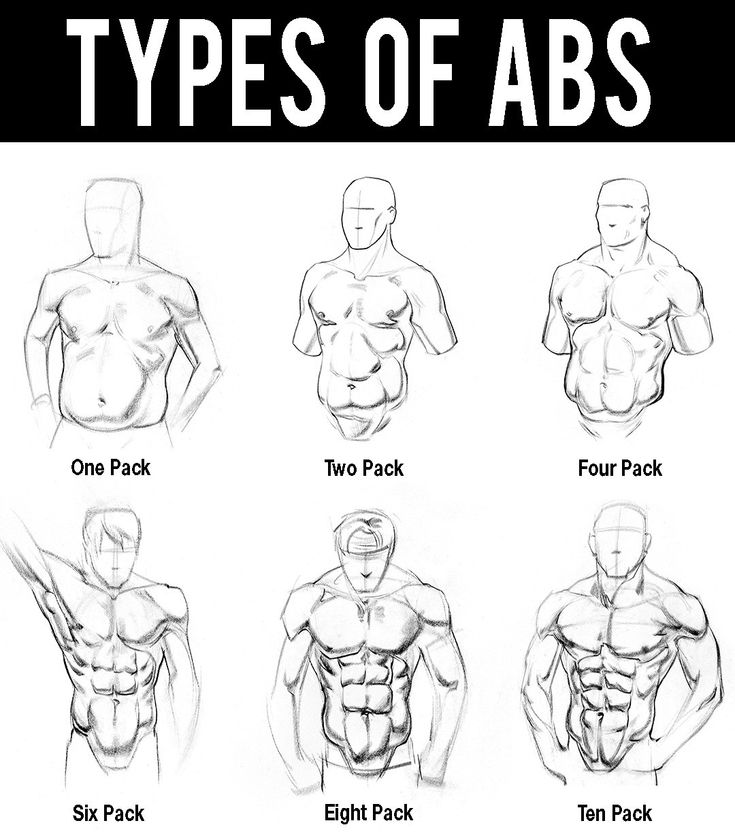
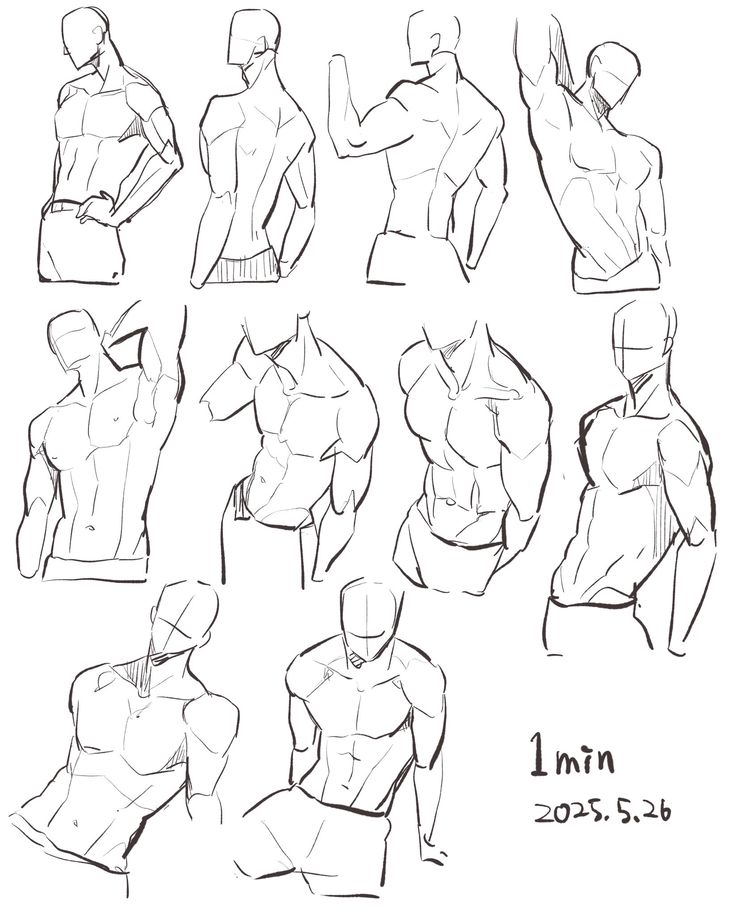
The abdomen consists of several layered muscles, but the main focus is the rectus abdominis or “six-pack” muscles. These are arranged in vertical segments separated by tendinous intersections.
Start with a flat, rectangular shape below the chest, then break it into segments with light horizontal lines. Keep the shape balanced; muscles aren’t perfectly symmetrical but should be even enough to look natural.
Oblique muscles on the sides wrap around the ribs and attach near the hips. They add a curved edge that frames the central muscles and creates a smooth transition to the sides.
Use soft lines and gentle shading to avoid making the abdomen appear too harsh or mechanical.
Defining the Back Muscles
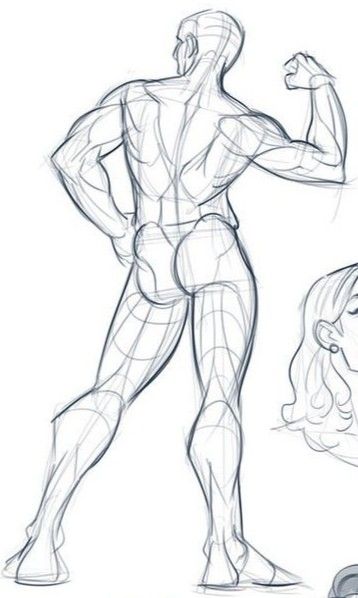
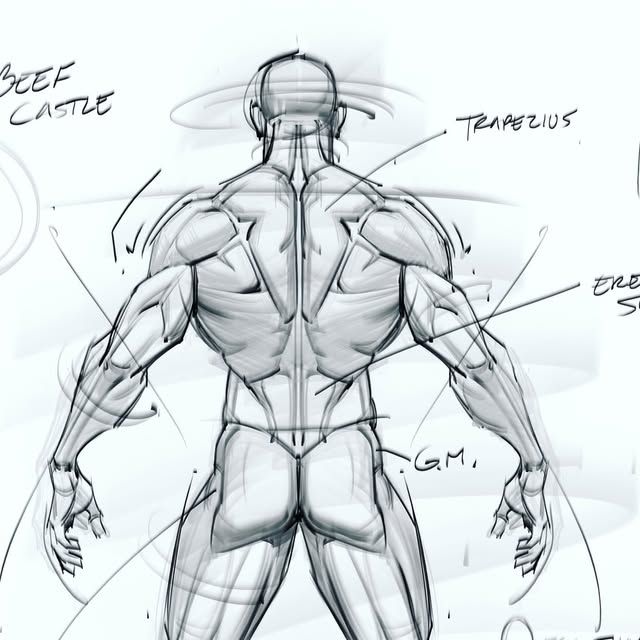
The back has broad muscle groups that create its shape. The trapezius covers the upper back, attaching from the neck to the shoulders. It forms a diamond shape and influences the neck and shoulder curves.
Below the trapezius, the latissimus dorsi spreads wide on each side, tapering towards the lower back. These muscles give the torso a V-shape when viewed from behind.
Other muscles, like the rhomboids and erector spinae, add subtle detail between the shoulder blades and along the spine. These can be shown with light lines and shading to suggest tension and depth.
Focus on the flow of muscles rather than exact detail to keep the back looking natural and dynamic.
Shaping the Arms and Shoulders
The arms and shoulders are made up of key muscle groups that define their shape and movement. Knowing their structure helps create drawings that look natural and strong. Focus on muscle placement, size, and how these muscles change with different arm positions.
Biceps and Triceps Anatomy
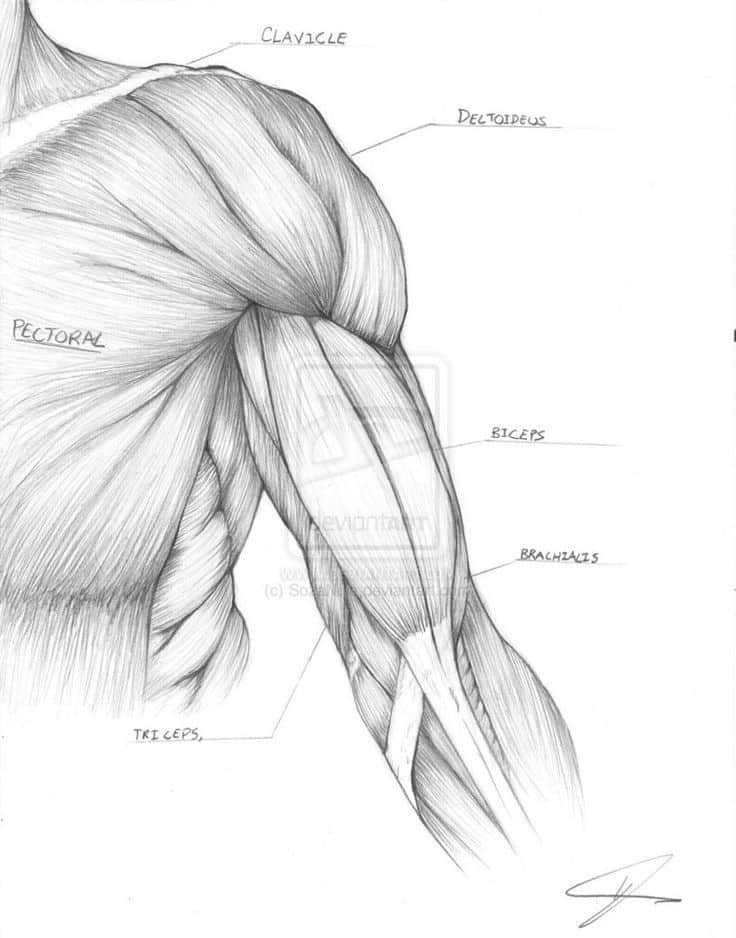
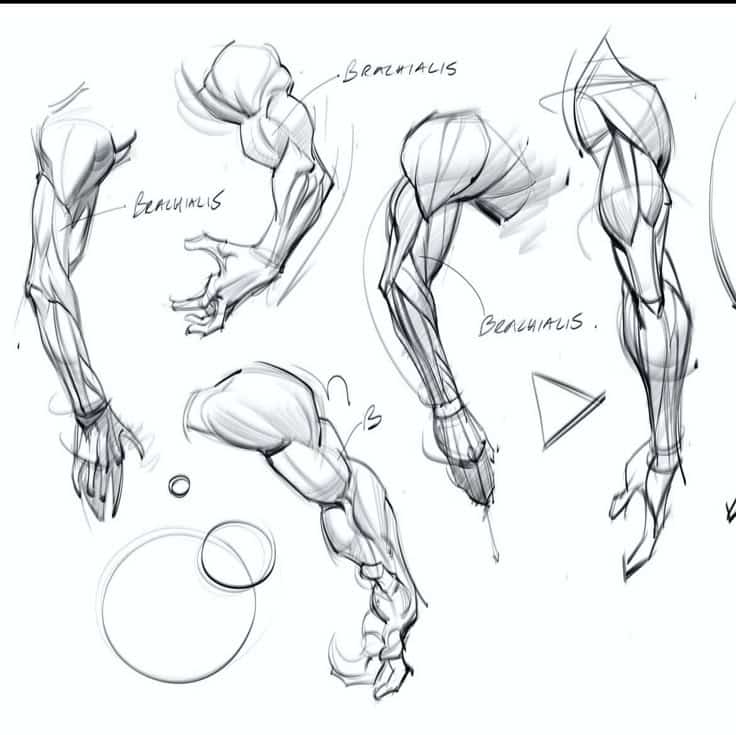
The upper arm mainly consists of two muscles: the biceps and triceps. The biceps sit at the front of the arm and have two heads that create a curved shape when flexed. They attach above the shoulder and run down to the elbow.
The triceps are at the back of the arm and have three heads, giving the arm a wide and bulky look from behind. They extend from the shoulder blade to the elbow, opposing the biceps.
Understanding how these muscles work together is key. When the biceps contract, the triceps relax, and vice versa. This push-pull effect changes the arm’s contour and must be shown in different poses.
Shoulder Muscle Groups
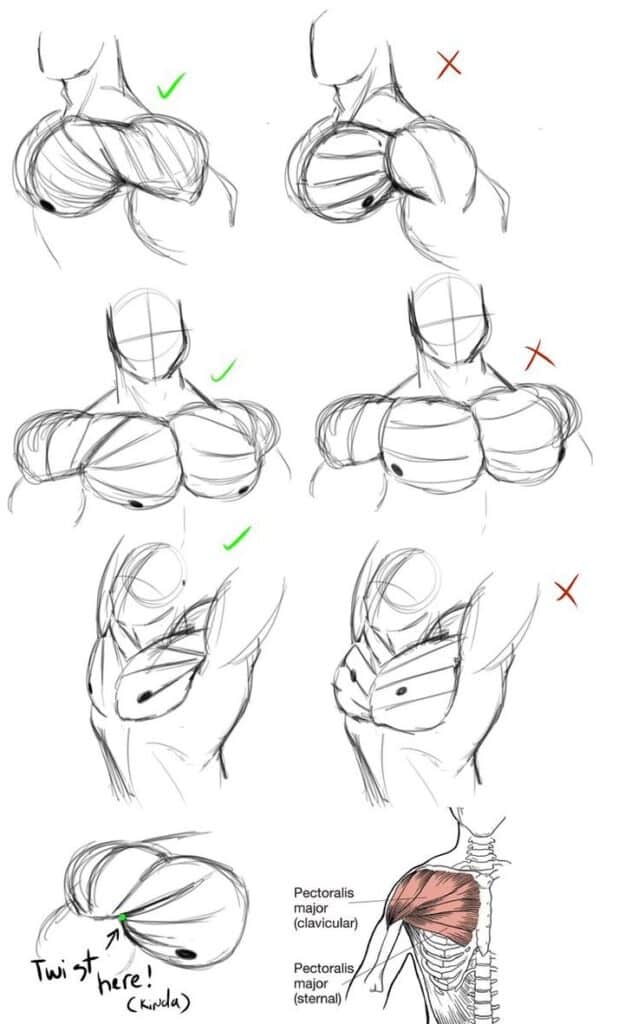
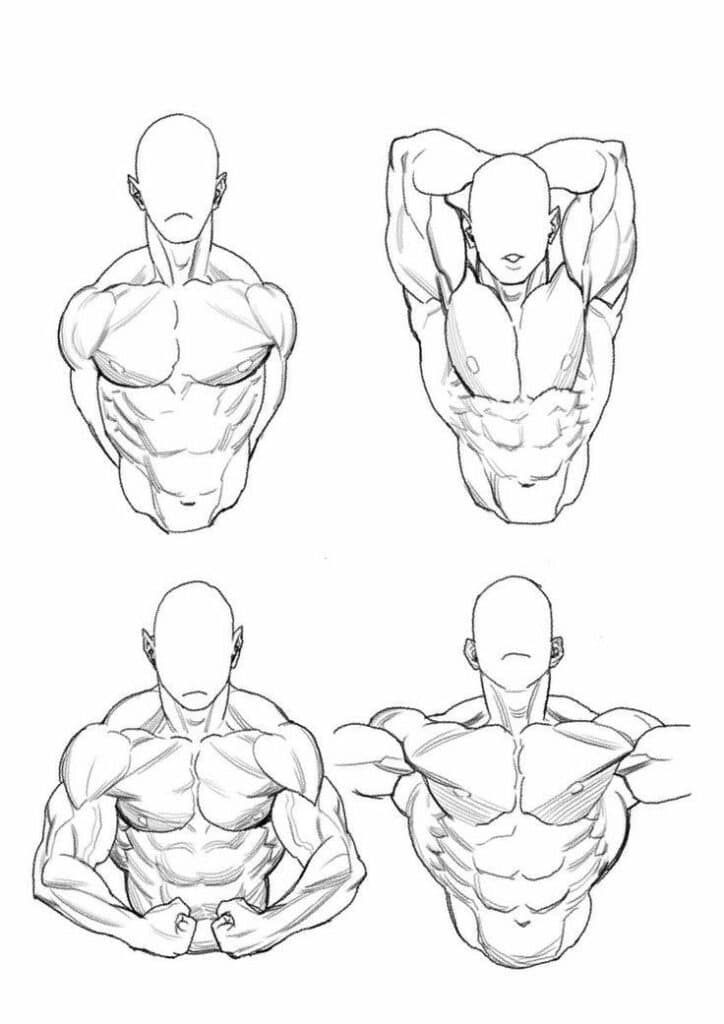
The shoulder is complex, made mostly of the deltoid muscle, which forms its rounded top. The deltoid has three parts: front (anterior), middle (lateral), and back (posterior). Each part works to lift and rotate the arm in different directions.
Beneath the deltoid lie smaller muscles like the rotator cuff group, which stabilize the shoulder but are less visible. The shoulder’s bone structure also influences muscle shape and how the skin folds when the arm moves.
Drawing shoulders from different angles requires noting how light hits the rounded deltoids and how muscles change under movement to avoid a flat, lifeless look.
Forearm Details
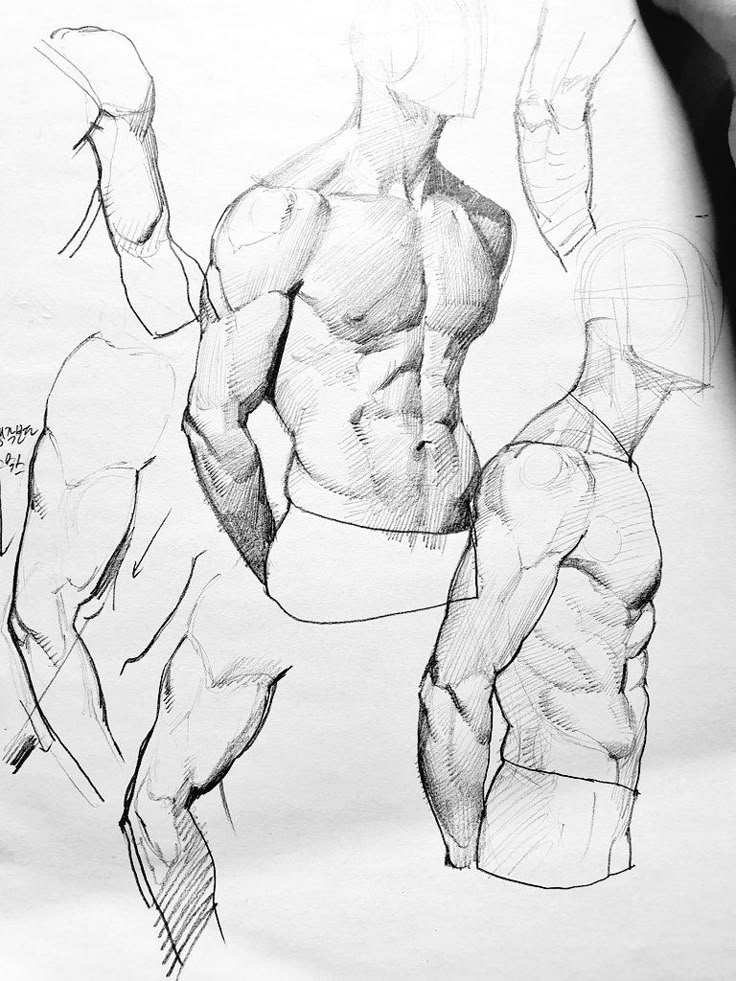
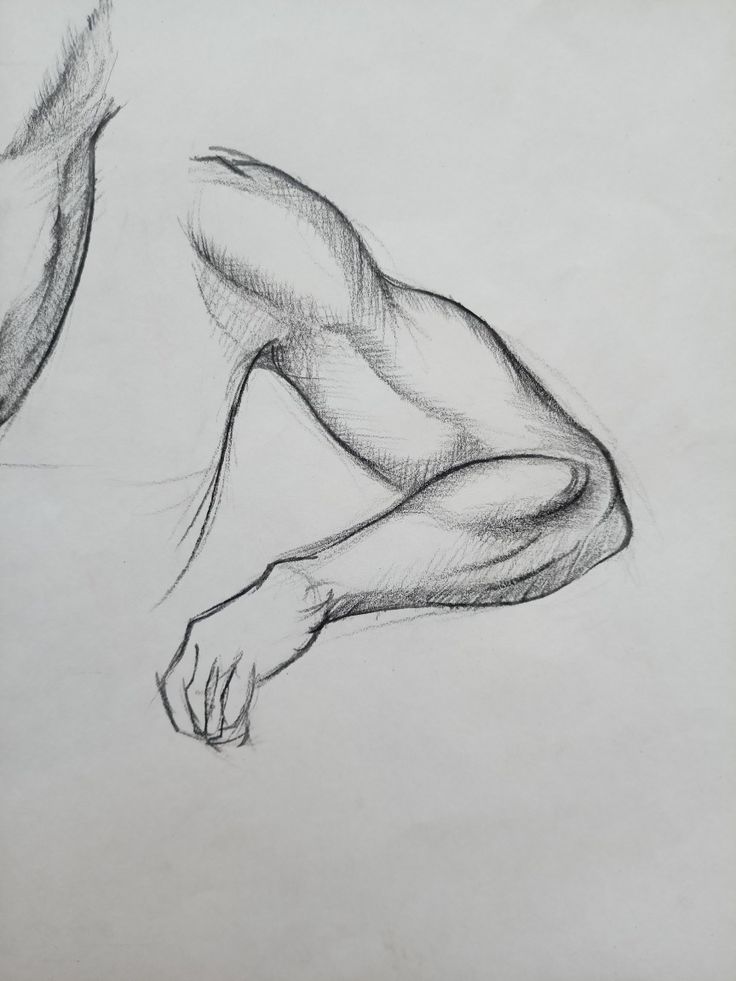
The forearm contains many muscles controlling wrist and finger movements. These muscles are slim and layered, running in different directions along the forearm’s length.
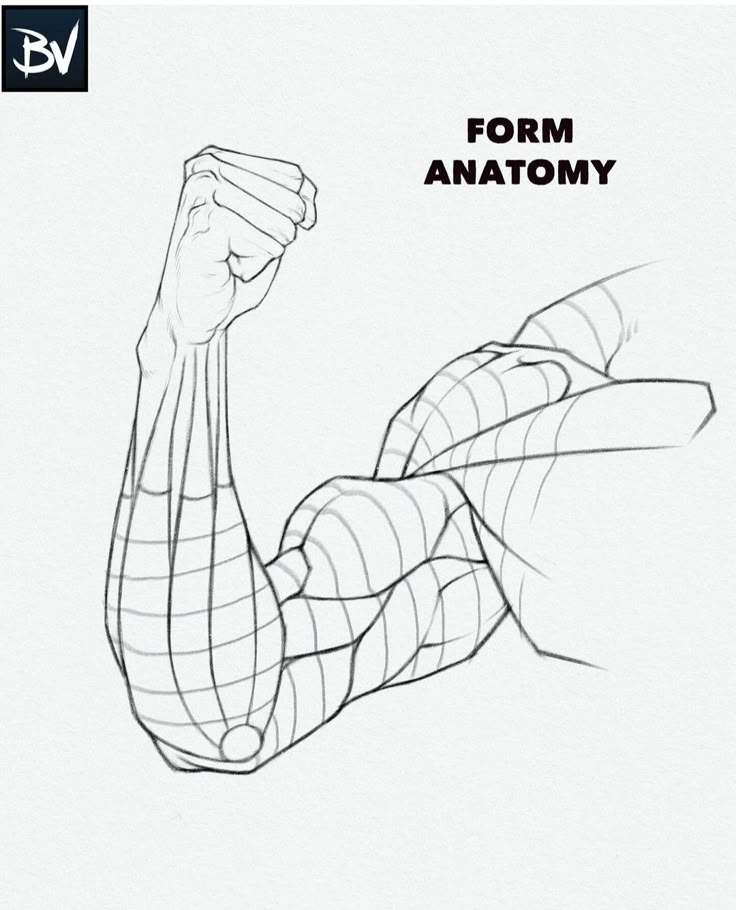
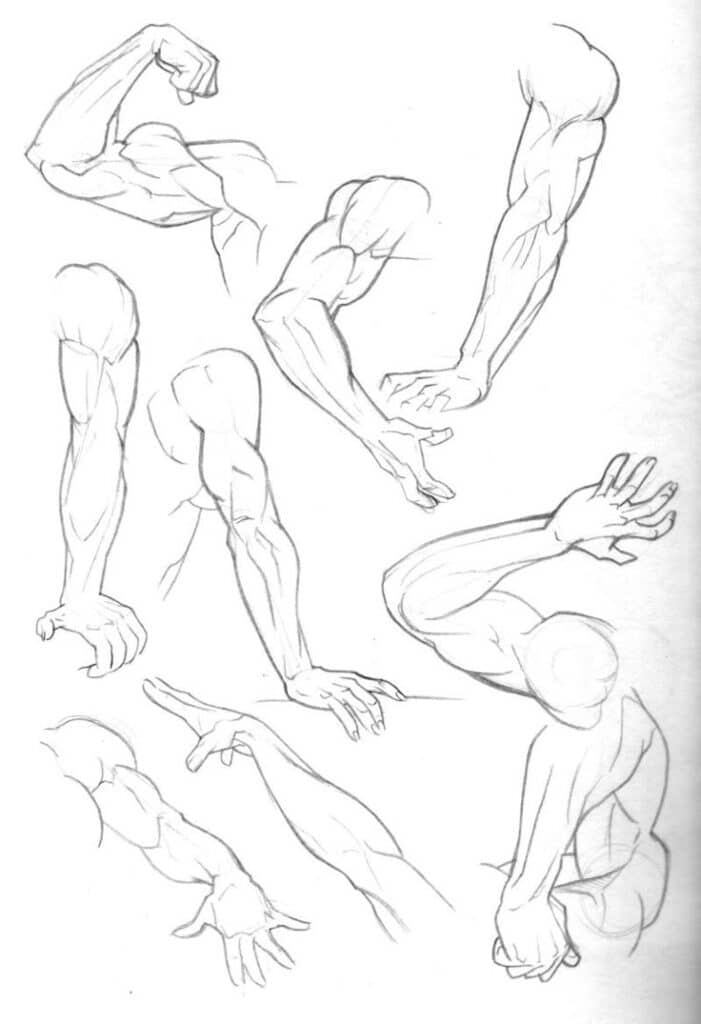
Key muscles include flexors on the inside of the arm and extensors on the outside. Their positions create visible tendons near the wrist and change when the hand is open or clenched.
Capturing the forearm’s twists and surface texture helps add realism. It’s important to show how muscles stretch or bunch based on hand position, as this makes the drawing more dynamic and believable.
Sketching the Male Legs
Drawing male legs requires focus on muscle groups, joints, and how they connect. Attention to shapes and volume helps create realistic and strong legs. The leg’s different parts work together in balance and movement.
Thigh Muscles Breakdown
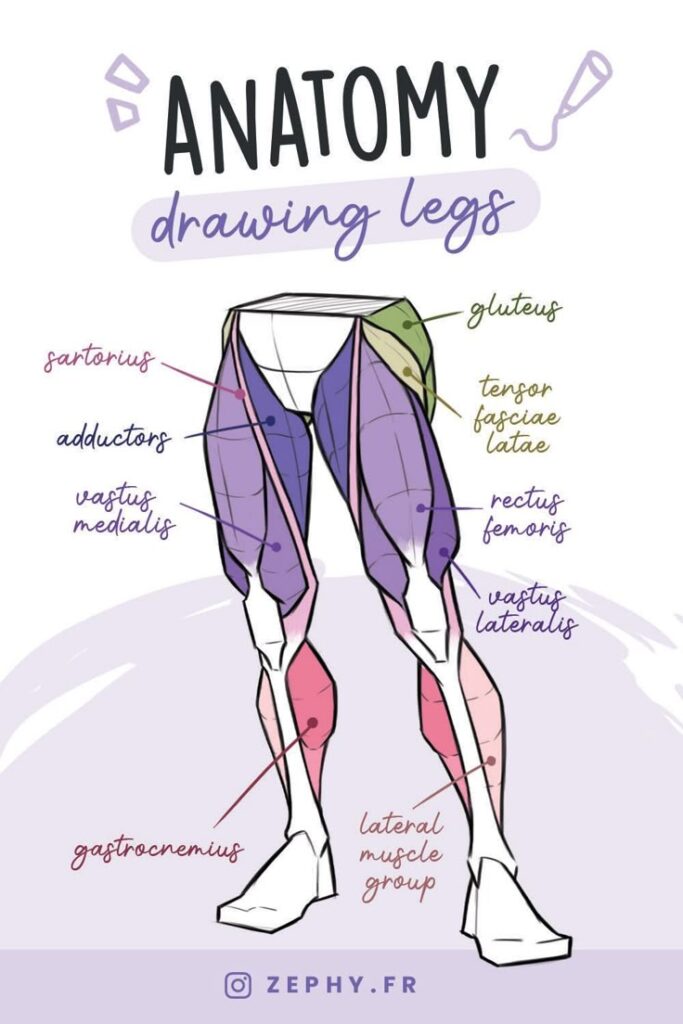
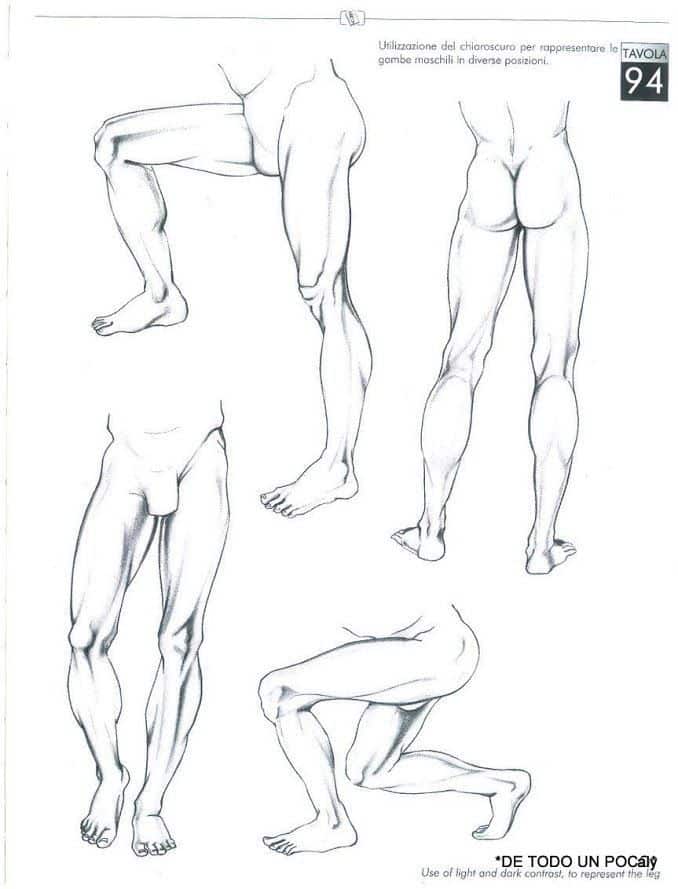
The thigh has three main muscle groups to consider: the quadriceps at the front, hamstrings at the back, and adductors on the inner side. The quadriceps consist of four muscles, but the most visible is the vastus lateralis on the outer side of the thigh. It creates a strong rounded shape.
Hamstrings run along the back of the thigh and flex the knee. They add depth and curvature opposite the front muscles. The adductors connect the thigh to the pelvis and are less prominent but help with inner thigh shape.
When sketching, start with simple shapes like ovals for muscle masses. Then define the contours following how muscles overlap and taper toward the knee.
Knee and Calf Construction
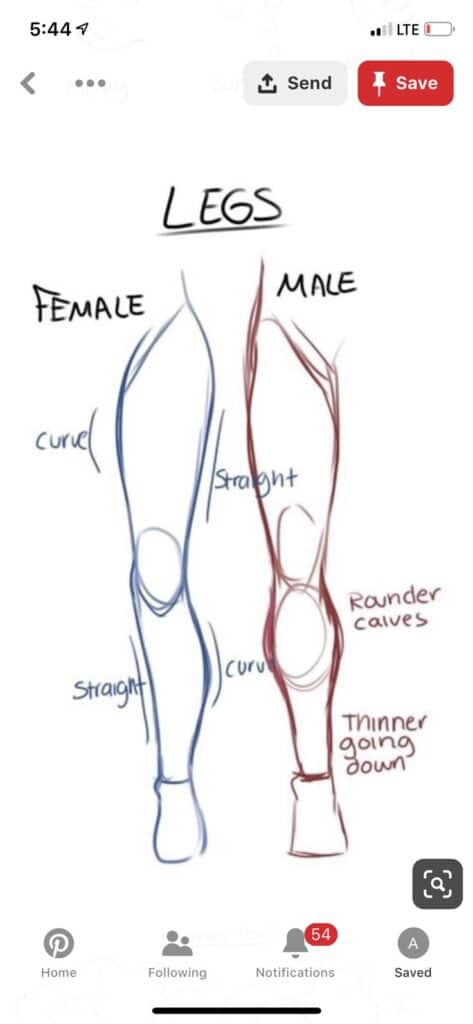
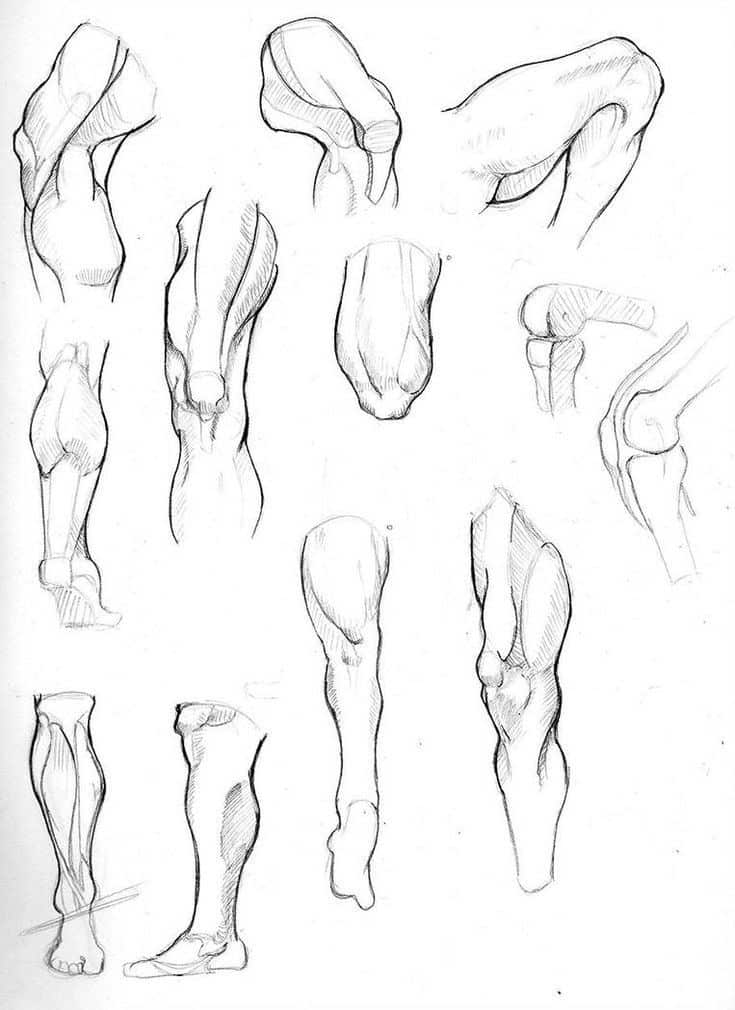
The knee is a hinge joint and key for leg movement. It’s made visible by the kneecap or patella, which sits over the joint. When bending, the knee folds in a clear curve, while the patella stays centered.
Calf muscles, mainly the gastrocnemius, form two bulges behind the lower leg. They start just below the knee and meet near the Achilles tendon above the ankle. This tendon is thin but strong.
Drawing the knee and calf together means capturing the transition from the hard kneecap to smooth muscle curves. The calf’s volume changes with leg position, so observe the angle carefully.
Ankle and Foot Placement
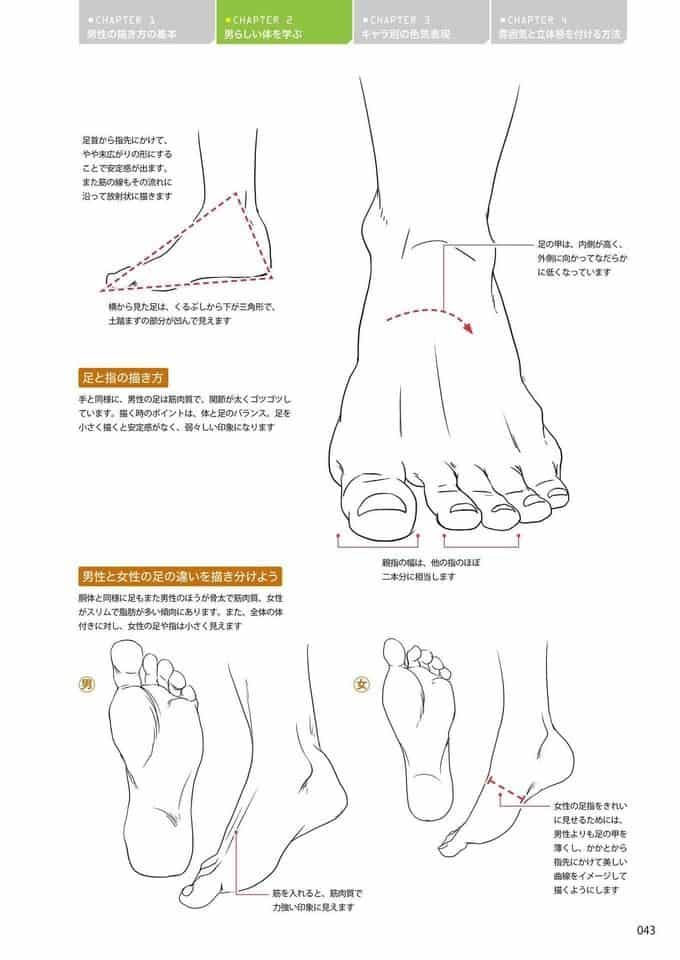
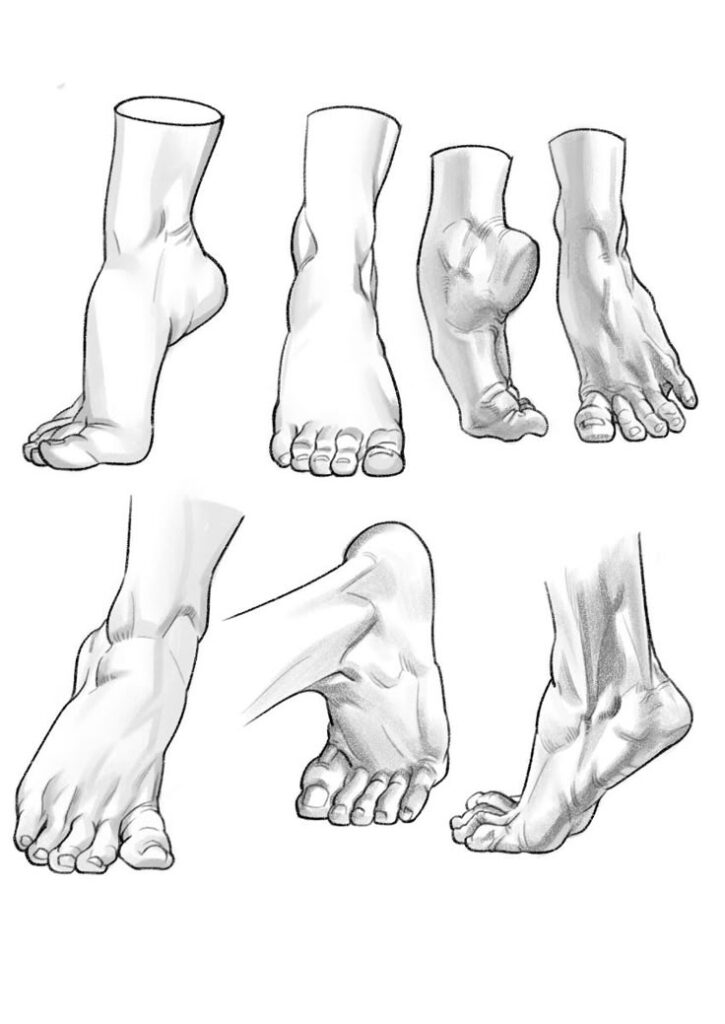
The ankle connects the leg to the foot and supports weight. It’s narrower than both calf and foot. The outer and inner ankle bones create small bumps that help define the joint.
The foot should be aligned with the lower leg, showing natural arch and toes. When sketching, mark basic shapes for the heel, arch, and ball of the foot. Keep the ankle flexible but stable.
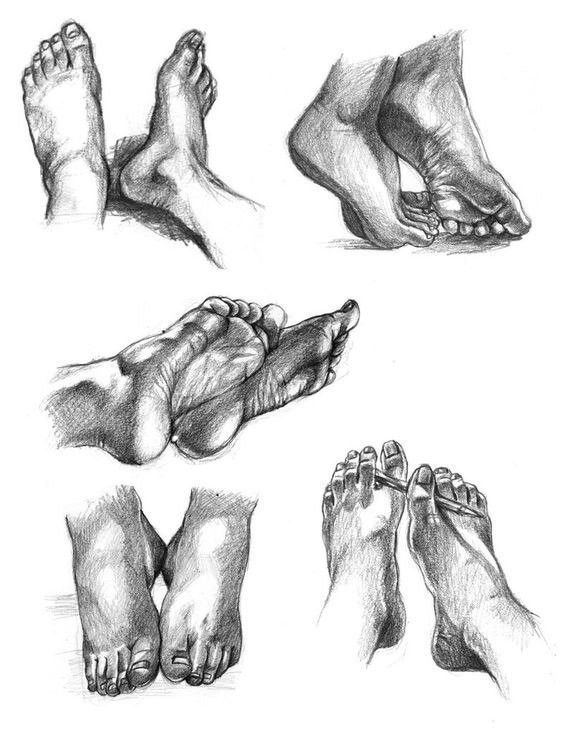
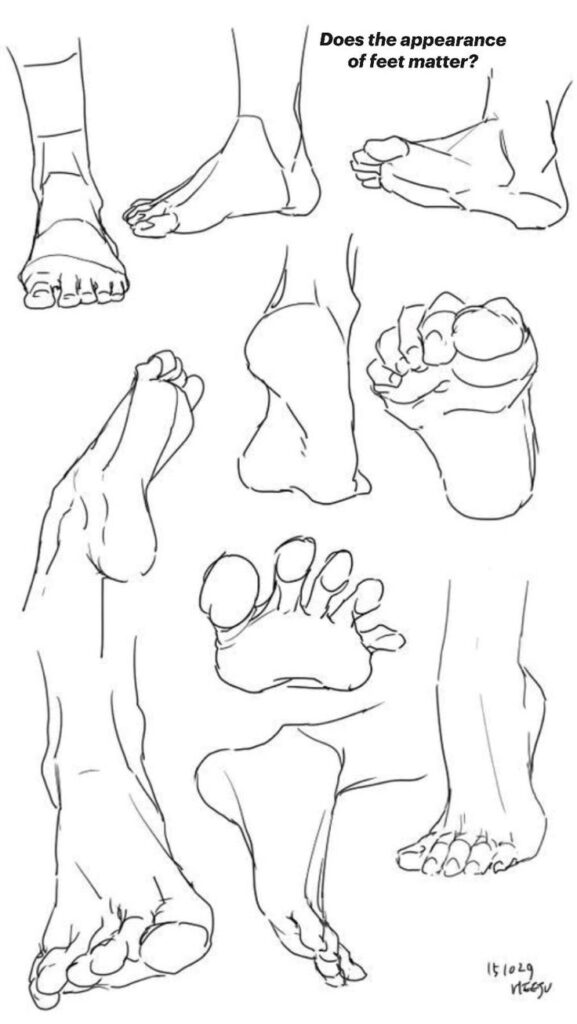
Feet angle changes with pose—straight, turned inward, or outward. Placing the foot correctly brings balance to the whole leg and affects how the leg stands or moves.
Head, Neck, and Facial Features
Accurate male anatomy drawing starts with a solid understanding of the skull’s shape, the muscles of the neck, and key facial landmarks. Each part plays a role in defining the head’s proportions and how expressions and movement appear.
Building the Male Skull
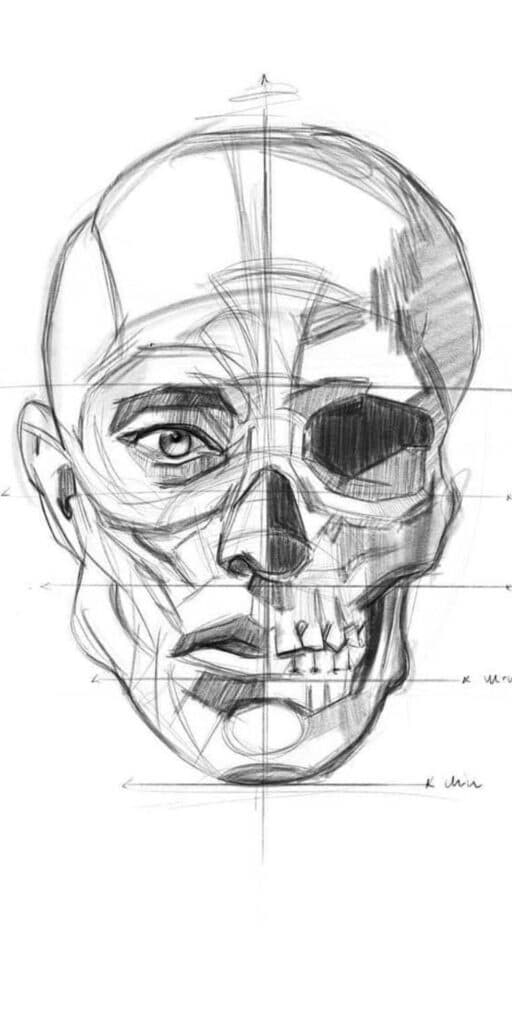
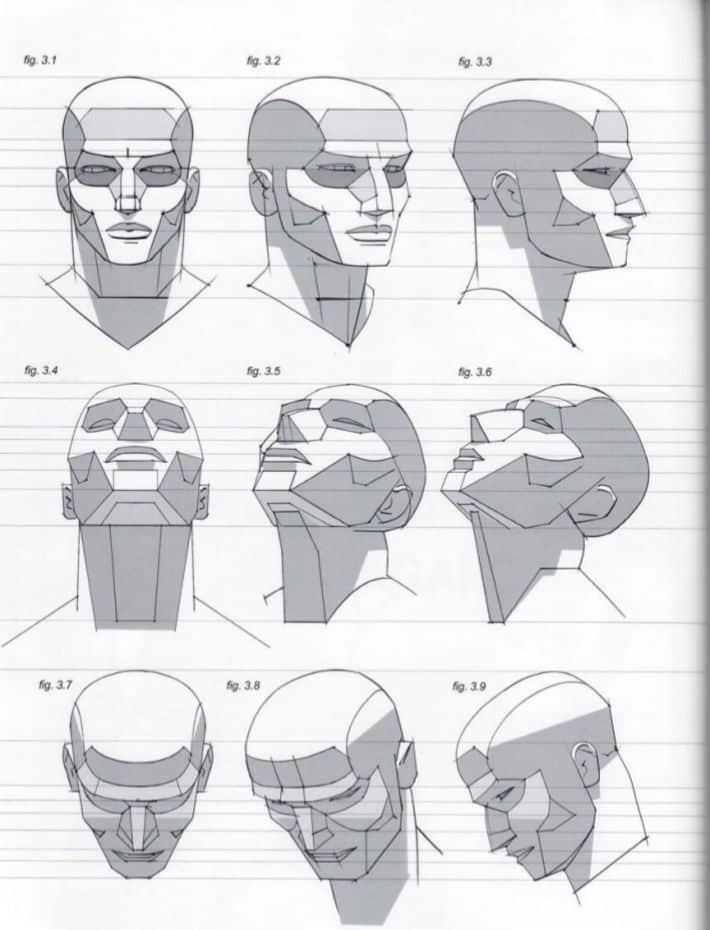
The male skull has a strong, angular shape compared to a female skull. Key areas include the pronounced brow ridge, larger jawline, and wider cheekbones. These features create a more defined and robust silhouette.
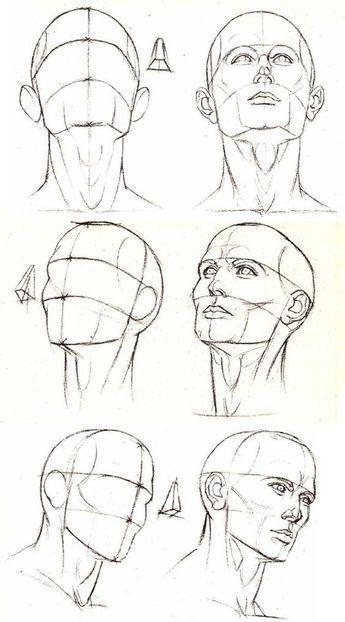
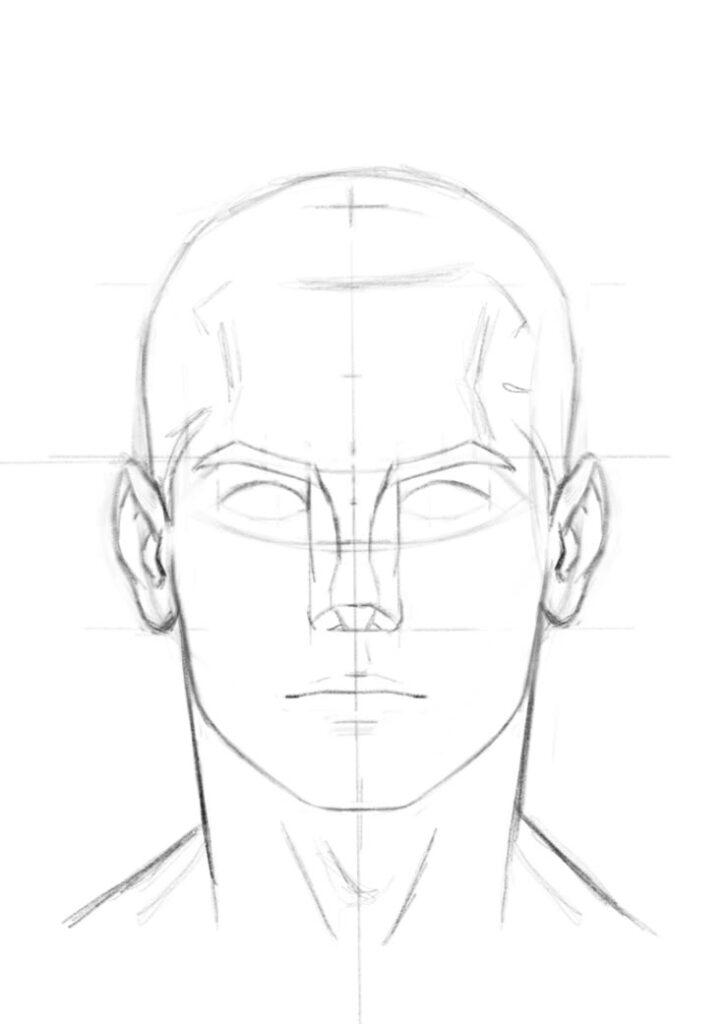
When drawing, focus on the overall shape: an oval with more square edges at the jaw. The skull’s proportions help place the eyes roughly halfway down the head. The width between cheekbones guides the face’s side boundaries.
Using simple shapes like circles and boxes can help block out the skull before adding details. This makes it easier to maintain symmetry and proportion throughout the drawing.
Neck Musculature
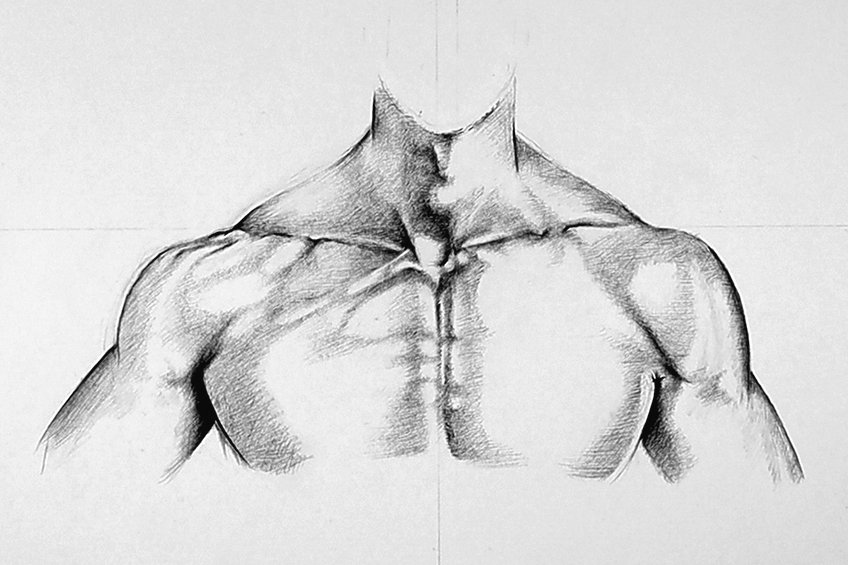
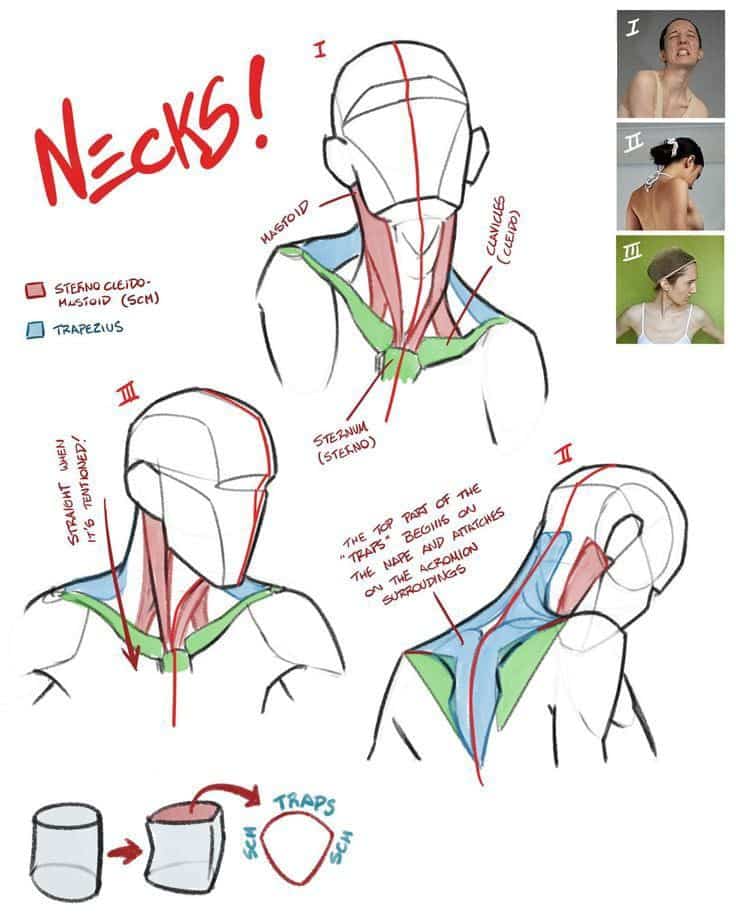
The neck connects the head to the torso and supports movement and balance. Two major muscles to note are the sternocleidomastoid and trapezius. The sternocleidomastoid runs from behind the ear to the collarbone, creating a strong diagonal line on each side of the neck.
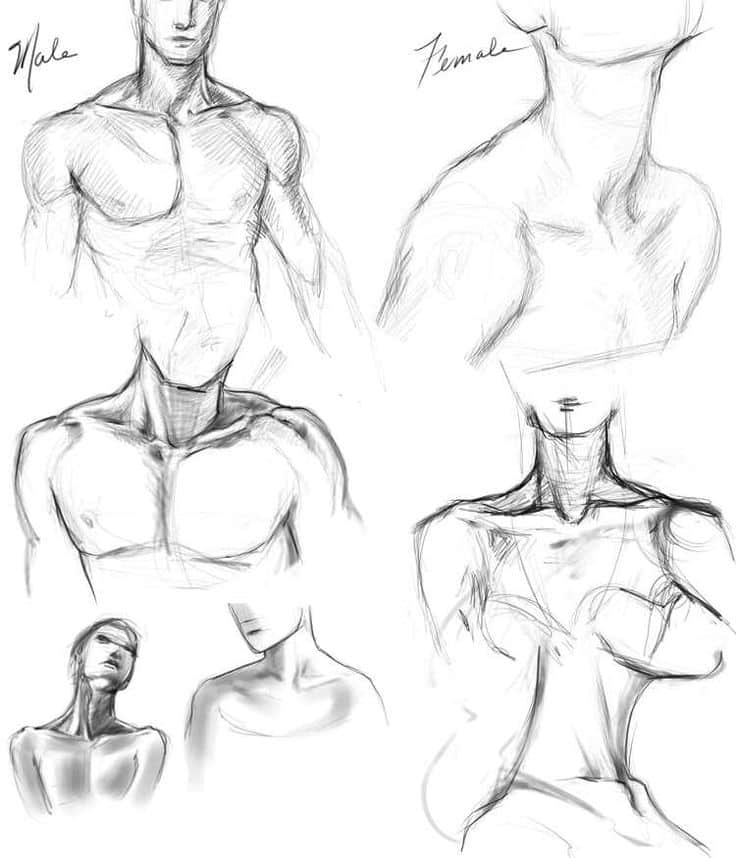
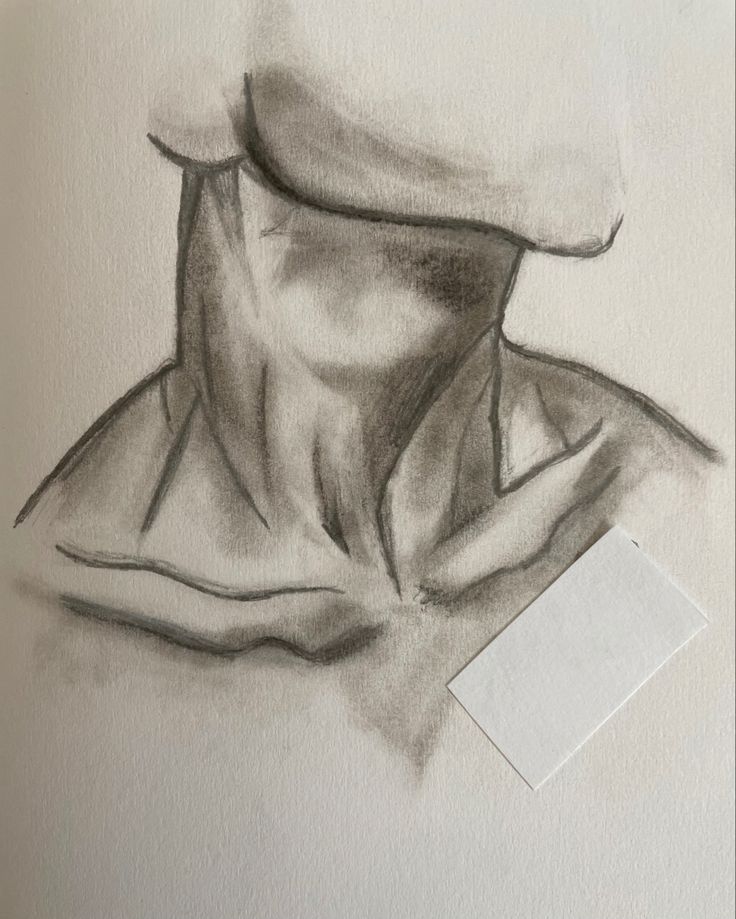
The trapezius starts at the neck’s base and fans out over the shoulders and back. Drawing these muscles with clear tension and natural curves gives the neck a realistic, sturdy feel.
Position and thickness of these muscles vary with posture and movement. For example, turning the head stretches one side of the neck and compresses the other, changing muscle shapes visibly.
Facial Landmarks
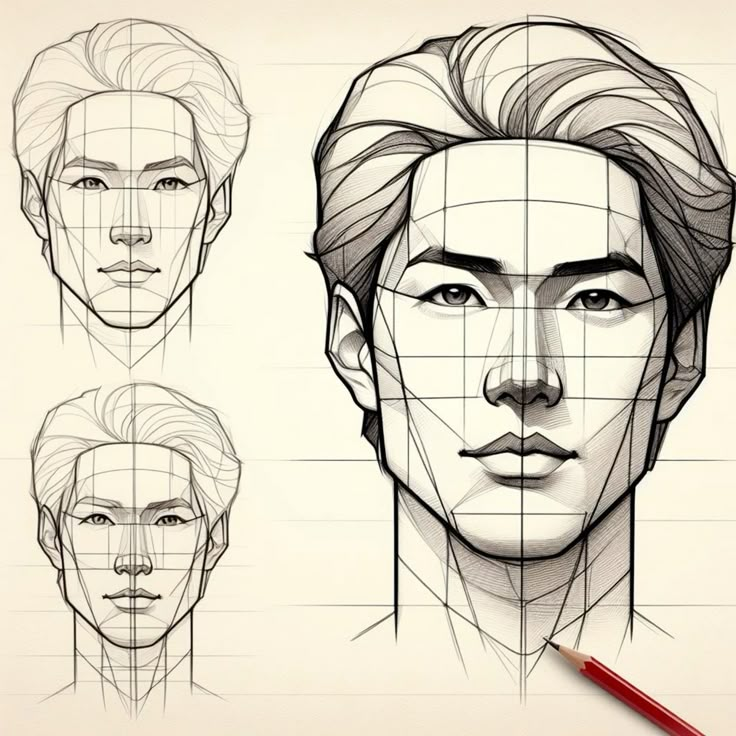
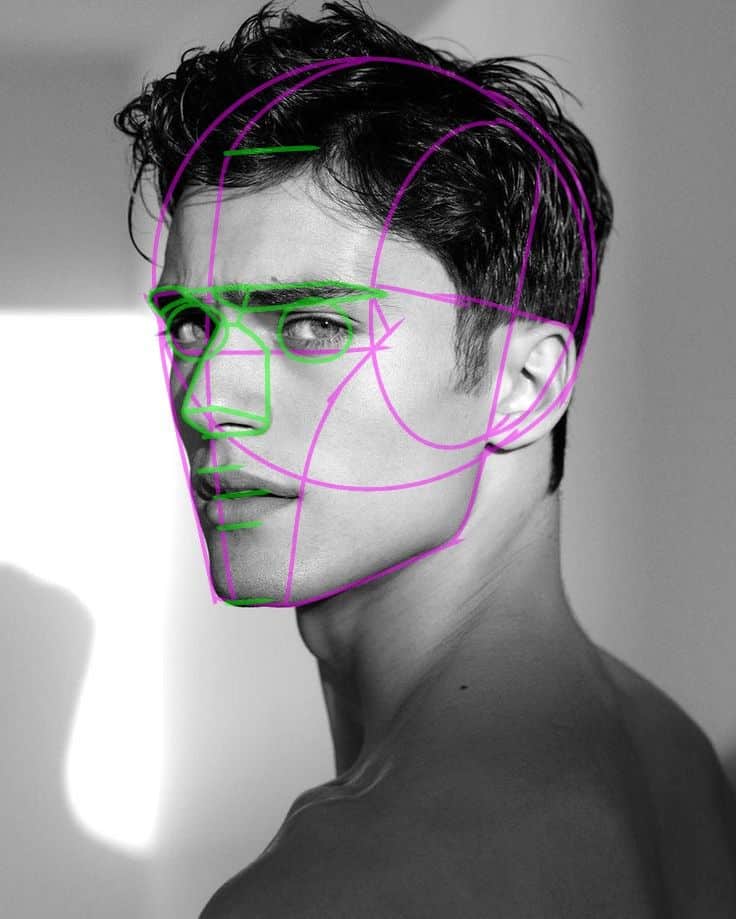
Facial landmarks are key points that guide facial feature placement. Important landmarks include the eye sockets, nose bridge, mouth corners, and chin tip.
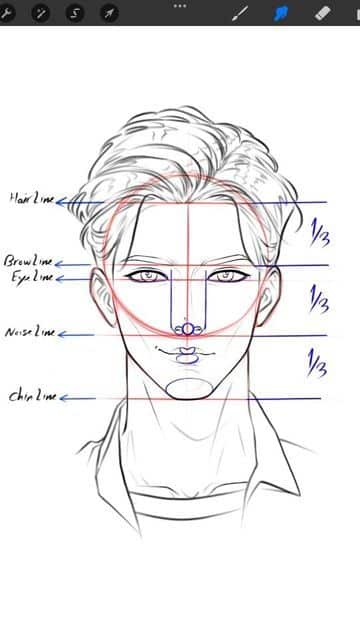
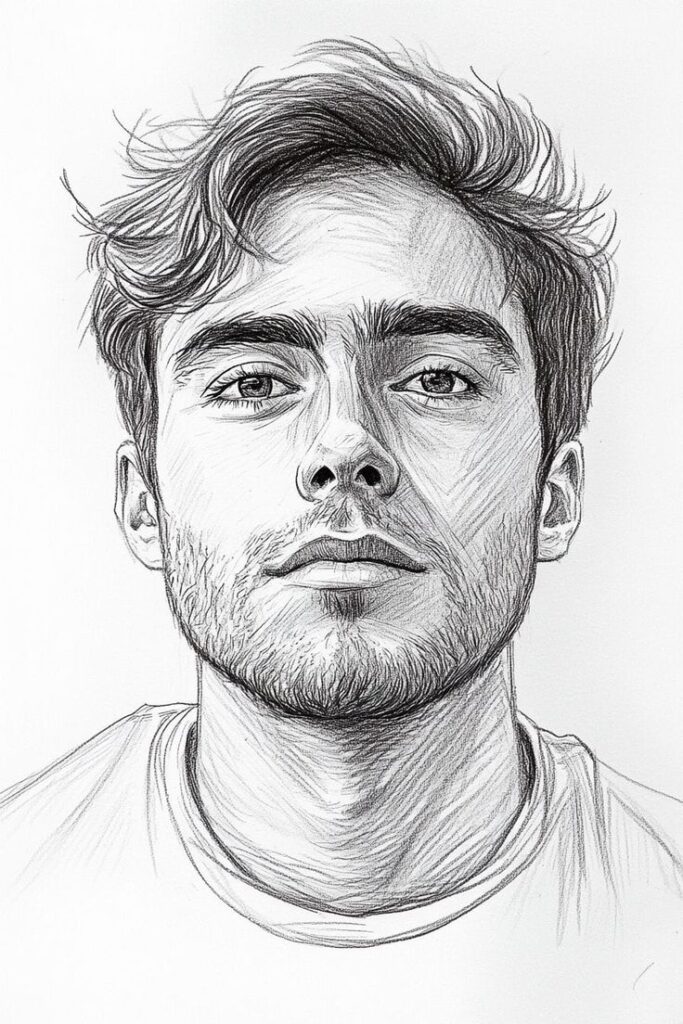
The eyes sit on a horizontal line halfway down the head. The nose usually extends from this line to about one-third down from the eyes to the chin. The mouth typically lies a third of the way down from the nose to the chin.
Understanding the landmarks helps keep facial features aligned and proportional. These points also define where muscles create subtle shadows and highlights, which add depth and expression to the face.
Creating Dynamic Poses
Dynamic poses bring life and energy to male figure drawings. They rely on a strong sense of movement, balance, and emotion. To achieve this, artists focus on capturing the flow of the body and how it expresses action or feeling.
Gesture Drawing Essentials
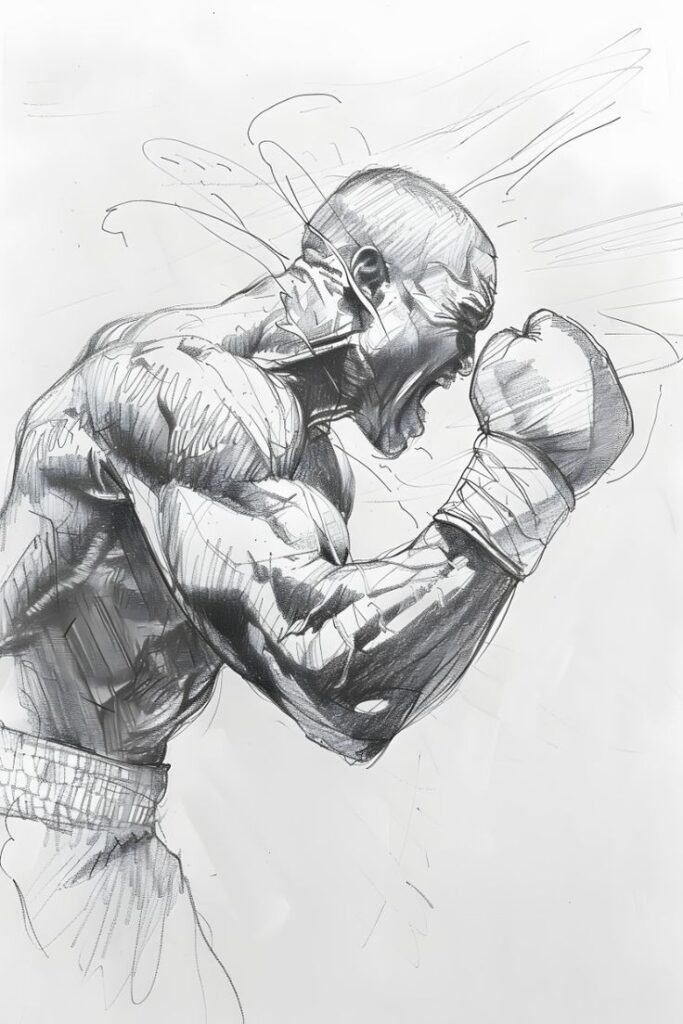
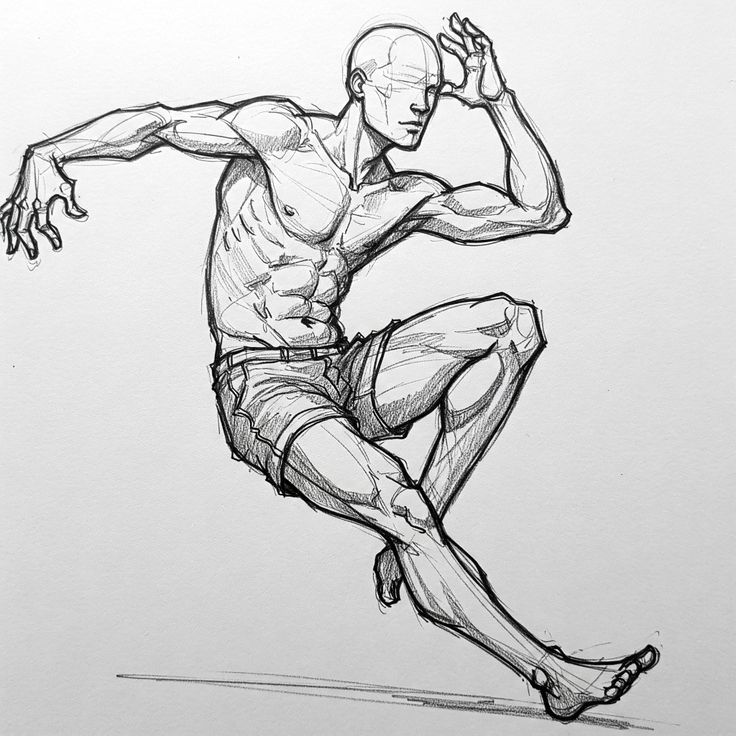
Gesture drawing is about quickly capturing the body’s movement and basic form. It focuses more on flow and energy than on details. Artists use loose, flowing lines to represent the body’s main action or posture.
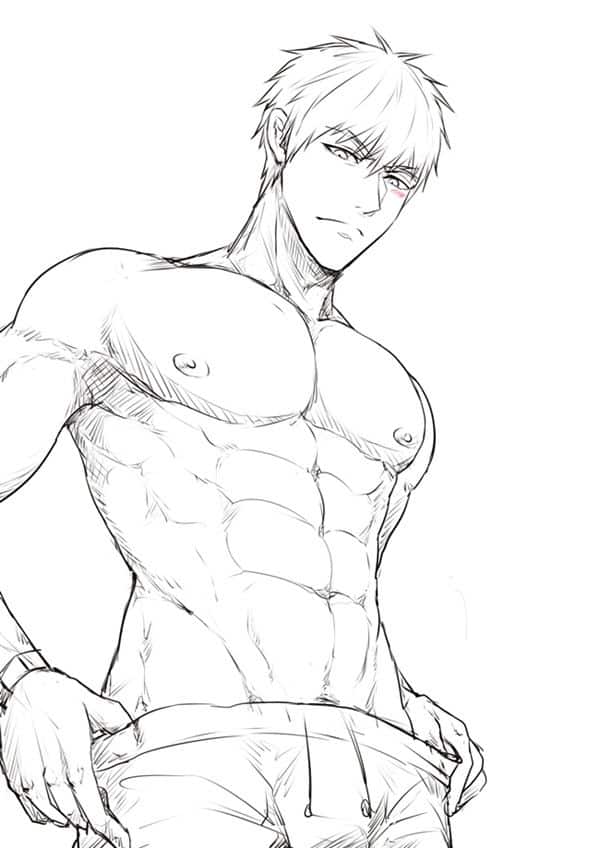
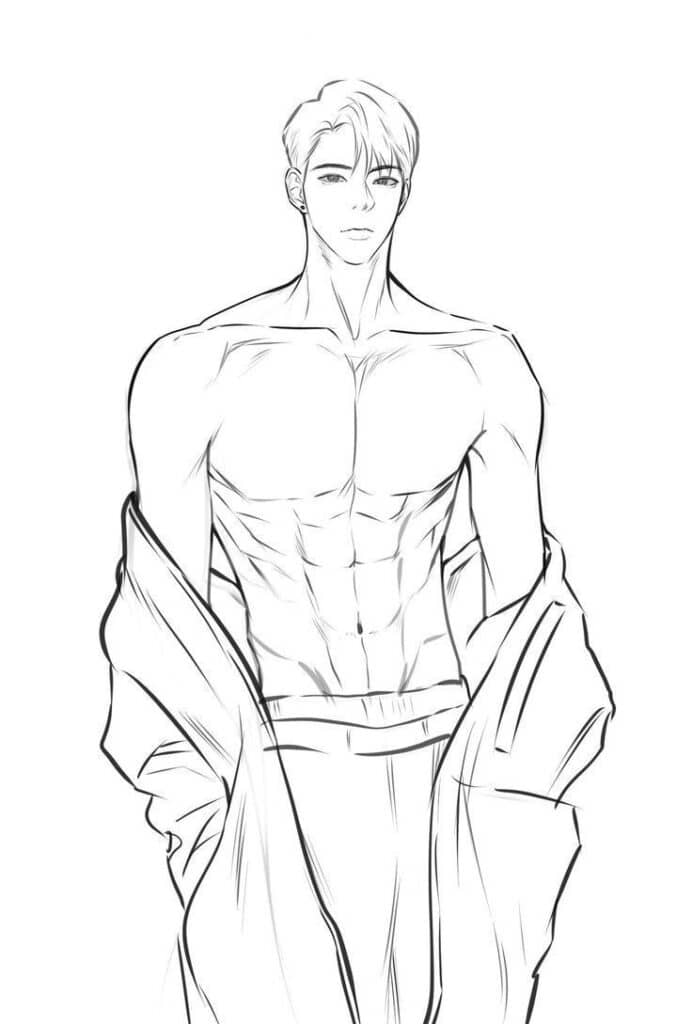
This practice helps to avoid stiffness. Instead of drawing each muscle or bone, it captures the overall movement. Using simple shapes like curves and lines, an artist can sketch the body’s rhythm and direction.
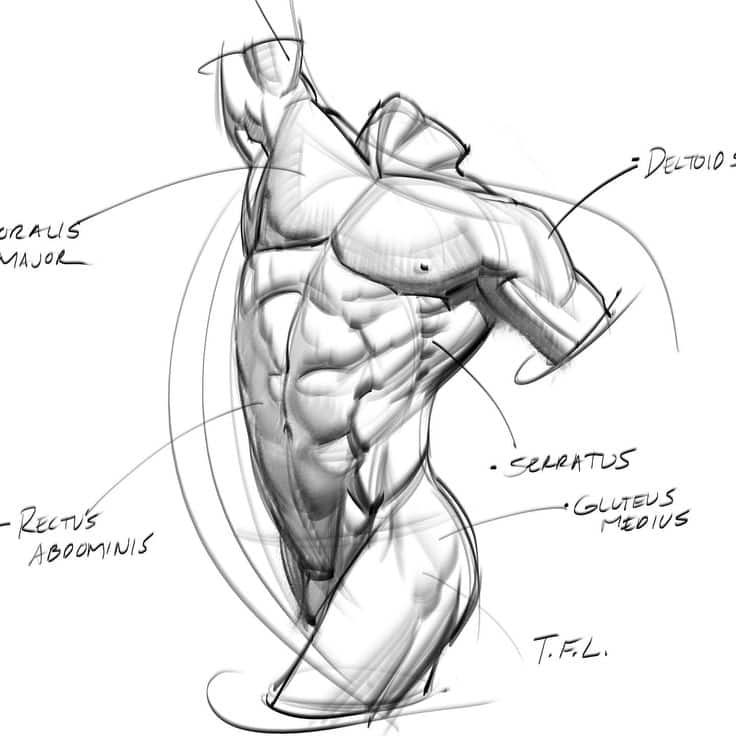
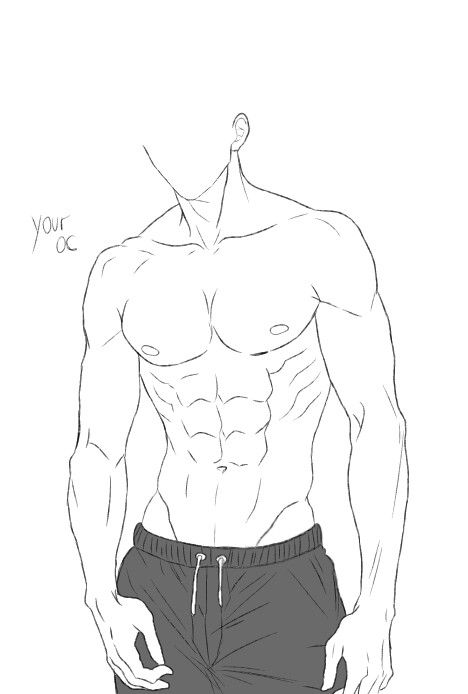
The goal is to show the body’s motion, weight, and balance. Gesture drawing sessions often last just a few seconds to a few minutes. This trains artists to see and translate the pose’s essential energy fast.
Understanding Movement and Balance
A strong dynamic pose shows how weight shifts and how the body supports itself. Balance means the figure looks stable, even in motion. To get this right, artists study the body’s center of gravity.
They note how the hips, shoulders, and feet align. When a person leans, the body shifts to keep balance. Artists sketch this by tilting the spine or adjusting limb placement.
Movement comes from joints and muscles working together. Artists observe how limbs bend and stretch in natural ways. Showing tension in some muscles while others relax makes the pose believable.
Expressing Emotion Through Posture
Posture changes with mood, attitude, and personality. Small shifts in body language can express sadness, confidence, anger, or joy. Artists use this to make poses tell a story.
For example, slumped shoulders and a lowered head suggest sadness or tiredness. Upright posture with chest forward can show pride or strength. The position of hands and the curve of the spine add extra clues.
Facial expressions matter, but the body can communicate just as much. A well-chosen pose can connect the viewer to what the character feels or thinks without words.
Adding Details and Realism
To make a male body drawing look lifelike, attention to small details is key. This includes the texture and appearance of skin, how muscles catch light and shadow, and subtle elements like body hair. Each of these parts adds depth and makes the figure feel more real.
Skin and Surface Anatomy
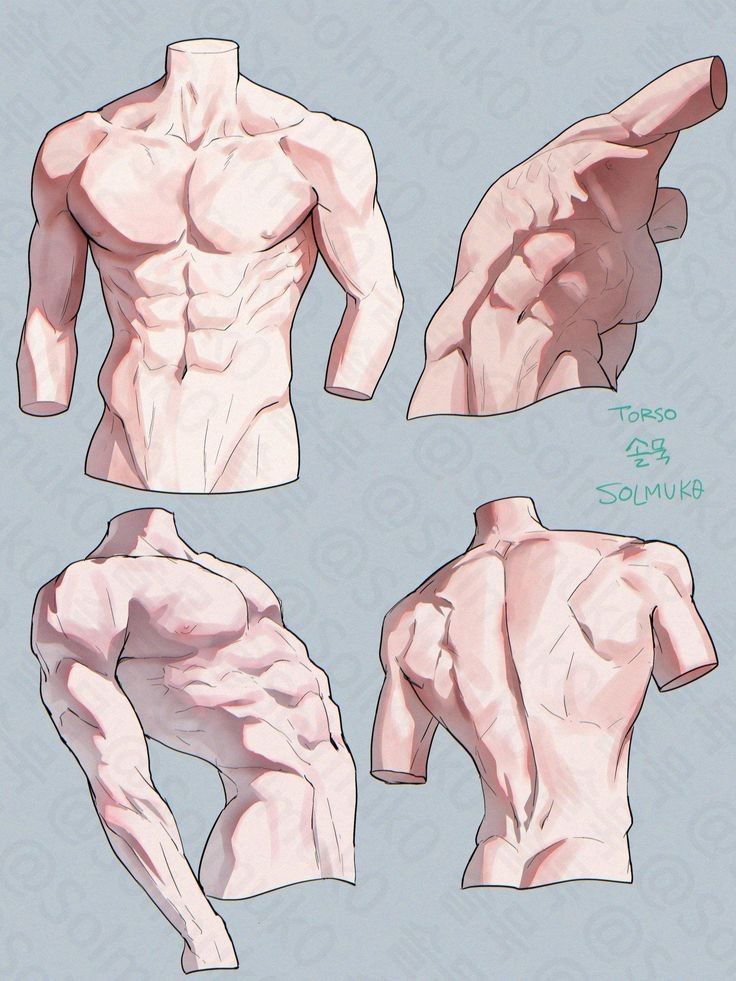
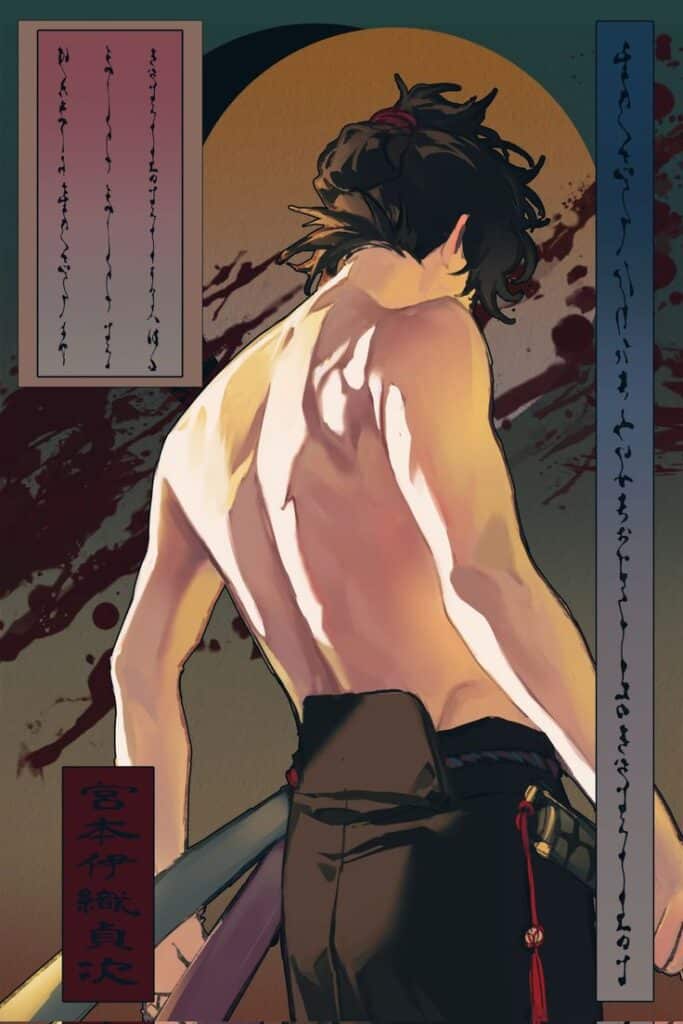
Skin isn’t flat or smooth; it has texture and changes depending on the body’s shape. Artists should observe how skin folds around joints or stretches over muscles. Adding tiny lines or subtle wrinkles helps show movement and flexibility.
Surface anatomy means showing bones, tendons, and veins just beneath the skin. These features give clues about the form underneath and add realism. For example, the collarbone and elbows have clear edges. Lightly drawing these details can make skin look more natural and connected to the body.
Shading Muscle Definition
Muscle shapes appear clearer with shading. Artists use light and shadow to show where muscles bulge or recede. Hard edges give a strong, defined look, while soft shading blends muscles smoothly.
It helps to identify the major muscle groups like the pectorals, abs, and biceps to know where to place shadows. The direction of the light source controls how the shadows fall. Using gradual shading rather than harsh lines makes the muscles look rounded and realistic.
Depicting Body Hair
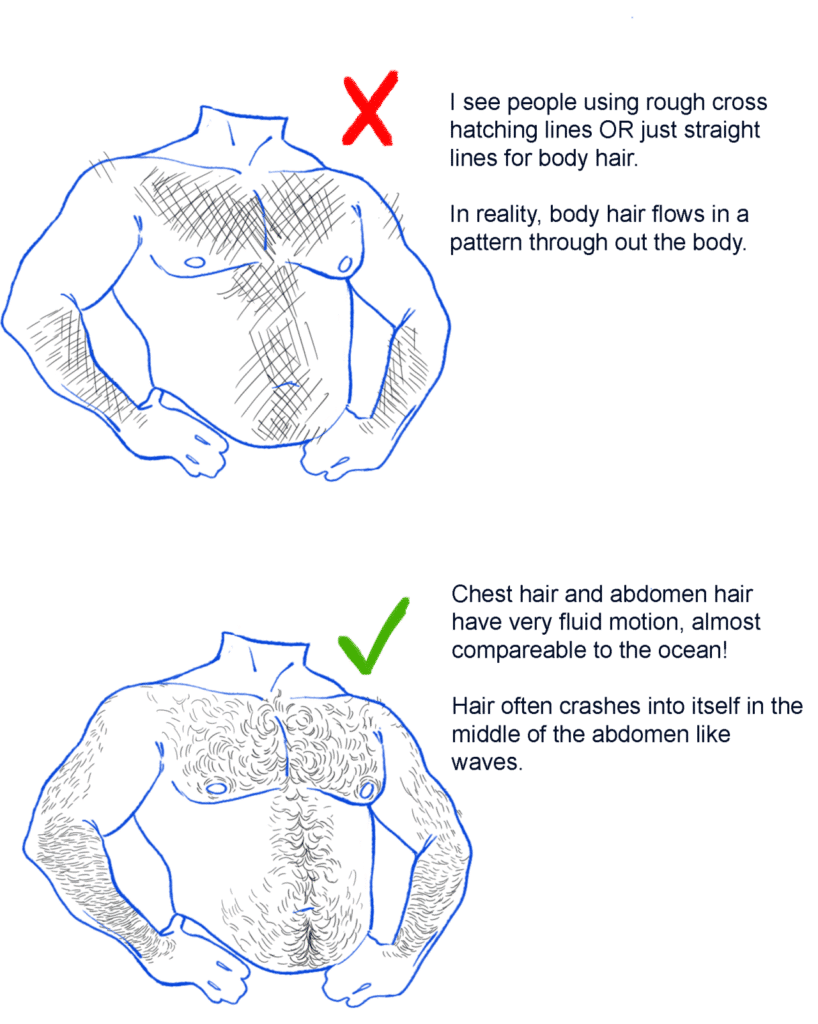
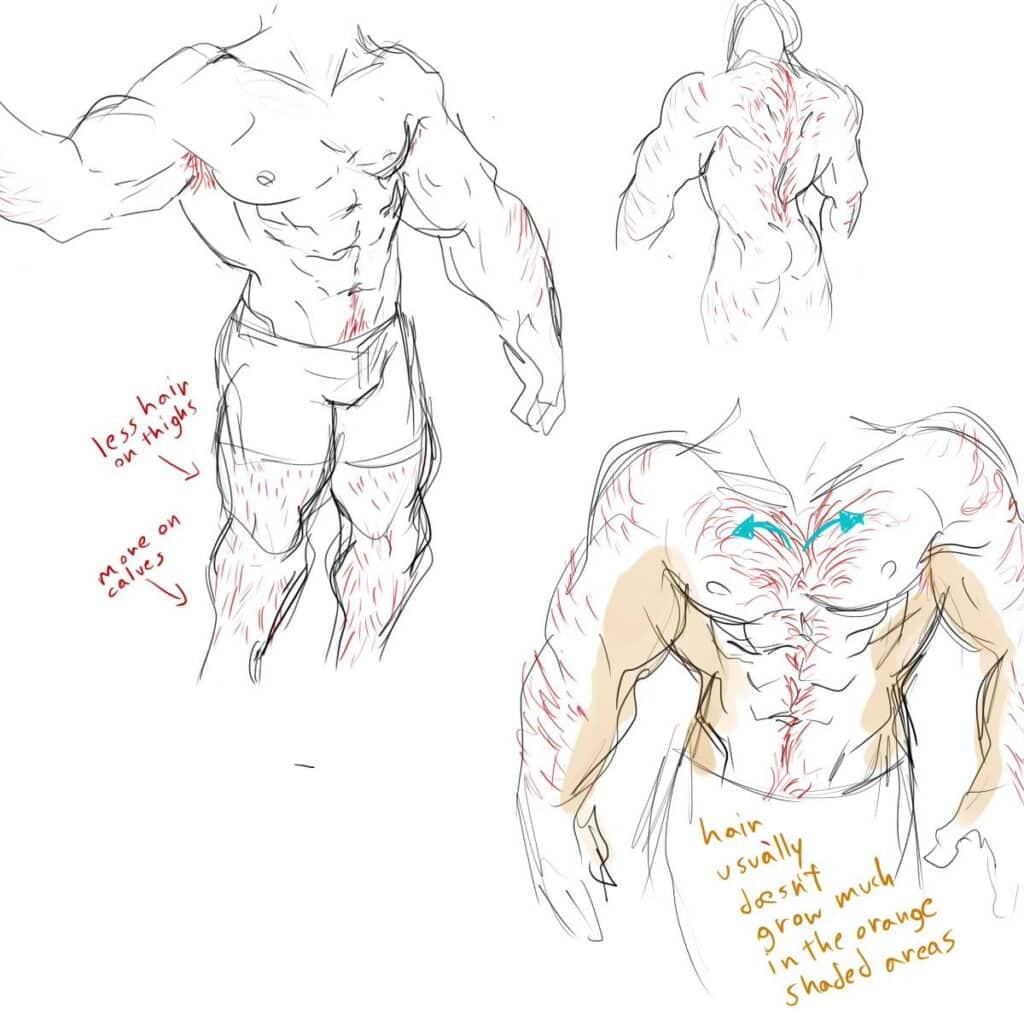
Body hair varies in thickness, length, and location. It’s important to represent this honestly without overdoing it. The chest, forearms, and legs often have light to moderate hair, while the face and underarms tend to be denser.
Hair direction should follow natural growth patterns. Drawing individual strands or small clusters adds texture but keep it subtle. Using soft, fine lines works best to avoid making the hair too heavy or distracting from the overall figure.
- 19shares
- Facebook0
- Pinterest18
- Twitter1
- Reddit0
