Drawing trees can be really fun and relaxing, but it can also be tricky if you don’t know where to start. Learning a few helpful tips can make a big difference in how your tree drawings turn out.
Whether you’re just starting out or you’ve been drawing for years, there’s always something new to learn. These tips will help you capture the beauty and structure of trees more easily.
Use references to real trees

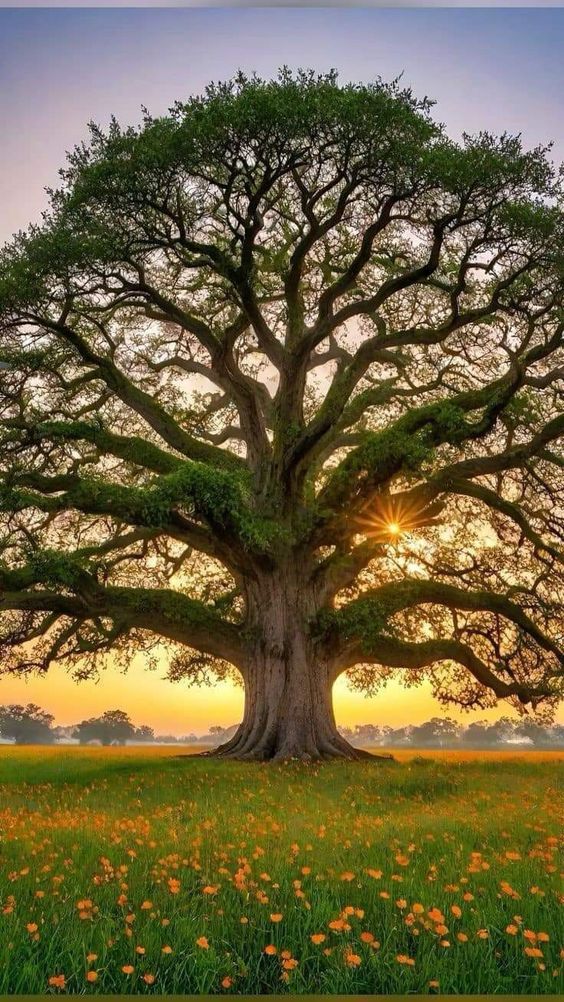
To draw realistic trees, artists should look at real trees. Studying real trees helps capture the shape, texture, and details.
He or she can take photos of trees in different seasons and from different angles. These photos can be used as references when drawing.
They can also go outside and sketch trees in person. This allows them to observe the way light hits the leaves and branches.
It’s helpful to notice the differences between tree species. For example, oak trees and pine trees have very different shapes and leaf structures.
Using reference images or sketches makes tree drawings more accurate. They can focus on the bark texture, leaf patterns, and how branches grow.
By looking at real trees, the artist can improve their drawings and make them more lifelike.
2. Start with basic shapes
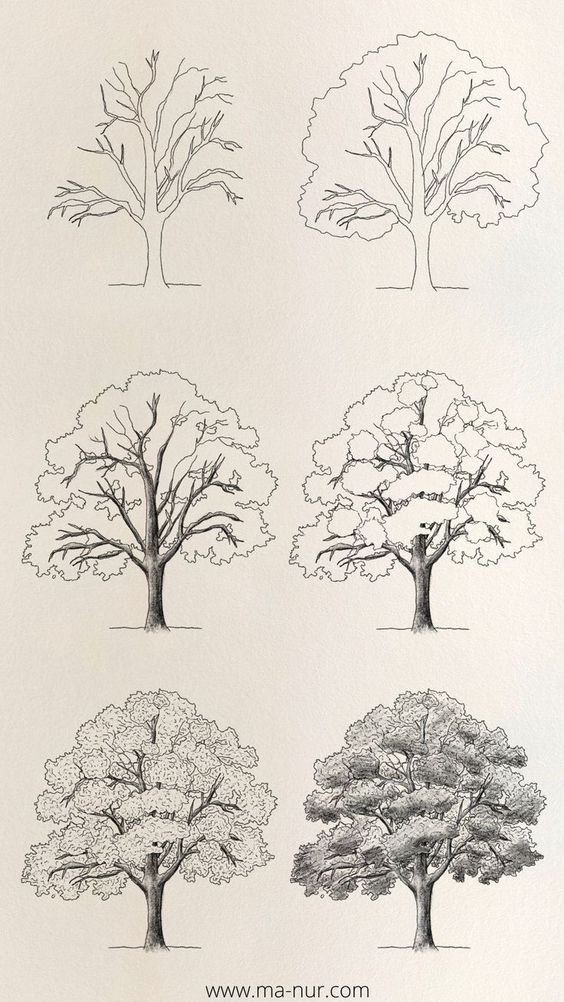

When drawing a tree, begin by sketching simple shapes. Use a triangle for the leaves and a rectangle for the trunk. This makes it easier to add more detail later.
Once the basic shapes are in place, add branches using straight or slightly curved lines. Keep them simple at first. They can be refined later.
For the foliage, use circles or ovals to represent clusters of leaves. This helps to give the tree some texture and depth. These simple shapes are your guide.
Starting with basic shapes helps make the drawing process less intimidating. It’s easier to correct mistakes early on when the forms are simple. This foundation makes adding details much smoother.
3. Focus on the trunk structure


The trunk is the backbone of any tree drawing. It provides stability and defines the overall shape of the tree.
Start by sketching a rough outline. Begin with a simple, vertical line that marks the trunk’s main direction. Divide this line into segments to help gauge the thickness of different parts.
Notice how trunks aren’t perfectly straight. Add slight curves and bends to make it look natural. Vary the thickness as you move from the base upwards.
Don’t forget the roots. Draw some roots spreading out from the base. They give the tree a grounded appearance. Roots should be thicker near the trunk and taper off as they extend outward.
Texture is important too. Use short, quick strokes to add bark patterns. Try small vertical lines and criss-cross patterns. This helps the trunk look more realistic and less flat.
Study real trees to understand different trunk shapes and patterns. Some trees have smooth bark, while others are rough. Observing these details can make a big difference in your drawing.
Practice makes perfect. Keep experimenting with trunk structures until you’re satisfied with the look. The more you draw, the more natural it will become.
4. Add texture to the bark
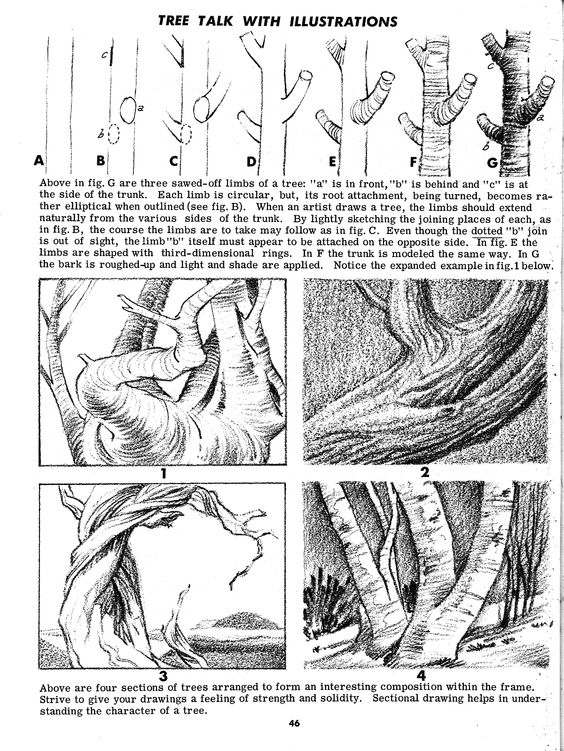

Adding texture to the bark makes trees look more realistic. He or she should start by observing real tree bark. Notice the lines, cracks, and unique patterns each tree has.
Using a pencil or a pen, they can draw small, quick lines to mimic those patterns. Varying the pressure they apply helps create different textures. For example, pressing harder can make deeper grooves.
It’s helpful to practice on a separate piece of paper first. This way, they can get a feel for how the lines will look. They should not worry about being perfect; nature is full of irregularities.
For a different effect, they can also use shading. Lightly shading some areas while leaving others untouched gives the bark a three-dimensional look. Using an eraser to create highlights also adds depth.
Mixing different line types can give the bark a rougher or smoother appearance. Combining short and long lines, along with different angles, will add variety. Trying out a mix of straight and curved lines also helps.
Finally, adding some knots or holes can make the bark even more interesting. These small details can really bring the drawing to life. Using a reference photo as guidance can be a great help.
5. Vary Branch Thickness

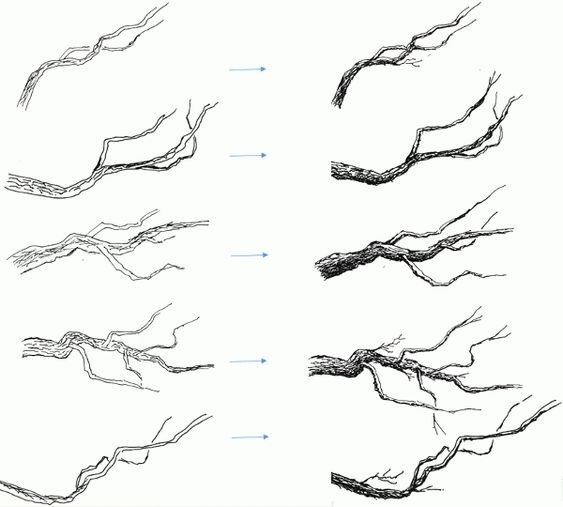
When drawing trees, it’s important to change the thickness of the branches. Start with a thick trunk. From there, lead off with thicker branches. Then, make the branches thinner as they split off.
This makes the tree look more natural. Thicker branches near the trunk show strength. Thinner branches further out look more delicate.
Try not to use the same thickness for all branches. This can make the tree look fake. Use different sizes to break up the pattern.
Different trees have different branch thicknesses, too. A pine tree might have a very different look compared to an oak tree. Experiment with these styles.
Keep practicing. The more you draw, the better you will get at making branches look realistic.
6. Use overlapping lines for leaves


Drawing leaves can be tricky, but using overlapping lines makes them look more natural. When you layer the lines, it gives the leaves depth and texture. This is because leaves rarely grow in perfect shapes or equally spaced apart.
Start with a few main lines to mark out the shape of the leaves. Then, add smaller lines that criss-cross and overlap. Don’t worry if it looks messy at first; nature is often a bit chaotic.
Try using different shades or pressing harder on some lines. This makes some leaves look closer and others farther away. It adds a sense of depth to the drawing. Keep experimenting with this technique to see what works best.
7. Incorporate different leaf shapes
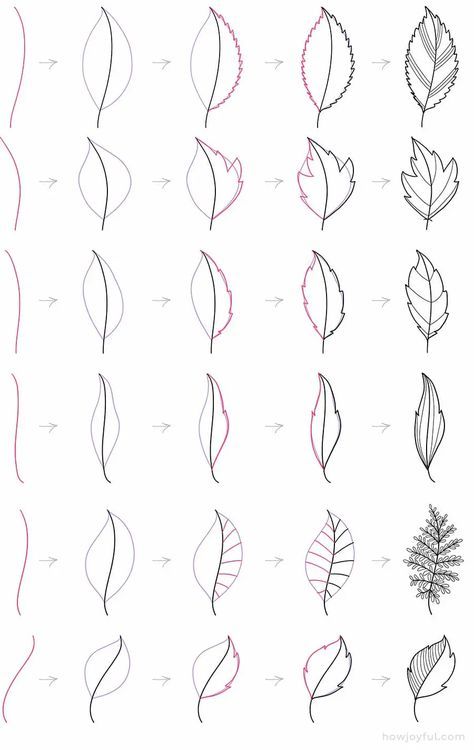

Drawing trees gets more interesting when you mix up the leaf shapes. Instead of using just one type of leaf, try adding variety.
Some trees have oval leaves, while others have heart-shaped ones. These little differences make a big impact.
Experiment with spiky leaves for a pine tree or rounded ones for a maple. Keep practicing different shapes. Each shape helps your drawing stand out more.
Notice how each tree species has its unique look. By using various leaf shapes, you can make your trees look more realistic.
8. Capture light and shadow


To make your tree drawings look real, it’s important to show how light and shadow work. Light can come from different directions, so think about where your light source is.
When light hits the tree, some parts will be bright, and some parts will be dark. Use lighter colors for the parts that the light hits and darker colors for the shady areas.
Try adding different shades to the leaves, branches, and trunk. This will make your tree look more three-dimensional.
Remember, the time of day changes the light and shadows. Draw with softer shadows in the early morning and late afternoon, and sharper shadows at noon.
Practice drawing trees in different lighting conditions, like sunny days, cloudy days, and at sunset. The more you practice, the better you’ll get at capturing light and shadow.
9. Experiment with different pencil grades


Trying out different pencil grades can change your tree drawings a lot. Pencils range from hard (H) to soft (B). Hard pencils like 2H or 4H give light, fine lines. These are great for sketching outlines or adding subtle details.
On the other hand, soft pencils like 2B or 6B create dark, bold lines. These are perfect for shading and adding depth. Using a range of pencil grades will make your drawing more interesting.
Mixing hard and soft pencils can help show different textures in the tree. Leaves might look better with a soft pencil, while you might use a hard pencil for the bark. Keep experimenting to see what works best for your style.
Trying different pencils can also help with creating shadows. Use soft pencils to make deep shadows and hard pencils for lighter ones. This gives the tree a more three-dimensional look.
Switching up your pencils makes the drawing process more fun. Don’t be afraid to try new pencils and see how they change your art. Your trees will look more realistic and dynamic with this technique.
10. Sketch from life when possible


Sketching from life makes drawings more detailed. Real trees have unique shapes, textures, and colors. Observing them in person helps capture these features better.
When outside, take a closer look at the tree’s branches and leaves. Notice the bark’s texture and how the light hits different parts of the tree. A real view provides many details that a photo can’t.
Different trees have different structures. By sketching from life, artists learn to see these differences. This practice improves their skills and makes each tree drawing more accurate.
Carrying a small sketchbook can help. Draw a quick sketch during a walk in the park or hiking. Even short sessions improve observation skills and bring new ideas for future drawings.
11. Include background elements
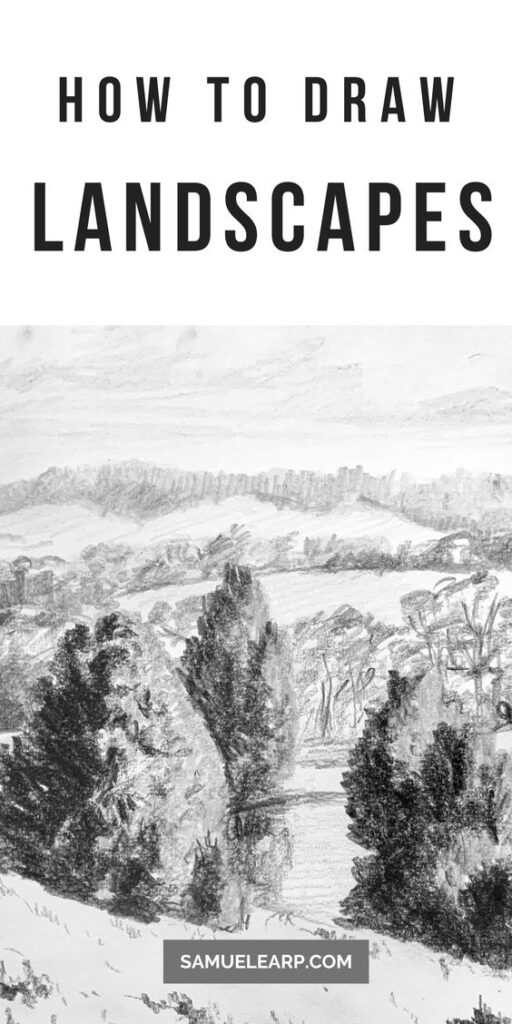
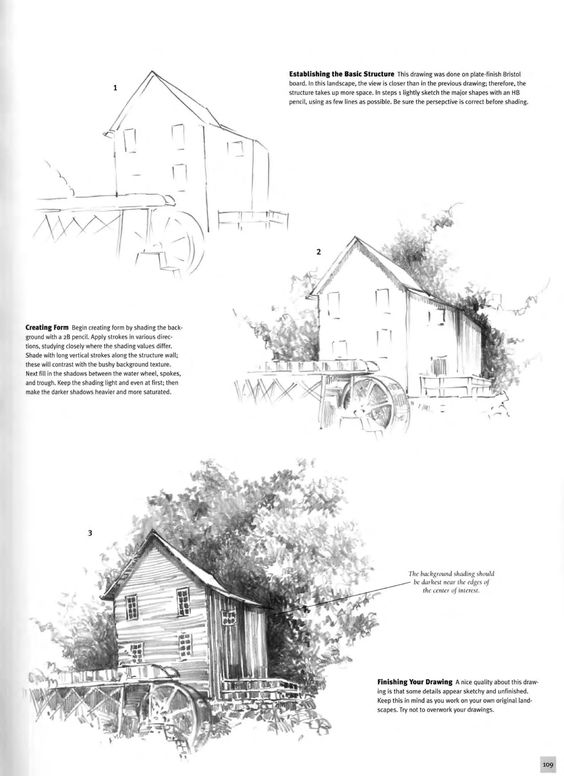
Adding background elements to your tree drawings can make them more interesting. These elements might include mountains, clouds, or even a distant forest.
Using background elements helps set the scene. It gives your drawing context and makes it feel more complete.
He can start with simple shapes. Maybe a hill with some small bushes or rocks.
She might also add a sun or moon in the sky. It doesn’t have to be detailed, just enough to hint at the surroundings.
Don’t forget about the ground. Adding some grass or fallen leaves makes it look more natural.
They could also draw some birds or insects flying around. This adds life and movement to the scene.
Experiment with different elements and see what works best for the drawing. Just remember to keep it simple. Too many details can make the drawing look cluttered.
12. Simplify the foliage

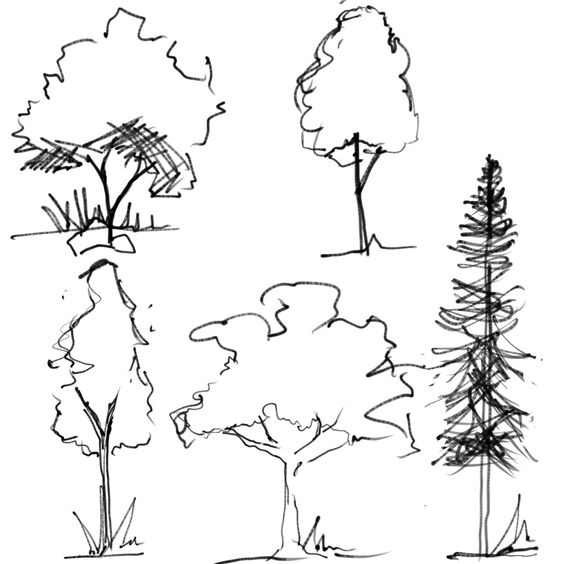
To make trees look less cluttered, keep the leaves simple. Instead of drawing every single leaf, just hint at their presence with small clusters.
Use broad strokes to create a sense of fullness. This way, the viewer gets the idea of a leafy canopy without being overwhelmed by too much detail.
Vary the shapes and sizes of these clusters. This adds some natural variety while keeping the drawing easy to manage. Don’t stress over making each part perfect.
Understanding Tree Structure
Tree structure can be broken down into different parts and types that each have unique characteristics and functions.
The Anatomy of Trees
Trees have many parts, including roots, trunks, branches, and leaves. Roots anchor the tree and absorb water and nutrients from the soil. Trunks provide support and transport nutrients and water through the tree. Branches spread out to provide a structure for leaves, which capture sunlight for photosynthesis.
The bark protects the trunk and has layers that indicate the tree’s age. Inside the trunk, the xylem transports water, while phloem moves nutrients. Each part plays a role in keeping the tree healthy and growing.
Types of Trees and Their Characteristics
There are many types of trees, each with unique features. Deciduous trees like oaks and maples lose their leaves in the fall. These trees often have broad leaves that provide a lot of shade. Coniferous trees such as pines and firs keep their needles year-round. They usually grow cones and are well-suited for colder climates.
Evergreen trees keep their leaves or needles all year. Examples include holly and spruce. Fruit trees like apple and cherry trees produce edible fruits and often have blossoms in spring. Understanding these types helps in drawing realistic trees.
Choosing the Right Tools
Picking the right tools for drawing trees makes a big difference. Start with the basics, then use more advanced tools for detailed work.
Essential Drawing Tools for Tree Sketching
To start sketching trees, you need some basic tools. Pencils are a must. Use an HB pencil for light lines and shading. You might also want a 2B pencil for darker areas. Paper is important too. Regular sketch paper works, but heavier paper handles erasing better.
Erasers are handy for fixing mistakes and creating highlights. A kneaded eraser is soft and molds to any shape, making it ideal for fine details. Blending stumps help smooth out pencil marks and create soft shadows.
Advanced Tools for Detailed Tree Drawings
For more detailed tree drawings, consider using micron pens or technical pens. These pens come in different sizes, like 0.1mm to 0.5mm, and help add sharp, fine lines. Colored pencils can also make your tree drawings look more realistic. Brands like Prismacolor offer smooth, blendable colors.
Graphite sticks are great for covering large areas with even shading. Watercolor pencils can take your work to the next level. Draw with them like regular colored pencils, then add water to blend the colors. Brush pens can add dynamic lines and texture. They are especially useful for creating the look of bark and leaves.
Mastering Techniques
Mastering tree drawing involves learning the basic shapes, adding depth, and using light and shadow.
Basic Shapes and Forms
Trees start with simple shapes. To draw a tree, begin with a trunk, often a slightly curved or straight line. From the trunk, draw branches that get thinner as they extend. Think of the branches as “arms” reaching out. Use ovals, circles, and triangles to form leaves and clusters.
Practice drawing different types of trees like oak, pine, and willow to understand their unique shapes. An oak has a thick trunk and wide branches, while a pine is tall with a pointy top. Each type of tree has its own structure, so try out different styles.
Adding Depth and Texture
Adding depth makes trees look more realistic. Use overlapping lines for branches to show which ones are in front and which are behind. Drawing rough, jagged lines for the trunk and branches can create texture. Bark details, like small, uneven lines, add a natural feel.
For leaves, draw clusters with varying shades. Darker shades give the illusion of shadow, while lighter shades show light. Add a mix of small and large leaf shapes to create a fuller look. Practice shading techniques to make the tree stand out and look three-dimensional.
Using Light and Shadow
Light and shadow play a huge role in tree drawing. Identify a light source and imagine where the light hits the tree. The side facing the light should be lighter, while the opposite side should be darker. Shade the darker areas progressively to show depth.
Leaves create their own shadows on the branches and trunk. Use softer, lighter strokes for the areas hit by light. Darker strokes will show the shaded areas. Highlights on leaves can make them look shiny and more detailed. By mastering light and shadow, trees will look much more lifelike.
Frequently Asked Questions
Learn how to draw trees with easy steps and techniques that help improve your sketches. Get tips to make your trees look natural and well-proportioned.
What are some simple steps to draw a tree for beginners?
Start with basic shapes like circles and rectangles. This helps to outline the trunk and the branches. Then, gradually add details like leaves and texture to make the tree come to life. Using references from real trees can be helpful.
Can you share some tricks to make my tree drawings look more realistic?
Adding texture to the bark and varying the thickness of the branches can help. Paying attention to how light and shadow play on the tree also makes a big difference. Use shading to add depth and give the tree a more lifelike appearance.
How can I draw a beautiful tree easily?
Begin with a solid trunk structure and then branch out. Using softer pencils can make shading easier. Adding small details like knots in the bark and imperfections on the leaves can make the tree look more beautiful and unique.
What techniques can help me improve my tree drawing skills?
Practice drawing different types of trees from various angles. Observe real trees to understand their structure and shapes. Experiment with different drawing tools and techniques, like using charcoal for a rough texture or colored pencils for more vivid details.
Is there a specific rule to follow when drawing trees?
One rule is to keep the tree’s branches varied in thickness. This makes the tree look more natural. Another is to ensure that the roots are somewhat visible, which gives the tree a sturdy appearance. Don’t forget to add details to both the trunk and the leaves.
What’s a good way to ensure my tree drawings look well-proportioned and natural?
Use references from real trees to guide your proportions. Pay attention to the balance between the trunk, branches, and foliage. Drawing lightly at first so you can easily make adjustments as you go along can also help you achieve a natural look.
- 4.7Kshares
- Facebook0
- Pinterest4.7K
- Twitter0
