A bathroom renovation works best when the decisions happen in the right order. Survey the room, decide whether the layout will change, confirm approvals, price the whole scope, and choose waterproofing and ventilation before buying decorative finishes. Tiles and taps come later.
This bathroom renovation guide covers the planning sequence, budget structure, realistic timeline, trade responsibilities, material choices, and handover checks. The regulatory notes use England as the reference market; readers elsewhere should confirm local building, plumbing, and electrical rules before work starts.
- Bathroom renovation guide at a glance
- 1. Survey the bathroom before choosing a style
- 2. Decide the renovation scope and layout
- Six bathroom styles to test against the floor plan
- 3. Build a bathroom renovation budget
- 4. Set a realistic timeline and buying schedule
- 5. Check approvals and assign the right trades
- 6. Design the waterproofing before the tile
- 7. Choose fixtures around use and maintenance
- 8. Plan ventilation and bathroom lighting together
- 9. Follow a controlled construction sequence
- 10. Inspect the room before final handover
- Common bathroom renovation mistakes
- Bathroom renovation FAQ
- What order should a bathroom renovation follow?
- How long does a bathroom renovation take?
- How should I budget for a bathroom renovation?
- Does keeping the existing layout save money?
- Do bathroom tiles need waterproofing underneath?
- Do I need building regulations approval for a bathroom renovation in England?
- A good bathroom is resolved behind the finish
Bathroom renovation guide at a glance
| Stage | Decision to lock | Output before moving on |
|---|---|---|
| Survey | What stays, moves, or needs repair | Measured plan, photos, and defect list |
| Scope | Cosmetic refresh or full renovation | Written room brief and fixture schedule |
| Compliance | Approval, ventilation, and electrical needs | Building-control and trade checks confirmed |
| Budget | Quotes, allowances, and contingency | Cost plan that includes labour and hidden work |
| Specification | Waterproofing, surfaces, fittings, and lighting | Compatible products with lead times recorded |
| Construction | Trade order and inspection points | Programme with hold points before surfaces close |
| Handover | Testing, certificates, and snagging | Dry, ventilated, working room with records |
The sequence matters more than the style. A beautiful tile cannot correct a poorly placed waste pipe, inadequate extraction, or a shower tray that does not drain. Freeze the technical decisions first, then use the visual choices to support them.


1. Survey the bathroom before choosing a style
Measure the room at floor and ceiling level, because older walls are rarely perfectly square. Record door swings, window positions, ceiling height, soil pipe, hot and cold feeds, radiator, extractor, switches, and every electrical point. Photograph the room from each corner and take close-ups before anything is removed.
Then make a defect list. Look for cracked grout, loose tiles, stained ceilings, soft flooring, slow drainage, persistent condensation, and sealant that repeatedly fails in the same place. These clues can reveal a problem behind the finish. If there is active leakage, movement, damaged wiring, or suspected mould within the construction, investigate it before pricing the new look.
Write a room brief, not a shopping list
A useful brief describes what the room must do. Note who uses it, whether bathing is essential, how much closed storage is needed, which items need charging, and whether accessibility may matter during the life of the renovation. Separate needs from preferences. “Easy-clean shower with a handheld spray” is a need; “fluted brass screen” is a preference.
- Keep: sound fixtures, useful plumbing positions, and storage that already works.
- Repair: ventilation, leaks, subfloor movement, damaged substrates, and unreliable electrics.
- Change: items that block movement, waste storage, are difficult to clean, or do not suit the household.
- Optional: premium finishes and technology that can be removed without weakening the core scheme.
2. Decide the renovation scope and layout
Keeping the toilet, basin, bath, and shower close to their existing service positions usually reduces opening-up work and coordination. Moving them can be worthwhile when the current layout is unsafe or awkward, but it should solve a clear problem. Draw the existing and proposed plans at the same scale, including usable standing space and door movement.
| Scope | Usually includes | Main risk |
|---|---|---|
| Cosmetic refresh | Paint, mirror, lighting, hardware, accessories, and limited surface repairs | Covering defects that need investigation |
| Like-for-like refit | New sanitaryware and finishes in broadly the same positions | Assuming existing substrates and services are sound |
| Full renovation | Strip-out, service changes, waterproofing, new surfaces, fixtures, and ventilation | Unclear scope between trades |
| Layout change | Moved walls, drainage, plumbing, electrics, doors, or windows | Approval, structural, drainage, and programme complexity |
Use the measured plan to test different arrangements. For visual direction, these modern bathroom ideas show how proportion, storage, and lighting can work together. In a compact room, compare the plan with these ways to make a small bathroom feel bigger and brighter, but keep circulation and cleaning access ahead of visual tricks.
Six bathroom styles to test against the floor plan
Style should refine a resolved layout rather than hide a weak one. These six directions use different finishes and lighting, but each keeps the room legible: a clear route, accessible storage, defined wet zones, and fixtures that can be maintained.
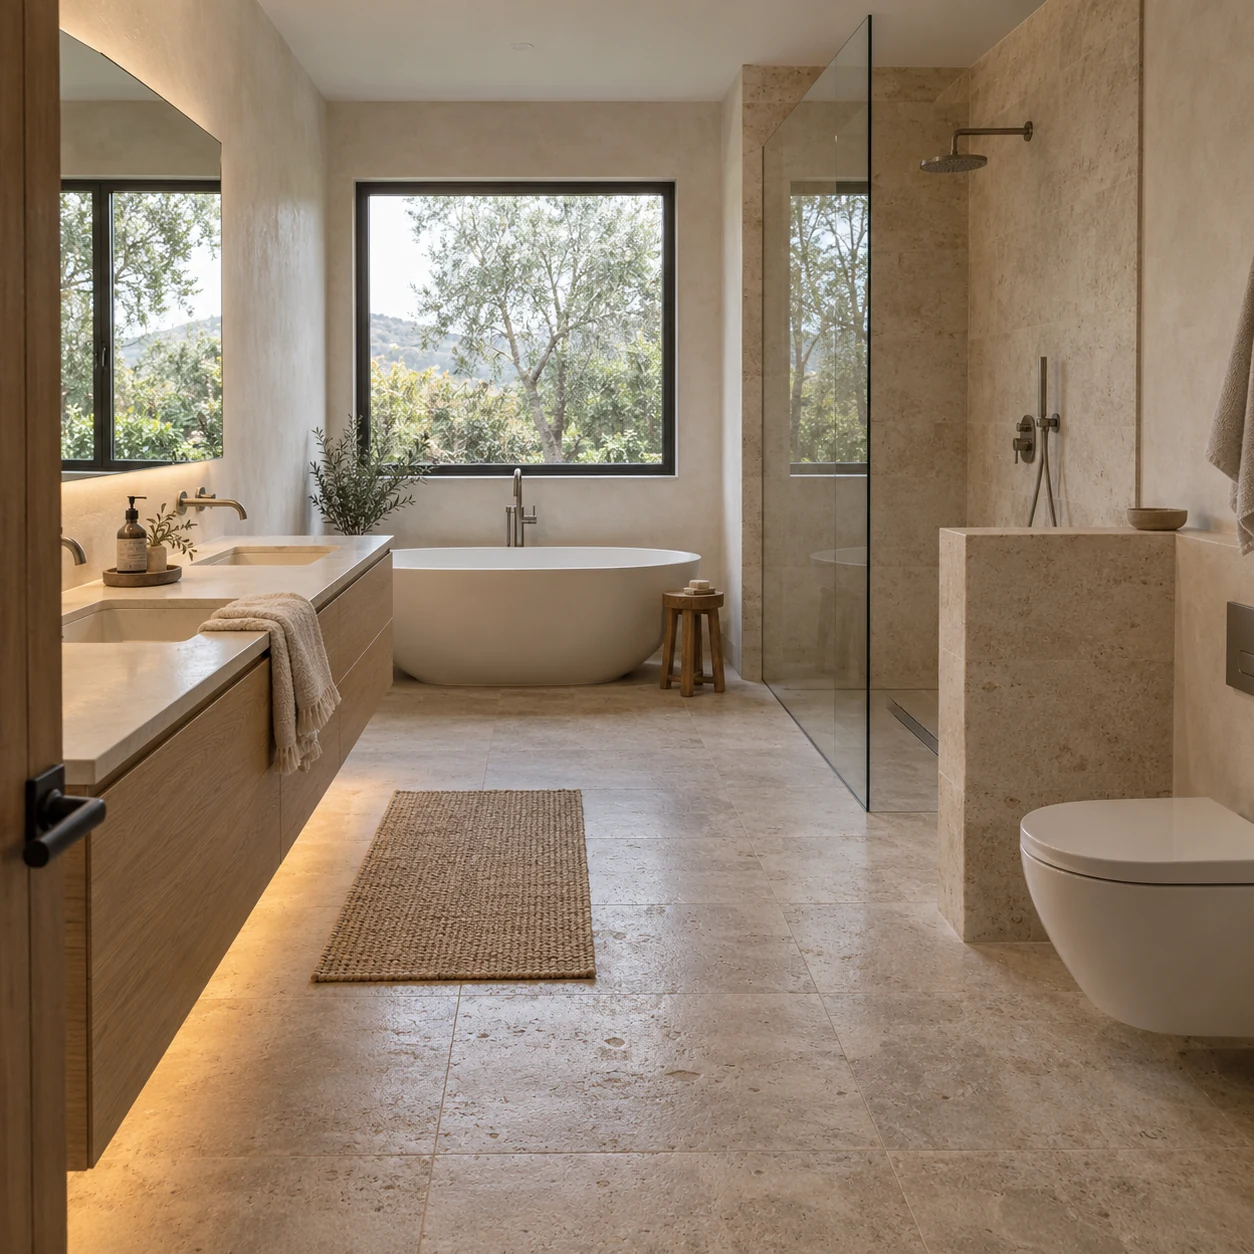
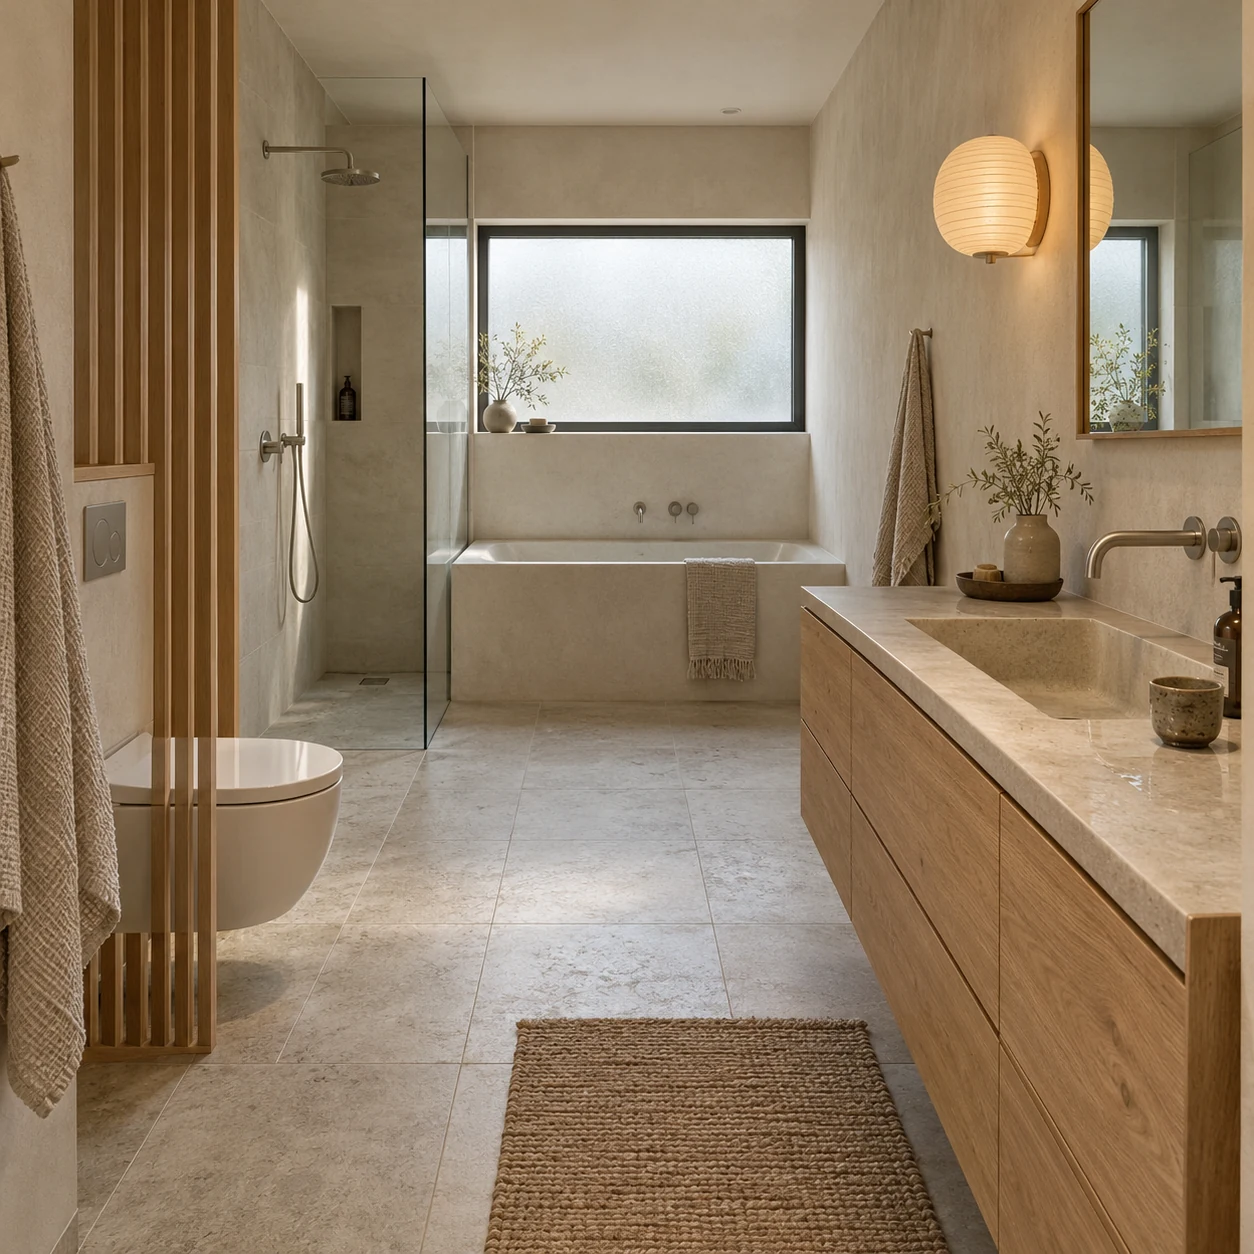
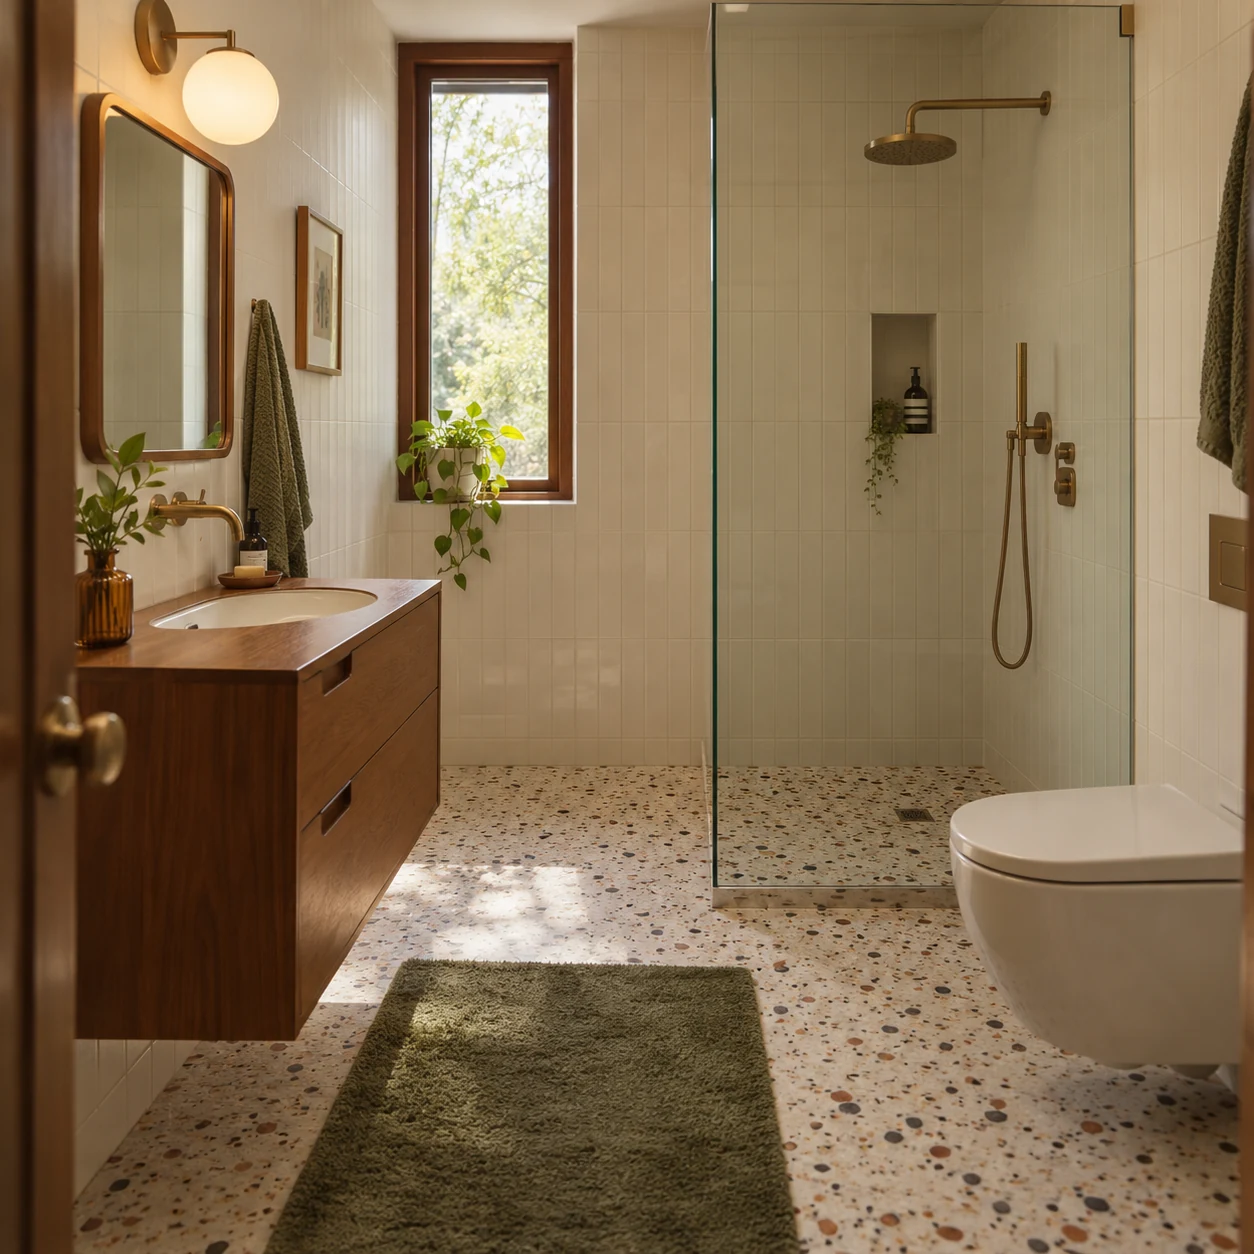
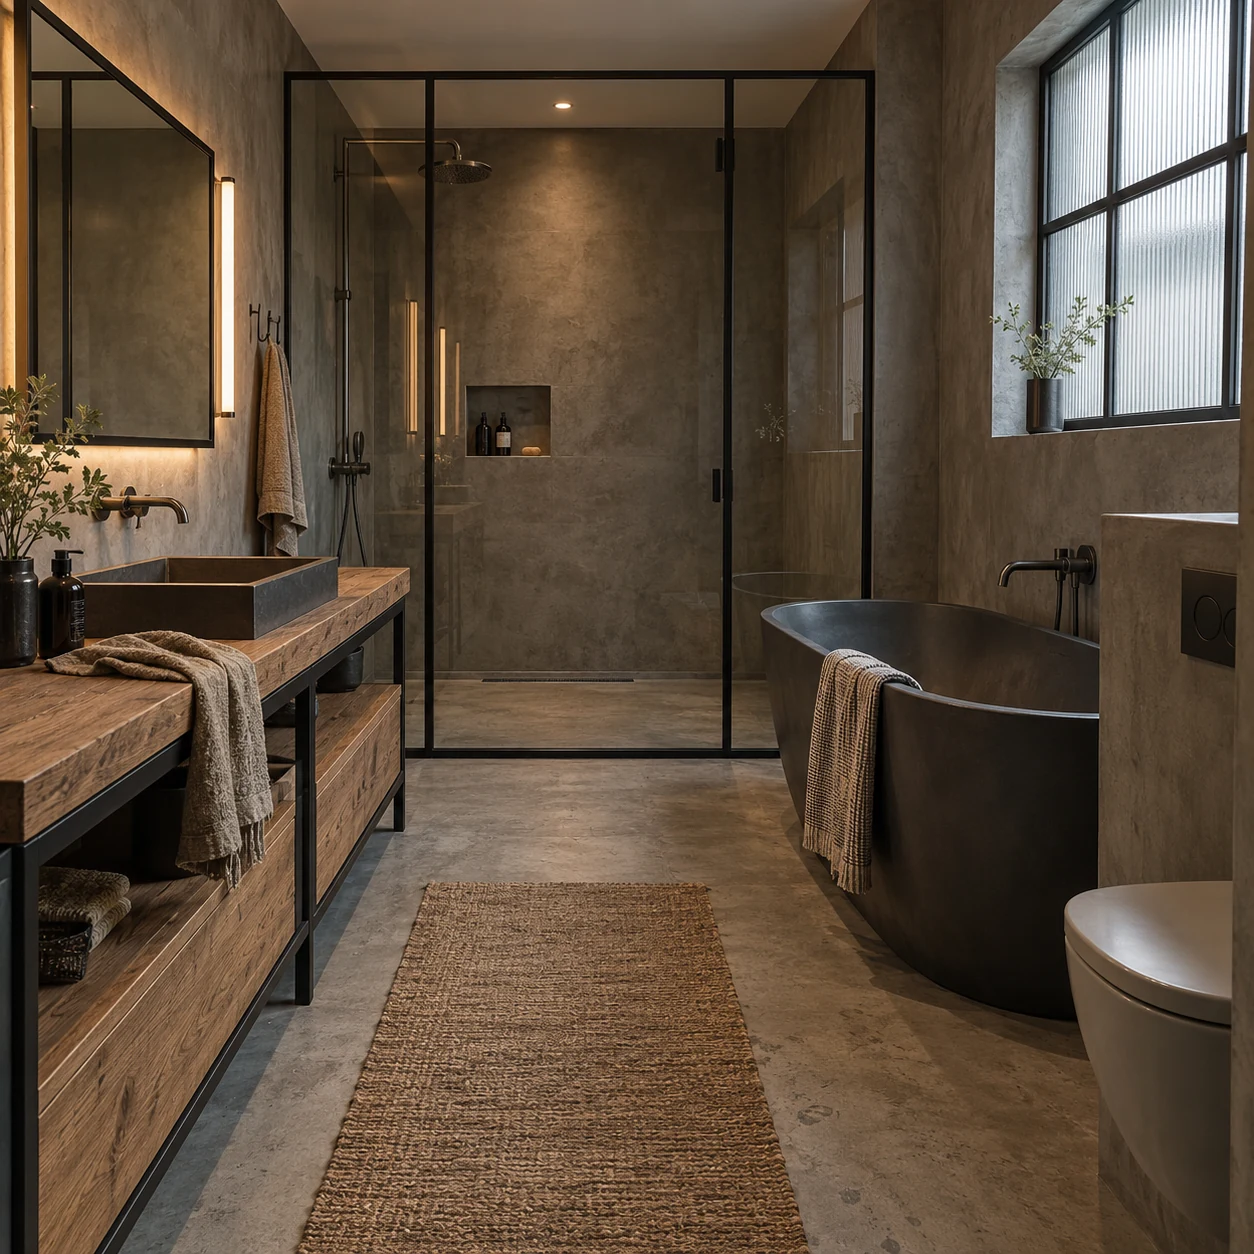

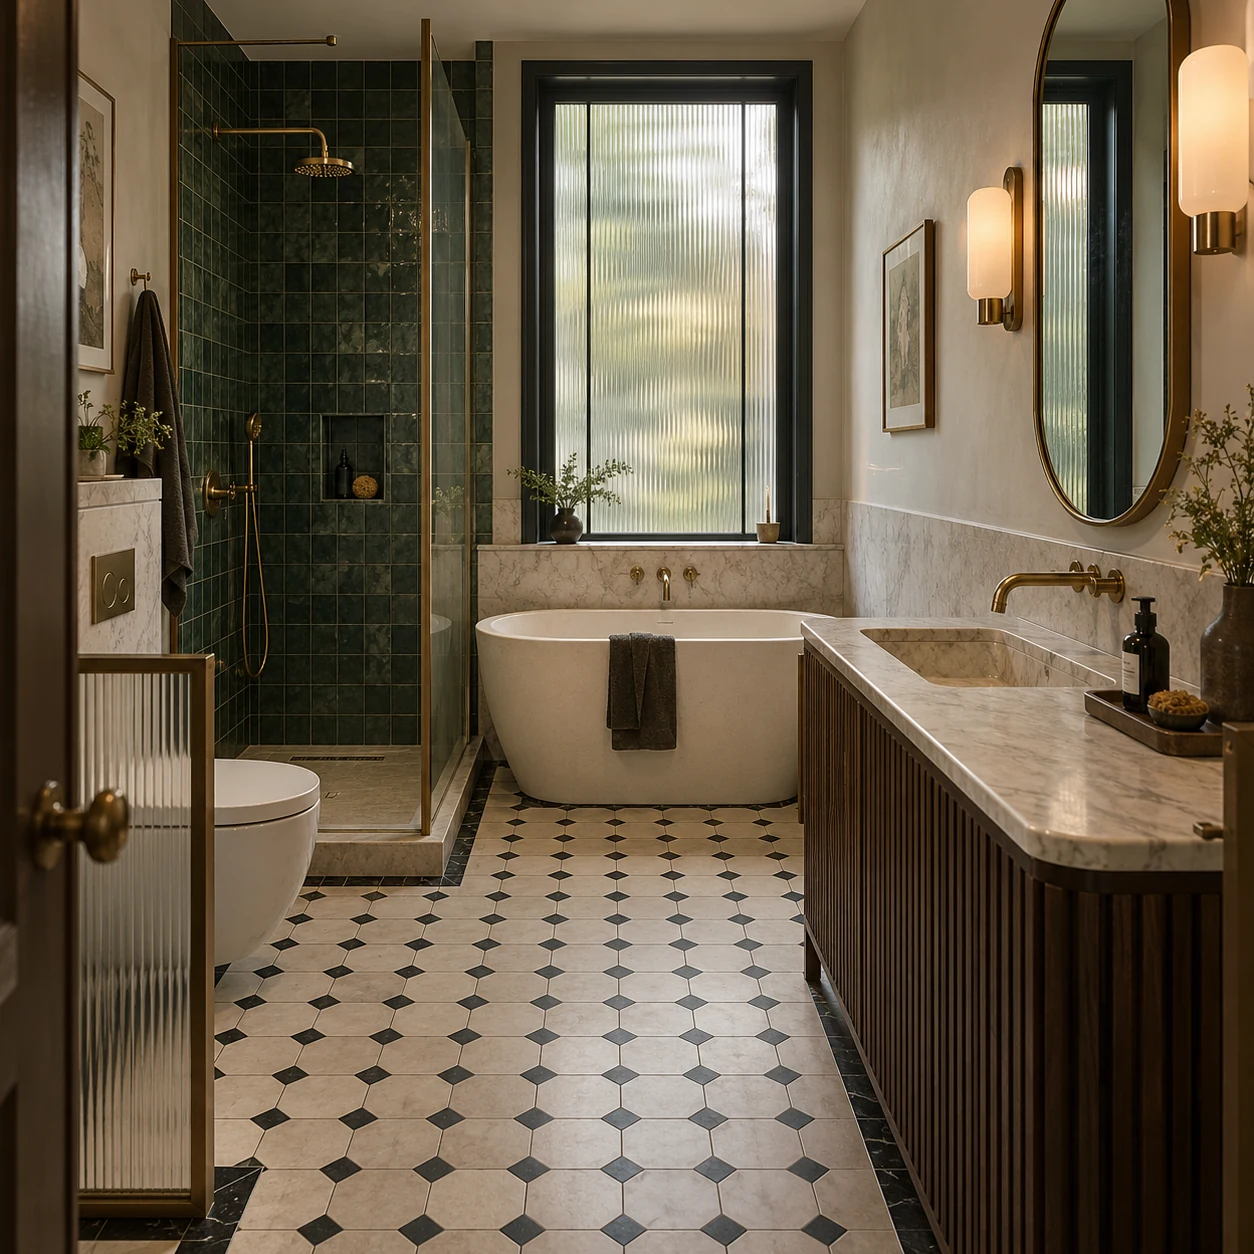
Interior style plans at a glance
Each card pairs the rendered room with an editorial floor-plan interpretation. Use these plans to compare circulation, fixture placement, and wet-zone organization; they are visual planning aids, not measured construction drawings.
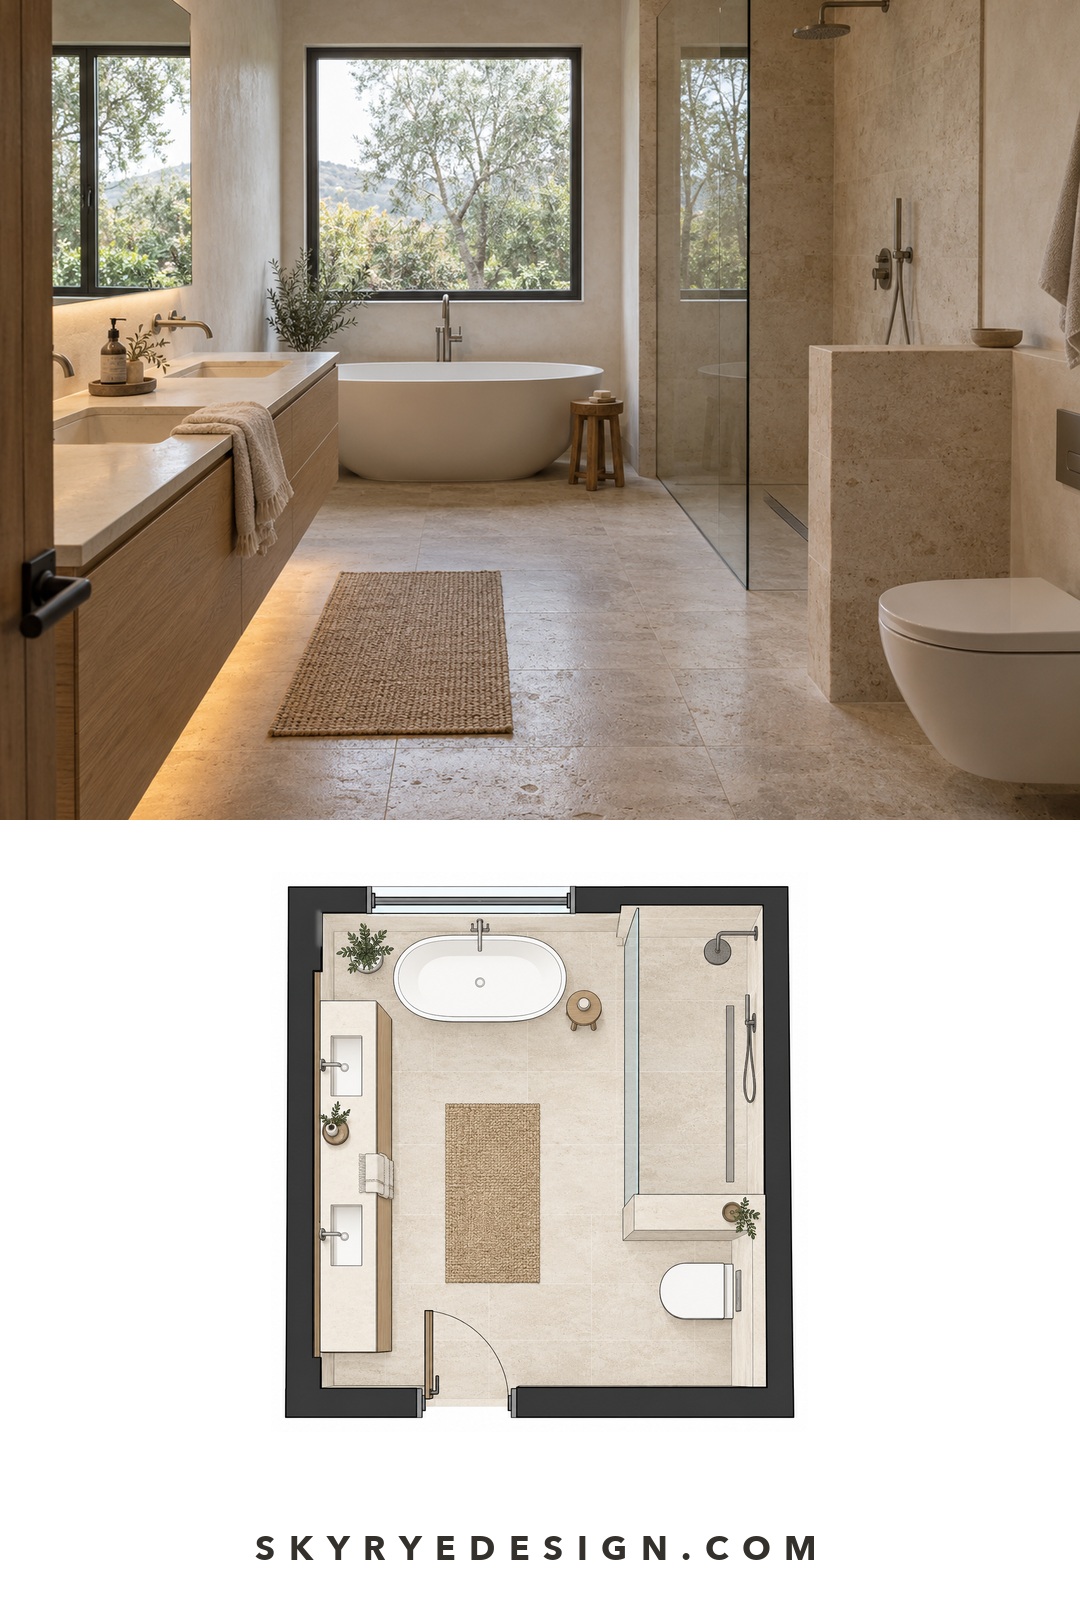
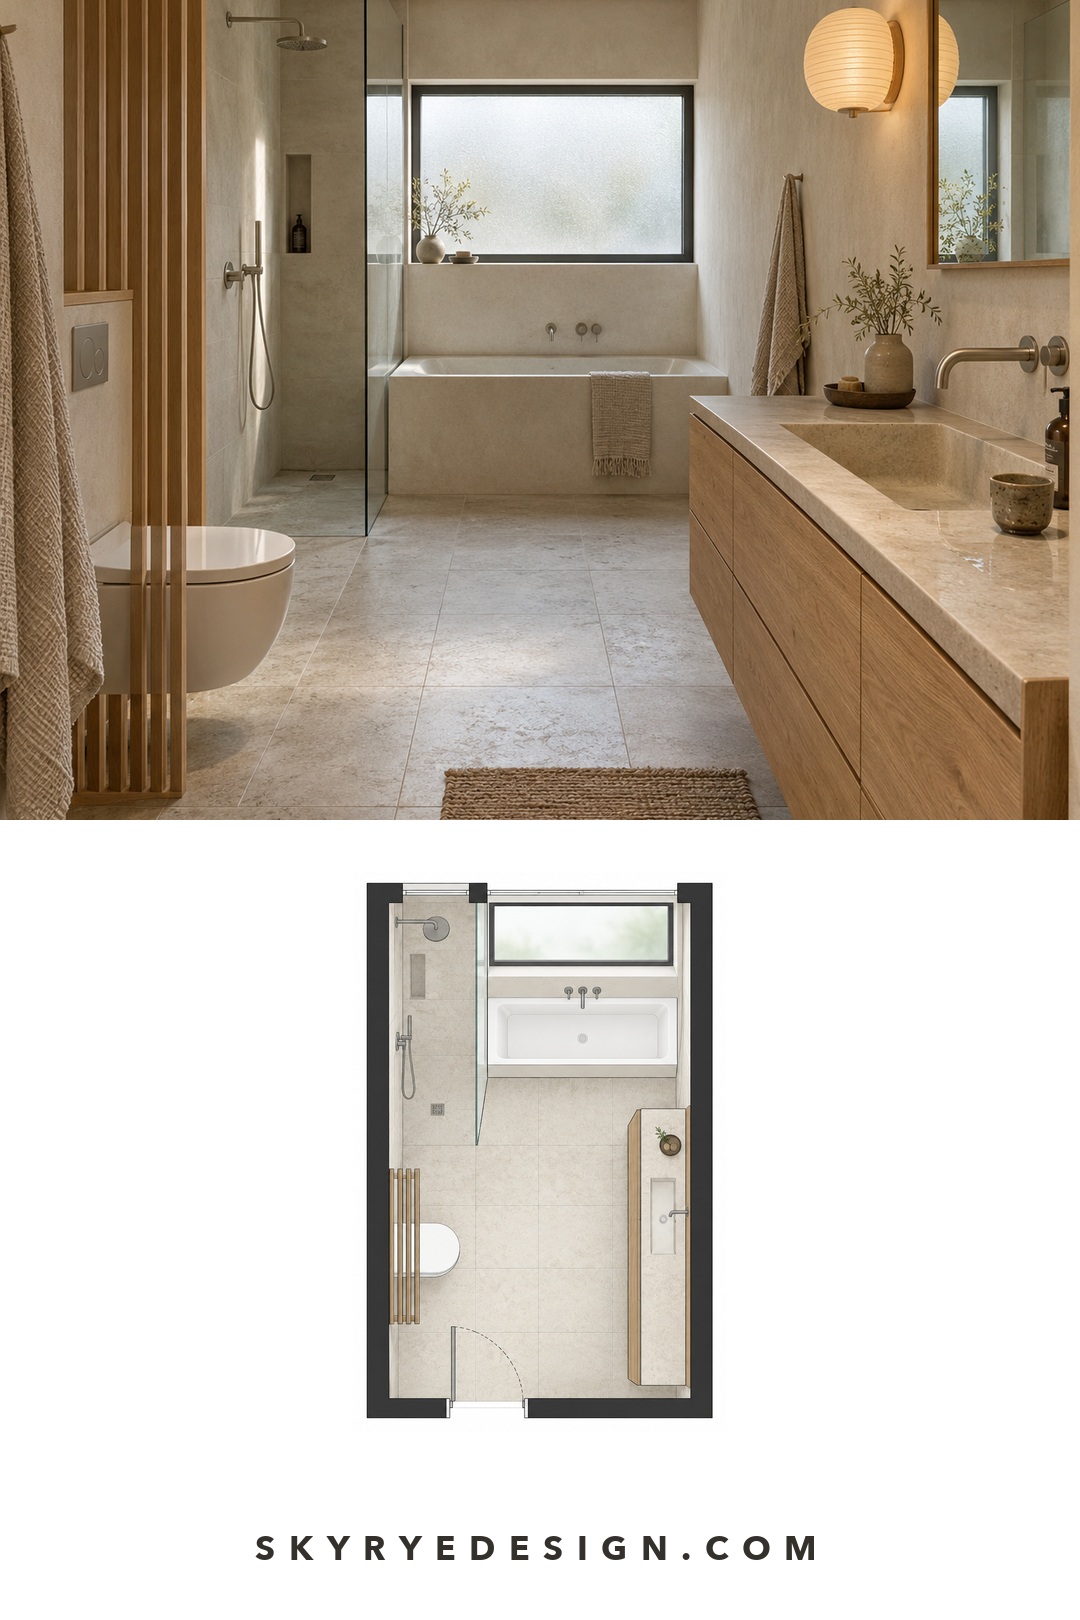
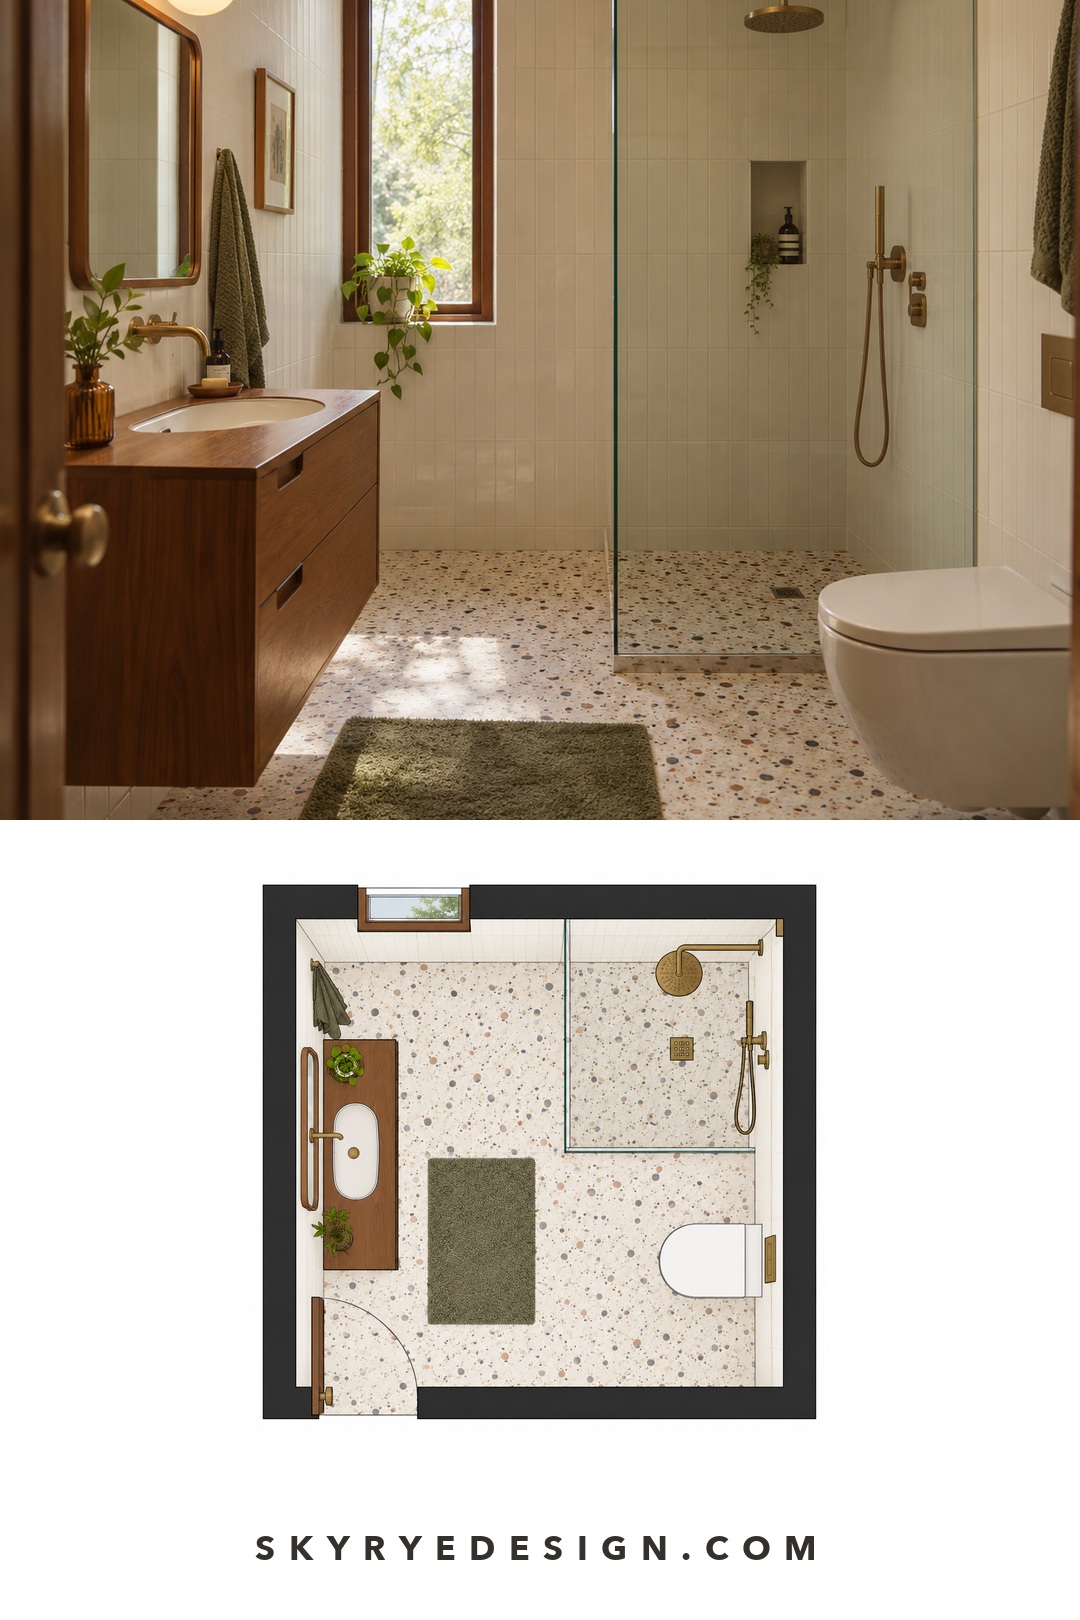
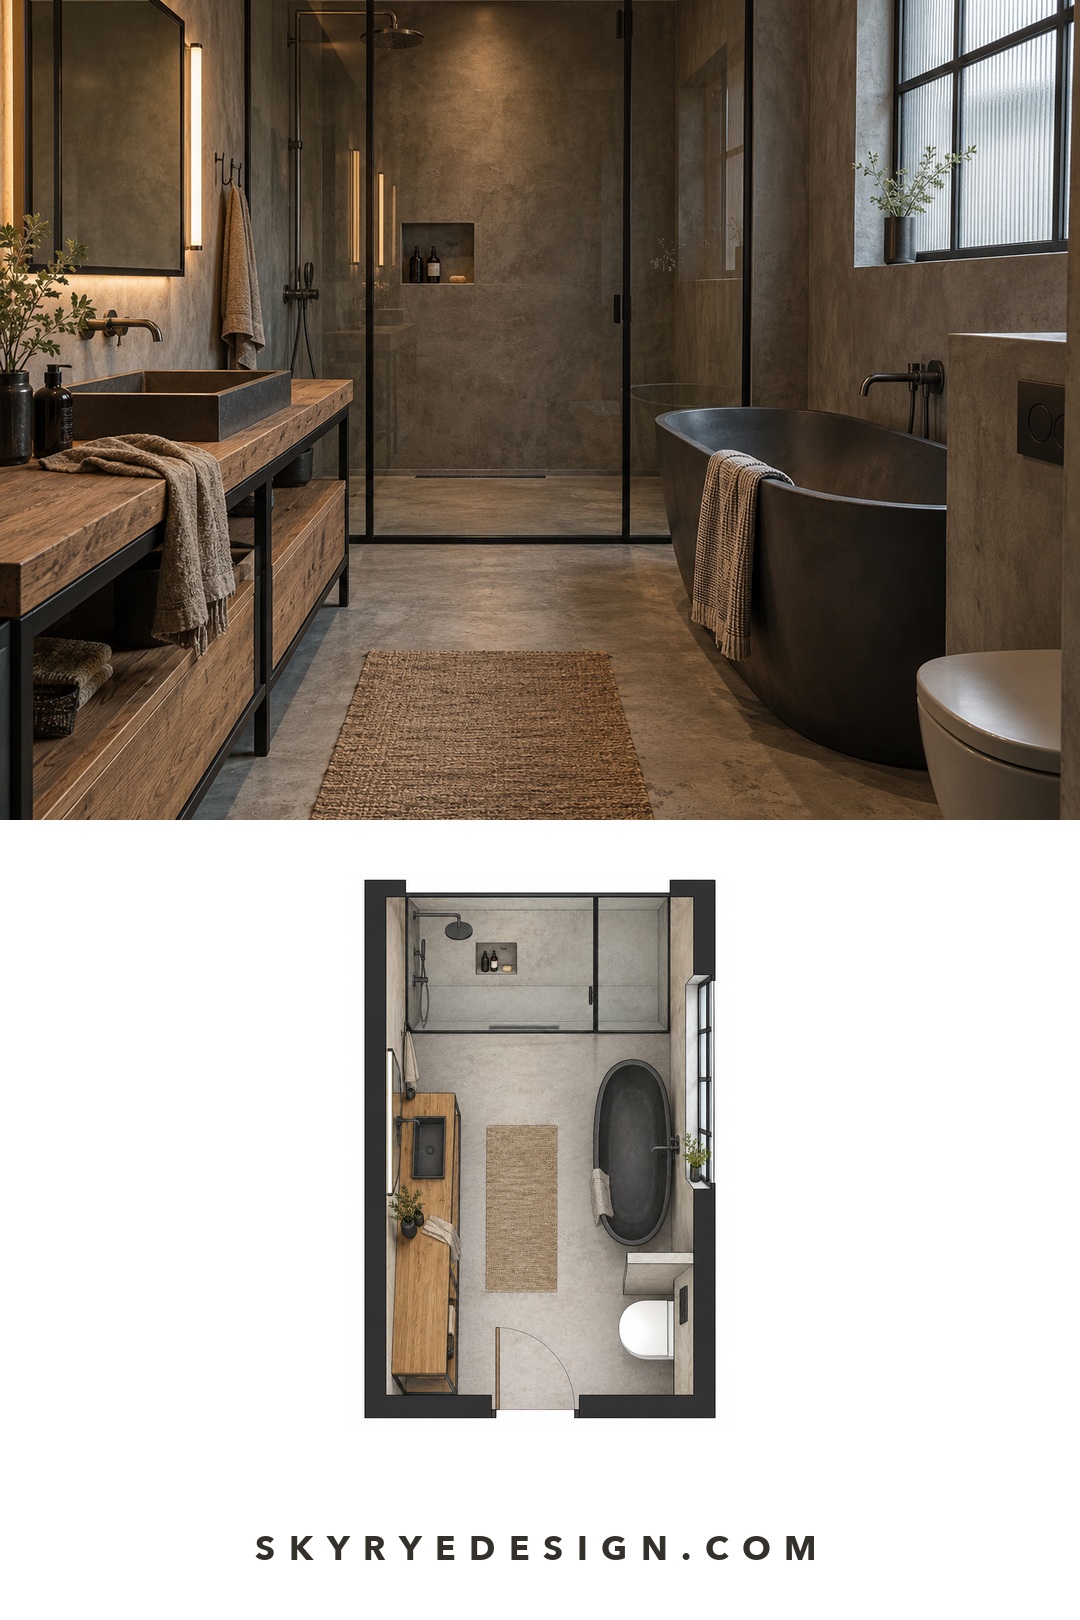
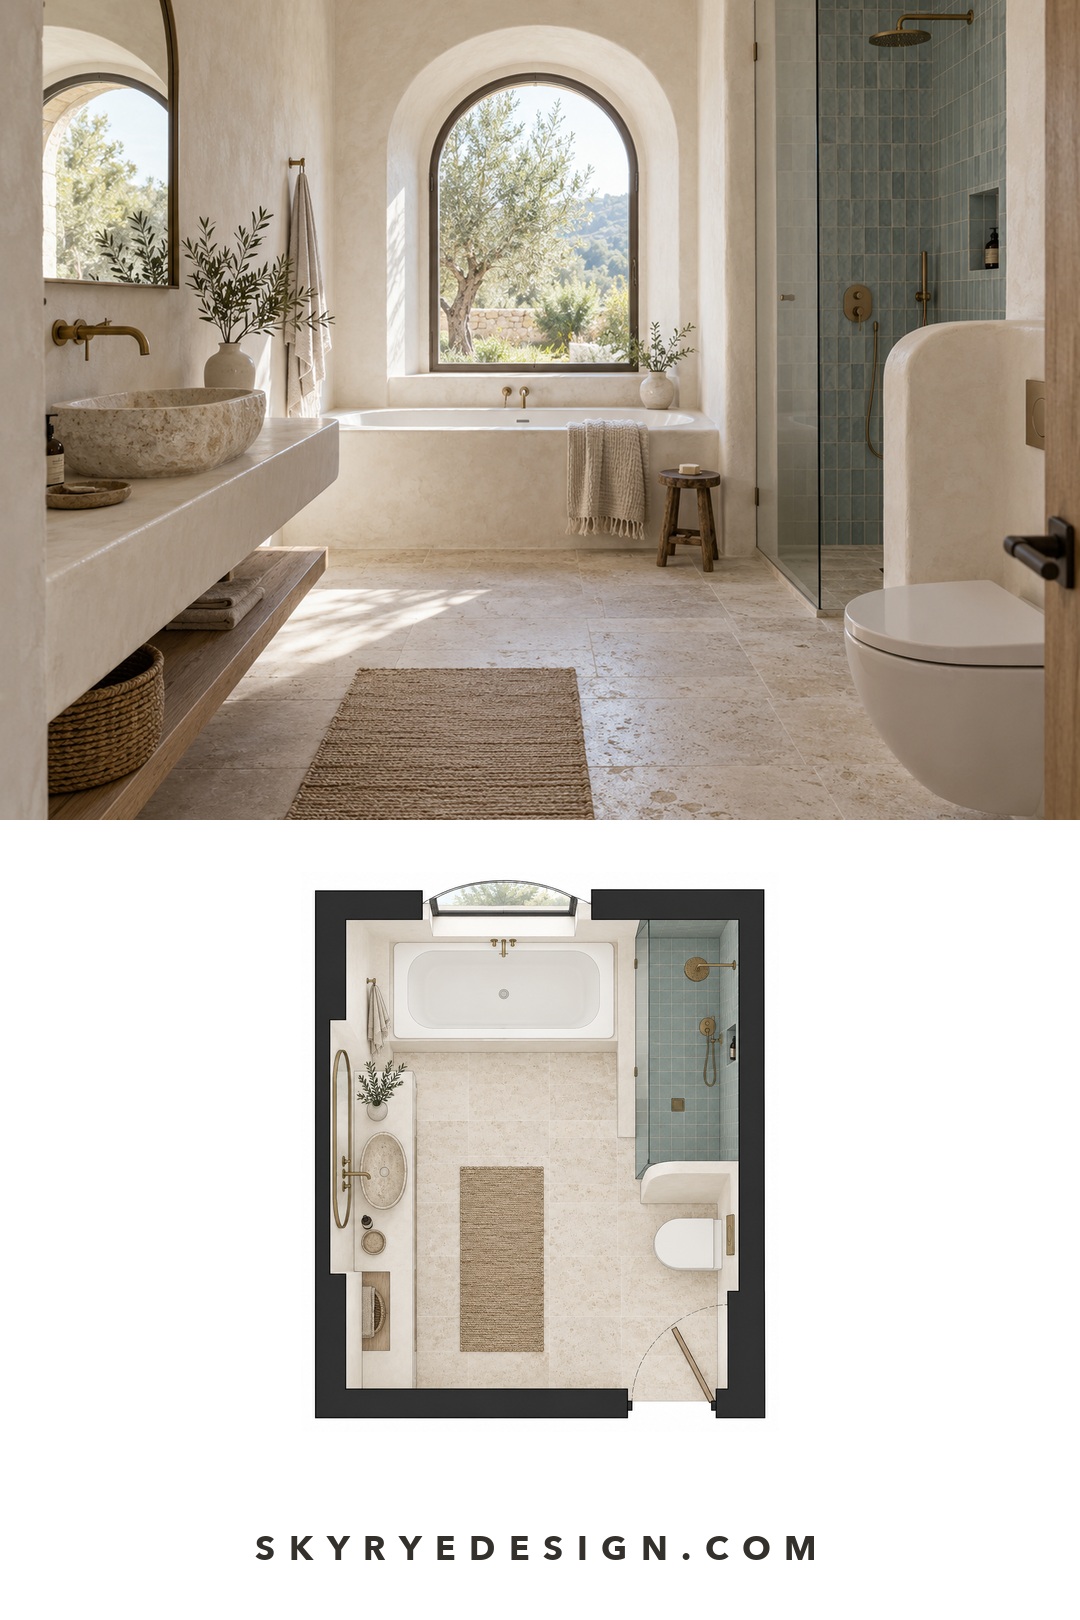
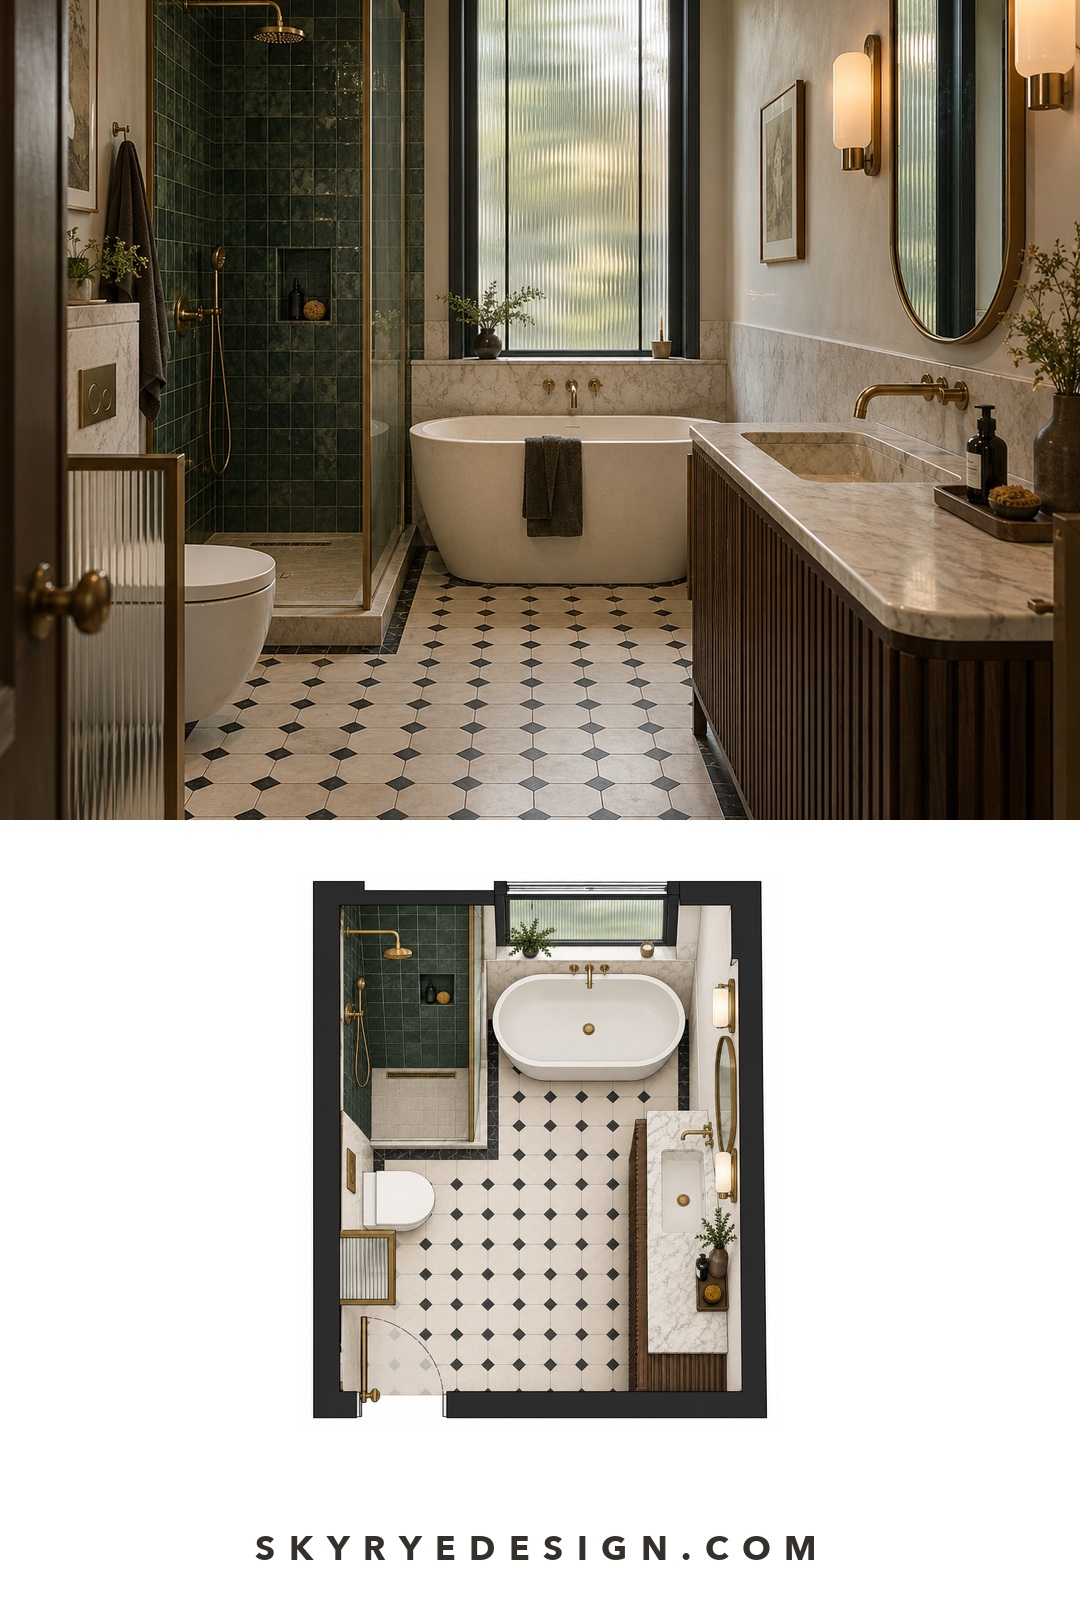
Compare the plans as well as the photographs. Warm modern and industrial schemes suit long rooms, Japandi makes careful use of a narrow footprint, while the compact mid-century, Mediterranean, and Art Deco examples show how material character can change without compromising access or service zones.
3. Build a bathroom renovation budget


Start with scope and quotations, not a single headline figure. Prices vary by region, room condition, specification, and access, so a useful budget is a list of cost packages rather than an online average. Ask each contractor to price the same drawings and schedule so the quotes can be compared properly.
| Budget package | Include | Common omission |
|---|---|---|
| Pre-construction | Survey, drawings, approvals, skip or waste plan | Design revisions and inspection fees |
| Strip-out and repair | Protection, demolition, disposal, damaged timber or subfloor | Making good outside the room |
| Services | Plumbing, drainage, electrics, heating, extraction | Consumer-unit or pipework upgrades |
| Wet-area build-up | Substrates, falls, tanking system, tray or former | Compatible tapes, collars, primers, and sealants |
| Finishes | Tile, grout, paint, trims, worktop, joinery | Cutting waste and delivery charges |
| Fixtures | Sanitaryware, brassware, screen, mirror, lighting, accessories | Wastes, traps, valves, frames, and fixings |
| Contingency | Reserved money for defects and agreed changes | Spending it on upgrades before opening-up work is complete |
Keep a 10–20 percent contingency where the room has not yet been opened, with the higher end for older or poorly documented properties. Treat that as a planning buffer, not a target to spend. This separate guide to bathroom remodel costs can help identify the variables to ask about, but current written quotes should control the project.
Compare contractor quotes line by line
Request at least three itemised quotations for a substantial renovation. Check what is excluded, who supplies each product, whether tax and waste are included, and how variations are approved. A cheaper total can simply mean that waterproofing accessories, decorating, electrical certification, or making good have been left out.
4. Set a realistic timeline and buying schedule


Construction is only one part of the programme. Design decisions, quotations, approval checks, contractor availability, and product lead times can take longer than the work in the room. Do not strip the bathroom until all critical products are on site and checked for damage.
| Phase | What must happen | Hold point |
|---|---|---|
| Planning | Survey, brief, layout, scope, approval check | No quote until the same scope is issued to every bidder |
| Procurement | Order tray or bath, valves, sanitaryware, tile, lighting, and ventilation | Do not demolish until critical sizes and lead times are confirmed |
| Strip-out | Remove fittings and finishes, inspect hidden construction | Agree defects and changes before rebuilding |
| First fix | Drainage, plumbing, electrics, ventilation, carpentry | Photograph and test services before closing walls |
| Wet-area build | Substrate, falls, tanking, tray or bath, flood test where specified | Approve waterproofing before tile covers it |
| Finishes | Tile, grout, paint, joinery, second-fix fixtures | Protect completed surfaces between trades |
| Handover | Testing, certificates, cleaning, snagging | Release final payment only as agreed in the contract |
A simple like-for-like refit may be quick; a layout change with hidden defects may take much longer. Ask the contractor for a dated sequence rather than a verbal duration. If the home has one bathroom, agree temporary arrangements before work begins.
5. Check approvals and assign the right trades
Approval depends on location and scope. In England, replacing a bath, toilet, basin, or sink can be exempt, while a new bathroom involving plumbing or electrical changes near a bath or shower may fall under building regulations. Check the current GOV.UK building regulations guidance or ask the relevant building control body before work begins. Scotland, Wales, Northern Ireland, and other countries use different systems.
DIY only the work you can inspect and correct
Painting, careful removal of loose furniture, accessories, and some decorative work may suit an experienced homeowner. Plumbing alterations, new circuits, bathroom electrical work, structural changes, and the wet-area build-up need the right competence and documentation. If you are splitting the work yourself, write down who owns each interface: plumber to waterproofing, waterproofing to tile, and tile to final sealant.
For a smaller update, this DIY home improvement guide can help separate manageable jobs from trade work. For a larger scheme, compare that approach with the coordination benefits described in full-service remodeling.
- General contractor: programme, trade coordination, protection, waste, and shared responsibility.
- Plumber: supply, waste, valves, fixture installation, testing, and heating connections.
- Electrician: circuits, RCD protection, bathroom zones, lighting, fan supply, testing, and certification.
- Waterproofing installer or tiler: substrate preparation, compatible tanking system, falls, tile, grout, and sealant interfaces.
- Joiner or cabinet installer: framing, access panels, doors, vanity, storage, and scribing.
6. Design the waterproofing before the tile


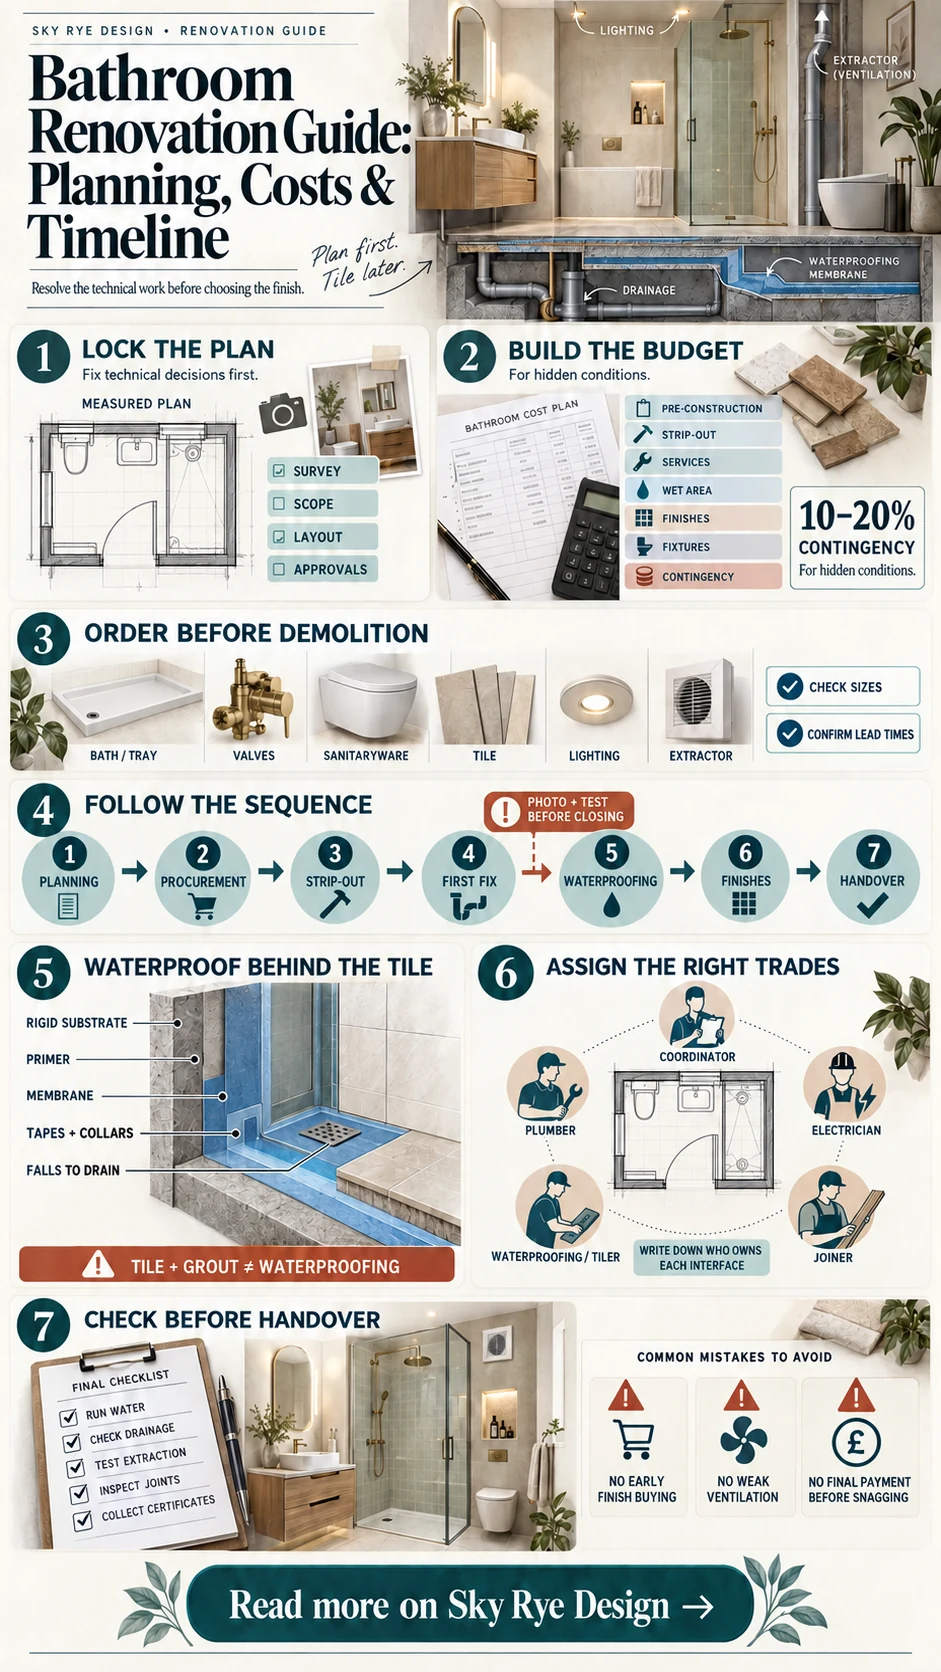
Tile and grout are finishes, not the complete waterproofing strategy. Specify the substrate, primer, liquid or sheet membrane, tapes, corners, pipe collars, tray or former connection, and sealant zones as one compatible system. Follow the manufacturer’s build-up and drying times rather than mixing leftover products from different systems.
- Make the substrate rigid, flat, clean, and suitable for the selected system.
- Form the required falls before finishes so water reaches the drain without ponding.
- Seal corners, board joints, niches, valves, and pipe penetrations with the specified accessories.
- Record the installed system with photos before tile hides it.
- Keep access to concealed valves, traps, and serviceable connections wherever the design allows.
Small mosaics can help a shower floor follow the falls, while large-format tile reduces grout lines on broad walls. The pattern should follow the drainage geometry. See these shower-floor mosaic ideas for visual options, then confirm slip resistance, substrate, adhesive, and grout with the supplier.


7. Choose fixtures around use and maintenance
Vanity, basin, and storage


Check the vanity depth against the door and standing space, then draw the drawer and cabinet openings on plan. A floating vanity can reveal more floor and simplify cleaning, but the wall needs suitable support. Choose storage around actual bottles, towels, cleaning products, and charging needs rather than display objects.
Keep traps and shut-off valves reachable. If exposed services disrupt the room, use an access-conscious solution from this guide to hiding bathroom plumbing without blocking repairs.
Shower, bath, and screen


Choose the bathing fixture from the household brief. A bath-shower combination saves space and supports family use; a walk-in shower improves access but needs careful spray control, drainage, and warmth. Mark the showerhead, controls, niche, grab points, and screen swing at full scale before pipework is fixed.
Toilet, taps, and hardware


Confirm the toilet projection, waste position, access to the cistern, and replacement-part availability. For taps and showers, check working pressure, hot-water system compatibility, spout reach, and valve depth. Finish comes last. These modern bathroom faucet examples show how different finishes behave visually, but serviceability should decide the shortlist.
8. Plan ventilation and bathroom lighting together


Extraction controls moisture; lighting controls visibility and atmosphere. In England, current Approved Document F guidance covers bathroom ventilation, including extract requirements. Use the latest GOV.UK Approved Document F for the applicable project and have the design checked for the room, duct route, fan performance, and controls. A fan that is poorly ducted or never switched on will not solve condensation.
Before choosing controls, review the home ventilation checks for moisture and airflow. Knowing how the room connects to the rest of the home helps you ask better questions about replacement air, operation, and maintenance.
Use a bright, even layer for cleaning and general use, plus vertical light near the mirror to reduce facial shadows. Decorative light should not replace task light. Position fittings only after the electrical zones, IP rating, switching, and fan controls have been agreed. Electrical Safety First explains why bathrooms need special precautions, RCD protection, and competent installation in its bathroom electrical safety guidance.
For fixture placement and colour temperature examples, use this guide to bathroom lighting design after the safety layout is fixed.
9. Follow a controlled construction sequence
Agree the sequence before the first trade arrives. The exact order changes by system, but every project needs inspection points before work is covered.
- Protect access routes and isolate water and power safely.
- Remove fixtures and finishes in a controlled way; inspect hidden construction.
- Approve any defect repair or change order in writing.
- Complete framing, drainage, plumbing, electrics, heating, and ventilation first fix.
- Photograph and test concealed services before closing surfaces.
- Install the specified substrate, falls, and waterproofing system.
- Complete tile, grout, paint, and joinery with finished work protected.
- Fit sanitaryware, brassware, lighting, mirror, screen, and accessories.
- Test drainage, water, extraction, lighting, heating, and all serviceable parts.
- Clean, snag, collect certificates and warranties, and store spare finish materials.
Plan demolition waste before strip-out. For larger projects, a properly sized dumpster rental may reduce loose debris and repeated disposal trips; confirm permitted materials, access, and local placement rules with the supplier.
If this bathroom is part of wider work, the sequencing framework in this home renovation guide can help coordinate rooms, trades, and disruption.
10. Inspect the room before final handover


Do not judge only from the doorway. Run the shower, basin, bath, and toilet; inspect every visible joint while water is flowing and again after it stops. Check that the fan operates as designed, doors and drawers clear one another, hot and cold are correct, wastes drain promptly, and the shower screen contains normal spray.
- Look beneath the basin and around the toilet for fresh moisture.
- Check tile edges, grout, sealant, trims, and penetrations under good task lighting.
- Confirm falls carry water to the drain without persistent ponding.
- Test fan overrun or humidity controls where specified.
- Collect electrical and other compliance documents that apply to the work.
- Record product names, finish codes, warranties, valves, and access-panel locations.
- Keep spare tile and grout from the installed batches for future repairs.
Protect the result with a simple care routine


Use the extractor during bathing and for the specified run-on period, dry persistent standing water, and repair failed sealant or leaks promptly. Follow the product instructions for tile, stone, grout, metal finishes, glass, and worktops. This guide to cleaning a shower correctly explains how to avoid damaging new surfaces with the wrong cleaner.
Common bathroom renovation mistakes
| Mistake | What it causes | Better decision |
|---|---|---|
| Buying finishes before the layout is fixed | Wrong quantities, wasted returns, and compromised service positions | Approve the measured plan and fixture schedule first |
| Pricing only visible items | Budget shock when substrates, services, waste, and labour appear | Use cost packages and written inclusions |
| Treating tile as waterproofing | Hidden moisture damage behind an attractive finish | Specify a complete compatible wet-area system |
| Moving every fixture without a clear benefit | More drainage, plumbing, approval, and programme risk | Move services only to solve layout or access problems |
| Weak ventilation | Condensation, slow drying, and premature finish failure | Design the extract route and controls before the ceiling closes |
| One ceiling light only | Shadows at the mirror and poor cleaning visibility | Combine ambient and vertical task light |
| No inspection before surfaces close | Defects become expensive to locate and repair | Set photo, testing, and approval hold points |
| Final payment before snagging | Unclear leverage for unfinished details | Use the agreed contract and documented completion process |
Bathroom renovation FAQ
What order should a bathroom renovation follow?
Survey and scope the room first, then confirm approvals, budget, layout, product compatibility, and trade responsibilities. Construction normally moves through strip-out, repairs, first-fix services, substrate and waterproofing, finishes, second-fix fixtures, testing, and snagging. Add hold points before walls and floors are closed.
How long does a bathroom renovation take?
Duration depends on scope, hidden defects, approvals, trade availability, and product lead times. A cosmetic refresh can be brief, while a full renovation with a layout change may require several weeks on site plus planning and procurement. Ask for a dated programme and do not remove the old room until critical items are available.
How should I budget for a bathroom renovation?
Price pre-construction, strip-out, repairs, services, waterproofing, finishes, fixtures, labour, waste, and contingency separately. Get itemised quotes against the same scope and keep roughly 10–20 percent available for hidden conditions where the room has not yet been opened. Do not spend that reserve on decorative upgrades early.
Does keeping the existing layout save money?
It often reduces drainage, plumbing, opening-up, and coordination work, but only if the existing layout functions well and the services are sound. Moving a fixture can be justified when it improves access, circulation, storage, or safe use. Compare both plans and quotes before deciding.
Do bathroom tiles need waterproofing underneath?
Wet areas need a specified system behind the finish. Tile and grout alone should not be treated as the complete waterproof layer. Use a compatible substrate, membrane, tapes, collars, and connections installed to the system manufacturer’s instructions and the requirements that apply to the project.
Do I need building regulations approval for a bathroom renovation in England?
It depends on the work. Like-for-like replacement of sanitaryware can be exempt, while new plumbing, electrical work near baths or showers, structural changes, ventilation work, or a new bathroom may require approval or competent-person certification. Check the current GOV.UK guidance and confirm the specific scope with building control before starting.
A good bathroom is resolved behind the finish
The strongest bathroom renovation is easy to use, dry, maintain, and repair. Make the layout and service decisions first, document what will be hidden, and inspect each layer before it is covered. When the technical work is calm and deliberate, the visual design has a much better chance of lasting.
- 828shares
- Facebook0
- Pinterest828
- Twitter0
- Reddit0