The first time I tried drawing an erupting volcano I was about nine years old, using school-issue colored pencils and no real idea how lava moves. It came out looking like a red triangle with squiggles. The problem was not skill. It was that I had no model in my head for what a volcano actually is under the surface.
A volcano is simple enough for a first drawing session, but it is deep enough to study for years. My academic drawing training hammered one idea into me: every object has geometry underneath it, and the drawing is that geometry made visible. For a volcano, the structure is surprisingly clear: a cone or shield form, a crater opening, and then the chaotic material that breaks the regularity: lava, ash, rock, and atmosphere.
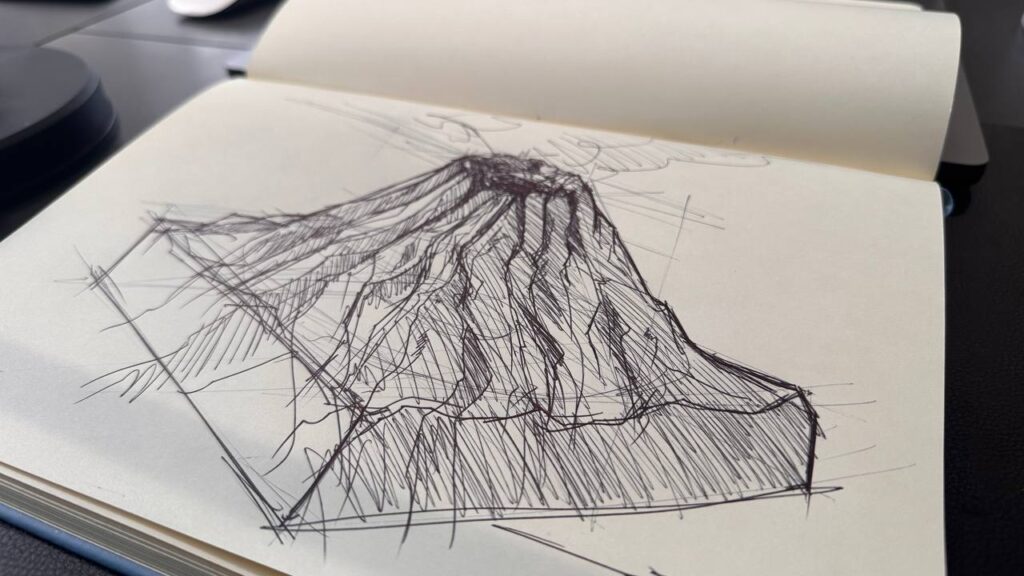
This guide shows how to draw a volcano step by step, from structural sketch to finished pencil study. We will build the cone, place the crater, render lava flow, shape the ash cloud, and use the background to make the eruption feel large.
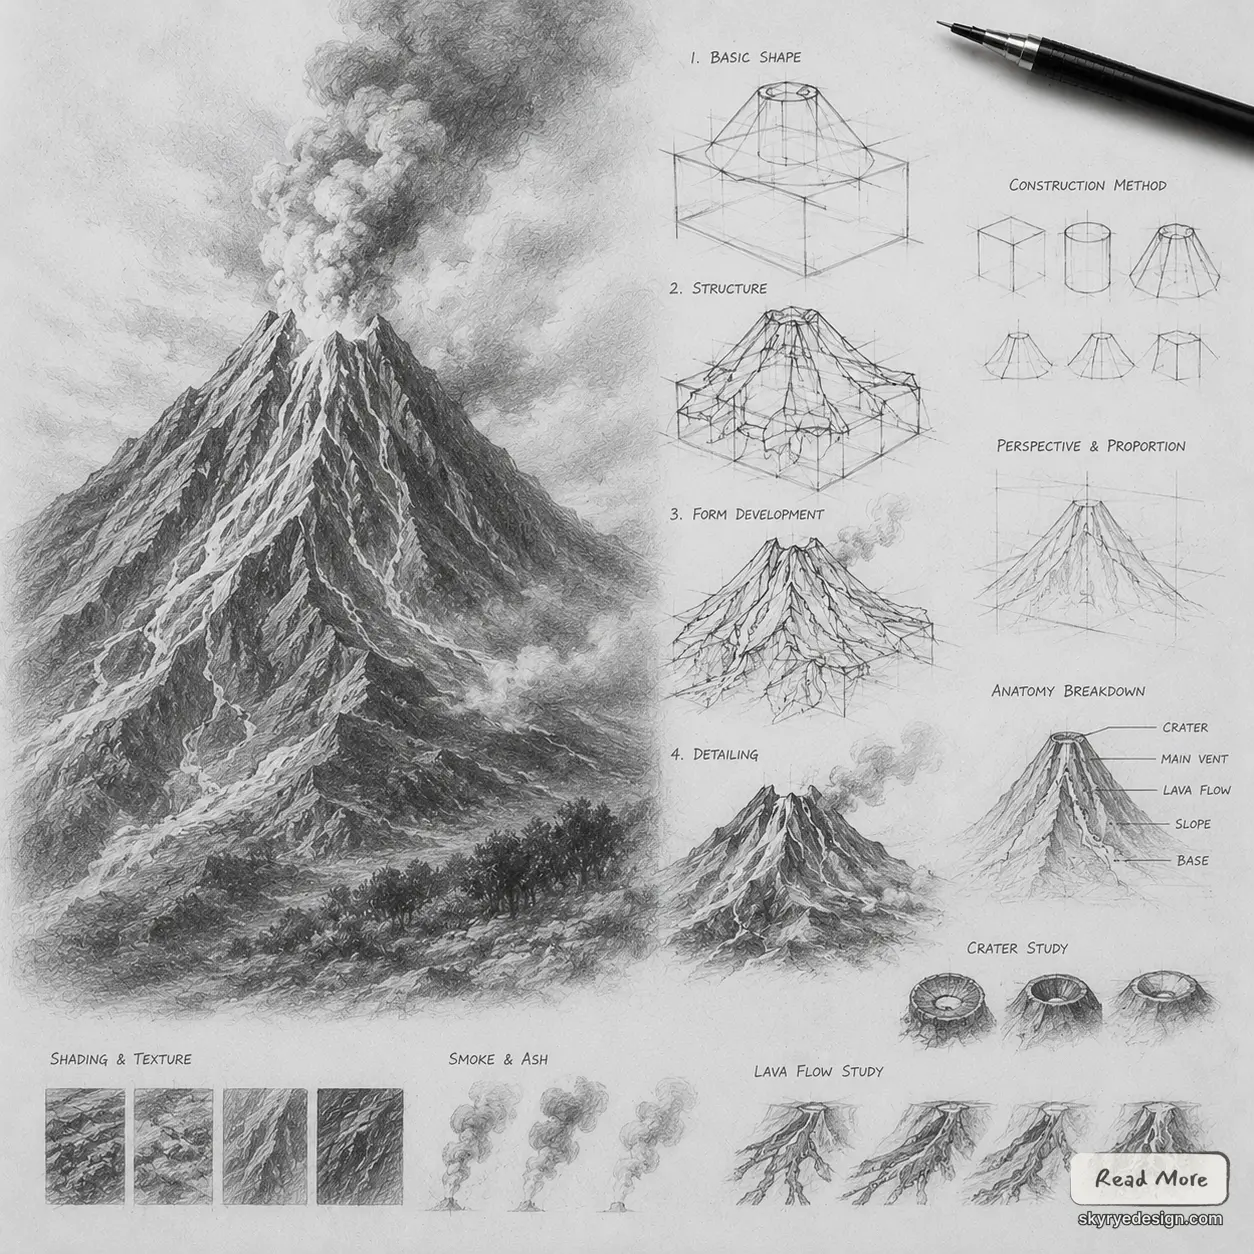
What is a stratovolcano?
A stratovolcano is a steep-sided, conical volcano built from alternating layers of hardened lava, volcanic ash, and pyroclastic debris. Slope angles typically run 30-40 degrees from horizontal. Famous examples include Mount Fuji in Japan, Mount Vesuvius in Italy, and Mayon in the Philippines, often described as one of the world’s most perfect volcanic cones.
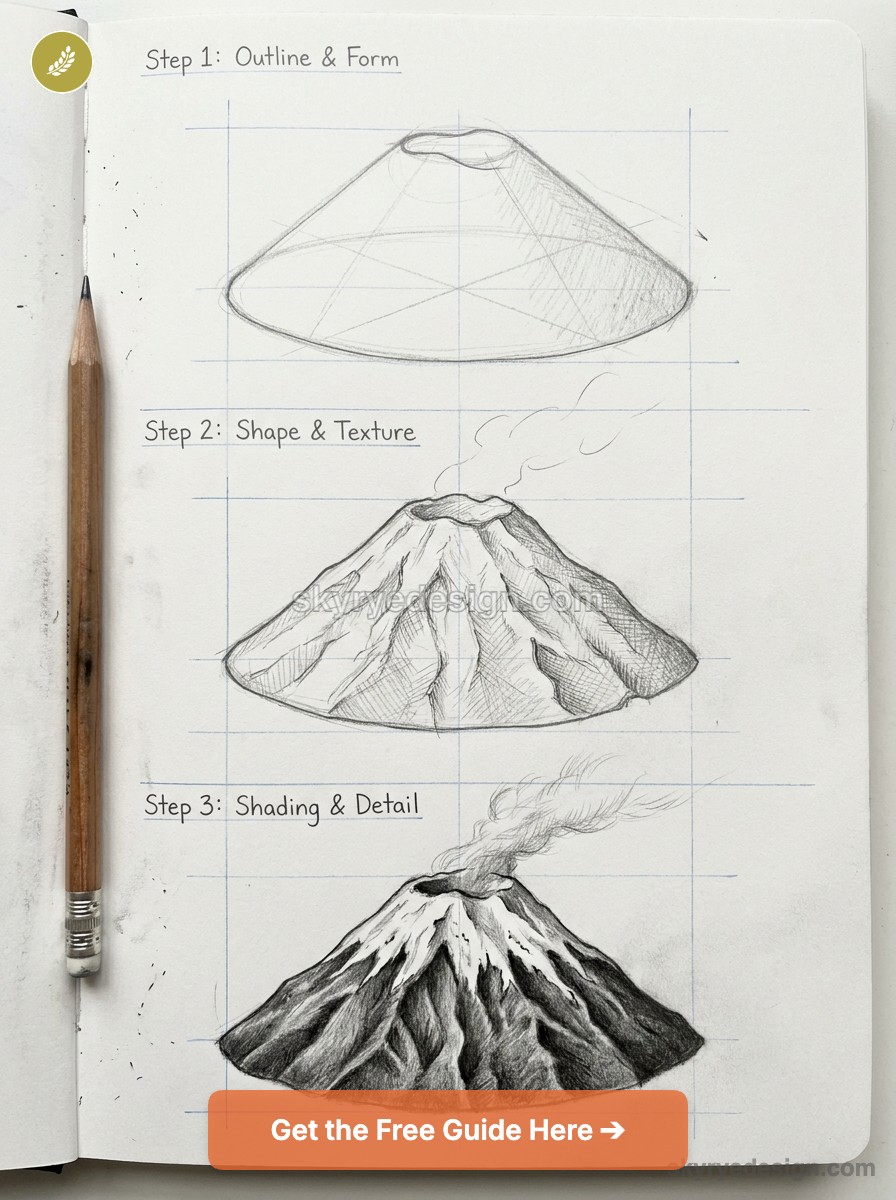
For drawing, this matters because the silhouette has to read before the details do. A stratovolcano feels steep and iconic. A shield volcano feels broad and low. A cinder cone feels small and sharp. A caldera reads more like a collapsed bowl. If you choose the wrong silhouette, no amount of shading will fully fix the drawing.
What do you need to know about volcano anatomy before drawing?
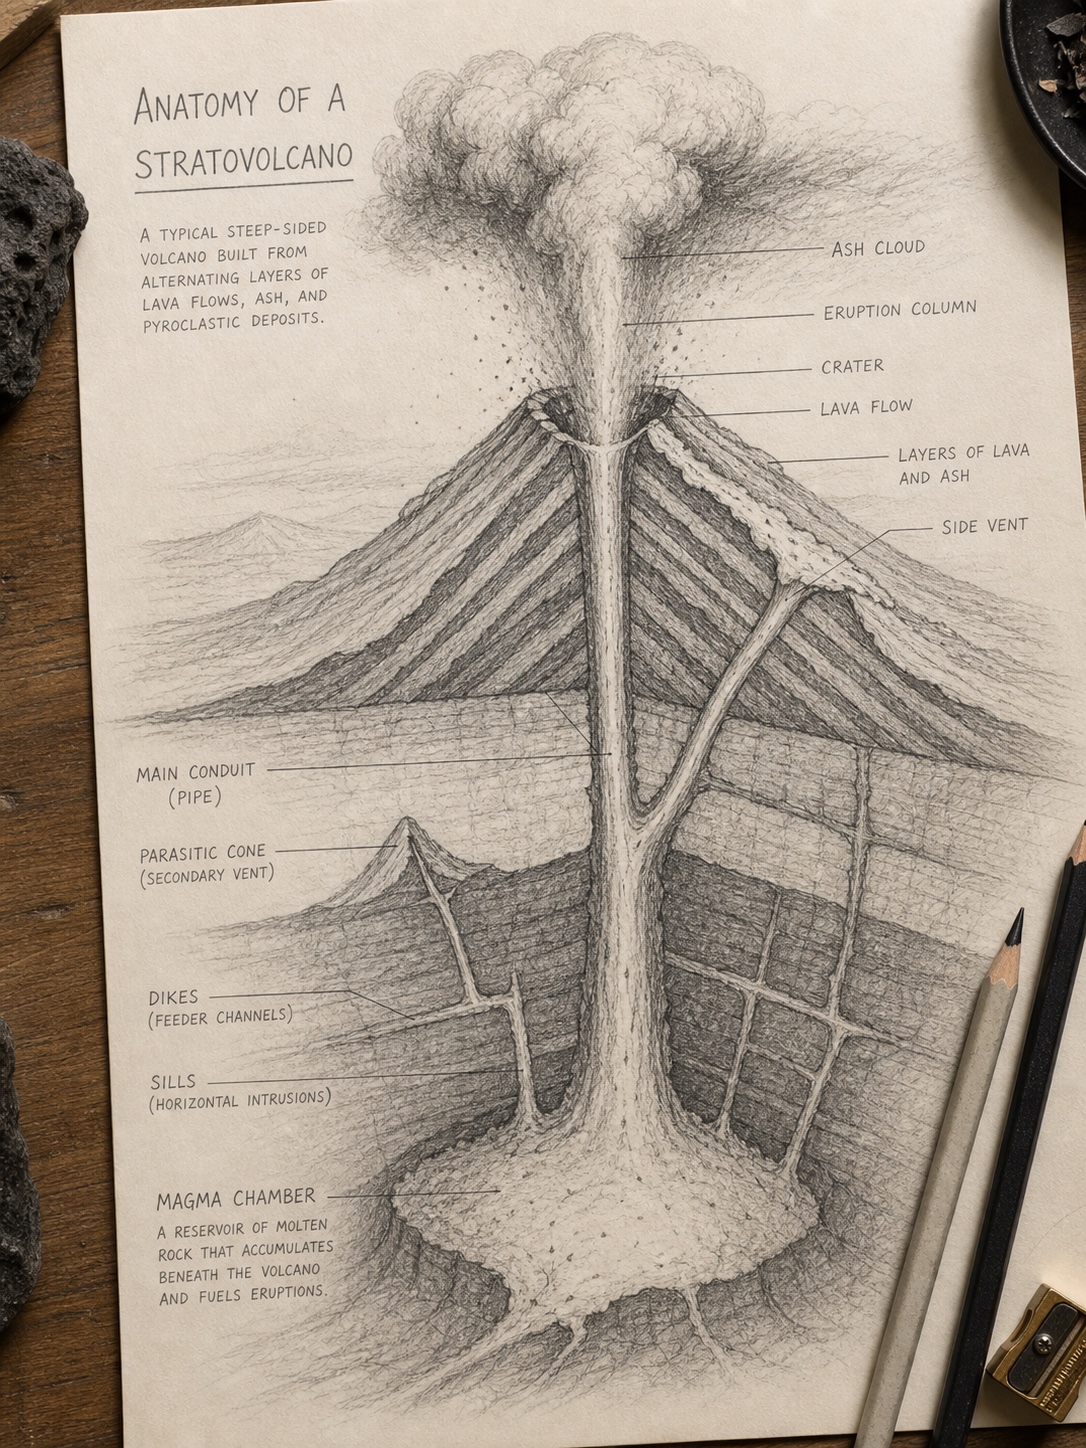
Before any line hits paper, spend two minutes deciding what type of volcano you are drawing. Most tutorial drawings use a stratovolcano because it is the shape people expect when they hear the word volcano. The rough proportion is about 2:1 width-to-height from base to summit.
One thing that trips beginners up: the crater should be slightly offset from the visual center of the cone. Dead center reads as a diagram. A small offset reads more like a real place shaped by uneven lava, collapse, and erosion.
The key structural lines
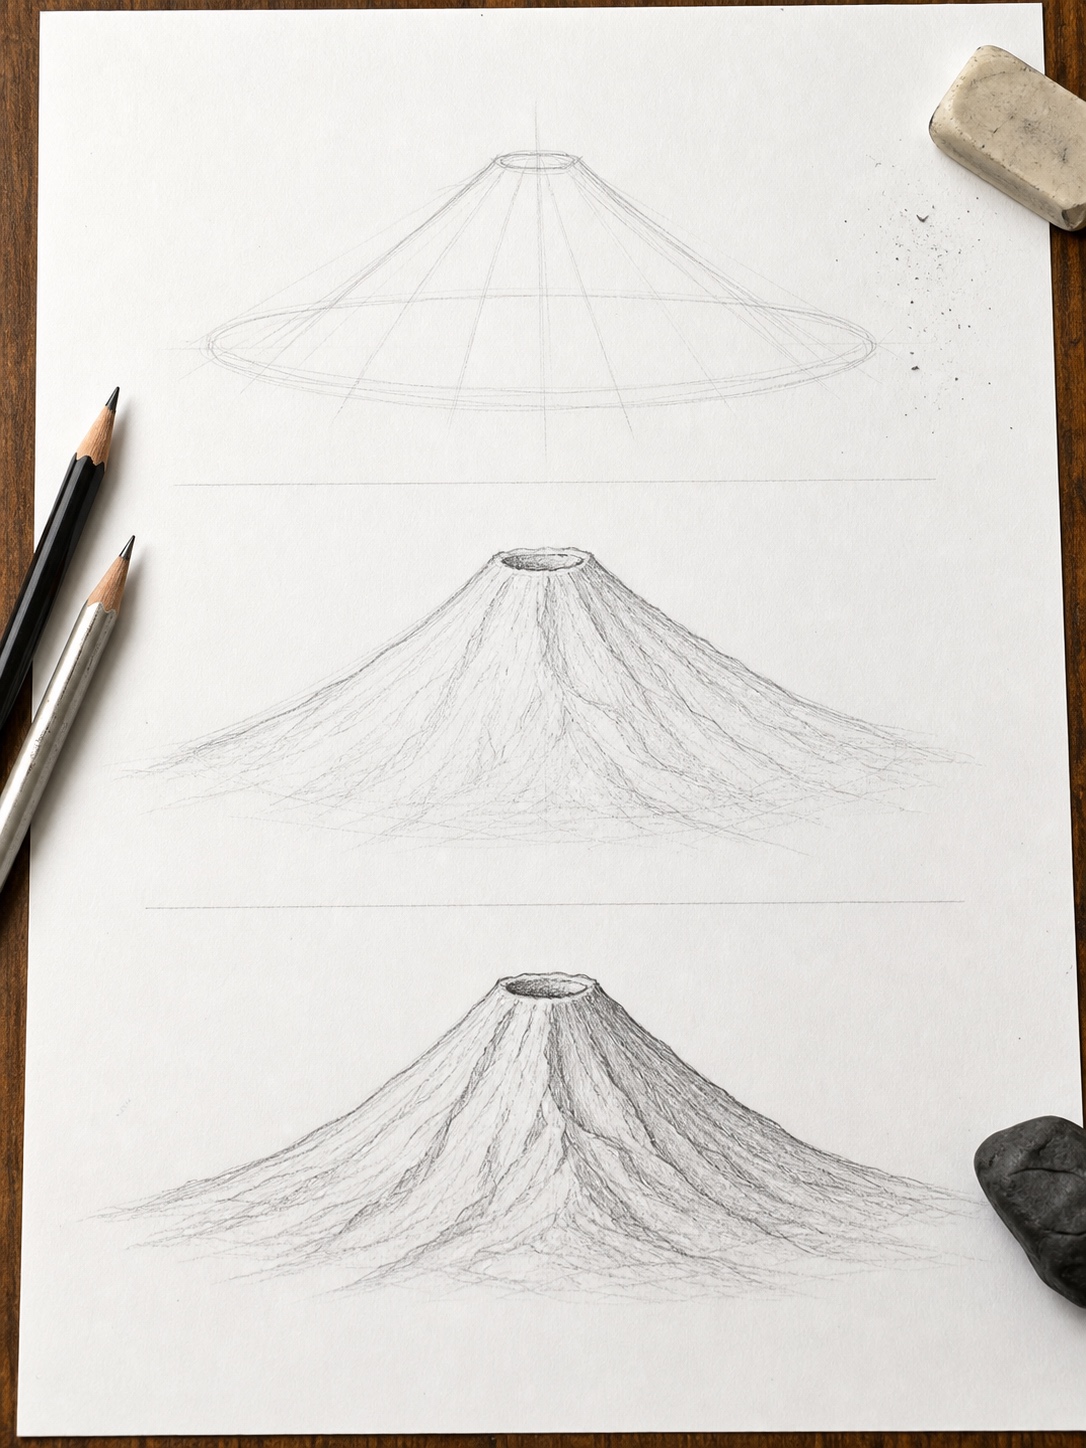
Three lines define the form before anything else goes down. First, the base ellipse: a flattened oval showing where the volcano meets the ground. Second, two slope lines rising from the outer edges of that ellipse toward the summit. Third, the crater opening: a smaller ellipse at the top, tilted toward the viewer.
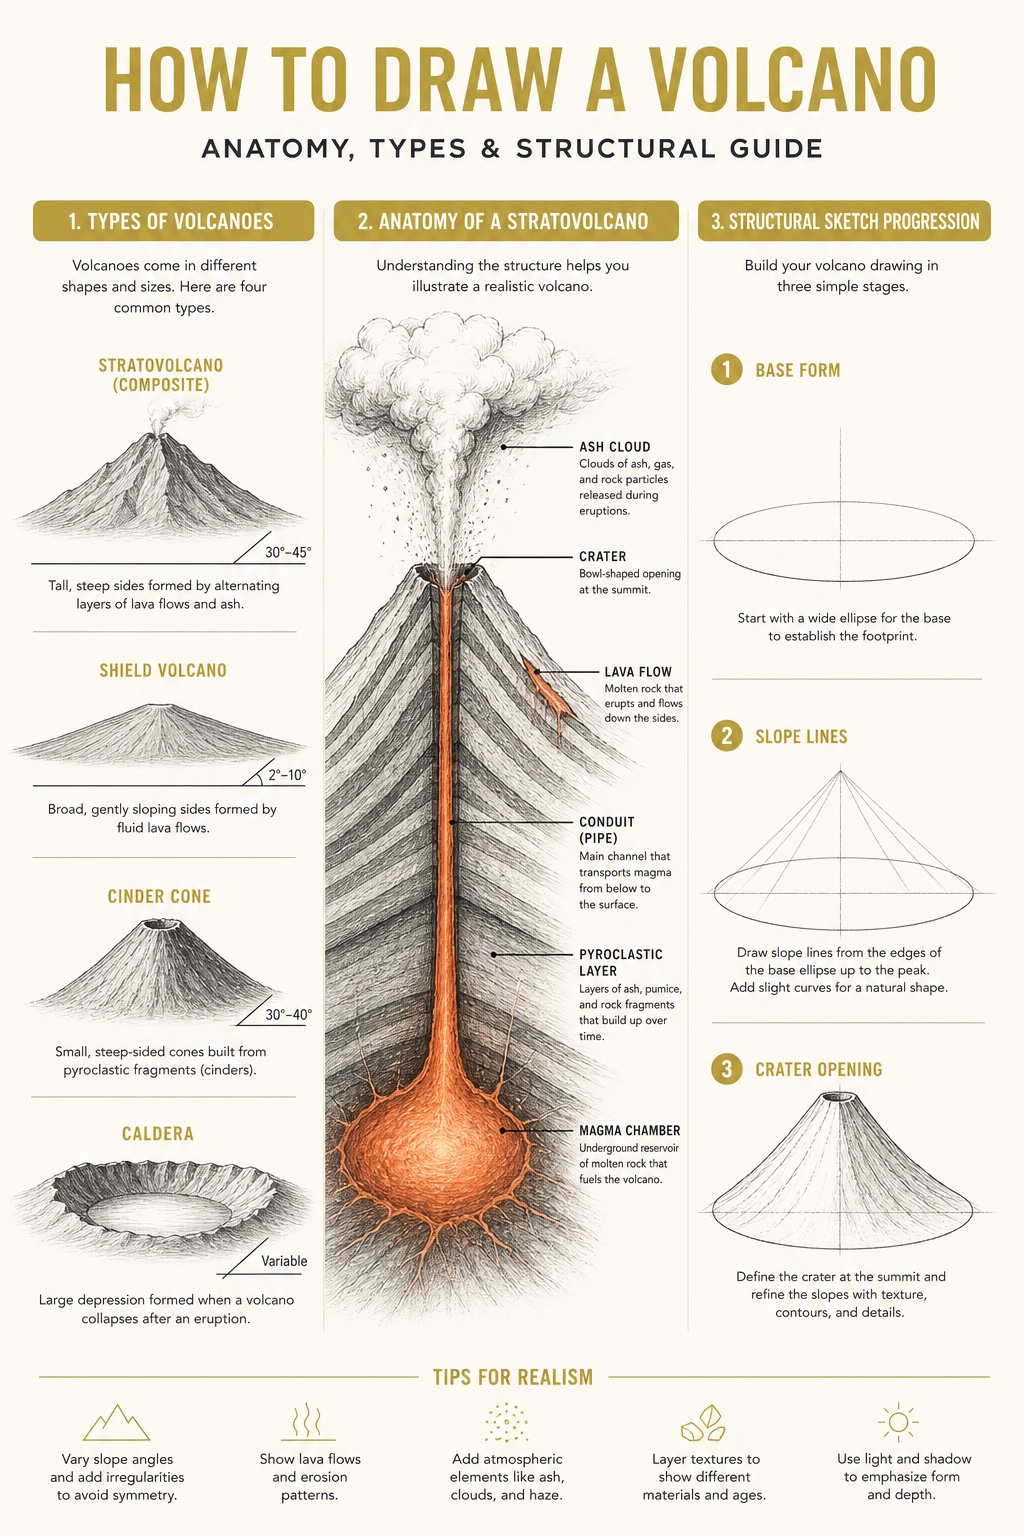
Slope angle tells the viewer what type of volcano they are looking at. The USGS Volcanic Hazards Program describes stratovolcanoes as steep volcanic cones, while shield volcanoes are much lower and broader. Get the angle right early and the rest of the drawing becomes easier.
Basic sketch: building the cone from geometric shapes
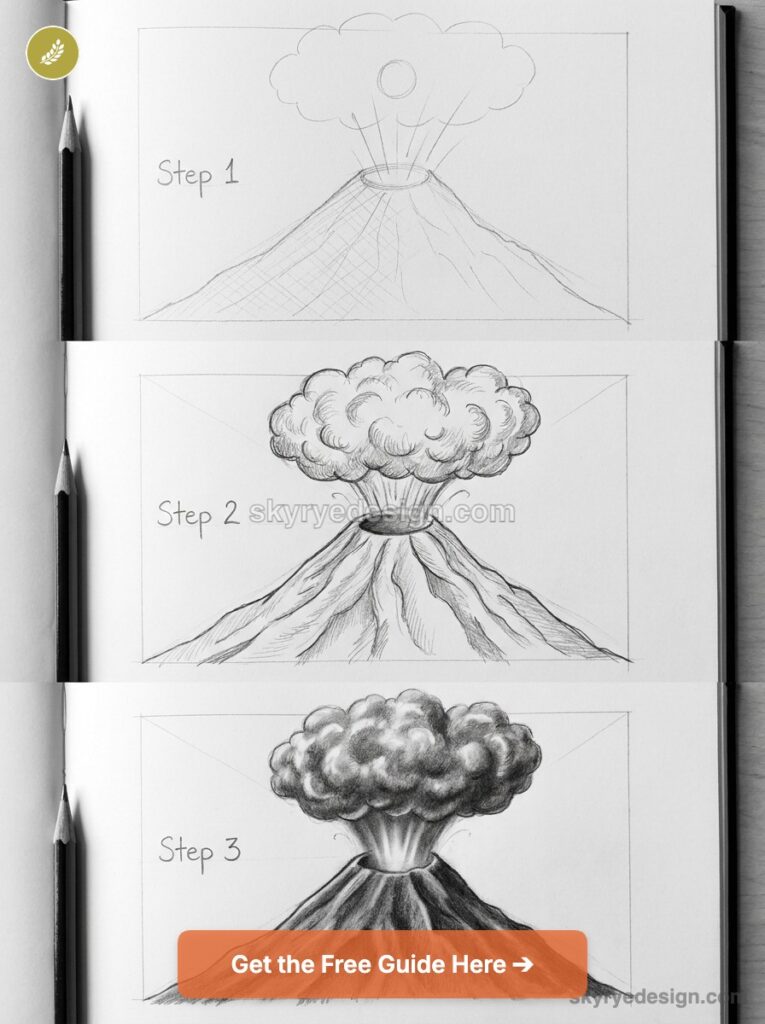
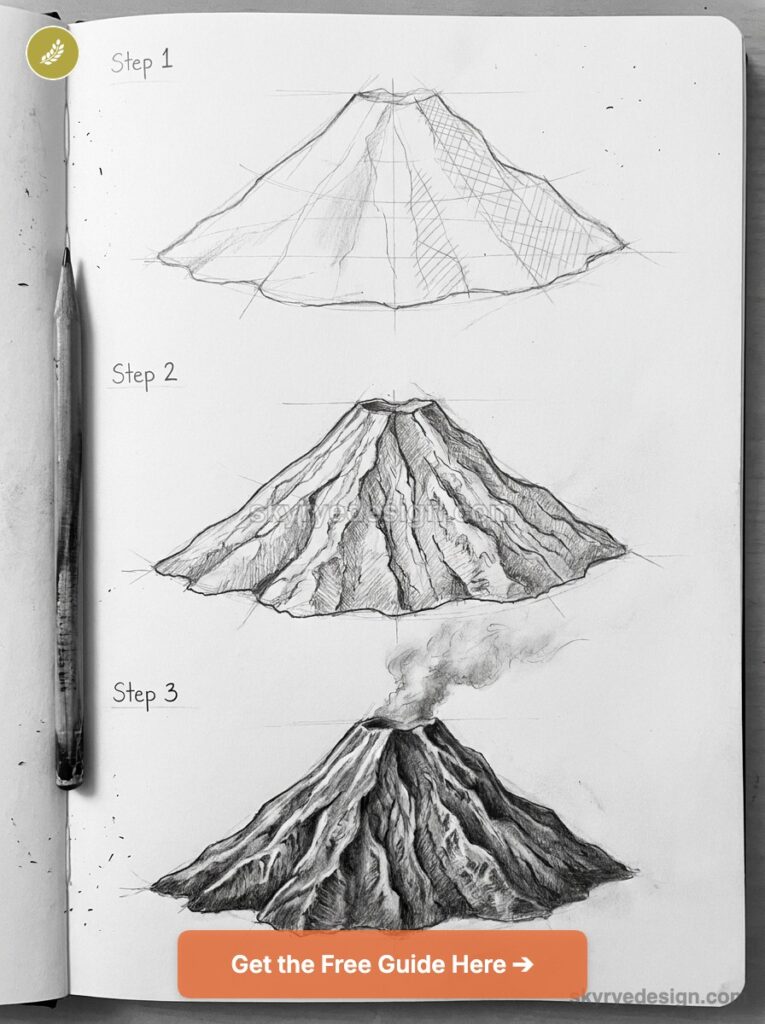
Step 1: light construction lines
Use an H or 2H pencil with very light pressure. These are scaffolding lines, not the final drawing. Draw a horizontal base line about two-thirds down the page. Above it, mark the center of your base ellipse and draw it lightly: about 12 cm wide and 2-3 cm tall on A4 paper.
From the outer left and right edges of the ellipse, draw two converging lines up to the summit. Keep the summit slightly left or right of the ellipse center. On A4, around 10 cm above the base gives you enough room for the eruption column. Cut the summit too high and the ash cloud feels cramped.
Step 2: crater and vent opening
At the summit, draw a small ellipse tilted toward the viewer, around 2-3 cm wide. That is the crater rim. A second smaller ellipse inside it becomes the vent. The gap between the two is the crater wall.
Most beginners draw the crater as a circle. Don’t. A circle reads as a hole cut in a flat surface. An ellipse reads as a three-dimensional opening on a tilted surface. At a 30-40 degree viewing angle, the crater should be noticeably wider than it is tall.
Step 3: refine the silhouette
Switch to HB and trace the outline with a confident stroke. Stratovolcano slopes are not perfectly straight. They bow slightly outward near the base, then tighten toward the summit. That subtle curve is what separates a cone from a triangle. Add it, then erase the construction ellipses once the outline is clean.
Adding lava flows: how molten rock actually moves
Lava flows are where most volcano drawings fail. People draw flat red stripes. Real lava has mass, direction, and internal structure, and getting that onto paper is mostly a shading problem, not a line problem.
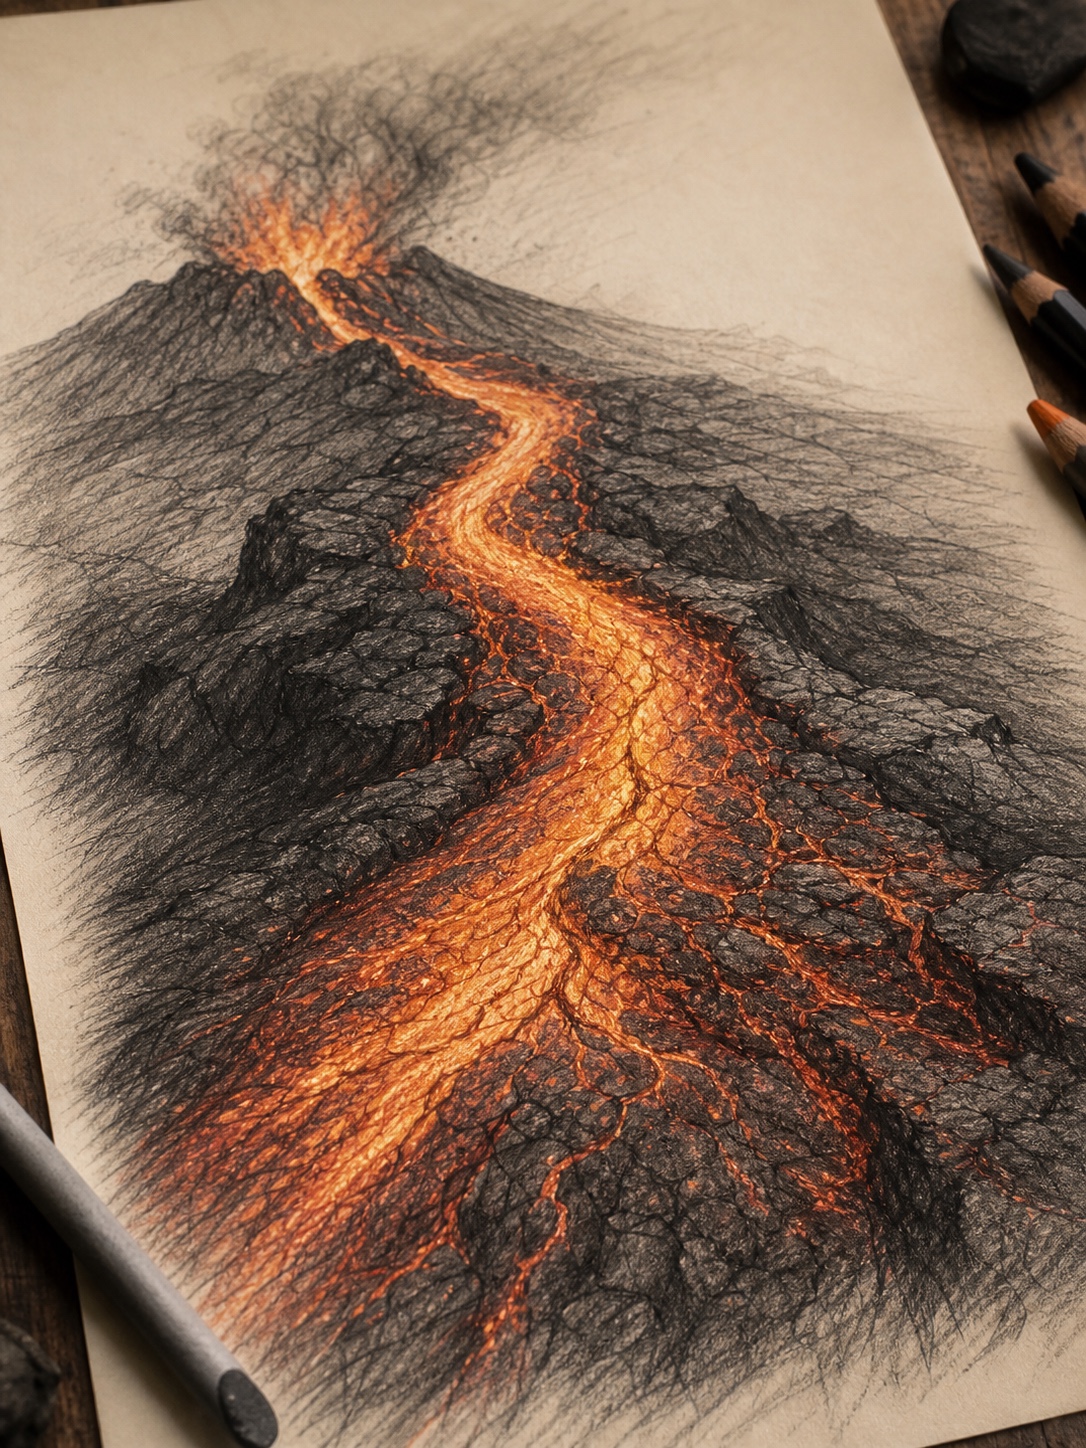
Channels narrow and accelerate on steep slopes, then widen and slow on shallow ground. As the outer material cools, it builds raised levee walls on both sides of the channel. The Smithsonian Global Volcanism Program and the Hawaiian Volcano Observatory are useful places to study real lava behavior before drawing it.
Drawing the flow channels
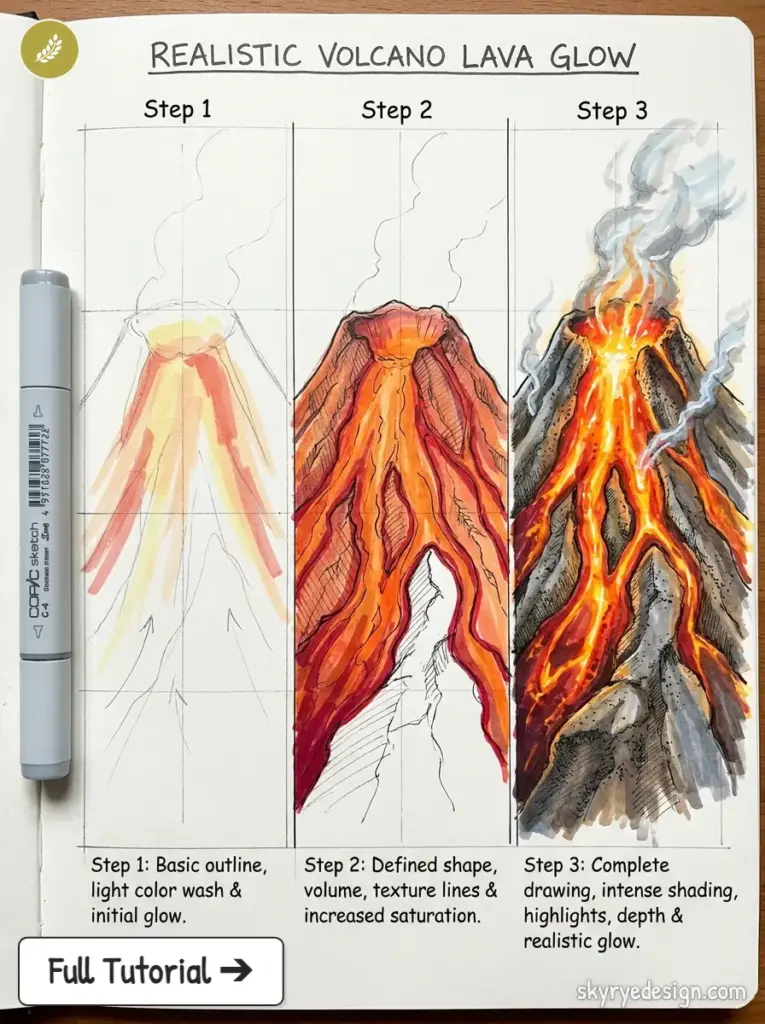
From the crater or cracks in the upper cone, draw two or three tapering channels that follow the slope downward. Water running downhill finds the lowest path, pools, then spills. Lava does the same. Two or three channels converging into one wider flow at the base looks more natural than four parallel streams going nowhere.
Channel edges should be irregular, but not wavy for the sake of decoration. Short perpendicular marks along the edges suggest cooled crust cracking away from the active flow. It takes about 20 seconds per edge and changes how the lava reads.
Rendering the glow
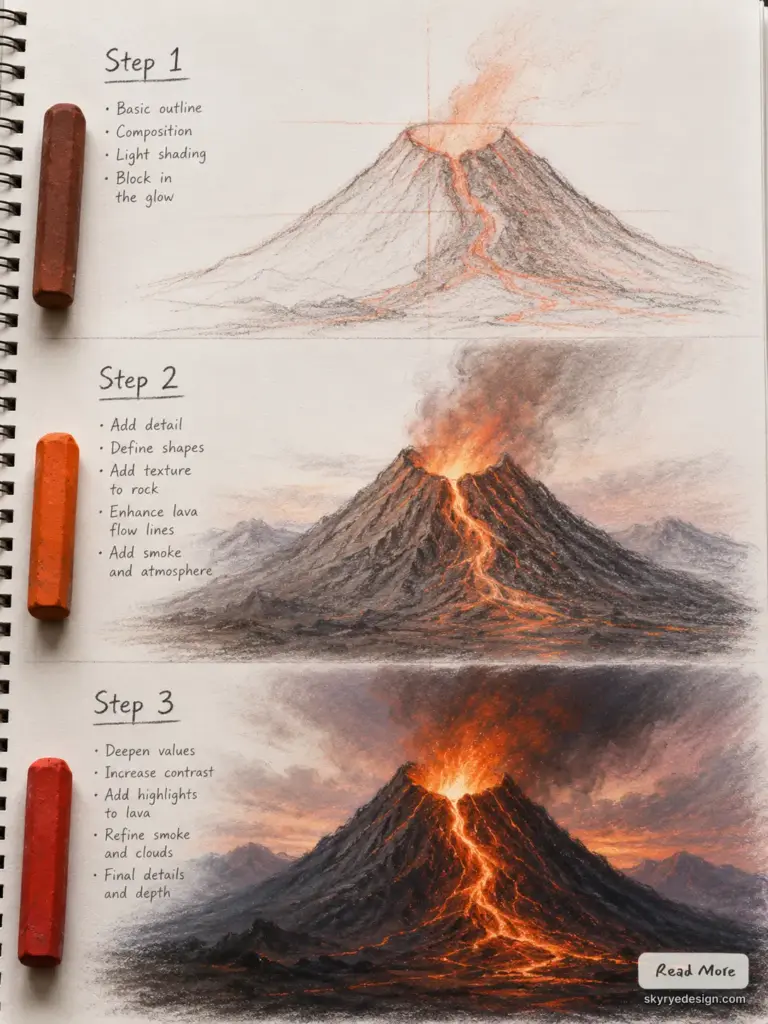
In pencil, leave the center of the channel near-white, then darken outward with 4B or 6B. The lightest point is the upper middle of the flow because that is the freshest, hottest material. Work outward in small circular strokes, building the dark crust slowly.
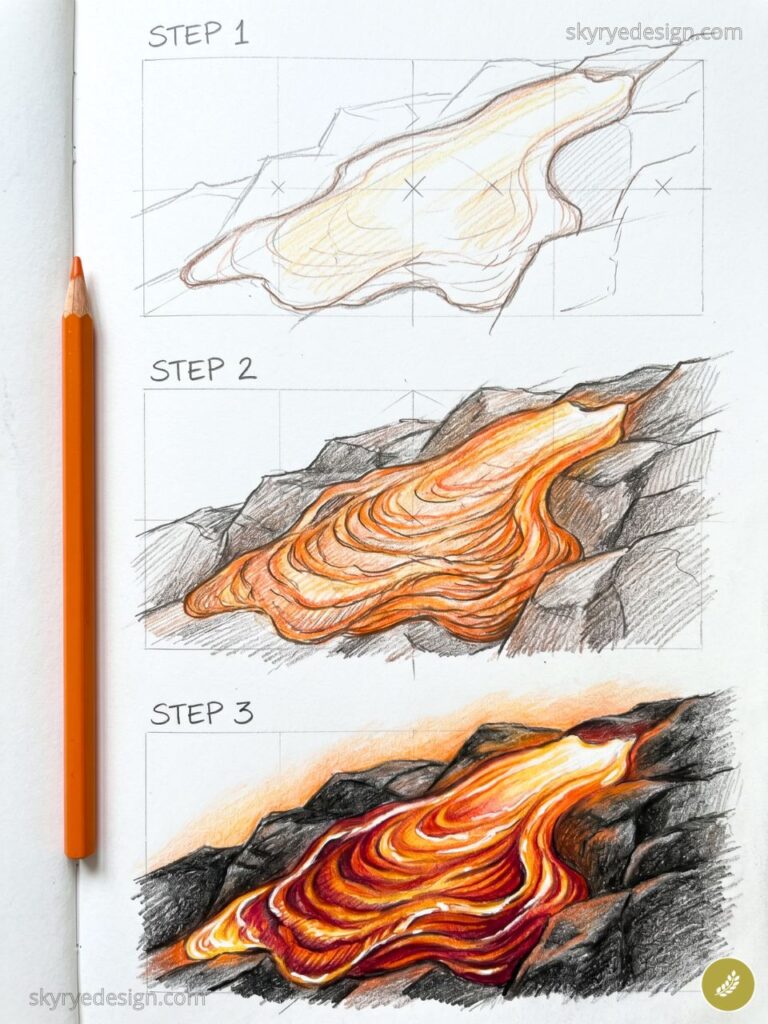
In digital, lay down the dark channel shape first. Add a center layer in bright orange-yellow on an overlay or screen blending mode. The light bloom around active lava comes from a soft yellow-white brush at 15-20% opacity, built up over several passes.
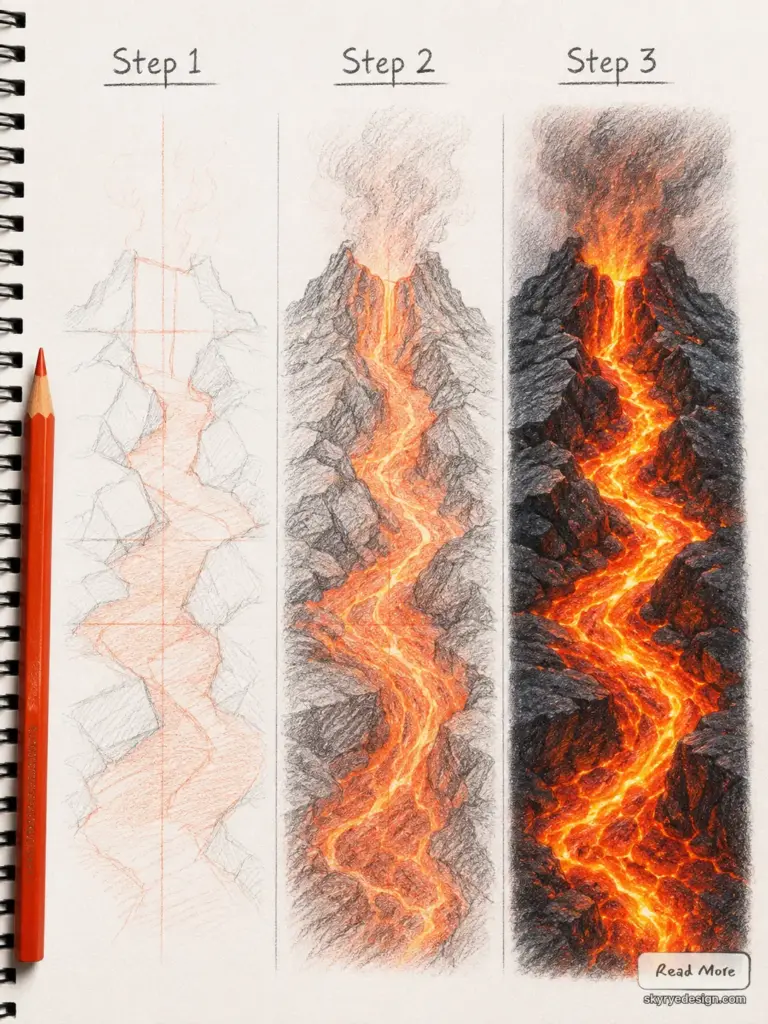
Tip: Lava does not glow uniformly. Brighten only the points where the flow is moving fastest or where it drops over a ledge. Static pooled lava is darker and more textured at the surface.
Drawing the eruption column and ash cloud
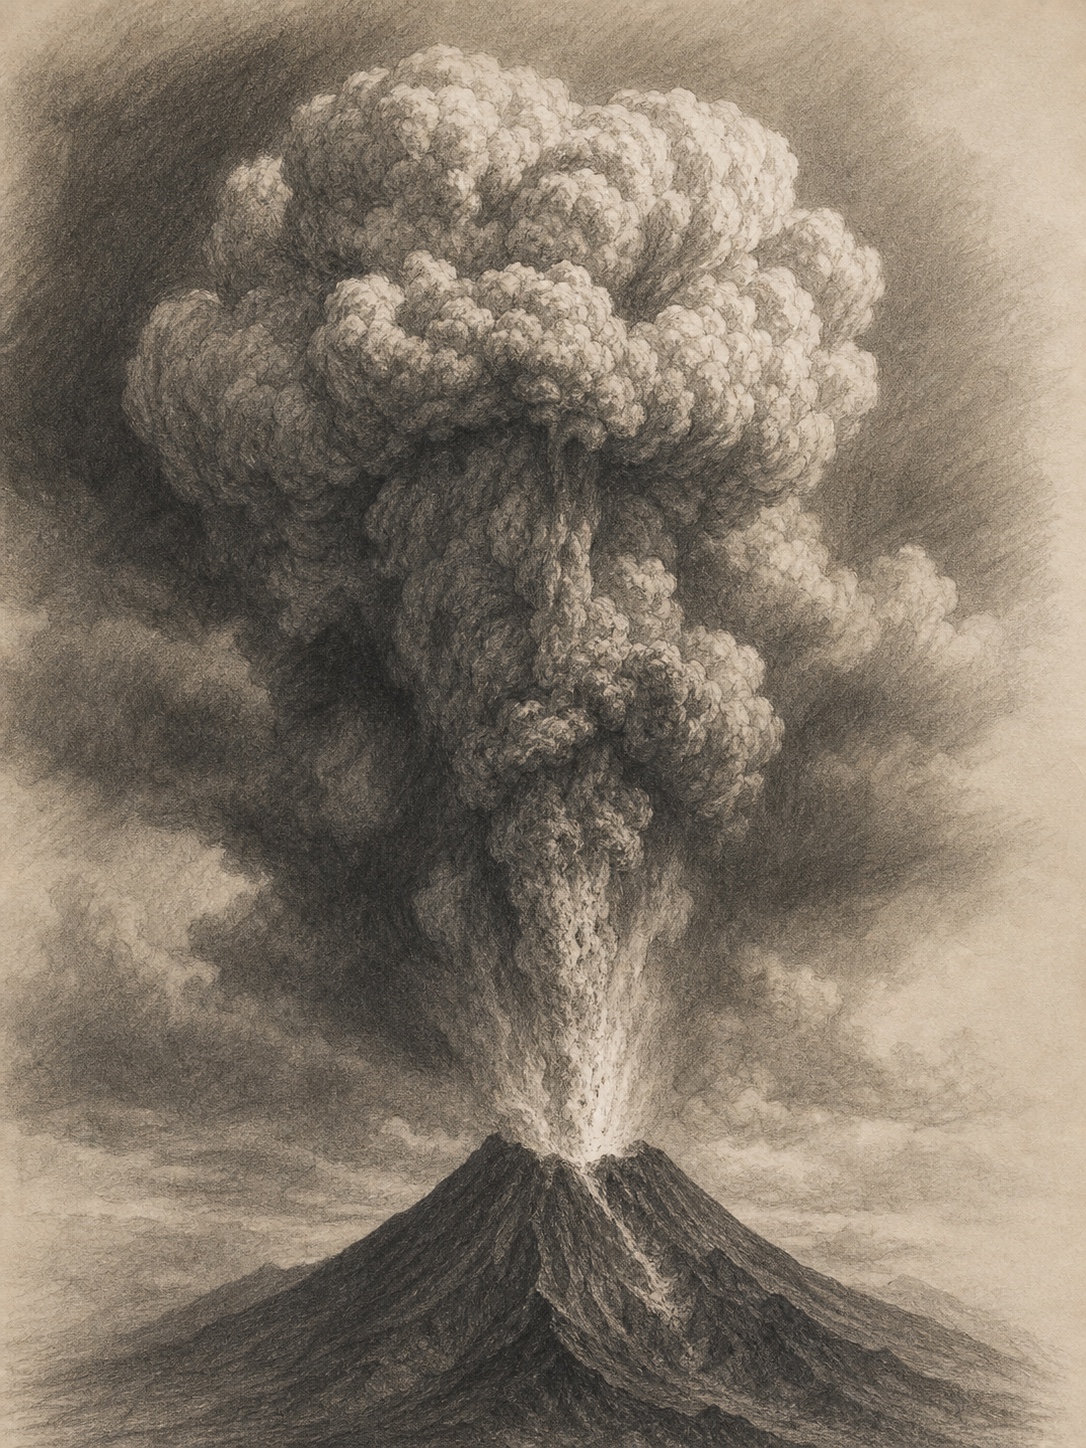
The ash cloud is the most complex form in the drawing, and probably the most satisfying to get right. The eruption column follows some of the same visual logic as a fast-moving cumulonimbus cloud: narrow force at the base, expanding volume above, large rounded forms catching light and shadow.
For softer cloud masses, study the value logic in this realistic cloud drawing guide before you add ash texture. The same hard, soft, and lost edge control keeps eruption clouds large instead of smoky and flat.
Column structure
The base of the column is narrow and fast: a tight shaft of superheated gas and debris shooting from the vent. It widens as it rises and eventually spreads into the classic umbrella or cauliflower form at the top. Draw that shape first: narrow stem, expanding crown.
The column interior should not be uniformly dark. At the base it is lit by heat below; higher up it catches direct light. Shadow accumulates on the lower edges and under the spreading crown. Many beginners draw the cloud as dark inside and light outside. Check reference once and you will avoid that habit.
Ash cloud texture
Each lobe of the cloud is a rounded, bulging form. Draw them as overlapping spheres. Light hits the top, shadow falls underneath. Use short circular strokes with a 2B pencil to build shadow areas from the outer edge inward, leaving the top third of the cloud noticeably lighter.
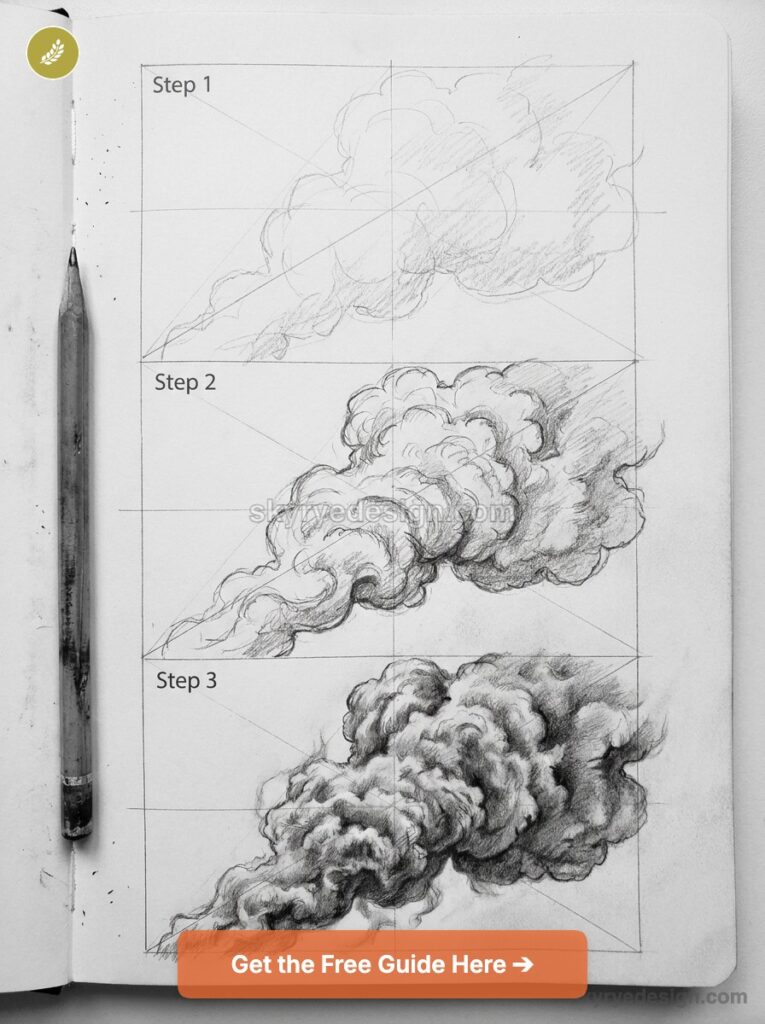
I usually spend more time on the cloud than on the cone itself. A flat ash column kills the whole drawing, even if the volcano is well built. Do it properly and the entire piece gains weight.
Tip: Add three or four fragments of ejected rock near the vent. Keep them small and irregular. This tiny detail adds scale and energy without cluttering the page.
Background, sky, and atmospheric perspective
Atmospheric perspective is why distant mountains look pale and slightly blue. Air between you and the subject scatters light, washing out contrast as things recede. In pencil, this is simple: distant forms are lighter and softer; close forms are darker and sharper.
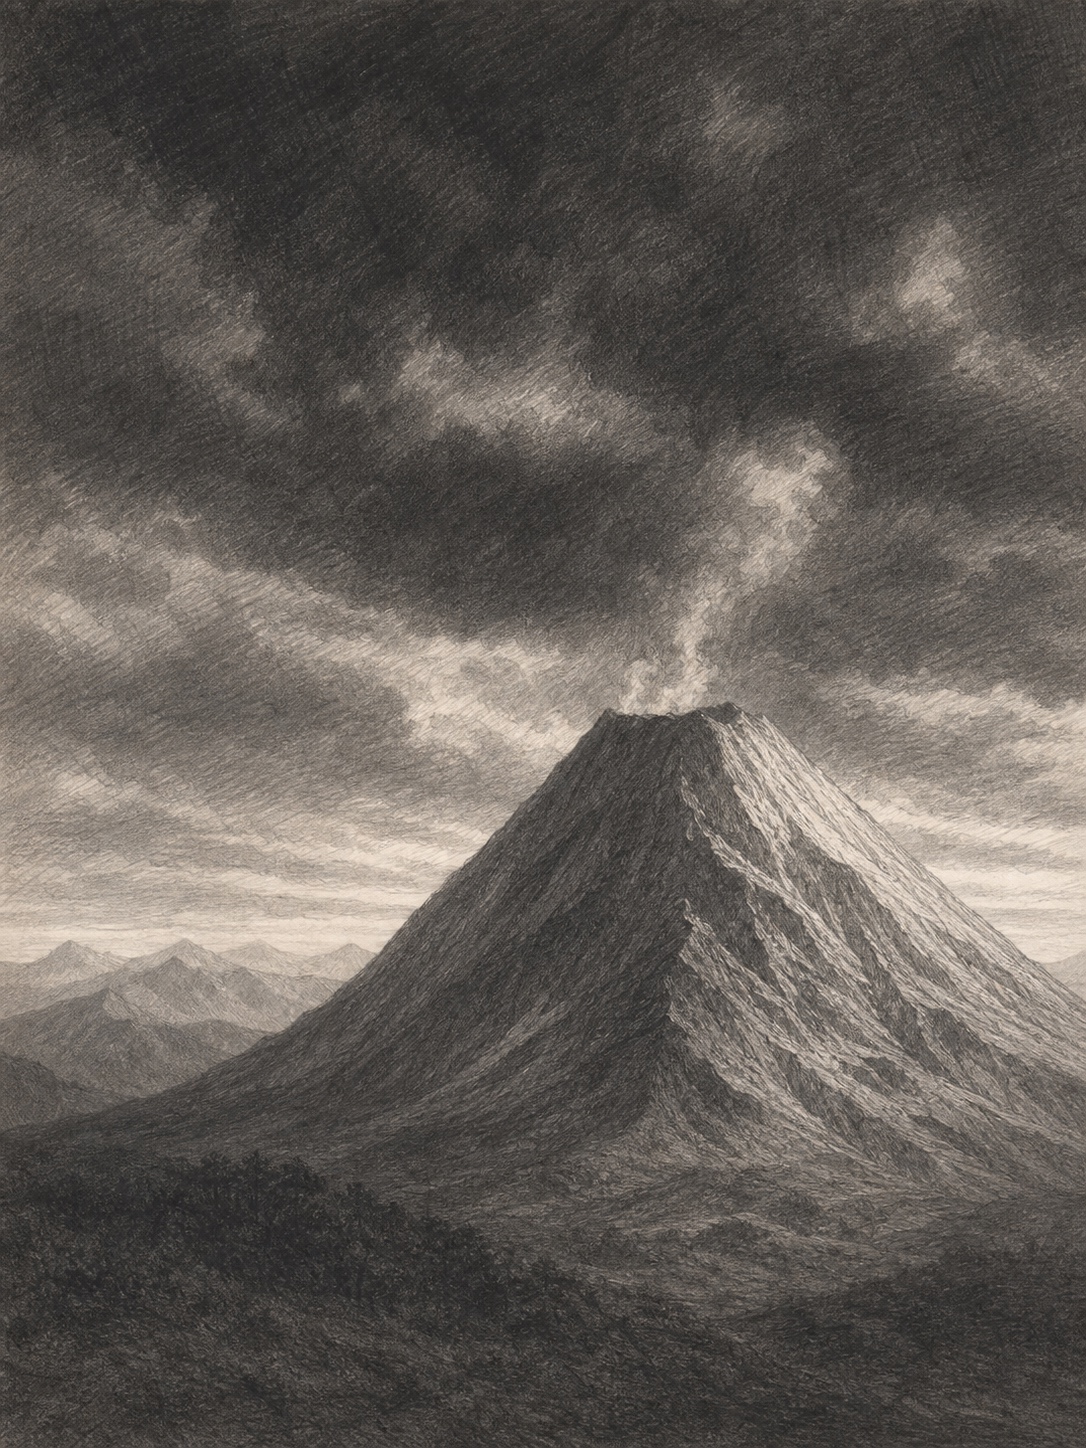
For a volcanic scene, I usually go dramatic: deep charcoal sky built with 6B, blended with a tortillon, then a lighter horizon so the distant terrain separates from the cone. A pale scientific illustration style can also work, but a dark sky makes the eruption column pop.
Foreground texture
The foreground should hold the most texture. Cooled basalt has a cracked-plate surface: irregular polygons divided by thin fissures. Draw the cracks with a sharp HB, then shade each plate slightly darker at the edges with 2B. It is mechanical work, but satisfying.
Avoid even detail across the whole composition. The eye should land on the vent and upper column first. Keep the foreground interesting, but reduce contrast as you move into the middle ground. If the foreground competes with the volcano, pull it back.
Comparison: five ways to draw a volcano
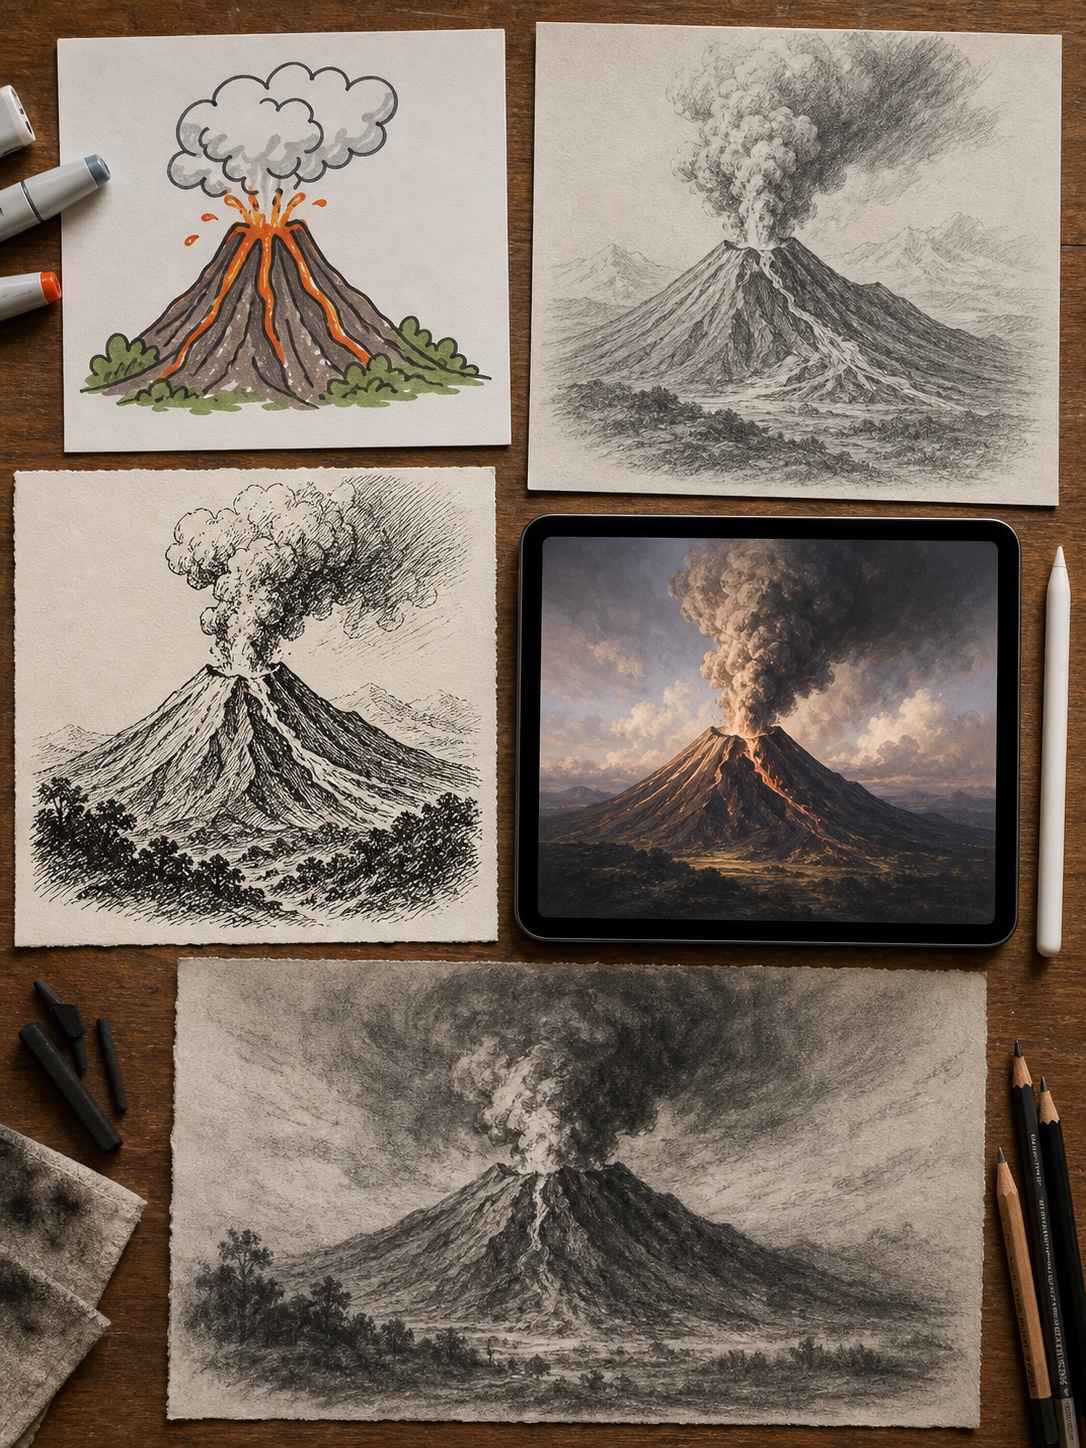
Which technique you use depends on what you are making the drawing for. Pencil gives you the most control over light and form, which is why it is the basis of this tutorial. Ink is faster and reproduces well. Charcoal gives you scale and drama. Digital gives you color control and easy revisions.
| Style | Tools | Difficulty | Best for | Time |
|---|---|---|---|---|
| Simple cartoon | HB pencil, marker | Beginner | Kids, first attempt, quick sketches | 15-20 min |
| Realistic pencil | 2H, HB, 4B, 6B | Intermediate | Portfolio work, study, shading practice | 60-90 min |
| Ink + hatching | Micron 0.1-0.5 | Intermediate | Editorial, zine, high contrast look | 45-60 min |
| Digital painterly | Procreate, iPad | Intermediate-Advanced | Social media, prints, vibrant color | 90-120 min |
| Charcoal dramatic | Charcoal sticks, fixative | Advanced | Large format, gestural, gallery work | 60-90 min |
For sharper graphic work or a tight deadline, ink hatching is hard to beat. Micron 0.3 on heavier paper gives a clean editorial look, especially when the lava and ash cloud need to read at small size.
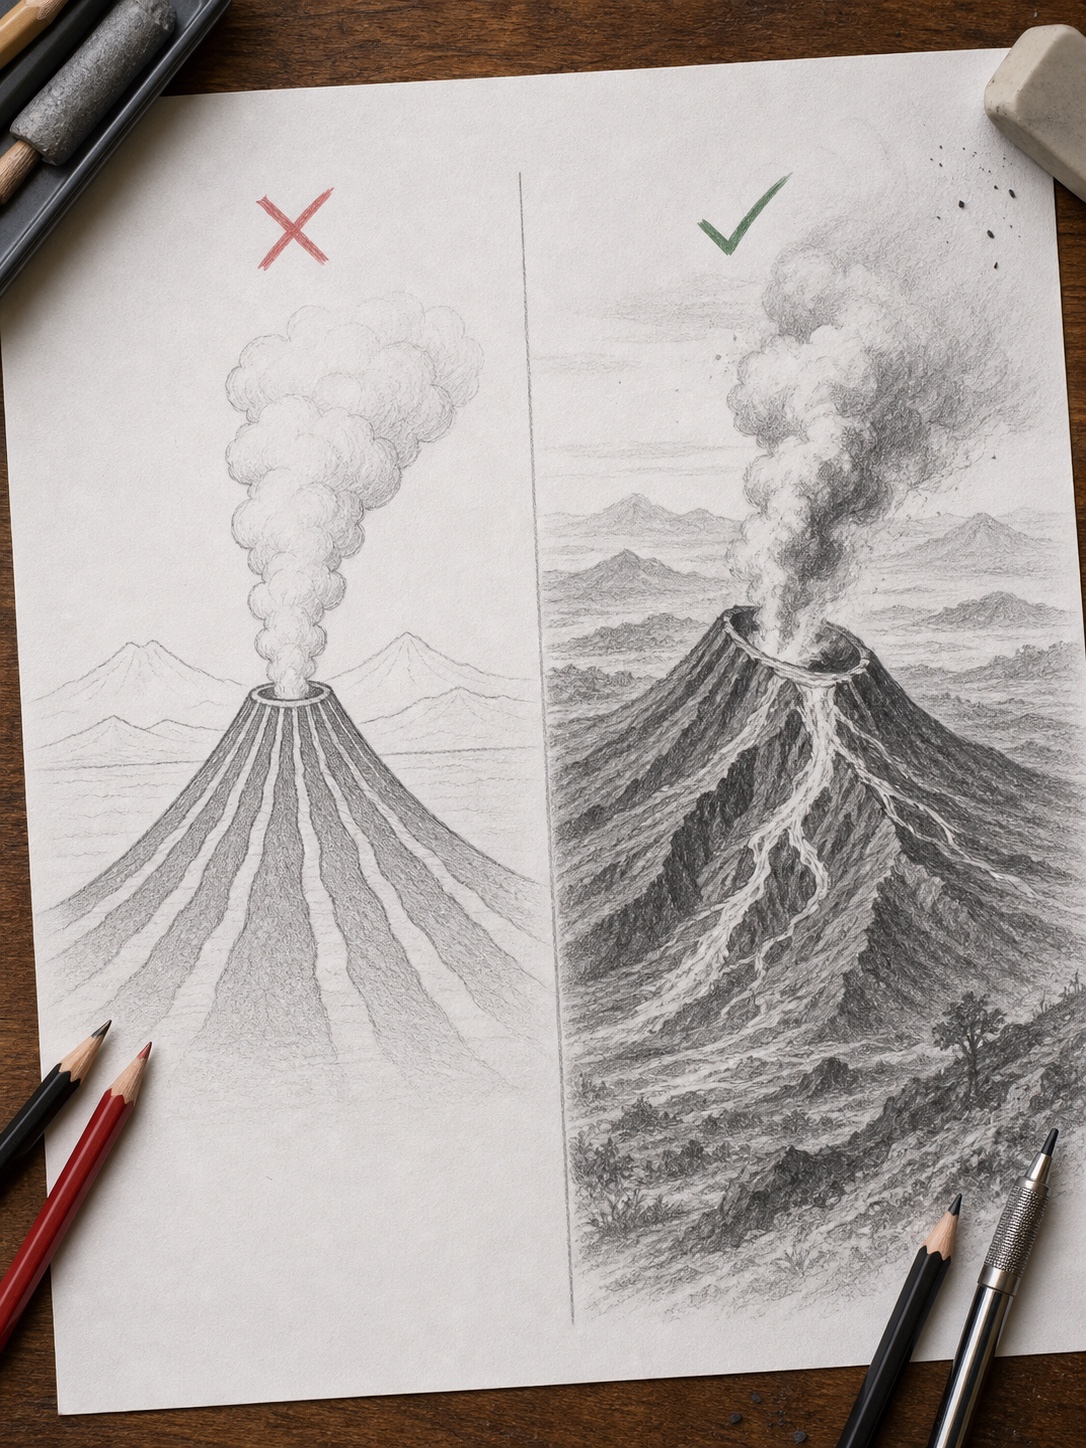
Common mistakes and how to fix them
Symmetric cone
A perfectly symmetric cone looks like a logo. Real stratovolcanoes have asymmetric slopes. Offset the summit from center and vary the slope angles left to right by a few degrees. You are not making it random; you are making it specific.
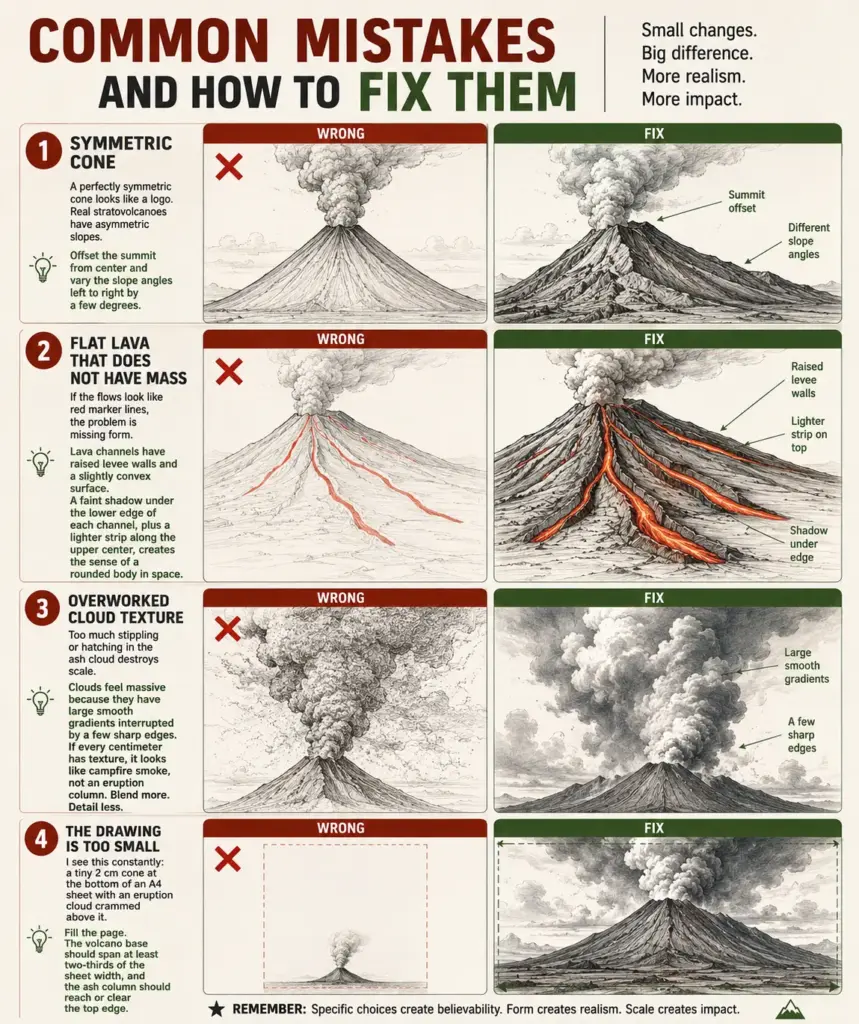
Flat lava that does not have mass
If the flows look like red marker lines, the problem is missing form. Lava channels have raised levee walls and a slightly convex surface. A faint shadow under the lower edge of each channel, plus a lighter strip along the upper center, creates the sense of a rounded body in space.
Overworked cloud texture
Too much stippling or hatching in the ash cloud destroys scale. Clouds feel massive because they have large smooth gradients interrupted by a few sharp edges. If every centimeter has texture, it looks like campfire smoke, not an eruption column. Blend more. Detail less.
The drawing is too small
I see this constantly: a tiny 2 cm cone at the bottom of an A4 sheet with an eruption cloud crammed above it. Fill the page. The volcano base should span at least two-thirds of the sheet width, and the ash column should reach or clear the top edge. Scale sells the drama.
What materials do you need to draw a volcano?
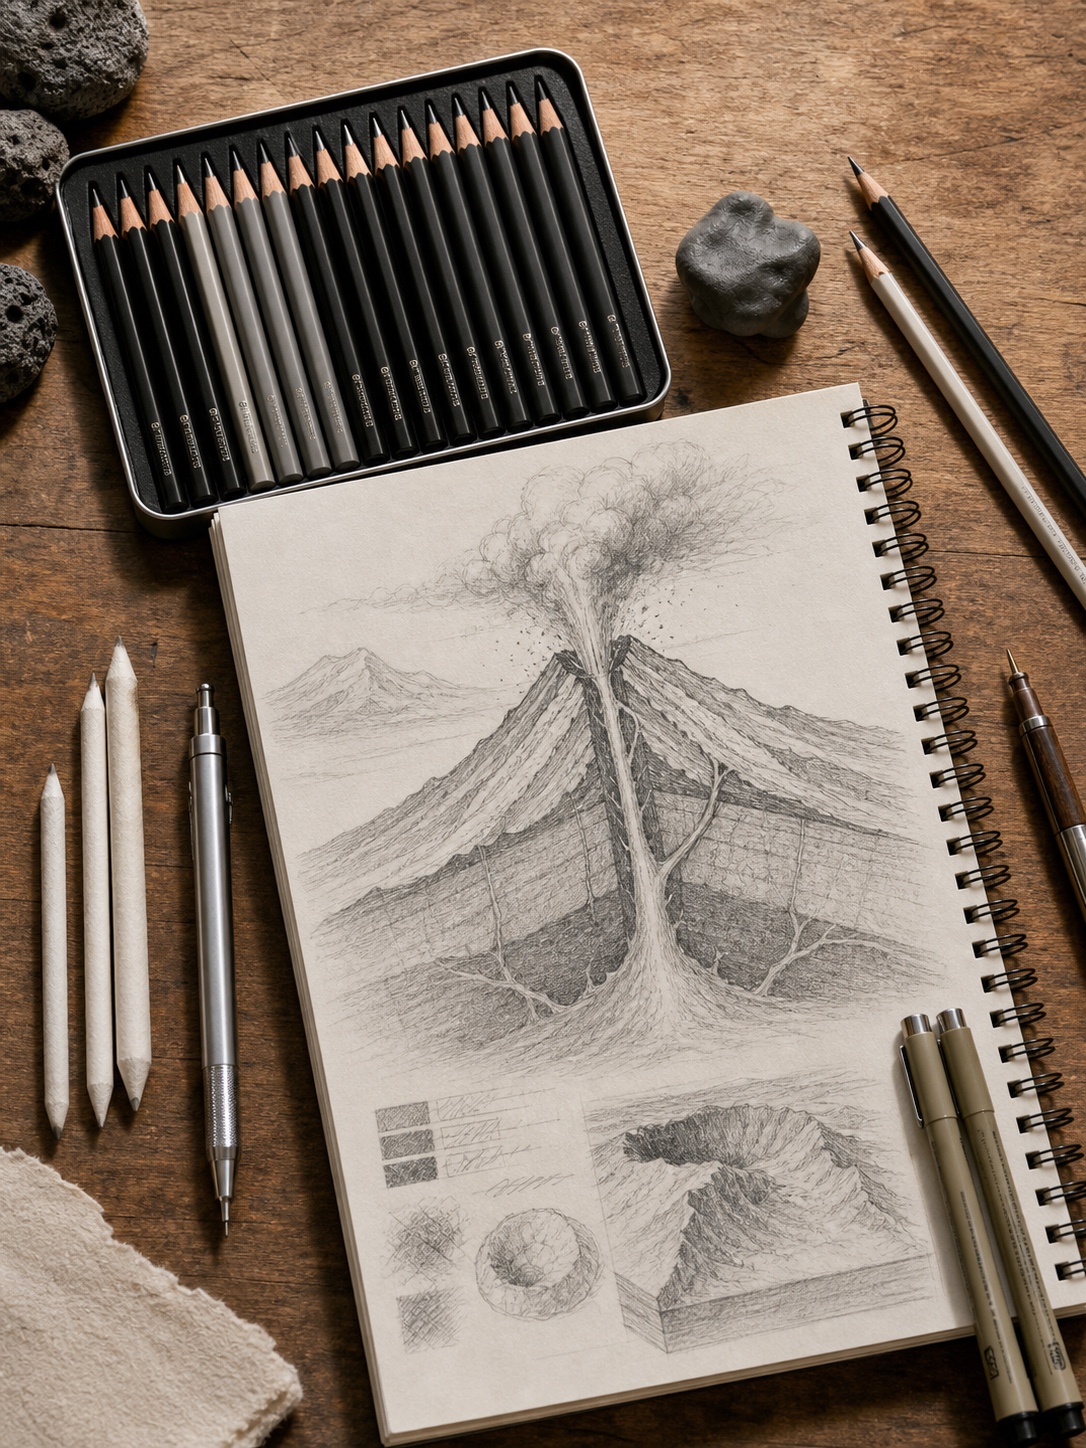
You do not need much. I have made detailed volcano studies with one HB pencil and printer paper. But if you are setting up properly, these are the tools that actually matter.
Pencils. A 2H to 6B range covers the whole drawing. Use 2H for construction lines, HB for outline work, 2B and 4B for mid-tones, and 6B for the sky, crater interior, and cooled lava crust. Staedtler Mars Lumograph and Faber-Castell 9000 are both excellent.
Paper. Any sketchbook works for practice. For a drawing worth keeping, use 160 gsm or heavier cartridge paper. Smooth paper is better for detailed graphite; a slightly textured surface is better for charcoal.
Blending tools. A tortillon helps with sky and cloud gradients. A kneaded eraser lifts graphite to create highlights without damaging the paper, which is useful for the bright center of the lava channel.
Tip: Do not buy fixative spray until you need it. For practice drawings and portfolio studies, graphite stored flat between glassine sheets is usually fine. Use fixative for framed or display pieces.
If the volcano outline starts feeling too symmetrical, practice a few irregular ridges with the mountains drawing guide first. The same value layering helps volcanic slopes feel heavier and less like a flat triangle.
Related drawing practice
Before adding lava or ash, warm up with this realistic landscape drawing guide so the volcano sits in believable space.
For more sketching practice, browse the drawing archive, the landscape drawing section, and the drawing tools and supplies guides. Volcano drawing sits right between landscape study, texture rendering, and dramatic value control; for another cliff-and-flow study, try the waterfall drawing tutorial.
FAQ: how to draw a volcano
Q: What is the easiest way to draw a volcano for beginners?
A: Triangle on a curved base line. Small V at the summit for the crater. Three wavy lines down the slopes for lava. A rough oval above the crater for the eruption cloud. Five minutes. Once that is comfortable, add shading: darker on one slope, lighter on the other. Shading is what turns a symbol into a drawing.
Q: How do you draw realistic-looking lava?
A: Three tonal zones: near-white center core, mid-orange or red active surface, dark cracked outer crust. In pencil, leave the center lightest and darken outward with 4B or 6B. In digital, use an overlay layer in yellow-orange over a dark base. Add small irregular cracks at the channel edges, perpendicular to the flow direction.
Q: What type of volcano should I draw first?
A: Start with a stratovolcano. It has a steep defined cone, readable proportions, and forgiving construction. Mount Fuji in Japan and Mayon in the Philippines are excellent references because their profiles are clean and easy to study.
Q: How long does it take to draw a detailed volcano?
A: A basic structural sketch takes 10-15 minutes. A finished pencil study with shaded cone, lava flows, and ash cloud takes 60-90 minutes at intermediate level. The ash cloud alone can take 20-30 minutes if you build the form properly.
Q: What pencils should I use for a volcano drawing?
A: Use HB for construction and outline, 2B for mid-tone shading on the cone and foreground, and 4B or 6B for deep shadows in the sky, crater interior, and cooled lava crust. A 2H pencil is useful for the initial geometric lines you will erase.
Q: Can I draw a volcano in ink instead of pencil?
A: Yes. Ink gives sharper line quality and high contrast that reproduces well in print and photos. Use Micron fine liners: 0.1 for fine detail, 0.3 for main lines, and 0.5 for the heaviest outlines. Sketch the composition in pencil first, ink over it, then erase the pencil once the ink is dry.
Q: How do you draw an ash cloud that looks large and realistic?
A: Scale comes first. The cloud should dominate the upper half of the composition. Draw individual lobes as rounded, overlapping spheres with light on top and shadow underneath. Three or four large lobes blending into each other usually look more convincing than twenty small ones.
About the author
Written by Vlad, an industrial designer with 15+ years of cross-disciplinary experience. Trained in academic drawing, composition, and life painting at a transport design university; worked professionally in Germany; based in Kyiv, Ukraine. Portfolio work spans automotive design, jewelry, web and app design, and architectural visualization.
Final thoughts
Drawing a volcano well comes down to three things: the geometric structure of the cone, the physics of how lava and gas move, and how light and atmosphere behave in an extreme environment. Get those right and the rest becomes detail work.
Start with the construction geometry. Spend longer on the ash column than feels necessary. Leave the lava center lighter than your instinct says. Fill the page. Those four adjustments fix most volcano drawings immediately, wherever you are in your practice.
My early volcano drawings were embarrassingly flat. The ones I make now, after years drawing car bodies, mountain ranges, and architectural forms, have a different sense of weight. That gap closes through repetition. Not talent.
If you like landscape studies with dramatic atmosphere, the ocean drawing guide is a good companion for practicing horizons, value bands, and moving natural forms.
- 1.4Kshares
- Facebook0
- Pinterest1.4K
- Twitter0
- Reddit0