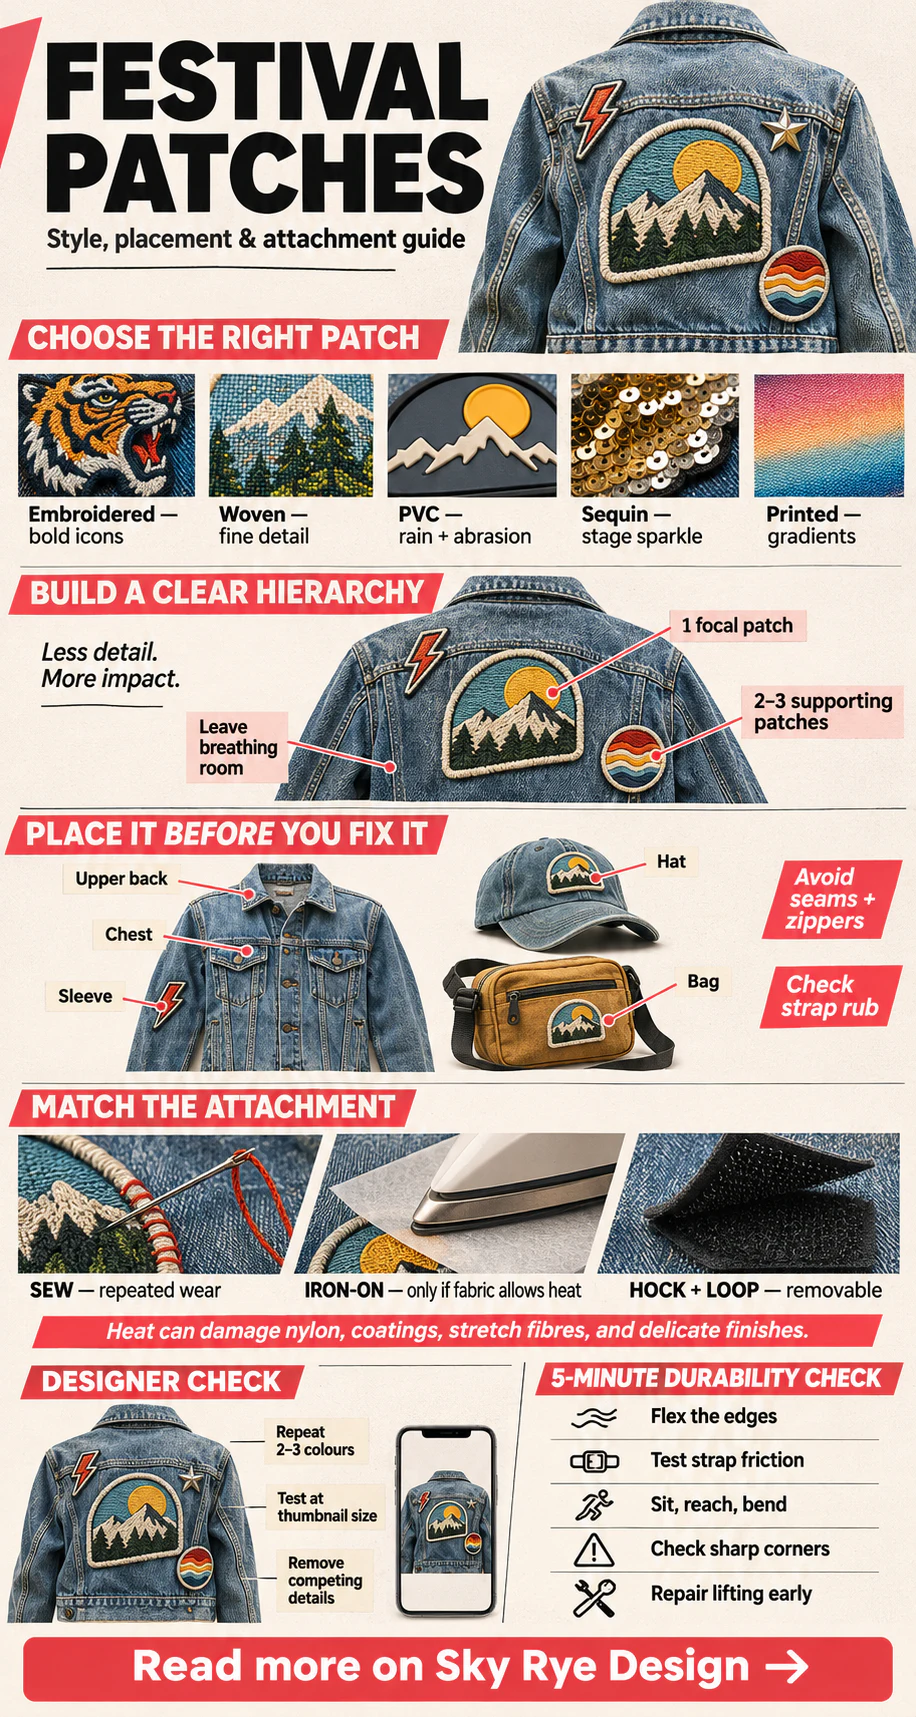
Festival patches work best when they look like part of the outfit rather than random stickers on fabric. Choose one focal patch, repeat one colour or shape in two smaller patches, and leave enough empty space for the garment to breathe. Embroidered patches suit bold lettering and simple icons; woven patches hold finer lines; PVC handles rain and abrasion; sequins create stage-light sparkle; printed patches are useful for gradients or artwork. Before attaching anything, pin or tape paper templates to the jacket, bag, or hat and photograph the layout from several metres away.
Keep patches away from seams, zippers, backpack straps, and areas that fold against the body. Use the attachment method approved for both the patch and the base fabric: heat can damage nylon, coatings, stretch fibres, or delicate finishes. For an item you expect to wash or wear repeatedly, stitching around the edge is usually the most dependable choice.
The design problem is not finding the greatest possible number of badges. It is deciding what should be noticed first, where the garment bends, and how the attachment will behave through a full day of movement. Use the sections below as a styling brief before you buy, order, or apply anything.
Choose the patch type by design goal
Patch material changes the level of detail, the way light hits the surface, and the amount of physical weight added to the garment. Match the technique to the artwork instead of choosing by price alone.
| Patch type | Best visual use | Strength | Watch for |
|---|---|---|---|
| Embroidered | Bold icons, names, simple lettering | Raised thread texture reads well on denim | Tiny text and soft gradients lose clarity |
| Woven | Fine lines, compact logos, detailed type | Flatter and more precise than dense embroidery | Less dimensional from a distance |
| PVC or rubber | Weather-exposed bags and technical looks | Resists moisture and abrasion | Extra weight and a less flexible edge |
| Sequin or metallic | One stage-light focal point | Strong movement and reflection | Snagging, weight, and difficult care |
| Printed fabric | Illustration, gradients, photographic colour | Reproduces complex artwork | Needs a strong border and colourfast print |
A useful proof test is to reduce the artwork to its final physical size on screen, print it at 100 percent, and view it at arm’s length. If the words or internal lines disappear, simplify the art before production. A patch that looks impressive at poster scale can turn into visual noise at 60 millimetres.


Plan placement before you attach anything
Cut paper templates to the real patch sizes and fix them temporarily with low-tack tape or pins that will not damage the fabric. Put the garment on, add the bag you will carry, move your arms, sit down, and photograph the front, side, and back. This catches collisions with seams and straps that a flat lay hides.
| Area | What works | Comfort check |
|---|---|---|
| Upper back | One large focal patch or centred group | Keep clear of backpack pressure points |
| Chest | One small badge above or beside a pocket | Do not block a zipper, button, or lapel fold |
| Sleeve | Narrow vertical sequence or one elbow-free accent | Raise and bend the arm before approval |
| Hat | Small high-contrast mark on front or side | Avoid thick seams and rigid internal supports |
| Bag | A removable cluster on a stable outer panel | Check strap rub, pocket access, and waterproofing |
Start with hierarchy: one dominant piece, one supporting group, and a quiet area. Repeat a colour from the focal patch in one or two smaller motifs. Irregular spacing can feel lively, but the gaps should still look deliberate. If every badge has the same size and contrast, the eye has nowhere to land.


Use colour, scale, and negative space like a designer
Pull two or three colours from the base garment, footwear, or bandana, then choose patches that repeat those colours in different proportions. On faded blue denim, warm orange and red accents create energy while cream or white provides a pause. On black fabric, one bright colour plus reflective or metallic detail often reads better than a rainbow of unrelated badges.
Check the layout in a phone photo. Festival outfits are frequently seen in group shots, short video, and small social previews. If the focal patch disappears at thumbnail size, enlarge it or remove a competing neighbour. If the cluster becomes one solid block, increase the spacing rather than adding another outline colour.
Choose an attachment that suits the fabric
The backing on a patch is not permission to use it on every material. Heat-sensitive nylon, coated rainwear, stretch fabric, faux leather, sequins, and delicate finishes can distort or melt. Read the garment care label and the patch maker’s instructions, then test a hidden area when the manufacturer allows it.
- Use sewing for repeated wear, washing, heavy patches, or any edge that may catch on a crowd or bag strap.
- Use iron-on backing only when the base fabric and decoration both permit the required heat and pressure.
- Use hook-and-loop backing when the item already has a compatible field and you want to change badges between events.
- Use temporary pins or clips for a one-day layout, but cover sharp points and keep them away from high-contact areas.
- Do not rely on an unknown craft adhesive for expensive clothing; it can bleed, stiffen fabric, or fail in heat.
The FTC care-label guide explains why the garment’s washing, drying, and ironing instructions matter. For heat-applied materials, use the exact time, temperature, pressure, and base-material guidance supplied for the product; the Cricut heat-transfer troubleshooting guide likewise directs users back to material-specific settings.


A five-minute durability check
- Flex the fabric around the full edge and look for lifting or puckering.
- Rub the patch gently with the bag strap, jacket cuff, or adjacent layer it will touch.
- Sit, reach, and bend while wearing the complete outfit.
- Check that no stiff corner presses into the body.
- After the first approved wash, repair a loose edge before it grows.
Plan festival patches as small-format merch
For an artist, label, or small brand, a patch can test whether a symbol deserves a place in a larger collection. The brief still needs production discipline. Define the finished dimensions, artwork, colour references, border, backing, quantity, delivery date, packaging, and the fabric customers are most likely to use.
Ask for a digital proof, then order a physical sample before scaling. Place that sample on the real jacket, hat, or bag; photograph it in daylight and stage-like lighting; and test the edge, backing, and smallest type. A low minimum order reduces inventory risk, but it does not correct artwork that was never designed for thread or a tiny format.
| Before approval | Question to answer |
|---|---|
| Size | Can the icon and lettering be read at the finished dimensions? |
| Colour | Are thread or material references confirmed, not guessed from a monitor? |
| Border | Does the edge support the shape without swallowing fine details? |
| Backing | Is it safe and practical for the intended garment or bag? |
| Sample | Has a physical piece been worn, photographed, flexed, and washed as permitted? |
| Claims | Can every durability, origin, or environmental claim be substantiated? |
When comparing a commercial supplier, use specifications as a starting point rather than proof of fit. For example, Patch Makers USA lists custom patch formats and woven patch options; request a current sample, written production details, and care guidance for your exact base fabric before ordering.


Build the rest of the festival look
Treat the patch layout as one layer in a complete outfit. These guides help coordinate the silhouette, accessories, colour story, and product decisions without making every element compete.
- Rave outfit guide — plan comfort, movement, footwear, and venue conditions.
- Y2K streetwear outfit ideas — pair patches with denim, cargo pockets, baby tees, and sporty layers.
- Y2K accessories guide — balance sunglasses, belts, bags, jewellery, and graphic details.
- Trendy accessories — decide whether the patch is the focal point or a supporting accent.
- How to style a bandana — repeat one colour or motif across two accessories.
- Merchandise design strategy — connect artwork, audience, production, and presentation.
- How to create a fashion line — test a small product within a coherent collection.
- Sustainable fashion guide — evaluate claims, materials, care, and repeat wear.
- Sky Rye Design fashion archive — browse more outfit and accessory guides.
Festival patches FAQ
Are iron-on or sew-on patches better for festival clothes?
Iron-on backing is convenient when the garment and patch both allow heat, but sewing gives a more dependable edge for repeated wear, movement, and washing. A useful compromise is to heat-tack a compatible patch in position and then stitch the perimeter. Never guess the temperature: check the patch instructions and the garment care label first.
Can you put a festival patch on nylon or waterproof fabric?
Sometimes, but a hot iron can melt nylon or damage a water-resistant coating. Use a sew-on, hook-and-loop, or removable attachment when the fabric manufacturer does not approve heat. If the item is waterproof, every needle hole can affect the barrier, so test a hidden area or ask a repair specialist before altering expensive technical gear.
How many patches should go on one festival jacket?
There is no fixed number. Start with one large focal patch and two or three smaller supporting pieces. Keep at least one clear area on the front or back so the design remains readable in photographs. Add more only when the colours, spacing, and visual weight still feel intentional rather than crowded.
Where should patches be placed on a denim jacket?
Good starting points are the upper back, one chest area, the outside of a sleeve, or above a pocket. Avoid thick seams, buttonholes, elbow folds, and the exact point where a bag strap rubs. Test the jacket while sitting and raising your arms, because a comfortable flat layout can behave differently in motion.
How do you wash clothing with attached patches?
Follow the most cautious instruction among the garment label, patch material, backing, thread, and decoration. Fasten zippers, turn the item inside out, use a gentle cycle when allowed, and avoid high heat unless every component permits it. Check loose edges after washing and repair them before the next wear.
What information should a brand give a custom patch supplier?
Send the final dimensions, artwork, thread or material colours, border type, backing, quantity, delivery date, and intended base fabric. Ask for a digital proof and, for a large order, a physical sample. Confirm how small text and fine lines will reproduce before approving production, then test the sample on the real garment or bag.
Patches and crystals both turn clothing into a personal graphic surface, but they behave differently in wear and washing. Compare them with this rhinestone hoodie design and care guide.
- 13shares
- Facebook0
- Pinterest13
- Twitter0
- Reddit0