Drawing dogs can be a delightful creative activity for artists of all skill levels. Whether you’re a beginner looking to sketch your first canine companion or someone wanting to improve your existing skills, learning to draw dogs doesn’t have to be complicated. With simple shapes and basic techniques, anyone can create adorable dog drawings that capture the charm and personality of these beloved pets.
The beauty of easy dog drawing methods is that they break down complex canine anatomy into manageable steps. You can start with basic circular shapes for the head and body, then gradually add details like the ears, snout, and tail. Many tutorials, like those found on YouTube channels dedicated to dog drawing, offer step-by-step guidance that makes the process accessible and enjoyable.
Key Takeaways
- Simple shapes and basic lines can transform into adorable dog drawings when you follow the right steps.
- Different dog breeds require slightly different approaches, but all start with the same foundational shapes.
- Regular practice with easy dog drawing techniques builds confidence and skills that transfer to more complex art projects.


Getting Started With Easy Dog Drawing
Drawing dogs can be a rewarding and enjoyable artistic endeavor that anyone can master with the right approach. The key is having proper materials, a comfortable space to work in, and a basic understanding of canine anatomy.
Essential Drawing Materials
For beginner dog drawings, you don’t need expensive art supplies. Start with a simple pencil set (HB, 2B, and 4B pencils) for different line weights and shading. A good quality sketchbook with medium-texture paper works best for dog sketches.
An eraser is crucial – get both a kneaded eraser for subtle corrections and a white vinyl eraser for complete removal of lines.
Consider these optional but helpful tools:
- Blending stumps for smooth shading
- Colored pencils if you want to add color
- Reference photos of dogs
Your materials don’t need to be fancy. Many successful dog drawings start with just a #2 pencil and printer paper.
Choosing the Right Drawing Space
Your drawing environment significantly impacts your work quality. Find a well-lit area with natural light if possible, as this helps you see details and shadows accurately.
Your workspace should have a flat, stable surface. A desk or table at comfortable height prevents back strain during longer drawing sessions.
Keep your reference materials within easy view. You might prop up photos or use a tablet to display reference images while you work.
Organize your supplies neatly within reach. This minimizes interruptions when you’re in the creative flow of your dog drawing.
Understanding Dog Anatomy Basics
Before drawing detailed features, familiarize yourself with basic dog proportions. Most dogs have a head-to-body ratio of approximately 1:3, though this varies by breed.
Pay attention to the skeletal structure underneath. Dogs have a distinctive shoulder blade position and hindquarters that give them their characteristic shape. Their legs aren’t straight posts but have joints at specific angles.
Facial proportions follow patterns too. The eyes typically sit about halfway down the head, with the muzzle length varying by breed.
Start your drawings with simple shapes. Use circles for the head and chest, and ovals for the muzzle and body. These basic forms will guide your more detailed work later.


Step-By-Step Dog Drawing Guide
Drawing a dog doesn’t have to be complicated. This guide breaks down the process into manageable steps that will help you create an adorable canine companion on paper with minimal frustration.
Drawing the Dog’s Head and Face
Start with a circle for the head. This will serve as your foundation. Add a smaller circle or oval overlapping the first one to form the snout.
Draw two triangular or floppy shapes on top of the head for ears. For breeds like beagles, make the ears long and droopy. For other breeds, adjust the ear shape accordingly.
Next, add two small circles for eyes positioned in the upper part of the head. Place a small oval or circle at the end of the snout for the nose.
Draw a curved line below the nose for the mouth. You can make it a simple curve for a closed mouth or add a slight opening for a friendly, panting expression.
Outlining the Body and Legs
Connect a larger oval to the head circle to create the body. Position this oval slightly lower than the head to form a natural dog posture.
Add four stick-like shapes extending from the body oval for the legs. Front legs should be relatively straight, while back legs can have a slight bend at the knee.
Draw small ovals at the end of each leg to represent paws. These should be slightly wider than the legs themselves.
For the tail, add a curved line extending from the back of the body. You can make it straight, curled, or wagging depending on the mood you want to convey.
Adding Details and Facial Expressions
Enhance the eyes by adding pupils and perhaps a small reflection dot to bring them to life. The positioning of the pupils can dramatically change your dog’s expression.
Add details to the nose by shading it in or adding a small line underneath. Draw a tongue if you’ve created an open mouth.
Create more definition in the paws by adding toe separations with small curved lines. This simple detail makes a big difference in realism.
Add collar details if desired. A simple band around the neck with perhaps a small tag adds personality to your dog drawing.
Refining the Line Drawing
Review your drawing and strengthen the main outline. Erase any unnecessary guide lines from earlier steps to clean up your work.
Add fur texture by drawing short lines around the outline of your dog. These shouldn’t be too uniform – vary the length and direction for a more natural look.
Consider adding shadows under the paws and below the body to create a sense of dimension. Even simple shading can make your drawing appear more grounded.
Check your proportions one last time. A puppy might have a larger head compared to its body, while an adult dog typically has more balanced proportions. Make adjustments as needed to capture the age and breed characteristics you’re aiming for.


Creative Techniques to Enhance Your Drawing
Once you’ve mastered the basic structure of drawing dogs, elevating your artwork with creative techniques can bring your canine companions to life. These methods add dimension, personality, and visual interest to even the simplest sketches.
Adding Color With Pencils or Markers
Color breathes life into your dog drawings, transforming simple sketches into vibrant portraits. When using color pencils, start with light layers and gradually build up intensity to capture fur textures and highlights. Apply gentle pressure for subtle shading and heavier pressure for darker areas.
For realistic fur effects, use short, directional strokes that follow the natural growth pattern of dog hair. Different breeds require different coloring techniques – a Golden Lab’s coat needs warm yellows and light browns, while a Husky might need cool blues in the shadow areas of their white fur.
Color markers offer bold, vibrant results but require more confidence as they’re less forgiving. Try using alcohol-based markers for smooth blending or water-based markers for a softer look. For best results, start with lighter colors and layer darker shades on top.
Using Digital Tools for Dog Drawings
Digital drawing offers flexibility and forgiveness that traditional media can’t match. Programs like Adobe Photoshop provide specialized brushes that can mimic fur textures with remarkable accuracy. The layer system allows you to separate elements of your drawing for easier editing.
Begin with a simple sketch layer and reduce its opacity before adding refined lines and colors on separate layers. Tablet pressure sensitivity helps create varying line weights that add dimension to your dog drawings.
Digital tools also offer advantages for beginners with features like the undo button and transformation tools. You can easily resize, rotate, or flip elements to perfect proportions. Experiment with different brush settings to find textures that realistically capture different coat types.
Incorporating Backgrounds
A thoughtful background transforms a simple dog portrait into a complete scene with context and story. Consider where your dog character exists – perhaps a cozy living room for a sleepy puppy or an outdoor park for an active breed.
Keep backgrounds simple when you want your dog to remain the focal point. A gradient wash of color or a subtle environment suggestion is often enough. Match the mood of your background to your dog’s personality or activity level.
For more dynamic compositions, place your dog in an action scene. This could be catching a ball, running through waves, or playing in snow. Use perspective techniques to create depth in your backgrounds. Elements closer to the viewer should be larger and more detailed than distant objects.


Fun and Easy Dog Drawing Ideas for Kids
Drawing dogs can be a delightful activity for children that builds creativity and fine motor skills. These simple techniques will help kids create adorable canine artwork with minimal frustration and maximum enjoyment.
How to Draw a Cute Puppy
Start with basic shapes to create a cute puppy. Begin by drawing a large circle for the head and a smaller oval for the body. Add two floppy ears on top of the head—these can be simple curved shapes.
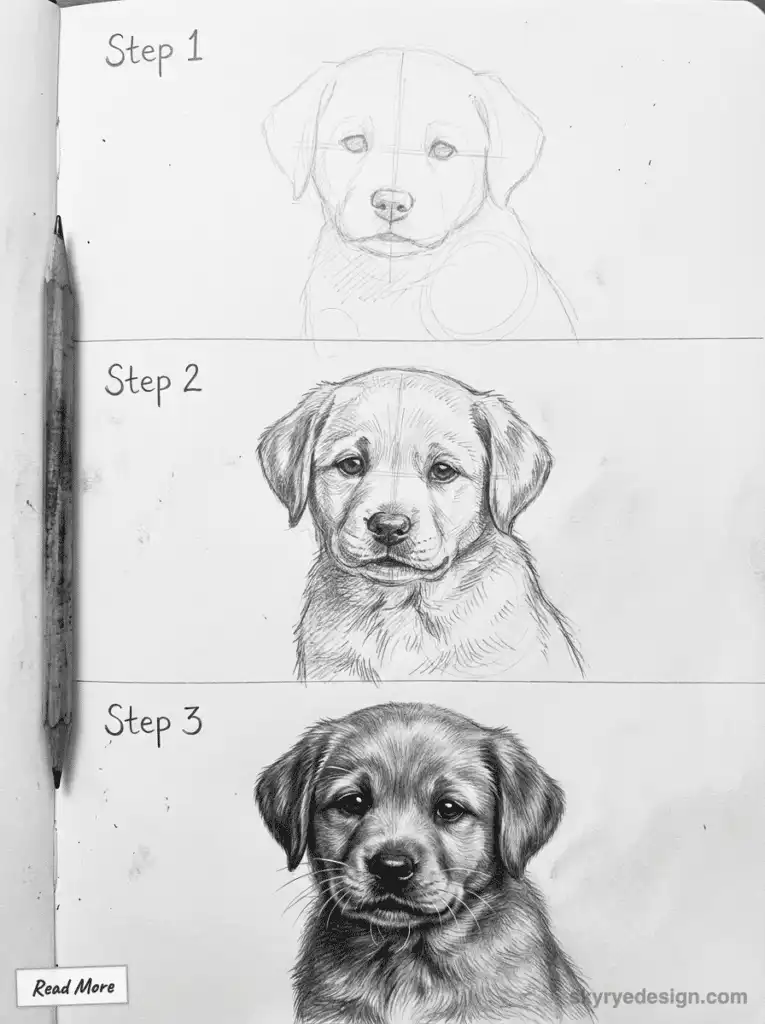
Draw a small circle for the nose and add a curved line below it for the mouth. Two small circles with dots inside make perfect puppy eyes. Don’t forget to add eyelashes or eyebrows to give your puppy character!
For the finishing touches, add simple paws (small ovals work well) and a wagging tail. Kids can personalize their puppies with spots, different ear shapes, or even a collar with a name tag.
Simple Cartoon Dog Designs
Cartoon dogs are perfect for beginners because they use exaggerated features that are forgiving to draw. Try a beagle design with a round head, long droopy ears, and a small body.
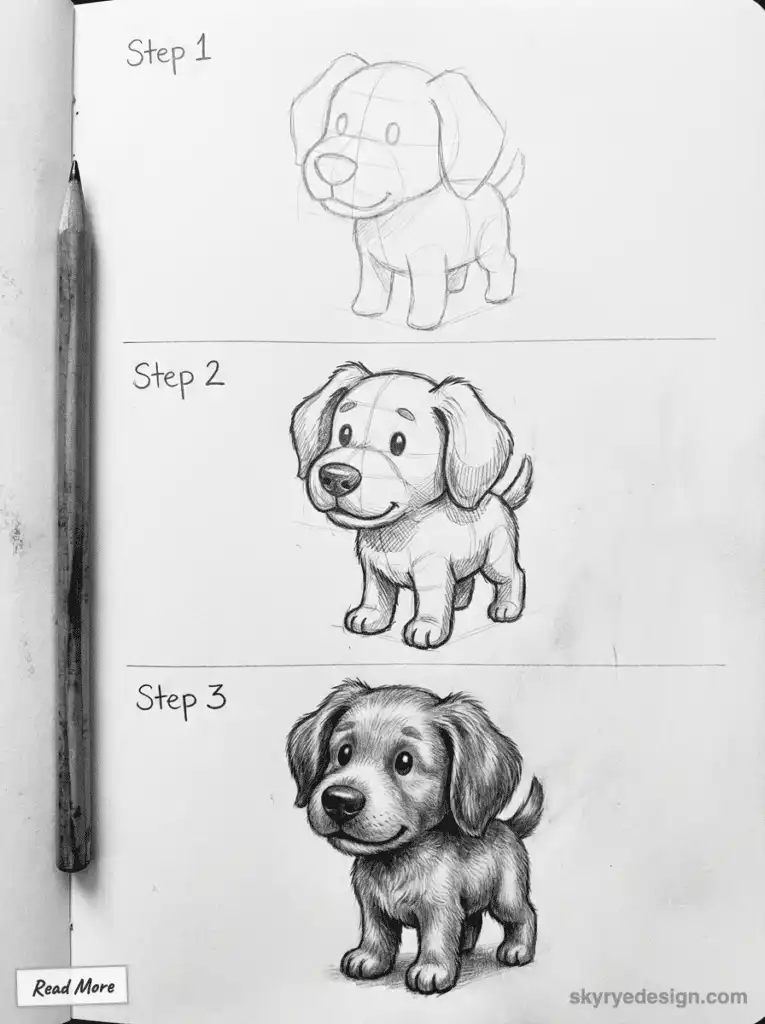
Focus on the facial expression—big eyes and a simple smile make the dog instantly appealing. You can draw the beagle standing on all fours or sitting with front paws extended.
Another easy design is a dachshund with its distinctive long body. Draw an oval for the head, a long rectangular body, and four short legs. Kids love adding colorful collars and patterns to make their cartoon dogs unique.
Printable Coloring Pages
Printable dog coloring pages offer a stepping stone for kids who aren’t ready for freehand drawing. These pages feature outlined dogs that children can color and customize.
Look for pages with different dog breeds—from bulldogs to poodles—to help kids learn about various canine characteristics. Simple line drawings work best for younger children, while older kids might enjoy more detailed pages.
To enhance the learning experience, combine coloring with drawing practice. Have kids trace the outlines before coloring, or challenge them to add backgrounds like dog houses or parks to their completed pages.
Many free resources are available online from art activities for kids websites. These often include step-by-step guides alongside the printable pages, making them perfect teaching tools.


Drawing Challenges and Practice Tips
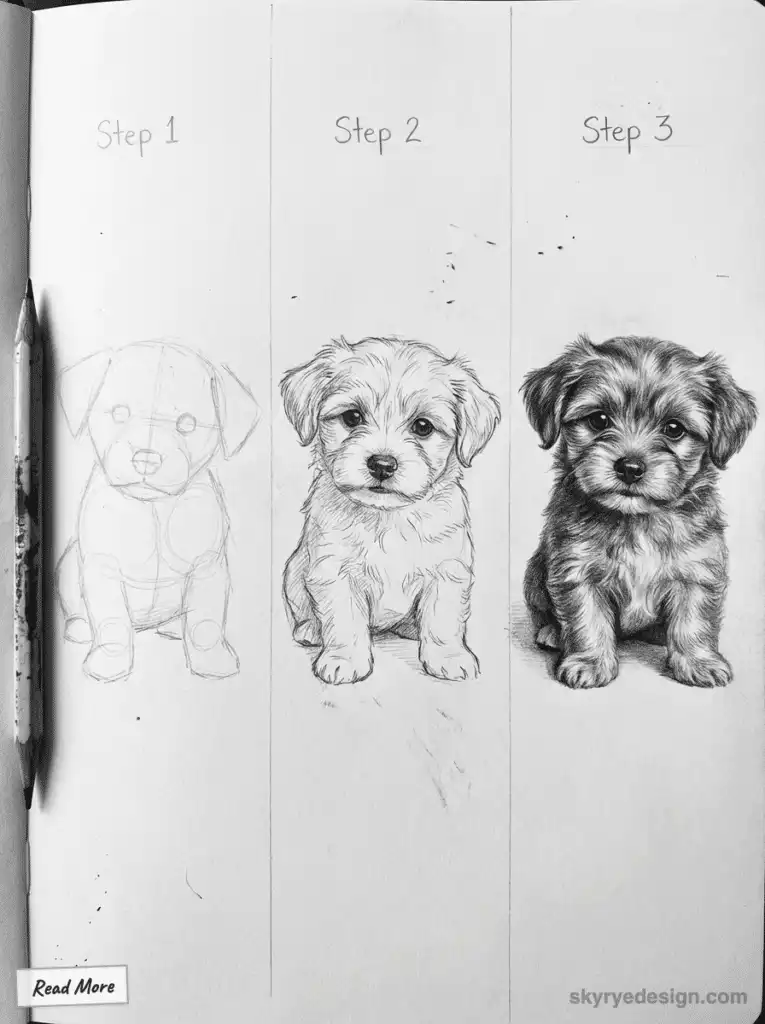
Drawing dogs can present unique challenges as you develop your skills. Even experienced artists encounter difficulties with capturing the right proportions and expressions that make dogs so lovable.
Overcoming Common Mistakes
Many beginners struggle with dog proportions, particularly the relationship between the head and body. A common error is drawing the head too small or the legs too short. To fix this, use basic shapes as guidelines—circles for the head and chest, and cylinders for the legs.
Another frequent issue is capturing facial expressions. Dogs communicate through their ears, eyes, and mouth positions. Study how these features change with different emotions.
Fur texture often proves challenging. Instead of drawing individual hairs, focus on creating the impression of fur through value and directional strokes. Light, loose pencil strokes work better than heavy, detailed lines.
Remember that mistakes are valuable learning opportunities. Keep your early drawings to track your progress over time.


Daily Drawing Exercises
Consistent practice dramatically improves your skills. Try a 10-minute daily dog sketch to build muscle memory and observation skills.
Quick Exercise Ideas:
- Draw dogs in different poses (sitting, running, sleeping)
- Sketch various dog breeds to understand structural differences
- Practice specific parts (paws, noses, ears) individually
- Create 30-second gesture drawings to capture movement
Reference photos are invaluable for these exercises. Create a digital collection of dog images or take photos of dogs you encounter.
Art challenges can provide motivation. Join a “Draw a Dog a Day” challenge online or create your own 30-day dog drawing challenge with specific daily prompts.
Improving Your Dog Drawing Skills
Analyzing professional dog drawings helps identify techniques you can incorporate. Pay attention to how artists simplify complex forms while maintaining recognizable characteristics.
Using drawing tutorials specifically designed for dogs can provide structured guidance. Many YouTube channels offer step-by-step lessons for different breeds and styles.
Experiment with various mediums. Pencil works well for beginners, but try charcoal for expressive lines or colored pencils to capture the vibrant colors of different breeds.
Seek constructive feedback from other artists or online communities. Fresh perspectives often reveal improvement opportunities you might miss.
Consider studying basic canine anatomy. Understanding skeletal and muscular structures helps create more realistic drawings, even in stylized approaches.
- 1.5Kshares
- Facebook0
- Pinterest1.5K
- Twitter3
- Reddit0

