Most dolphin drawings go wrong in the same three places: the forehead, the tail, and the fin on the back. Get those right and even a quick doodle reads as a dolphin from across the room. Get them wrong and you’ve drawn a fish, or a small shark with good intentions.
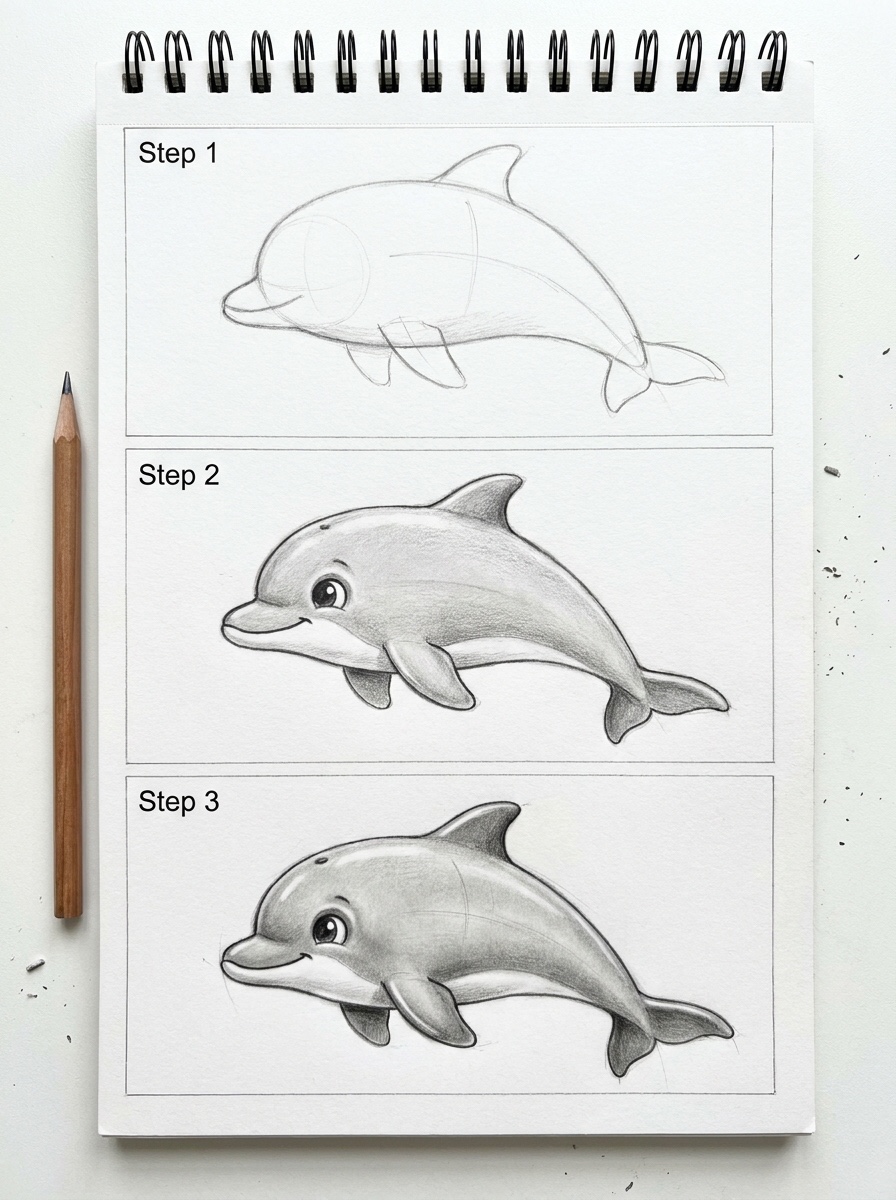
This guide shows you how to draw a dolphin in eight steps, starting with a single curved line and ending with a clean, shaded drawing. You’ll also learn why the shape works, how to spot the errors that push it toward fish or shark, and how to finish it three ways: a simple line drawing, a realistic graphite study, or a layered colored-pencil piece.
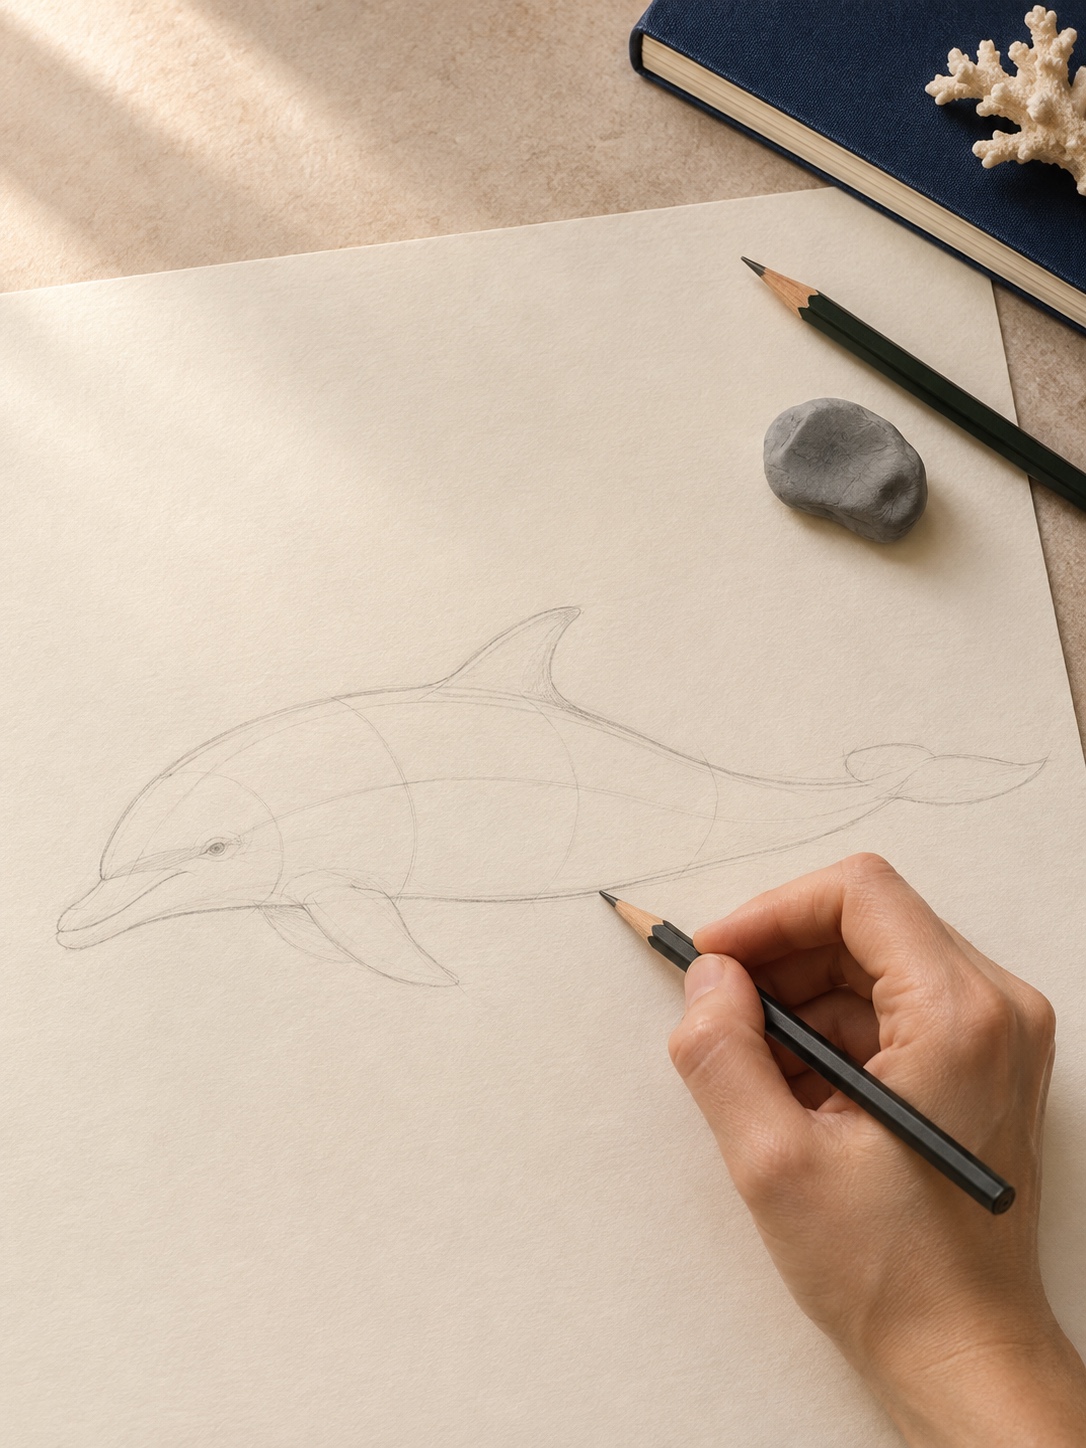
The model throughout is the bottlenose dolphin. It’s the shape most people picture, and good reference photos are easy to find.
The short version
To draw a dolphin, build it from the inside out:
- Draw one curved gesture line that shows the direction of travel.
- Wrap a long, tapered body around it, widest in the front half.
- Add a rounded forehead (the melon) and a short beak (the rostrum).
- Narrow the body into a slim tail stock and add two horizontal flukes.
- Place a backswept dorsal fin and two pectoral flippers.
- Add a small eye just behind the mouth line and mark the lighter belly.
- Clean the outline and check the silhouette at arm’s length.
- Plan three values, then shade or color.
Steps 1 through 4 decide whether it looks like a dolphin. Steps 5 through 8 decide how good it looks.
Tools and reference setup
An easy dolphin drawing needs a pencil, paper, and an eraser. Printer paper and an ordinary HB pencil are fine for your first ten attempts. You’re practicing shape, not building a portfolio, and cheap paper makes it easier to toss a bad sketch and start again.
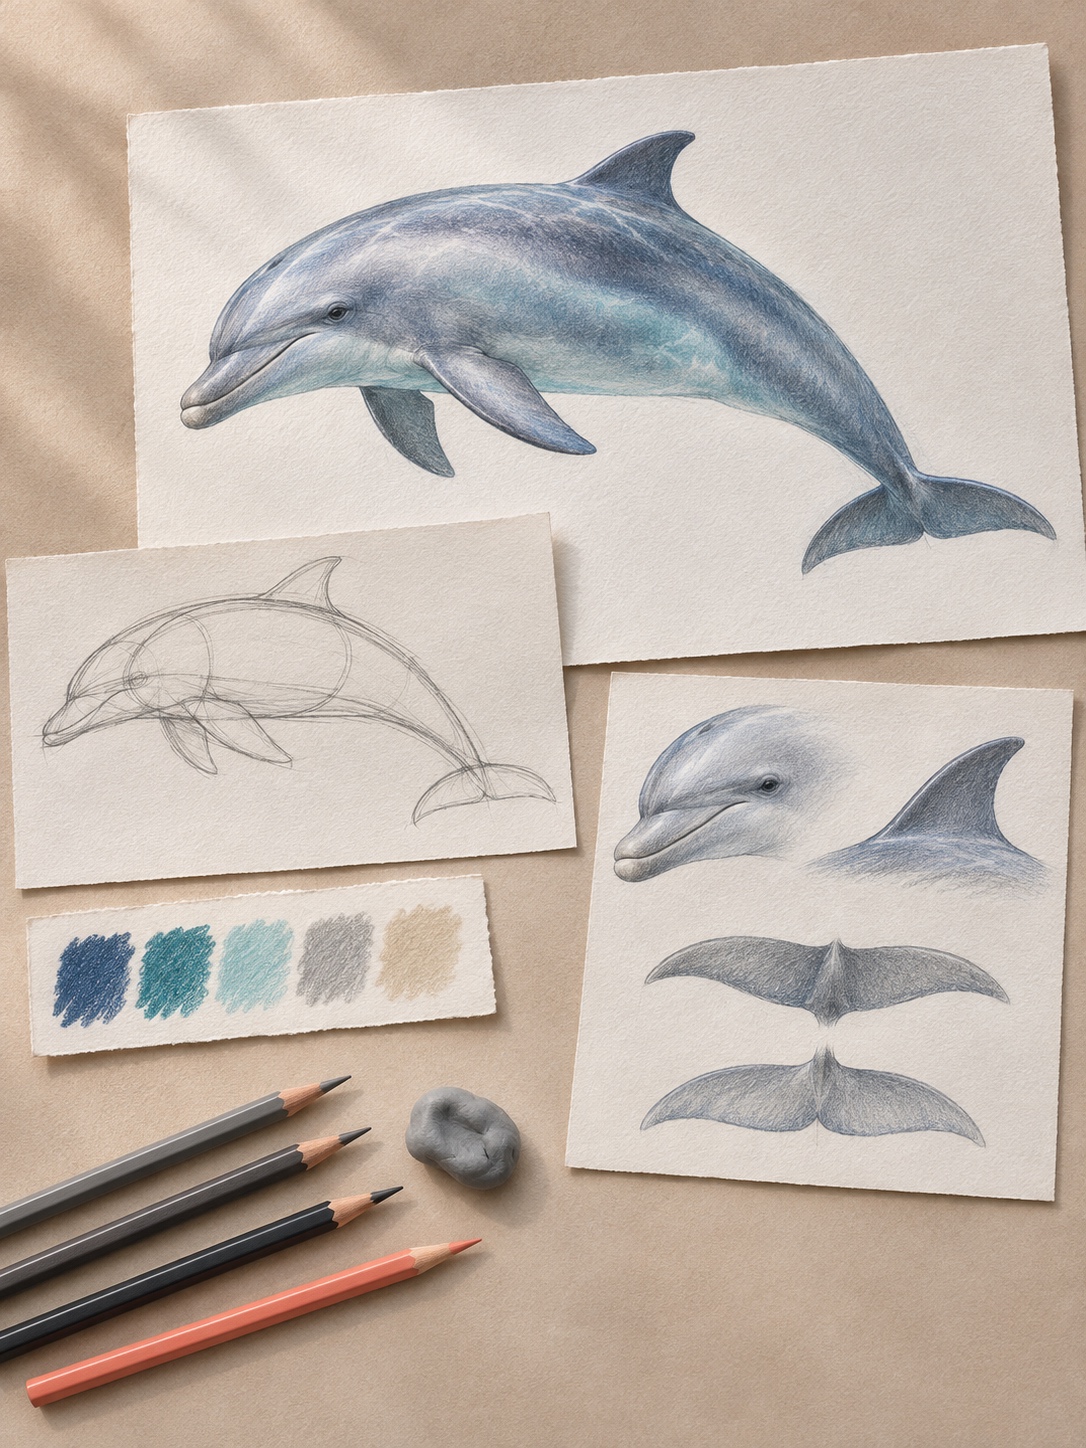
When you move to finished work, a small kit pays off:
- An HB or H pencil for light construction lines that erase cleanly
- A 2B for middle tones and a 4B for darks
- A kneaded eraser, which lifts graphite without scuffing the paper and can be pinched to a point for highlights
- Smooth, heavyweight drawing paper that survives erasing and layering
- For color, a limited set: two cool grays, a navy or indigo, a teal, a cyan or turquoise, a warm sand or cream, and white
A white pencil earns its place in colored pencil, where it can soften reflected light. Skip it in graphite. It tends to sit on top of the gray as a waxy smear.
Reference matters more than materials. Gather two or three photos of bottlenose dolphins in side view and one mid-leap, ideally with clear light on the head and the flukes visible. If you’re building a broader practice list, animal drawing ideas has more subjects that use the same construction approach.
Understand the dolphin silhouette first
Look at a dolphin with a product designer’s eye and you’ll see a streamlined body: thick through the front and middle, tapering toward both ends, with no hard corners anywhere. The silhouette carries most of the identity before a single detail arrives.
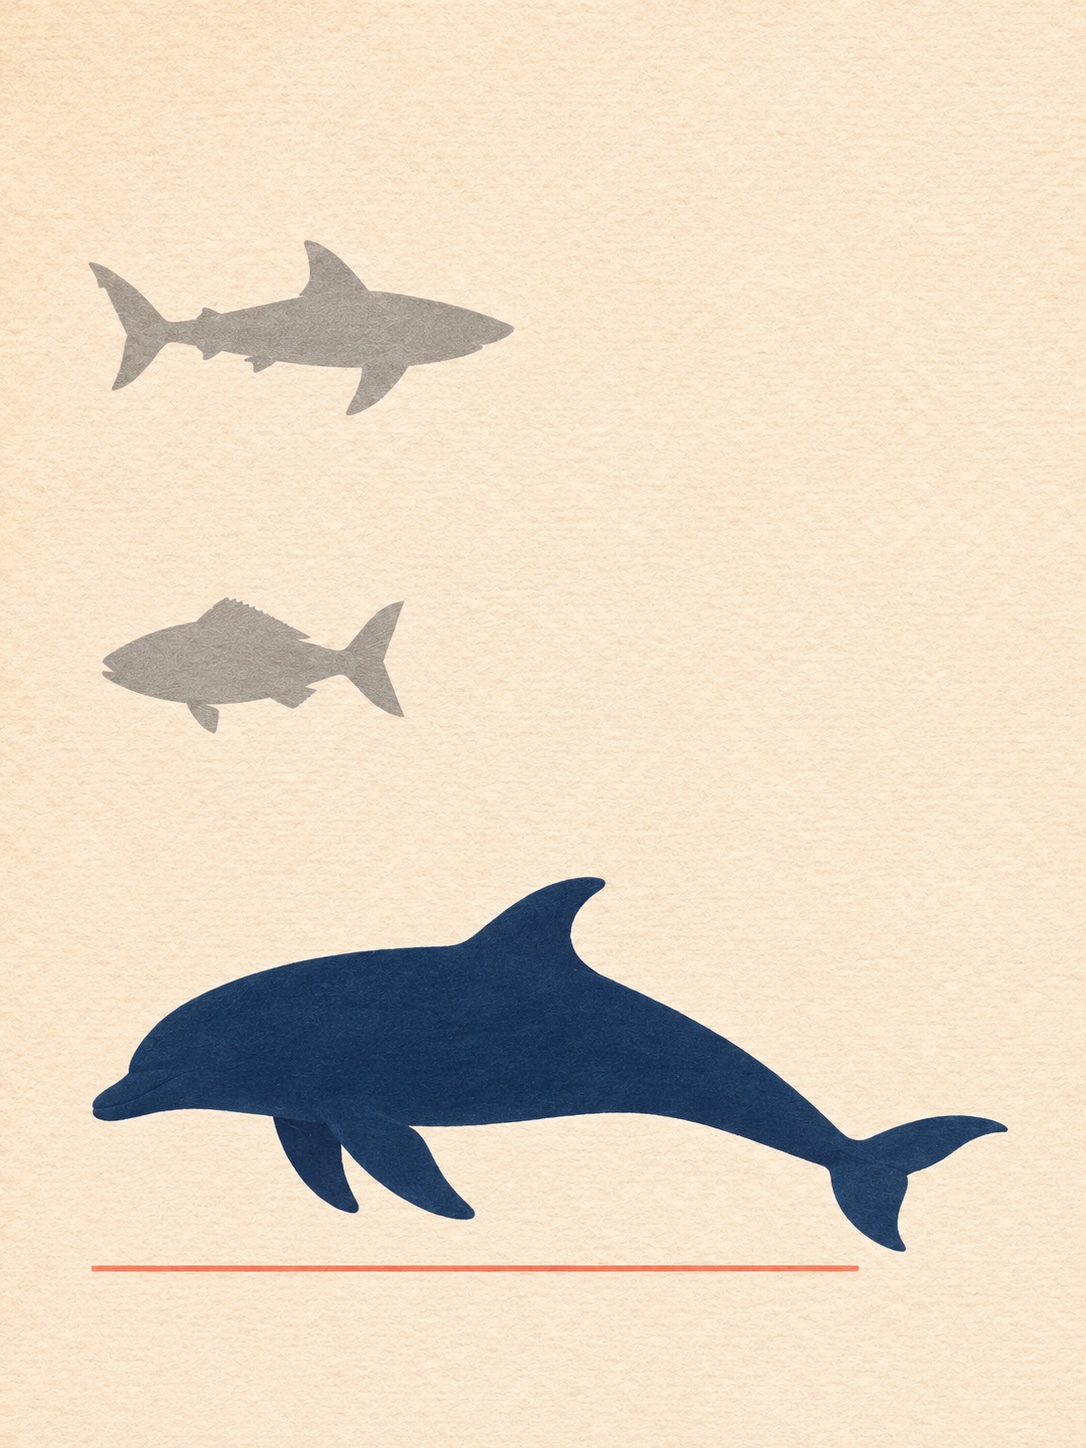
Four landmarks separate it from every other sea creature you might draw by accident. The melon is the rounded forehead, a smooth bulge that rolls down toward the beak. The rostrum is the beak itself, short and blunt, growing out of the head rather than stuck onto it. The dorsal fin curves and leans back toward the tail. And the flukes spread horizontally, two lobes reaching left and right from a narrow tail stock called the peduncle.
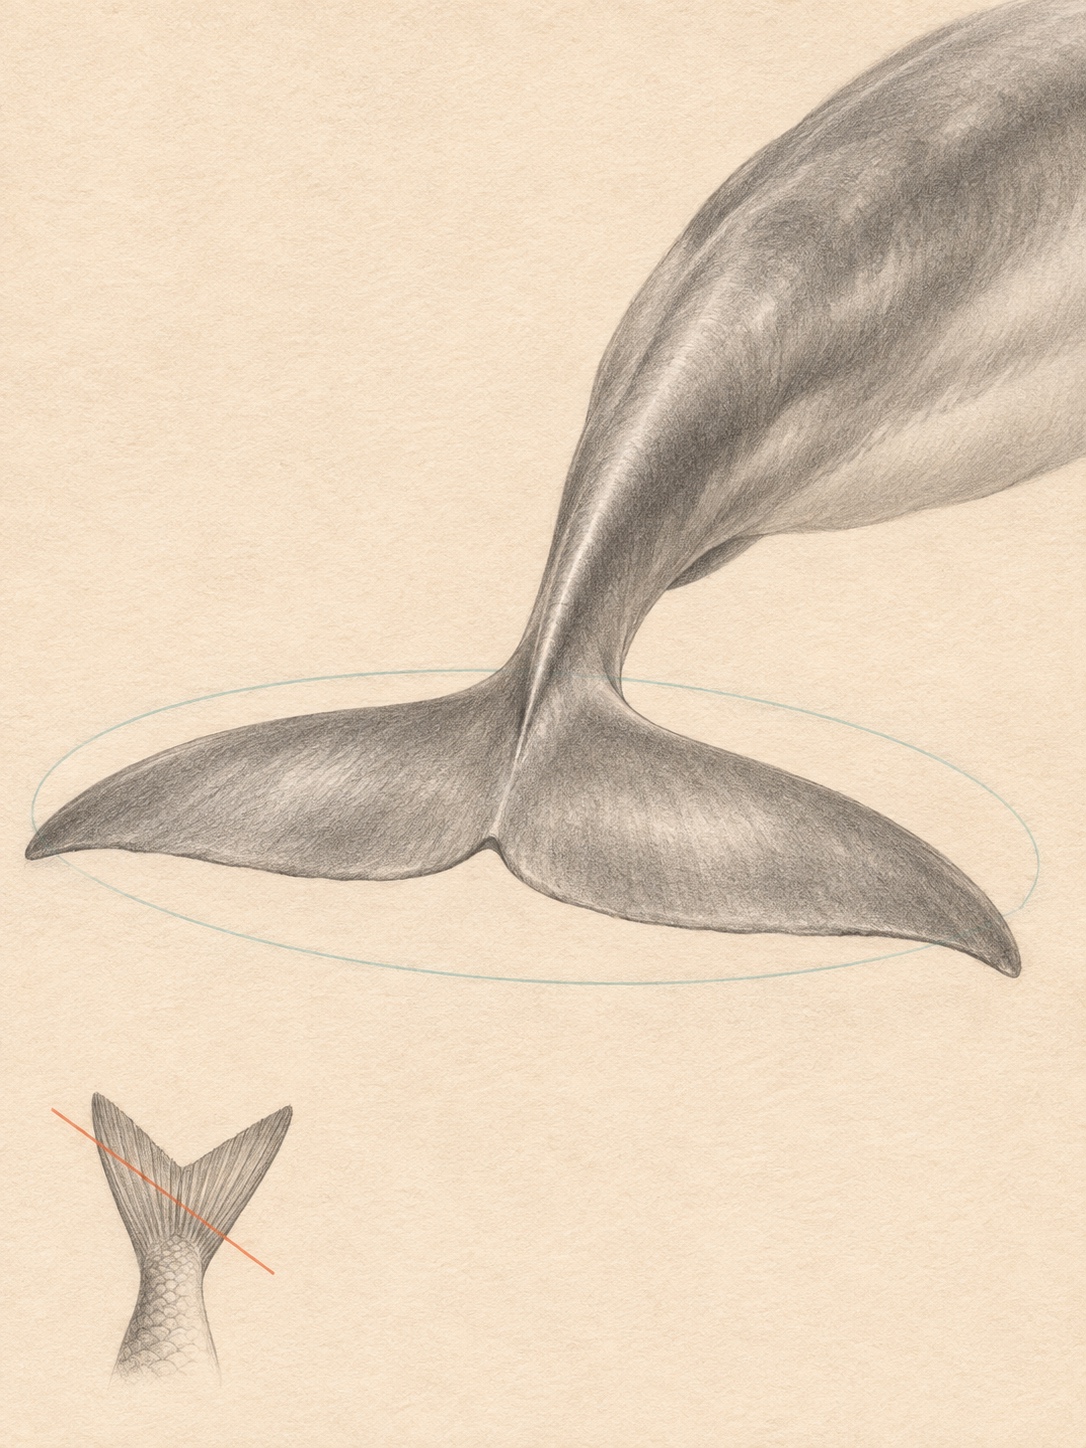
That last point is the big one. Dolphins swim by moving their tail up and down, so the flukes lie flat. Most fish swim with a side-to-side tail, so their tail fin stands upright. Draw an upright tail and your dolphin becomes a fish on the spot.
A useful habit before you start: squint at your reference until the details disappear. If you can still name the animal from the dark shape alone, you’ve understood the silhouette.
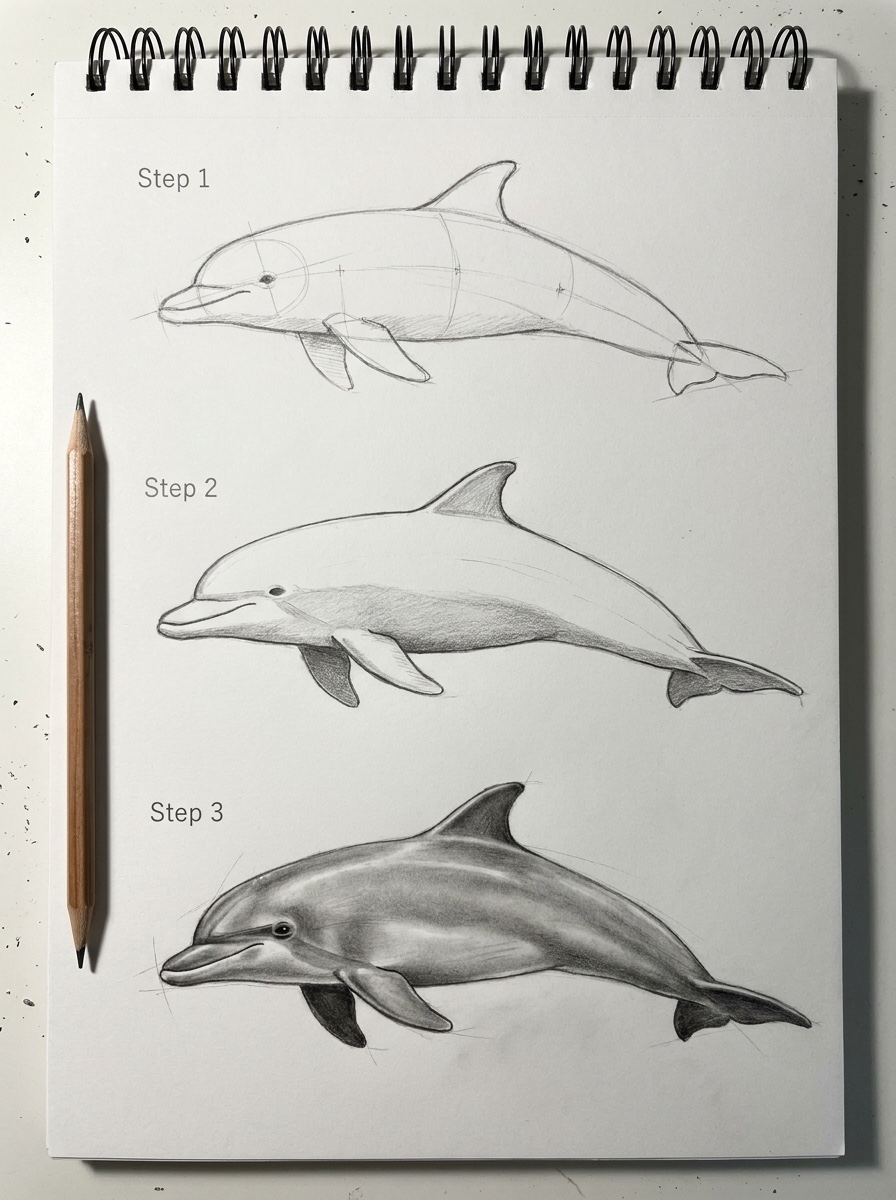
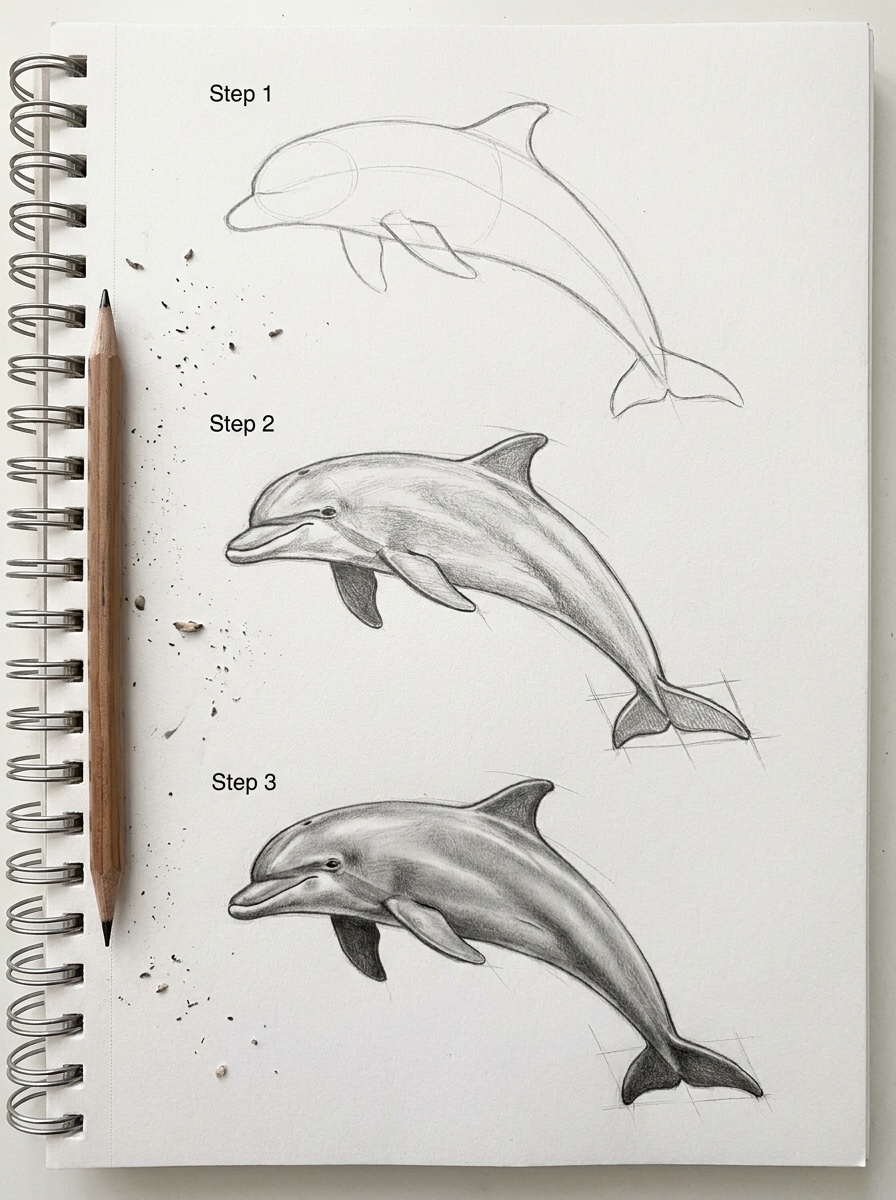
How to draw a dolphin step by step
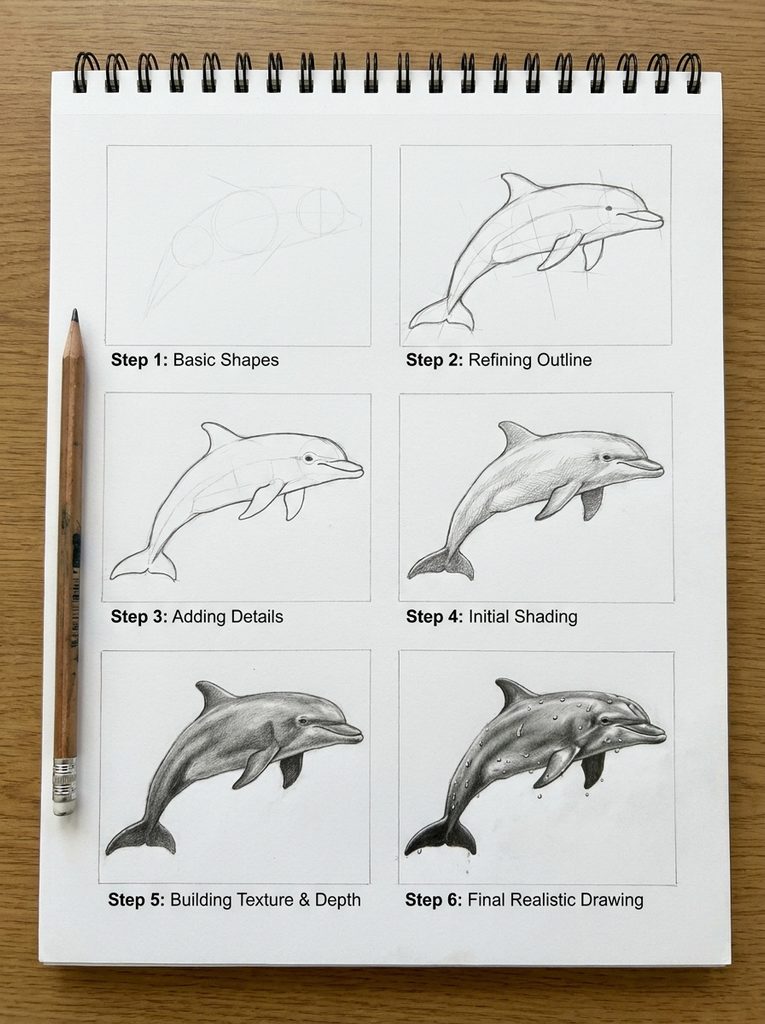
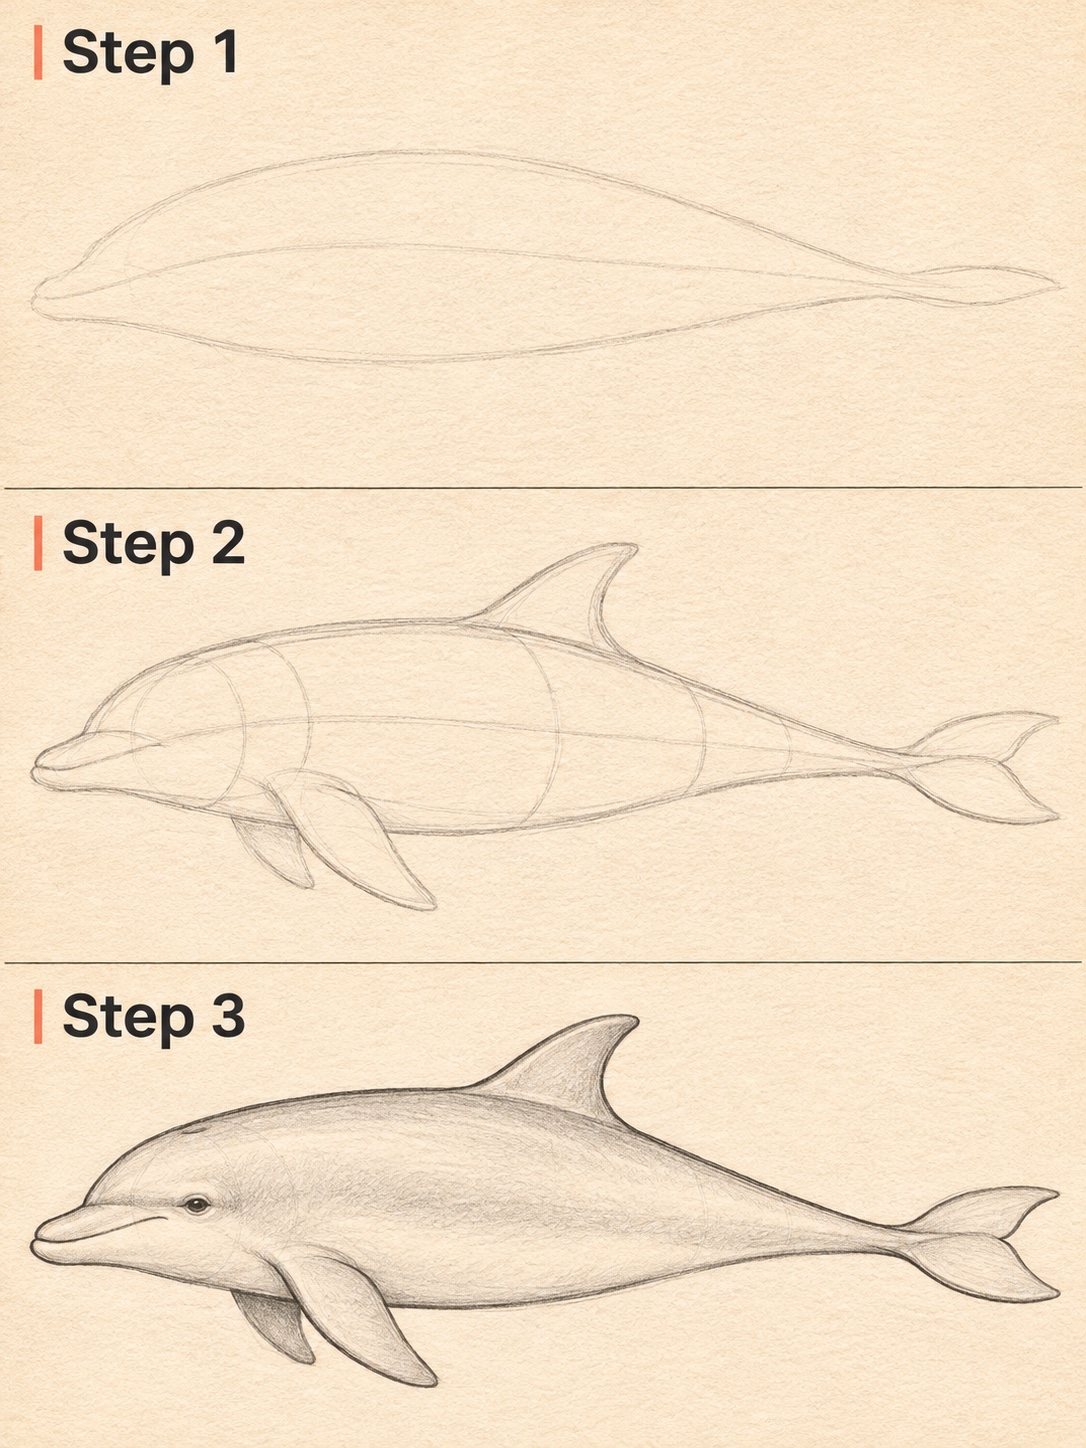
Keep your pressure light for steps 1 through 6 and press harder only at step 7. Start with a thumbnail roughly the size of a matchbook to test the pose, then draw full size once the small version reads correctly.
1. Draw the gesture line
Draw one curved line for the spine, running from the tip of the beak to the end of the tail. A gentle arc suits a swimming dolphin. A stronger C or S suits a leap. Add a small arrow at the head end to remind yourself which way the animal is moving. Draw it from the shoulder, not the wrist. A single sweeping pass makes a smoother curve than several short, hairy strokes stitched together.
This line carries the motion. Every later shape hangs from it, so if the curve feels stiff now, it will still feel stiff after shading. Redraw it until it has some swing.
2. Build the body mass
Wrap a long, teardrop-like volume around the gesture line. Make it widest around the front-to-middle third, then taper gradually toward the tail. Keep the back and belly curves different: the back is usually a longer, calmer arc, the belly a fuller one. Quick proportion check: the deepest point of the body should fall in the front half, around or just ahead of where the dorsal fin will sit. If the thickest part drifts toward the tail, the dolphin looks like it’s swimming backward.
Sketch two or three curved section lines across the body, like contour rings on a product rendering. They prove to your eye that the body is round, and later they’ll guide the direction of your shading strokes.
3. Shape the head, melon, and rostrum
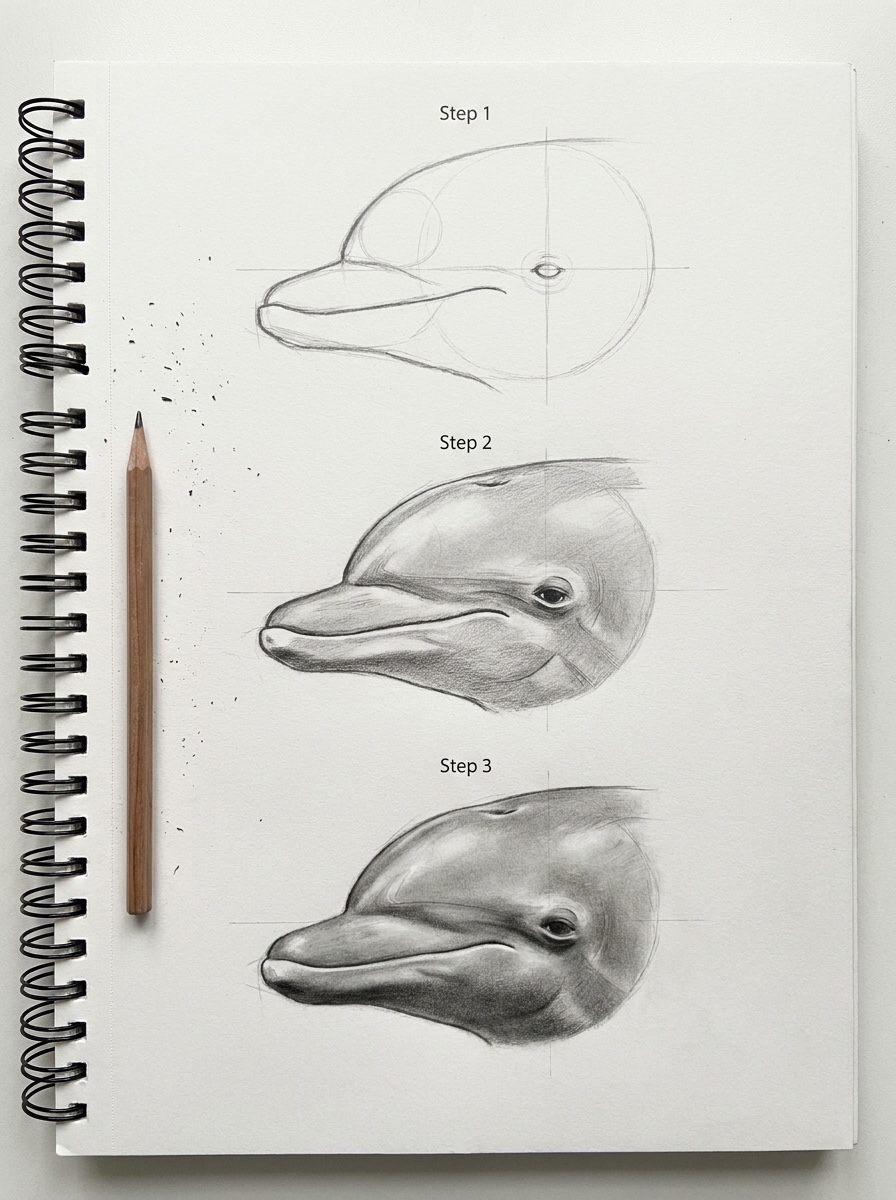
At the front, round the top of the head into the melon. It should bulge forward slightly, then curve down to meet a short, blunt beak. No sharp point.
Turn the paper so you can pull the melon curve toward you in one stroke. A pulled curve is usually easier to control than one pushed away. Draw the beak as a continuation of the head mass. The upper line of the melon flows into the top of the rostrum through a small, soft crease where the two meet. If the beak looks like a separate tube glued to the face, blend its lines back into the head until the joint feels grown rather than attached.
4. Narrow the tail stock and add horizontal flukes
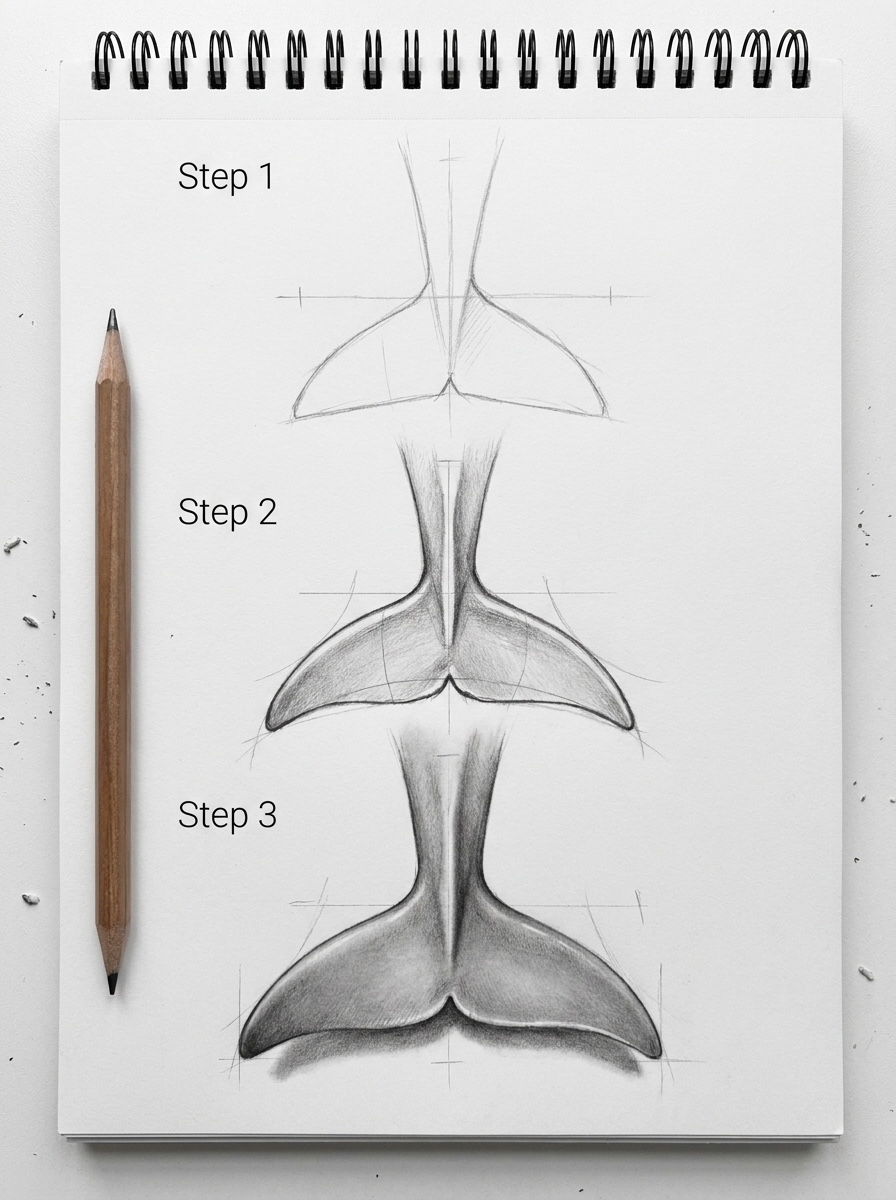
Toward the back, pinch the body into a slim tail stock. It narrows from side to side but stays fairly deep from top to bottom, so in side view it can look taller than you’d expect right before it ends.
At the tip, add two flukes spreading horizontally. In a strict side view you’ll see them almost edge-on, as a thin, slightly angled shape. Tilt the view a little and both lobes appear, swept back with a small notch between them. That’s the whole secret of how to draw a dolphin tail: keep the flukes in a horizontal plane, never standing upright like a fish’s.
5. Place the dorsal fin and pectoral flippers
Put the dorsal fin roughly over the middle of the back. Start with a wide base that rises out of the body, then sweep the tip back toward the tail. The trailing edge curves inward, which gives the fin its hooked look. Draw the fin’s leading edge in one stroke from base to tip, then the trailing edge back down. Two curved strokes keep it from turning into a stiff triangle.
The pectoral flippers attach low on the body, behind and below the head. Sweep them back and slightly down. The near flipper shows in full. The far one is shorter, partly hidden behind the body, and sometimes nothing more than a tip.
6. Add the eye, mouth, and belly line
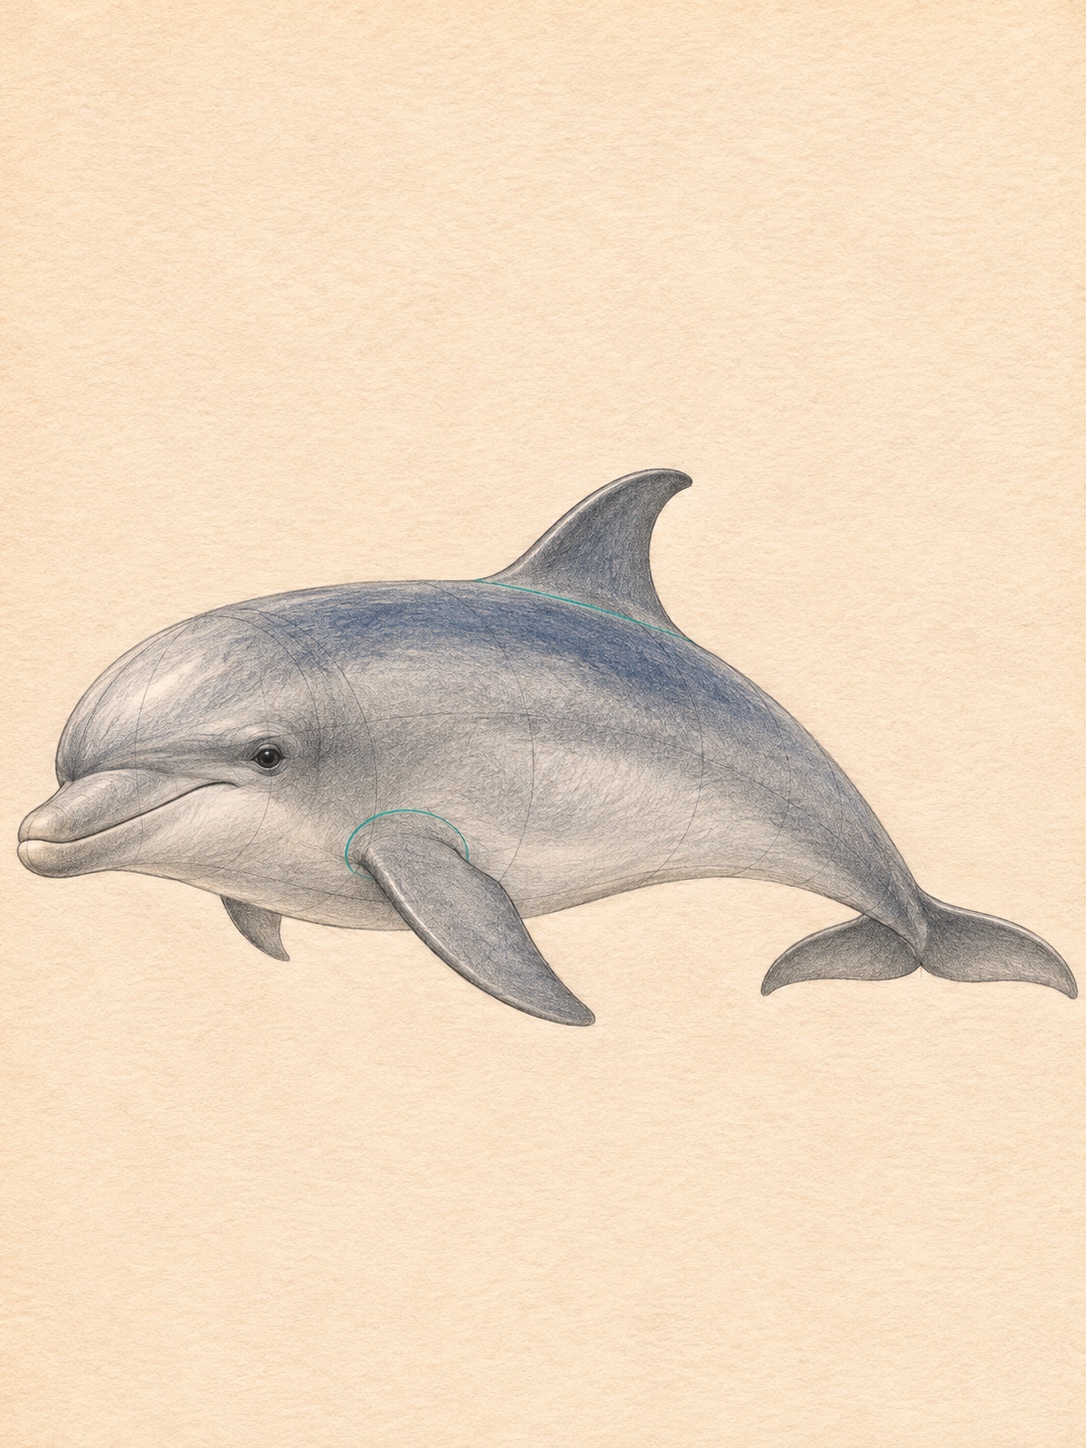
The mouth line runs back from the tip of the beak and lifts a little at its end, which is where the famous “smile” comes from. Place a small eye just behind and slightly above the end of that line. Too far forward and the head looks squashed. Too large and it turns cartoonish.
Then draw a soft line along the side to separate the darker back from the lighter belly. It isn’t a hard stripe. Treat it as a value boundary you’ll blend later.
7. Clean the contour and check the silhouette
Dab away construction lines with the kneaded eraser, leaving only a faint ghost. Then commit to the outline with firmer pressure. Vary the line weight: a little heavier on the shadow side and where forms overlap, lighter along top edges where light lands. Hold the pencil a little lower on the barrel for these final lines, and lift off at the end of each stroke so the line tapers instead of stopping in a blob.
Prop the drawing up and step back to arm’s length. Check the silhouette. Rounded forehead, short beak, backswept fin, horizontal flukes. If all four read, move on. Troubleshooting example: if the silhouette reads more like a small whale, the body is probably too deep for its length. Stretch the taper behind the dorsal fin and recheck.
8. Plan values and finish
Before shading, choose three values: light for the belly and highlights, middle for the sides, dark for the back and cast shadows. Mark each zone lightly so you aren’t deciding on the fly.
For a simple dolphin drawing, stop at a clean line plus a light middle tone on the back. For more depth, continue to the graphite or colored-pencil sections below. Either way, keep the brightest areas along the top of the melon and back, where light from above hits first.
Why your dolphin looks like a fish or a shark
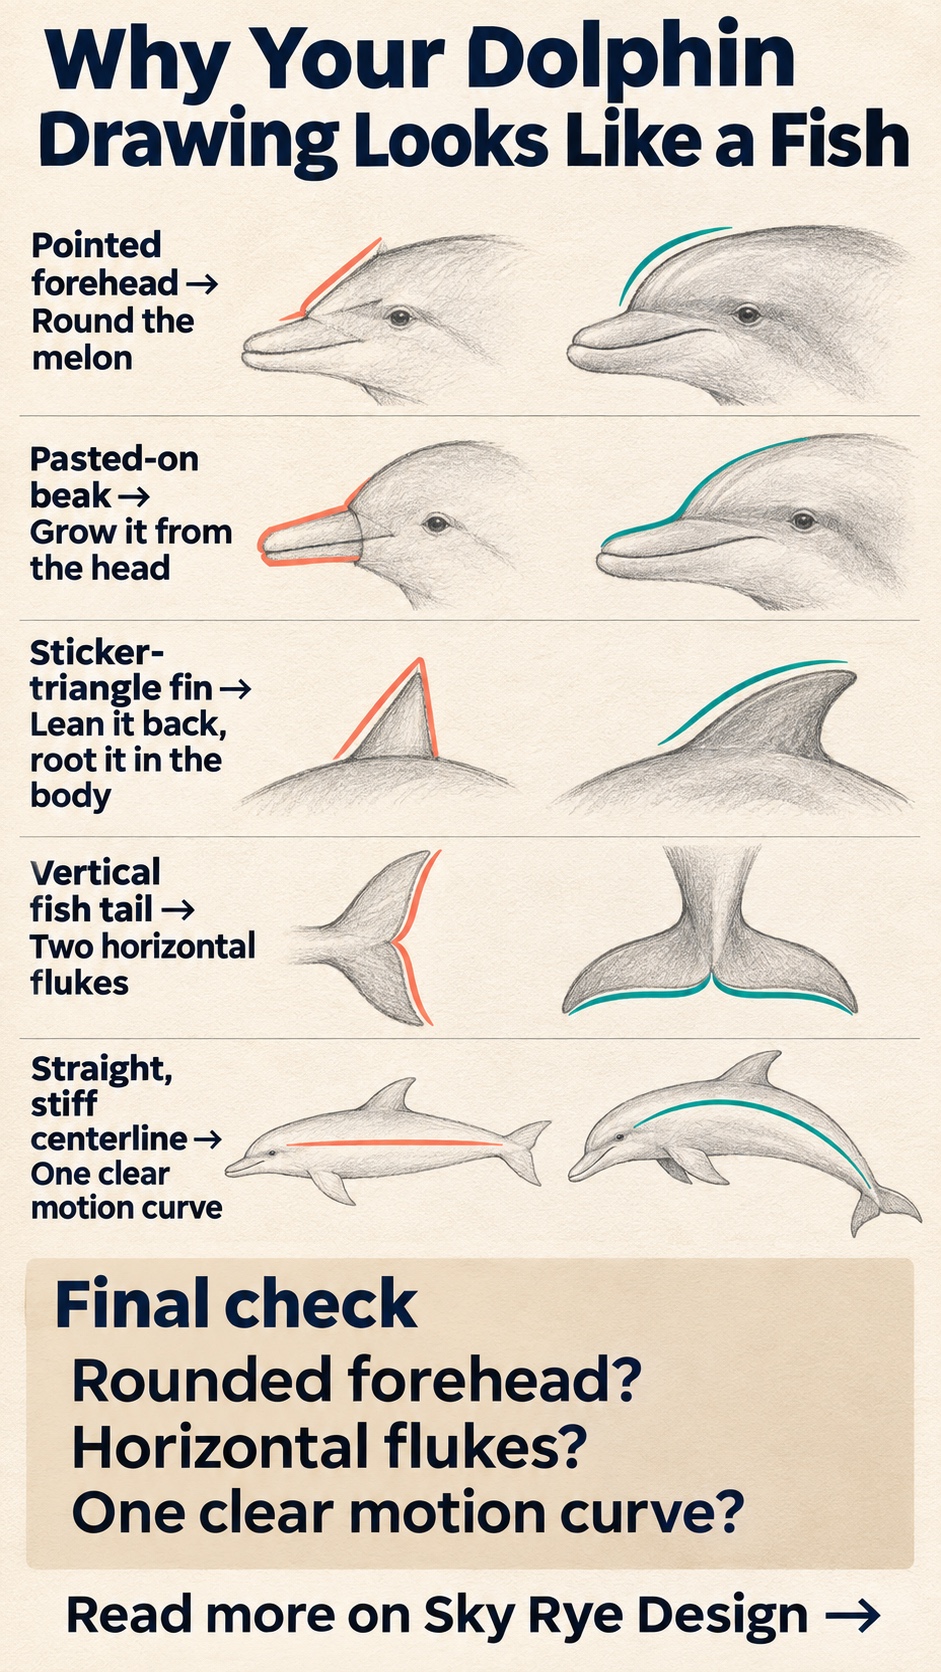
Most failures come from shapes borrowed from other animals. The hand draws what it knows, and most of us have drawn far more fish than dolphins.
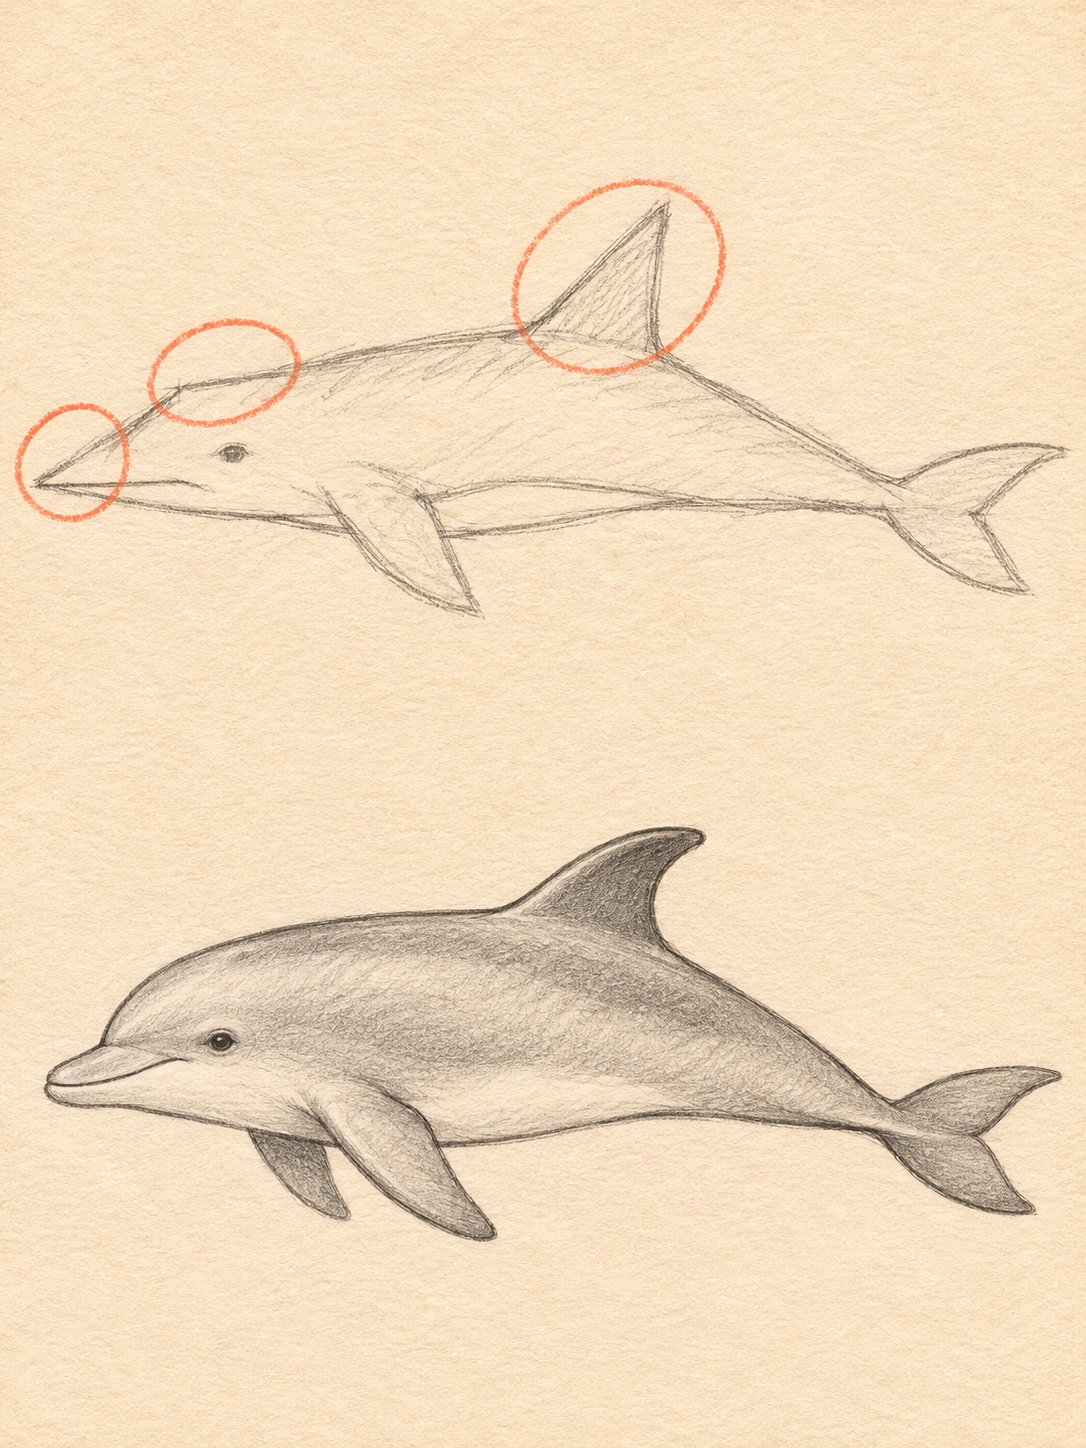
Three swaps cause nearly all of them. A pointed head with a flat forehead reads as shark, because a shark’s snout slopes back with no melon. A tall, rigid triangle on the back also says shark, especially when it stands straight up instead of leaning. And an upright tail fin says fish, every time.
Eyes are the quieter culprit. A big round eye near the top of the head pushes the drawing toward a cartoon fish. Keep it small and low, close to the corner of the mouth.
Proportion matters too. A body that stays the same thickness from head to tail looks like a sausage with fins attached. The taper toward the tail stock is what makes the animal look fast.
If you’ve already practiced sharks, draw one beside your dolphin and compare them. how to draw a shark covers that shape in detail, and the differences jump out side by side.
How to draw a realistic dolphin with graphite
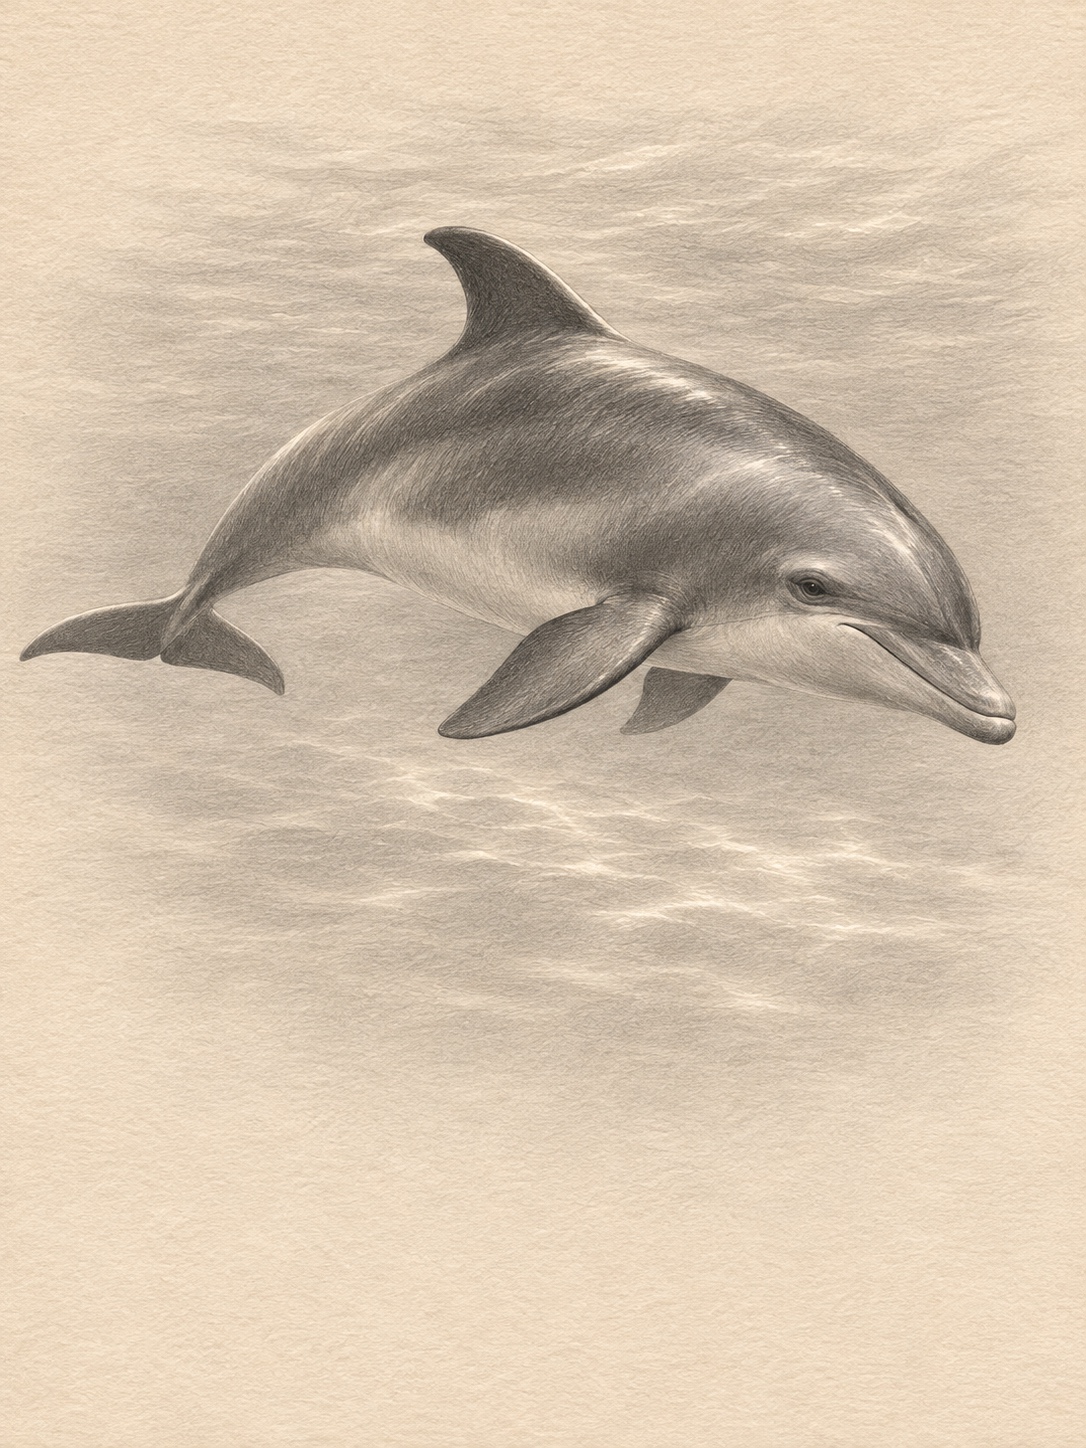
Realism here comes from values and edges far more than from detail. Dolphin skin is smooth, so there’s no texture to hide behind. Every tonal decision shows.
Start from your three-value plan. Lay the middle value across the sides with a 2B, using light, overlapping strokes that follow the section lines from step 2. Strokes that wrap around the form describe roundness. Strokes going every which way start to describe fur.
Next, push the darks with a 4B: the top of the back, the shadow under the near flipper, the crease under the jaw. Leave the belly and a narrow highlight along the melon and back as bare paper or very light tone.
Blend with restraint. A tissue or blending stump will smooth the middle tones, but blending everything grays the entire drawing. Keep hard edges where the dorsal fin crosses the far side of the body, along the flipper, and at the beak tip. Let edges soften where the body turns away from the light.
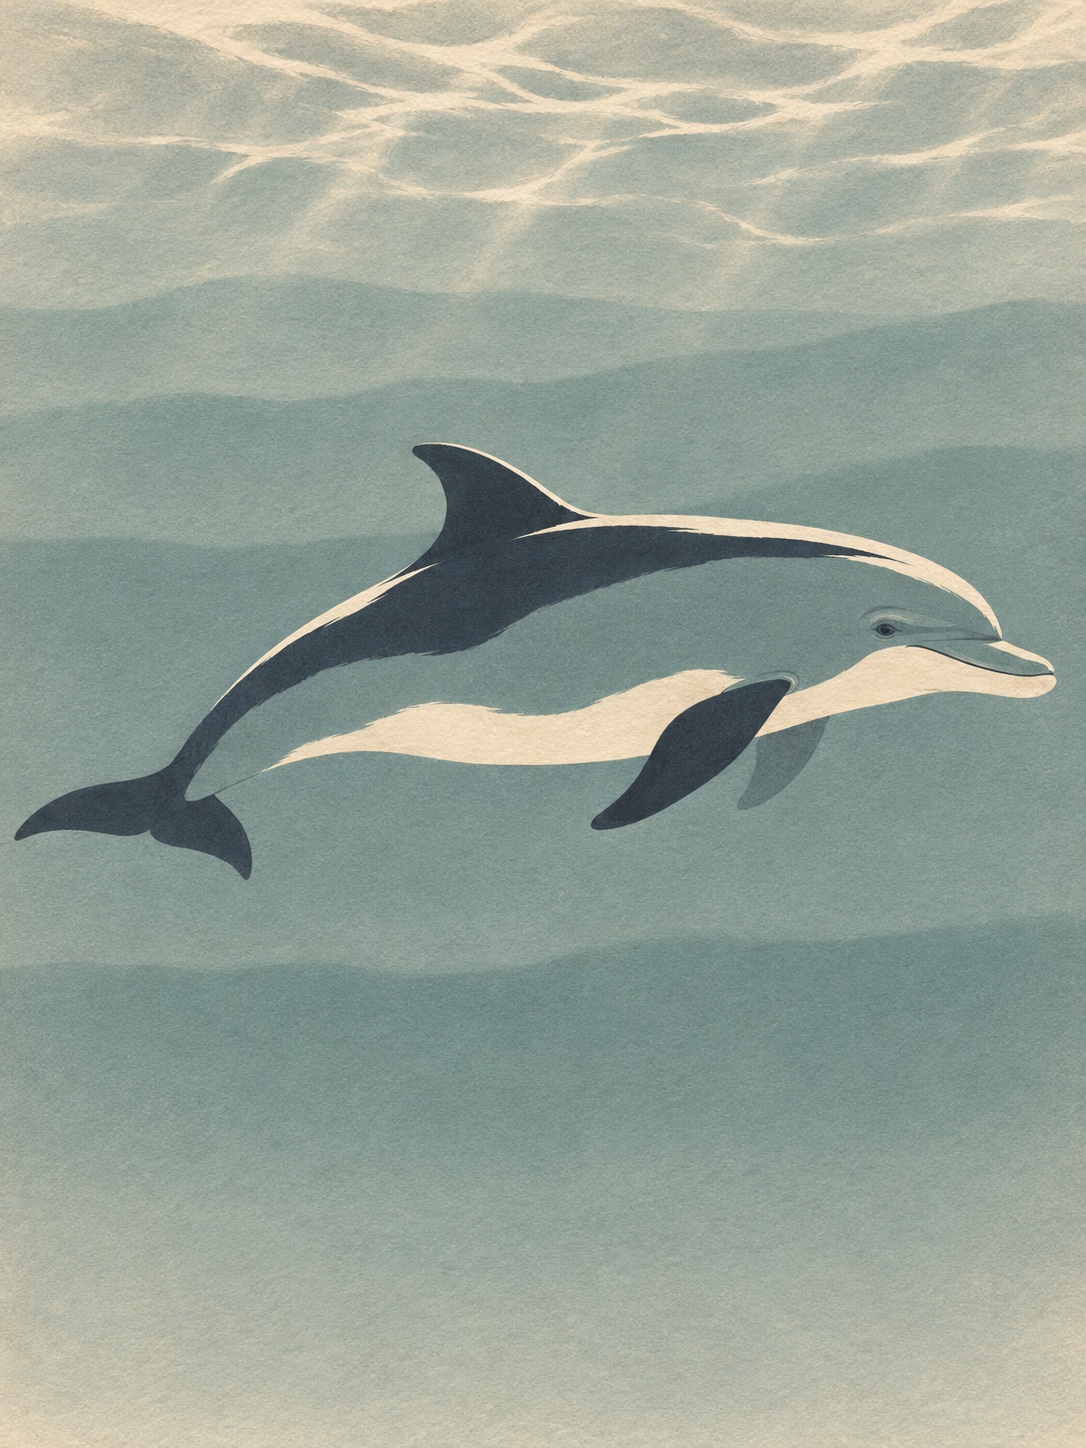
For a dolphin in water, add a few loose horizontal tone bands behind it and lift soft, broken shapes of light with the kneaded eraser. Suggest the water rather than rendering every ripple. More on controlling graphite gradients: pencil shading techniques.
How to draw a dolphin with colored pencils
Colored pencil rewards patience and punishes heavy pressure early. The wax builds up, and once the paper’s tooth fills, new layers skid off the surface.
Layer one is a pale cool gray across the body, with the belly and highlights left as untouched paper. Decide your light direction now. Reserved paper is your brightest white, and a white pencil can’t fully bring it back later.
Layer two builds form. Use the darker cool gray and a soft teal on the back and upper sides, following the contour lines. A bottlenose isn’t one blue. It’s mostly gray, darker along the back, with a gentle shift toward the paler belly.
Layer three adds temperature. A whisper of warm sand or cream on the belly and lower jaw makes the cool tones read as cooler by contrast. Then glaze cyan or turquoise into the underside, where the body would pick up reflected water color.
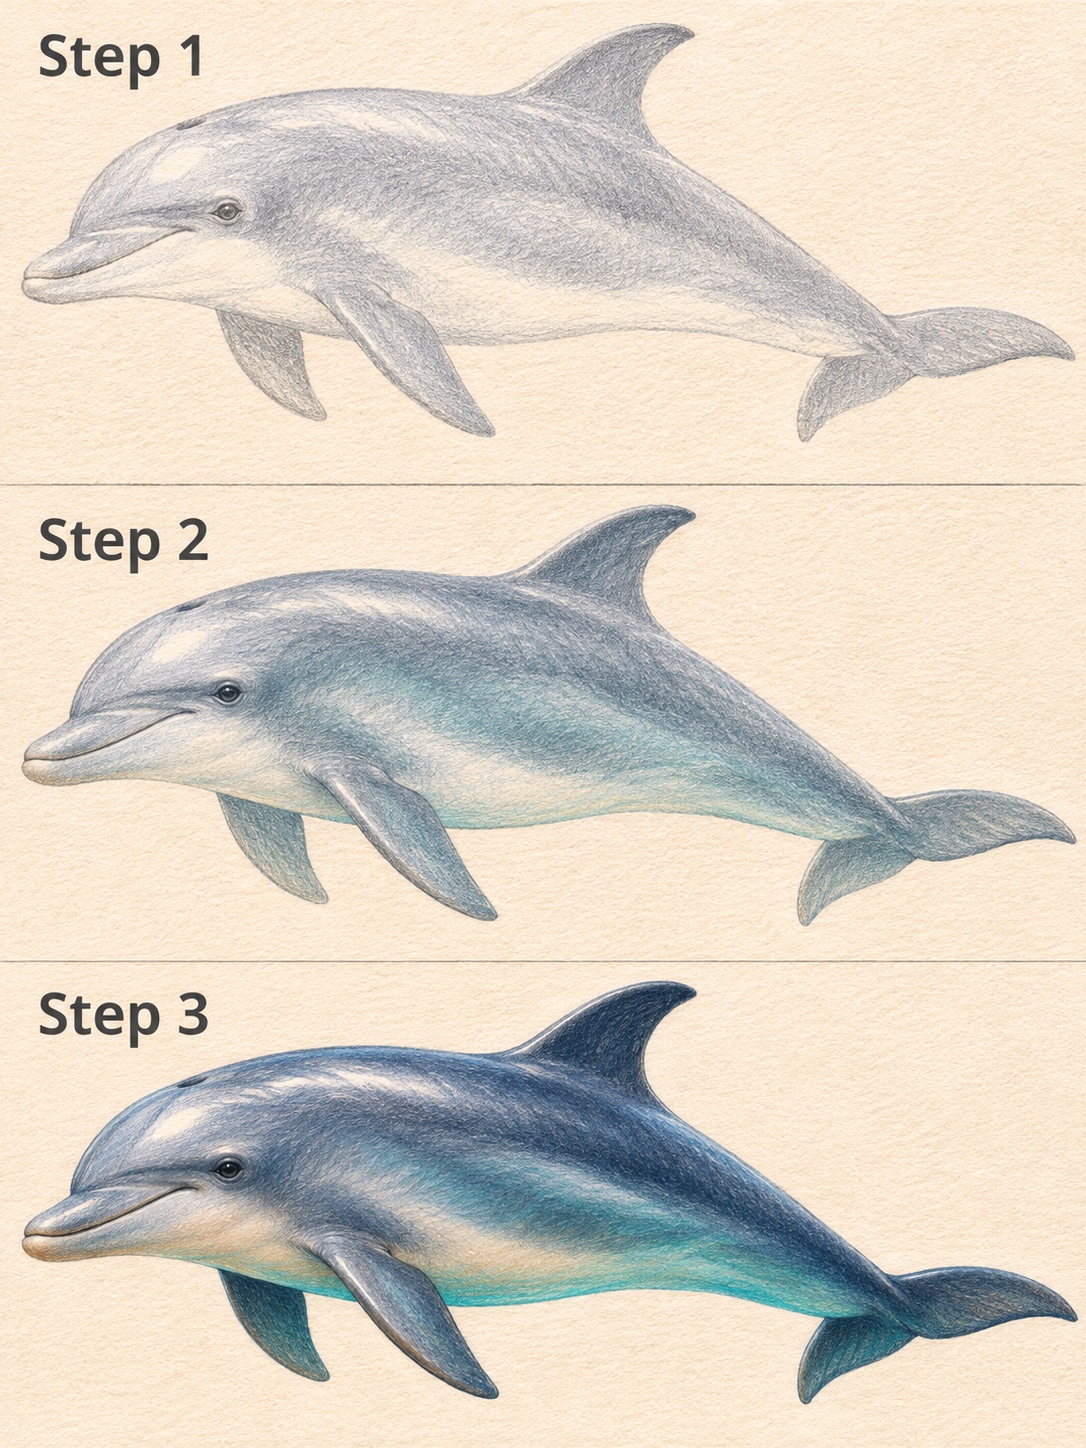
Finish with navy or indigo in the deepest shadows, a firmer final pass to burnish selected areas, and a freshly sharpened pencil to tighten edges at the fin, flippers, and beak. Check the highlights one last time. They should still be paper.
How to draw a jumping dolphin in three-quarter view
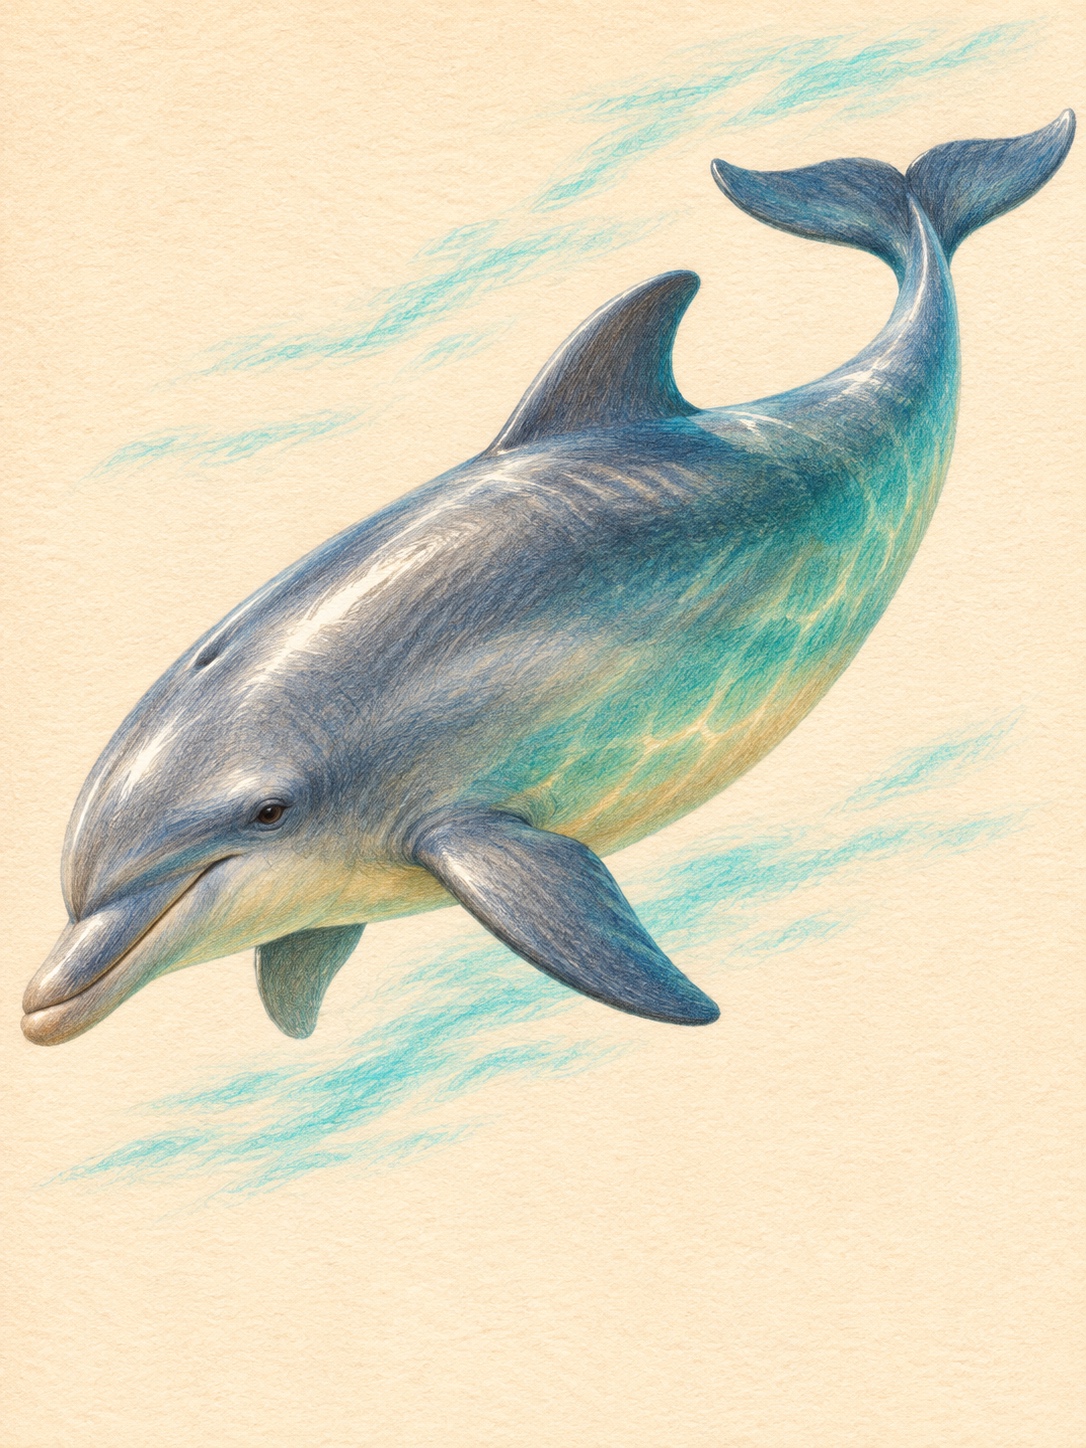
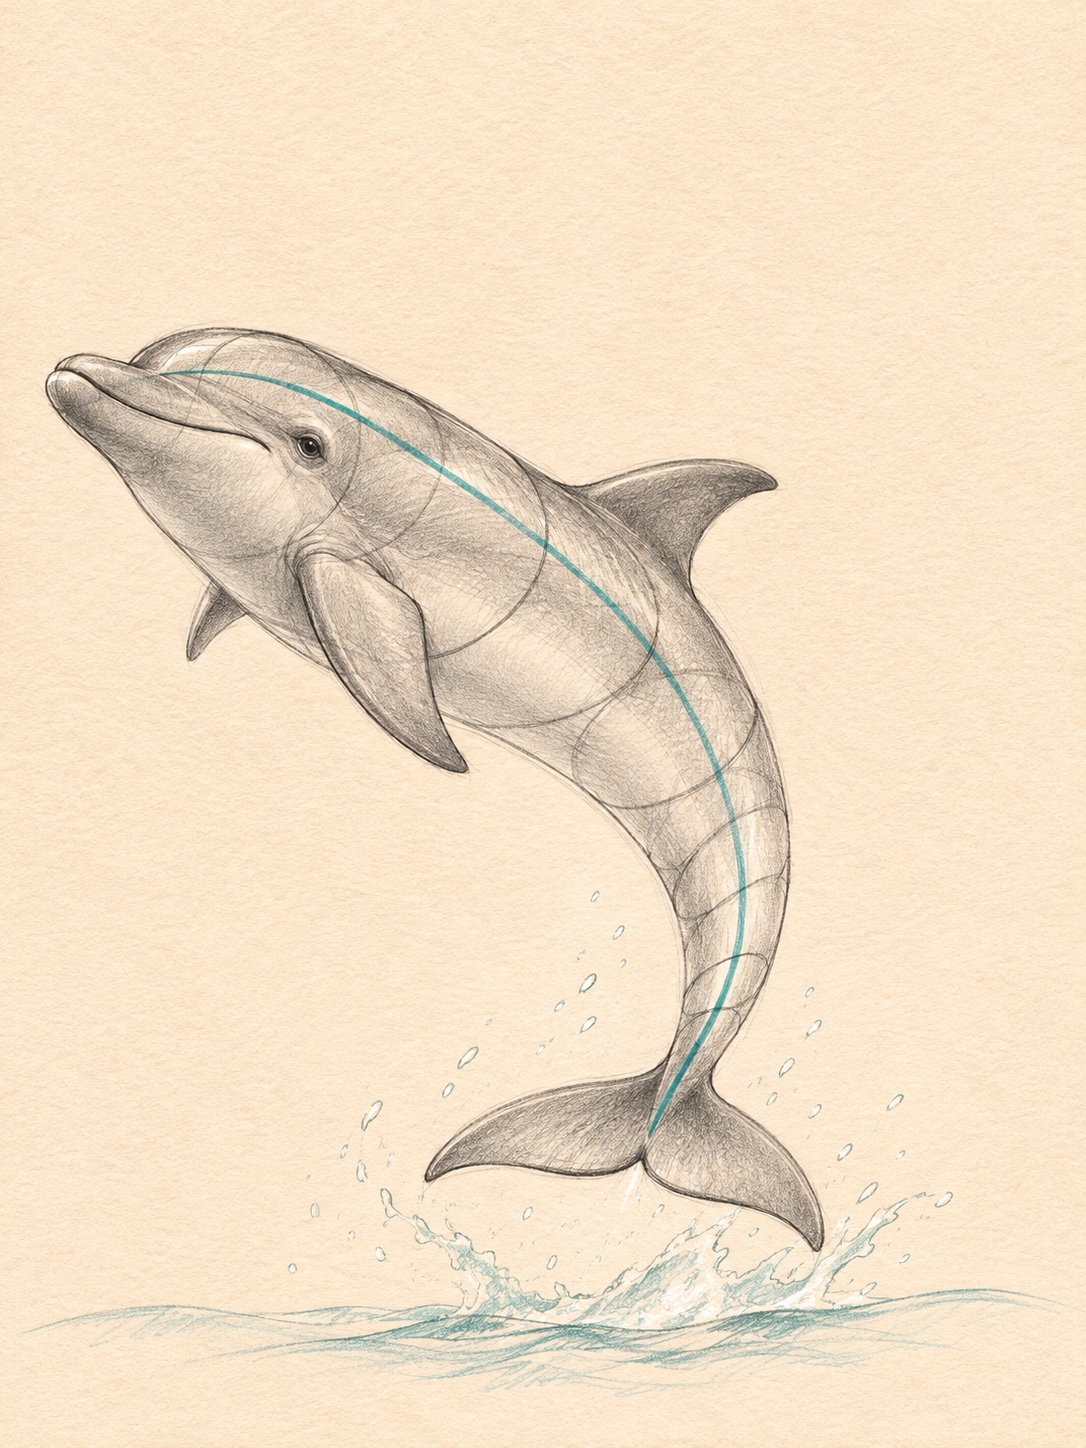
A leap is the pose most people want, and the one that exposes stiff construction fastest. Start with a strong S-curve gesture: head lifting, back arching, tail trailing behind.
In three-quarter view the body foreshortens. Parts nearer to you look larger and overlap what sits behind them. Let the head overlap the base of the near flipper, and let the body hide most of the far flipper so only its tip shows. Draw your section lines as ellipses that tilt more steeply where the body turns toward or away from you.
The flukes are where foreshortening gets fun. On a leaping dolphin they often present their broad flat surface, so both lobes show in full. That’s the moment the horizontal tail becomes unmistakable.
For a dolphin jumping out of water, add a splash at the tail, a few droplets falling back, and a curved waterline below. Keep the spray light and broken, with plenty of paper showing through. If the splash is slowing you down, practice it separately with this water splash drawing guide. Then use these ocean drawing ideas to build a fuller scene once the leap feels comfortable.
Four studio correction cases
These are typical problems drawn as studio examples, written up the way a teacher would mark them at the desk: diagnosis, cause, fix, and a quick test.
Case 1: a side view that reads as a shark
Diagnosis: a side-view sketch with a long pointed snout, a stiff triangular dorsal fin, and a flat forehead. Cause: the head was drawn as a cone, and the fin was added as a standalone triangle. Fix: round the top of the head into a melon, shorten the beak, and redraw the fin with a wide base, a backswept tip, and a hooked trailing edge. Quick test: cover the tail with your hand. If the head alone still says dolphin, it’s fixed.
Case 2: a leap that looks stiff
Diagnosis: the jumping dolphin looks like a plank tossed into the air. Cause: a straight centerline and an even taper from front to back. Fix: redraw the gesture as an S-curve, compress the belly side slightly where the body bends, and let the near flipper overlap the body. Quick test: trace the centerline on its own. One clear swing means the motion is back.
Case 3: a graphite study gone muddy
Diagnosis: the whole dolphin is one gray smudge. Cause: similar pressure everywhere, then heavy blending over all of it. Fix: lift back to a light tone, reassign three values, pull a clean highlight along the melon and back, and restore hard edges at the fin and flipper. Quick test: squint. You should see three distinct shapes of tone, not one. Better.
Case 4: a colored-pencil dolphin that looks like a sticker
Diagnosis: a flat blue shape inside a dark outline. Cause: one hue applied evenly from edge to edge. Fix: rebuild with cool gray as the base, add a warm sand note on the belly, keep paper white for highlights, and glaze turquoise into the underside for reflected water. Quick test: does the color shift from back to belly? If it does, the form will read.
A focused 20-minute practice plan
Short, deliberate rounds beat one long, wandering session. Set a timer and keep moving.
- Minutes 0–5: six thumbnails, gesture line and body mass only. Vary the curve each time.
- Minutes 5–10: pick the strongest thumbnail and add the melon, beak, tail stock, and flukes.
- Minutes 10–15: fins, flippers, eye, belly line, then cleanup and a silhouette check.
- Minutes 15–20: a three-value pass in graphite, or a first color layer.
Repeat with a new pose each day: swimming, gliding, turning, leaping. After a few sessions the order of the steps usually becomes automatic, and that frees your attention for edges and values.
Final checklist
- The gesture line has one dominant curve.
- The body is widest in the front half and tapers to a slim tail stock.
- The forehead is rounded, and the beak grows out of it.
- The dorsal fin leans back and rises from the body.
- The flukes are horizontal.
- The far flipper is shorter and partly hidden.
- The eye is small and sits just behind the mouth line.
- You planned three values before blending.
Where to go next
Learning how to draw a dolphin comes down to a few early decisions: a curve with some life in it, a rounded head, and flukes that lie flat. Get those right, and the finish becomes a choice rather than a rescue.
Run the eight steps a handful of times, then try the leap. When the shape feels reliable, take one drawing all the way in graphite or color. For a complete coastal composition, place the finished subject into one of these beach drawing ideas. Same dolphin, a new skill each time.
Frequently asked questions
What is the easiest way to draw a dolphin?
Start with one curved line, wrap a tapered body around it, then add a rounded forehead, short beak, backswept dorsal fin, and horizontal flukes. Those four features make even a very simple dolphin recognizable.
How do I draw a cute or cartoon dolphin?
Exaggerate the melon, shorten the beak, enlarge the eye a little, and round off the fins. Keep the flukes horizontal. That single feature stops a cartoon dolphin from turning into a fish. To push the expression further, borrow the simple shape language from these easy cartoon character drawing exercises.
Why does my dolphin drawing look like a shark?
Usually it’s a pointed snout, a flat forehead, and a straight triangular fin. Round the head into a melon, shorten the beak, and sweep the dorsal fin back with a curved trailing edge.
Which way does a dolphin’s tail go?
Horizontally. The two flukes spread left and right, and the tail moves up and down as the dolphin swims. An upright tail fin belongs to a fish.
What pencils do I need to draw a realistic dolphin?
If you’re learning how to draw a dolphin with pencil, an HB or H for construction, a 2B for middle tones, and a 4B for darks will cover it. Add a kneaded eraser and smooth, heavyweight paper.
How do I draw a dolphin in water?
Draw the dolphin first, then build the water around it with loose horizontal tone bands and soft lifted light. Keep the belly lighter, and for a leap, add a broken waterline and a light splash at the tail.
- 0shares
- Facebook0
- Pinterest0
- Twitter0
- Reddit0