A good duck drawing starts with a few simple forms, not feathers. Mark the action and waterline, build a bean-shaped body, add a rounded head through a curved neck, then place the flat bill, eye, wing, tail and feet. Clean the contour last and finish with grouped feathers, value or color.
Most ducks that look wrong went wrong in the first two minutes.
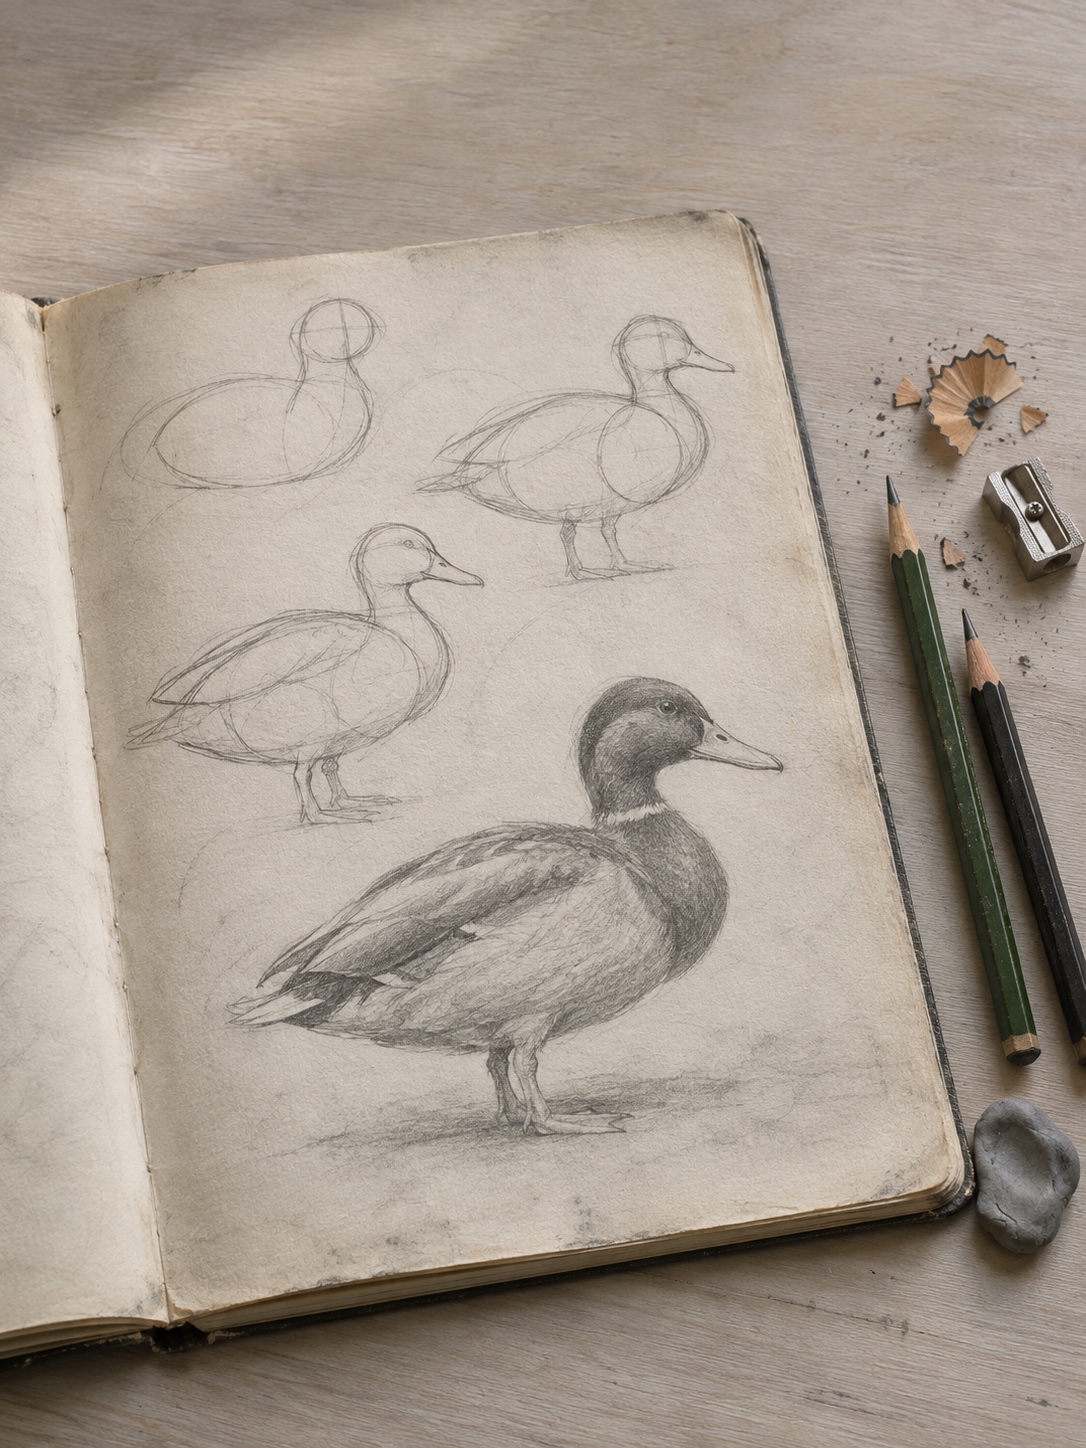
This guide gives you one construction to reuse for a side view, a shaded study, a colored mallard, a duckling, a swimming bird and a cartoon. Adult beginners can follow it as written, and a motivated child can too, with an adult nearby for sharp tools.
What you need
Minimum kit
- HB and 2B pencils
- Sharpener
- Kneaded eraser
- Sketchbook or smooth drawing paper
- A clear reference photo of a duck, ideally your own
Optional upgrades
- 2H pencil for faint construction and 4B for the darkest accents
- Heavier smooth paper, such as Bristol, for layered work
- Wax- or oil-based colored pencils (palette below)
- Colorless blender for burnishing
Skip the blending stump at first. Smudging can make a weak shape look finished without fixing it.
Proportion landmarks worth checking
There is no single correct duck. A mallard, a runner duck and a white Pekin carry themselves differently, and one bird changes shape when it stretches, preens or settles on water. Use these as starting checks for a relaxed adult duck in side view, then trust your reference over the numbers.
- Body length: about three head lengths from breast to tail base.
- Head position: above the front of the body.
- Neck: short and thick at rest, longer and narrower when the bird is alert.
- Bill: roughly two-thirds to one head length, and flatter than most first attempts.
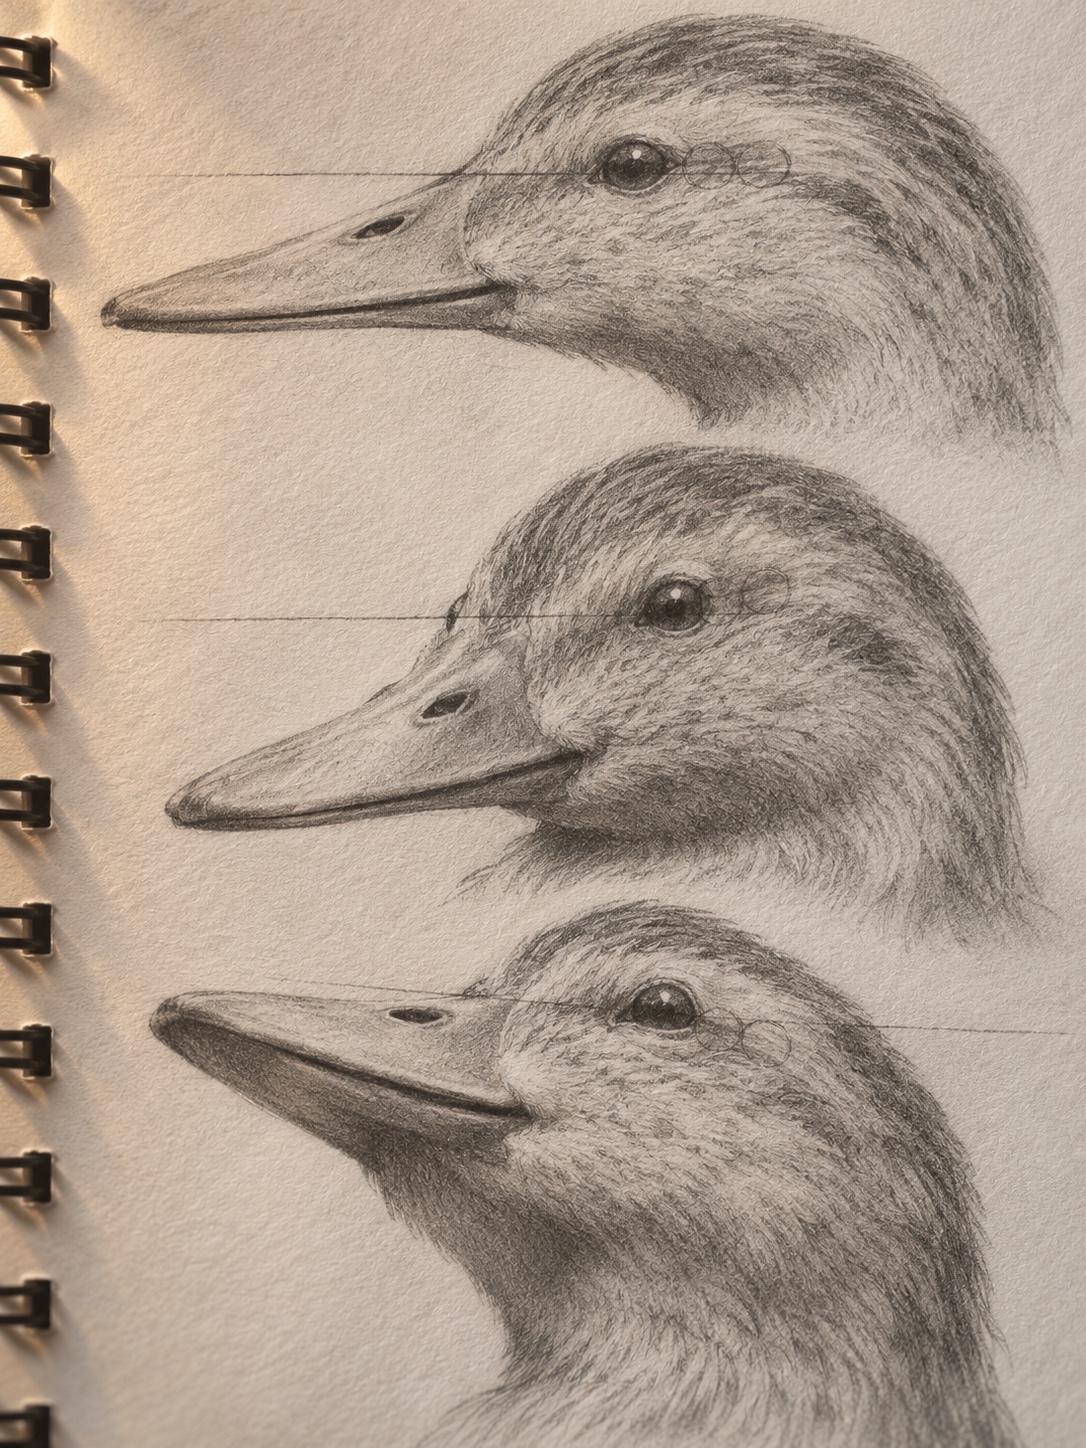
- Eye: in the upper half of the head, slightly closer to the bill than to the back of the skull. A line continuing the top edge of the bill usually passes close to it.
- Folded wing: begins around the front third of the body and ends near the tail base.
- Legs and feet: attached toward the rear half of the body, with the feet landing under the bird’s balance point.
To measure, mark one head length on your pencil with your thumb, then walk that length along the body. It catches most size errors before they harden into contour.
The six-step construction method
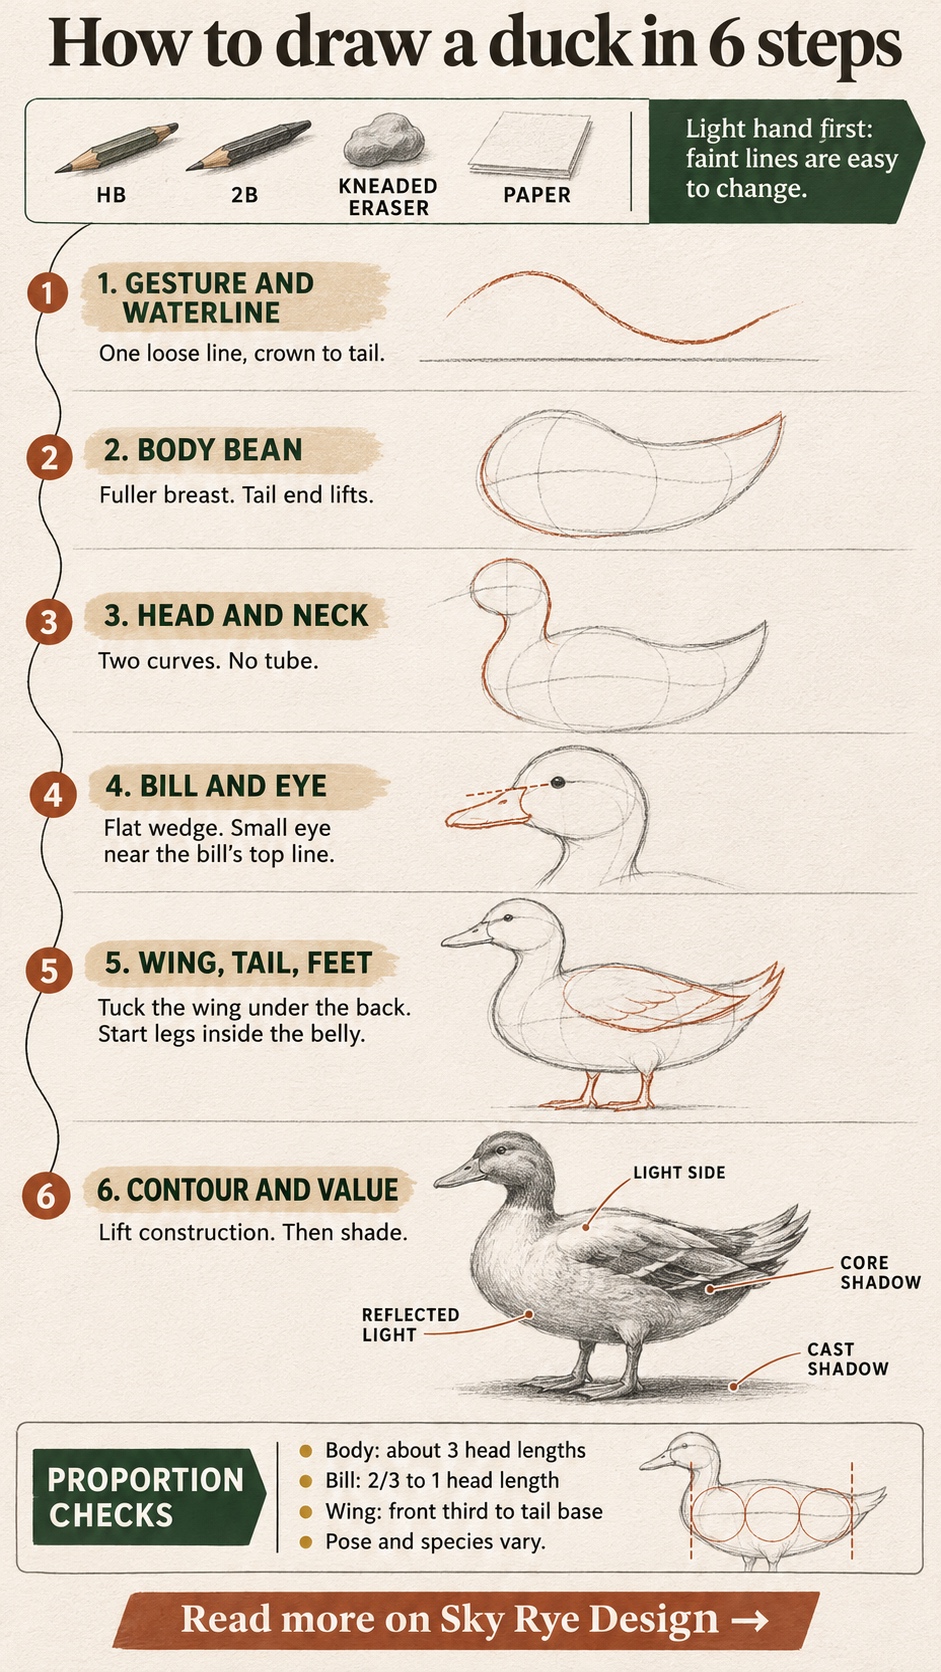
This is the core method. Keep your pressure light through step five, because faint lines are cheap to change.
- Gesture and waterline. Draw one loose line from the crown, down the neck, along the back and out through the tail. Add a waterline for a swimming bird or a ground line for a standing one. That second line gives the duck weight.
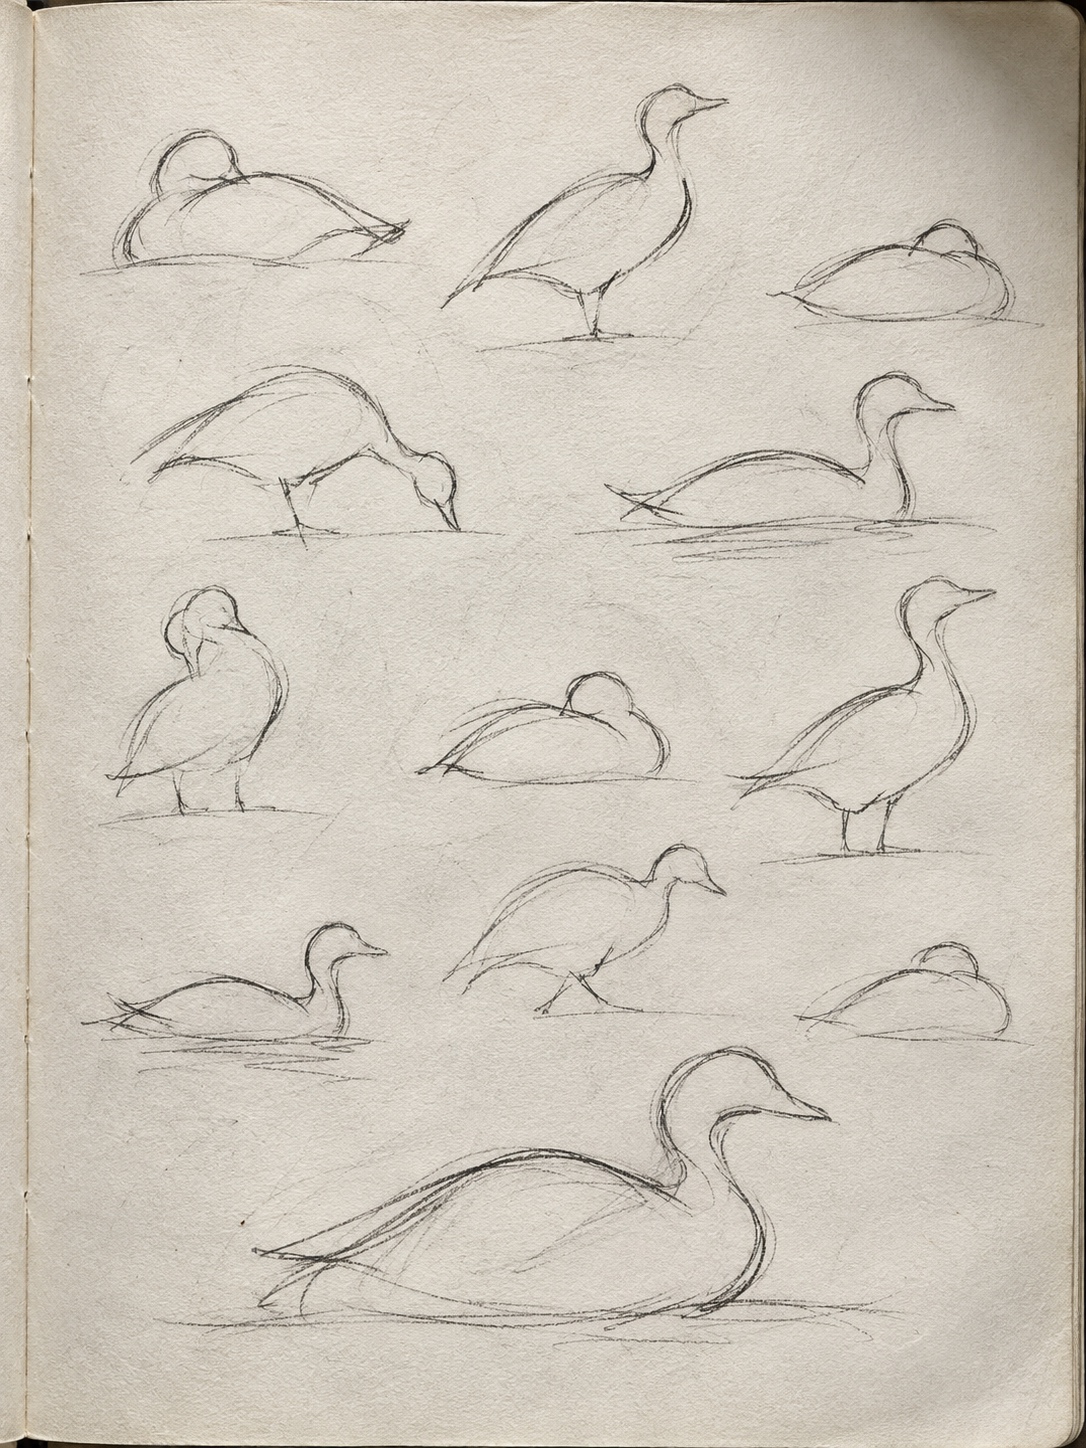
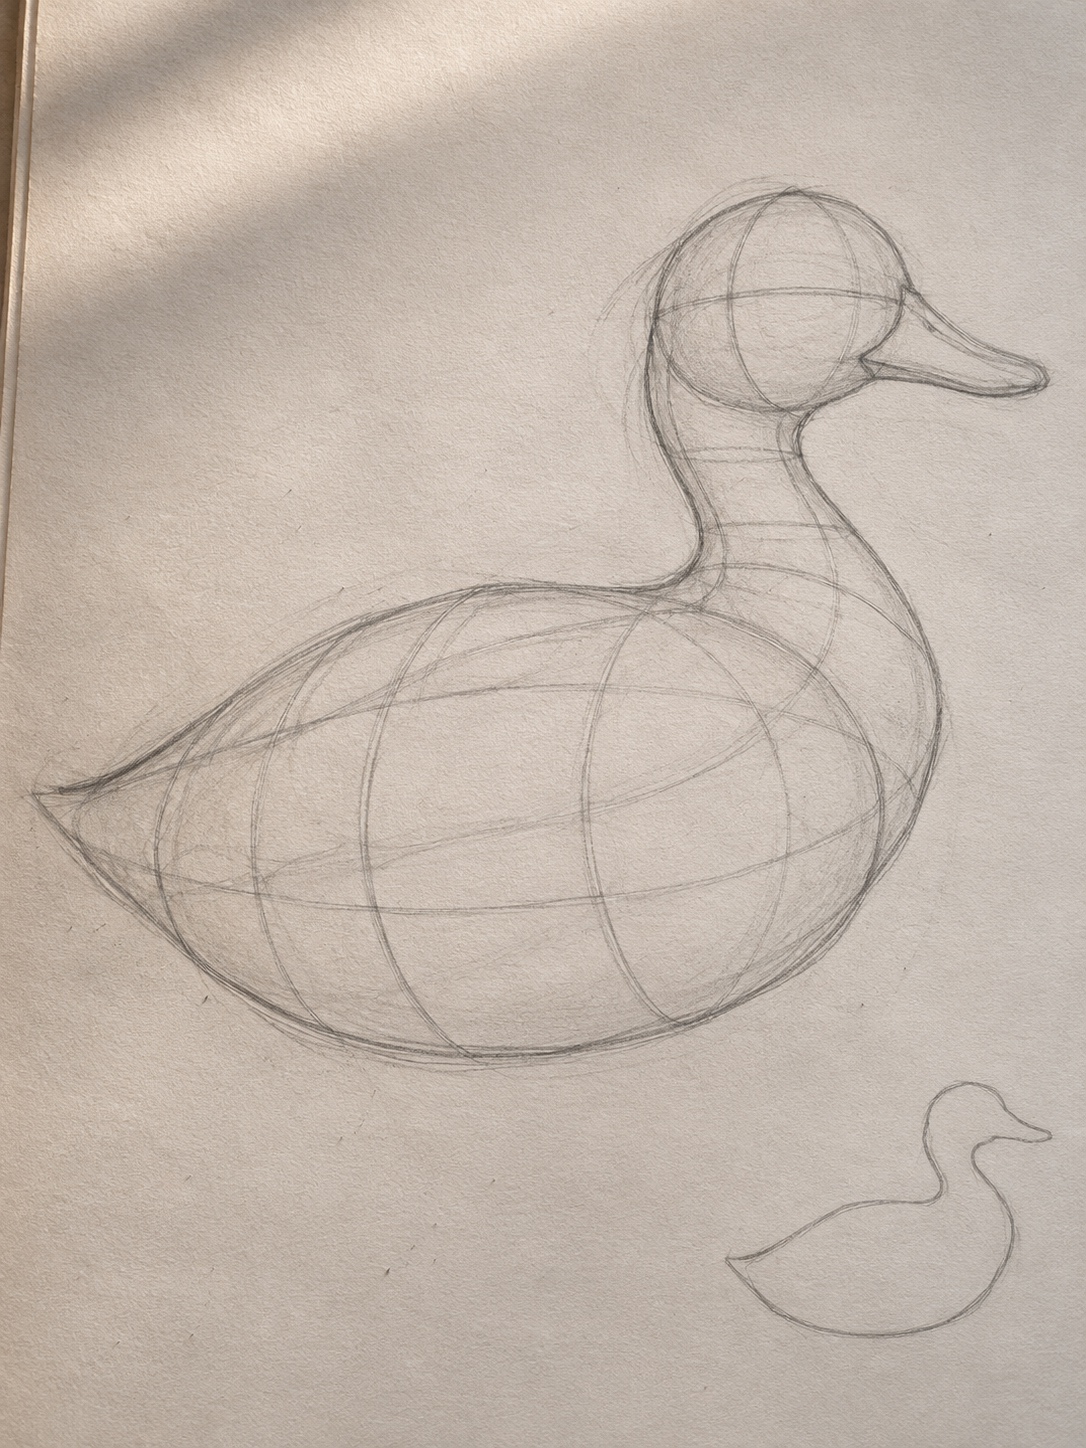
- Body oval or bean. Draw through the form, including parts you will later erase. Make the breast fuller than the rear and let the back end lift slightly. Two or three cross-contour lines will remind you that the body is round.
- Head and neck connection. Place a sphere or slightly long oval for the head. Connect it with two curves: the back of the neck flows into the back, and the front flows into the breast. The neck widens at its base, so avoid a tube.
- Bill wedge and eye placement. Attach a flat wedge to the front of the head. Its top edge slopes down from the forehead in a smooth dip, and its mouth line runs back toward the cheek. Keep the eye small. Almost everyone draws it too large at first.
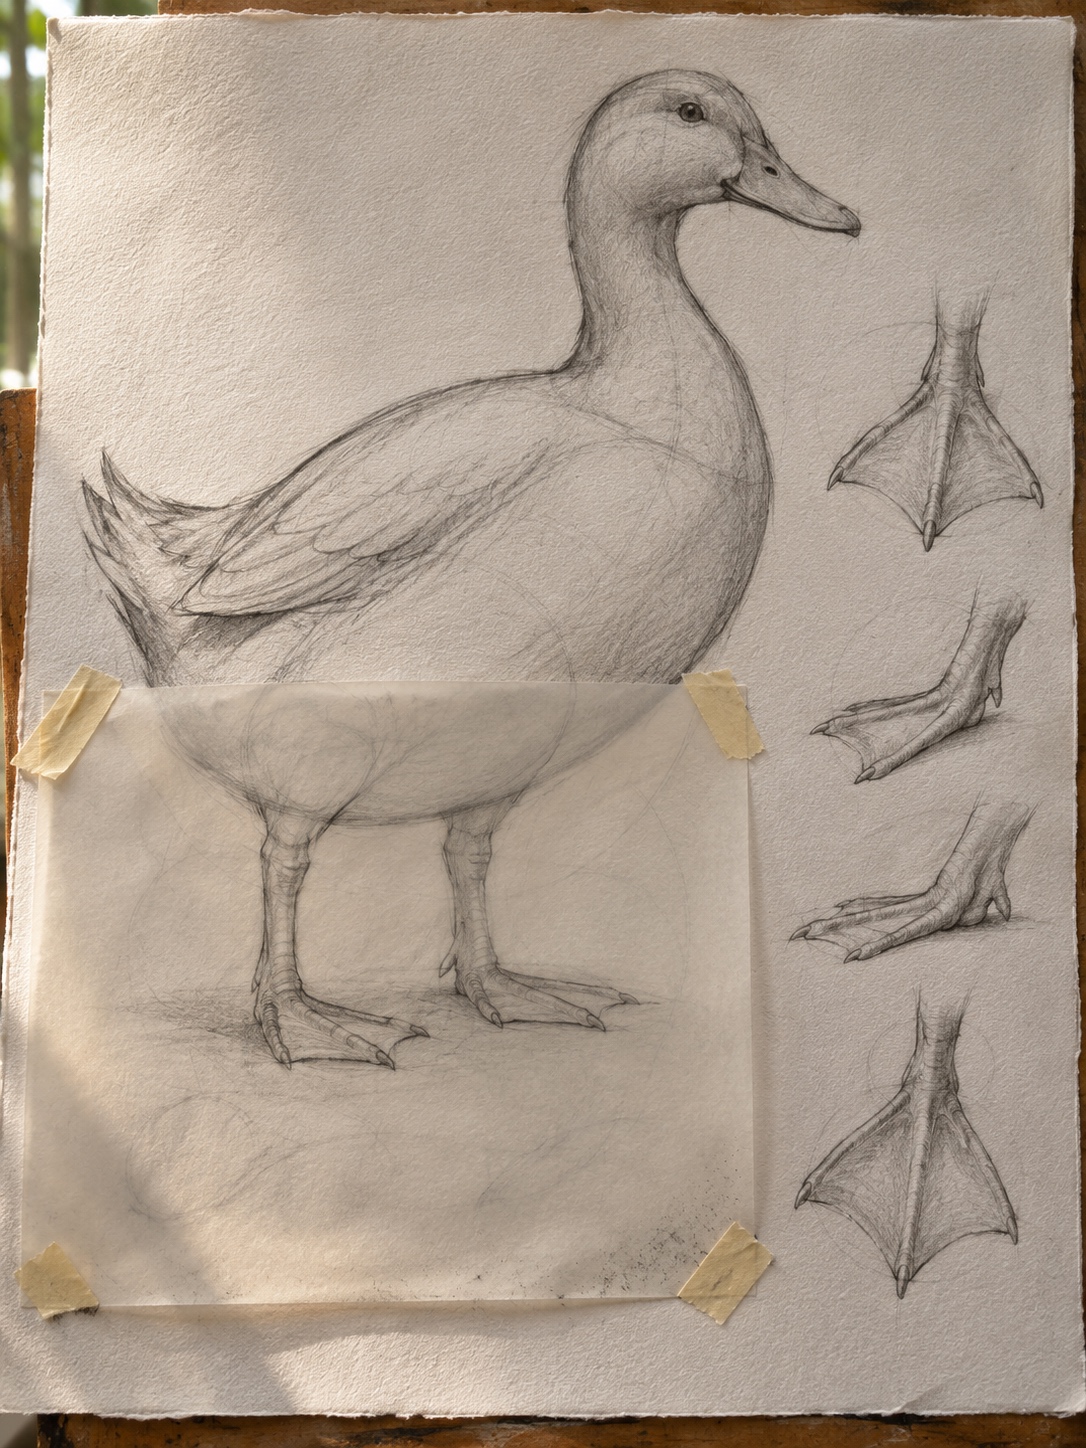
- Wing, tail and feet. Draw the folded wing as a long teardrop and tuck its top edge under the back contour. Add a short, lifted tail wedge. For a standing bird, start the legs inside the belly, then build each webbed foot as a flattened triangle with three forward toes. A swimming bird’s feet stay hidden underwater.
- Clean contour, feather groups, then value or color. Press the construction down with a kneaded eraser. Redraw the outline with varied pressure, firmer under the belly and at the bill, lighter across lit areas. Add feather groups as large shapes, then shade or color.
I check the silhouette before step six. If the shape does not read as a duck when I squint, detail will not rescue it.
Easy side-view duck, step by step
This version faces left and stands on a ground line. Allow about 15 minutes, and use the HB until the final step.
- Turn your page horizontally and draw a short ground line in the lower third.
- Above it, sketch a bean about three inches wide. Make the left side fuller and let the right side rise slightly.
- Make two small ticks along the top of the bean, dividing it into thirds. One third is your head width.
- Draw a circle of that width above the left end of the bean, leaving a gap of about half a circle.
- Join head and body with two neck curves, the back curve sinking into the top of the bean and the front curve swelling into the breast.
- Add the bill on the left of the circle, about two-thirds as long as the circle is wide. Draw a shallow mouth line through it.
- Place a small eye in the upper half of the head, slightly left of center.
- Draw a teardrop wing, round end near the front third of the body, point near the tail, top edge disappearing into the back.
- Add a short, pointed tail lifting past the right end of the bean.
- Add two short legs from inside the rear half of the belly. Draw the near foot on the ground line and the far foot slightly higher and smaller.
- Soften the construction with the kneaded eraser. Switch to the 2B, redraw the contour with broken lines, add three or four feather arcs on the wing, then shade under the belly and add a short cast shadow.
Stop there if it reads clearly. A simple drawing is a complete drawing, not an unfinished realistic one. For another approachable bird study, compare the construction and shading in our bird drawing techniques guide.
Making the drawing more realistic
Realism comes from organized observation, not more lines. Keep the same construction and spend your attention on feather groups, edges and value.
Group feathers before you draw them
Think in territories. The head and neck carry tiny feathers that read as tone. The breast and flank hold soft, overlapping rows. The folded wing stacks into clearer layers, with shorter coverts near the shoulder and longer flight feathers toward the tail. Draw each territory as one shape first.
A feather is a small, flat plane with an edge and a shadow, not a strand. Lay tone with the side of the pencil, following the form, then define only a few feather edges. I usually finish a handful near the head or wing and let the rest dissolve.
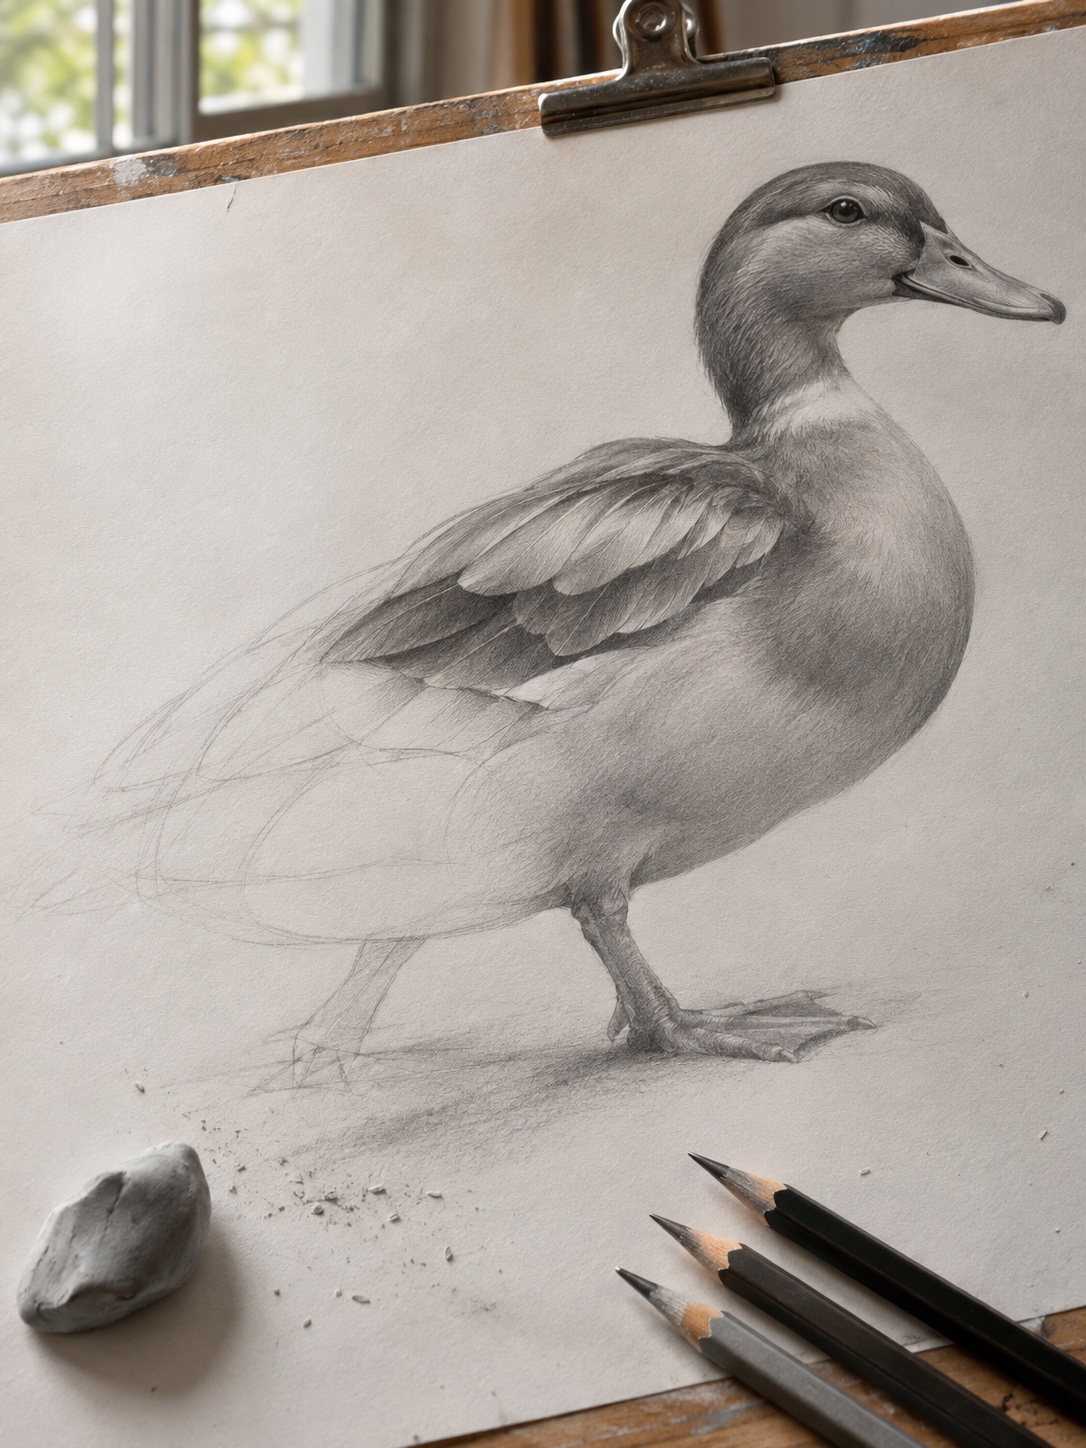
Control your edges
Use hard edges where forms are firm or overlap sharply: the bill, the eye, the wing tips. Keep edges soft where feathers turn from the light, especially around the neck and breast. On the light side, let a contour disappear.
Build value from a simple scale
Start with a five-step graphite value scale, from paper white to your darkest pencil. Choose one light direction before shading. With light from the upper left:
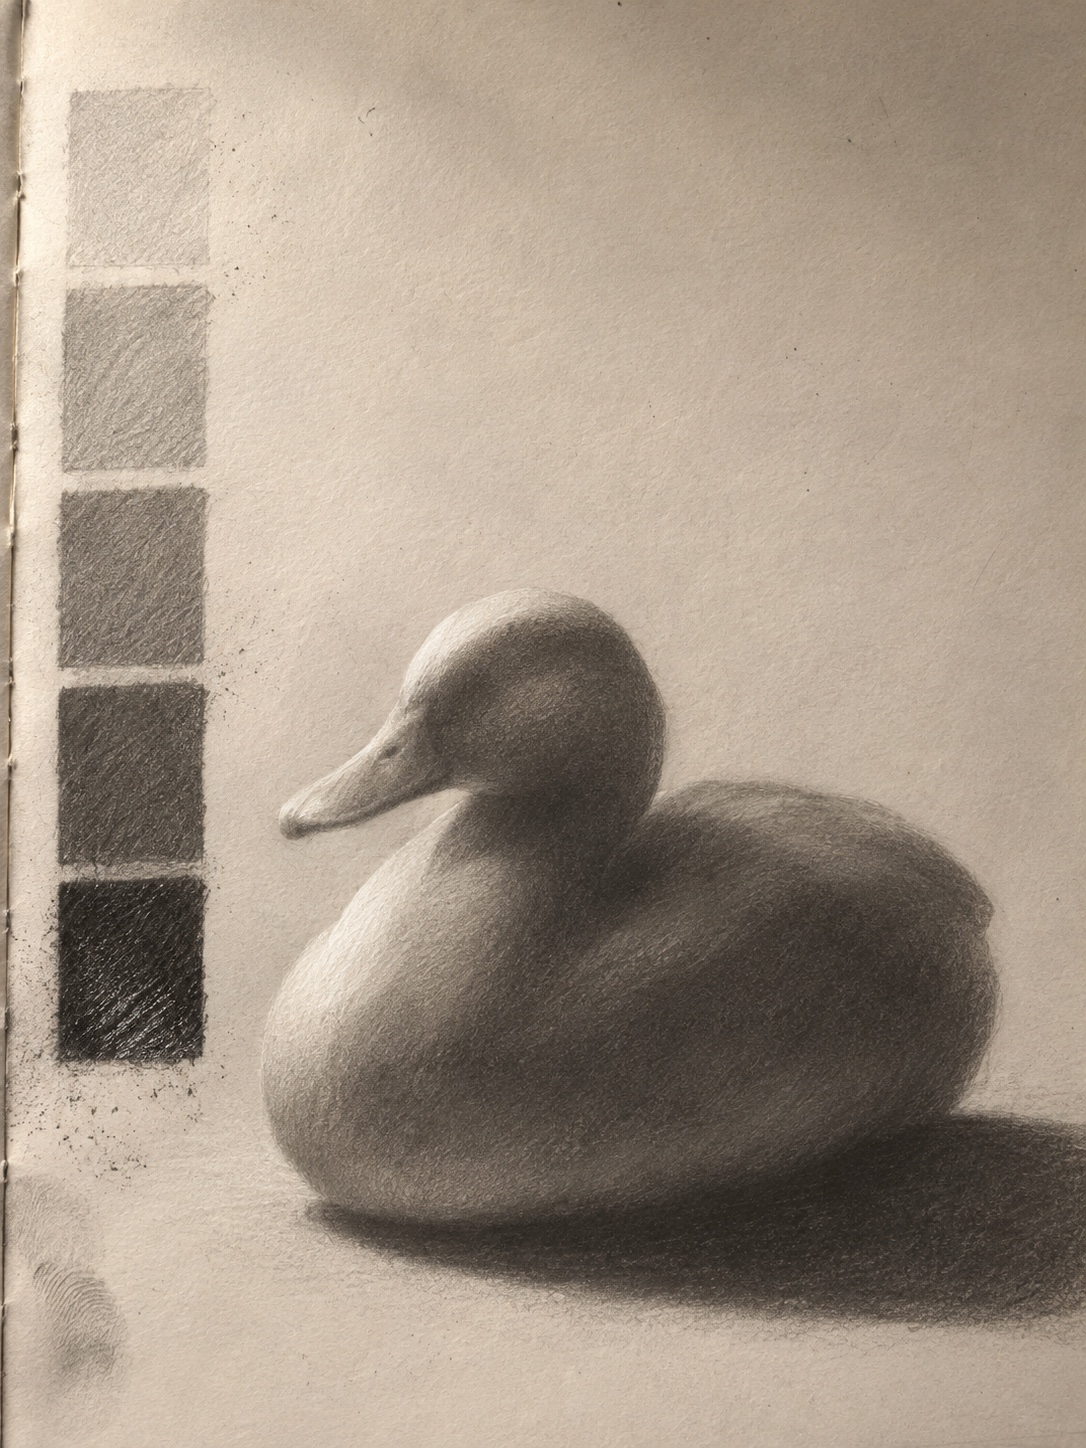
- Light side: top of the head, back and upper wing, mostly paper or pale gray.
- Core shadow: the darkest band on the form, along the lower flank.
- Reflected light: a soft lift along the belly, bounced from the ground or water. Keep it darker than the light side.
- Cast shadow: the dark shape below the bird, deepest where it meets the body.
Lift highlights with a pointed kneaded eraser, pressing and rolling rather than rubbing. On a white duck, use pale grays and shadow shapes, not a dark outline. For more references on feather shape and value, browse these bird drawing ideas.
Coloring a mallard with colored pencil
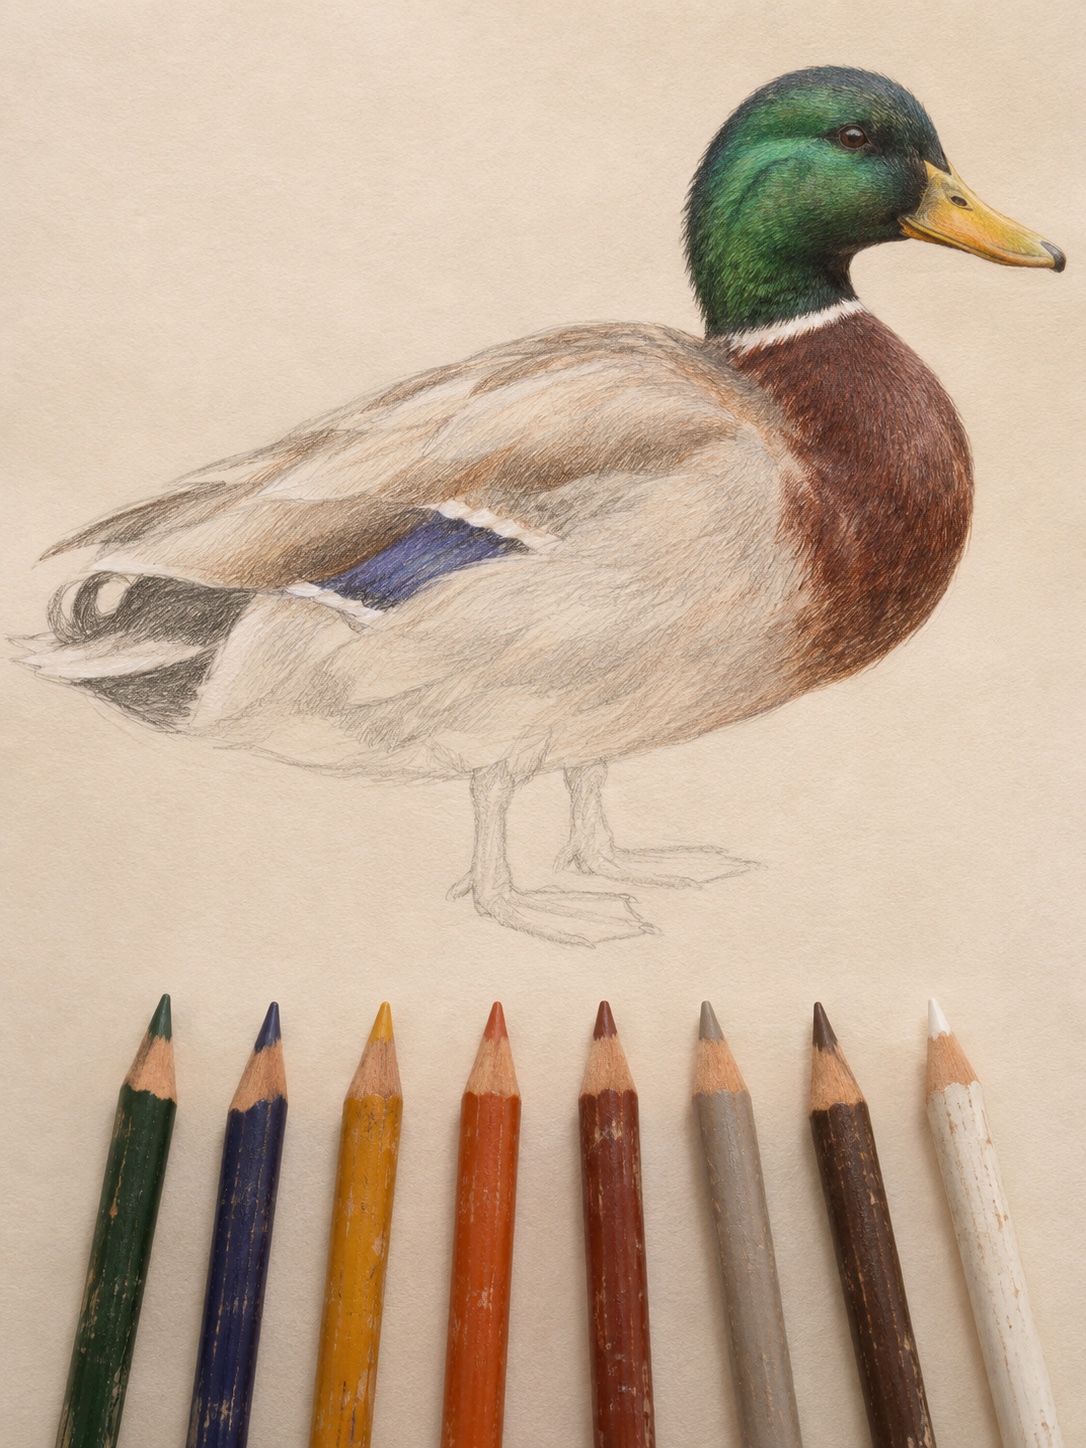
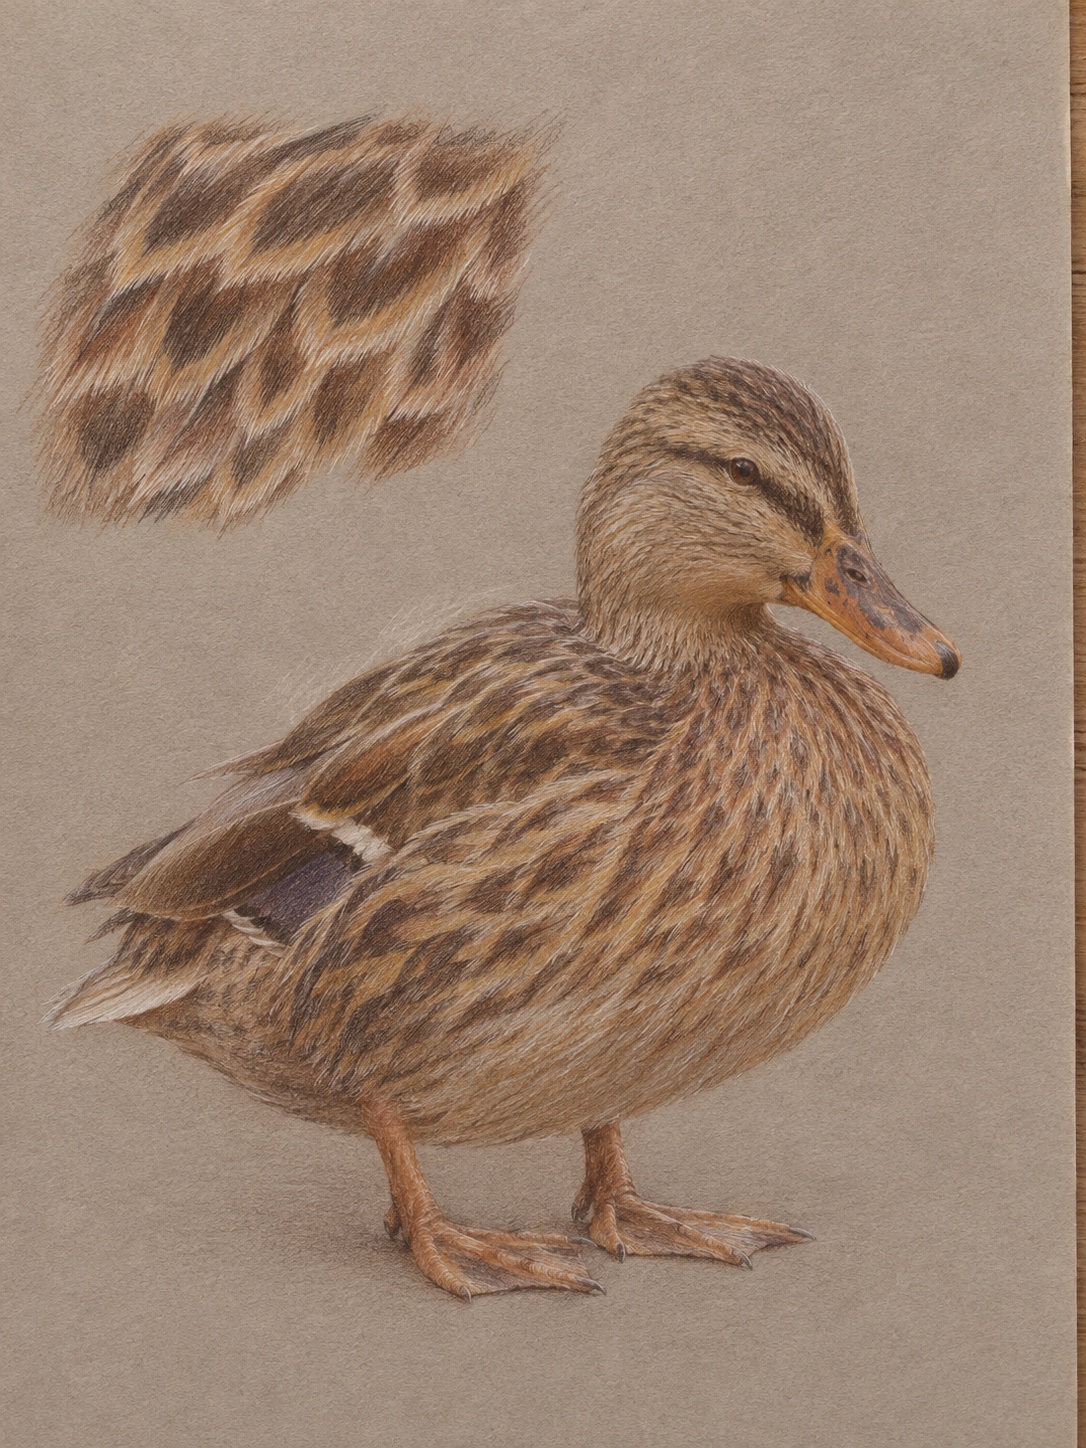
A male mallard is a good color exercise because its areas are clearly separated: green head, white neck ring, chestnut breast, pale gray body, yellow bill, orange feet and a blue wing patch. A female, built from mottled browns, makes a good second study.
Eight pencils are enough: deep green, indigo, yellow ochre, burnt orange, chestnut brown, warm gray, dark umber and white.
| Area | First layer | Build with |
|---|---|---|
| Head | Indigo in shadows | Deep green overall, yellow ochre glaze on the lit side |
| Neck ring | Bare paper, reserved from the start | Warm gray in shadow |
| Breast | Burnt orange | Chestnut, dark umber in shadow; stay lighter than the head’s darkest areas |
| Body | Warm gray | Very light indigo in shadow; keep it pale |
| Bill | Yellow ochre | Burnt orange along the lower edge |
| Wing patch | Indigo, with white borders reserved | Dark umber at the edges |
| Feet | Burnt orange | Chestnut in shadow |
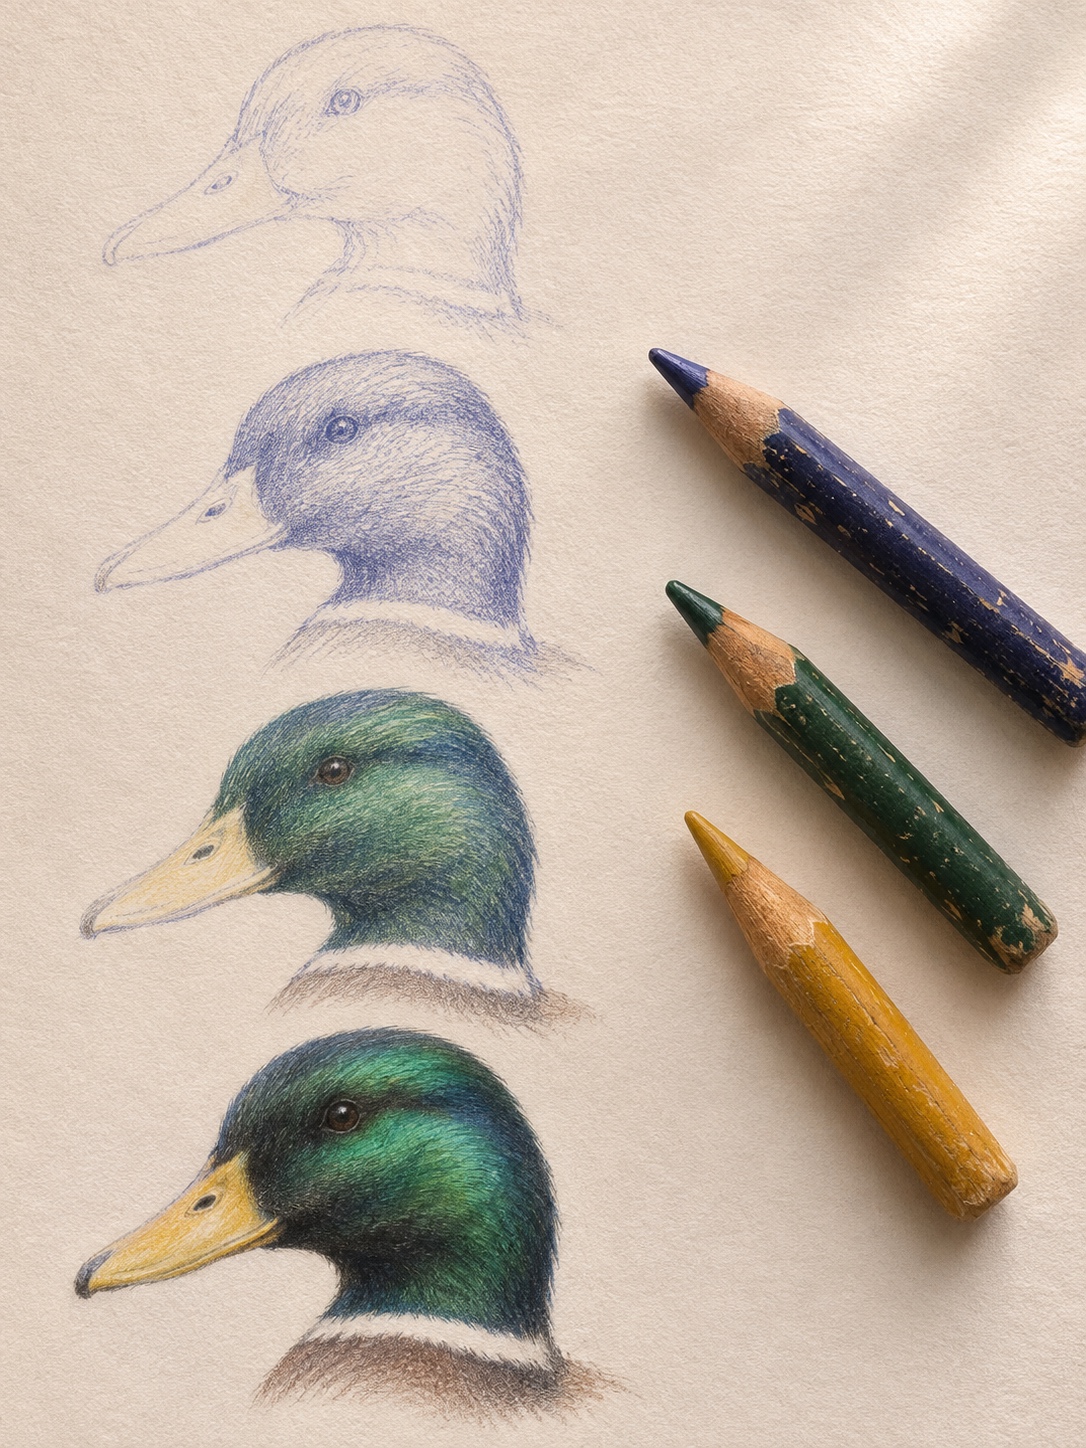
Work in this order:
- Lift the graphite. Press the drawing with a kneaded eraser until only a ghost remains, because heavy graphite can gray the colors above it.
- Map the first layer. Use a sharp point and light pressure, following the direction of the feather rows.
- Build local color. Add three or four thin passes rather than one heavy one.
- Set the shadows. Use indigo or dark umber rather than black, which can deaden the color.
- Burnish selectively. Press firmly with white, a pale tone or a colorless blender on the head, the bill and a few breast feathers. Leave the rest with its paper tooth.
- Restate the accents. Sharpen the eye, the bill edge and the darkest overlaps.
Test burnishing on scrap first. If dark waxy areas develop a pale haze, called bloom, wipe gently with a soft tissue.
Drawing a swimming duck
Three decisions carry this drawing.
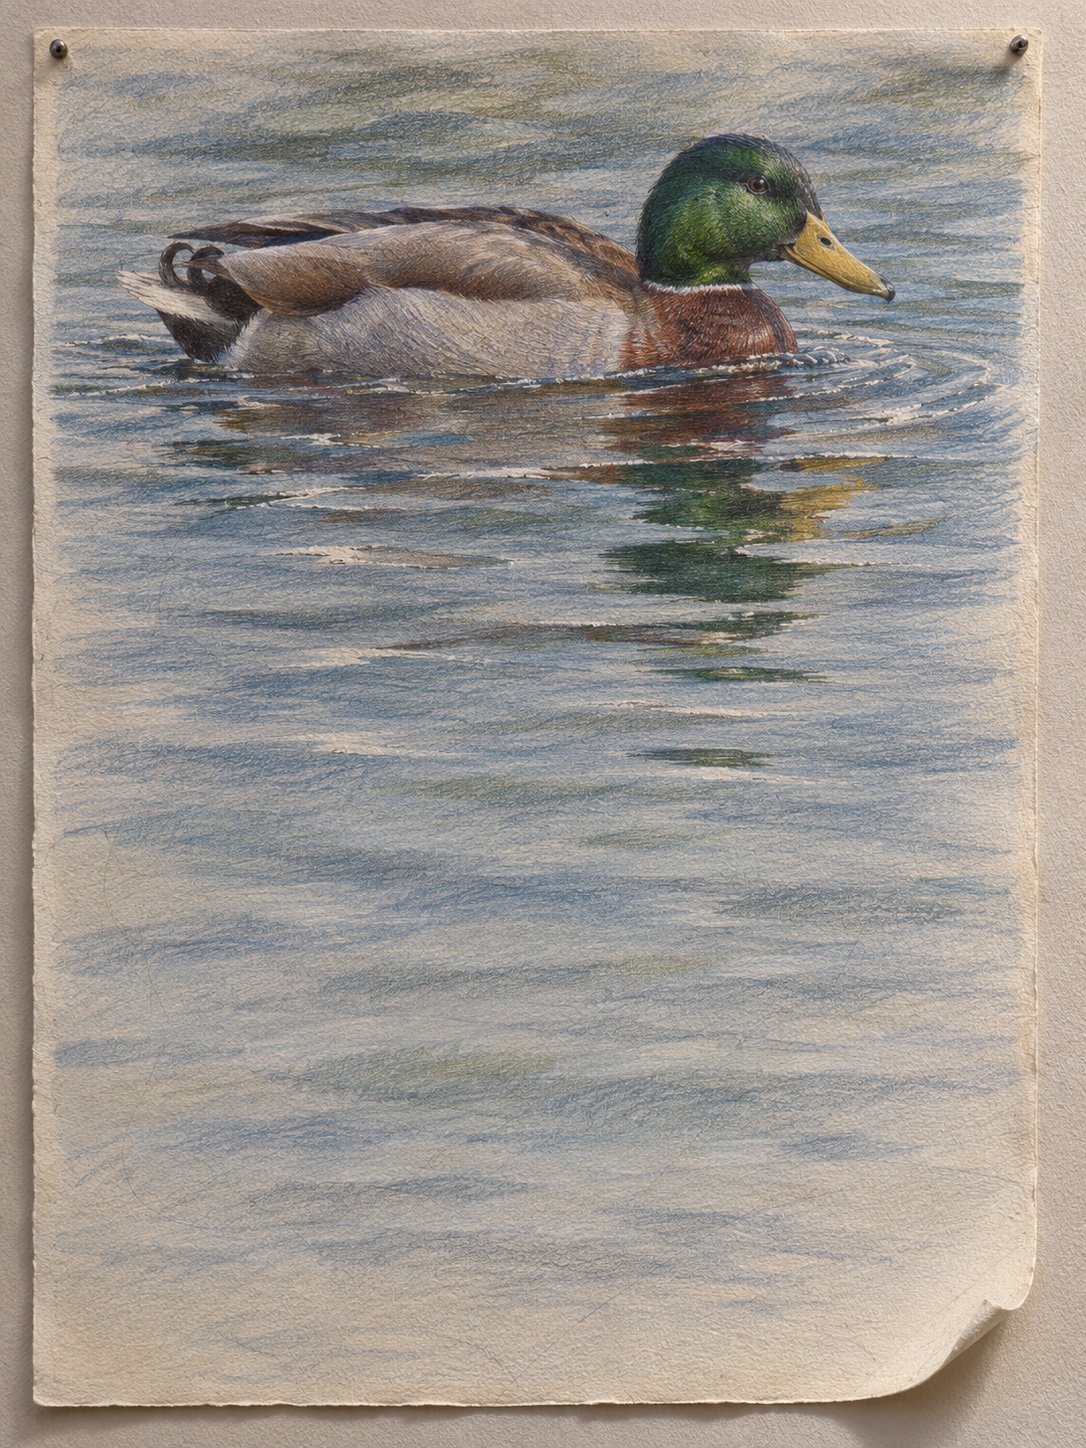
Waterline. Draw the whole bean, then cut it. The line should pass across the lower part of the bean, not underneath it. At eye level it is almost straight. From higher up, it becomes a shallow curve wrapping around the breast and flank. Darken the contact line in places, but don’t trace it evenly.
Concentric ripples. Ripples read as flattened ellipses, and the lower your viewpoint, the flatter they get. Draw broken arcs, tighter near the bird and wider and fainter farther out. If the bird is moving, open them into a V trailing behind it.
Broken reflection. A reflection sits directly below what it reflects, but it isn’t a flipped copy. The water sees the bird from a low angle, so you get more breast and underside and less back. Ripples slice it apart.
- Block the reflection lightly below the waterline using horizontal strokes.
- Cut it into bands with a kneaded eraser, widening the gaps farther from the bird.
- Add darker accents close to the waterline, where the reflection holds together best.
- Keep its contrast lower than the bird’s, and let the lower edge fade.
In color, mix the reflected hue with the water: a muted green streak for the head, with indigo or cool gray passing through it.
Adapting the construction
Duckling
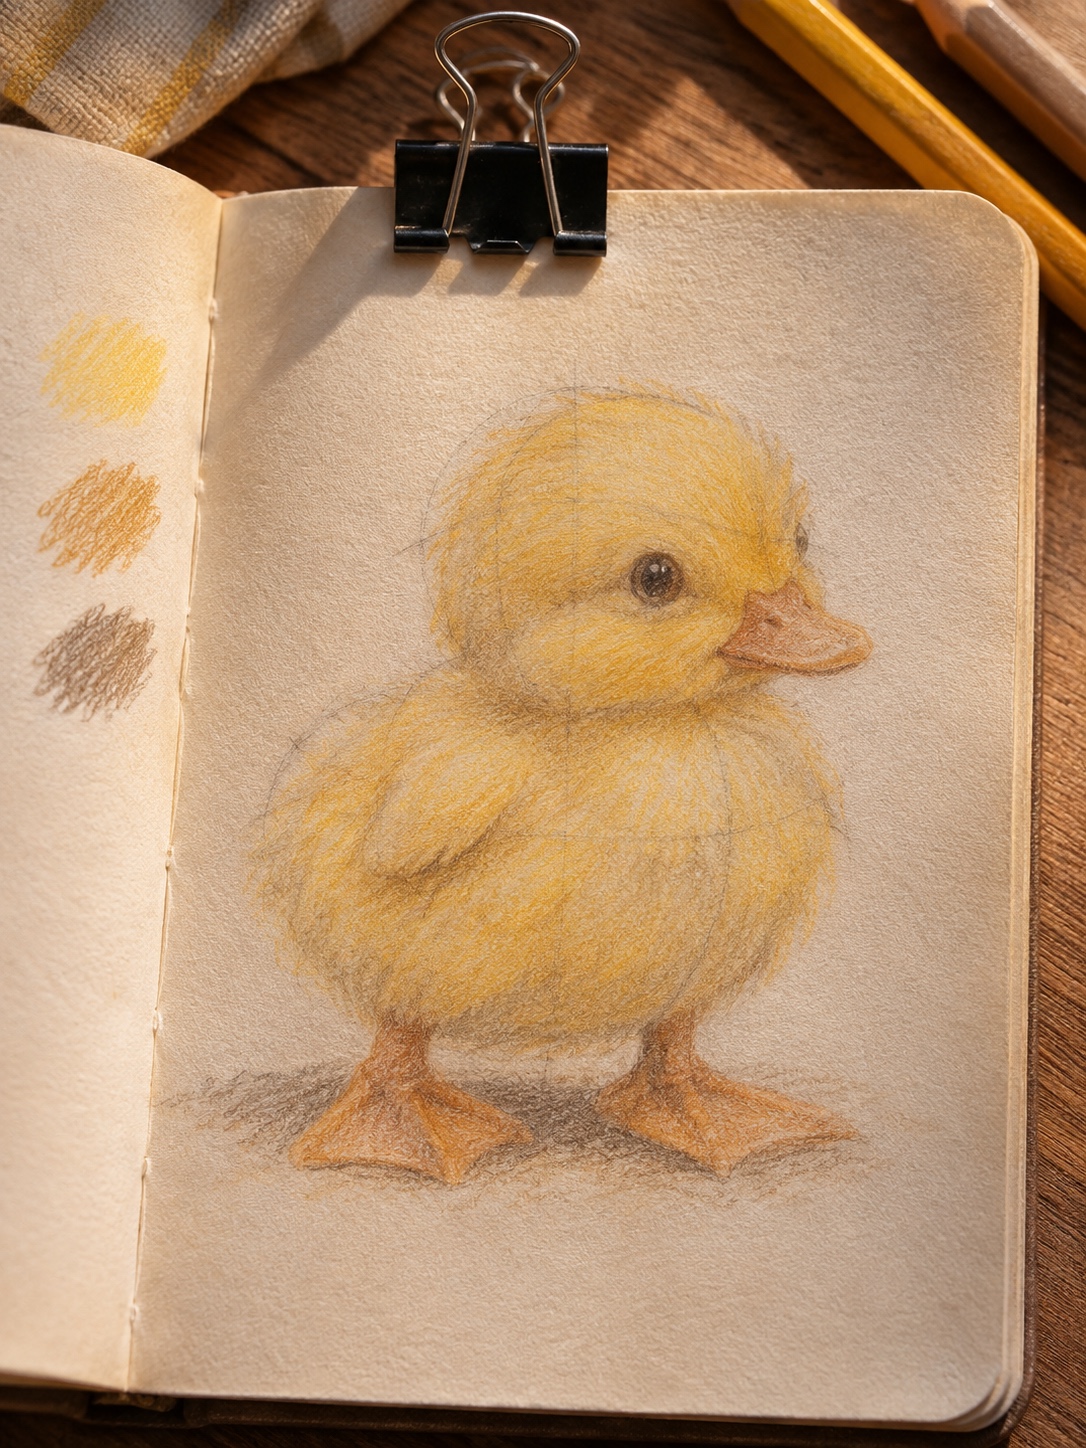
Keep the six steps and change the ratios. Make the body one and a half to two head lengths, nearly remove the neck, and keep the bill short and stubby. Set a larger eye a little lower on the head. Reduce the wing to a nub and let the feet look slightly too big.
For texture, use the side of a soft pencil and break the outline into short, uneven marks. Draw clumps of down, not strands. Shade yellow down with ochre and warm gray instead of brown, which turns dirty fast.
Cartoon duck
A cartoon still needs a clear gesture, body, head and bill. What changes is how far you push them. Round shapes feel friendly, while a flatter head and sharper bill feel grumpy or sly.
Exaggerate one or two things, perhaps an oversized bill or a tiny wing, and simplify the rest. Keep the bill and feet readable, because they do much of the work of saying “duck.” Design your own character rather than copying a famous one.
Three studio exercises
These are drawing examples to try yourself, not reports on any student or client.
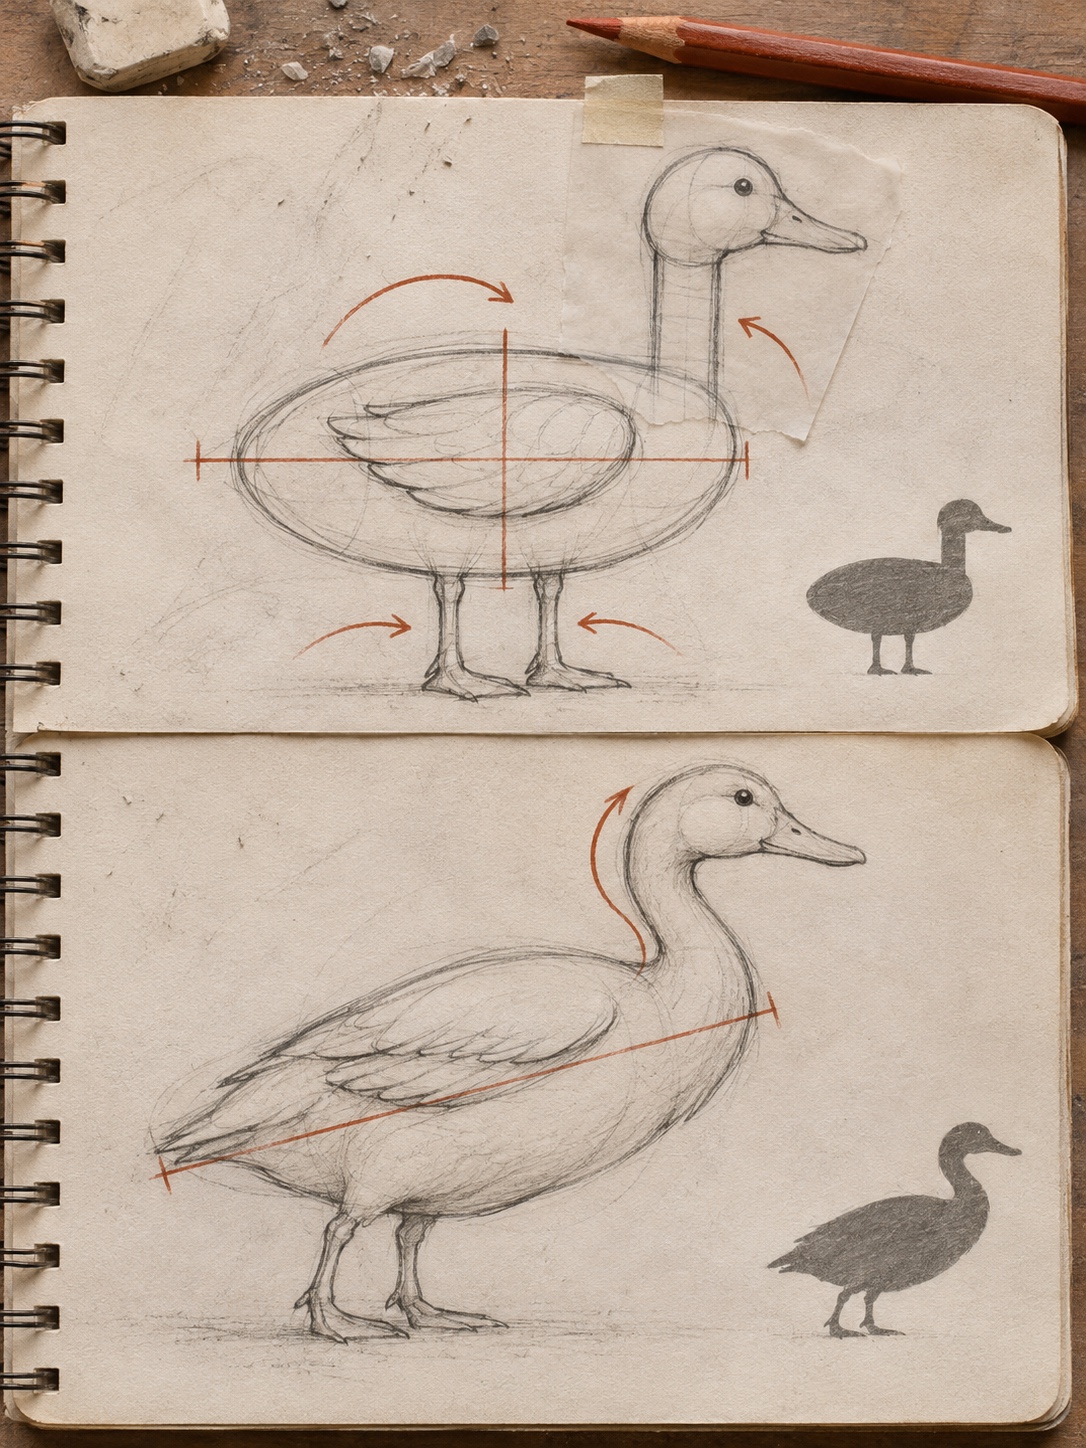
Studio exercise 1: fix a stiff side-view duck
Before: A horizontal oval body, a circle parked straight above it, a tube neck, a wing centered like a sticker, and two legs dropping from the exact middle.
Diagnosis: Every axis is horizontal or vertical, and nothing overlaps. The parts are there, but the drawing has no weight or direction.
Correction: On fresh paper, tilt the body so the tail end rises. Move the head forward and draw the neck as a gentle S. Slide the wing back and tuck it under the back contour. Move the legs into the rear half of the belly, then darken the contour under the body.
After: The parts are nearly the same size, but the bird now has posture. Fill both silhouettes with tone: the second should read with no interior detail.
Studio exercise 2: turn the same base into a duckling
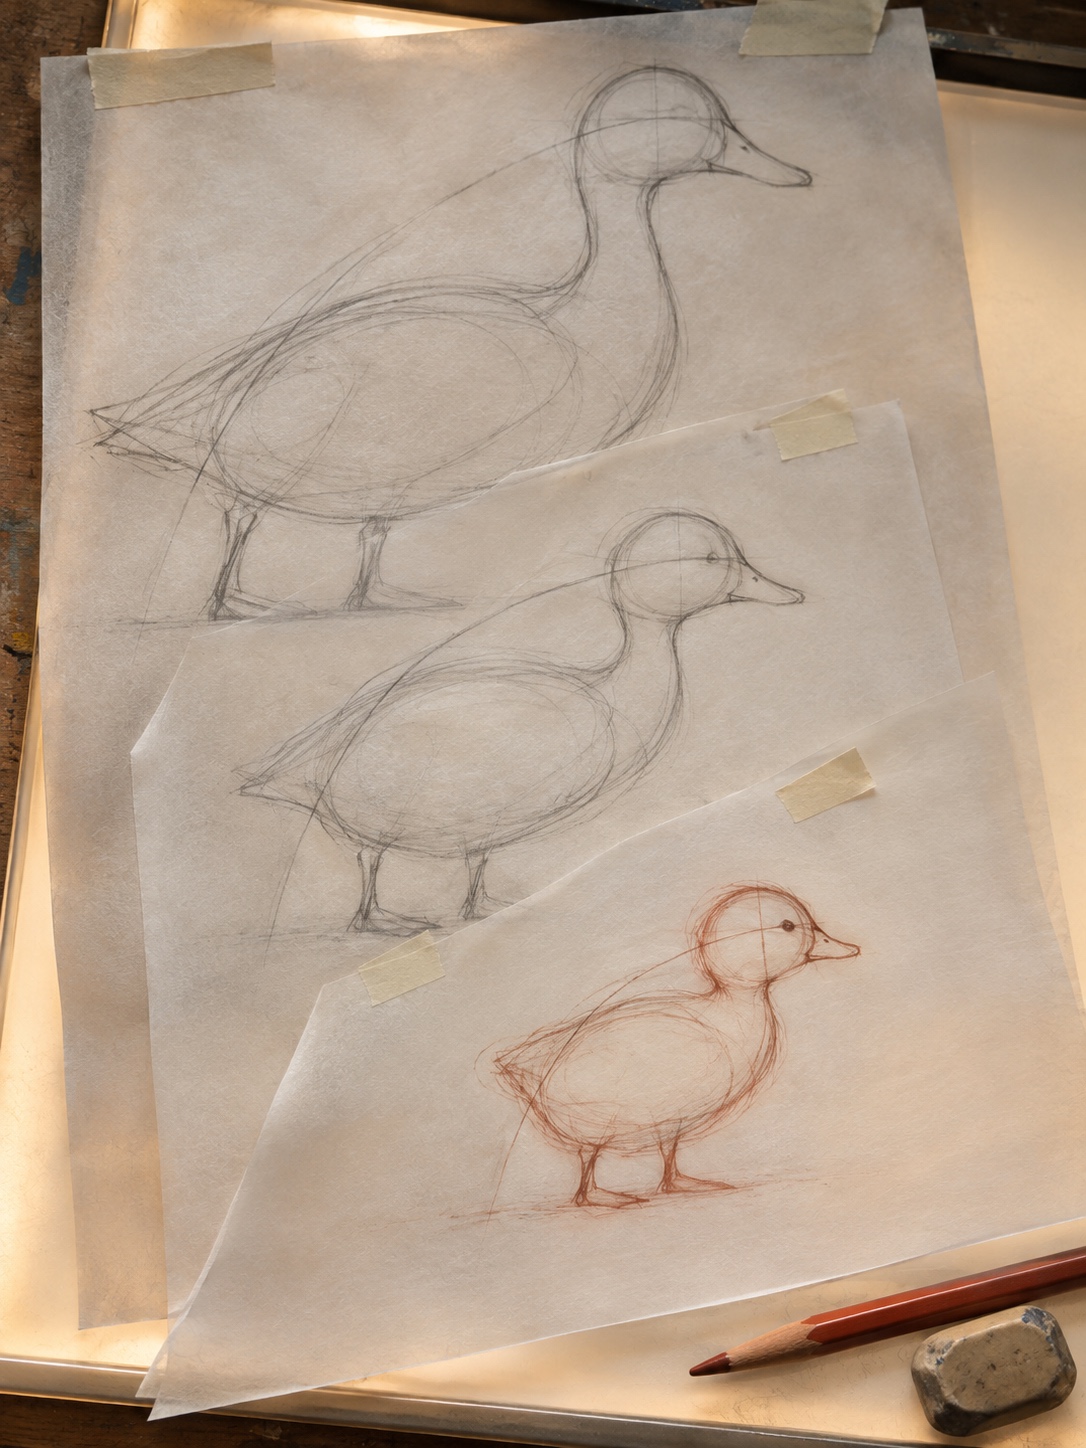
Before: You shrink an adult construction and get a small adult, not a young bird.
Diagnosis: The scale changed, but the ratios didn’t.
Correction: Keep your head circle and gesture line. Shorten the body to about two head lengths. Remove most of the neck, cut the bill nearly in half, lower the eye, reduce the wing to a nub and enlarge the feet. Break up the contour with short marks.
After: The construction is the same, but the bird is visibly younger.
Studio exercise 3: translate a graphite mallard into colored pencil
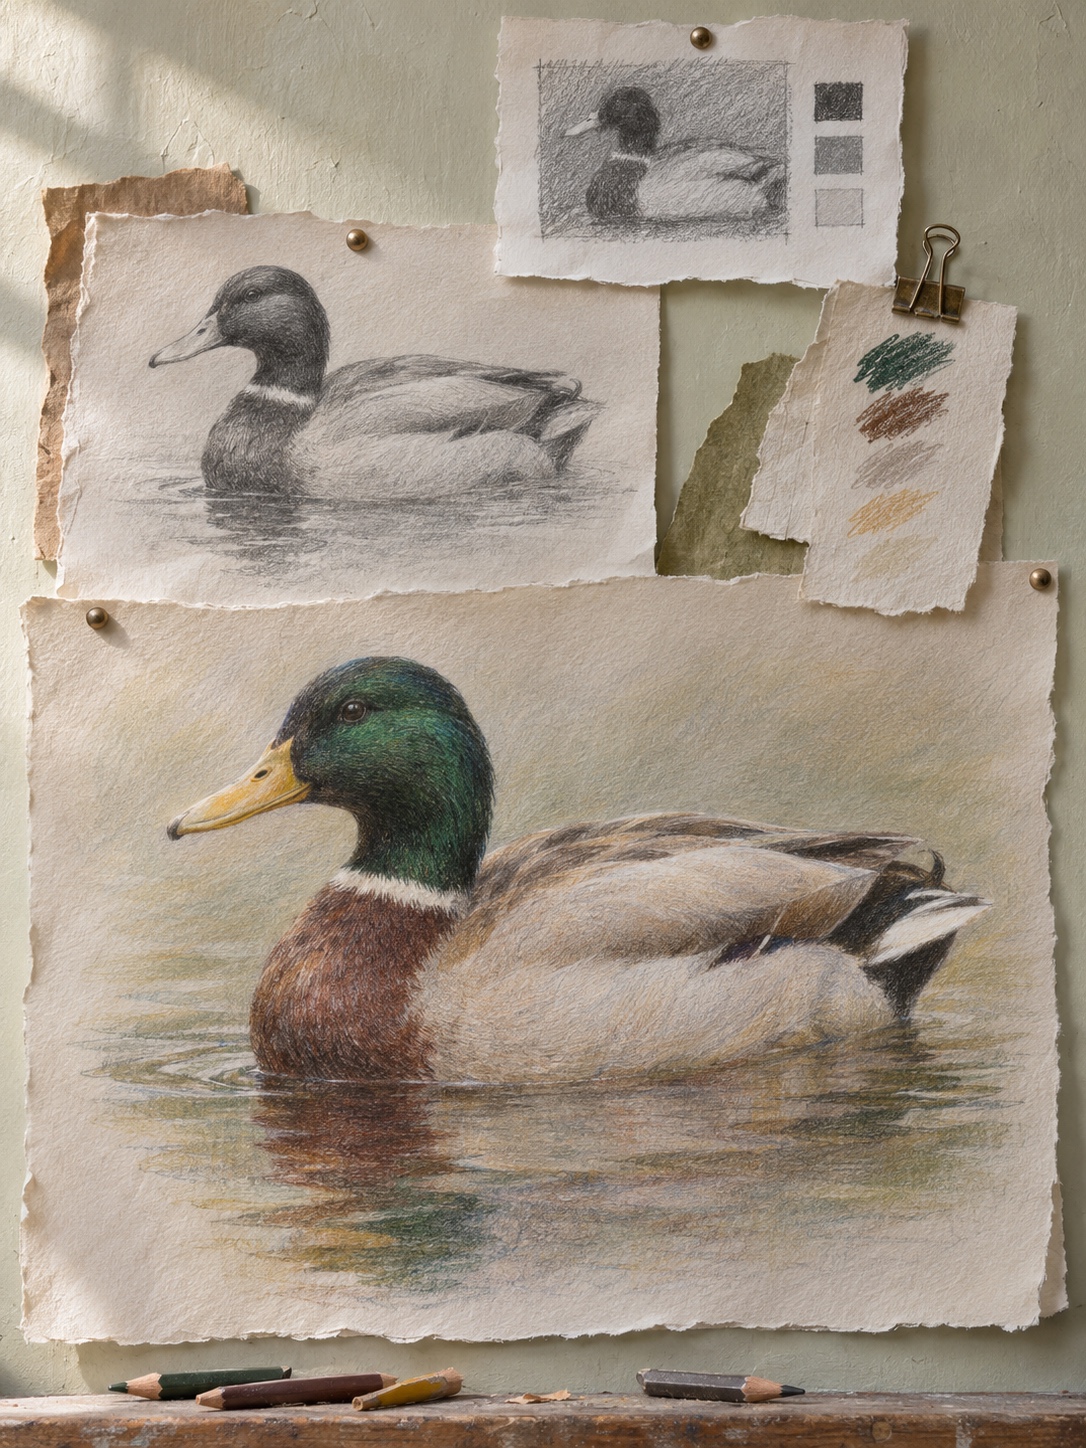
Before: A finished graphite study, dark and polished, gets a coat of color on top. The green turns gray, and the head and breast compete at the same strength.
Diagnosis: The graphite is doing the color’s job, and the value hierarchy was never decided.
Correction: Treat the study as a map, not an underpainting. Make a three-value thumbnail, then transfer only a faint contour and the main feather groups to fresh paper. Build the head from indigo and deep green, reserve the neck ring, keep the breast a step lighter than the head’s darkest areas, and hold the body in pale warm gray. Burnish only the head, bill and a few breast feathers.
After: Photograph both drawings in grayscale. The color version should read dark head, mid-value breast, light body. If it doesn’t, fix the values before adding more color.
Troubleshooting table
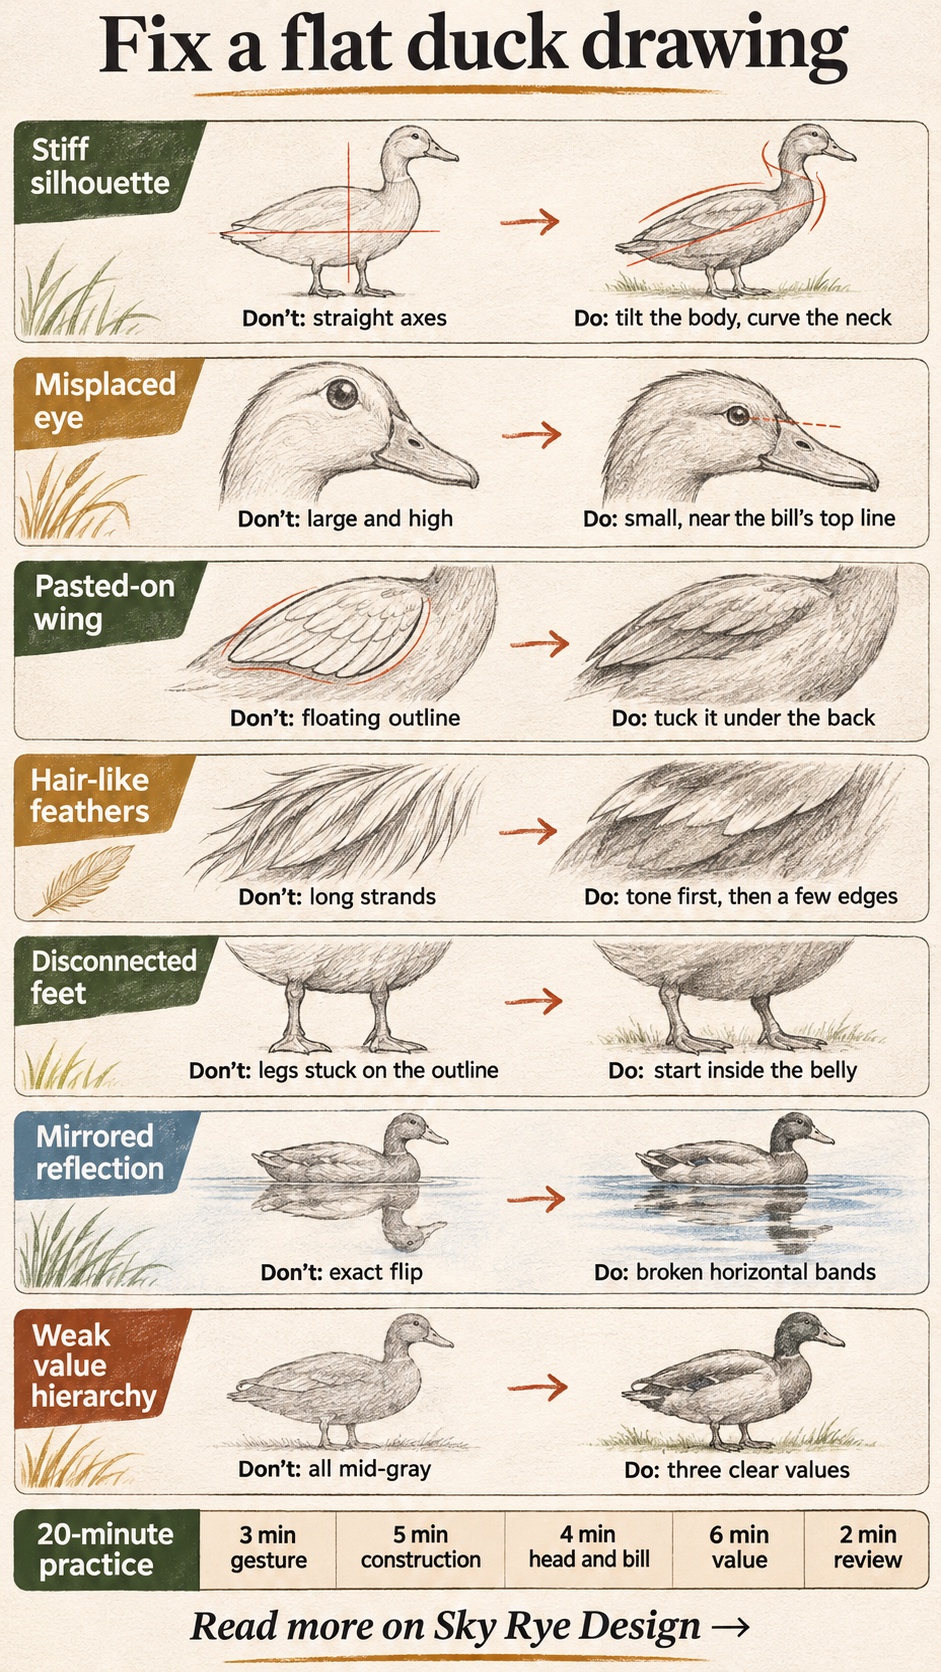
| Problem | Likely cause | Fix |
|---|---|---|
| Looks like a different bird | Narrow, pointed bill or overlong neck | Flatten and widen the bill, shorten the neck |
| Stiff body | All axes horizontal or vertical | Tilt the bean and curve the gesture line |
| Startled expression | Eye too large or too high | Shrink it and check it against the bill’s top line |
| Wing looks pasted on | Closed outline in the middle of the body | Move it back, tuck the top edge under the back |
| Feathers look like hair | Long, thin, repeated strokes | Lay tone first, then define a few feather edges |
| Feet look disconnected | Legs start at the body’s outline | Draw from inside the belly, feet under the balance point |
| Reflection looks like a sticker | Exact flip with hard edges | Use horizontal bands, lower contrast, a faded edge |
| Shading looks flat | Everything sits in mid-gray | Use three values, darkest at the focal area |
How to practice
A 20-minute routine
- 3 minutes, gesture: six fast action lines from reference photos.
- 5 minutes, construction: two ducks using only bean, sphere, neck curves and wedge.
- 4 minutes, head and bill: three heads at different angles, checking the eye against the bill.
- 6 minutes, value: one small duck in three values with a cast shadow.
- 2 minutes, review: write one thing to fix tomorrow in the margin.
A 7-day plan
- Day 1, gesture and bean: ten small side views with no detail.
- Day 2, heads: ten heads, varying the bill angle and eye position.
- Day 3, wings, tails and feet: study each from reference, then attach them to simple bodies.
- Day 4, full drawing: complete the easy tutorial twice, the second time from memory.
- Day 5, realism: make a value scale, then one graphite study.
- Day 6, water: draw a swimming duck with a waterline, ripples and a broken reflection.
- Day 7, your choice: make a colored mallard, a duckling or a cartoon, then compare it with Day 1.
Date the pages and keep the bad ones.
Common mistakes
- Starting with the eye. It locks the head in place before you know the size of the bird.
- Pressing hard too early. Dark construction becomes contour you cannot change.
- Drawing only what will show. Drawing through helps the far leg, wing and waterline sit correctly.
- Detailing everything equally. Choose a focal area, usually the head, and let the rest stay quiet.
- Adding water as decoration. Plan the waterline from the first step.
FAQs
How do I draw a duck the easy way?
Build it from a bean body, a circle head, two neck curves and a flat wedge bill. Add a small eye, a teardrop wing and a lifted tail.
What is the best simple duck drawing for pencil beginners?
Start with the side view, which shows the bill, neck, wing and tail with no foreshortening. An HB and a 2B are enough.
Can kids follow this method?
Yes, with a simplified version. Focus on big shapes, skip the measuring and let an adult handle the sharpening.
How do I make a duck drawing look realistic?
Group the feathers, control your edges and choose one light direction before adding fine detail.
What colors do I need for a mallard?
For a male: deep green, indigo, yellow ochre, burnt orange, chestnut brown, warm gray, dark umber and white.
How do I draw a duck in water?
Let the waterline cut across the lower body, leave out the feet, add broken elliptical ripples and split the reflection into fading horizontal bands.
What makes a duck drawing hard?
Mostly viewpoint and pose. Front and three-quarter views foreshorten the body and bill, and preening or flapping complicates the wing. The same simple forms still apply.
How is a cartoon duck different from a realistic one?
Both can use the same base. A cartoon exaggerates a few shapes and removes most detail, while a realistic study stays close to observed proportions and value.
Keep the construction, change the bird
A convincing duck rarely depends on a special pencil or feather tricks. It depends on whether the body has weight, the head connects, the bill is flat and the values have order.
Draw the same construction until you stop thinking about it, then change the pose. You’ll find more drawing guides and visual studies on Sky Rye Design. For now, start a fresh page with one gesture line.
- 13shares
- Facebook0
- Pinterest13
- Twitter0
- Reddit0