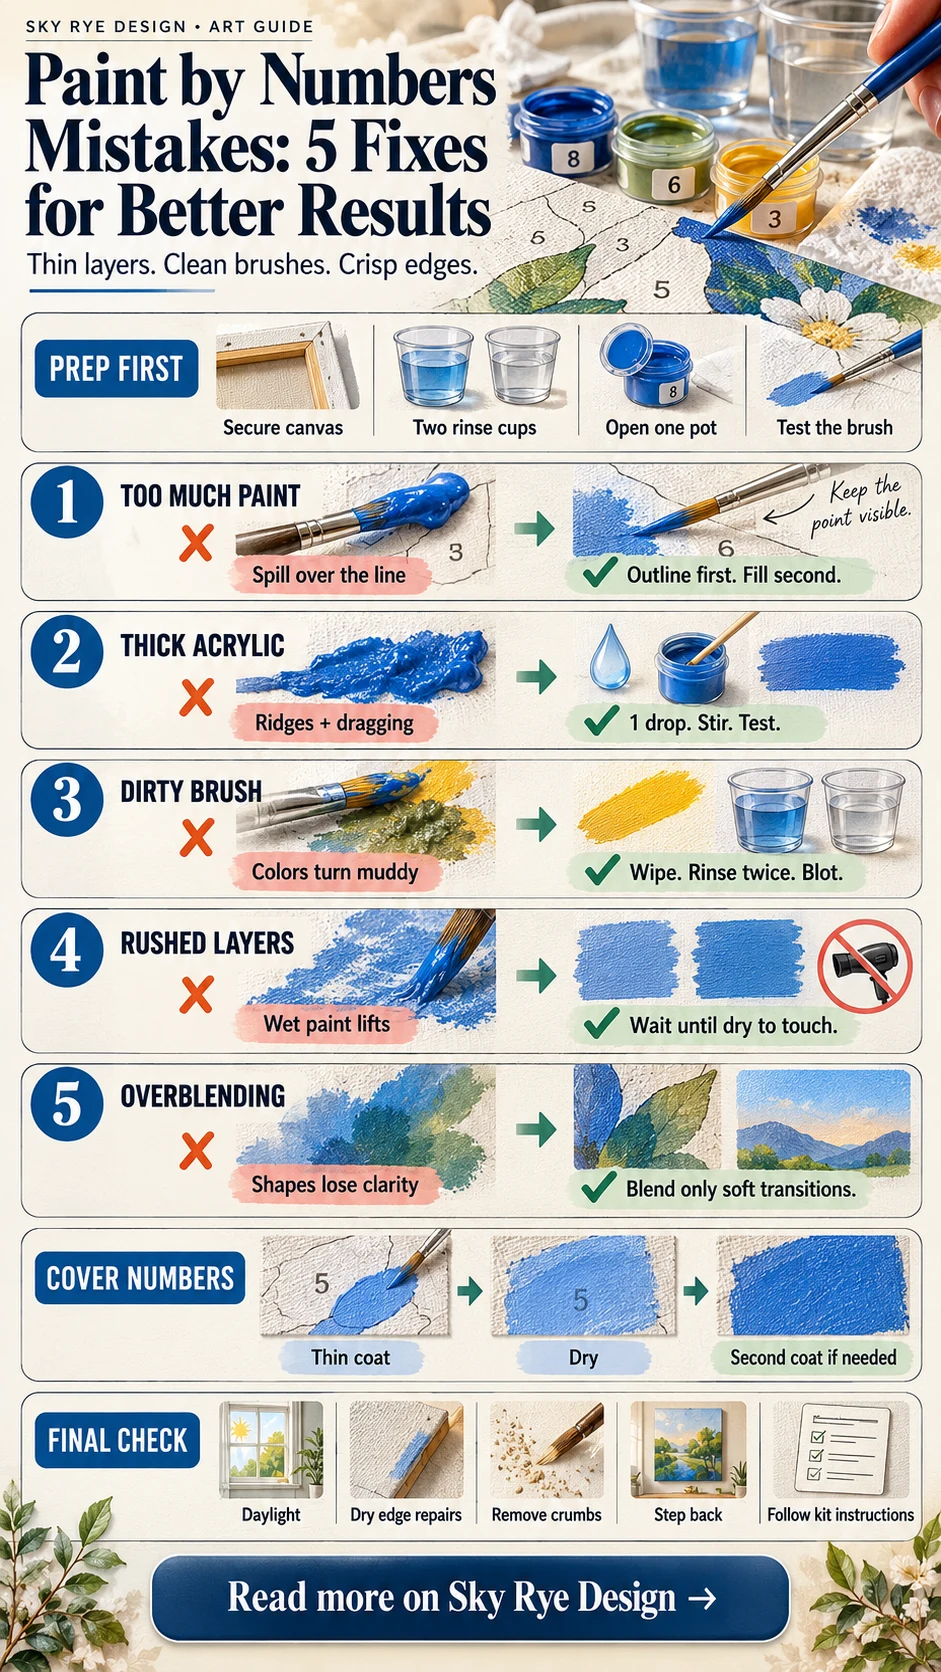
Most paint by numbers mistakes are not about talent. They come from a brush carrying too much paint, an acrylic pot left open too long, or a second pass made before the first has settled. The practical fix is to work in thin layers, keep the brush point clean, and stop correcting an edge while both colors are wet.
This guide covers the five problems that make a numbered canvas look muddy or uneven: paint crossing the lines, thick or drying acrylic, contaminated colors, rushed layers, and unnecessary blending. Each one can be prevented, and most can be repaired without starting the section again.
Paint by numbers mistakes: quick fixes
| What went wrong | What you will notice | Best next move |
|---|---|---|
| Too much paint or a large brush | Paint crosses the printed boundary | Let it dry, then rebuild the edge with a small clean brush |
| Paint has thickened | Dragging, ridges, or patchy coverage | Test one drop of water if the kit allows it; replace solid paint |
| Brush was not fully rinsed | Fresh colors look grey or muddy | Use a two-stage rinse and blot before loading the next color |
| Layer is still wet | Colors lift, mix, or leave bare streaks | Stop and wait until the surface is dry to the touch |
| Every edge was blended | Shapes lose clarity and values merge | Keep intentional hard edges; blend only where the reference supports it |
Prepare the kit before opening every paint pot
Flatten or secure the canvas, photograph the color chart, and arrange the pots so their numbers are easy to read. Keep clean water, a second rinse cup, paper towel, a fine round brush, and a small flat brush within reach. Open only the color you are using. Acrylic forms a skin quickly in a shallow pot, and leaving several lids open turns a relaxed session into a race.
Before the first section, test the brush on a palette or scrap card. The paint should leave an even mark without a raised bead at the end. When I check a numbered canvas, I look at edge control before opacity. A clean edge with a slightly transparent first coat usually reads better than a thick, opaque patch that spills into the neighboring shape.


1. Loading too much paint and crossing the lines
A brush that is too large for the shape is difficult to steer, but an overloaded small brush causes the same problem. Dip only the lower part of the bristles, then roll or tap one side against the palette so the point stays visible. Use the tip to draw the boundary first and fill the center second.
If paint crosses a line, leave it alone until it dries. Wiping wet acrylic often enlarges the mark and pulls the correct color out of the neighboring section. Once dry, restore the boundary with the adjacent color in one or two thin coats. For tiny corners, rotate the canvas instead of twisting your wrist into an awkward angle.


2. Trying to paint with acrylic that is too thick or dry
Slightly thick paint drags across the canvas and leaves the printed number visible between ridges. If the kit label allows water thinning, add one clean drop, stir slowly with a toothpick, and test the consistency. Add another drop only after the first is fully mixed. Pouring water directly into a tiny pot is hard to reverse and can leave the color weak or foamy.
Do not expect a rubbery lump or solid puck to return to fresh paint. Replace that color with a compatible artist acrylic, matching it on a white card and allowing the swatch to dry before deciding. Wet acrylic can shift slightly as the water leaves the film. For a broader comparison of paint behavior, the watercolor versus acrylic guide explains opacity, layering, and correction.


3. Carrying one color into the next with a dirty brush
One trace of a dark blue can dull an entire pot of yellow. Wipe excess paint onto paper towel before rinsing, swish the brush in the first cup, finish in the second cup, then blot and check the bristles. The water inside the ferrule matters too; a brush that looks clean can still release a grey wash when pressed.
Clean acrylic from the brush before it dries. The Liquitex brush-care guidance recommends removing excess paint, rinsing with water, washing gently with soap, reshaping the bristles, and avoiding a soak above the ferrule. If your brush has lost its point, reserve it for larger background sections and use a sound detail brush for boundaries.
4. Rushing a second coat or forcing the drying process
A second coat applied too soon can lift the first one and produce a streak that looks lighter than either layer. Touch the edge lightly with a clean fingertip. If it feels cool, tacky, or leaves color behind, move to a different part of the canvas and return later.
Drying time changes with film thickness, humidity, temperature, airflow, and the absorbency of the canvas. The GOLDEN technical notes on acrylic drying distinguish a surface that is dry to the touch from a film that has dried through. Gentle room airflow is useful; strong heat aimed at fresh paint can dry the surface too quickly and may cause bubbling or other film problems.


5. Blending every boundary instead of reading the design
Paint by numbers is built from separated color shapes. Those hard edges are often part of the design, especially in graphic florals, architecture, and patterned subjects. Blending every border can reduce contrast, bury small shapes, and turn two useful colors into one dull middle value.
Blend only where the reference image shows a gradual transition, such as a soft sky, reflected light, or a rounded cheek. Place the two colors beside each other while both are workable, then feather the shared edge with a clean, barely damp brush. Two or three passes are enough. If the paint starts to drag, stop; repeated brushing over half-dry acrylic creates a rough patch.
For practice beyond the numbered guide, try the edge, gradient, and layering ideas in ways to use paint in drawings. A structured kit teaches brush control, but a small freehand study teaches you when to keep or soften an edge.
How to cover printed numbers without heavy paint
Use a thin first coat to establish the shape, let it dry to the touch, then add a second coat only where the number or canvas still shows. Pale colors may need another pass because some pigments are naturally more transparent. Do not compensate by leaving a thick mound; it creates a visible ridge beside the surrounding sections.
Work under a lamp that reveals glare across the surface. Viewed straight on, a wet patch can look opaque; viewed at a low angle, gaps and ridges are easier to see. If you want a less rigid next project, compare the beginner options in seven beginner art projects or use the short sessions in the 7-day art challenge.
Choosing a kit that is easier to finish
Look for a clear reference image, readable printed numbers, sealed paint pots, and a design whose smallest areas match your patience and brush control. A large canvas is not automatically easier; hundreds of narrow shapes can be slower than a smaller design with broad areas. If you want to compare commercial options, Figured’Art paint by numbers kits include adult designs and custom-photo formats.
The related guide to custom paint by numbers explains how a personal photo changes the subject and difficulty. Whatever the kit, inspect the canvas and paints as soon as it arrives so missing colors or damaged pots can be addressed before you begin.
Paint by numbers finishing checklist
- Check the painting in daylight and under a side lamp for missed numbers and thin patches.
- Correct edges only after both neighboring colors are dry to the touch.
- Remove loose dust or dried crumbs with a clean, dry soft brush.
- Compare the whole value pattern from several steps away before adding more detail.
- Follow the kit maker’s drying and varnishing instructions before framing.
Set the finished canvas aside for a day, then look again. Small local differences often disappear at normal viewing distance, while one muddy edge or unpainted number remains obvious. Fix the parts that change the image, not every brush mark. If you plan to display the result, the home art studio guide includes practical lighting and storage ideas for works in progress.
Paint by numbers mistakes FAQ
Should I paint light or dark colors first in paint by numbers?
There is no single order that suits every design. Working one color at a time reduces brush cleaning, while moving from larger background shapes to smaller details makes the canvas easier to handle. Check the reference image before deciding. If a very dark section touches several pale areas, I usually paint the pale shapes first and let them dry so the edge stays easier to correct.
How do I thin thick paint in a paint by numbers kit?
Check the kit instructions first. If the paint is water-based acrylic and only slightly thick, add one drop of clean water, stir slowly with a toothpick, and test it on a spare surface. Repeat only if needed. Do not flood the pot. Paint that is rubbery, lumpy, or solid is unlikely to return to a smooth, reliable consistency and is better replaced.
How many coats does paint by numbers need?
Use as many thin coats as the color needs to cover the printed number without leaving a ridge. Pale yellows, creams, and some transparent pigments often need a second pass, while an opaque dark color may cover in one. Let the first layer become dry to the touch before judging its opacity; wet acrylic can look different from the finished film.
Should paint by numbers colors be blended?
Blend only where the reference image shows a soft transition or the kit specifically encourages it. Many designs rely on clean, separate color shapes, and blending every border can make the picture muddy. Test a transition on a palette or spare card first. If the two colors dry too quickly, keep the edge crisp instead of repeatedly scrubbing it.
How do I fix paint that went outside the lines?
Stop and let the area dry. Trying to wipe wet acrylic often spreads the mistake into two sections. Once dry, use a small clean brush and the correct neighboring color to rebuild the edge with a thin coat. If the wrong color is much darker, it may take two light corrective coats rather than one heavy patch.
How long should I wait between paint by numbers layers?
Wait until the surface is dry to the touch and no longer lifts onto a clean fingertip. The exact time changes with paint thickness, room temperature, humidity, airflow, and the canvas surface. Thin sections can set quickly; thicker corrections take longer. Avoid strong direct heat, which can dry the surface faster than the paint underneath.
How do I stop paint by numbers brushes from becoming stiff?
Wipe excess acrylic from the brush, rinse it before the paint dries, wash it gently with mild soap and water, reshape the point, and leave it flat or bristles-up to dry. Do not leave the brush standing on its tip in the water, and do not soak the handle above the metal ferrule. Clean water changes also prevent one color from dulling the next.
Related art practice
- Study value and depth with the landscape painting guide.
- Keep color tests and brush notes in one of these artist sketchbooks.
- Browse more tutorials and project ideas in the Sky Rye Design art archive.
- 13shares
- Facebook0
- Pinterest13
- Twitter0
- Reddit0