Dreaming of digital art but feel stuck at the starting line? Procreate on iPad offers a simple way to begin your artistic journey without the mess of traditional materials. You can create your first digital sketch in Procreate in just 5 minutes, even if you’ve never used the app before.

The app’s intuitive design makes it perfect for beginners. With a few taps, you can select brushes, adjust sizes, and start creating right away. No complex menus or confusing tools stand in your way.
Many new artists feel overwhelmed by digital art programs, but Procreate breaks this barrier. Its straightforward interface puts creativity first, letting you focus on your ideas rather than struggling with complicated software.
Key Takeaways
- Procreate’s simple interface allows anyone to start sketching immediately with minimal setup time
- Basic tools like the pencil brush and eraser are all you need for your first successful sketch
- Creating layers helps organize your work and makes corrections easier as you develop your skills
Getting Started in Procreate

Procreate offers a simple starting point for digital artists of all levels. The app combines powerful tools with an easy-to-learn interface that works well on iPad devices.
Setting Up Your Digital Canvas
To begin your Procreate journey, first open the app on your iPad. You’ll see the gallery screen with a “+” button in the top right corner. Tap it to create a new canvas.
Procreate offers preset canvas sizes for different projects. Choose from options like Screen Size, Square, or Portrait.
For beginners, the default screen size works well for practice. You can also create a custom canvas by setting specific dimensions, DPI, and color profile.
Canvas Settings to Consider:
- Dimensions (width and height)
- DPI (300 is standard for print)
- Color profile (sRGB is common)
- Layers (affects maximum canvas size)
Remember that larger canvases use more memory and may limit your maximum layers.
Exploring the Procreate Interface
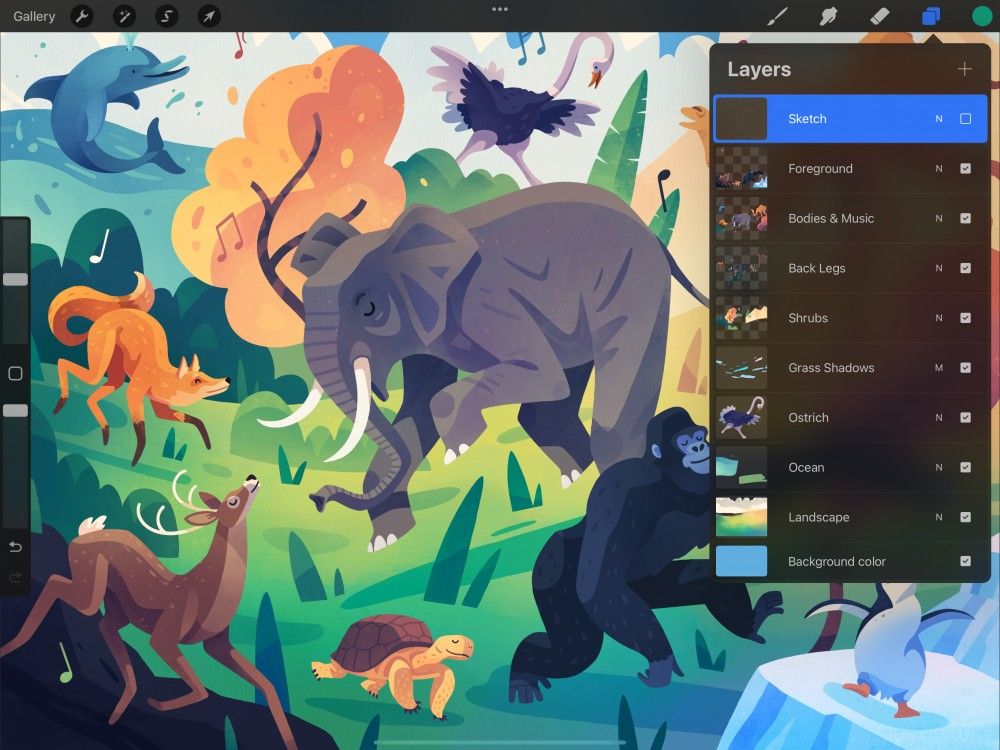
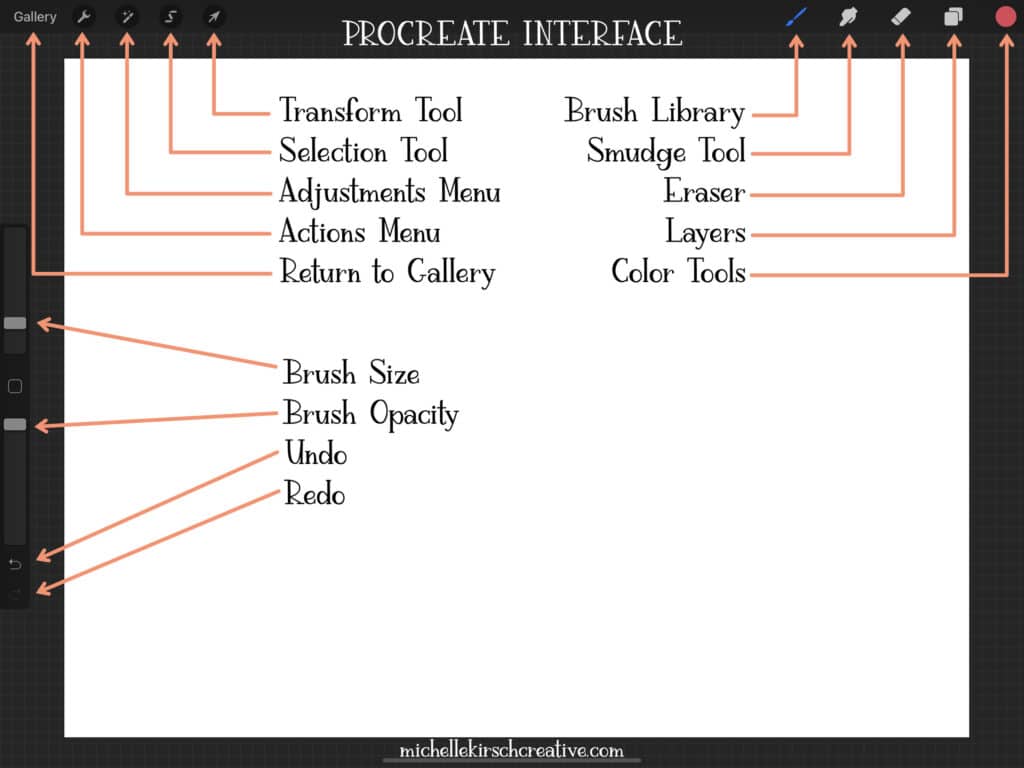
The Procreate interface keeps tools accessible without overwhelming new users. The main drawing area takes center stage with minimal elements around it.
At the top, you’ll find the adjustments bar with brush size, opacity, and layer controls. The toolbar sits on the right side with your brush library, eraser, smudge tool, and layers panel.
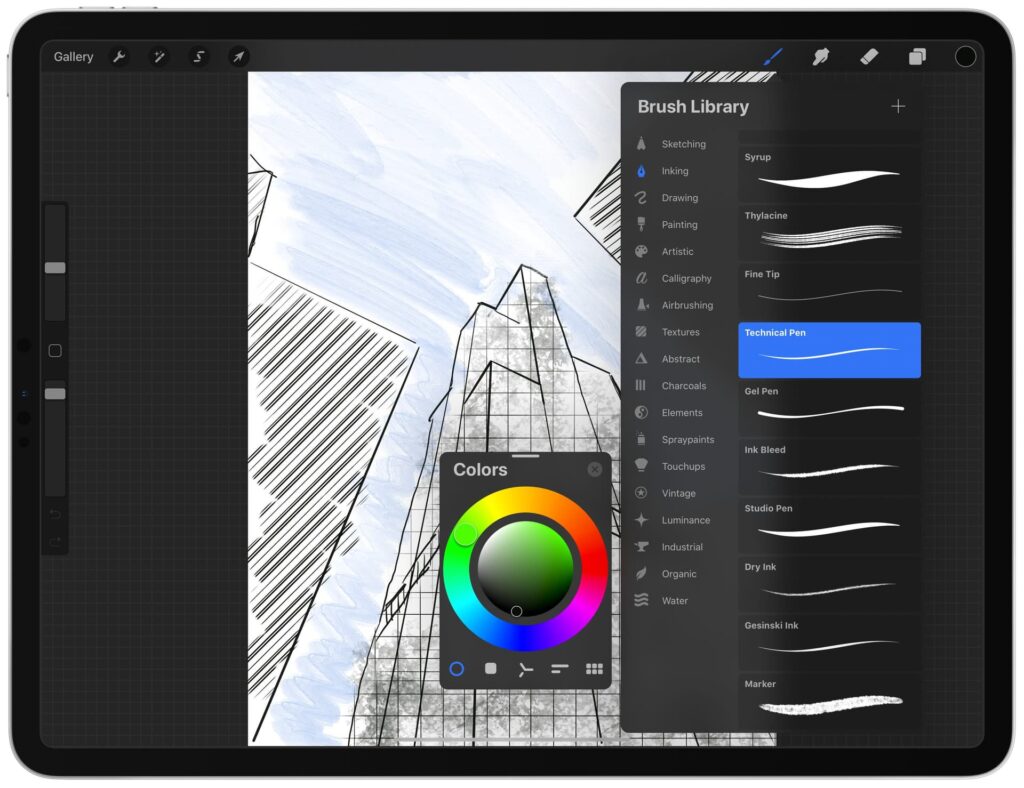
The left side contains the color selector and undo/redo buttons. This clean layout helps beginners focus on creating rather than hunting for tools.
Two-finger tap quickly undoes mistakes. Three-finger tap opens the copy/paste menu. These gestures make your workflow faster once you learn them.
Procreate saves your work automatically, so you don’t need to worry about losing progress.
Navigating Tools and Menus
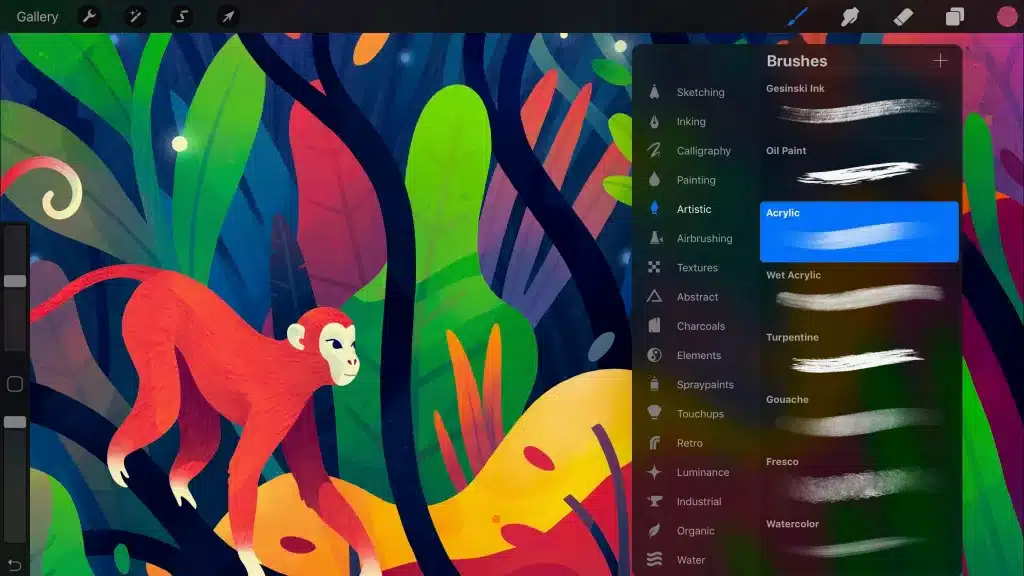
Procreate organizes tools logically for easy access. The brush library contains different brush sets categorized by type like Sketching, Inking, and Painting.
To select a brush, tap the brush icon and choose from the available options. Each brush can be customized by tapping it again to access settings.
Essential Tools for Beginners:
- Brushes (for drawing and painting)
- Eraser (removes unwanted marks)
- Smudge tool (blends colors)
- Selection tool (isolates areas)
- Layers panel (organizes artwork)
The Actions menu (wrench icon) contains important functions like adding text, importing images, and exporting your work. This menu also houses preferences where you can adjust how Procreate responds to your touch.
Practice pinch gestures to zoom in and out of your artwork. Use two fingers to rotate the canvas for comfortable drawing angles.
Choosing Essential Brushes and Tools

Procreate offers many brushes and tools that can seem overwhelming at first. The right selection makes sketching faster and more enjoyable.
Selecting Sketching Brushes
Procreate comes with a variety of brushes perfect for sketching. The “Sketching” category contains several options for beginners to try.
The 6B Pencil is great for rough sketches and resembles a real pencil. It creates natural-looking lines with slight texture.
Technical Pen works well for clean, precise lines. Many artists use this for final line art or detailed work.
The Soft Brush is perfect for shading and creating smooth transitions. It blends easily and adds depth to sketches.
Try these three brushes first before exploring others. Each has different strengths for different parts of your sketch.
Customizing Brush Size and Opacity
Adjusting brush settings helps you control your sketch details. Brush size and opacity are the most important settings to learn.
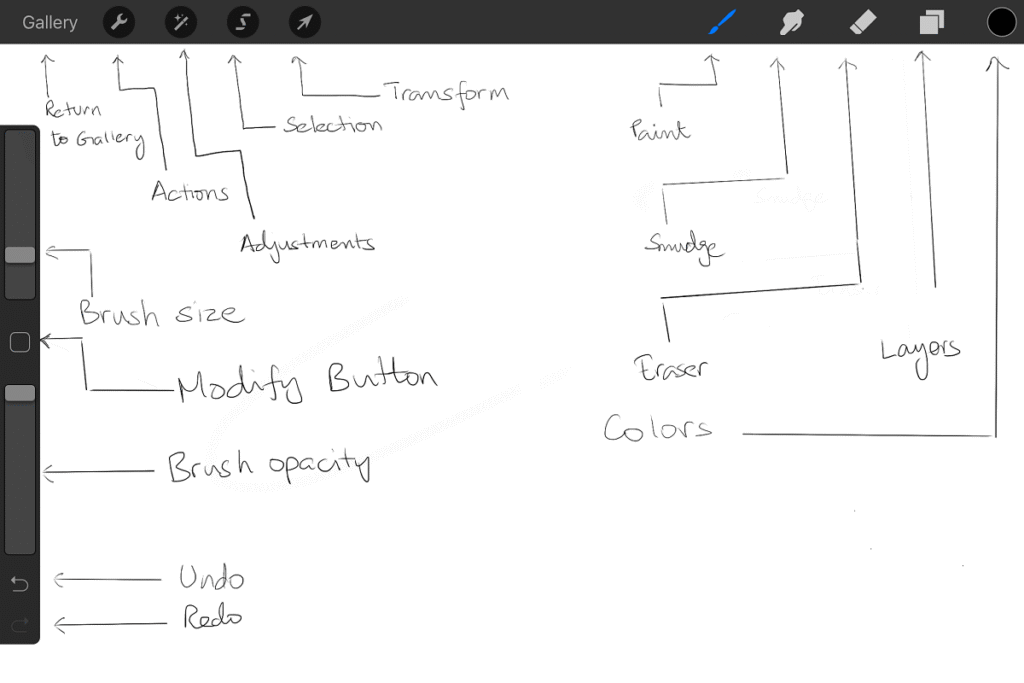
To change brush size, use the slider on the left side of the screen. Small sizes (1-5%) work well for details, while larger sizes (20-40%) are good for filling areas.
Opacity controls how see-through your strokes appear. Find this setting on the right slider.
- 100% opacity: solid, bold lines
- 30-50% opacity: good for shading
- 10-20% opacity: light sketching and planning
Try drawing with different settings to see how they affect your work. These small adjustments make a big difference in your sketch.
Exploring Painting Tools
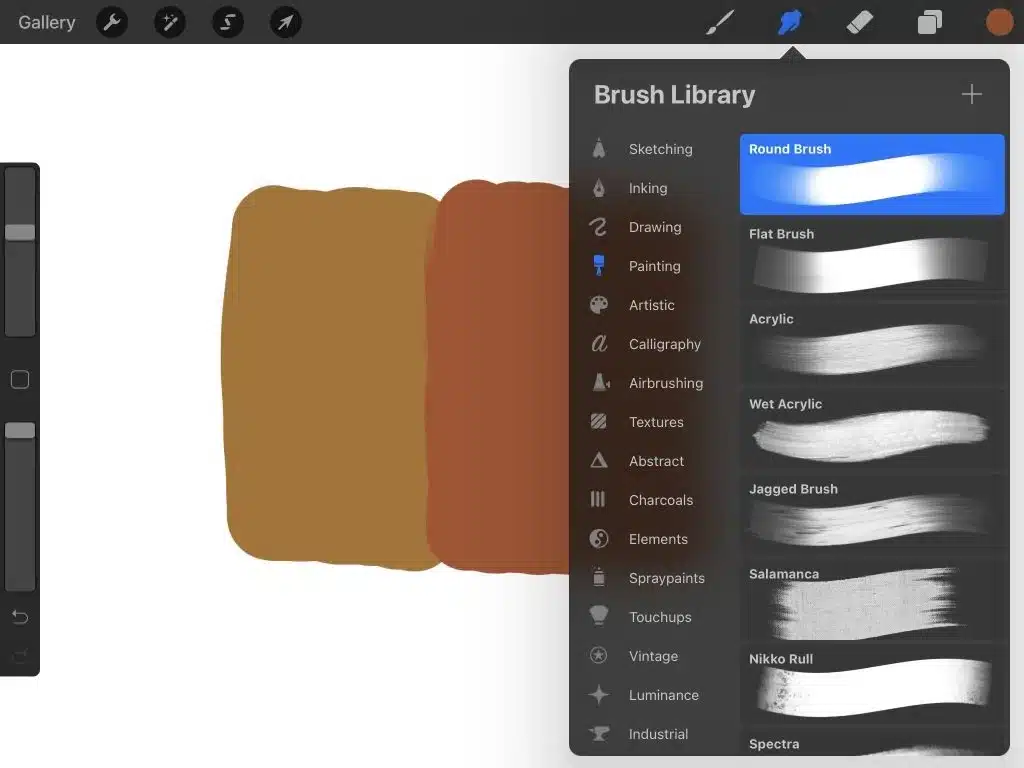
Beyond brushes, Procreate offers helpful tools that make sketching easier and more efficient.
The Eraser tool uses the same brushes as the painting tool. This means you can erase with the same texture you drew with—very useful for natural corrections.
Smudge helps blend colors and lines together. It works like running your finger across a real drawing.
The Selection tool lets you move, resize, or duplicate parts of your sketch. This saves time when you need to reposition elements.
Layers keep different parts of your drawing separate. Put rough sketches on one layer and final lines on another for more control.
Sketching Your First Outline

Now it’s time to put pencil to digital paper in Procreate. The right techniques will help you create clean, precise outlines that form the foundation of your sketch.
Drawing Basic Shapes and Lines
Start with simple shapes as the building blocks of your sketch. Tap the brush icon in the top right corner and select the “Sketching” category, then choose “6B Pencil” for a natural feel.
To begin drawing, touch your Apple Pencil to the screen and drag. Apply light pressure for thin lines and press harder for thicker, darker strokes.
Try creating basic shapes:
- Circles for heads or round objects
- Squares and rectangles for structures
- Triangles for directional elements
Practice making straight lines by drawing quickly from one point to another. Don’t worry about mistakes—tap the two-finger gesture to undo any errors.
Turn on drawing guides by tapping the wrench icon, then “Canvas” and “Drawing Guide.” These grid lines help maintain proportion and perspective in your sketch.
Using QuickShape for Precision
QuickShape is a powerful Procreate feature that transforms rough shapes into perfect forms. Draw a circle or line, but keep your pencil on the screen after finishing the shape. After a moment, Procreate will transform it into a perfect version.
Here’s how to use QuickShape effectively:
- Draw your shape (circle, square, line, etc.)
- Hold your pencil down at the end of your stroke
- Watch as the shape snaps into a perfect form
- Lift your pencil to accept the shape
You can create perfect squares, circles, triangles, and straight lines this way. This feature saves time and creates clean outlines.
For curved lines, try drawing an arc and holding at the end. QuickShape will smooth it into a perfect curve.
Mastering the Pencil Tool
The Pencil tool offers remarkable control over your sketching. To adjust settings, tap on the pencil tool and use the sliders to change:
- Size: Controls line thickness
- Opacity: Affects transparency
- Streamline: Smooths out your lines
For sketching outlines, start with a medium-sized pencil at about 70% opacity. This allows for visible lines that aren’t too harsh.
Create depth by varying your line weight. Use lighter pressure for distant or less important elements, and press harder for foreground objects or key details.
Try sketching with your wrist elevated slightly above the screen. This position gives you better control and prevents accidental marks from your hand.
Remember to use layers for your outline. Tap the layers icon (two squares) and create a new layer for your sketch. This keeps your work organized and lets you edit easily.
Working with Layers for Organization

Layers help you create complex artwork by separating elements into stackable pieces. You can move, edit, and hide each layer without affecting the rest of your drawing.
Adding and Arranging Layers
Procreate organizes artwork using layers that stack on top of each other. To add a new layer, tap the “+” icon in the Layers panel, which you can open by tapping the layers button in the top right corner.
You can rearrange layers by pressing and dragging them up or down in the stack. Higher layers appear on top of lower layers in your artwork.
Quick Layer Tips:
- Tap a layer to select it before drawing
- Swipe left on a layer to access delete and duplicate options
- Pinch two layers together to group them
The layer you’re currently working on appears highlighted. You can hide a layer by tapping the checkbox next to it, which is useful when working on complex drawings.
Adjusting Layer Opacity
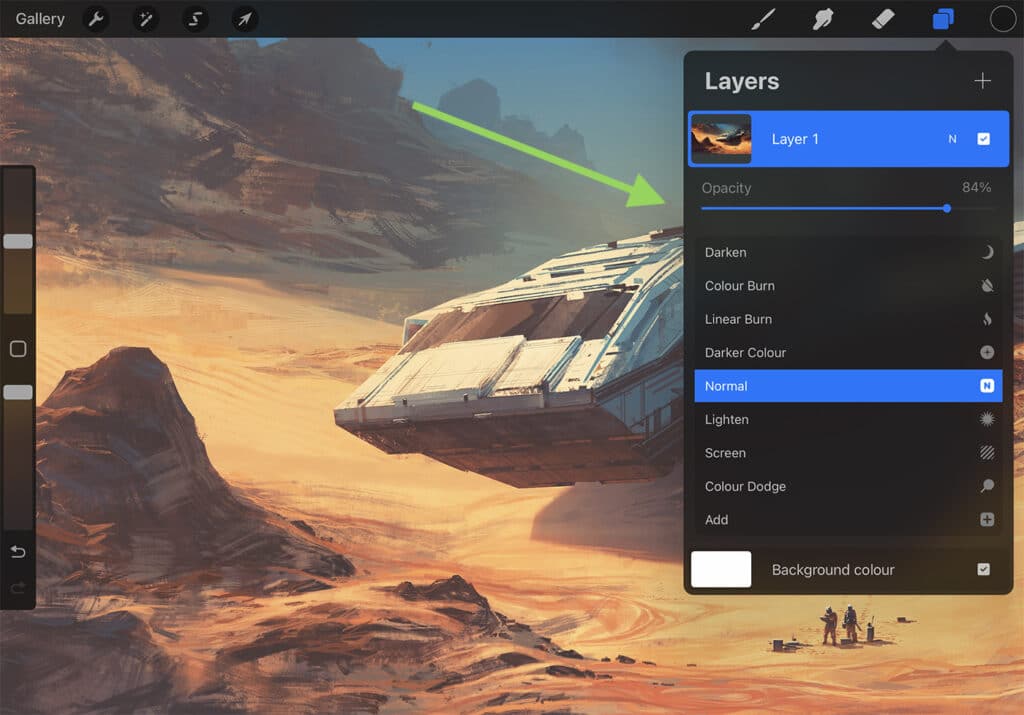
Opacity controls how transparent or solid your layer appears. To change a layer’s opacity:
- Select the layer in your Layers panel
- Tap the “N” (for normal) next to the layer
- Use the Opacity slider to adjust transparency
Lower opacity values make layers see-through, which is perfect for:
- Creating subtle shading effects
- Building up color gradually
- Placing reference sketches underneath your main artwork
Try setting your sketch layer to 20% opacity and adding a new layer on top for cleaner linework.
Introducing Alpha Lock and Masks
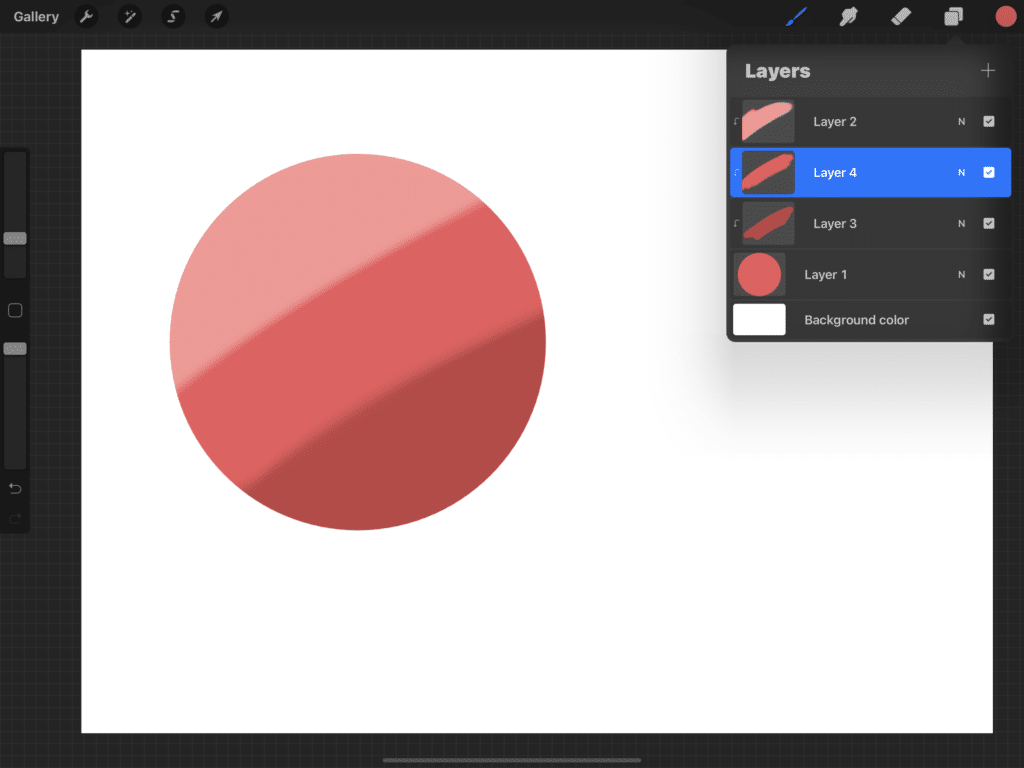
Alpha lock and masks give you precise control over where your colors and brushstrokes appear.
Alpha Lock restricts your painting to only the existing content on a layer. To use it:
- Swipe right on your layer with two fingers, or
- Tap the layer and select “Alpha Lock”
This lets you color inside the lines of existing shapes without going outside their edges.
Clipping Masks allow one layer to only show through the shape of the layer below it. Tap a layer and select “Clipping Mask” to attach it to the layer beneath.
Layer Masks hide or reveal parts of a layer without permanently erasing anything. Add a mask by selecting your layer and tapping “Mask.”
Adding Color and Effects

Now it’s time to bring your sketch to life with vibrant colors and professional effects. Procreate offers powerful tools that make coloring and adding special effects simple and fun.
Choosing and Creating Color Palettes
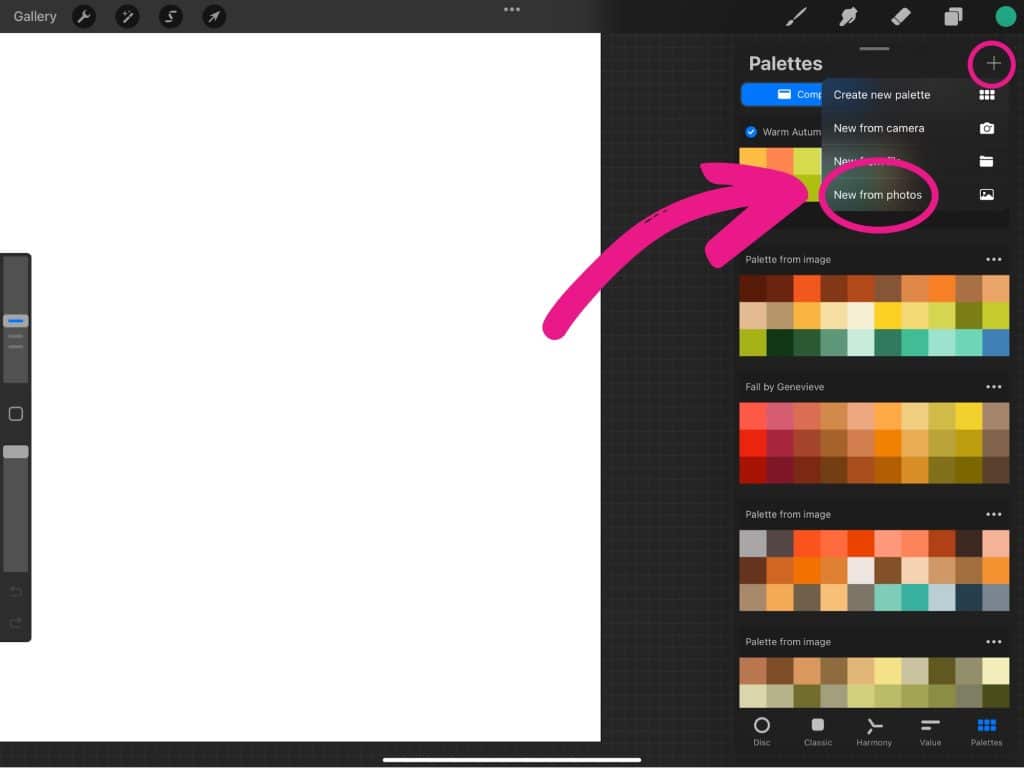
Procreate comes with many built-in color palettes, but you can also create your own. To select a color, tap the circle in the top right corner to open the Color Panel. You can pick colors using the disc, values slider, or classic panel.
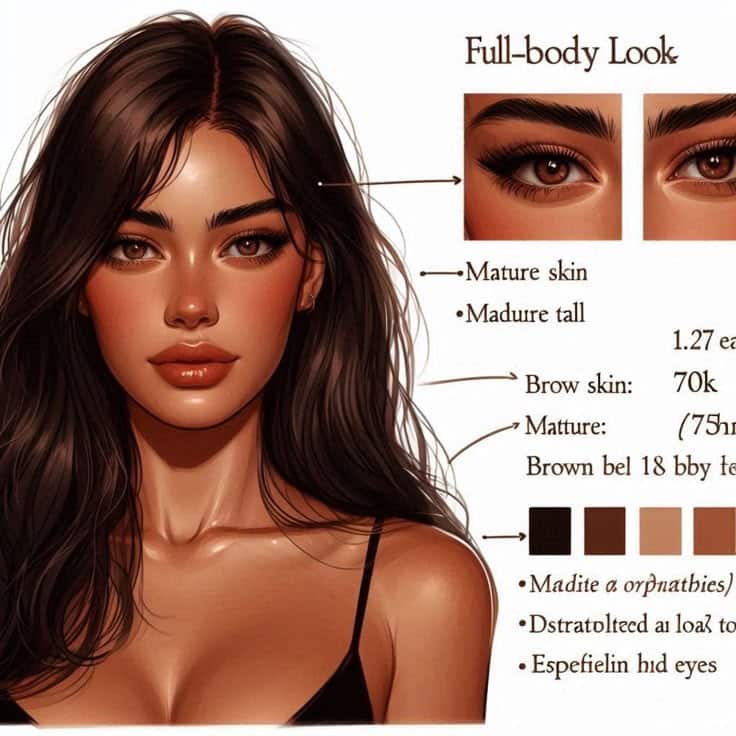
To save colors you like, tap the “+” in the Palettes section. This creates a new palette where you can store your favorite colors.
For a custom palette, you can:
- Import colors from images
- Mix colors using the Color Mixer
- Use the Eyedropper tool (touch and hold on the canvas)
Pro tip: Create separate palettes for different projects to stay organized.
Try using a limited color palette of 3-5 colors for a more cohesive look in your artwork.
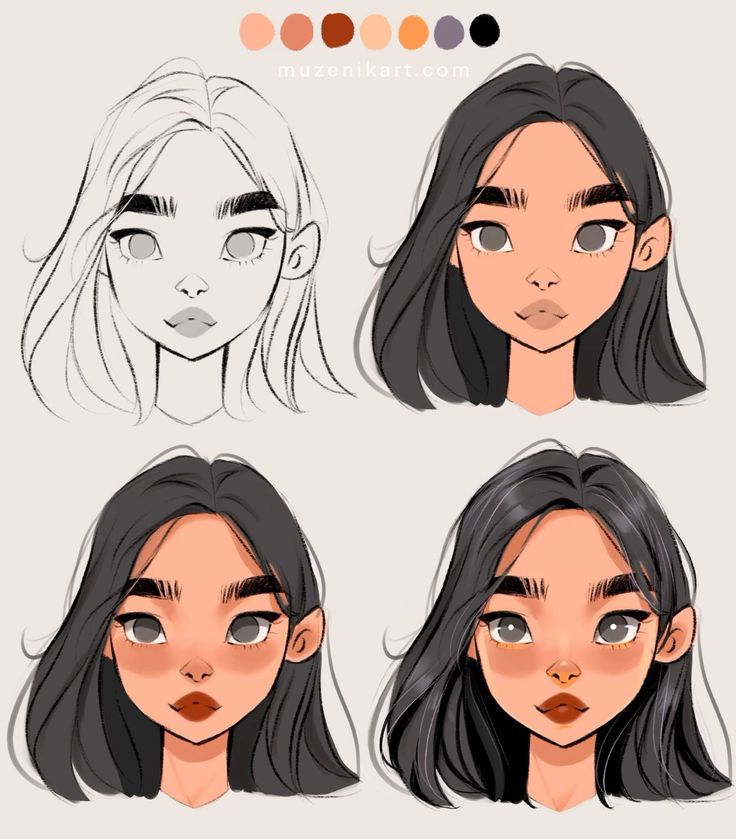
Using the Smudge Tool and Color Balance
The Smudge tool helps blend colors smoothly. Find it in the toolbar (looks like a finger icon). Adjust the size and pressure to control how much blending occurs.
For beginners, try these smudge settings:
- Brush: Soft Brush
- Size: 5-10%
- Opacity: 30-50%
Color Balance lets you adjust the colors in your artwork. Go to Adjustments > Color Balance to find this tool. You can modify:
- Shadows (dark areas)
- Midtones (medium areas)
- Highlights (bright areas)
Each section has sliders for red-cyan, green-magenta, and blue-yellow. Small adjustments often work best. Try moving a slider just 5-10% to see the effect.
Applying Blur and Sharpen Effects
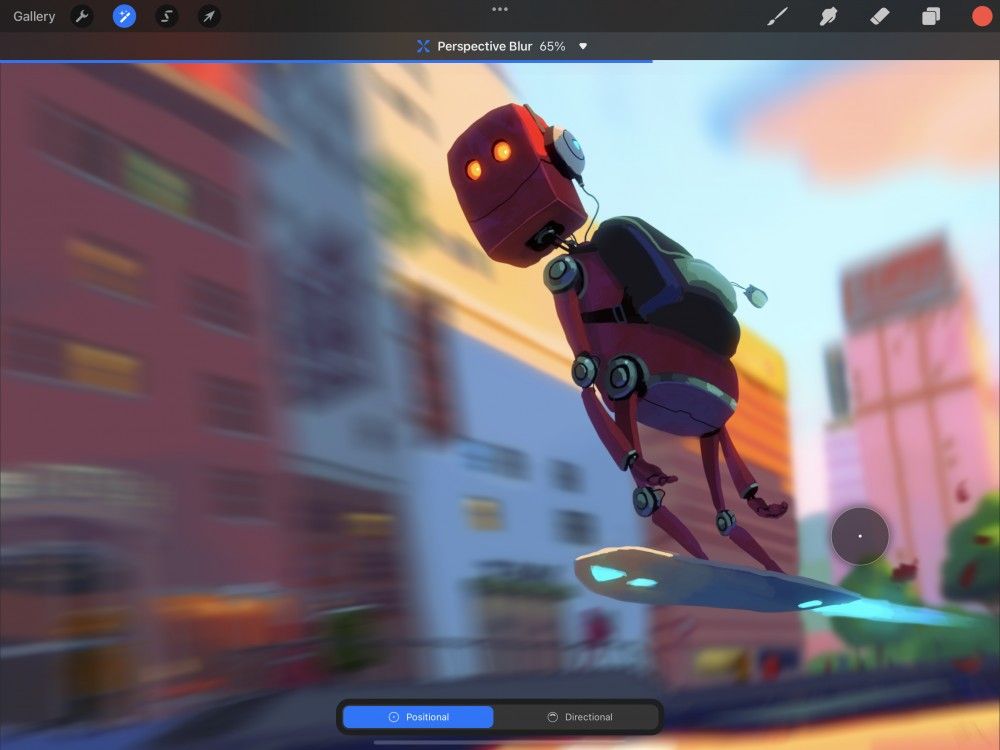
Procreate offers several blur options to soften areas of your artwork. To apply blur:
- Tap the magic wand icon
- Select “Gaussian Blur” or “Motion Blur”
- Adjust the percentage with the slider
Gaussian Blur creates an even, soft effect, perfect for backgrounds. Motion Blur adds a sense of movement in one direction.
The Sharpen effect works the opposite way, making details crisper. Find it in the same Adjustments menu. Use it sparingly—around 10-15%—to avoid a grainy look.
For a professional touch, try adding a bit of noise to your artwork. Go to Adjustments > Noise. A setting of 3-5% creates subtle texture that makes digital art look less flat.
Final Touches and Exporting Artwork

Once you’ve completed your sketch, it’s time to add finishing touches and save your work. Procreate offers simple ways to adjust your artwork and share it with others.
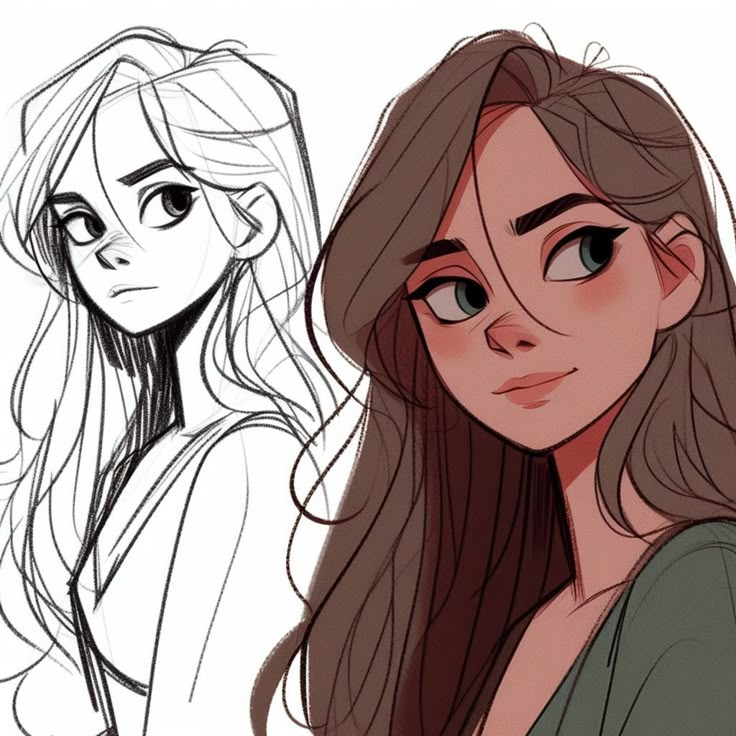
Using the Actions Menu to Save
The Actions menu is your gateway to saving and adjusting your artwork. You can find it in the top left corner of your screen, represented by a wrench icon. Tap this icon to open a menu with several options.
To save your work automatically, Procreate stores your progress as you draw. However, you should still save manually sometimes. Select “Gallery” to return to your gallery, and your work will save automatically.
The Actions menu also lets you make final adjustments. You can:
- Adjust colors with the Adjustments option
- Transform elements to resize or reposition them
- Select parts of your drawing to edit separately
If you need to undo mistakes, you can tap with two fingers or use the undo button at the bottom of the screen.
Exporting and Sharing Your Sketch
Procreate offers many export options for your finished artwork. To export, tap the Actions menu (wrench icon) and select “Share.”
You can choose from several file formats:
- JPEG: Good for sharing online
- PNG: Best for images with transparency
- PSD: For editing in Photoshop later
- PDF: For printing or documents
For social media, JPEG works well. If you need a transparent background, select PNG instead.
You can also create a time-lapse video of your drawing process. In the Actions menu, select “Video” and then “Export Time-lapse Video.” This shows how you created your artwork from start to finish.
To share directly to social media, select the platform icon after tapping “Share” in the Actions menu.
- 683shares
- Facebook0
- Pinterest680
- Twitter3
- Reddit0

