Drawing lips is a fundamental skill that no artist – regardless of how green or experienced they are – can afford to miss out on. Lips are basically the face’s secret language, conveying emotions and attitudes with remarkable subtlety & leaving a really big impression on whoever’s looking. But capturing their shape, texture & colour in a drawing can be a real challenge because it requires an in-depth understanding of lip anatomy, the right proportions, and some serious shading techniques.
BUT don’t worry, we’re here to walk you through the process so drawing lips feels more fun & rewarding. And to top it all off, there are some really cool digital tools – apps, for instance – that make it ridiculously easy to practice & hone your lip drawing skills.
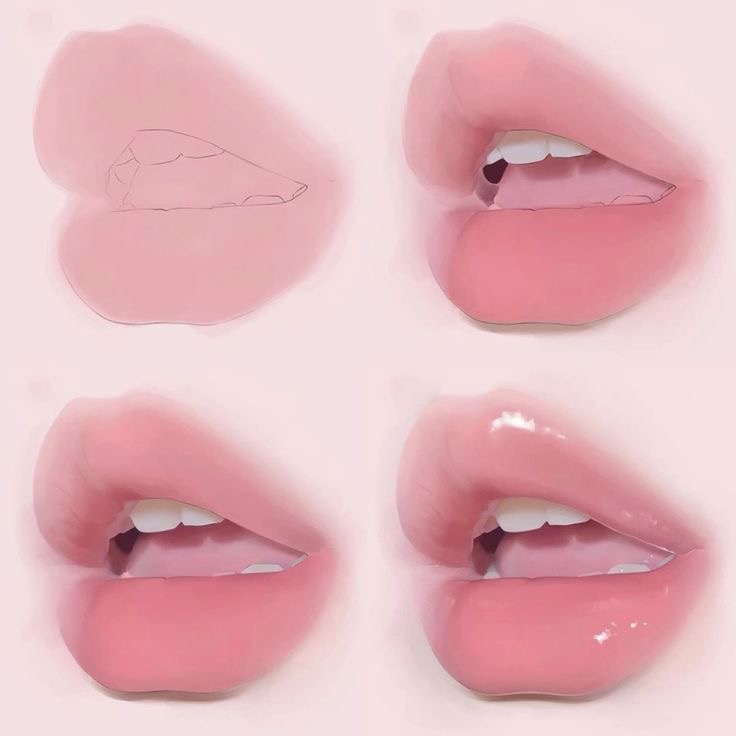
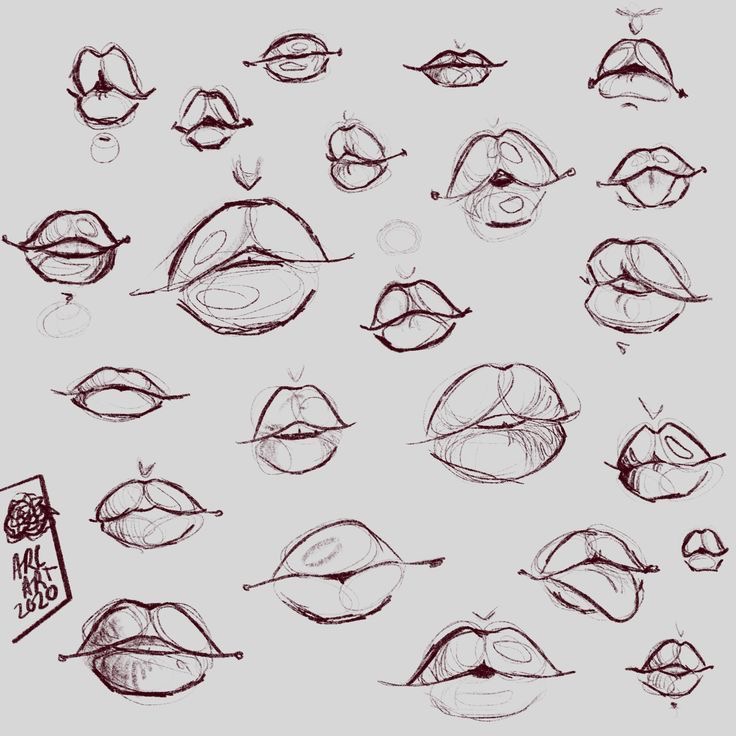
To draw lips realistically, it is important to first understand their anatomy. Lips are composed of several layers of tissue, including the skin, vermilion border, and mucous membrane, each with its own texture and color. The shape and size of the lips can vary greatly between individuals and ethnicities, but generally, the upper lip is thinner than the lower lip and has a more defined cupid’s bow shape. The corners of the mouth also play an important role in conveying emotion, as they can turn up or down to indicate a smile or a frown.
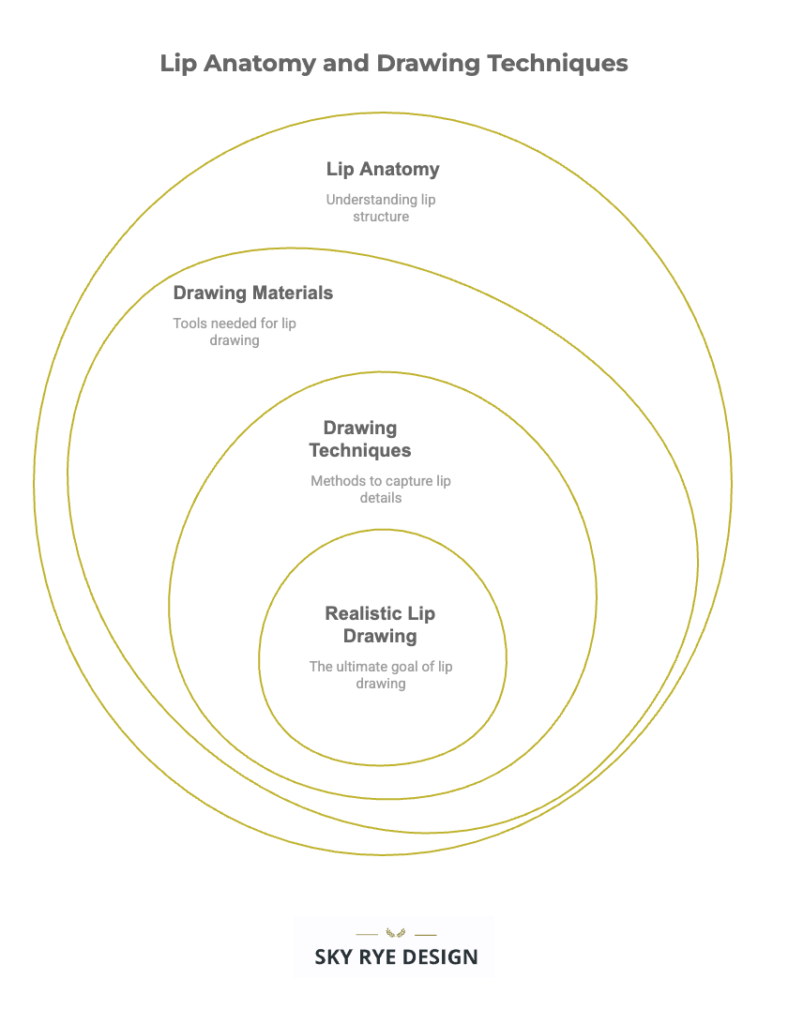
To draw lips, you will need basic drawing materials such as pencils, erasers, and paper, as well as shading tools like blending stumps and tortillions. Using a variety of pencil grades can enhance the shading and texture of the lips. There are several basic drawing techniques that can help you capture the shape and texture of lips, such as contour drawing, hatching, and cross-hatching.
By following a step-by-step drawing guide and practicing from different perspectives, you can improve your skills and achieve more realistic and expressive portraits.
Key Takeaways
- Understanding lip anatomy is essential for drawing realistic lips.
- Basic drawing materials and shading tools are needed to draw lips.
- Practicing different techniques and perspectives can help improve lip drawing skills.
Understanding Lip Anatomy
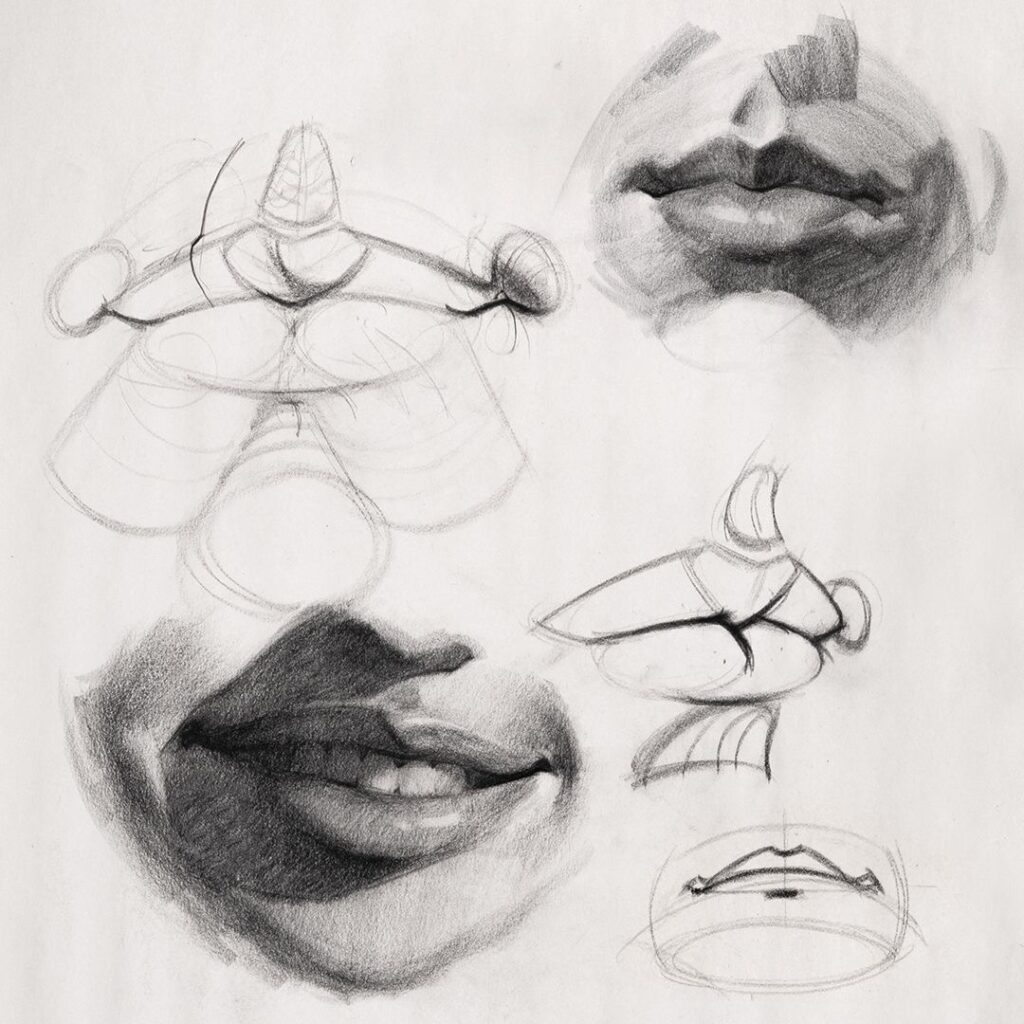
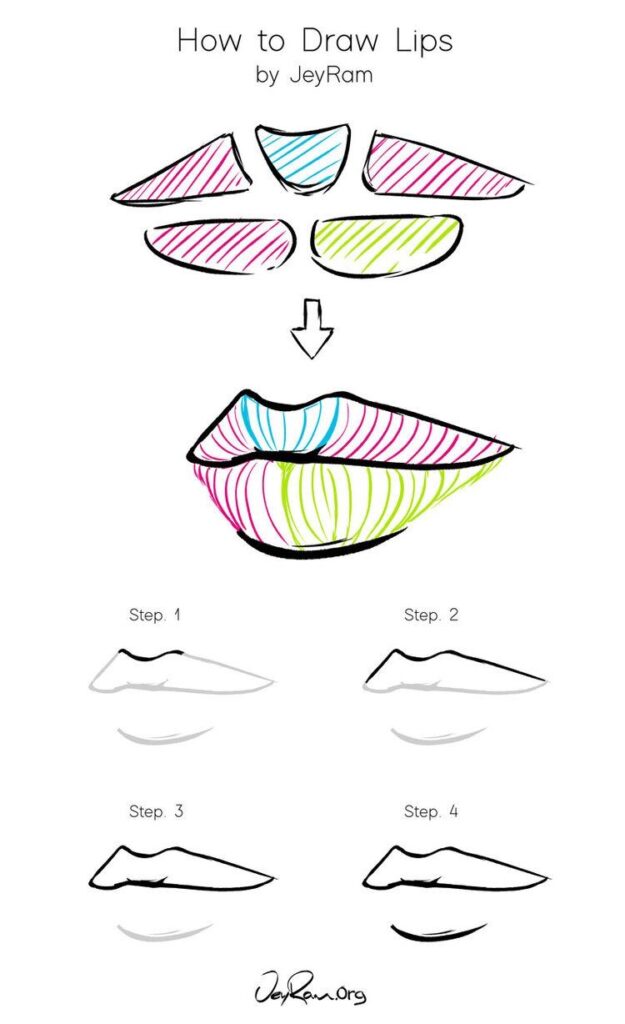
Understanding the anatomy of the lips is essential for drawing lips realistically. The lips are made up of several distinct forms and planes, which help create their three-dimensional structure and define how light and shadow interact across their surface. The upper lip consists of three forms: a central heart-shaped tubercle and two teardrop shapes on either side. These forms, along with the surrounding planes, are important to observe when sketching and shading lips.
The anatomical relationship between the nose and the lips is also crucial. The nose serves as a key reference point for positioning the lips accurately on the face, and its structure influences the placement and foreshortening of the lips, especially when drawing from different angles.
The Structure of Lips
Lips are one of the most important facial features that play a significant role in nonverbal communication. They are made up of various structures, including the upper lip and the lower lip. The upper lip is composed of the philtrum, the Cupid’s bow, and the vermillion border, while the lower lip consists of the vermillion border and the labial frenulum.
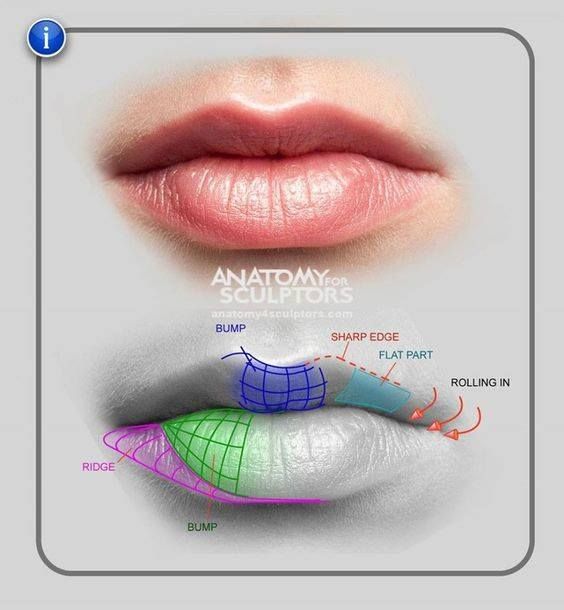
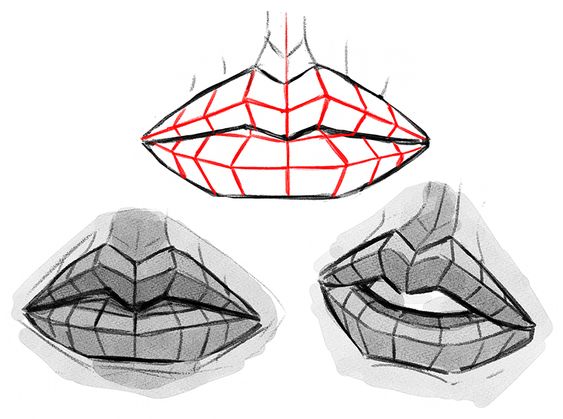
The structure of the lips is essential to understand for anyone who wants to draw them accurately. The lips’ shape, size, and fullness can vary depending on age, gender, and ethnicity. For instance, males tend to have thicker lips than females, and the lips’ size decreases with age.
Facial Features and Expressions
The lips play a crucial role in facial expressions, including smiling, pouting, and frowning. The muscles surrounding the lips are responsible for these expressions, such as the orbicularis oris muscle. This muscle is responsible for puckering the lips, which is essential for whistling and kissing.
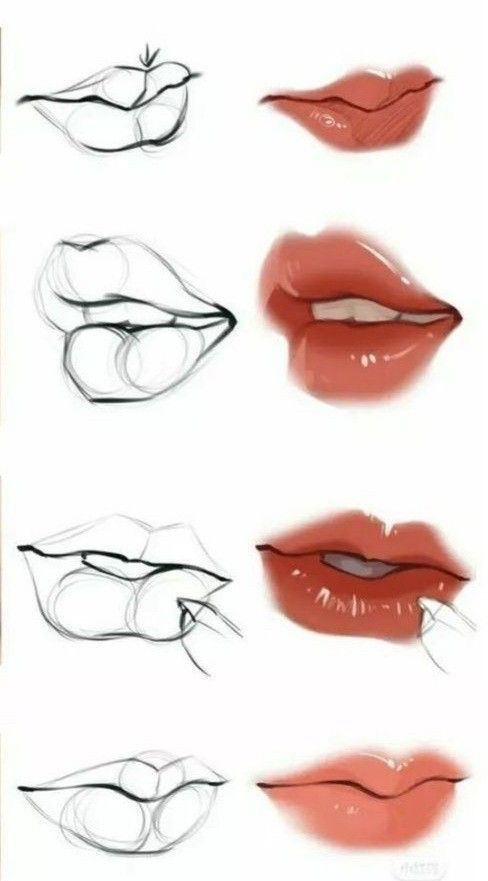
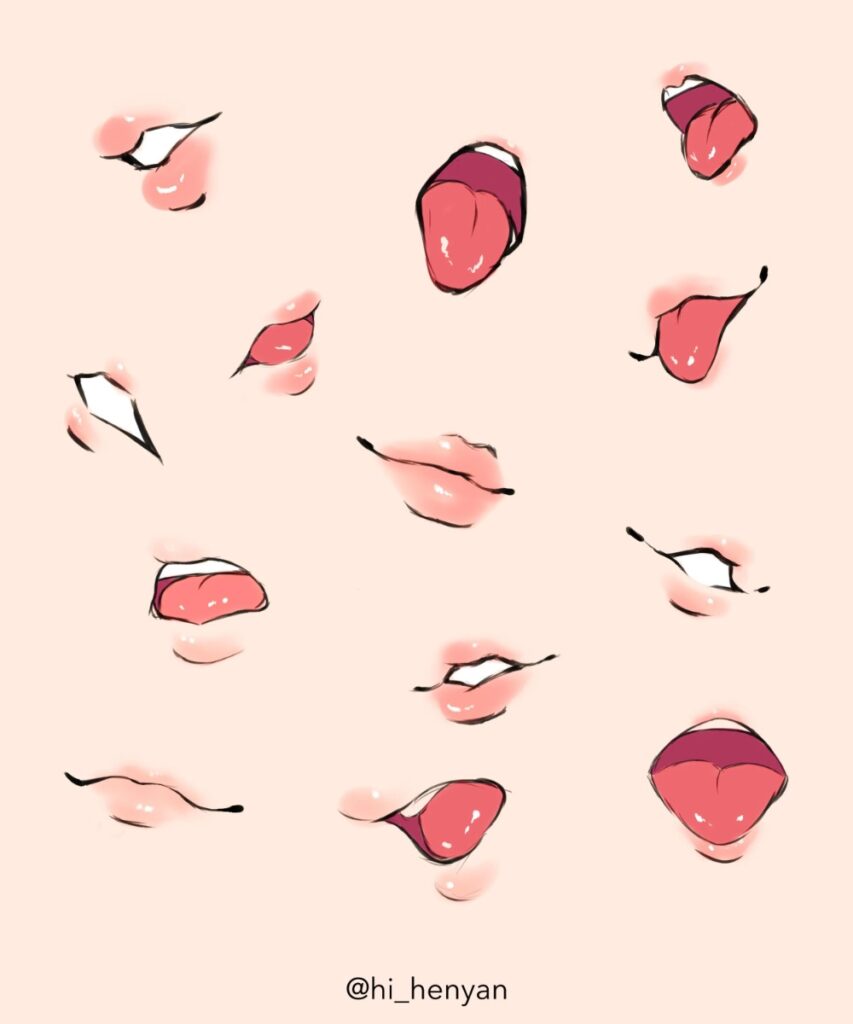
The lips’ appearance can also convey emotions and personality traits, such as confidence, sensuality, and youthfulness. For example, a full and plump lower lip is often associated with sensuality, while a thin upper lip is associated with a stern or serious personality.
In conclusion, understanding the anatomy of the lips is crucial for anyone who wants to draw them accurately. The lips’ structure, size, and shape can vary depending on age, gender, and ethnicity. The lips’ appearance can also convey emotions and personality traits, such as confidence, sensuality, and youthfulness.
Materials Needed
When it comes to drawing lips, having the right materials is essential. Here are some of the materials you will need:
Choosing the Right Pencil
Choosing the right pencil is important when drawing lips. A standard HB pencil is a good place to start, but if you want to create more detailed drawings, you may want to consider using a softer pencil, such as a 2B or 4B. These pencils will allow you to create darker lines and shading.
Paper Types
The type of paper you use can also have an impact on the final result of your drawing. For drawing lips, it is recommended to use a smooth paper with a medium weight. A paper with a smooth surface will allow you to create clean lines and make it easier to blend colors. A medium weight paper will be sturdy enough to hold up to erasing and blending without tearing.
Erasers and Blending Tools
When drawing lips, erasers and blending tools are essential for creating a polished final result. A kneaded eraser is a great tool for removing small mistakes or lightening areas that are too dark. A blending stump can be used to create smooth transitions between colors and to blend the colors together. It is also recommended to have a few different sized pencils and a sharpener on hand to make sure you have the right tools for the job.
Overall, having the right materials can make all the difference when it comes to drawing lips. By choosing the right pencil, paper, erasers, and blending tools, you can create a beautiful and realistic drawing.
Basic Drawing Techniques
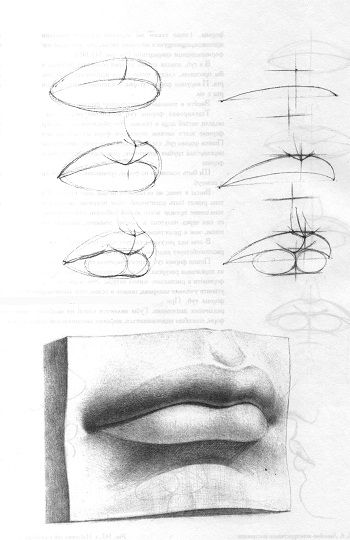
To make drawing lips more accessible, the process can be simplified by breaking the lips down into basic shapes, such as ovals and curves. This approach helps students understand the underlying structure before adding complexity.
When starting your drawing, students should begin by making light marks to outline the basic shape of the lips. These marks serve as reference points to ensure correct proportions and symmetry. Avoid adding details too soon, like fine lines and highlights, as this can hinder the establishment of overall structure and shading.
As you draw the outline of the lips, remember that drawing sharp corners is a common mistake. Instead, transitions between shapes should be smooth to achieve a more realistic appearance.

Creating Basic Shapes
Before diving into drawing lips, it’s essential to understand the basics of drawing. Drawing lips requires the artist to understand the structure of the lips and how they fit into the overall face. To achieve this, it’s essential to start by creating basic shapes.
The artist can begin by drawing a triangle or a circle that represents the basic shape of the lips. This simple shape can then be modified as needed to create the desired lip shape. By starting with a basic shape, the artist can ensure that the overall structure of the lips is correct before moving on to more detailed work.
Shading Fundamentals
Shading is a crucial element in creating realistic drawings. When drawing lips, it’s essential to understand how to use shading to create depth and dimension. The artist can use a variety of shading techniques to create the illusion of light and shadow on the lips.
One of the most basic shading techniques is to use hatching and cross-hatching. This technique involves drawing lines in a specific direction to create the illusion of depth and texture. The artist can also use stippling, which involves creating small dots to create a rough texture.
Blending for Realism
Blending is another essential technique in creating realistic drawings. When drawing lips, blending can be used to create a smooth transition between light and shadow. The artist can use a variety of blending techniques, including using a blending stump or a piece of tissue paper.
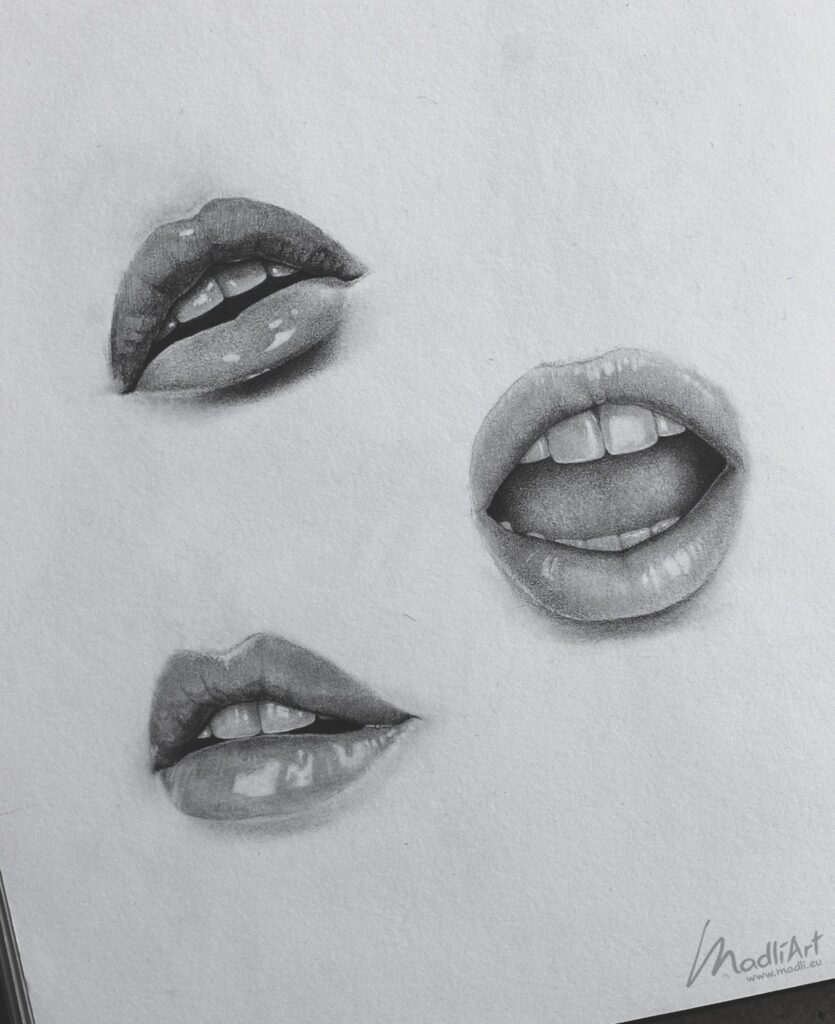
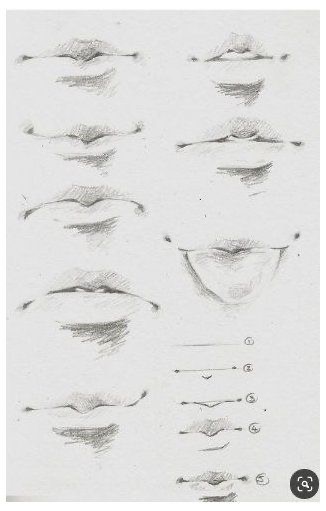
To achieve a realistic look, it’s important to blend the shading carefully. The artist can start by adding a light layer of shading and then gradually build up the shading as needed. By blending carefully, the artist can create a realistic and lifelike drawing of the lips.
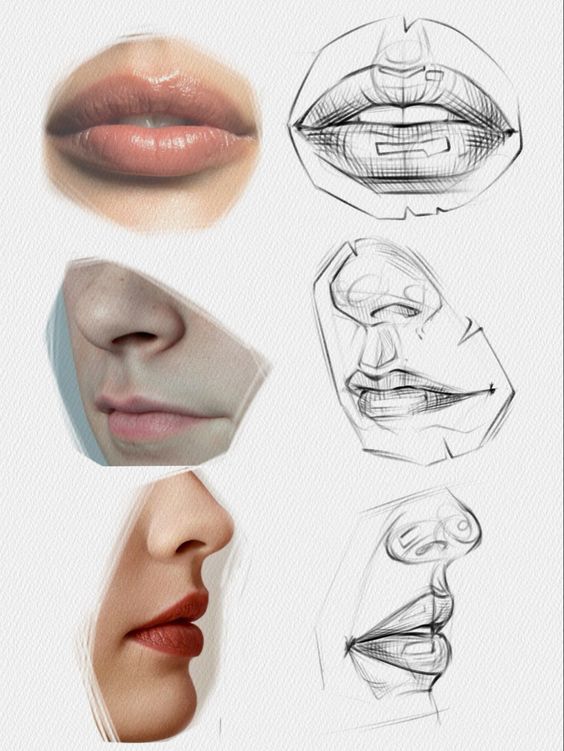
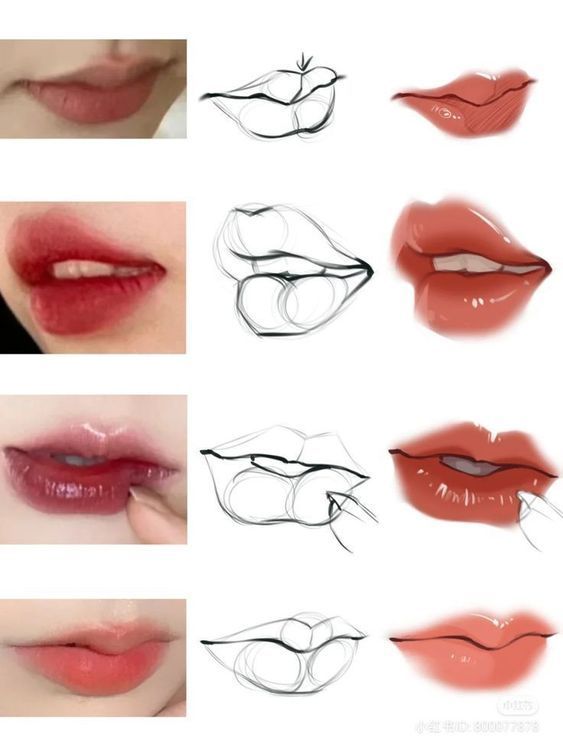
Overall, understanding the basics of drawing is crucial when it comes to drawing lips. By creating basic shapes, understanding shading techniques, and using blending to create a realistic look, the artist can create a lifelike drawing of the lips.
Step-by-Step Drawing Guide
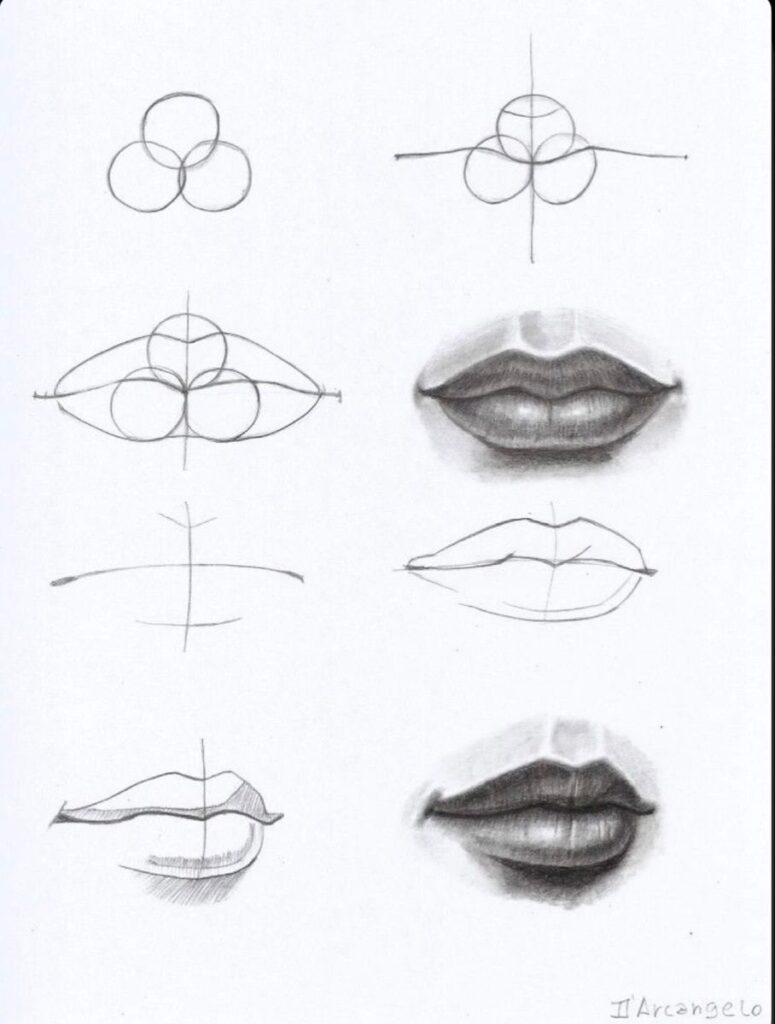
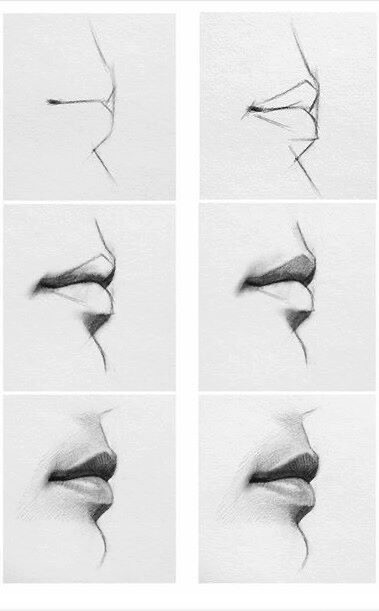
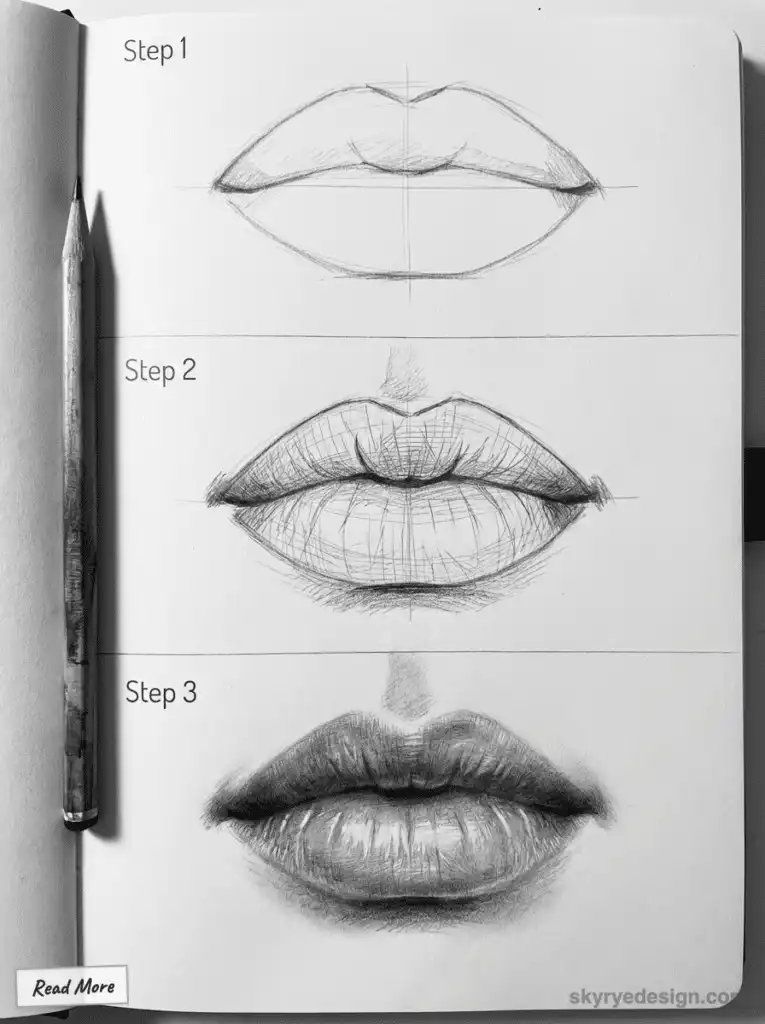
Drawing lips can be a challenging task, but with this step-by-step guide, anyone can learn to draw lips like a pro. Whether you’re a beginner or an experienced artist, this tutorial will provide you with the necessary skills to draw lips that look realistic and expressive.
Drawing the Outline
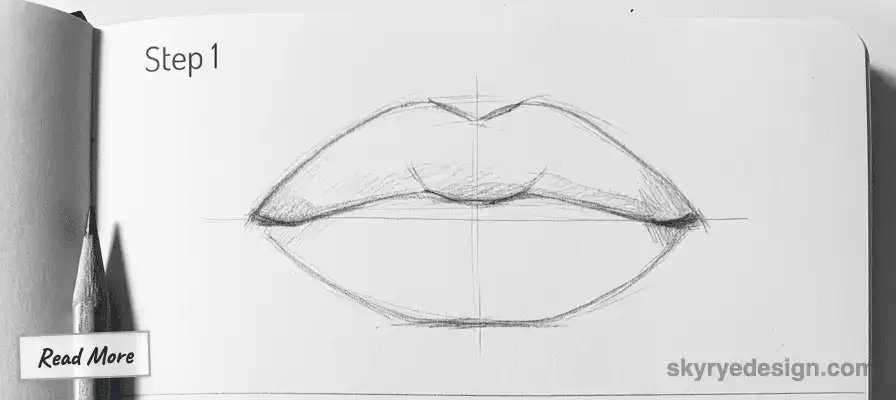
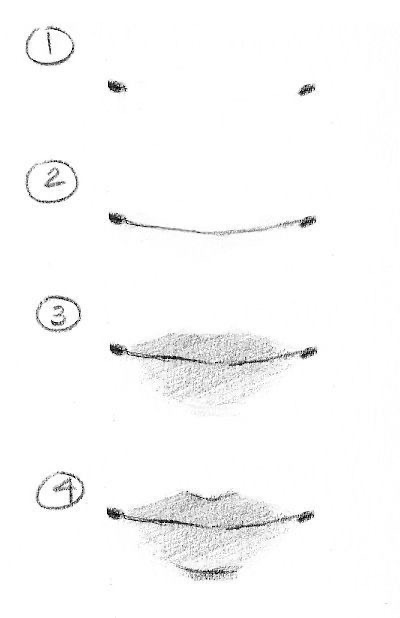
To begin, draw a horizontal line to indicate the position of the lips. Next, draw a curved line to represent the upper lip and a similar, slightly larger curved line to represent the lower lip. Make sure the lines are symmetrical and proportionate to each other.
Once you have the basic outline, add details such as the cupid’s bow, the philtrum, and the corners of the mouth. These details will give the lips a more realistic look and make them stand out.
Adding Details and Texture
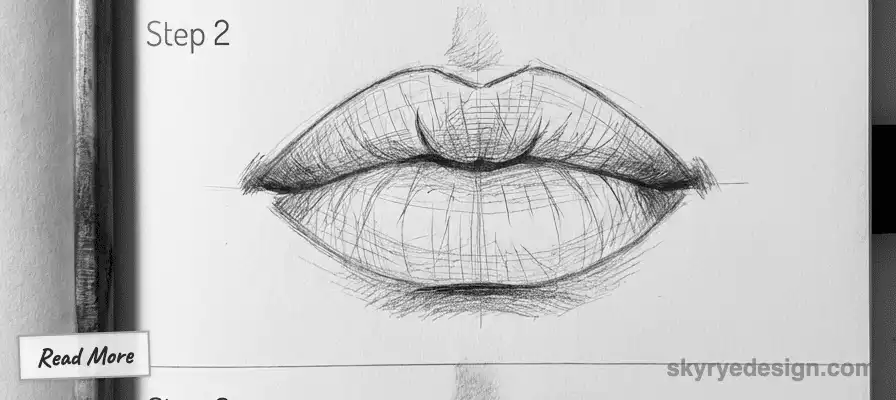
Next, add texture to the lips by drawing lip wrinkles and fine lines. These lines should follow the curves of the lips and should be drawn lightly to avoid making the lips look too harsh.
To add depth and dimension to the lips, use shading and shadow. Shade the areas where the lips meet, and add shadow to the corners of the mouth and the philtrum. This will give the lips a more realistic look and make them appear three-dimensional.
Refining Shadows and Highlights
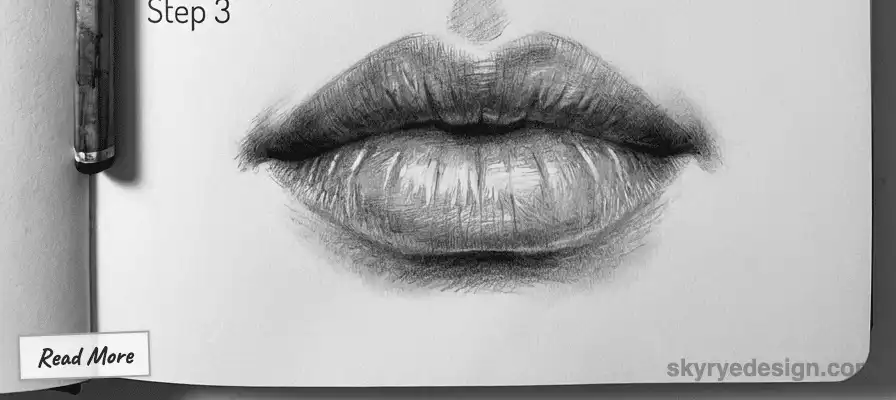
Finally, refine the shadows and highlights to make the lips look even more realistic. Add highlights to the center of the lips and the cupid’s bow, and add shadows to the areas where the lips meet and where the lips curve.
By following these steps, anyone can draw lips like a pro. With practice, you’ll be able to create lips that are expressive, realistic, and full of character.
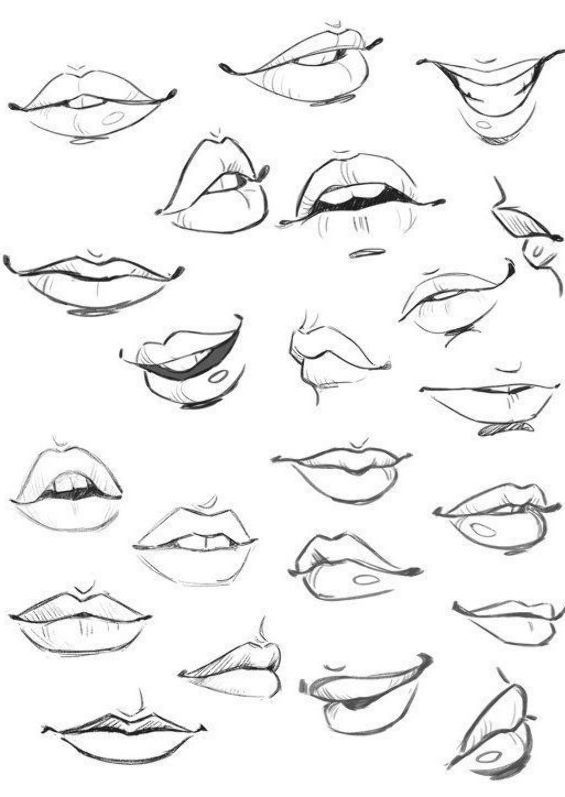
Drawing from Different Perspectives

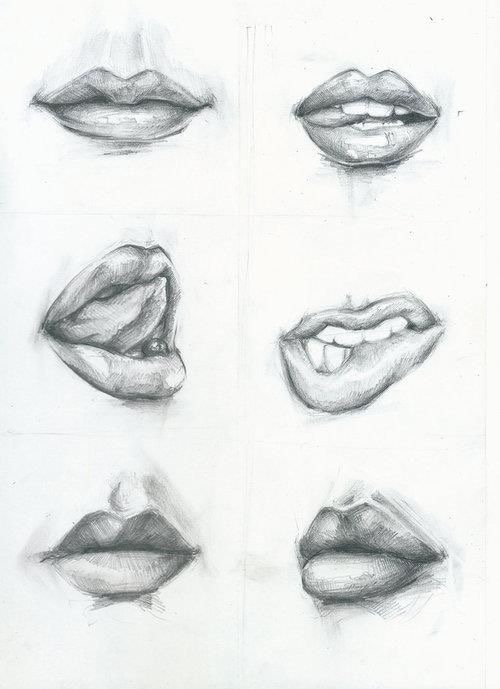
When drawing lips, it’s important to understand how to depict them from different angles and perspectives to create a realistic and accurate representation. Here are some tips for drawing lips from different viewpoints.
Front View
When drawing lips from the front view, it’s important to pay attention to the center line of the lips. This line should be drawn straight and vertical to create a symmetrical look. The triangle shape of the lips should also be taken into account, with the top lip being slightly smaller than the bottom lip.
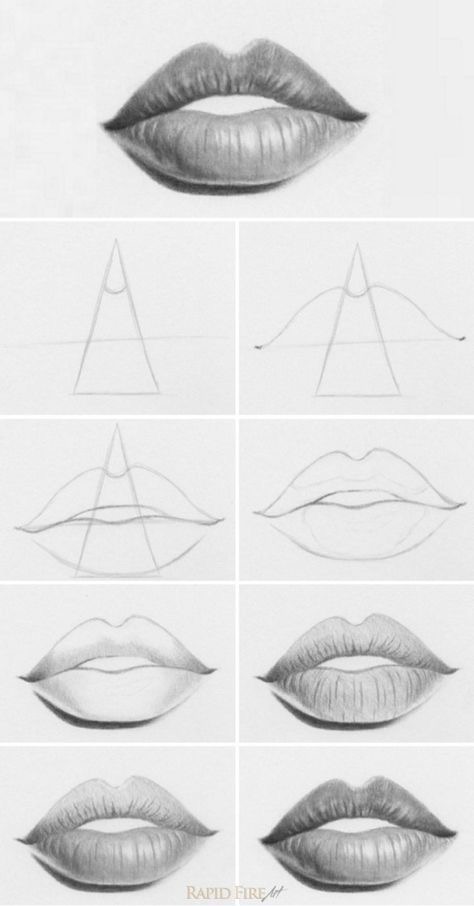
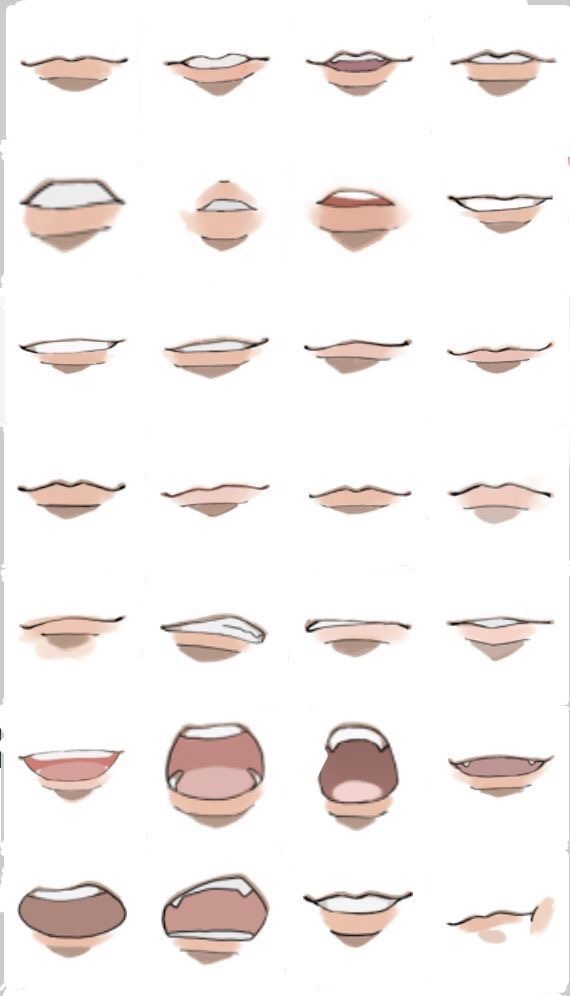
To create a realistic look, the contours of the lips should be drawn with care. The Cupid’s bow, or the curve at the top of the lips, should be drawn with a slight curve to create a natural look. The corners of the lips should also be slightly curved to create a subtle smile.
Side View
When drawing lips from the side view, the structure of the lips should be taken into account. The top lip should be drawn with a slight curve, while the bottom lip should be drawn with a more pronounced curve. The center line of the lips should also be drawn with a slight curve to create a natural look.
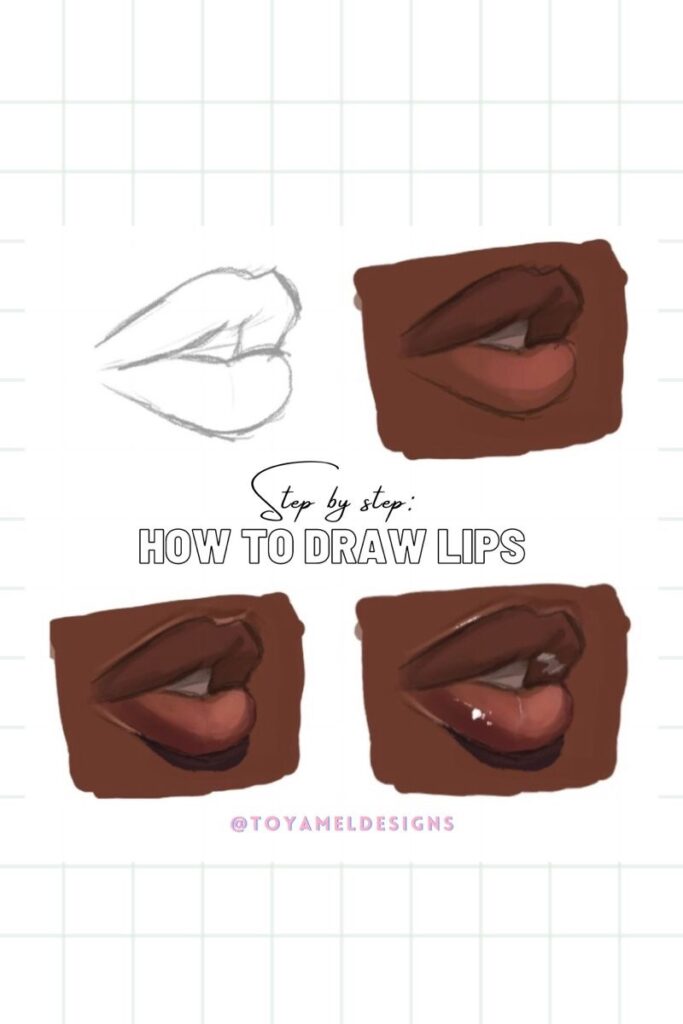
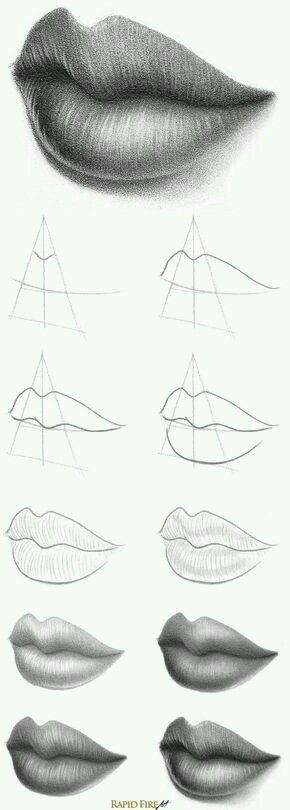
To create a realistic look, the contours of the lips should be drawn with care. The Cupid’s bow should be drawn with a slight curve, while the corners of the lips should be drawn with a downward curve to create a neutral or slightly downturned expression.
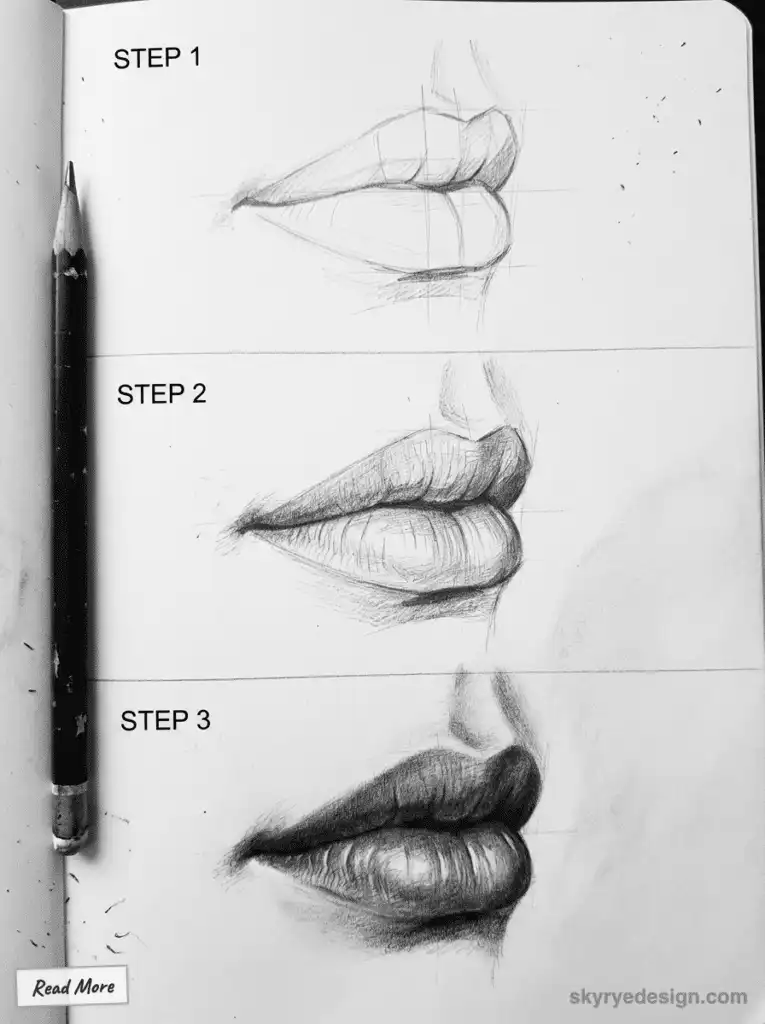
Overall, understanding how to draw lips from different perspectives is essential for creating realistic and accurate drawings. By paying attention to the structure, contours, and center line of the lips, artists can create lifelike depictions of the mouth.
Achieving Realistic Portraits

Integrating Lips into the Human Face
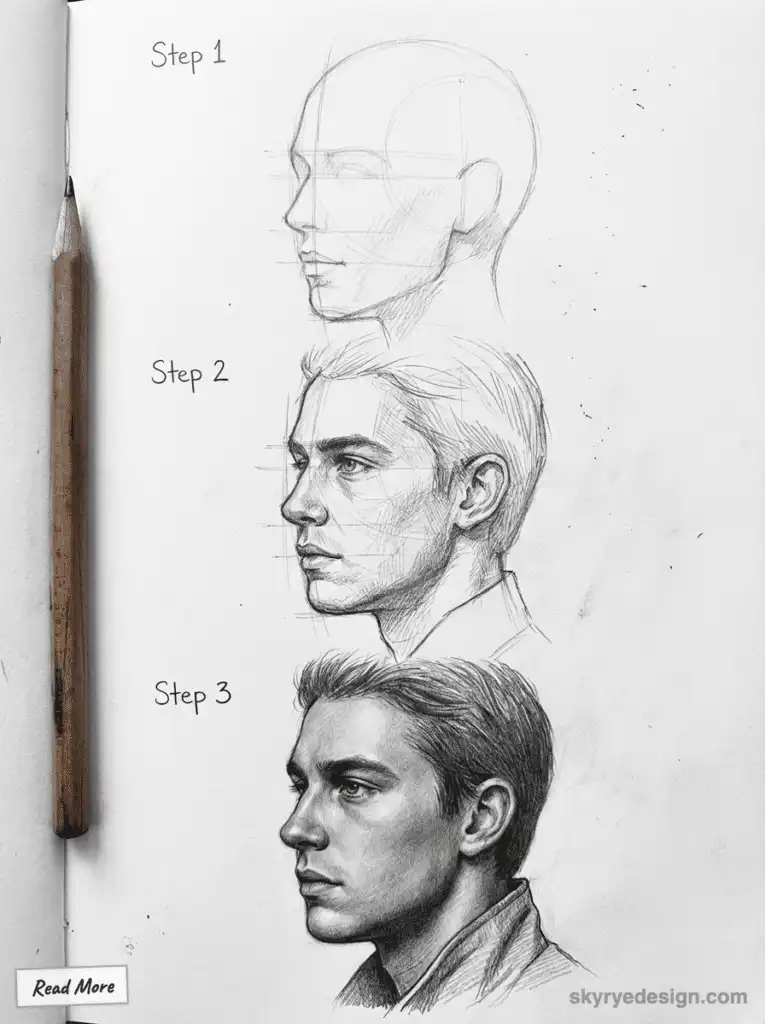
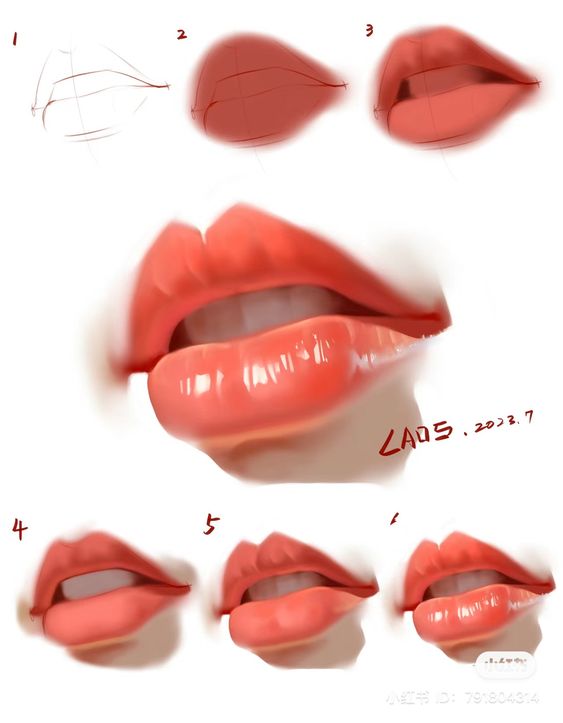
When drawing a realistic portrait, it is essential to pay attention to every detail of the human face, including the lips. The lips are an essential part of the face and can convey a lot about the subject’s personality. To achieve a realistic look, the artist should first study the shape and structure of the lips. This includes the shape of the upper and lower lips, the distance between them, and the curvature of the lips.
To create realistic lips, artists should use shading techniques to give depth and dimension to the lips. This involves using darker shades to create shadows and lighter shades to create highlights. The artist can also use cross-hatching techniques to create texture and depth to the lips. By using these techniques, the artist can create a realistic and lifelike appearance of the lips.
Capturing the Essence of the Subject
When drawing a portrait, it is essential to capture the essence of the subject. This means that the artist should not only focus on the physical appearance of the subject but also their personality, emotions, and character. To achieve this, the artist should spend time with the subject and observe their facial expressions, body language, and mannerisms.
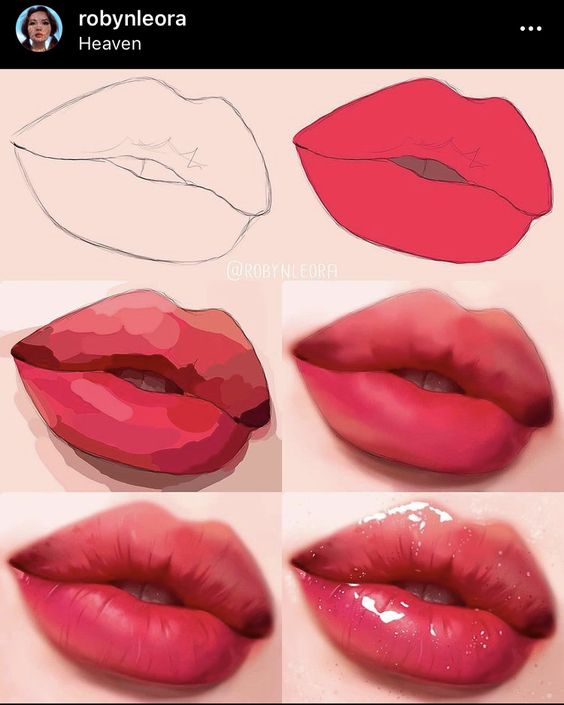
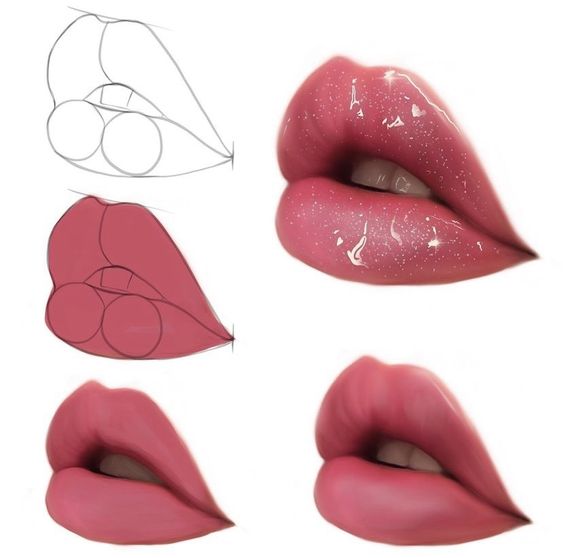
When drawing the lips, the artist should pay attention to the subject’s expression and emotions. For example, if the subject is smiling, the lips should be curved upwards, and if the subject is sad, the lips should be turned downwards. By capturing the emotions and personality of the subject, the artist can create a realistic and lifelike portrait.
In conclusion, achieving realistic lips in a portrait drawing requires attention to detail and the use of shading and texture techniques. However, to create a truly lifelike portrait, the artist must also capture the essence of the subject. By doing so, the artist can create a portrait that not only looks realistic but also conveys the subject’s personality and emotions.
Practice and Improvement


Drawing realistic lips requires practice and continuous learning. While some people are born with natural artistic talent, anyone can improve their drawing skills with dedication and effort. In this section, we will discuss some tips for practicing and improving your lip drawing skills.
Using Reference Photos
One way to practice drawing realistic lips is to use reference photos. Reference photos can help you understand the structure and details of lips, such as the shape of the cupid’s bow, the texture of the skin, and the shading of the lips. You can find reference photos online or take your own photos of lips to draw from.
When using reference photos, it’s important to choose high-quality images that show the details you want to capture in your drawing. You can also use tracing paper to practice drawing the basic shapes and outlines of lips before adding details.
Continuous Learning
Drawing is a skill that requires continuous learning and improvement. Even if you feel like you’ve mastered a certain technique or style, there is always room for improvement. You can improve your lip drawing skills by taking classes, watching tutorials, or studying the work of other artists.
Drawing for beginners can be challenging, but with practice and continuous learning, anyone can improve their skills. It’s important to be patient with yourself and not get discouraged if your drawings don’t turn out exactly as you imagined. Remember that every drawing is an opportunity to learn and improve.
In summary, practice and continuous learning are key to improving your lip drawing skills. Using reference photos can help you understand the structure and details of lips, while continuous learning can help you refine your technique and style. With dedication and effort, anyone can learn to draw realistic lips.
What are the basics I need to know before I start drawing lips?
Before drawing lips, it’s important to understand their anatomy, including the different layers and features like the Cupid’s bow, vermilion border, and the shape of the upper and lower lips.
Which materials are best for drawing realistic lips as a beginner?
For beginners, a standard HB pencil, smooth medium-weight drawing paper, erasers like kneaded erasers, and blending tools such as blending stumps are ideal for creating detailed and realistic lip drawings.
How can I practice drawing lips to improve my skills?
Practicing with reference photos, studying lip anatomy, creating basic shapes first, and steadily applying shading and blending techniques are effective ways to improve your lip drawing skills.
What are some good techniques for shading lips realistically?
Using hatching, cross-hatching, stippling, and blending for smooth transitions between light and shadow can help create realistic shading and depth in lip drawings.
- 15.4Kshares
- Facebook0
- Pinterest15.4K
- Twitter0
- Reddit0
