Nose drawing can be challenging for artists, whether they are beginners or experienced. The nose’s structure, shape, and position impact the balance and expression of the entire face. Mastering nose drawing has the potential to significantly improve one’s artistic skill and confidence in capturing facial features.
The key to drawing a realistic nose lies in understanding its anatomy. This includes grasping the different parts such as the bridge, nostrils, and tip. Choosing the right drawing tools and materials can make a difference in achieving various styles and textures.
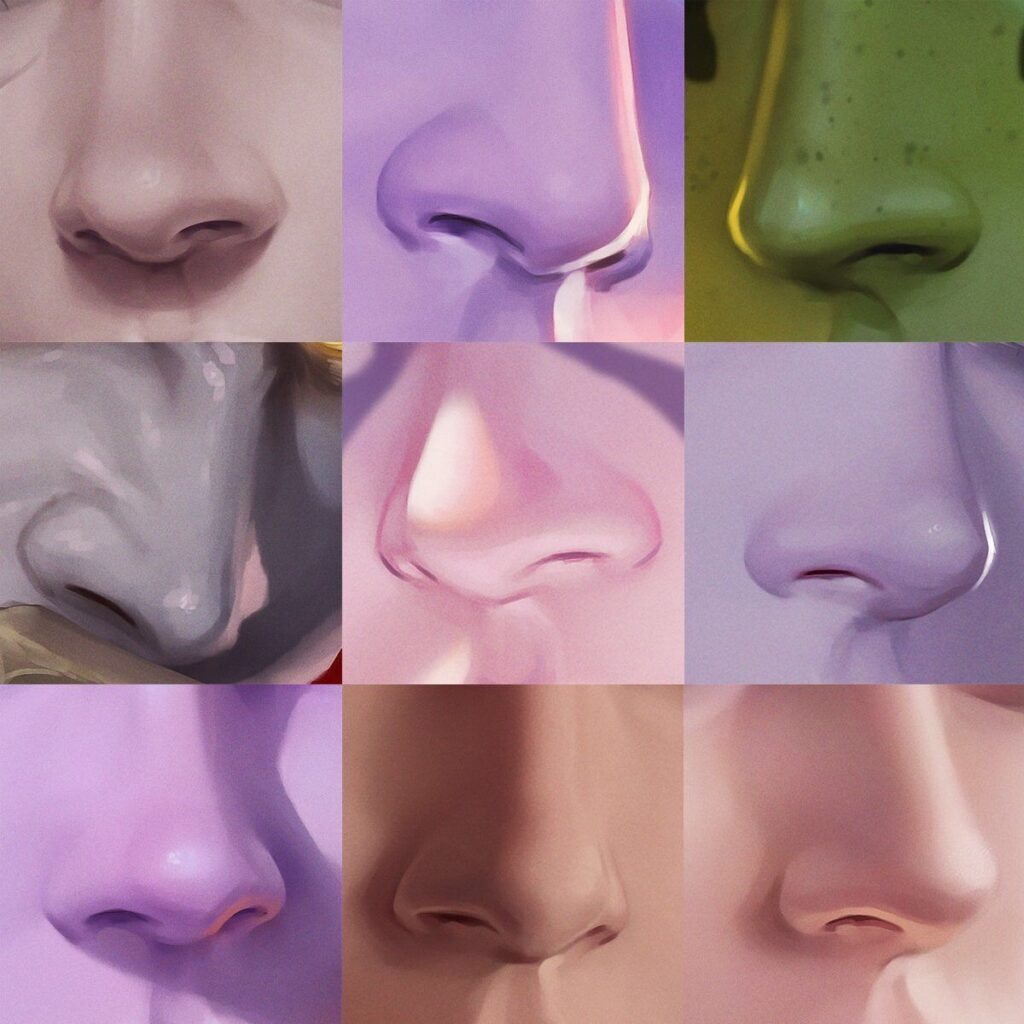
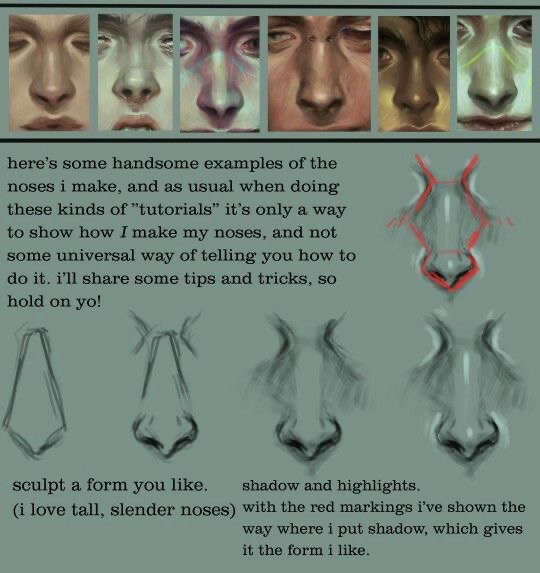
Nose drawings can vary greatly depending on the techniques used for shading, blending, and adding color. Each method contributes to the final look of the nose, from a simple cartoon style to a highly detailed, lifelike representation. Focusing on these techniques can elevate an artist’s overall skill.
Key Takeaways
- Basic anatomy is essential for accurate nose drawing.
- The right tools enhance the quality of nose drawings.
- Shading and blending techniques refine the drawing.
Understanding Nose Anatomy
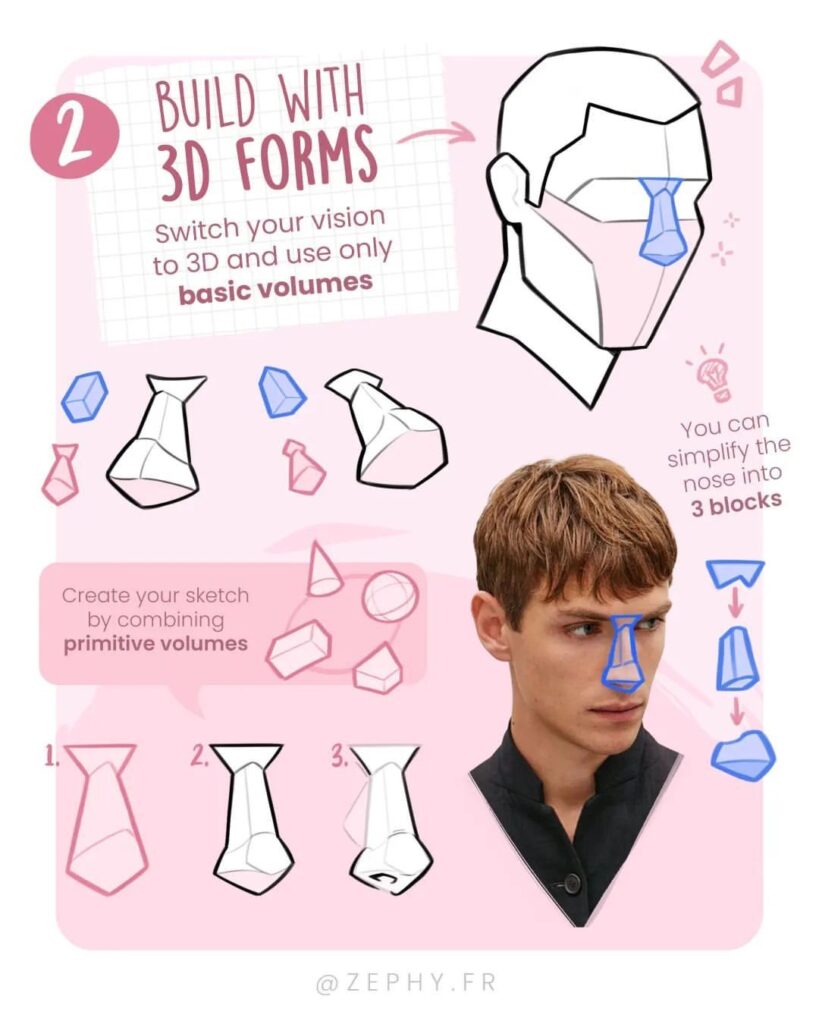
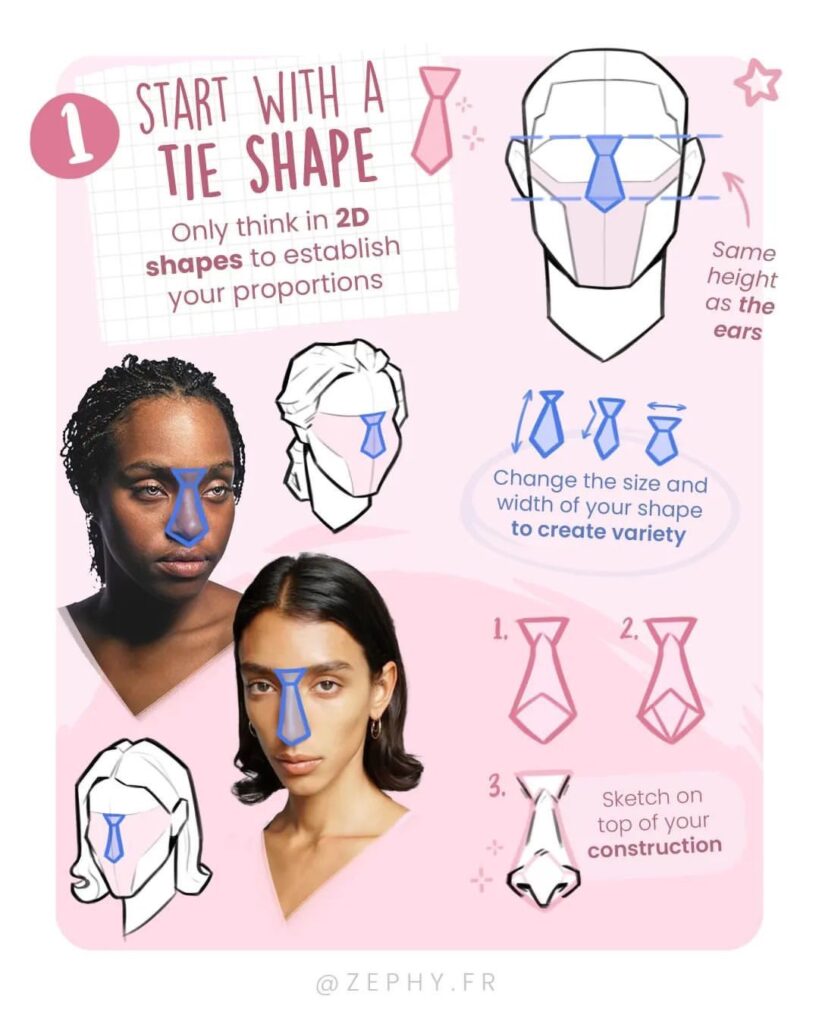
The nose is a complex structure with various parts and shapes. Each section of the nose has its unique features that contribute to its overall appearance and function.
Nose Shape Variations
Nose shapes vary widely across different people. Some common types include Roman noses, known for their high, curved bridge, and button noses, which are small with a rounded tip. Another type is the hawk nose with a prominent bridge and a downward curve at the tip. Nostrils can be narrow or wide and have an impact on the nose’s shape. The bridge of the nose can be either straight, curved, or bumpy, which influences how the nose looks from the side. Different planes of the nose create the overall structure and form.
Anatomy of the Nose
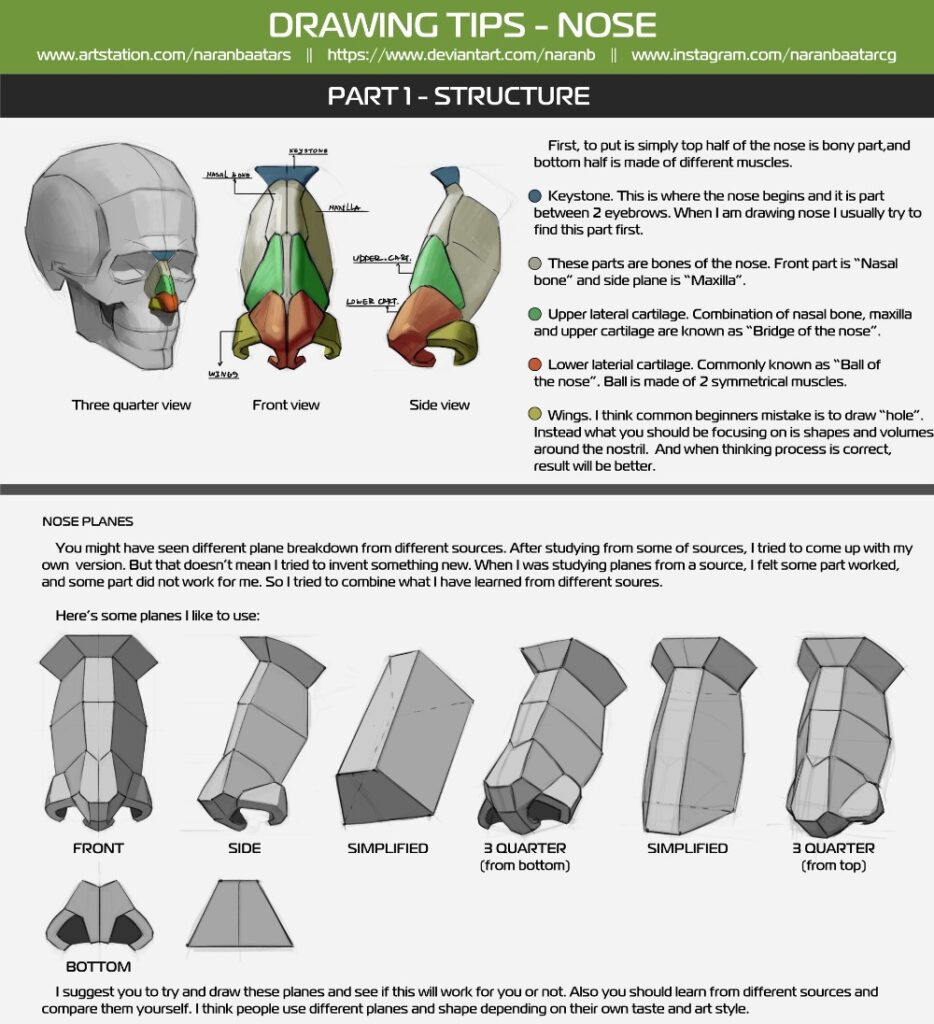
The nose consists of several key parts. The bridge of the nose starts from the forehead and leads down to the tip. The tip of the nose is flexible and can vary in shape. Nostrils are the openings that allow airflow in and out. The septum is the cartilage that separates the nostrils inside. The outside surface has different planes, which are the angled sections of the nose. These planes give the nose its 3D shape and define its appearance from various angles.
Each aspect of the nose, from the bridge to the tip and the nostrils, plays a critical role in its function and look. Understanding these parts helps in drawing the nose accurately.
Drawing Tools and Materials
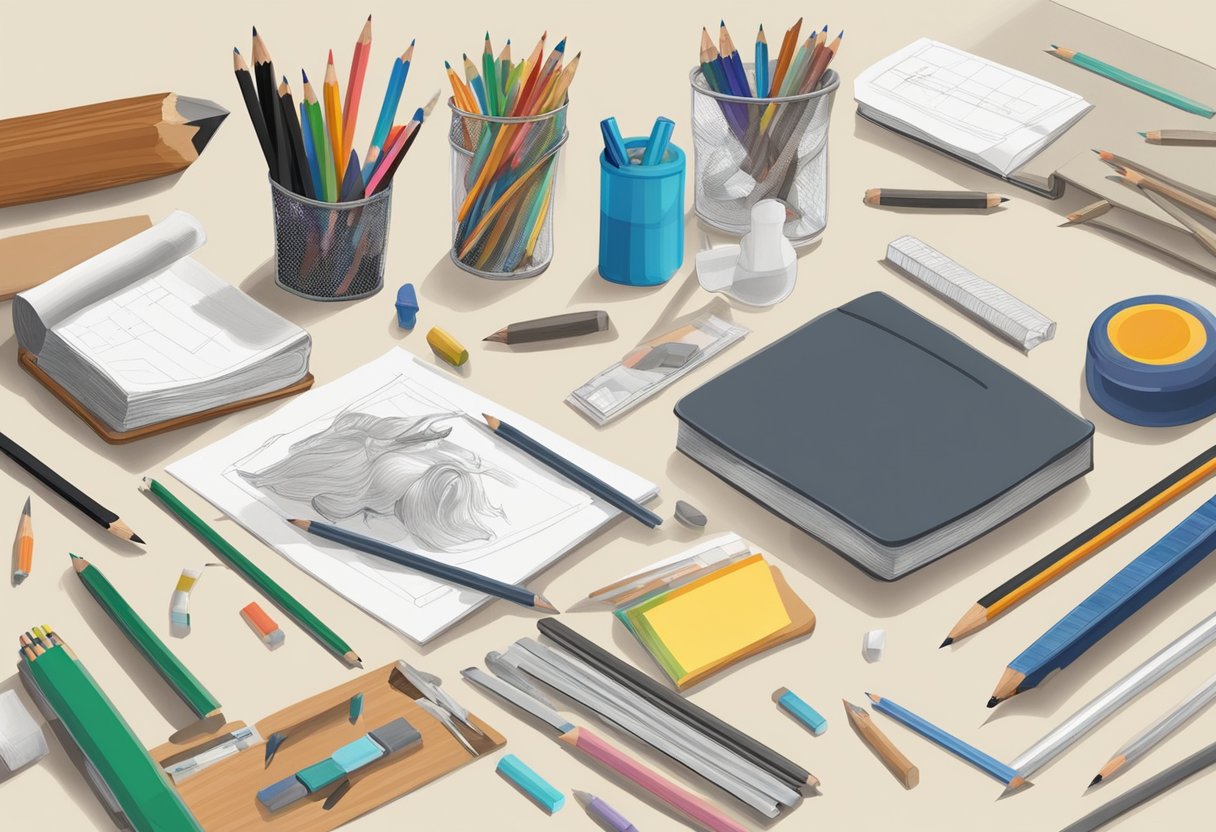
Using the right tools can greatly improve the quality of your nose drawings. This section covers essential items like pencils, paper, and digital tools.
Choosing the Right Pencils
Different pencils can create various effects. Graphite pencils come in different grades, ranging from hard (H) to soft (B). Hard pencils (H) are good for light sketching and fine lines, while soft pencils (B) are better for shading and darker lines.
Mechanical pencils offer consistent line quality and don’t need sharpening. An eraser is essential, with kneaded erasers being the best for lifting graphite without smudging. A sharpener keeps your pencils in perfect condition, ensuring fine details in your drawings.
Paper Selection
The choice of paper affects your drawing’s texture. Sketch paper is thin and good for practice, while drawing paper is heavier and better for finished pieces. Look for paper with a slight texture which holds graphite well but allows for smooth shading.
Bristol board is also a good option for detailed work due to its smooth surface. It’s ideal for professionals aiming for a polished look. If using a mechanical pencil, smooth paper works best to avoid ripping the paper.
Digital Drawing Tools
Digital tools are becoming increasingly popular for drawing. An iPad, combined with apps like Procreate or Photoshop, offers a versatile drawing experience. These tools allow for easy correction and a vast array of brushes and effects.
Using a stylus with pressure sensitivity can mimic traditional pencil strokes. Digital drawing makes it easy to experiment with different styles and techniques, save progress, and share work easily. Procreate and Photoshop also provide useful features like layers and undo options that are not possible with traditional methods.
Fundamentals of Nose Drawing
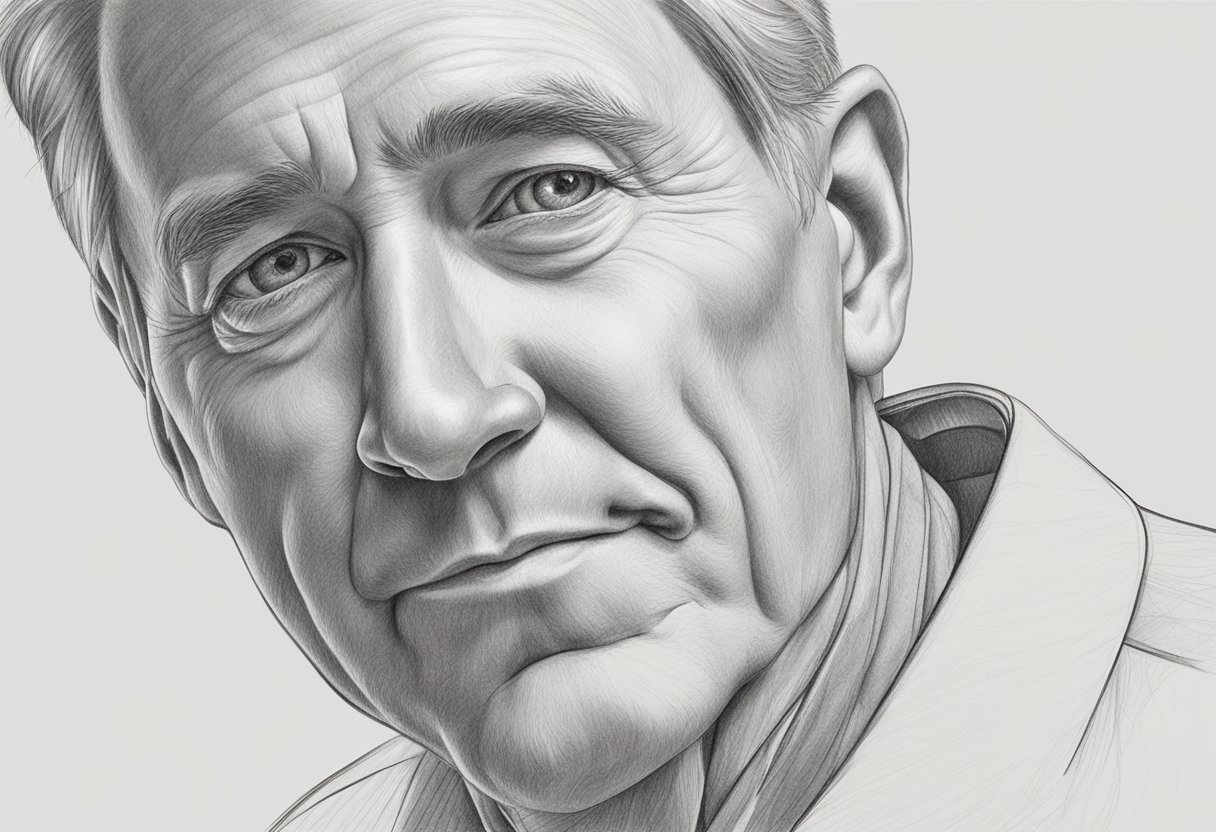
Nose drawing involves understanding shapes, lighting, and perspective. Knowing how to use these elements helps create a realistic and well-proportioned nose in your drawings.
Basic Shapes and Proportions
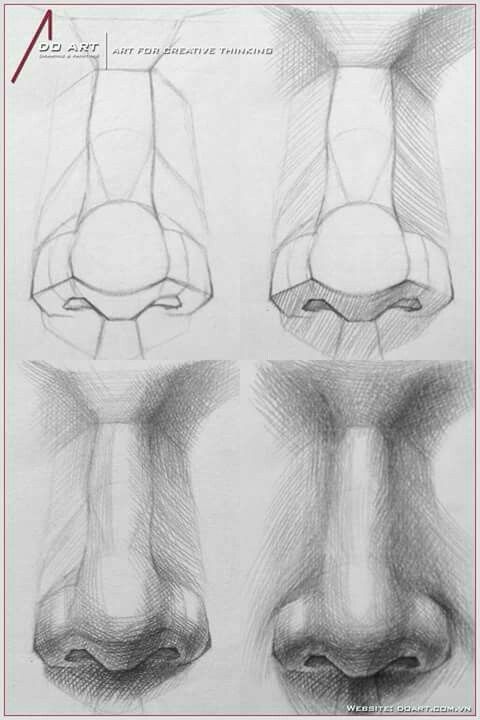
Start with simple shapes. Often, artists use a combination of circles, ovals, and rectangles. The bridge of the nose can be represented by a long rectangle. The tip of the nose could be a circle.
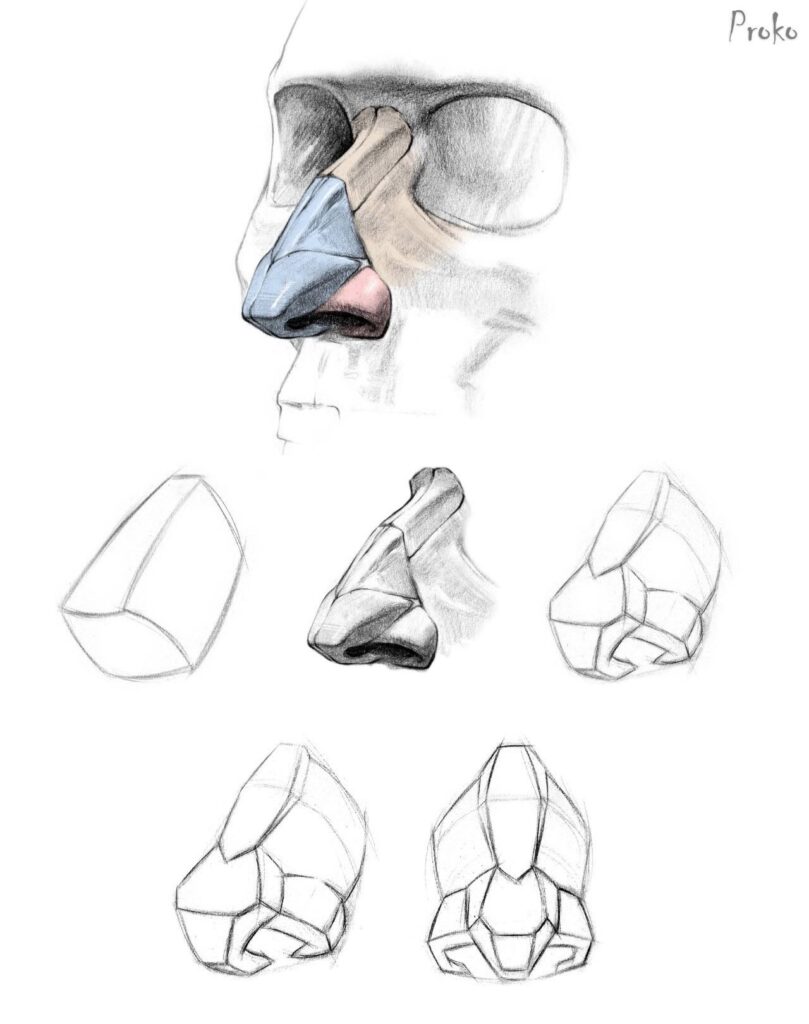
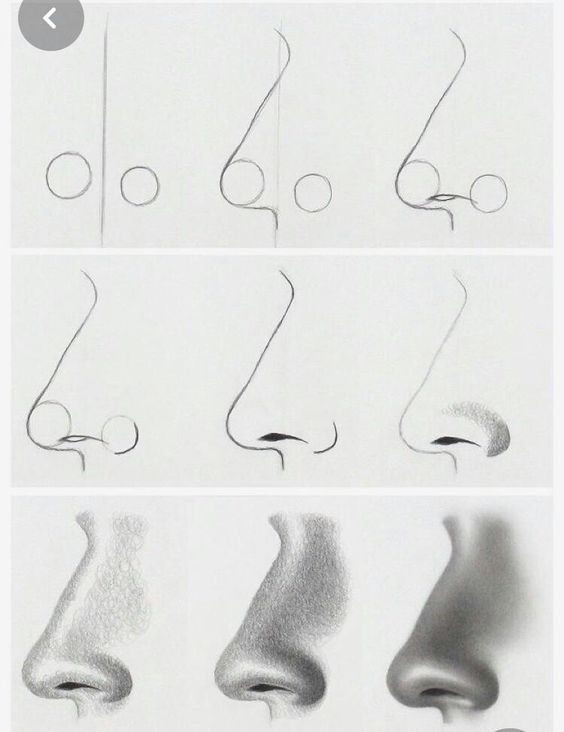
Make sure the nostrils are placed symmetrically. Draw smaller circles or ovals where the nostrils will be. Keep note of the space between them to maintain proper proportions.
The width of the nose usually aligns with the inner corners of the eyes. Pay attention to the length from the bridge to the tip. It should look balanced with the rest of the face.
Lighting and Shadow Basics
Lighting adds depth to your nose drawing. Identify the light source first. This helps in determining where the highlights and shadows will be.
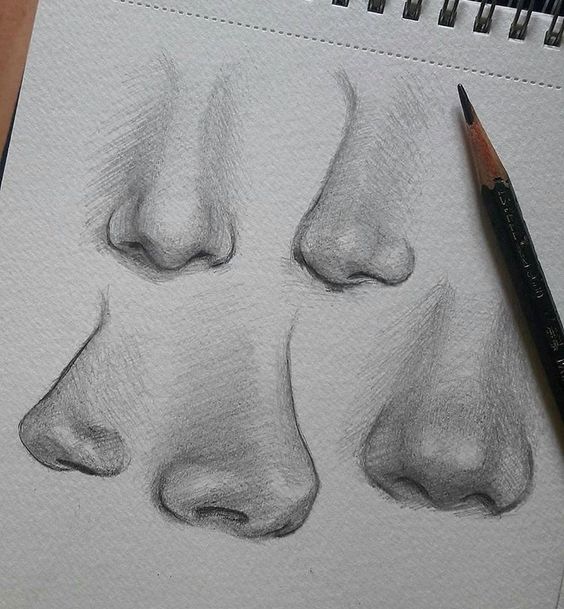
Shadows should appear on the side opposite the light source. If the light is coming from the top left, the shadows will be on the bottom right. Draw lighter lines where the light hits and darker lines where the shadows fall.
Blend the shadows smoothly to avoid harsh lines. Use shading techniques like hatching or cross-hatching to add texture. The nose tip and nostrils typically have the darkest shadows.
Perspective and Angle
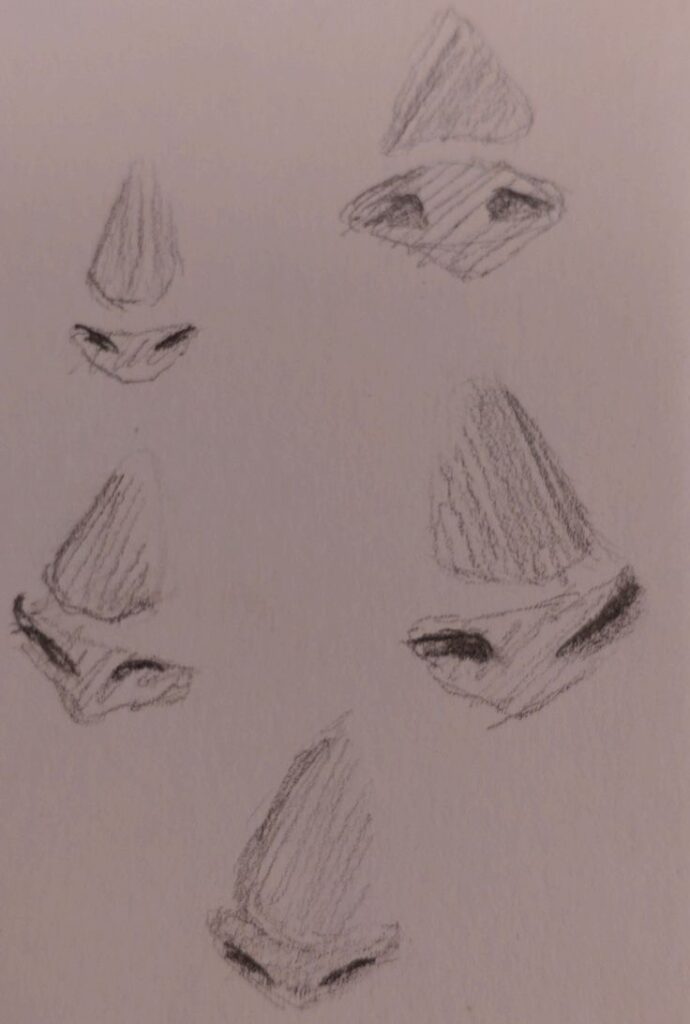
Noses look different based on the angle of the face. Drawing a nose from the front view will differ from drawing it in profile.
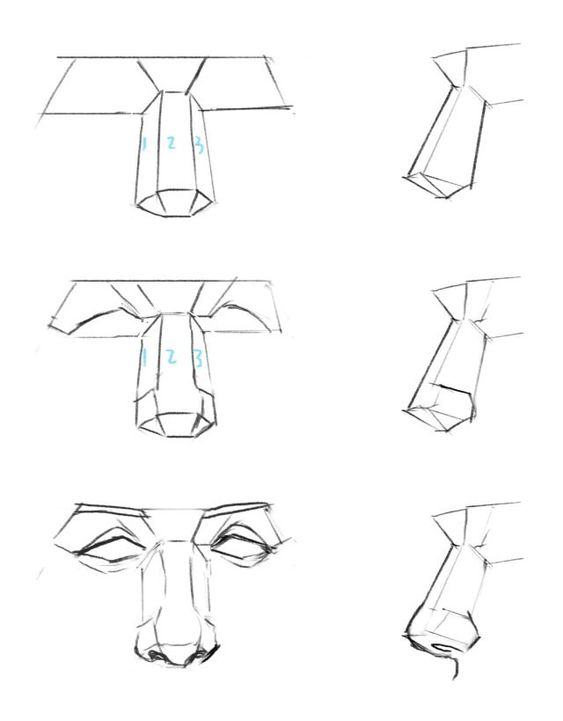
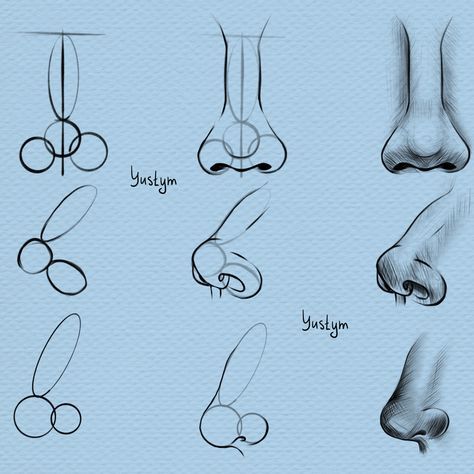
For a front view, make sure the nostrils are evenly placed. The bridge should be straight, and the tip of the nose should be prominent.
From a side view, the nose bridge will appear as a curve. The angle will highlight how far the nose extends from the face. Adjust the nostrils so they appear correctly from this perspective.
When drawing from a three-quarter view, blend elements of both front and side views. The nose will look more three-dimensional and lifelike.
Step-by-Step Drawing Guides
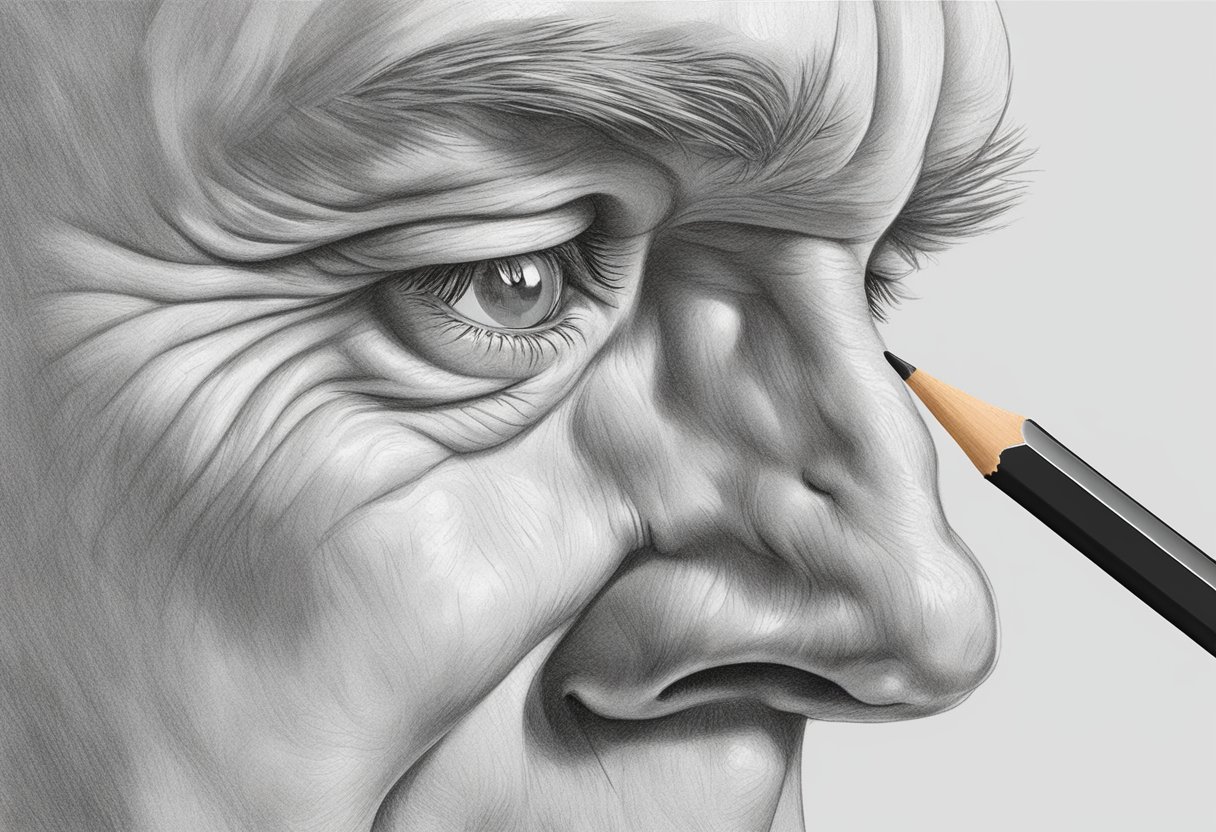
Mastering nose drawings involves understanding the nose’s shape from different angles and applying basic shapes to outline it. Practice helps artists draw realistic noses step by step.
How to Draw a Nose from the Front
Start with a simple guide. Draw a vertical line and a horizontal line to mark the center. Below the horizontal line, draw two small circles for the nostrils.
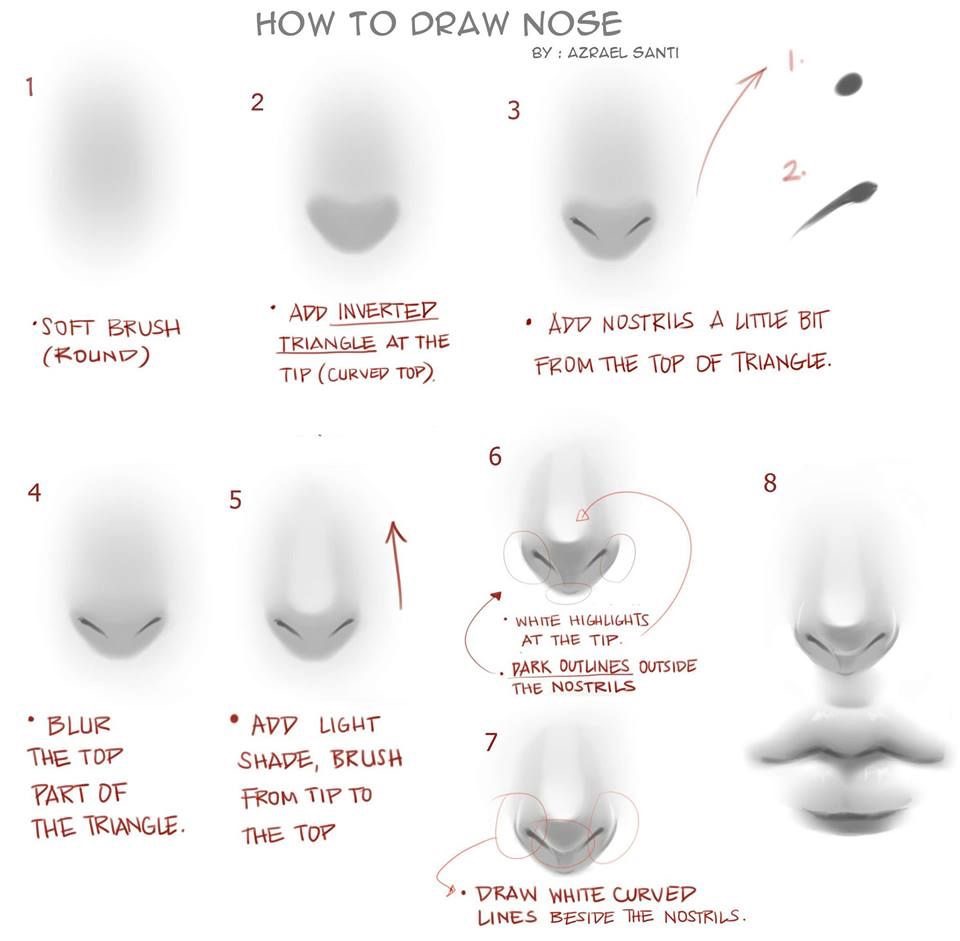
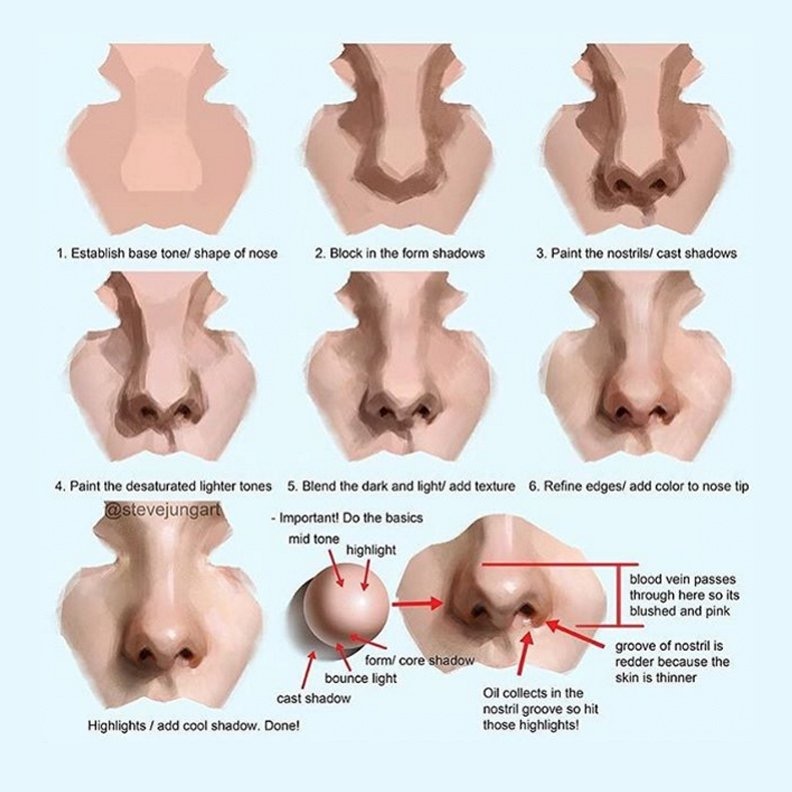
Add a larger oval above these circles for the main part of the nose. Connect the nostrils to the main oval with smooth lines. These lines form the nostril wings.
Sketch the bridge of the nose by drawing a straight vertical line from the top of the main oval up to where you want the nose to end. Add shading to give depth.
Drawing a Nose in Profile
Begin with an oval. This will be the general shape of the nose. Draw a straight line from the top of the oval to establish the bridge.
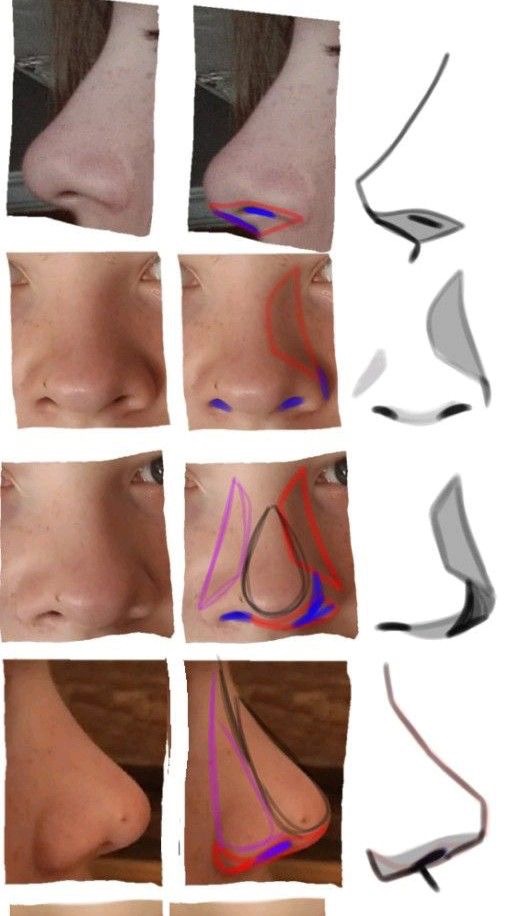
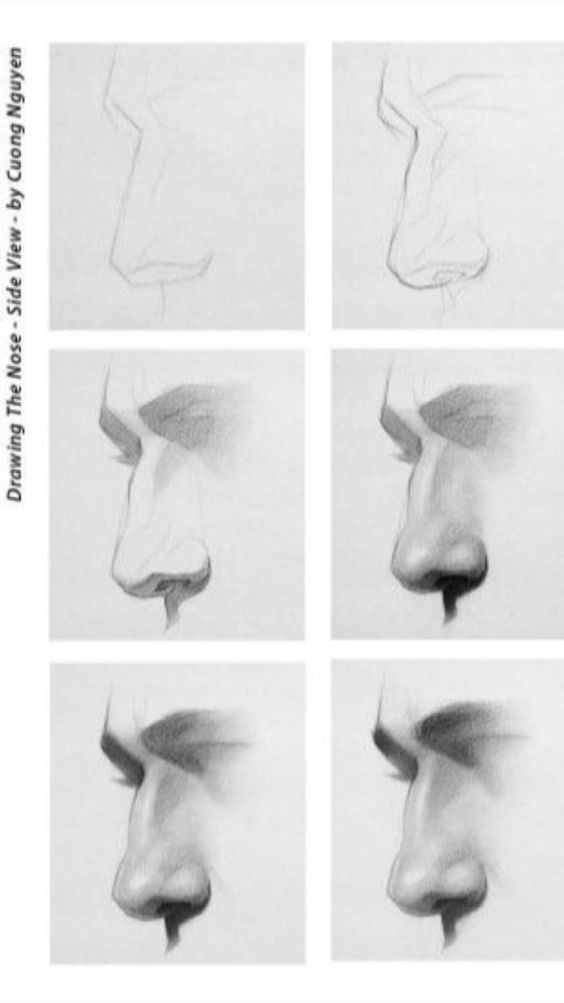
From the bottom of the line, draw a curve that extends outward, creating the tip of the nose. Beneath the tip, add a small curve to form the nostril.
Outline the nostril wing by connecting the tip and the mouth area using a slight inward curve. Finally, add shading to emphasize the nose’s contour and bridge.
Creating a Nose from Below
Draw a horizontal oval to start. This represents the base of the nose. Inside this oval, draw two smaller ovals for the nostrils.
To define the nostril wings, add curved lines from the outer edges of the nostrils to the center of the base oval. These lines will curve upward slightly.
Draw another oval above the base to represent the nose tip. Connect the nostrils and the top oval with gentle curves. Add details to the nostrils and shade the parts beneath.
Capturing the Nose from Above
Sketch an oval shape for the upper part of the nose, where the bridge is. Extend two lines down from this oval to form the sides of the nose.
At the bottom of these lines, draw horizontal ovals for the nostrils. The nostrils should appear smaller due to the viewpoint.
Connect the nostrils to the bridge with smooth curves, and add shading to give the impression of depth. Adjust the shading to reflect the light source, ensuring it looks realistic.
Shading and Blending Techniques

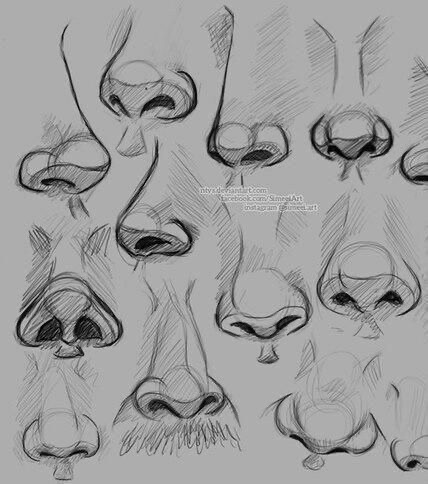
Creating a realistic nose drawing involves mastering shading and blending. Proper pencil shading gives depth, while blending smoothens transitions and enhances realism.
Basics of Pencil Shading
Pencil shading starts with choosing the right pencils. HB pencils are good for light shading, while 2B to 6B pencils work well for darker areas. Begin with light strokes to outline. Gradually darken areas to show shadows.
Use hatching and cross-hatching techniques. Hatching involves drawing parallel lines, while cross-hatching adds a second layer at an angle. Tonal variation is key. Press harder for darker tones, lighter for lighter tones. This gives the nose a three-dimensional look.
The direction of your shading should follow the form of the nose. For instance, small circular motions can mimic the skin’s texture. Remember to leave highlights unshaded; they show where light hits directly.
Blending for Realism
Blending smooths out pencil strokes, creating a more realistic appearance. Tools like tortillons or blending stumps are ideal. Cotton swabs or tissues can also work. Gently rub the shaded areas to soften lines.
Be careful not to over-blend. Too much blending can make the drawing look flat. Blend lightly to maintain texture. Work from darker to lighter areas, gradually blending the shades together.
Use an eraser to bring back highlights. A kneaded eraser is particularly good for this, allowing for precise adjustments. This enhances contrast and adds to the realism.
Creating realistic shading and blending requires practice and patience. Proper techniques make a big difference in how lifelike your nose drawings appear.
Adding Color to Nose Drawings
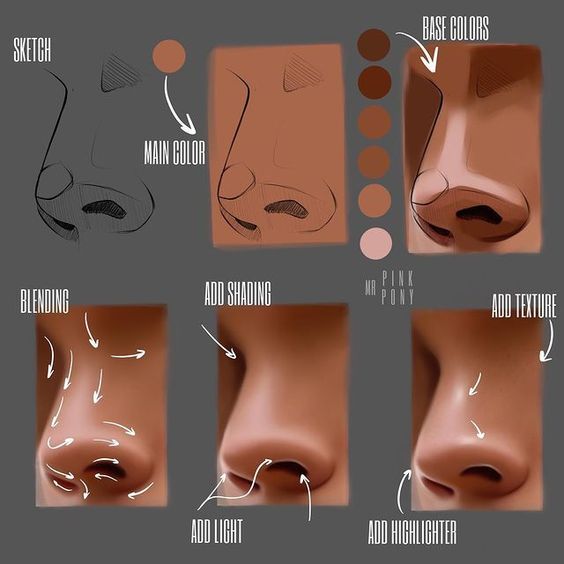
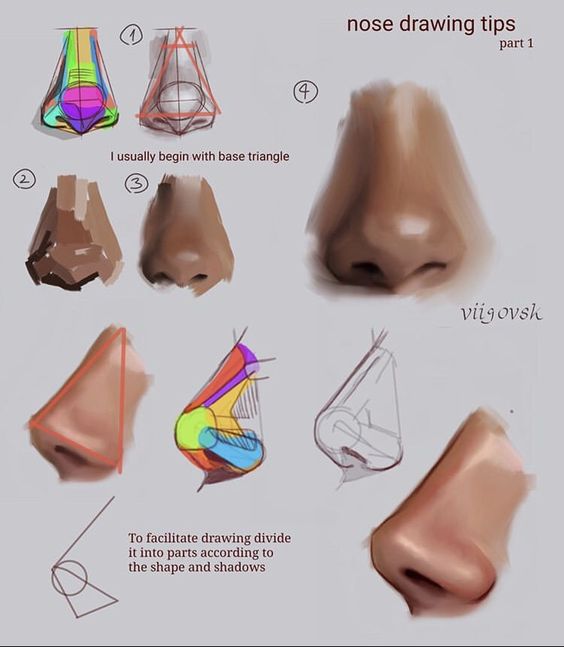
When adding color to nose drawings, it’s important to know the basics of color theory and how to apply color smoothly.
Color Theory Basics
Color theory starts with understanding the color wheel. Primary colors are red, blue, and yellow. These mix to make secondary colors like green, orange, and purple.
Warm colors (like red and orange) make areas look closer. Cool colors (like blue and green) make areas recede. This helps in creating depth.
Value and saturation are key. Value is how light or dark a color is. Saturation is how bright or dull a color is. Adjusting these can give a nose a realistic look.
Using a combination of light and shadow can highlight the nose’s shape. Remember, more saturated colors often draw attention, while less saturated colors can create shadows.
Applying Color to Noses
Start with a base color for the skin tone. Lightly add a mid-tone color to the entire nose. This creates a foundation.
Use a darker color for shadows. Areas under the nostrils and on the sides of the nose usually need more shadow. Blend smoothly.
Add highlights with a lighter color on points where light hits, like the bridge of the nose and the tip. This adds dimension.
Paints like watercolor or acrylic can be used. Watercolors are softer and easier to blend, while acrylics give more vibrant colors.
For digital art, use layers for shadows and highlights. This method allows for easier adjustments and blending. Use a soft brush for smooth transitions between colors.
Nose Drawing Styles and Techniques
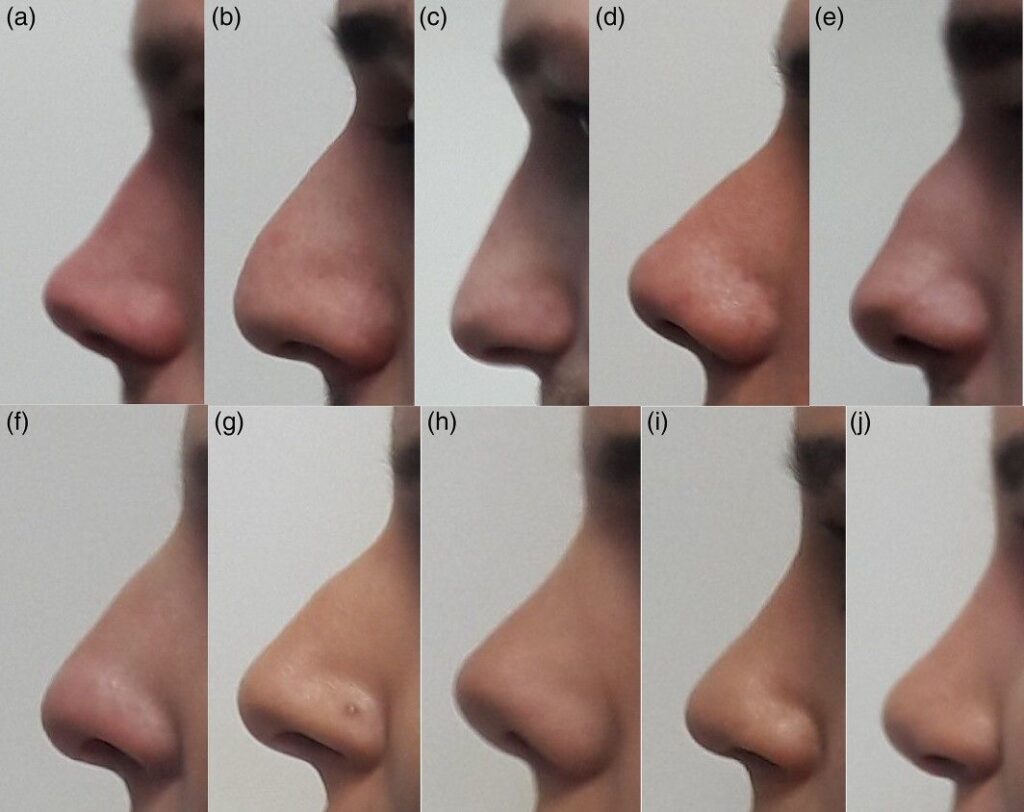
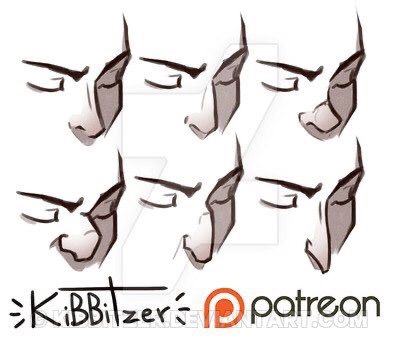
Drawing a nose can vary greatly depending on the style and purpose. Artists create feminine and masculine noses for different characters and use techniques ranging from simple animations to detailed realism.
Drawing Feminine and Masculine Noses
Feminine noses are often drawn smaller and more delicate. They typically have softer curves and a narrower bridge. Female noses in art sometimes include a slight upturn at the tip. These traits help in creating a gentler appearance.
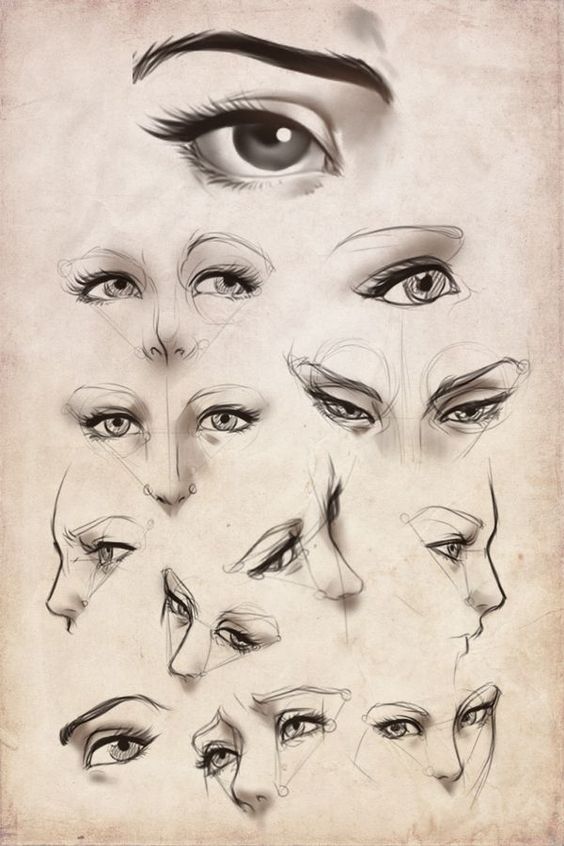
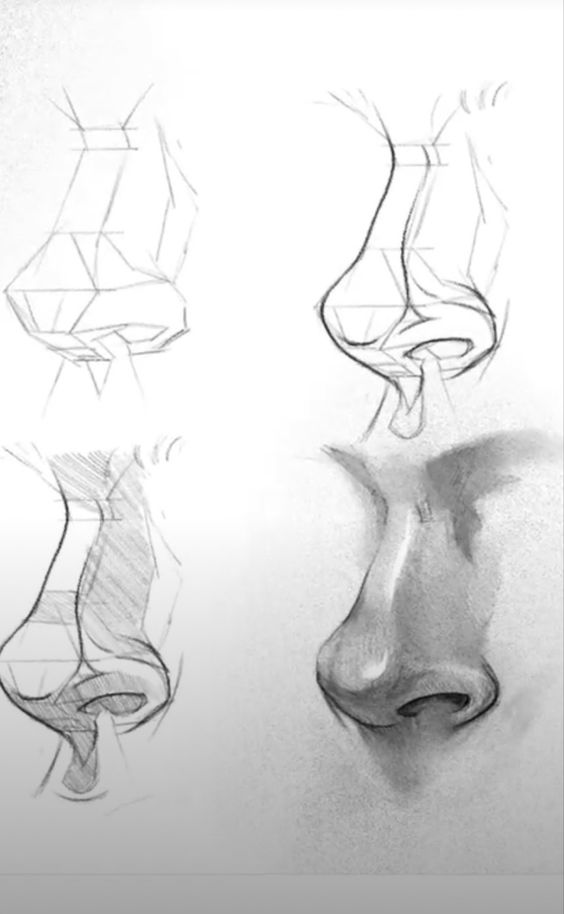
Masculine noses have a wider bridge and more angular shapes. Artists might accentuate a pronounced bump or nostrils to give a rugged look. The nostrils are often larger and more defined than in feminine noses. This differentiation helps to quickly convey gender and personality traits.
Character Design: Noses in Animation
In character design, noses play a big role in making characters recognizable. Animation often simplifies nose shapes to fit a unique style. Anime noses are usually minimal, often just a few lines or a simple dot, depending on the character’s emotion or the scene.
For more detailed animated characters, the nose might include light shading to add depth. The size and shape of the nose can convey age, ethnicity, and personality. Artists need to balance simplicity and character recognition, often using exaggerated elements for impact.
Realistic Nose Drawing Techniques
Realistic nose drawing requires attention to details like shadows, highlights, and subtle curves. Artists start by sketching basic shapes – usually a triangle or trapezoid. Lightly marking the nostrils and bridge helps in mapping out the nose’s structure.
Shading is crucial for adding depth. Light and shadow create the three-dimensional look. Highlights on the bridge and tip mimic how light hits the face naturally. Using various tones, from darks to lights, ensures the nose looks realistic. Each stroke impacts the final illusion, demanding precision and practice.
Finishing Touches
To make a nose drawing look realistic and polished, focus on adding depth and cleaning up stray marks. These final steps breathe life into your art.
Detailing for Depth and Dimension
Adding shadows and highlights is key to a realistic drawing. Use soft shading around the nostrils and the bridge of the nose. Highlight the tip and the bridge to make these areas stand out.
Vary your pencil pressure. Light strokes add soft shadows, while darker strokes add deeper shadows. Pay attention to the direction of light. This will determine where to place shadows and highlights.
Blending tools like a blending stump help smooth transitions between light and dark areas. This technique adds depth, making the nose look three-dimensional. Spend time observing real noses to see where natural shadows and highlights fall.
Cleaning Up the Drawing
Use a clean eraser to remove any stray marks or smudges around the nose. This helps keep your drawing neat and focused. Be gentle to avoid damaging the paper.
Erase unwanted lines carefully. Sometimes, a kneaded eraser works best for this, as you can shape it to fit tight spaces. Removing unnecessary lines will make your drawing cleaner.
Check the overall balance of your drawing. Make sure all parts of the nose blend well with the face. This attention to detail ensures a polished final piece.
Artistic Development
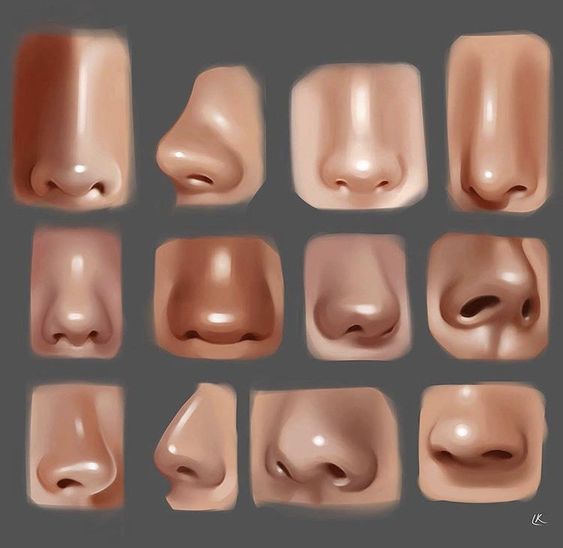
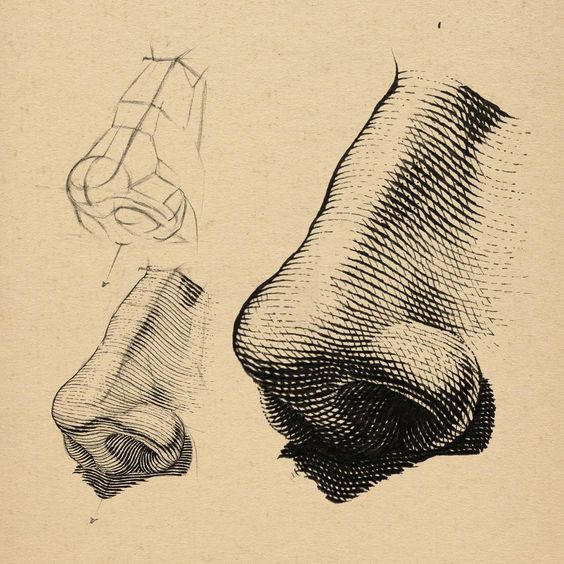
Developing your skills in nose drawing requires consistent practice and studying other artists’ techniques. It is crucial to refine both your practice habits and your ability to analyze great works.
Practice Techniques
Practicing nose drawing involves several key techniques. Beginners can start by studying basic shapes. Noses often break down into simple forms like spheres, triangles, and cylinders. Drawing tutorials can provide exercises focusing on these shapes, helping to build a solid foundation.
Using pictures as references is also helpful. Websites like Pinterest have a large collection of photos for practice. Print out these images or keep them on a screen. Examine how light and shadow play on different angles of the nose.
Regularly drawing noses in different styles and from various angles can enhance versatility. Start with simple sketches and gradually move to more detailed drawings. This practice sharpens observation skills and boosts confidence in handling more complex portraits.
Learning from Masters
Learning from master artists greatly improves nose drawing skills. Study portraits by renowned artists to see how they depict noses. Analyzing their techniques offers insights into proportion, shading, and texture.
Look for drawing tutorials by experienced artists. They often share tips and methods that can refine your craft. Videos and step-by-step guides can break down the process into manageable steps, making it easier to follow along.
Additionally, engage with art communities on platforms like Pinterest. Many artists share their work and processes, which can be valuable learning resources. Collaborating with others or receiving feedback helps improve and evolve your techniques.
- 2.0Kshares
- Facebook0
- Pinterest2.0K
- Twitter0
