Taking great pictures with your iPhone is easier than you might think. With the right techniques and understanding of your camera’s capabilities, you can elevate your photography skills significantly. By mastering composition, exposure, and creative techniques, you can capture stunning images that truly reflect your vision.
Embracing natural light and employing simple adjustments, such as locking focus and using the grid feature, can make a substantial difference. You don’t need a professional camera to take professional-quality photos; your smartphone can do the job with the correct application of techniques.
Whether you’re shooting a breathtaking landscape or a close-up of a flower, these tips will help you create impressive images that stand out. Soon, you’ll find yourself capturing moments with confidence and flair, turning everyday scenes into photographic masterpieces.
Key Takeaways
- Understand your iPhone’s camera settings for better results.
- Use composition techniques for more compelling images.
- Editing can enhance your photos significantly.


Understanding Your iPhone’s Camera Capabilities
Your iPhone camera offers a range of features designed to enhance your photography. By understanding different camera modes, image quality options, and exposure techniques, you can maximize your shots and capture stunning images.
Exploring Camera Modes and Lens Options
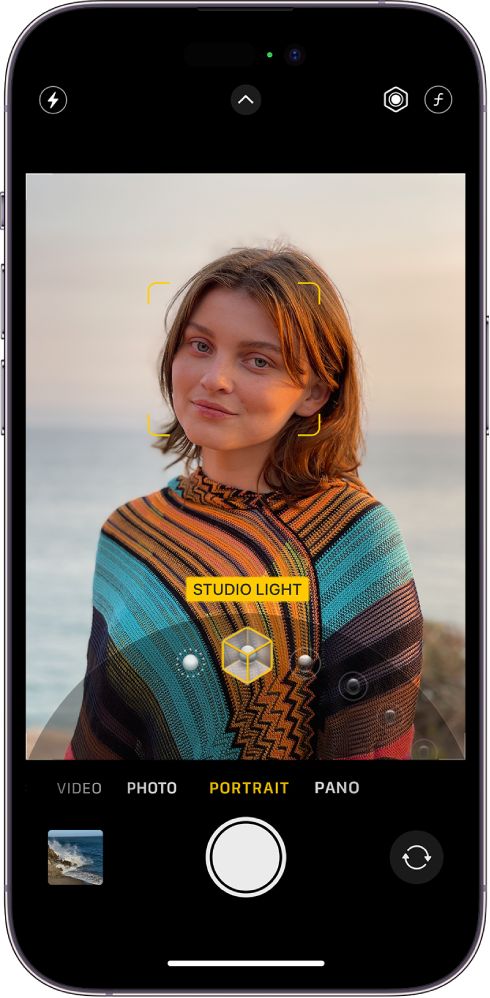
Your iPhone includes multiple camera modes tailored for different photography needs. Photo mode is perfect for everyday pictures, while Portrait mode creates a depth-of-field effect, blurring the background and focusing on your subject. If you want to capture wide landscapes, use Pano mode.
To switch modes, simply swipe on the camera screen. Each mode can utilize various lenses on newer iPhone models, like the ultra-wide lens. Familiarizing yourself with these options helps you adapt to diverse shooting conditions, ensuring you select the right mode for every situation.
Maximizing Image Quality with Resolution and Formats
Image quality on your iPhone is influenced by resolution and file formats. The standard format is JPEG, which balances quality and file size. However, if you want to retain more detail, opt for ProRAW. This format captures more data, offering greater flexibility in post-processing.
To switch to ProRAW, go to your Camera settings. Adjusting the resolution settings in the camera app can also enhance your image quality. Higher resolutions typically yield sharper images, so keep this in mind when framing your shots, especially for prints.


Harnessing High Dynamic Range (HDR) for Better Exposure
High Dynamic Range (HDR) helps in balancing light in scenes with both bright highlights and dark shadows. When enabled, your iPhone takes several photos at different exposures and merges them into one. This results in a more balanced image, preserving detail in both highlights and shadows.
You can activate HDR in your camera settings. It’s particularly useful in challenging lighting conditions, such as landscapes at sunset or interior shots with windows. Remember to check your settings and use HDR when appropriate to improve exposure in your photos.
Composition Techniques for Compelling iPhone Photos
Mastering composition techniques can significantly enhance your iPhone photography. By focusing on principles like the Rule of Thirds, utilizing depth of field, and finding the right angles with the grid feature, you can take your photos from ordinary to striking.
Implementing the Rule of Thirds
The Rule of Thirds is a fundamental technique that helps you compose balanced and engaging photos. Imagine your frame divided into a 3×3 grid. Place key elements along these lines or at the intersections for a more dynamic composition. This method moves the subject away from the center, creating tension and interest.
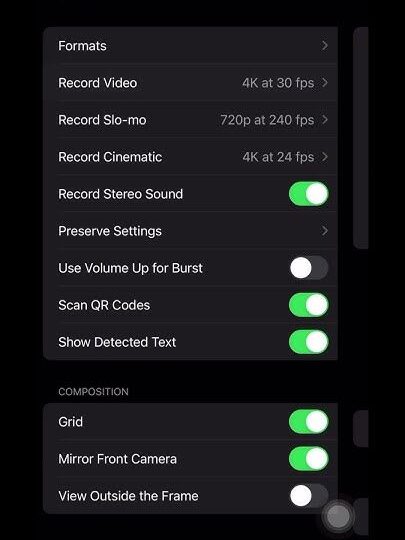
To enable the grid in your iPhone camera, go to Settings > Camera > Grid. Experiment by placing various elements like horizons or focal points on different grid lines. This simple adjustment can lead to more visually appealing shots.
Employing Depth of Field and Portrait Mode
Depth of field refers to the area in focus within an image. A shallow depth of field isolates your subject, creating a blurred background. This technique makes your subject pop and adds emotional impact.
Use the Portrait Mode on your iPhone to achieve this effect easily. The mode automatically blurs the background while keeping your subject sharp. Experiment with different lighting conditions and distances to find the most flattering perspective.
To enhance depth even further, consider including foreground elements, such as flowers or branches. This adds layers and directs the viewer’s eye towards your focal point.
Finding the Right Angle and Using the Grid Feature
The angle from which you take a photo can dramatically alter its impact. Instead of shooting from eye level, consider different viewpoints—get low, shoot from above, or try a side angle. Changing your perspective can reveal unique compositions that stand out.
Using the grid feature helps in aligning your shots. It guides you in keeping your horizon level and subjects well-placed within the frame. Avoid cluttering your composition by focusing on a single point of interest and simplifying the background. Experimentation is key to understanding which angles work best for your style.


Optimizing Exposure and Focus
To capture stunning images with your iPhone, mastering exposure and focus is crucial. These elements significantly impact the quality and clarity of your photos. Adjusting exposure correctly ensures your images are neither too dark nor too bright, while proper focus guarantees sharp details.
Adjusting Exposure for the Perfect Shot
To adjust exposure on your iPhone camera, tap the screen where you want to focus. You’ll notice a sun icon next to the yellow focus square. Slide this icon up or down to increase or decrease exposure. A higher exposure brightens the image, while a lower exposure darkens it.
Use natural lighting to your advantage, as shooting in bright conditions often requires less exposure adjustment. For optimal results, consider using the grid tool to align your shot. The grid can help you find the right balance of light and elements in your composition.
Achieving Sharp Focus in Your Images
Ensuring sharp focus is essential for quality photography. Start by tapping the screen on the subject you want to highlight. This action sets the focus point, allowing your iPhone to prioritize that area and capture a clear image.
For moving subjects or fast actions, use continuous focus mode by holding your finger on the screen until you see AE/AF LOCK. This locks both exposure and focus, allowing for adjustments as your subject moves. If you’re shooting macro shots, be especially cautious about focus, as even slight shifts can blur the main subject.


Creative Techniques in iPhone Photography
To enhance your iPhone photography, explore creative techniques that leverage unique features of your device. Focusing on methods like Live Photos and Burst Mode can elevate image quality, while timing your shots during the Golden Hour adds warmth and depth. Engaging in Street Photography presents opportunities to capture candid moments in dynamic environments.
Experimenting with Live Photos and Burst Mode
Utilizing Live Photos provides a novel way to capture motion and emotion in your photography. This feature records a brief video when you take a picture, allowing you to revisit moments with sound and movement. To access Live Photos, tap the icon in the camera app before shooting.
Burst Mode is ideal for fast-moving subjects. Simply hold down the shutter button to capture a series of images in quick succession. This method increases your chance of getting the perfect shot of a fleeting moment. Review and select the best image from the burst after shooting.
Capturing the Golden Hour
The Golden Hour refers to the period shortly after sunrise and before sunset, producing soft, warm light that flatters your subjects. During this time, the sun is low in the sky, reducing harsh shadows and creating gentle highlights.
Plan your shoots around this time to achieve ethereal landscapes or portraits. Use the camera’s grid feature to apply the Rule of Thirds, ensuring balanced compositions. Consider shooting towards the light to create stunning silhouettes and emphasize colors that come alive in this golden light.
Engaging in Street Photography
Street Photography provides an opportunity to capture authentic moments in everyday life. Your iPhone’s portability makes it an ideal tool for this kind of work. Be observant and ready to shoot the spontaneous interactions and unique scenes around you.
Focus on using natural light and interesting subjects. Try to capture emotions and stories through candid shots. Experiment with different angles and distances to offer varied perspectives. Always be respectful of your subjects, ensuring you’re not intruding on private moments, but you can often discover striking images in public settings.


Editing and Enhancing Your iPhone Photos
Editing your iPhone photos can significantly improve their visual appeal. Utilizing in-built tools, applying filters, and managing file sizes are essential steps in this process. Here’s how to make your images stand out.
Utilizing in-built Editing Options
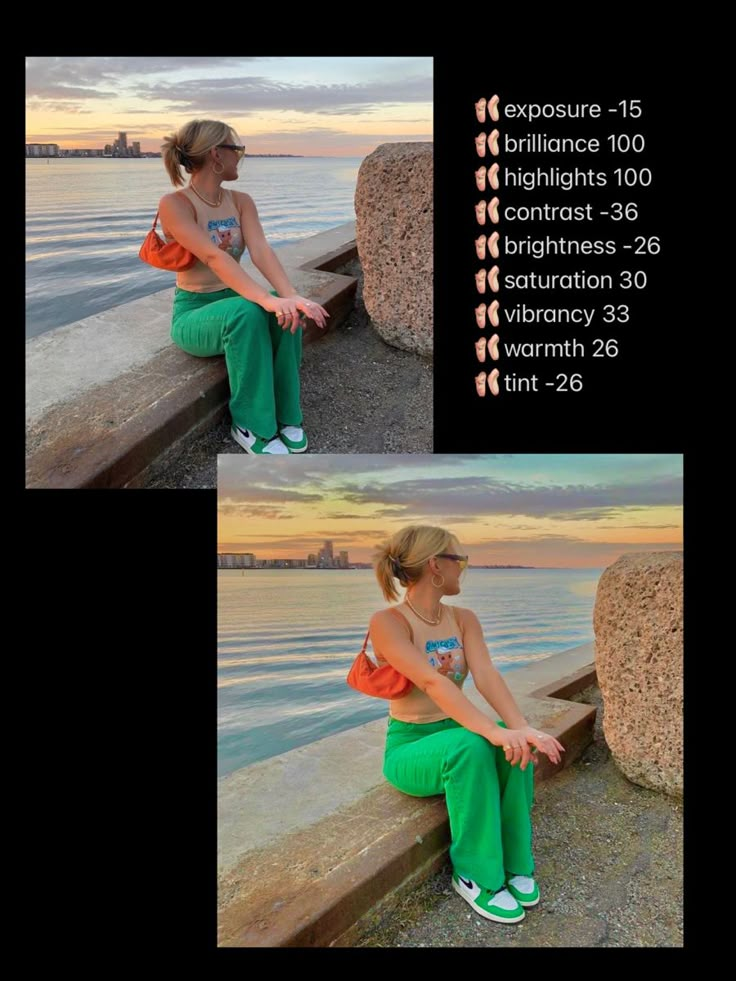
Your iPhone offers robust editing options directly within the Photos app. After selecting an image, tap “Edit” to access features like Crop, Adjust, and Filters.
- Crop and Rotate: Use the crop tool to straighten and frame your shot effectively. This can enhance composition and focus the viewer’s attention.
- Adjust: Here, you can fine-tune exposure, brightness, contrast, shadows, and highlights. This is crucial for achieving a polished look.
- Natural Light: Use the built-in options to adjust the warmth and tint for more realistic colors.
Take full advantage of these tools to refine your images before sharing or saving.
Working with Filters and Presets
Filters can dramatically alter the mood of your images. iPhone comes equipped with several presets to enhance your photos effortlessly.
- Built-in Filters: Experiment with different styles like Vivid, Dramatic, and Mono. These can transform a simple photo into a compelling visual.
- Custom Filters: Third-party apps, such as VSCO and Snapseed, offer advanced filtering options. You can adjust the intensity of each filter to suit your vision.
- Consistency: If you’re editing a series of photos, consider using the same filter for a cohesive look. This helps in creating a professional feel in your photography.
Incorporate filters carefully to emphasize your subject without overwhelming the original image.
Managing File Size after Editing
Editing can increase the file size of your photos, which may affect storage. Managing this efficiently is key.
- Check File Size: After editing, observe the file size by checking the photo details. Large files can be challenging to store and share.
- Export Options: Many editing apps allow you to save or export a photo in lower resolutions. Opt for this if you’re sharing online to prevent lag.
- Cloud Storage: Consider backing up your images to iCloud or another service. This frees up storage space on your device while keeping your best shots safe.
Being mindful of file size helps maintain the quality of your workflow and storage capacity.


Advanced iPhone Photography Settings
When capturing stunning photos with your iPhone, understanding advanced camera settings can enhance your results. Mastering features like Night Mode will improve your low-light photography. Moreover, preserving custom settings will ensure that your preferences are always applied for consistent outcomes.
Mastering Night Mode for Low Light Situations
Night Mode is an essential feature for taking photos in low-light conditions. It automatically activates when your iPhone detects dim lighting, such as during sunset or indoors at night.
To utilize Night Mode effectively, consider the following tips:
- Stabilize your iPhone: Use a tripod or rest your phone on a flat surface to reduce motion blur.
- Adjust the exposure: Tap the moon icon to set the exposure time manually. Longer exposures gather more light but require stability.
- Experiment with different lighting: Move around to find the best angles and apply creative compositions using available light sources.
Using these strategies will significantly improve the quality of your low-light images, helping you achieve stunning results with your iPhone photography.
Preserving Custom Settings for Consistent Results
Preserving your custom settings ensures that you maintain your preferred configuration for every shooting session. This is especially useful for regular smartphone photography sessions.
To preserve your settings on an iPhone model like the iPhone 14:
- Go to Settings > Camera.
- Use the “Preserve Settings” option. Here, you can preserve settings for modes like Night Mode, the camera mode, and Live Photo.
- Turn on the desired features. This will enable the settings you prefer automatically.
Such adjustments allow for quick and easy access to your ideal shooting mode, minimizing setup time and maximizing creativity while you capture your world.
- 616shares
- Facebook0
- Pinterest613
- Twitter3
- Reddit0


