Creating a male body sketch is a foundational skill for artists aiming to capture human anatomy with accuracy and expression. Mastering the proportions, muscle structure, and posture of the male form allows you to produce realistic and dynamic drawings that can serve as the basis for further artistic work. Understanding these core elements is essential whether you are a beginner or advancing your craft.
To develop strong male body sketches, you must focus on observing anatomical details while learning practical techniques. Using references and breaking down the figure into basic shapes helps simplify complex forms. This structured approach will enhance your ability to portray movement, balance, and the natural variations found in the male physique.
Key Takeways
- Successful male body sketches rely on accurate understanding of anatomy and proportion.
- Using simplified shapes improves your ability to draft complex body poses.
- Consistent practice and referencing real models enhance your drawing skills.


Fundamentals of Male Body Sketching
To sketch the male body effectively, you need a clear grasp of anatomy, proportional relationships, and how to build the figure using basic shapes. These elements work together to create a believable and dynamic male silhouette.
Understanding Human Anatomy
You must understand the male anatomy to depict muscles, bones, and joints accurately. Focus on key muscle groups like the pectorals, deltoids, biceps, and abdominal muscles, which define the male form.
The skeletal structure serves as the framework. Pay attention to the ribcage, pelvis, and spine alignment, as these influence posture and balance. Knowing muscle attachment points helps you render tension and movement realistically.
Study how muscles contract and stretch based on different poses. This knowledge aids in avoiding flat or unnatural sketches. Remember, the male body generally has broader shoulders and narrower hips compared to the female form.
Proportions of the Male Figure
Accurate proportions are foundational for convincing male figure drawings. Typically, the average male height is about 7 to 7.5 heads tall.
Key proportional relationships include:
- Shoulders tend to be about 2 to 3 head widths wide.
- The torso length from shoulders to the pelvis is roughly 3 heads.
- Legs are generally longer than the torso, about 4 heads in length.
- The arms hang close to mid-thigh when relaxed.
Use these ratios as a starting framework but adjust slightly to match individual body types or stylistic choices. Consistency in proportions ensures your figure doesn’t look distorted.
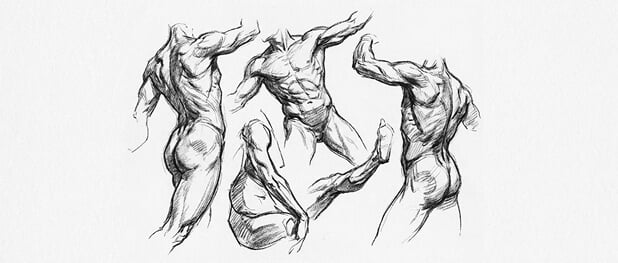
Basic Shapes and Silhouette Construction
Begin your sketches by breaking the body into simple geometric shapes. Use ovals for the head and chest, cylinders for the limbs, and rectangles or trapezoids for the pelvis and shoulders.
This approach helps maintain correct proportions and angles before adding detail. Focus on the overall silhouette to capture dynamic poses and weight distribution.
A clear silhouette shows the figure’s gesture and character even without internal detail. Avoid overly rigid shapes; instead, use curved lines to represent muscle mass and natural flow of the human body.
Using basic shapes as construction blocks allows you to iterate quickly and adjust posture or proportions while maintaining structural integrity.


Techniques and Materials for Sketching
Mastering your male body sketch requires careful choice of tools, materials, and methods. Each element—from pencils to paper type—impacts the clarity, durability, and style of your drawing.
Popular Drawing Tools and Art Materials
Start with a reliable set of pencils, ranging from hard (H) to soft (B) leads. Hard pencils (H, 2H) are ideal for initial light guidelines, while softer pencils (2B to 6B) bring depth and shading.
Charcoal and graphite sticks offer versatility for detailed or expressive strokes. You may also want blending stumps to smooth gradients and erase pencils for fine corrections.
Keep an eraser nearby for refining anatomy and proportions. Quality sharpeners and a ruler are useful for precise angles when mapping limbs or posture.
Using Archival Inks and Color
Archival inks are essential if you want longevity in your sketches. These inks resist fading and discoloration, which preserves your line work over time.
When adding color, choose pigment-based inks or watercolor pencils designed for durability. They offer strong pigmentation that won’t bleed or degrade quickly.
Use ink pens with fine nibs for detailed contours or crosshatching to enhance muscle definition. Applying color sparingly can emphasize structure without overpowering the sketch.
Digital Drawing and Vector Art
Digital sketching lets you experiment without material waste. Tablets with pressure-sensitive styluses replicate pencil strokes, allowing nuanced shading of the male form.
Vector art programs give you control over shape and proportion adjustments without quality loss. This is useful if you want to tweak anatomy or create clean, scalable reference sketches.
Consider layering your digital work, using separate layers for construction lines, details, and shading. This improves flexibility as you refine your drawing.
Choosing Paper and Surface
The choice of paper affects texture and how your materials behave. For graphite or charcoal, medium-to-heavyweight paper with slight tooth (surface texture) helps hold the pigment without smudging excessively.
Smooth Bristol board works well if you prefer detailed ink work or fine lines. It supports clean strokes and crisp edges, especially important for anatomical precision.
If you use wet media like ink washes or watercolor pencil, opt for heavier, cold-pressed paper to prevent warping and allow absorption without bleeding.
Keep your drawing surface sturdy and flat to facilitate accurate, controlled hand movements.


Step-by-Step Process for Drawing a Male Body
Start by setting a clear foundation for the body’s posture and flow, then build the structure by focusing on muscles and anatomy. Finally, bring energy and personality into your sketch by emphasizing strength and thoughtful details.
Establishing the Gesture and Pose
Begin your drawing by capturing the overall movement and balance of the figure. Use light, loose lines to sketch a simple gesture that represents the spine’s curve and limb positions. Focus on rhythm and flow rather than exact details at this stage.
Identify key points like the head, shoulders, hips, and limbs to create a proportional framework. This will guide the pose’s dynamics and help you maintain a natural stance. Keep proportions consistent using basic measurements like head lengths.
Avoid stiffness by emphasizing the body’s natural twists and bends. This early stage sets the tone for muscle placement and anatomical accuracy, so be deliberate but flexible in your marks.
Sketching Muscles and Anatomy Details
After the gesture feels balanced, overlay the major muscle groups to define form and volume. Study the torso, arms, and legs to understand how muscles wrap around the skeleton.
Use simplified shapes like ovals and cylinders to block in muscles like the pectorals, biceps, and quadriceps. Pay attention to muscle origins and insertions to keep anatomy believable.
Highlight muscle tension and relaxation areas to convey realism. For instance, flexed muscles should appear more prominent, while relaxed ones have smoother contours.
Adjust proportions if needed to ensure the figure feels masculine but not exaggerated. Careful observation of muscle structure creates depth and solidity in your drawing.
Adding Power, Care, and Creative Expression
Imbue your sketch with a sense of power through strong, deliberate lines around muscle groups. This adds visual weight and highlights physical strength. Use shading selectively to emphasize muscle definition without overworking the image.
Show care in your rendering by refining details like joint articulations and subtle muscle overlaps. This elevates your sketch beyond basic anatomy into a thoughtful representation.
Introduce creative expression by varying line weight and exploring unique poses. Let your sketch convey mood—strong, relaxed, or dynamic—to push beyond clinical accuracy into engaging art.
Balance technical precision with artistic interpretation to make the male body sketch feel both anatomically sound and visually compelling.


Inspiration and References for Artists
Access to varied visual resources deepens your understanding of male anatomy in dynamic and realistic ways. Using diverse tools such as digital media, real-life observation, and the work of skilled artists can greatly improve your sketches.
Stock Photos, Videos, and 360° Panoramic Images
You can find high-quality stock photos specifically focused on male bodies that show different muscle groups, poses, and lighting. These images offer consistent reference points and help you study proportions and anatomy without needing a live model.
Videos add dynamic movement to your study, allowing you to observe how muscles flex and relax during motion. Meanwhile, 360° panoramic images let you view the human form from multiple angles, which is useful for understanding volume and spatial relationships.
Using these resources, you can practice sketching from multiple perspectives, improving accuracy and detail in your work.
Studying People and Gym References
Observing people in real-life settings, especially in gyms, provides insight into natural and flexed muscle forms. Gym environments show various body types, strength levels, and muscle development, which enriches your anatomical knowledge.
You can focus on specific muscle groups during different exercises, noting tension and movement. This allows you to capture authentic poses and body language rather than static postures.
Pay attention to lighting and shadow in gyms, which often highlight muscle definition clearly, adding depth to your sketches.
Influential Artists: Melissa Wang
Melissa Wang is a modern artist known for her detailed and accurate male anatomy sketches. Her approach combines solid understanding of form with artistic expression, offering a reliable learning model.
Studying Wang’s tutorials and model sheets helps you grasp muscle structure and proportion subtleties. She breaks down complex poses into manageable shapes, making it easier to replicate realistic male figures.
Her work demonstrates how anatomy can inform artistic style without losing precision, which you can apply to your own sketches.


Artwork Presentation and Applications
Your male body sketches can serve multiple purposes beyond initial creation. Proper presentation and application enhance their value whether used as decorative art, professional tools, or educational aids.
Creating Wall Art and Decorative Pieces
Transform your male body sketches into striking wall art by choosing the right medium and framing. Use high-quality paper or canvas to maintain detail and vibrancy over time. Consider adding matting to give your artwork a clean, professional look.
Color balancing and subtle shading emphasize musculature and expression, making your piece visually engaging. Select frames that complement your style—sleek metal for modern looks or wood for classic appeal. Positioning your art at eye level maximizes viewing impact.
Business and Medical Uses of Male Body Sketches
In business, male body sketches assist product design, marketing, and fitness industries. You can create accurate anatomical references for clothing design or exercise guides. These sketches also support advertising by illustrating physique ideals or garment fit.
In medicine, sketches function as educational tools. Detailed anatomical drawings clarify muscle groups and body mechanics for students or patients. You may provide visual aids for rehabilitation programs or surgical planning, ensuring clear communication between professionals and clients.
Mounting, Display, and Warp-Resistant Construction
To preserve your sketches, use warp-resistant backing materials like acid-free foam board or hardboard. These prevent bending or damage caused by humidity and handling. Apply gentle adhesive or mounting corners to avoid paper damage.
For displays, avoid direct sunlight to prevent fading. Use UV-protective glass or acrylic if framing. Maintain proper humidity (around 40-50%) to reduce expansion or contraction of paper or canvas. This preserves your artwork’s integrity over time.
Wall-Mounting Hardware and Easy to Hang Techniques
Choose hardware appropriate for the weight and size of your finished piece. D-rings, wire hangers, or sawtooth hooks offer reliable support. Use wall anchors or studs to secure heavier art safely.
For ease of hanging, mark wall positions using a level and measuring tape. Consider removable adhesive strips for lighter pieces to avoid wall damage. Label backs discreetly with orientation marks to ensure correct alignment during installation.


Variations and Related Concepts
Understanding the nuances in male body sketches helps you capture age and style differences effectively. Key distinctions arise when comparing child and adult male anatomy, while specialized approaches like Male Body Sketch II refine proportions and technique. Influences from star artists also shape how you approach these drawings with more realism or stylization.
Child and Male Body Sketch Differences
When sketching a child versus an adult male, focus first on the proportions. Children have larger heads compared to their bodies, roughly 1/4 of their total height, while adult males have heads about 1/8 of their height. This shift changes the silhouette and balance in your drawing.
Muscle definition and body mass are less pronounced in children. Your line work should be softer, with less emphasis on muscle groups and more on smooth contours. Pay attention to limb length, too; children’s limbs are shorter and less angular.
Facial features also differ. You’ll want to emphasize roundness and youthfulness for children, while male sketches highlight sharper jawlines and more defined facial structures. These differences are crucial for accurate age representation.
Male Body Sketch II and Star Artists
Male Body Sketch II builds on foundational body drawing by introducing refined anatomy rules and dynamic poses. It often involves more detailed muscle groupings and realistic movement, making your sketches appear more lifelike without losing clarity.
Star artists influence your style significantly. They introduce concepts such as exaggerated muscle emphasis or altered proportions to evoke strength or agility. By studying their techniques, you can decide whether to pursue realism or an idealized, stylized male form.
These artists also focus on gesture and posture, helping you capture energy and personality beyond static poses. Observing their work guides your choices in anatomy accuracy and creative expression.
- 2.4Kshares
- Facebook0
- Pinterest2.4K
- Twitter3
- Reddit0


