A convincing fox drawing starts with shape, not fur. Get the narrow tapered muzzle, the tall triangular ears, the light-boned legs and the heavy bushy tail into the right relationships, and the animal reads as a fox before you shade a single hair. Skip that, and even beautiful texture ends up on a small dog.
- Materials and reference setup
- Read the fox silhouette before details
- Fox drawing step by step: seven-step construction
- Fox head drawing: ears, eyes, muzzle and cheek planes
- Legs, paws and tail
- Graphite workflow: values and how to draw fox fur
- Colored-pencil workflow: red fox color
- Three correction cases
- Four drills and a two-week practice plan
- Fox drawing FAQ
- Closing takeaway
This workshop shows how to draw a fox in a repeatable way. You’ll read the silhouette, build the body in seven visible steps, construct the head, then finish in graphite or colored pencil. You’ll also get a diagnostic for the dog problem, a fur-direction map, three correction cases and a two-week practice plan.
Industrial design training made me strict about silhouettes: if the outline is vague, fur won’t rescue it. Years of academic life drawing taught me the second half of the lesson. You find the animal through gesture and construction first, then earn the right to render. That order is the whole method here.
Materials and reference setup
Keep the kit small. Fewer tools force clearer decisions.
- Graphite: an HB for construction, a 2B pencil for midtones and a 4B pencil for darks. Staedtler Mars Lumograph and Faber-Castell 9000 both work well.
- Erasers: a kneaded eraser for lifting, plus a plastic eraser for clean corrections.
- A sharpener or craft knife. Fur work needs a point.
- Paper: smooth or medium-tooth drawing paper, such as a Strathmore 400 Series Drawing pad or smooth Bristol.
- Colored pencils: cream, yellow ochre, orange, burnt sienna, dark brown, warm gray, indigo and white. Faber-Castell Polychromos (oil-based) and Prismacolor Premier (wax-based) both layer well. Caran d’Ache Luminance is a premium alternative.
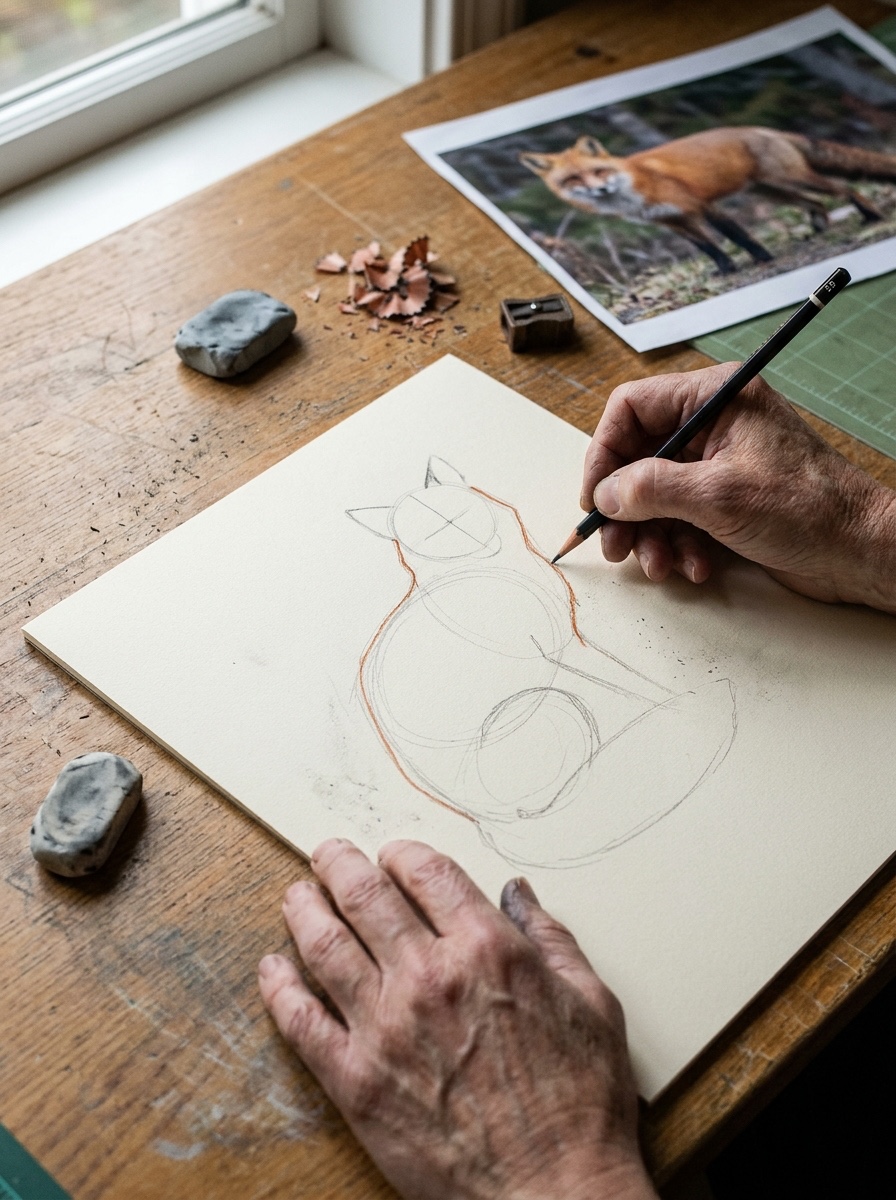
Then pick a wildlife reference photo with a clear side or three-quarter view and readable legs. Before drawing anything, measure:
- the head angle and the ear angle against a vertical;
- the curve of the spine from skull to tail root;
- the sizes of the ribcage and pelvis masses;
- where each paw touches the ground;
- the arc of the tail;
- the negative spaces between the legs, under the belly and around the tail.
Compare at arm’s length. How many head lengths fit along the back? Is the tail tip higher than the chest? Ten seconds of measuring saves twenty minutes of erasing.
Read the fox silhouette before details
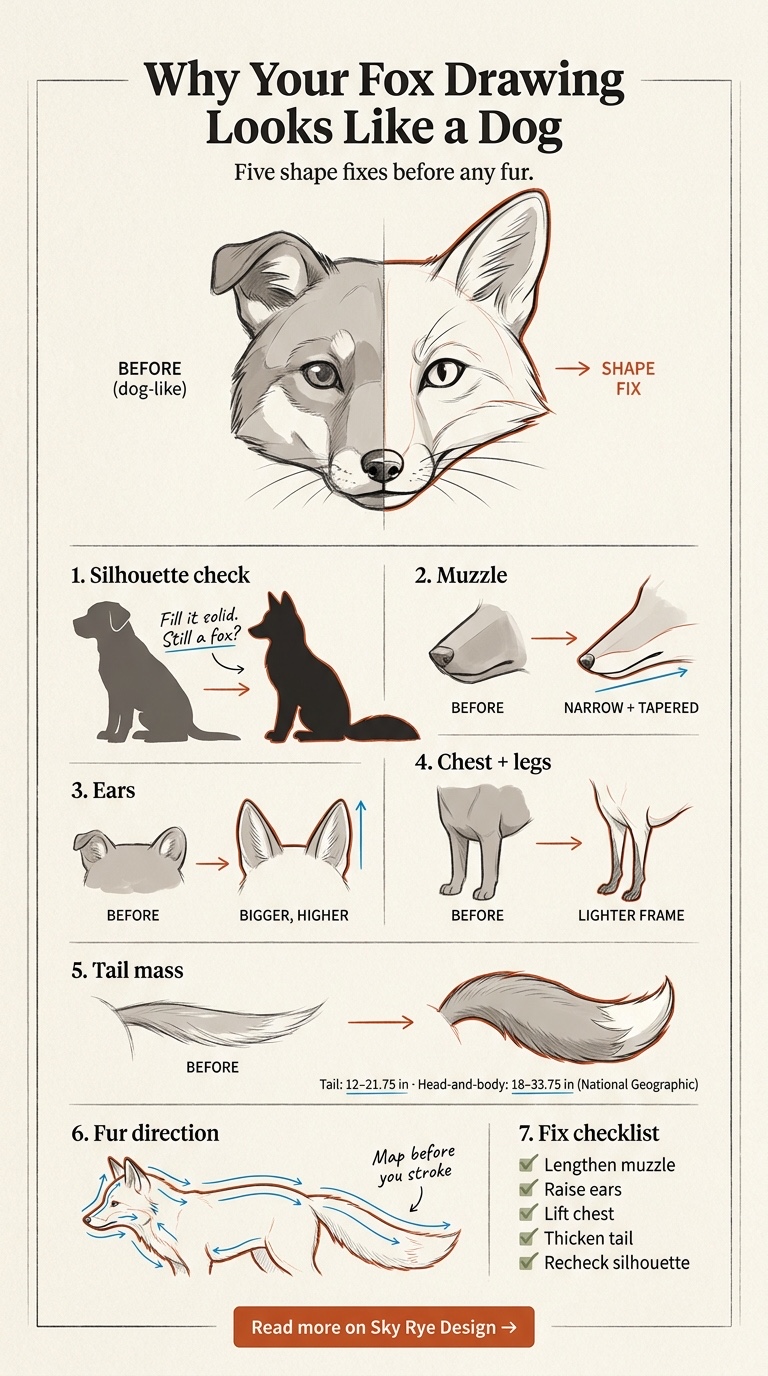
Squint at your reference until the fox becomes a dark shape. Viewers recognize that shape first, so fix it first.
The red fox, Vulpes vulpes, is a small, light-framed canid. National Geographic gives a head-and-body length of roughly 18 to 33.75 inches and a tail length of 12 to 21.75 inches. At both ends of those ranges, the tail is roughly two-thirds of head-and-body length. Treat it as a check, not a rule.
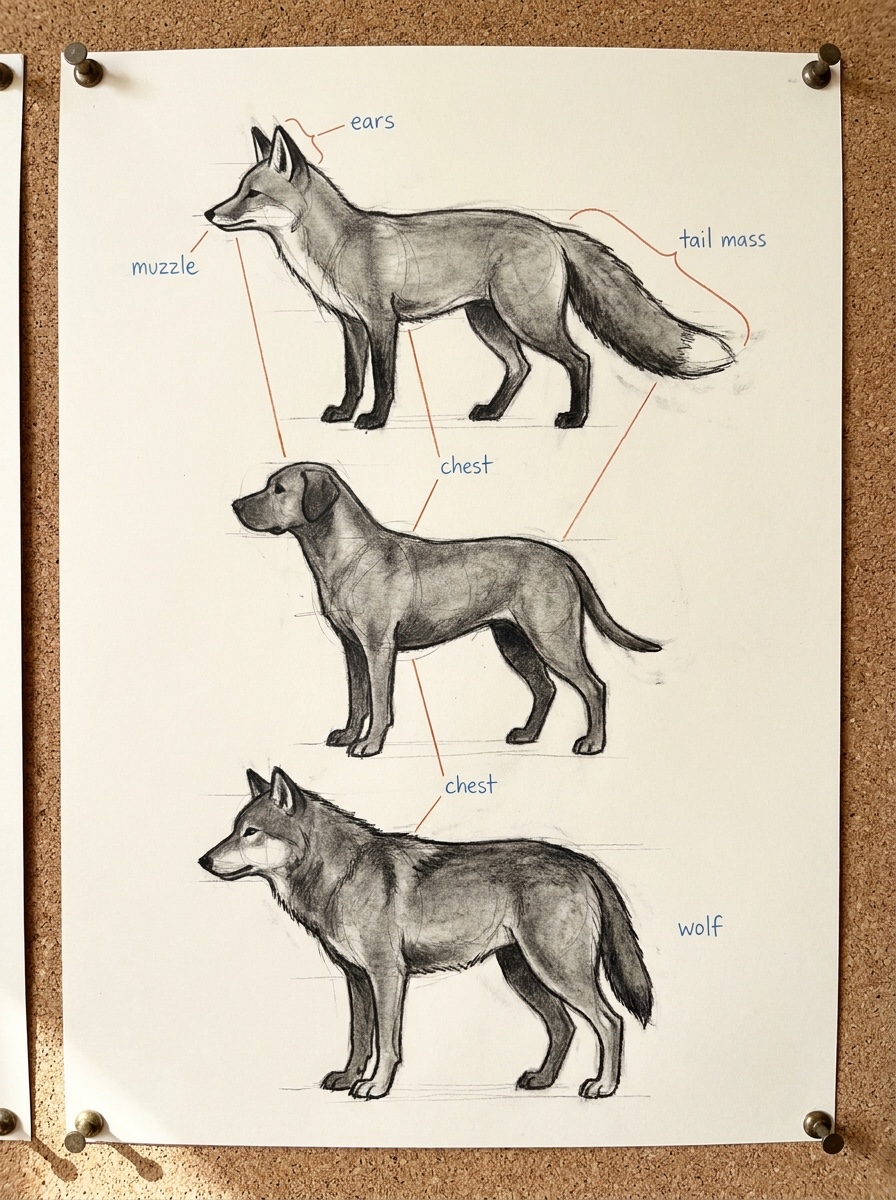
Here’s how the fox silhouette tends to differ from a dog or wolf silhouette in drawings. Breeds and individuals vary, so read these as tendencies.
- Muzzle: the fox muzzle is narrow and tapers to a fine point. Wolves and many dogs carry a blockier muzzle with a squarer end.
- Ears: large, triangular and set high, they read big relative to the skull. Shrink them and the animal turns into a dog.
- Body: a fox looks long and low, with slim legs. A wolf carries a deeper chest and heavier legs.
- Tail: thick along most of its length, often held low or curled, and a major mass in silhouette.
National Geographic notes that the thick tail aids balance, warmth and communication. Never treat it as an afterthought, since its arc carries the pose’s mood.
Quick test: trace your rough sketch onto scrap paper and fill it solid with the side of a 4B. If you still see a fox, the silhouette works. If you see a terrier, go back before you touch fur.
Fox drawing step by step: seven-step construction
Keep your HB light and don’t move on until each checkpoint passes. Every line in steps one to five should be erasable.
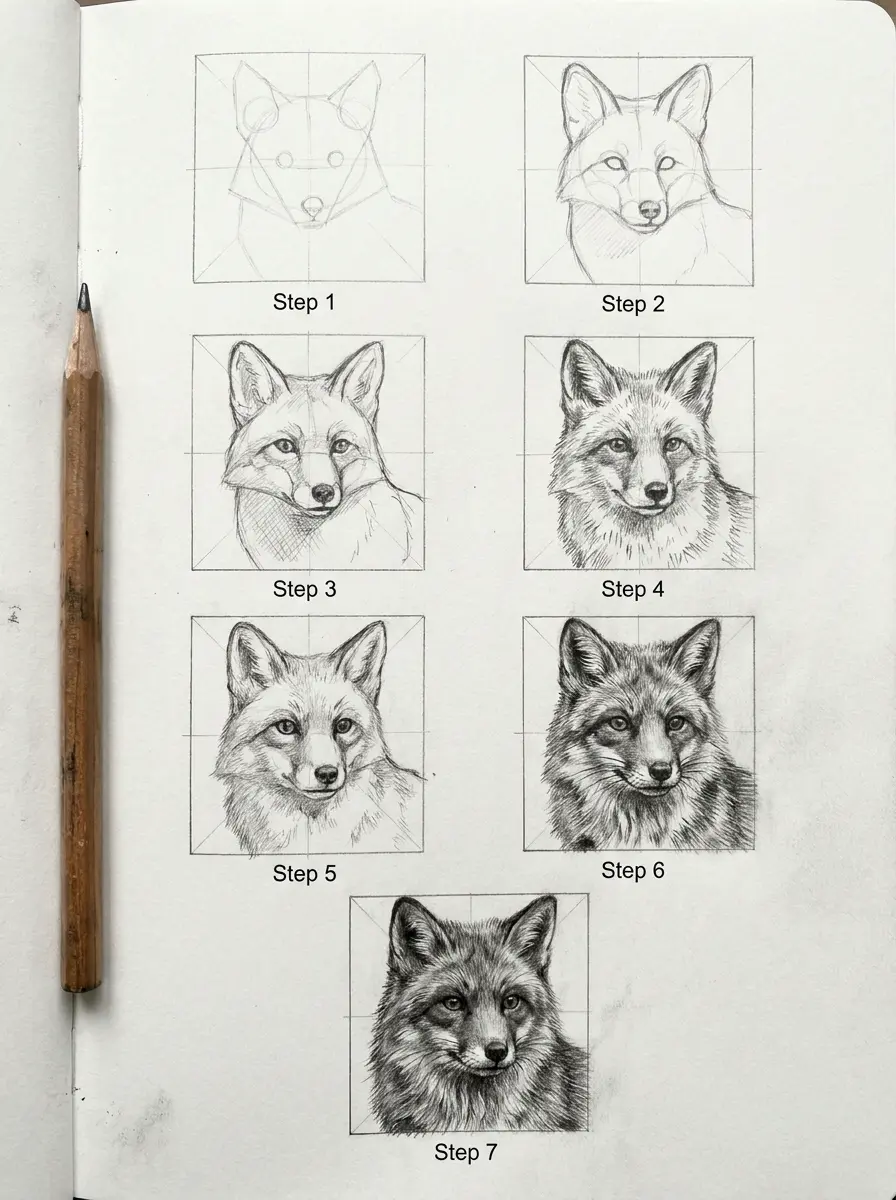
I approach this the way industrial designers develop a product: volumes first, surfaces last. Nobody polishes the edge of a handle before the proportions of the whole object are approved. Fox fur is that polish.
Step 1: gesture line and line of action
Draw one long curve that runs from the nose through the neck and spine into the tail. That’s your line of action. A sitting fox makes a gentle S, a trotting fox a long, shallow arc, and a pouncing fox a tight C.
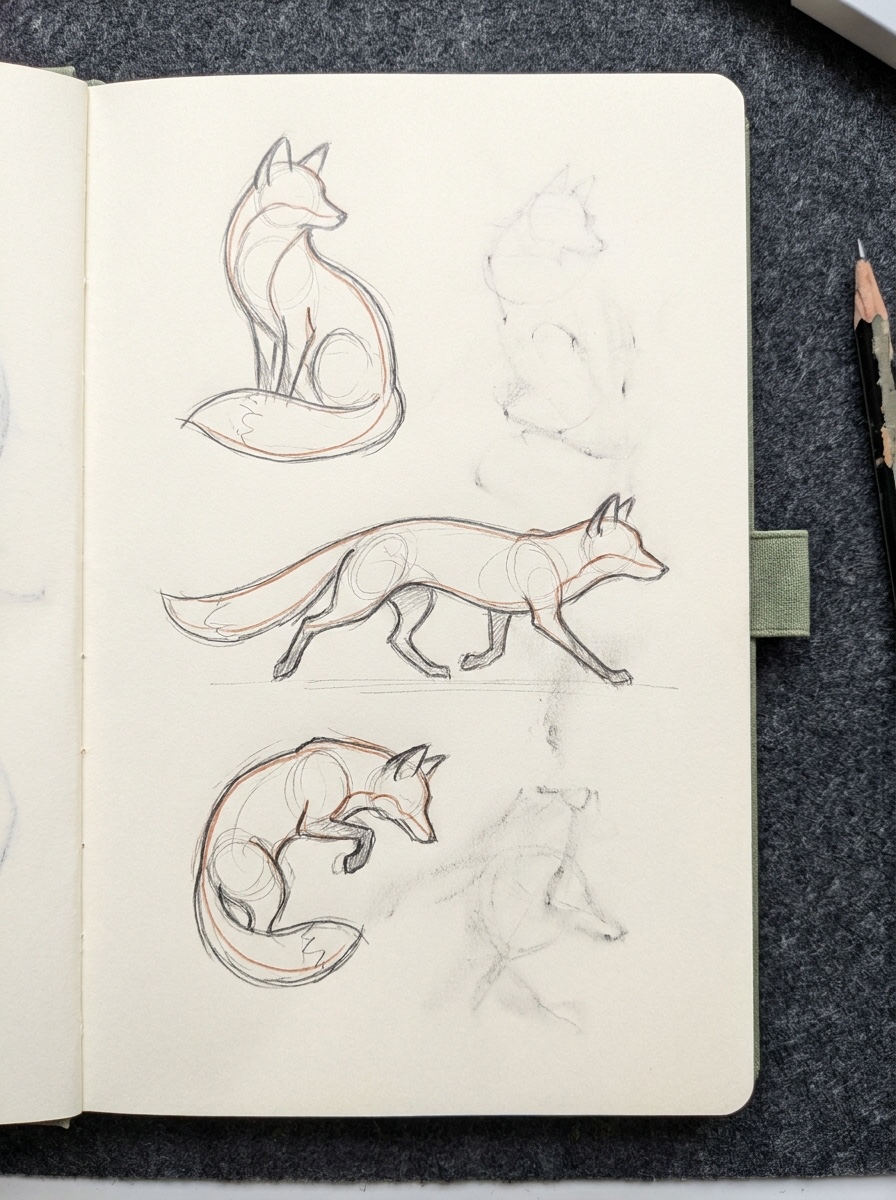
Checkpoint: does the single line already feel like the pose? If it’s straight and timid, redraw it with more commitment.
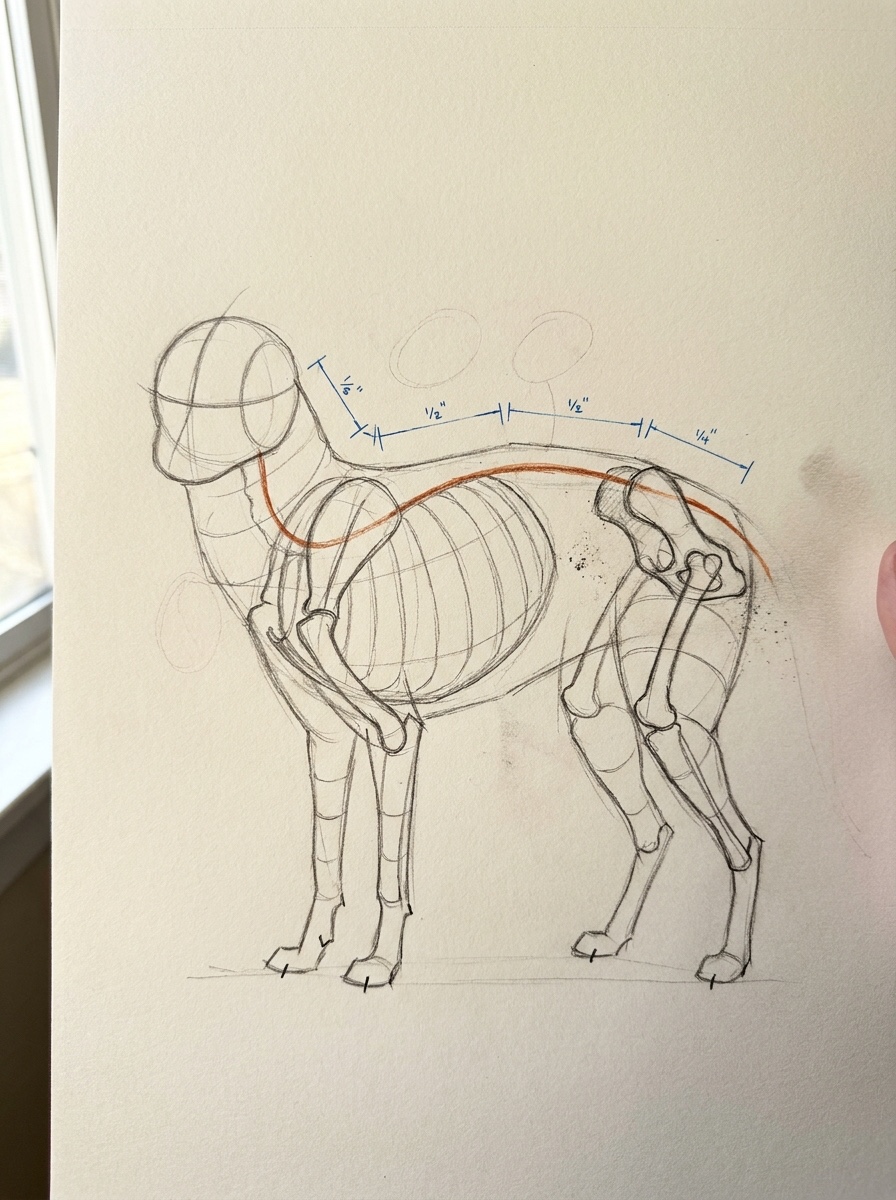
Step 2: ribcage oval and pelvis mass
Along the gesture line, place a ribcage oval behind the neck and a smaller pelvis mass toward the tail. The ribcage is the larger, deeper shape. The pelvis is shorter and slightly tilted. Leave a slim waist between them.
Checkpoint: if the ribcage hangs far below the pelvis in a standing pose, you’re drifting toward a heavy dog chest.
Step 3: head block and neck
Place a circle for the cranium at the end of the neck. Then add a centerline that wraps around it to show which way the face turns. Two curves connect the neck to the top and front of the ribcage.
Checkpoint: the head circle should look small next to the ribcage. A big head pushes the drawing toward a cartoon or a puppy.
Step 4: muzzle wedge and ears
Project a narrow wedge forward from the circle for the tapered muzzle. Then place two triangular ears high on the skull, angled slightly outward. Measure the ear angle from your reference, because it carries much of a fox’s expression.
Checkpoint: cover the body. Does the head alone say fox? If not, fix it now.
Step 5: legs and paw contact points
First, mark each paw’s ground contact with a small tick. Then draw each leg as simple segments: upper leg, lower leg, a slim wrist or hock, and a compact oval paw. Front legs drop from under the ribcage. Hind legs hang from the pelvis and bend backward at the hock.
Checkpoint: the contact points should sit on one believable ground plane. A floating fox usually has a paw tick that drifted.
Step 6: tail mass
Draw the tail as a long, thick sausage that follows the end of your line of action. Taper it only near the end, and mark a band for the white tail tip.
Checkpoint: rerun the silhouette test. The tail should now balance the head end of the drawing.
Step 7: refined contour
Now, and only now, draw the outer contour. Wrap one confident line around the masses and let it break where fur interrupts the form: at the cheek ruff, the chest, the backs of the thighs and along the tail. Press harder where the shape turns from the light or overlaps another form, and ease off where it faces the light.
Next, knock back the construction lines with a kneaded eraser. Leave them faint, because they’ll guide your shading.
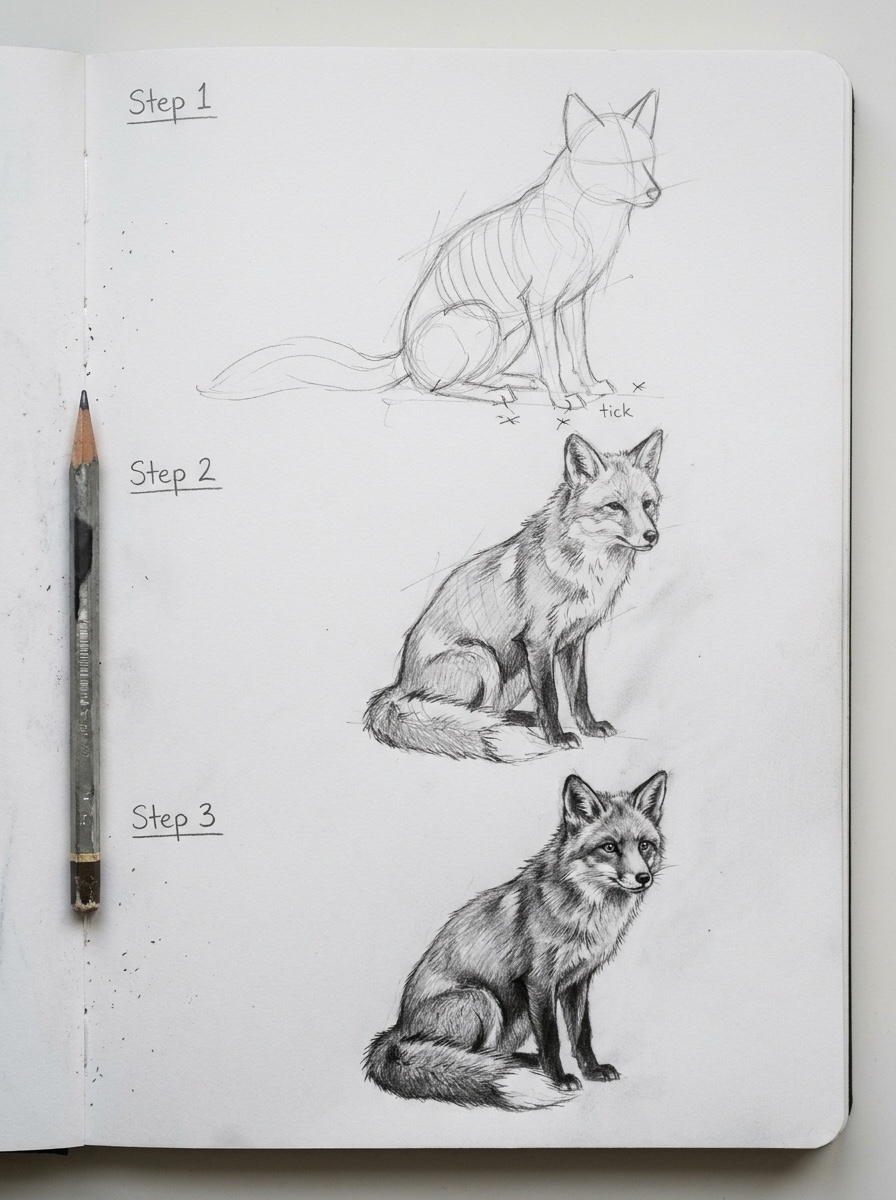
Transfer the pose: sitting, trotting and running
Use the same masses to change poses. Only their relationships move.
For a sitting fox, the pelvis drops and rotates under the ribcage, the hind legs fold into a compact shape, and the tail often curls forward around the paws. The spine runs almost vertically.
For a trotting fox, level the spine, stretch the gap between the ribcage and pelvis, and move diagonal leg pairs together, as in any trot. Check your reference to see which paws carry the weight.
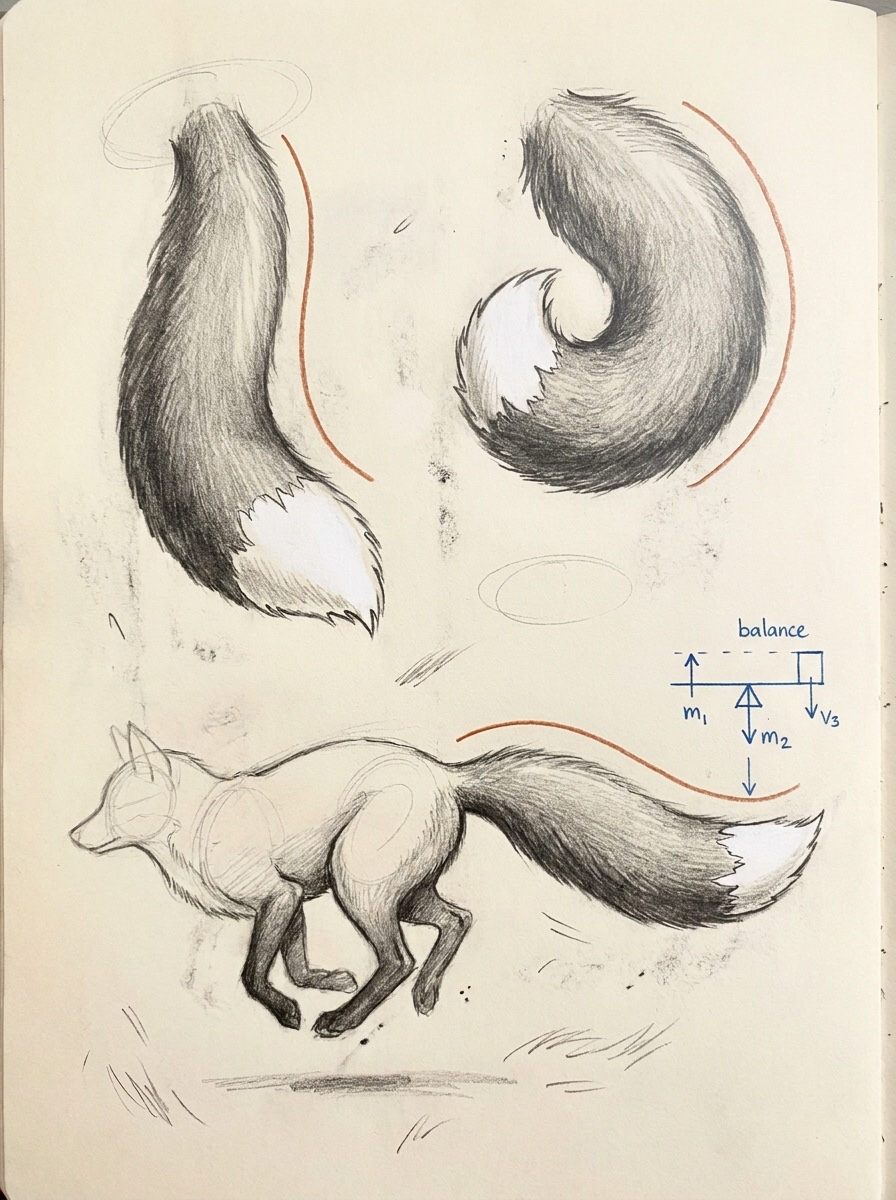
For a running fox, the line of action flattens into a long arc and the spine flexes and stretches between strides. The legs reach far forward and back, and the tail streams behind as a counterweight.
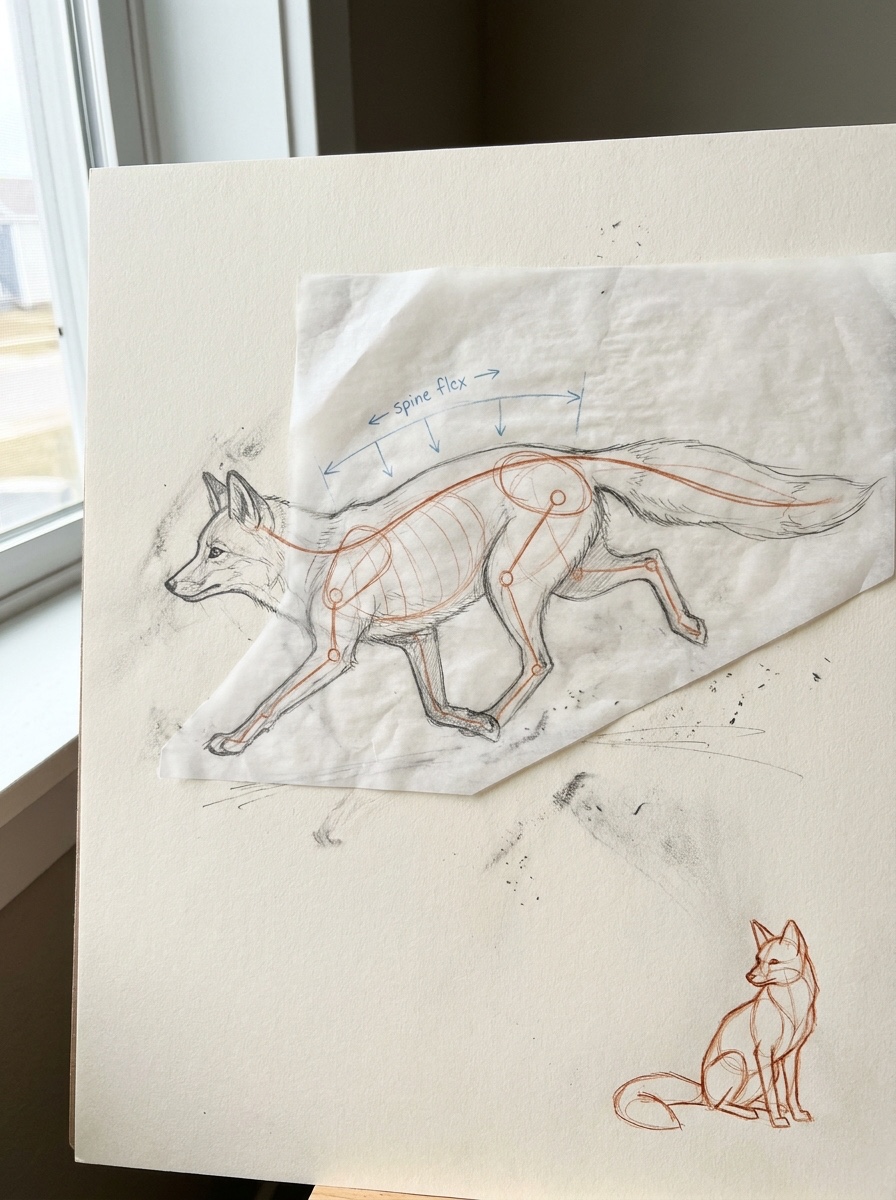
Short animal gesture drawing sessions build this arc-first habit.
Fox head drawing: ears, eyes, muzzle and cheek planes
The head decides the species. Many dog-like foxes go wrong here, so study the head separately.
Start with the cranium circle and a centerline that splits the face. Run an eye line across it, curved to match the head’s turn. In a three-quarter view, the far side of the face compresses, so the far eye and far cheek get narrower.
Cheek planes come next. The face widens at the cheeks, then narrows sharply into the muzzle. Draw each cheek as a flat plane angled back, with fur flaring at the jaw. From the front, that flare and the tapered muzzle make an inverted triangle.
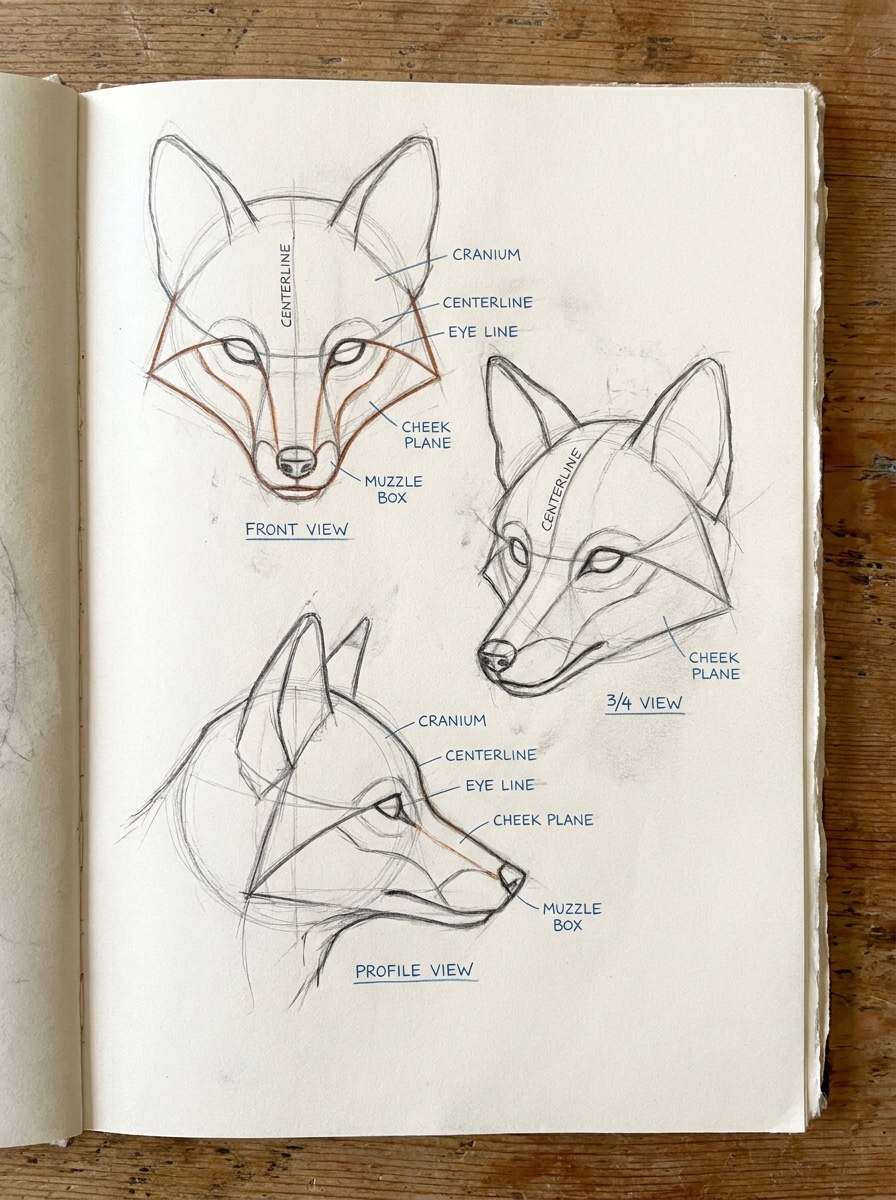
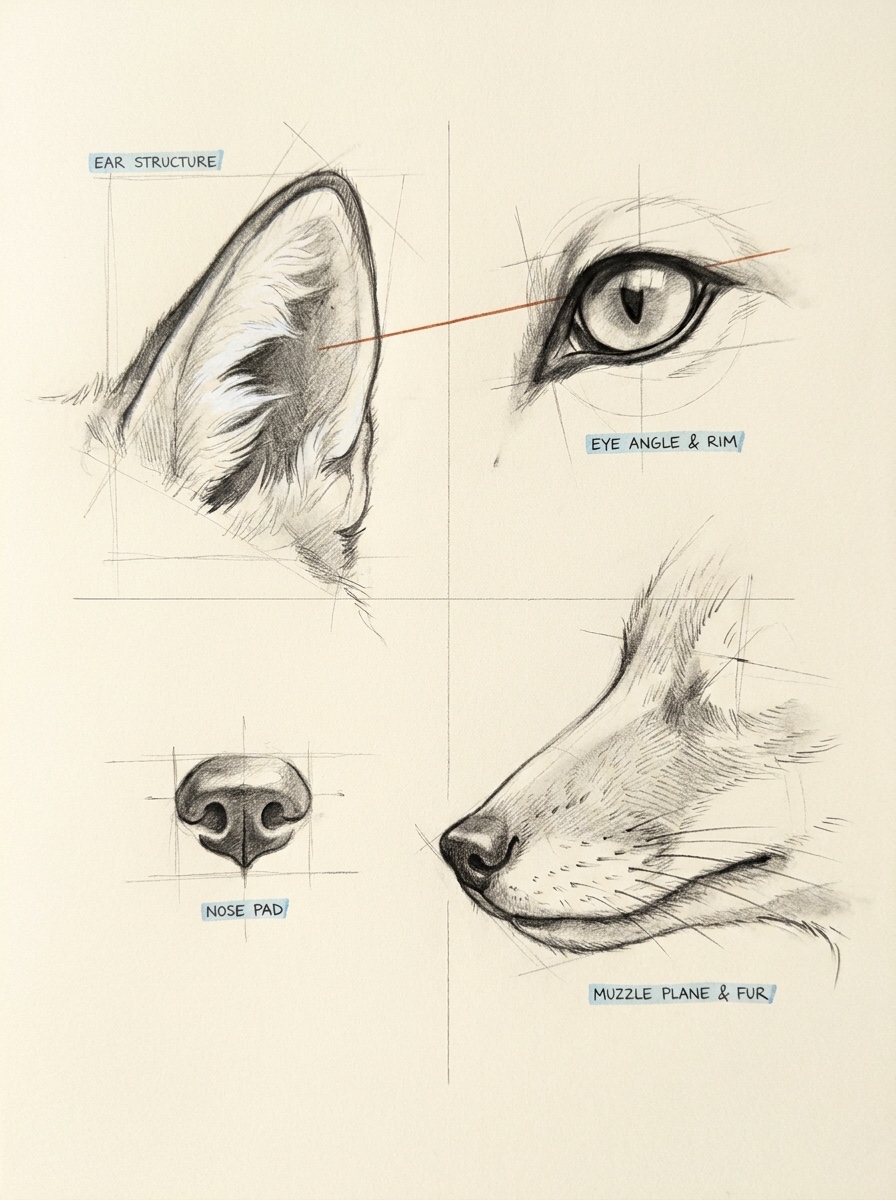
The muzzle is a long, slim box seen in perspective. Give it a top plane, two side planes and a small nose pad at the tip. Keep the nose bridge fairly straight, because a deep stop between the forehead and muzzle tends to read as a dog.
The eyes sit on the eye line, angled slightly upward toward the ears. Draw almond-shaped eyes with a dark rim. If your reference shows a dark line from the inner corner toward the muzzle, keep it, since it sharpens the expression. Skip round dog eyes.
The ears finish the job. Draw each one as a triangle with thickness: an outer rim, an inner bowl and pale inner tufts. The Natural History Museum describes red foxes with dark brown ears and legs, so plan dark ear tones in your value or color map.
For a cute fox face drawing, enlarge the eyes and round the cheeks, but keep the tapered muzzle and big ears, since they hold the species. The EasyDrawingTips fox head tutorial offers another step-by-step approach for warm-ups.
Legs, paws and tail
Fox legs look delicate, and that delicacy is a species cue. Their dark brown color helps, since darker lower legs read slimmer and let the white neck and belly stand out.
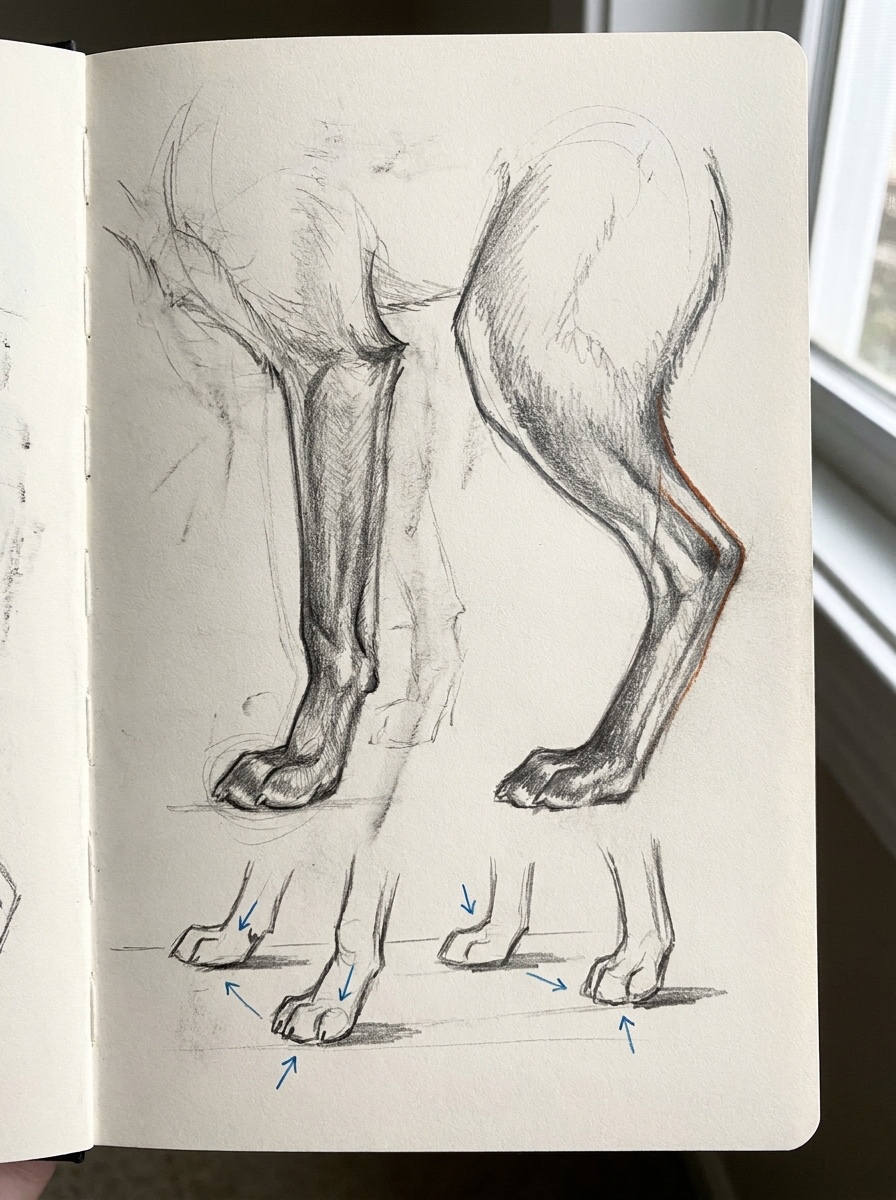
On the front leg, look for a long forearm, a slight bend at the wrist and a compact paw. On the hind leg, the thigh is the big mass, the hock points backward, and the long lower segment angles down to the paw. Beginners often straighten the hock into a pole. Don’t.
Paws are small ovals with a hint of toe divisions along the front edge. Draw the pad side only when the paw lifts. For a standing fox, flatten the bottom of each oval where it meets the ground, and add a short cast shadow to lock the contact.
The tail is where many drawings lose weight. Treat it as a soft cylinder with a lit top plane and a shadowed underside. Leave clean paper for the white tail tip, and keep the transition ragged, because a ruler-straight band looks painted on.
A decision rule for the tail arc: in calm poses, let it hang low or wrap the body. In motion, extend it along the line of action. If the tail fights the gesture, the pose stalls.
Graphite workflow: values and how to draw fox fur
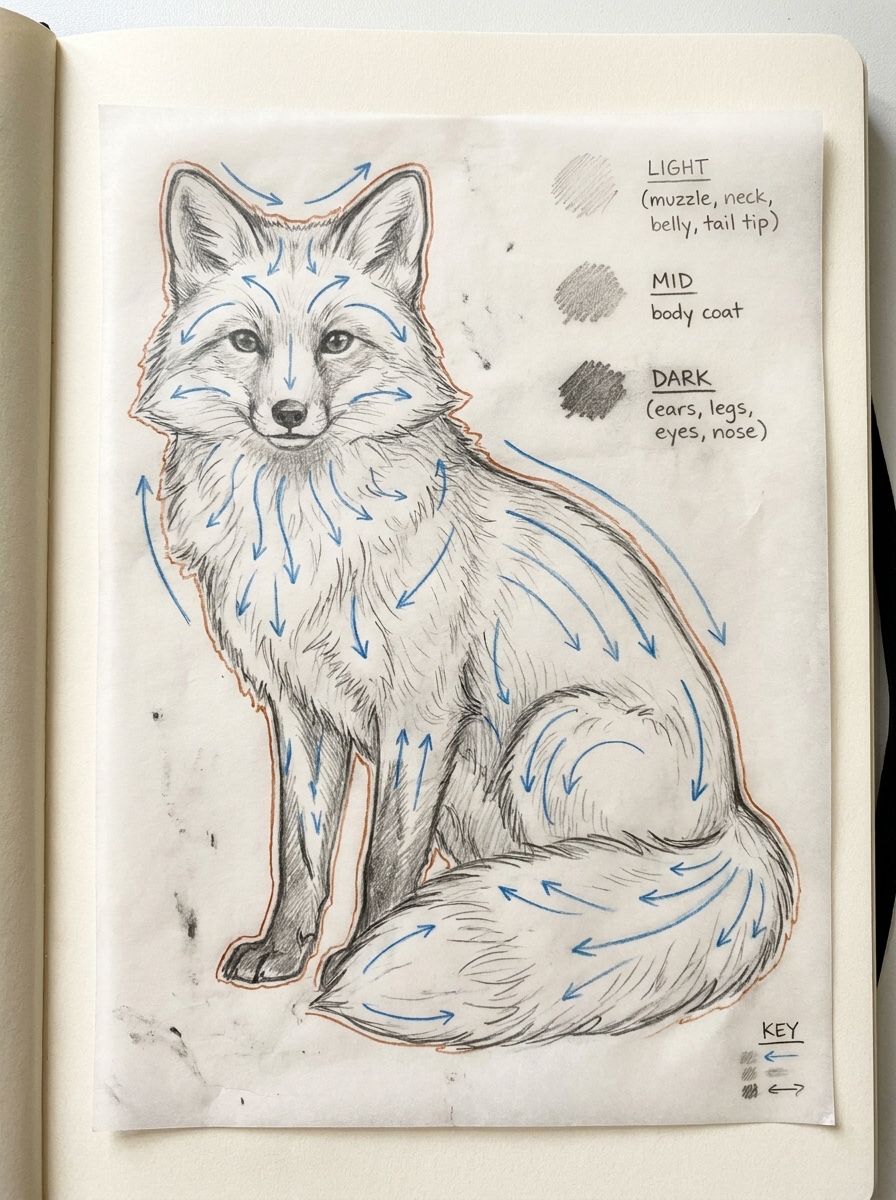
A fox pencil drawing succeeds on value grouping, not hair count. Before any texture, set three groups: lights (white muzzle, neck, belly and tail tip), midtones (rusty coat) and darks (ears, legs, eyes, nose and core shadows).
Then build the fur-direction map. Lightly draw arrows on your sketch, or on tracing paper over it, following the coat:
- from the nose back over the muzzle and up between the eyes;
- outward and down across the cheeks into the ruff;
- down the neck and chest, parting slightly at the breastbone;
- back along the spine from the shoulders to the tail root;
- down and back over the ribcage and thighs;
- short and close on the lower legs and paws;
- outward and toward the tip along the tail, fanning at the sides.
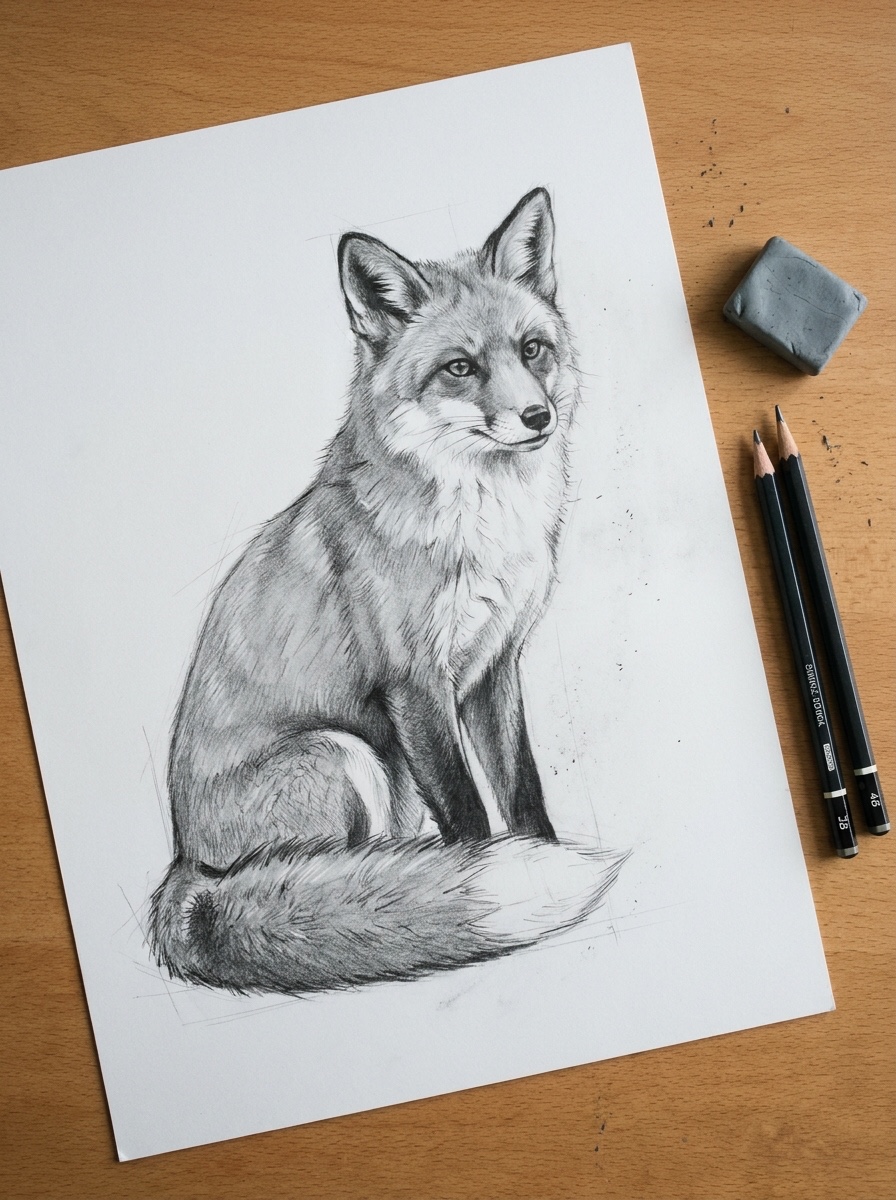
Shade in three passes. First, lay a smooth 2B midtone along the arrows. Second, add shadow shapes with the 4B under the jaw, behind the foreleg, under the belly and beneath the tail. Third, draw fur only at edges and value transitions, with short, tapered strokes along your arrows.
Think in two layers. Underfur is the soft tone you blend, and guard hairs are the longer, sharper strands that break the silhouette. Lift a few in light areas with the pressed edge of a kneaded eraser.
Edge control finishes the drawing. Keep hard edges at the eyes, nose and ear tips, and soften them on the back and flank where the form turns away. Light cross-hatching under the fur strokes deepens shadows without muddying the paper.
If tones look blotchy, revisit pencil shading techniques before adding more fur. Texture can’t fix uneven value.
Colored-pencil workflow: red fox color
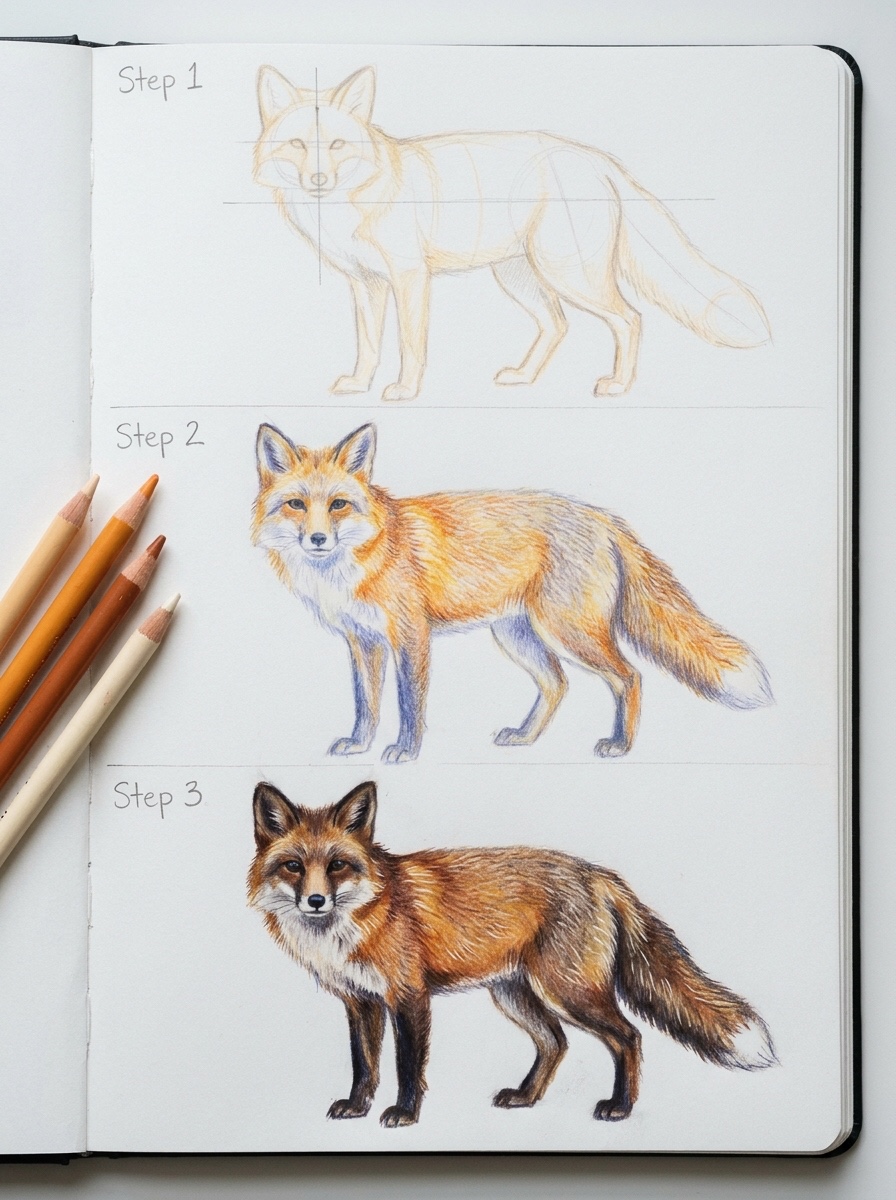
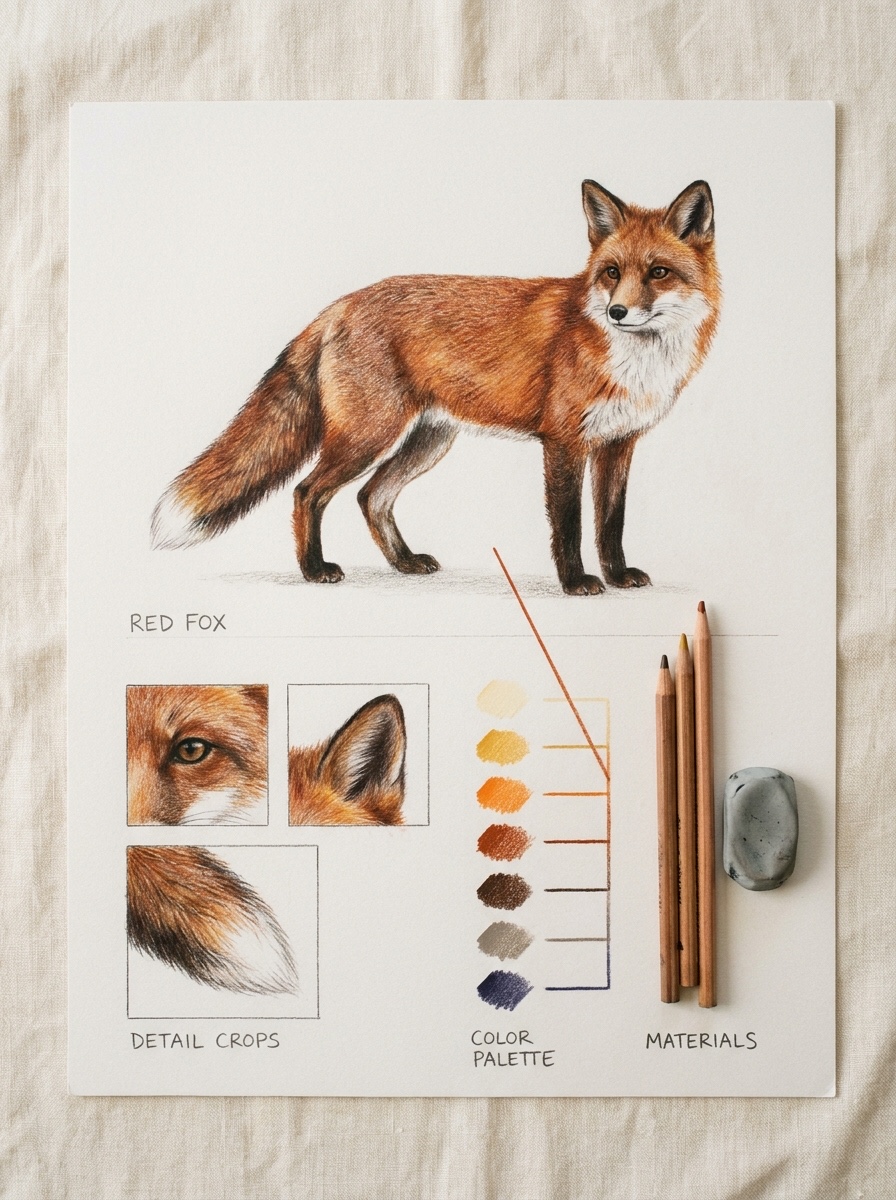
A colored pencil fox drawing lives or dies on layering. The Natural History Museum gives you the color map: a rusty red coat, a white muzzle, neck, belly and tail tip, and dark brown ears and legs. The goal is rust that glows instead of flat orange.
This sequence works with Polychromos or Prismacolor:
- Transfer the construction drawing with a light, warm pencil such as cream. Graphite lines can gray the color.
- Lay indigo very lightly in the shadows. That cool base gives the shadow side depth instead of mud.
- Block in the coat with yellow ochre and orange, following the fur-direction map.
- Build the rust with burnt sienna over the orange, heaviest where the form turns away from the light.
- Shade the white areas with warm gray and a touch of indigo. White fur still has form.
- Push the darks on the ears, legs, eyes and nose with dark brown, then indigo for the deepest accents.
- Finish with guard hairs: sharp strokes of cream or white over the coat, plus a few dark strokes breaking the edges.
For colored pencil layering, use light pressure for most passes and save burnishing for the last layer, since a burnished surface takes little more pigment. Prismacolor Premier blends quickly under pressure, while Polychromos stays crisper for fine fur strokes.
One palette rule I hold to: never use a single orange for the whole coat. Warm the lit planes with ochre and cool the turning planes toward burnt sienna and indigo. The fox gains volume without extra hair strokes.
For more fox-specific colored-pencil study, see the Bonny Snowdon fox resources. If your layers turn waxy or patchy, revisit colored pencil blending.
Three correction cases
Recreate each mistake on purpose once, then fix it. You’ll spot it faster later.
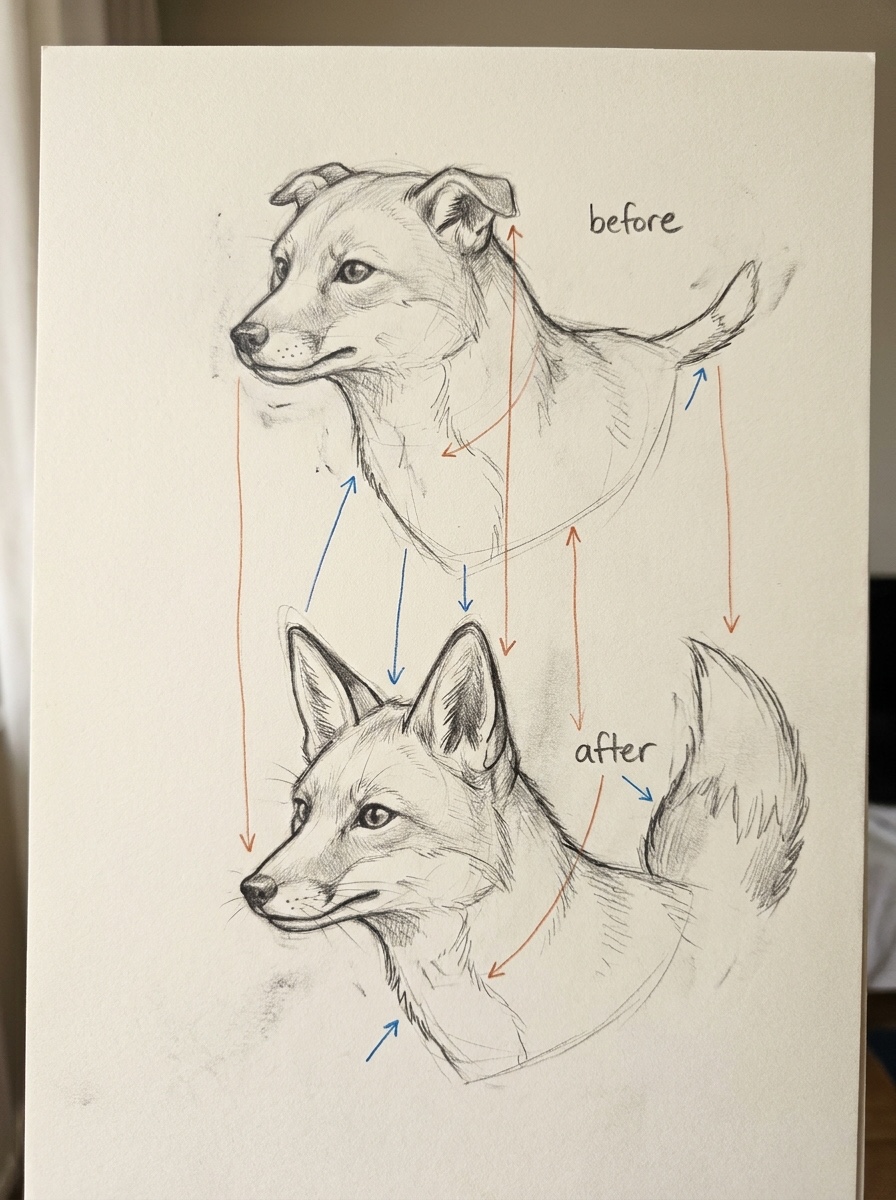
Case 1: the fox reads like a dog
Symptoms: a short, blunt muzzle, small ears set low, a deep chest and a thin tail. Usually the fox was drawn from memory rather than from a measured reference.
Fix: lengthen and narrow the muzzle wedge, flatten the nose bridge, raise and enlarge the ears, lift the chest line so the ribcage reads shallower, and thicken the tail. Recheck with the silhouette fill test. Often those five moves are enough.
Case 2: the body looks stiff or flattened
Symptoms: a straight back, legs like table posts, and a body pressed flat against the page. The outline came first and the masses were skipped.
Fix: redraw the line of action with a clear curve. Rebuild the ribcage oval and pelvis mass as overlapping 3D forms wrapped in cross-contour lines, and give the hind leg its backward-pointing hock. Overlap the far legs behind the near ones, and darken the far side slightly so it recedes.
Case 3: the fur looks pasted on or muddy
Symptoms: uniform scribbled strokes everywhere, gray smears across the white areas, and no clear lights or darks. The fur sits on top of the form instead of describing it.
Fix: lift the white muzzle, neck, belly and tail tip back to near-paper with the kneaded eraser, then reestablish three value groups. Remove texture from the middle of large planes and keep it only at edges and transitions, following the fur-direction map. Fewer strokes, placed with intent, read as more fur.
Four drills and a two-week practice plan
Short, repeated sessions beat one long struggle. Each drill below isolates one skill, so you’re never fixing gesture, anatomy and texture at once. Academic training works the same way.
- Ten-second gestures: twenty line-of-action sketches from fox photos, one line each.
- Silhouette fills: five fox sketches filled in solid and checked for dog or wolf drift.
- Head turns: one fox head in front, three-quarter and profile views, construction only.
- Fur swatches: a two-inch square of underfur and guard hairs, once in graphite and once in colored pencil.
Then follow this schedule, roughly 20 to 40 minutes a day:
- Days 1-2: gestures and silhouette fills.
- Days 3-4: the seven-step construction on a standing fox, twice daily.
- Days 5-6: head turns and ear studies.
- Day 7: one full fox sketch, checked against the silhouette tendencies above.
- Days 8-9: leg, paw and tail studies, plus a sitting-to-trotting pose transfer.
- Days 10-11: a fur-direction map and a graphite value study.
- Days 12-13: a colored-pencil fox, layered over two sessions.
- Day 14: redraw your Day 7 fox from the same reference and put both side by side.
That last comparison is the point. Write down what changed: muzzle, ears, tail mass, edges. The list tells you what to practice next.
Fox drawing FAQ
How do I draw a fox easily as a beginner?
Start with three shapes: a ribcage oval, a smaller pelvis oval and a head circle, linked by one gesture line. Then add a narrow muzzle wedge, two big triangular ears and a thick tail. That’s an easy fox drawing that still reads correctly. The Envato Tuts+ fox tutorial offers a second step-by-step approach.
Why does my fox drawing look like a dog?
Usually the muzzle is too short and blunt, the ears are too small, the chest is too deep or the tail is too thin. Fix those four in that order, then rerun the silhouette fill test.
What pencils do I need for a realistic fox drawing?
An HB for construction, a 2B for midtones and a 4B for darks cover most needs. Add a kneaded eraser and smooth or medium-tooth paper. Control matters more than pencil count.
How do you draw fox fur without it looking messy?
Map the fur direction first, group your values second, and draw individual strokes only at edges and transitions. Blend the underfur, then add a few sharp guard hairs. Leave the white areas clean. For stroke control, see drawing fur.
What colors do I need for a red fox drawing?
A small set works: cream, yellow ochre, orange, burnt sienna, dark brown, warm gray, indigo and white. Use warm gray and cool tones for the white fur, and indigo for the deepest shadows.
How long is a fox’s tail compared with its body?
National Geographic lists a red fox head-and-body length of 18 to 33.75 inches and a tail length of 12 to 21.75 inches. For drawing, roughly two-thirds of head-and-body length is a reasonable starting check, adjusted to your reference.
Closing takeaway
Draw the fox you can see, not the one you remember. Measure the wildlife reference, fix the silhouette while it’s still made of ovals, and give the head its narrow muzzle and tall ears before any fur appears. Then let value grouping and a fur-direction map do the rendering, in graphite or colored pencil.
If a drawing goes wrong, it usually goes wrong early. Go back to the gesture line, the ribcage oval and the tail mass. Those three shapes decide whether the page says fox, and they take minutes to correct. Spend the fourteen days there, and compare your first fox with your last.
- 0shares
- Facebook0
- Pinterest0
- Twitter0
- Reddit0