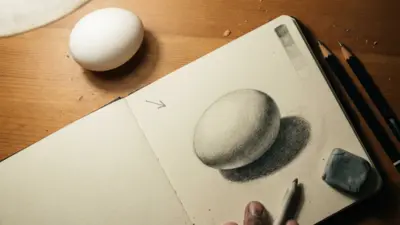
Most basketball drawing tutorials stop at a circle with four lines through it. That gives you a symbol, not a ball. A ball reads as round only when the seams, the shading and the cast shadow all describe the same sphere under the same light.
This guide follows that whole chain: construct the ball as a sphere, wrap the seams as cross-contours, then shade it in graphite and colored pencil. The same habits carry over to the hoop, the player and the court, and there’s a 20-minute routine at the end.
- What you need
- Basketball drawing step by step
- Easy pencil version vs realistic version
- Colored-pencil workflow
- How to draw a basketball hoop and backboard
- How to draw a basketball player
- How to draw a basketball court in perspective
- Three practice cases
- Troubleshooting table
- A 20-minute practice routine
- Common mistakes and how to spot them
- FAQ
- Your next drawing
I’ve spent more than 15 years in industrial and product design, alongside academic drawing and life painting. In product work, ellipses, silhouette, proportion and value get checked before detail. A basketball rewards exactly the same order.
What you need
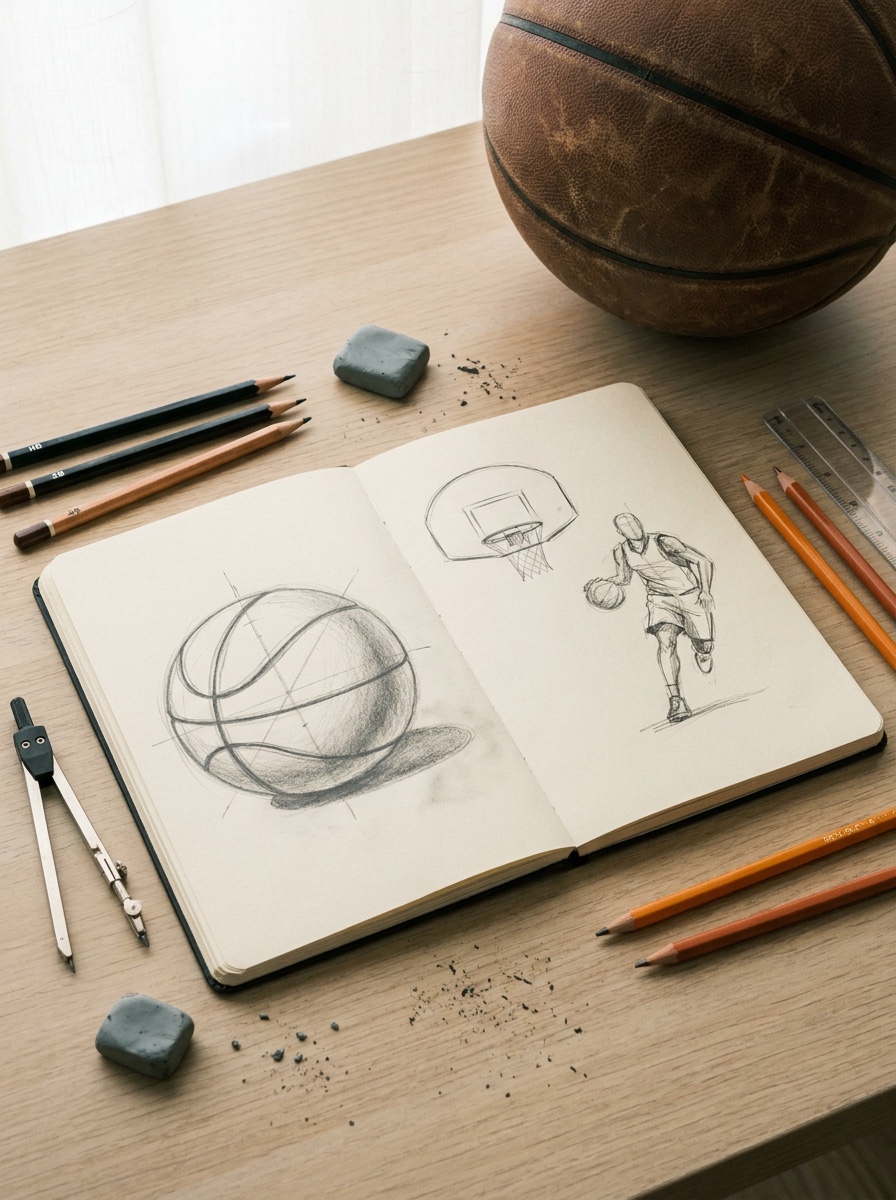
- HB pencil: construction lines. It erases cleanly.
- 2B pencil: halftones and seams.
- 4B pencil: the core shadow and the darkest part of the cast shadow.
- Kneaded eraser: lifts highlights without scrubbing graphite in.
- Ruler: backboard edges, court lines and vanishing lines.
- Compass or circle template: a clean final outline.
- White drawing paper with a light tooth, roughly 90 to 130 gsm.
A 0.5 mm mechanical HB handles construction, and a vinyl eraser or thin eraser pen gives crisper lifts. No compass? Trace a roll of tape or the base of a glass. Printer paper is fine for warm-ups but smears and won’t take many layers.
For color, Faber-Castell Polychromos are oil-based and firm, holding a sharp point for seams. Prismacolor Premier are wax-based and softer. They blend faster but can develop a waxy haze, called bloom, under heavy layers.
Also useful: a real basketball and a desk lamp, for studying an actual seam pattern under one light.
Basketball drawing step by step
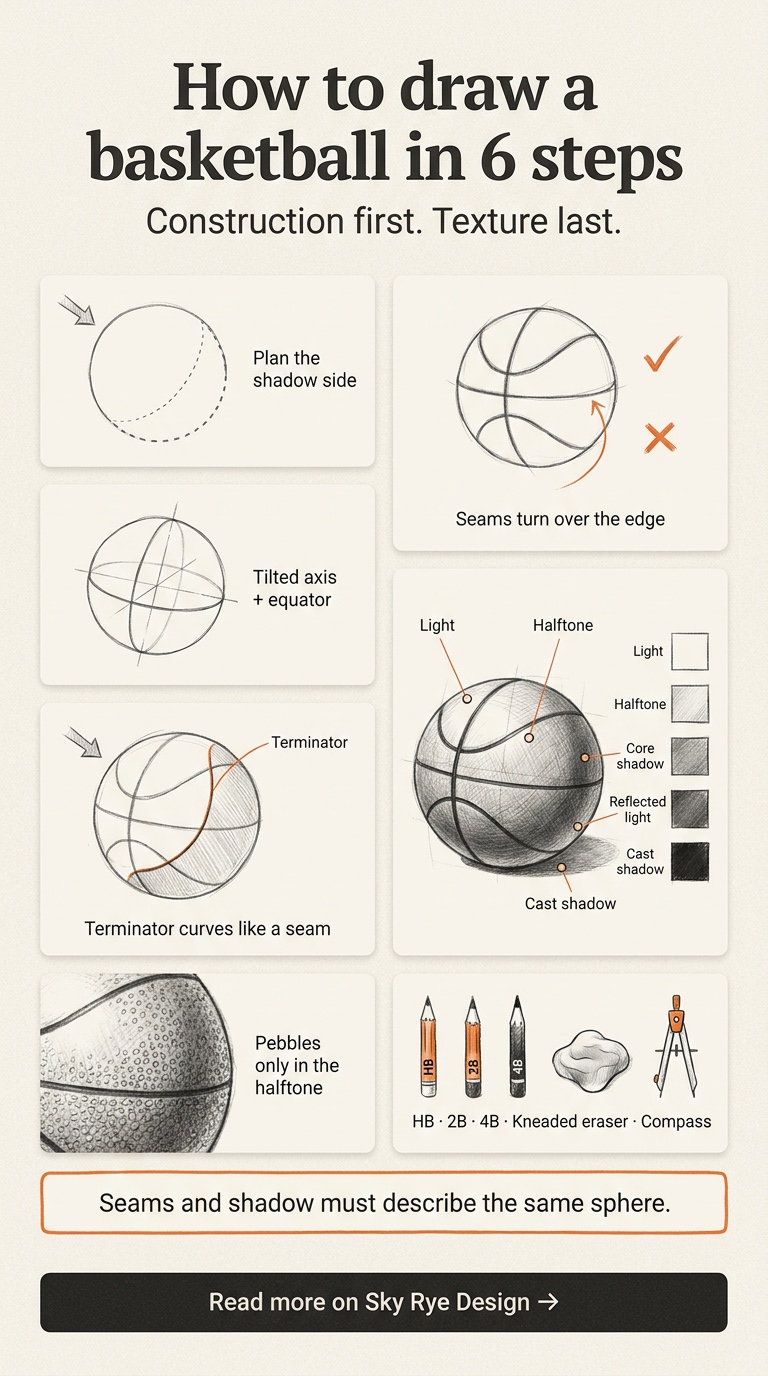
This is the core workflow for how to draw a basketball.
Step 1: place the ball and plan the shadow
Decide where the light comes from before you draw anything. With light from the upper left, the cast shadow falls to the lower right, so give the ball room on that side.
For practice, size the ball to about a third of the page width. Smaller, and the seams turn into scribbles.
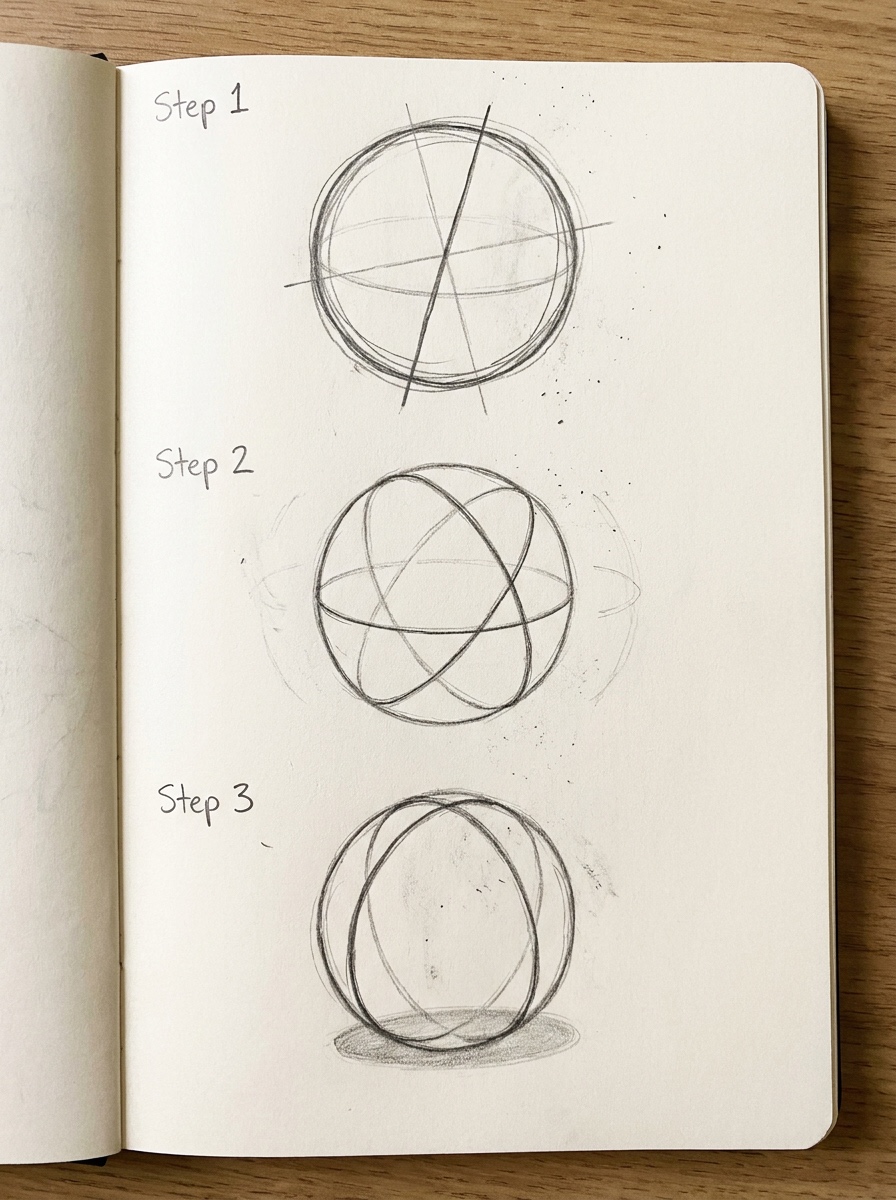
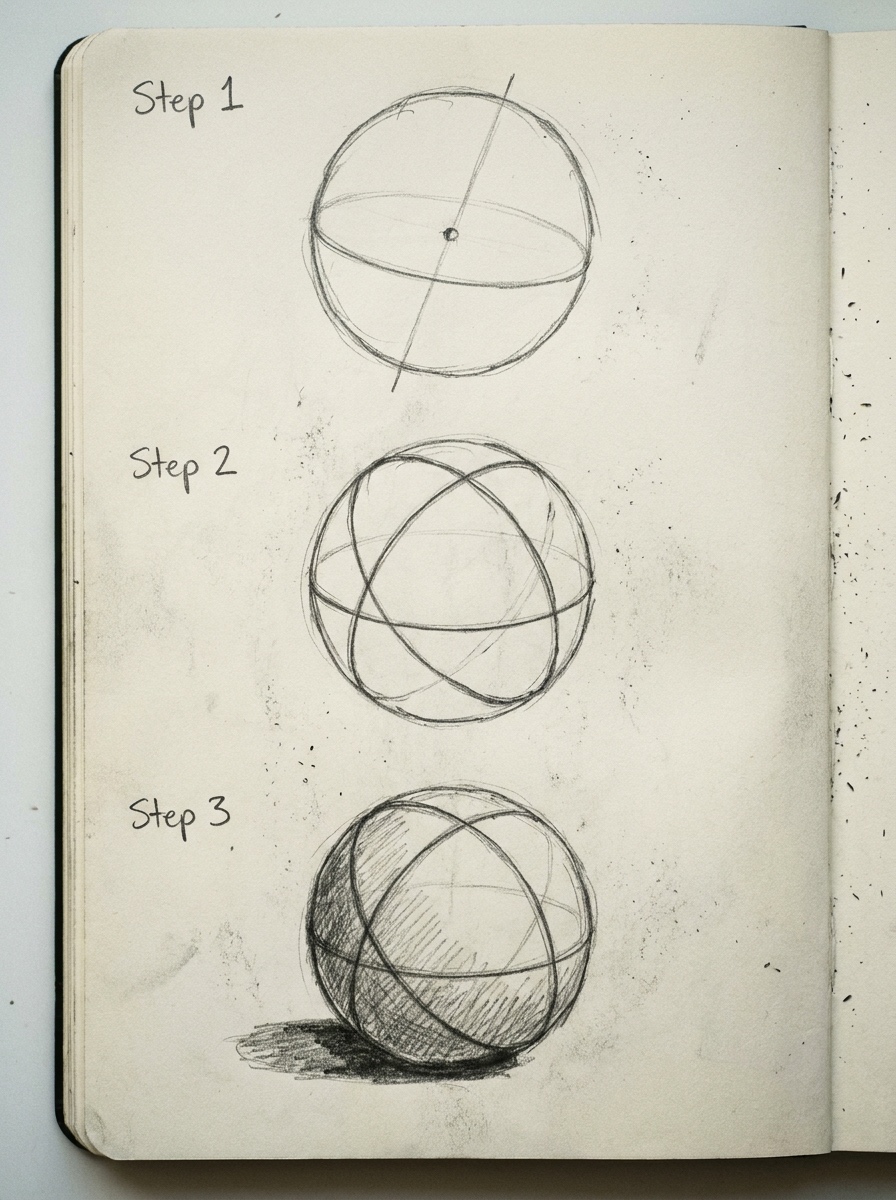
Step 2: construct the sphere
Draw the circle lightly from the shoulder, going round three or four times, then tidy the best line with a compass if you like. Freehand trains the eye; the compass only cleans up.
Now draw two axes through the center and tilt them slightly. A tilted axis tells the viewer the ball has a top, a bottom and a front. Add one ellipse across the middle as an equator. The narrower that ellipse, the closer the band sits to your eye level.
Step 3: map the seams as cross-contours
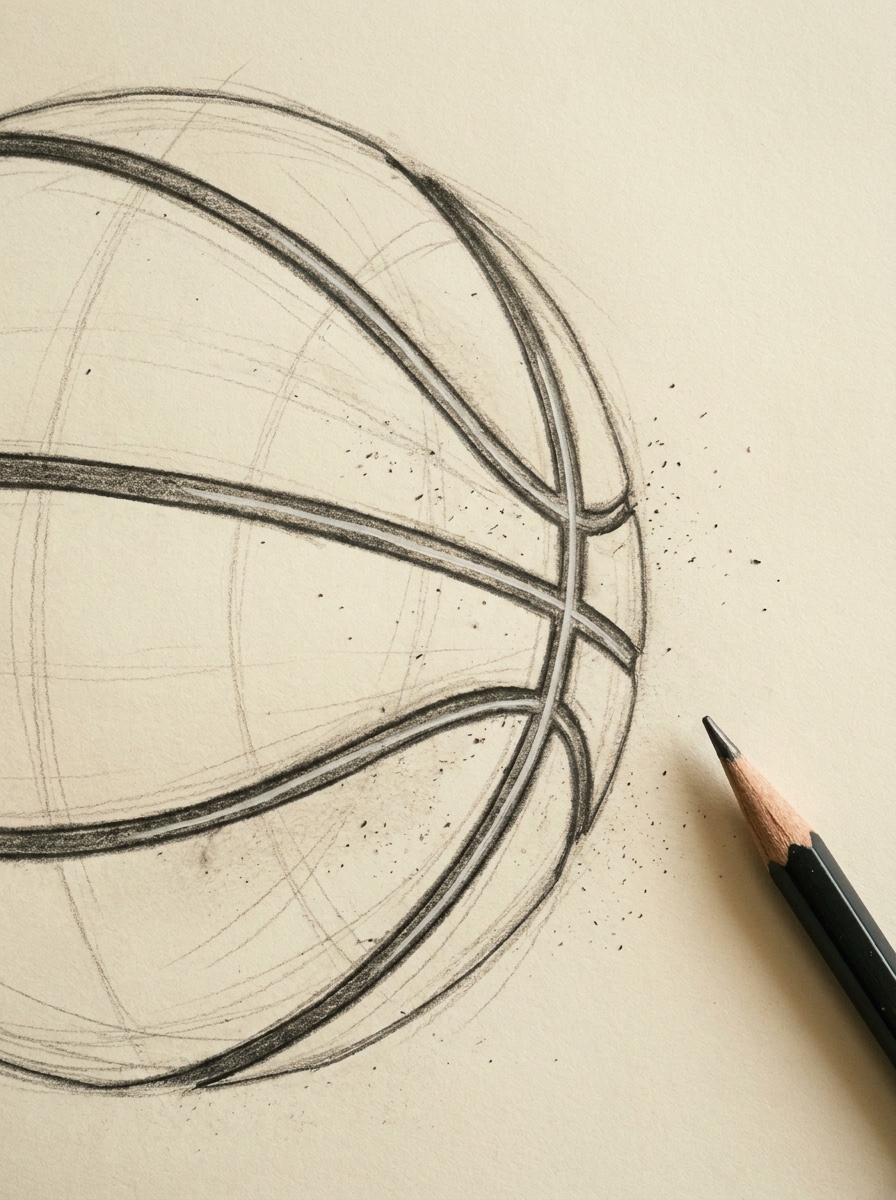
This is where most drawings fail. A seam lies on the surface, so it bends with the form like latitude and longitude on a globe.
On many standard eight-panel balls you’ll see two seams that run all the way round and cross at right angles, plus two curved seams on opposite sides that loop toward the poles. Copy the actual ball, because designs vary.
Three decision rules keep the seams honest:
- Every seam is an ellipse or part of one. Near the center it’s almost straight; toward the outline it curves and compresses.
- A seam that runs all the way round touches the outline at two points directly opposite each other. If a line through those two points misses the center, the seam is wrong.
- Seams turn over the edge. A seam that stops a millimeter inside the outline flattens the ball instantly.
Draw them as single HB lines for now.
Step 4: establish light direction
Draw a small arrow in the margin to show the light. Then draw the terminator, the line where light turns into shadow. On a sphere it’s another ellipse, at right angles to the light, so it curves like a seam.
If seams and terminator curve in contradictory ways, the ball looks like two objects. Compare them now, while everything is still faint.
Step 5: build the value structure
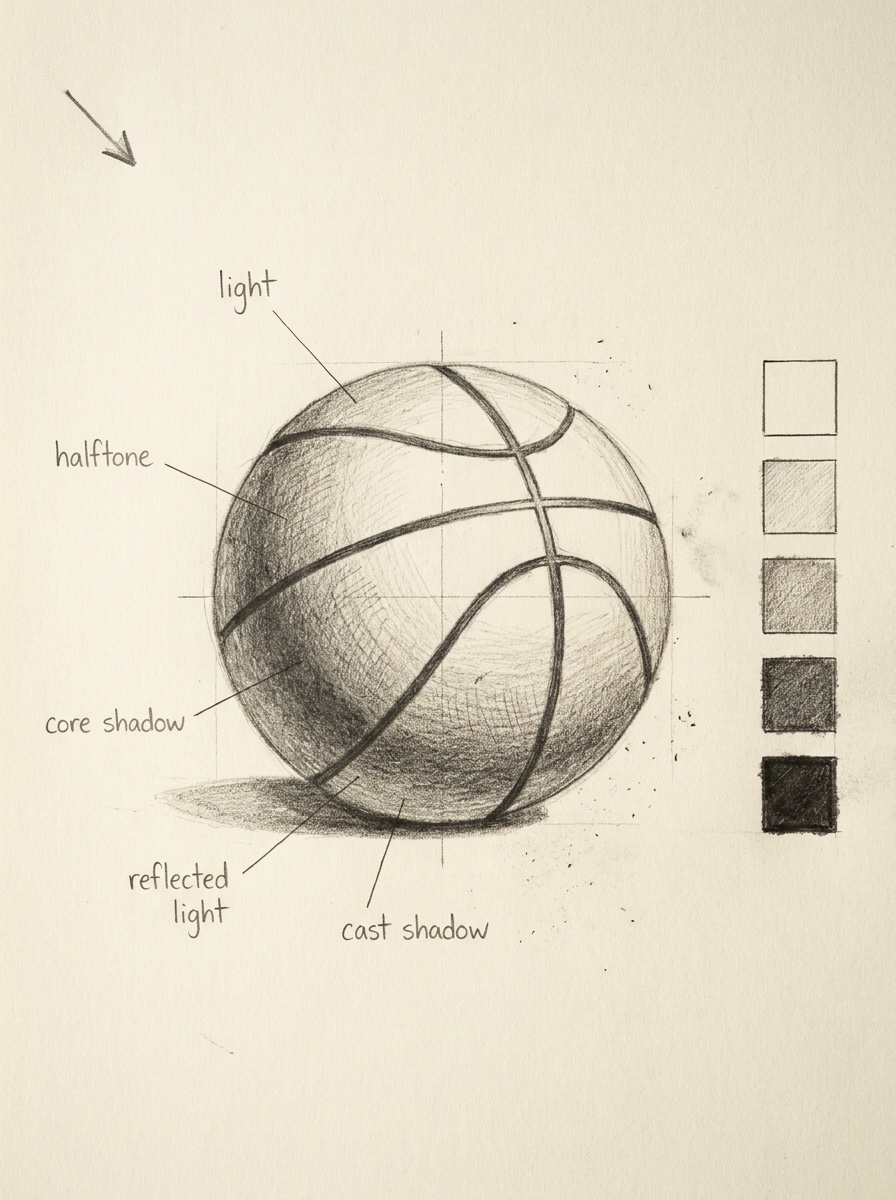
Work with a five-step value scale: highlight, light, halftone, core shadow and cast shadow. Block the shadow side with 2B strokes that follow the cross-contours.
- Core shadow: the darkest band on the ball, just past the terminator. Push it with the 4B.
- Reflected light: a slightly lighter zone along the shadow edge, bounced up from the floor. Keep it darker than any value on the lit side. This is the rule people break most often.
- Cast shadow: an ellipse on the ground, offset away from the light, darkest under the contact point and softer farther away.
Now widen the seams into shallow grooves: on the lit side, a dark line with a thin light lip facing the light. In shadow, they nearly dissolve into the core.
Step 6: add pebbled texture selectively
Basketball texture lives in the light. The pebbles of the orange leather grain show mostly in the halftone and around the highlight’s edge, where light rakes across them.
Draw them as tiny irregular dots or rings with the 2B, each slightly darker on the side away from the light. Make them smaller and more crowded toward the outline. Leave the core shadow and the center of the highlight almost bare. Even texture everywhere turns the ball into an orange.
Easy pencil version vs realistic version
An easy basketball drawing takes about 15 minutes with HB and 2B. You construct the sphere, place the seams, shade the shadow side in one flat tone and add a cast shadow, with no texture or reflected light. The form is right, which is what counts. It’s also the best format for a quick basketball sketch.
The realistic version takes an hour or two and changes four things:
- Values grow from two to five, including reflected light.
- Seams become grooves with a lit lip instead of single lines.
- Texture appears, but only where the light reveals it.
- Edges vary: crisp against the background on the light side, soft in the shadow.
What doesn’t change is the construction. A realistic finish on a wrong sphere still looks wrong, only slower.
Colored-pencil workflow
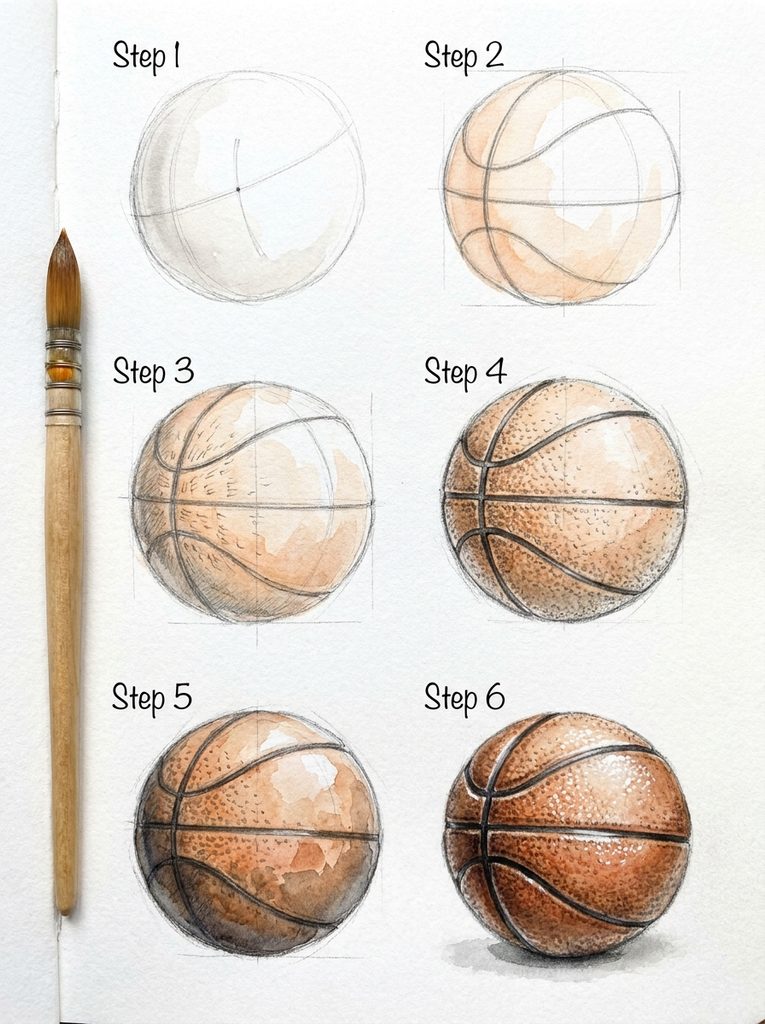
Construct in pencil first, then knock it back with the kneaded eraser until it’s barely visible, since graphite under colored pencil muddies the orange.
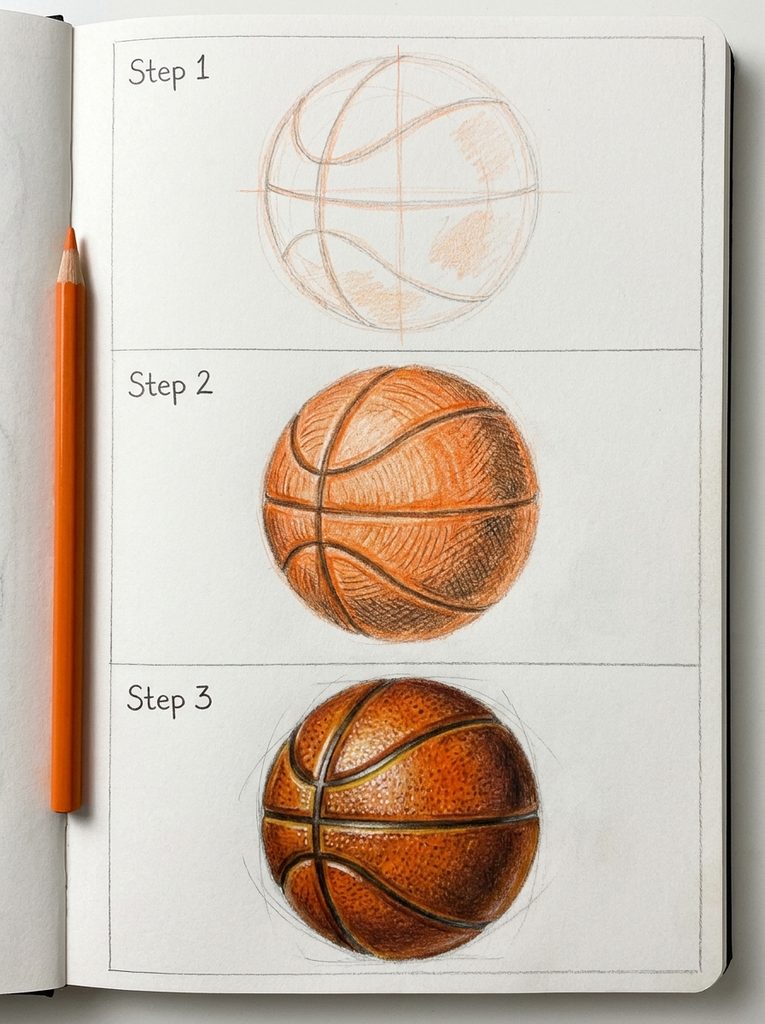
- Base layer. Cover the ball with a light yellow-orange at low pressure, following the cross-contours. Leave the highlight as bare paper.
- Warm light, cool shadow. Layer orange and a touch of yellow ochre in lit areas. In shadow, use burnt sienna, then a thin blue-violet glaze. Avoid black; it greys the orange instead of darkening it.
- Reflected light. Keep it warm: a slightly lighter burnt orange near the bottom.
- Seams. Use dark sepia or dark brown rather than pure black. Black seams sit on top of the ball; brown ones sit in it.
- Texture. Dot the pebbles in a slightly darker orange, as in pencil.
- Burnishing. Burnish only the final light layer, and only in lit areas. Early burnishing fills the tooth, and nothing sticks afterward.
- Highlights. Protect them from the start. If you lose one, lift it with a kneaded eraser or low-tack tape; oil-based pencils lift more cleanly than wax. White pencil over heavy wax often looks chalky.
For another warm-and-cool layering exercise, use the colored-pencil section in our snow drawing guide.
How to draw a basketball hoop and backboard
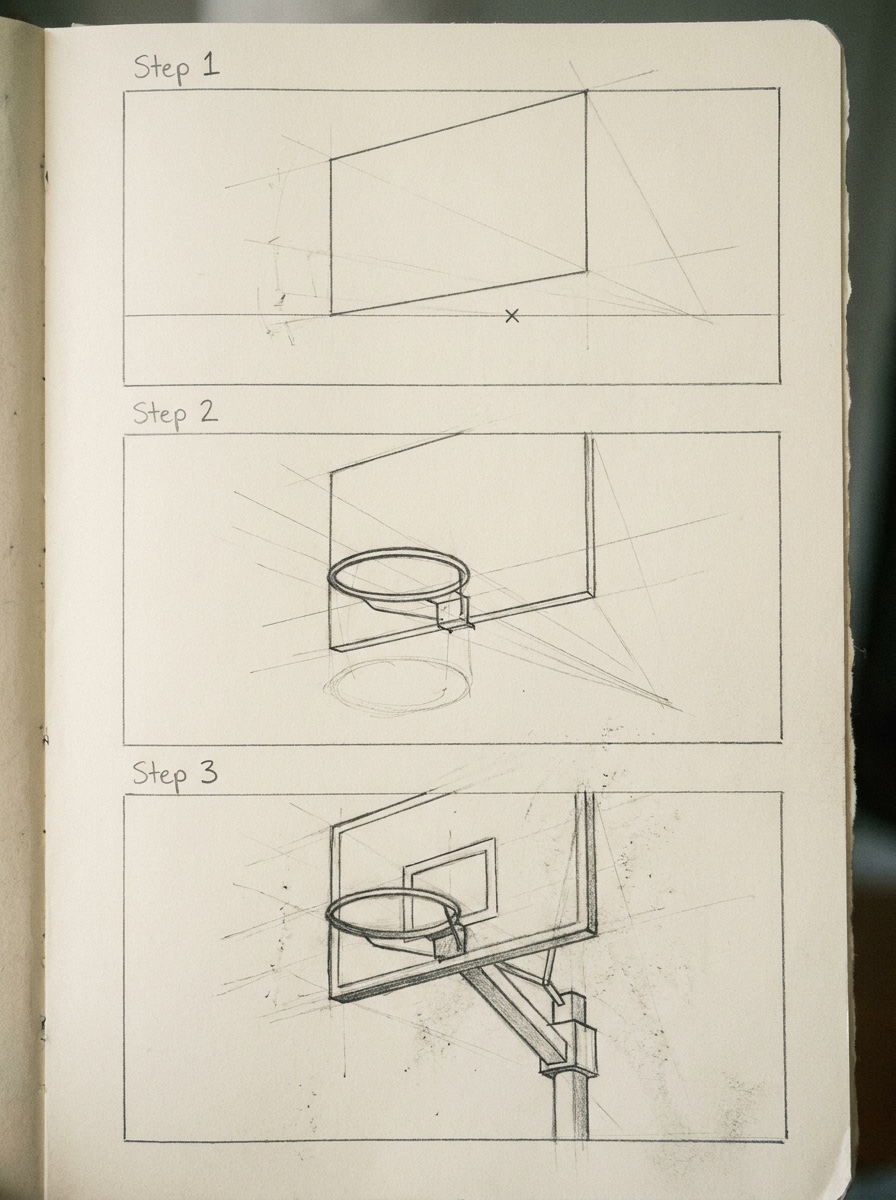
A basketball hoop drawing is a test of ellipses. Get the viewpoint right and the rest is assembly.
Set eye level first
Draw a horizon line. Standing near the basket, you see the rim from below, so its near edge sits lower on the page than the far edge.
Rim
The rim is a horizontal circle, so facing it squarely you see an ellipse with a horizontal major axis. The more steeply you look up, the rounder it gets. Draw it as two ellipses, outer and inner, to show the tube’s thickness, which looks greatest at the front.
For scale, a regulation rim is 18 inches across and a size 7 ball is about 9.4 inches, so the rim is roughly twice the ball’s diameter. Use that ratio whenever you draw a basketball and hoop together. For another perspective exercise built around circles and cylinders, compare the wheel construction in our Mustang drawing guide.
Backboard and support
The backboard is a rectangle in perspective that must share the rim’s eye level and vanishing point. A regulation board is 72 by 42 inches. The rim mounts at its bottom center on a short bracket projecting toward the court.
Add the small rectangle above the rim, then the pole, arm and padding as simple boxes and cylinders.
Net construction
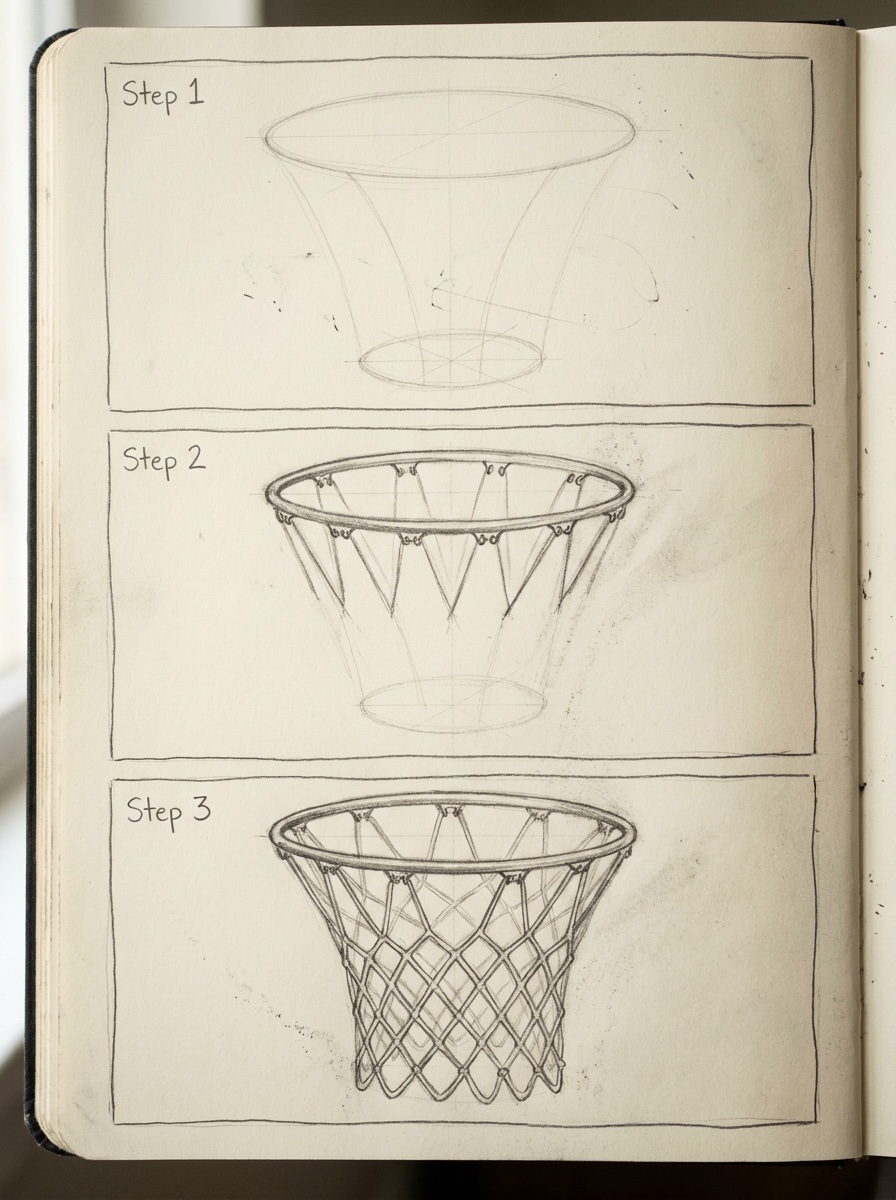
Draw a smaller ellipse below the rim where the net ends. Mark evenly spaced loops around the rim, closer together at the sides where they turn away. Connect them with diagonal strings to the lower ellipse, crossing to form diamonds.
Like basketball seams, the diamonds follow cross-contours: widest at the front, compressed toward the edges. Strings at the back show through the front ones and should be lighter.
Perspective mistakes to watch
- A rim drawn as a perfect circle or a flat line.
- A backboard drawn straight on while the rim is seen from below.
- A net drawn as a flat grid hanging in front of the rim.
How to draw a basketball player
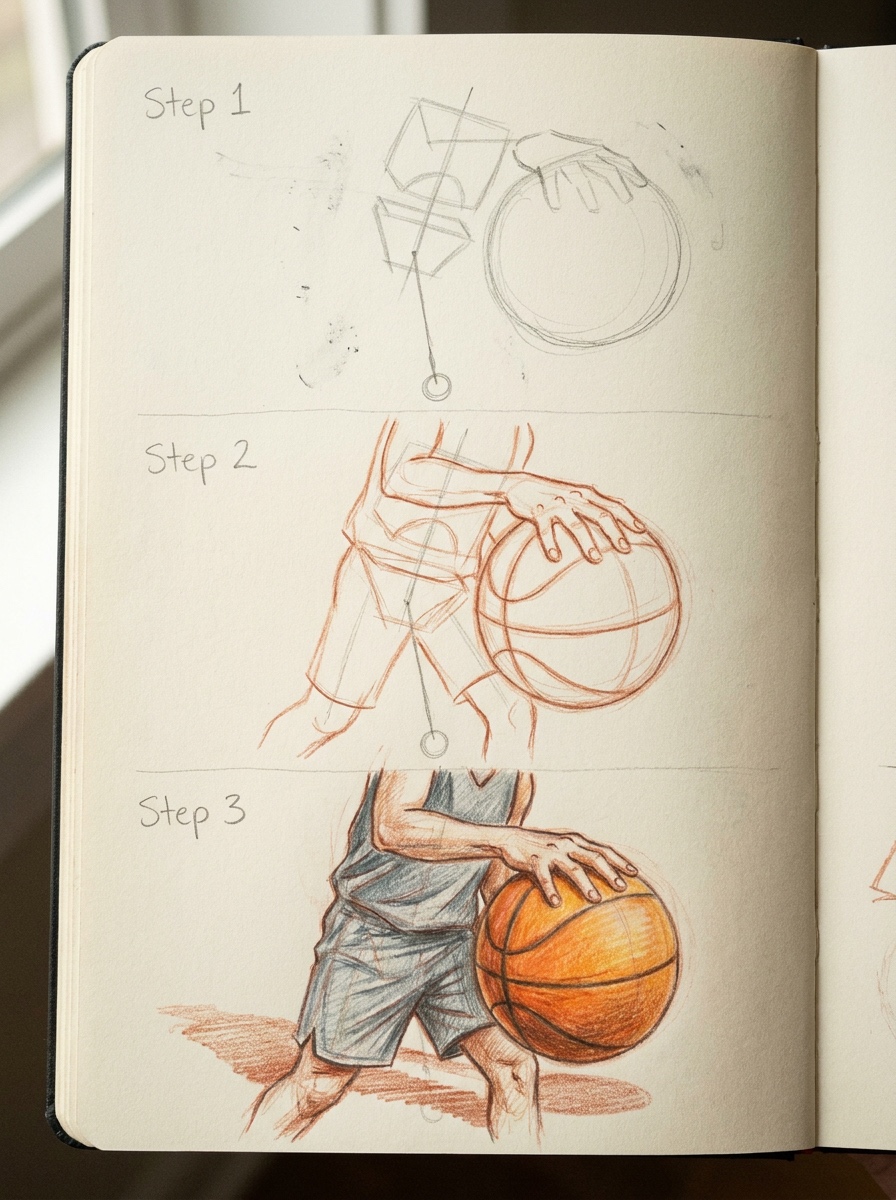
A good basketball player drawing needs gesture, weight and a believable hand-ball relationship, not anatomy.
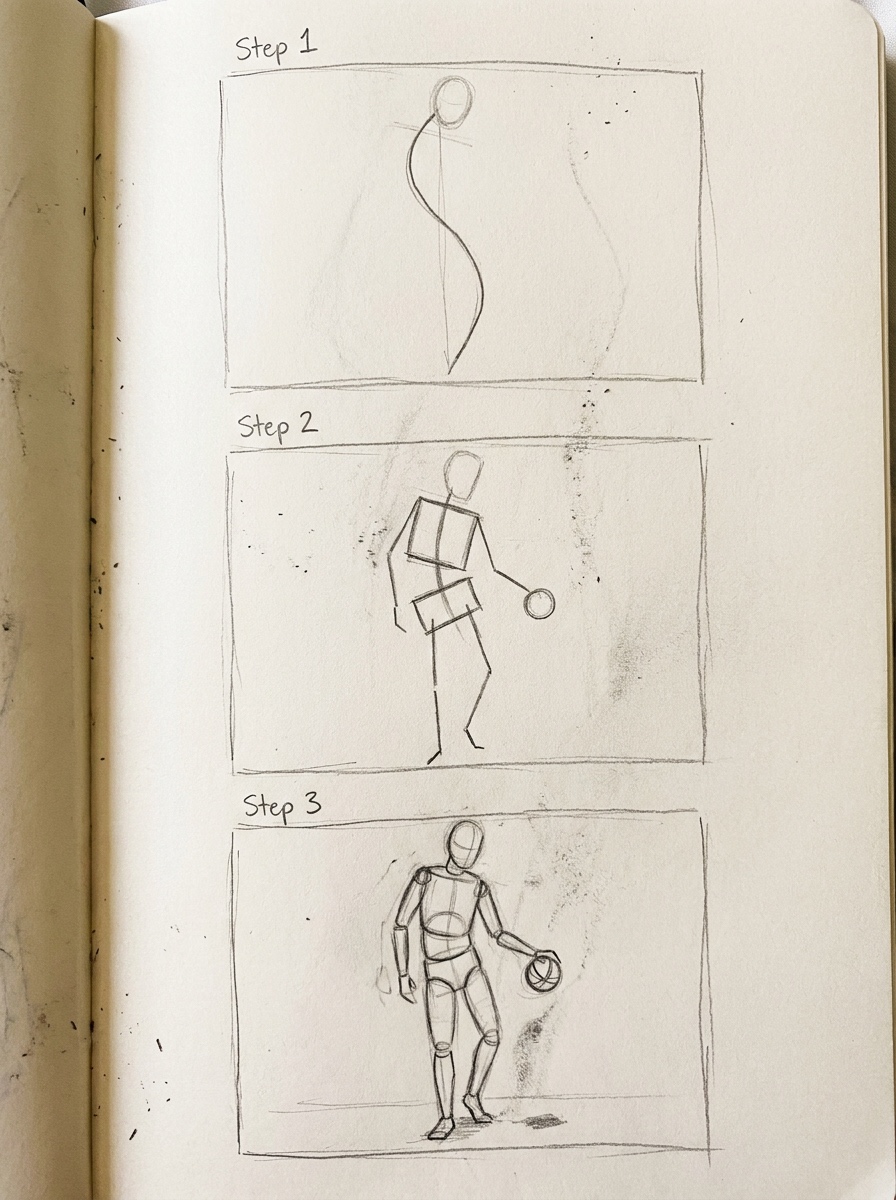
Start with the gesture line
Draw one curve from the head through the spine to the weight-bearing foot. Give it 20 to 30 seconds. A C-curve suits a reaching layup; an S-curve suits a crossover dribble. Our beginner drawing techniques guide includes a short gesture and line-of-action drill.
Block the rib cage and pelvis
Hang a box or egg shape for the rib cage and a smaller box for the pelvis on that line. In most action poses they tilt opposite ways: when the hips drop on one side, the shoulders usually rise on that side.
Find the weight-bearing leg
Drop a plumb line from the pit of the neck. In a balanced stance or dribble, it lands near the supporting foot. If it lands outside the feet and the player isn’t airborne, the figure falls.
Connect hand and ball
The ball is roughly the size of the player’s head. On a dribble, the palm sits on top of the ball or slightly to the side, fingers spread and curved around it. The ball’s cast shadow tells the viewer how high it is; without one, the ball floats.
Check the action silhouette
Fill the figure in solid gray, on tracing paper or in your head. If the action doesn’t read, or the arms vanish into the torso, open the limbs away from the body.
Foreshorten with simple forms
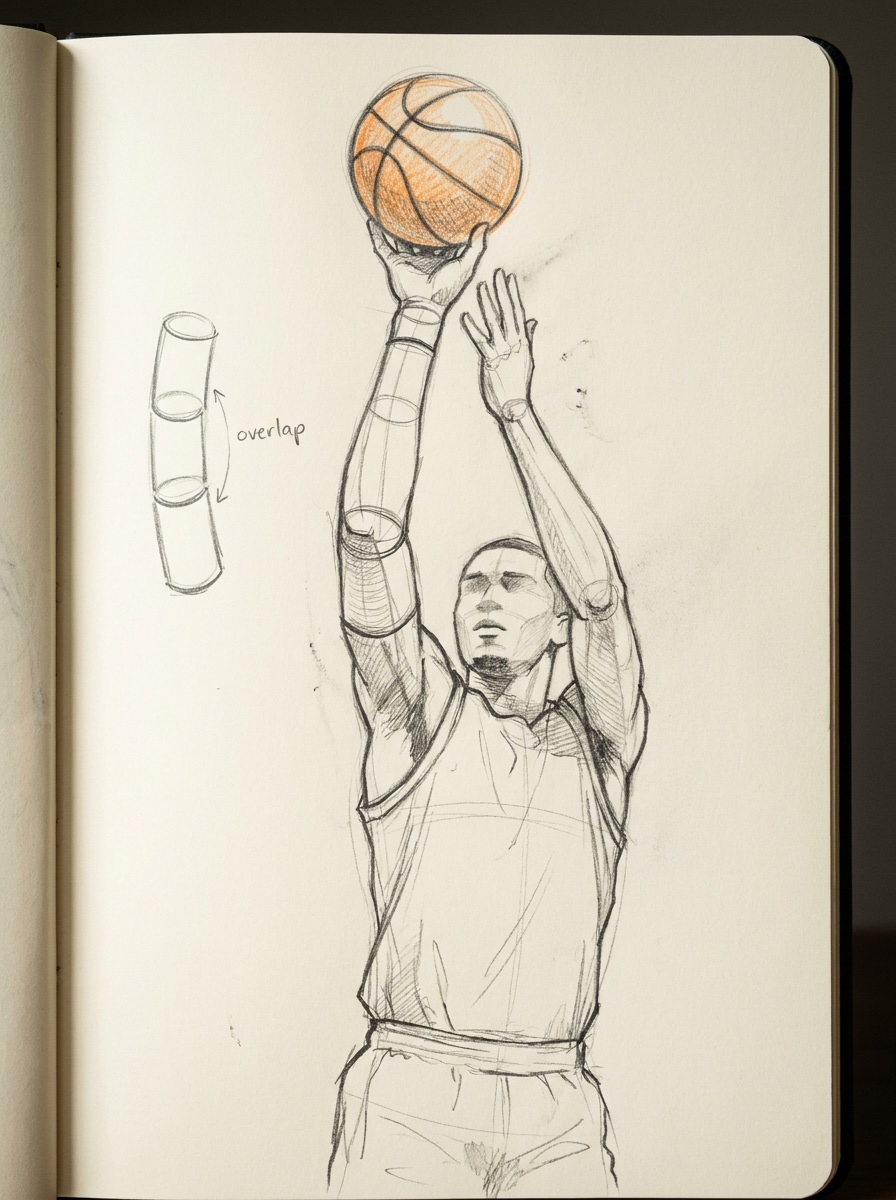
In a jump shot seen from the front, the shooting arm points partly toward you. Draw upper arm and forearm as cylinders with ellipses at elbow and wrist, each overlapping the next: hand over forearm over upper arm. Overlap sells depth better than length does.
Clothing folds
A jersey hangs from the shoulder points. Shorts hang from the hips and pull into diagonal folds from the moving knee. Keep folds few and pointing toward the stress.
How to draw a basketball court in perspective
Horizon and vanishing point
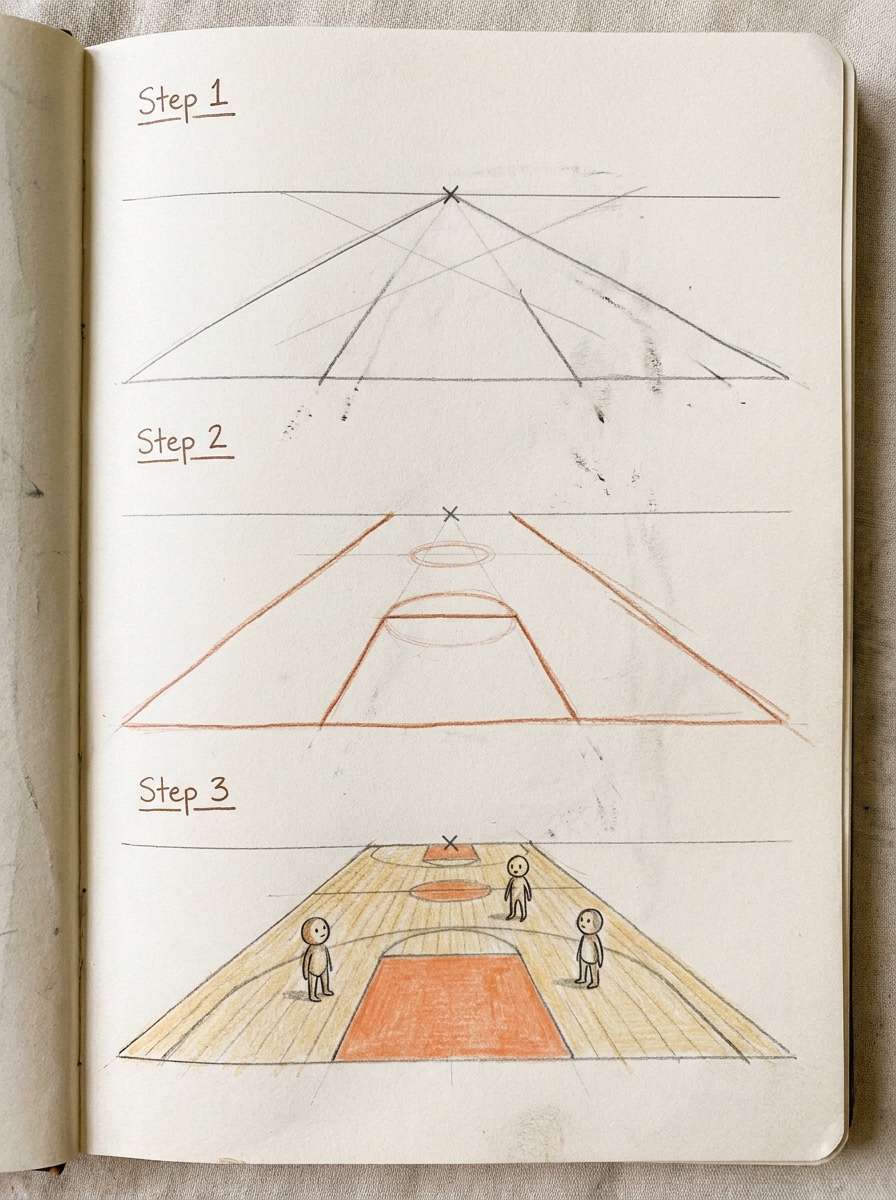
A basketball court drawing starts with the horizon at your eye level. For a view from behind one baseline, use one-point perspective with the vanishing point on the horizon, centered on the far basket. The sidelines and lane lines all run to that point.
The key and free-throw circle
The key is a floor rectangle, so its long sides converge and its far edge looks shorter. The free-throw circle becomes an ellipse centered on the free-throw line. Draw the full ellipse lightly, even if half ends up hidden.
Sidelines and scale
A full NBA or NCAA court is 94 by 50 feet, and a FIBA court is 28 by 15 meters. To find the middle of any floor rectangle in depth, draw its diagonals. They cross at the perspective center.
For figure scale, place the horizon at a standing adult’s eye height. Every standing figure of similar height then has its eyes near the horizon, at any distance. Taller players’ heads rise slightly above it.
Three practice cases
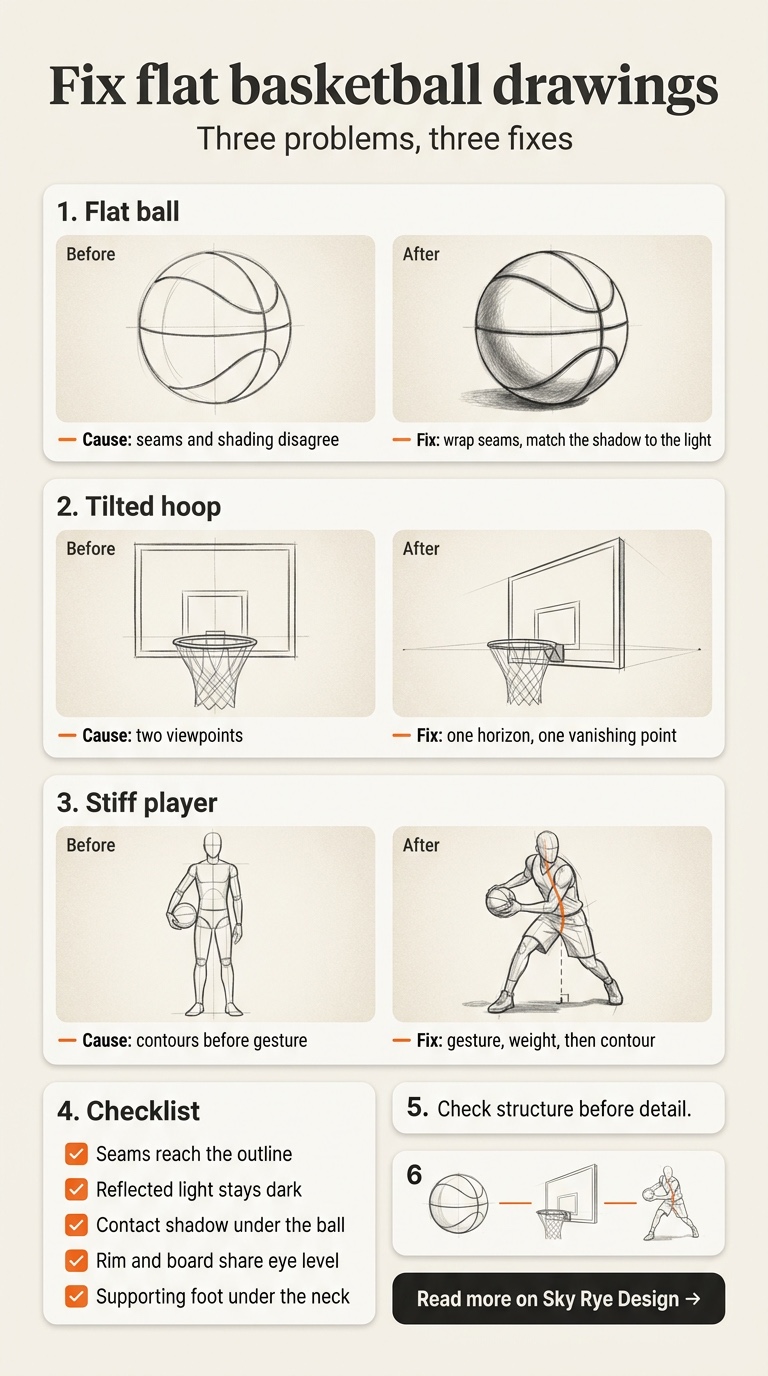
Case 1: the ball looks flat
What you see: a circle with curved seams and decent shading that still reads like a sticker. The seams bow one way, the terminator the other, and the seams stop short of the outline.
Diagnosis: the seam curves and the values describe two different spheres.
Correction sequence:
- Erase the shading back to a faint ghost.
- Redraw the axis and equator ellipse, then realign each seam to them.
- Check that the full-round seams meet the outline at opposite points.
- Redraw the terminator at right angles to the light arrow.
- Reshade with the core shadow following that terminator, and run every seam over the edge.
Case 2: the hoop looks tilted
What you see: the rim tips toward the viewer like a plate, while the backboard looks flat on.
Diagnosis: the rim was drawn from below and the backboard from eye level: two viewpoints in one picture.
Correction sequence:
- Draw one horizon line across the entire page.
- Place a single vanishing point on it.
- Redraw the backboard edges to that point.
- Refit the rim ellipse so its major axis stays horizontal and its roundness matches its height above the horizon.
- Rebuild the net between the rim and the lower ellipse.
Case 3: the action pose feels stiff
What you see: clean contours and reasonable muscles, but the player looks like a mannequin. The torso is vertical, both feet carry equal weight and the ball floats.
Diagnosis: the contours were drawn before the gesture and the weight.
Correction sequence:
- Lay tracing paper over the drawing and draw one gesture curve that exaggerates the action.
- Re-block the rib cage and pelvis so they tilt against each other.
- Drop a plumb line and move the supporting foot under it.
- Reposition the ball relative to the hand, then add its cast shadow.
- Redraw contours over the new structure, keeping old lines only where they fit.
Troubleshooting table
| Symptom | Likely cause | Fix |
|---|---|---|
| Ball looks like a flat disc | Seams stop before the outline | Carry seams over the edge |
| Ball looks like an orange | Texture spread evenly | Keep pebbles in the halftone near the highlight |
| Shadow side looks hollow | Reflected light too bright | Darken it below every lit-side value |
| Ball floats | No contact shadow | Put the darkest value directly under the ball |
| Rim looks like a plate | Ellipse doesn’t match eye level | Set one horizon and refit the ellipse |
| Net looks pasted on | Diamonds drawn as a flat grid | Compress diamonds toward the sides |
| Player tips over | Supporting foot off the plumb line | Move the foot under the pit of the neck |
| Court looks warped | Depth lines aim at different points | Run all depth lines to one vanishing point |
| Colored ball looks muddy | Black shadows or graphite underneath | Use sienna plus a cool layer; erase graphite back |
A 20-minute practice routine
Set a timer and use cheap paper.
- Minutes 0 to 3: six spheres with tilted axes and equator ellipses.
- Minutes 3 to 8: seams on three balls in three different orientations.
- Minutes 8 to 12: three thumbnail value studies, each lit from a different direction.
- Minutes 12 to 16: a column of rim ellipses, from just above eye level to high overhead.
- Minutes 16 to 20: eight 30-second gestures from basketball reference photos.
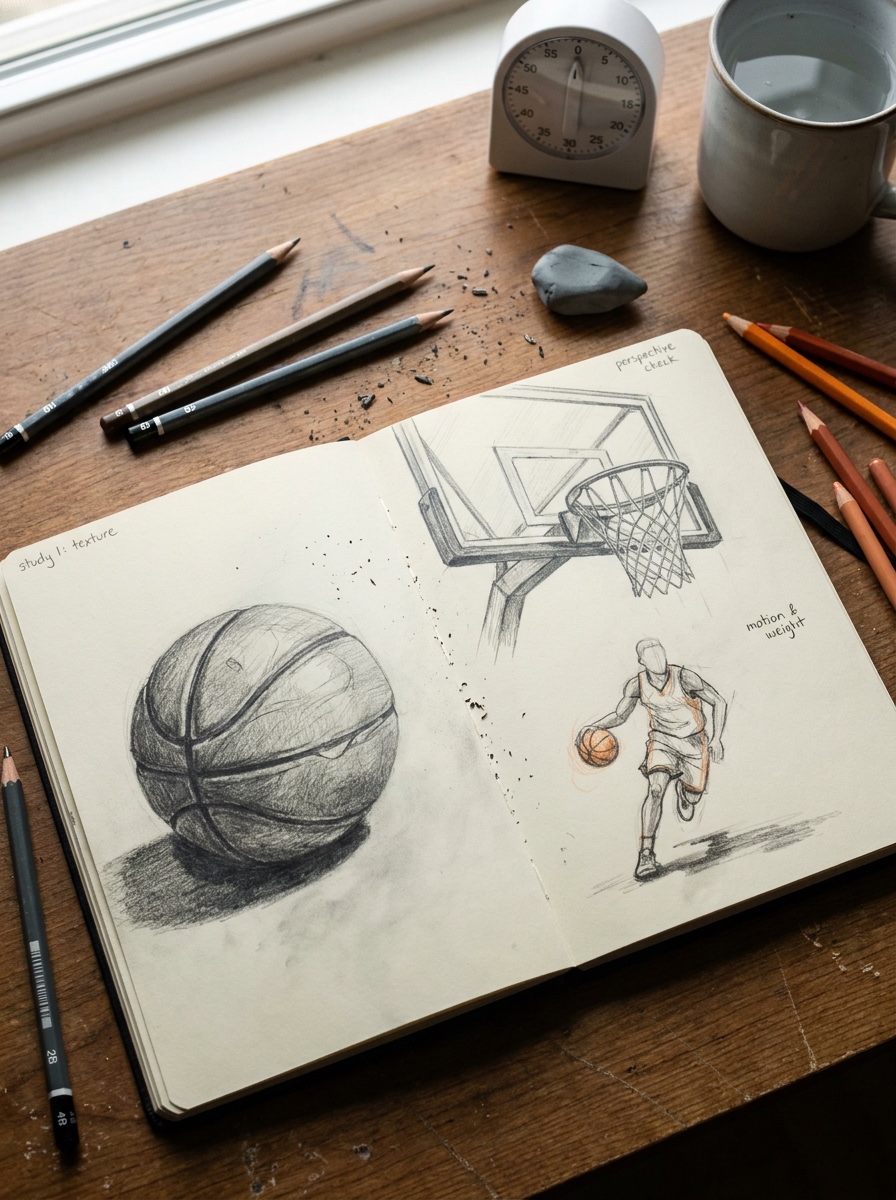
Three-study progression
Spread these over a week and keep the same light direction in all three.
- Ball: a real basketball on a table under one desk lamp. Full value scale, selective texture.
- Hoop: a hoop, backboard and net from a reference photo taken from below. One horizon, one vanishing point.
- Player: a dribbling player, with the ball, its cast shadow and the floor plane consistent with the first two studies.
Common mistakes and how to spot them
- Symbol seams: a plus sign, the same width right up to the edge.
- Heavy outline: the lit edge is darker than the background beside it.
- Highlight sticker: a clean white oval with no soft border or texture.
- Missing contact shadow: you could slide paper under the ball.
- Two horizons: the backboard edges converge somewhere other than the court lines.
- Stiff limbs: straight tubes with no overlap at elbows and knees.
FAQ
What’s the easiest way to draw a basketball?
Draw a circle with a compass, add a tilted axis and an equator ellipse, then place the seams along them. Shade the side away from the light in one tone and add a small cast shadow. That’s a complete, correct easy drawing.
How do I draw a perfect circle freehand?
Move from the shoulder, not the wrist, and ghost the circle several times before pressing down. Rotate the paper to check it. For a final outline, a compass or circle template is completely fine.
Where do the seams go on a basketball?
Copy them from a real ball, since designs vary. Many balls have two full-round seams crossing at right angles, plus two curved seams on opposite sides. Every seam is part of an ellipse and turns over the edge.
How do I make the texture look realistic?
Keep the pebbles in the halftone and around the highlight, where light skims the surface. Make them smaller toward the outline and let them fade out in the shadow.
How do I draw a basketball hoop?
Set a horizon first. Draw the rim as two ellipses, the backboard to the same vanishing point, then build the net as diamonds between the rim and a smaller ellipse below it.
How do I draw a basketball player?
Start with a 30-second gesture line, then block the rib cage and pelvis. Put the supporting foot under the plumb line and place the ball relative to the hand. Contours come last.
Your next drawing
Put a basketball on a table with one lamp at the upper left. Draw it three times at the same size: once with the two full-round seams crossing near the center, once tilted about 45 degrees, and once rotated so a curved seam runs close to the outline.
Use only HB and 2B, and give each version 15 minutes. Then lay the three side by side and check one thing: on each ball, does the terminator curve in agreement with the seams around it?
- 0shares
- Facebook0
- Pinterest0
- Twitter0
- Reddit0