The first time I actually tried to draw a jellyfish from a tank instead of a photo, I got about four lines in and realized my usual approach was wrong. I had been treating the bell like a circle with squiggles hanging off it. Up close, through glass, a moon jellyfish is basically a dome of light — translucent, catching reflections from three directions at once, with almost no hard edge anywhere on it.
Most online tutorials never get past the “circle with squiggles” stage, which is why jellyfish drawings so often look flat no matter how many tentacles you add. This guide covers both the fast, cute version you can knock out in five minutes and the slower, realistic version that actually captures that glassy, glowing quality.
Same anatomy underneath either way — you will know exactly which shapes to build first and, more importantly, why tentacle lines are the one thing that makes or breaks the whole drawing.
Jellyfish anatomy in five shapes (before you start)
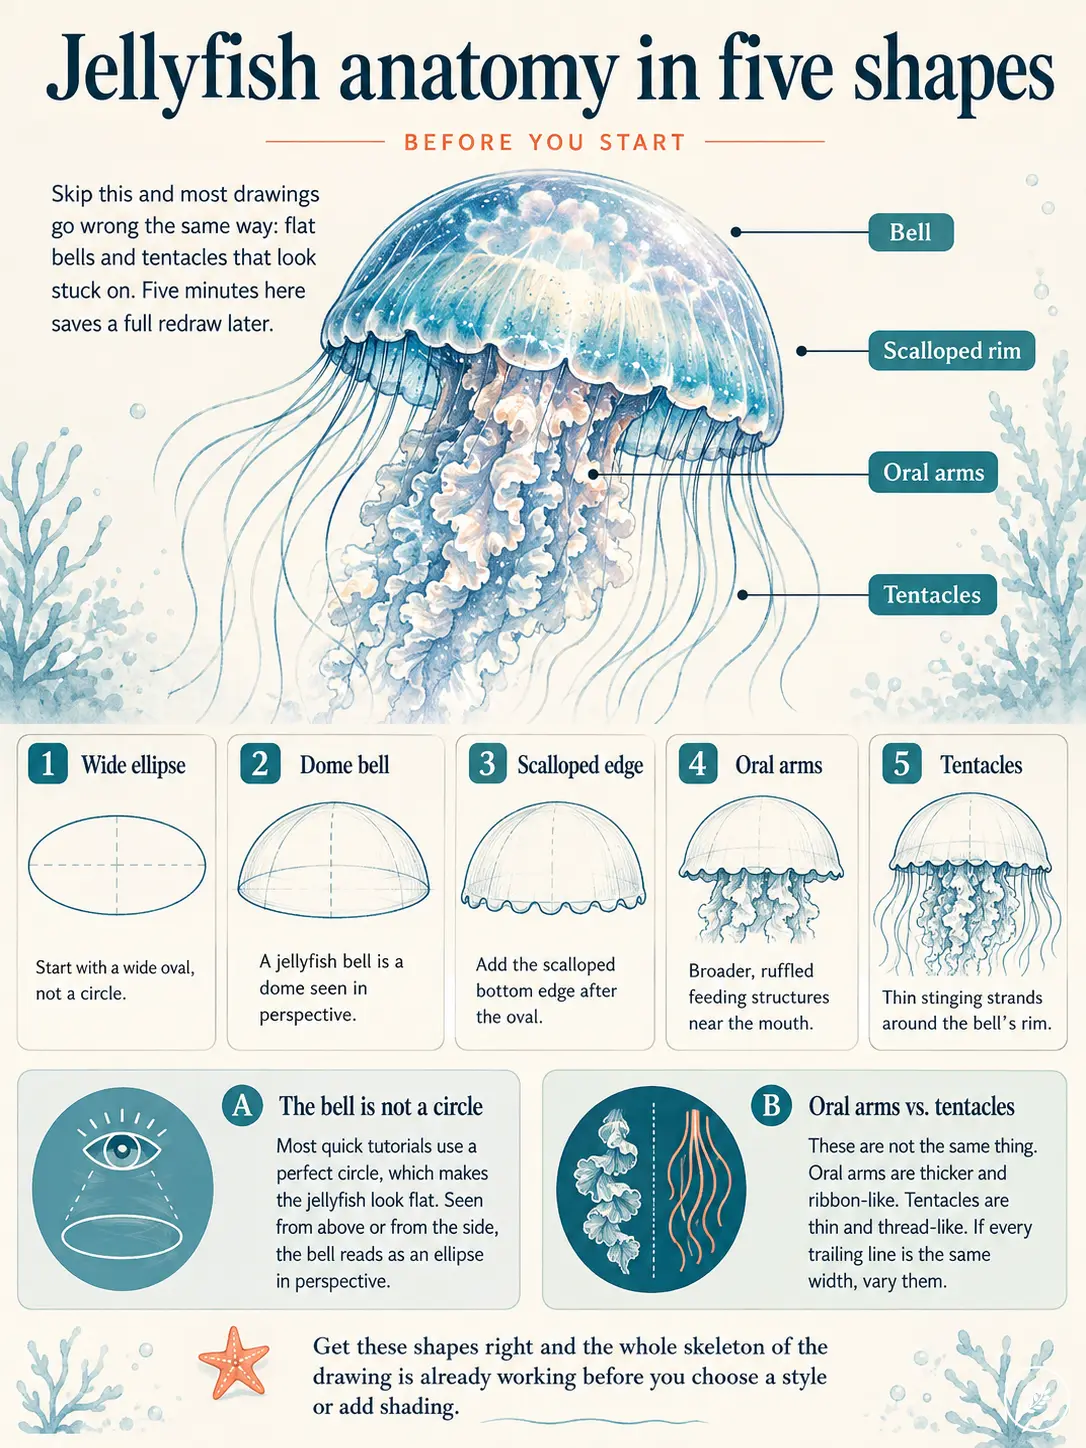
Skip this section and you will spend the whole tutorial fighting the same problem everyone else has: a bell that reads as flat, and tentacles that look stuck on rather than growing out of the animal. Five minutes here saves you from redrawing the whole thing later.
The bell is not a circle — it is an ellipse in perspective
Every quick tutorial draws the bell as a perfect circle, and it is the single biggest reason those drawings look flat. A jellyfish bell is a dome, and any dome viewed from slightly above or to the side reads as an ellipse, not a circle — the same rule that applies to drawing the top of a cup or a car’s wheel arch. Flatten that curve into a true circle and you lose the sense that you are looking at a three-dimensional form floating in water.
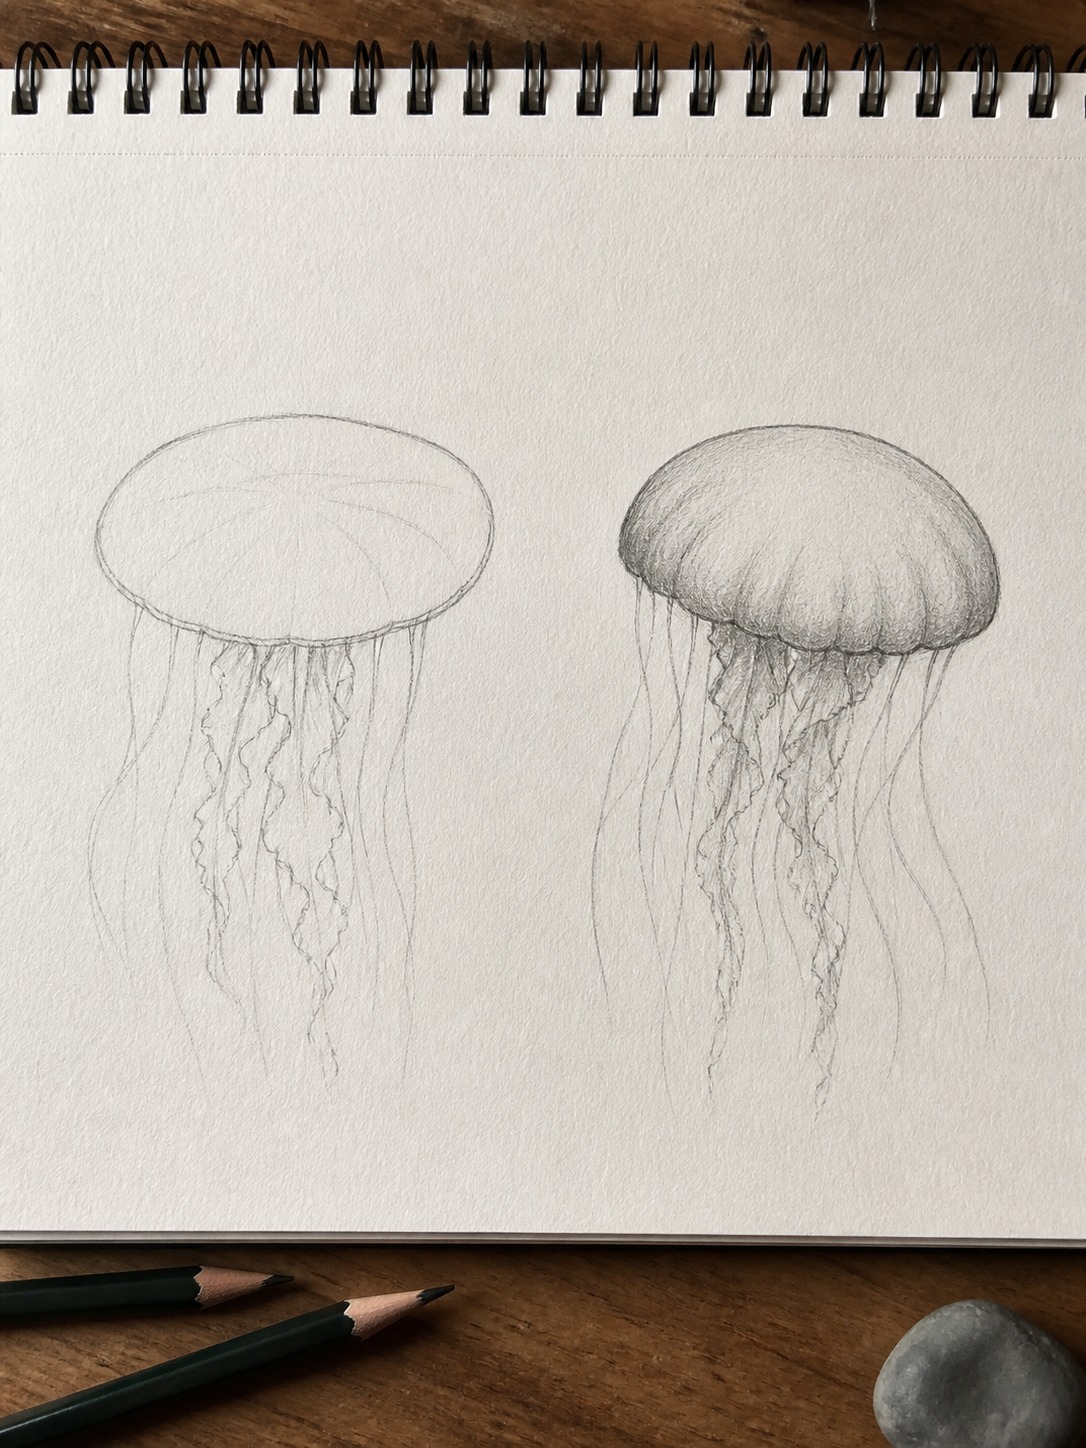
In my experience, the fix is simple: sketch the bell as a wide oval first, then add the scalloped bottom edge afterward. That oval is doing more work for realism than any amount of detail you add later.
Oral arms vs. tentacles — the distinction almost nobody explains
Here is what most tutorials skip entirely: a jellyfish has two different trailing structures, not one. The oral arms are the thicker, frilly, often ruffled structures near the mouth, used for feeding. The tentacles are the thin, long strands around the bell’s rim, used mainly for stinging prey. Visually, oral arms should read as broader and more ribbon-like; tentacles should read as fine and thread-like.
Mixing the two up is an easy mistake, but it is also an easy fix once you know to look for it. If every trailing line in your drawing is the same width, that is your cue to vary them.
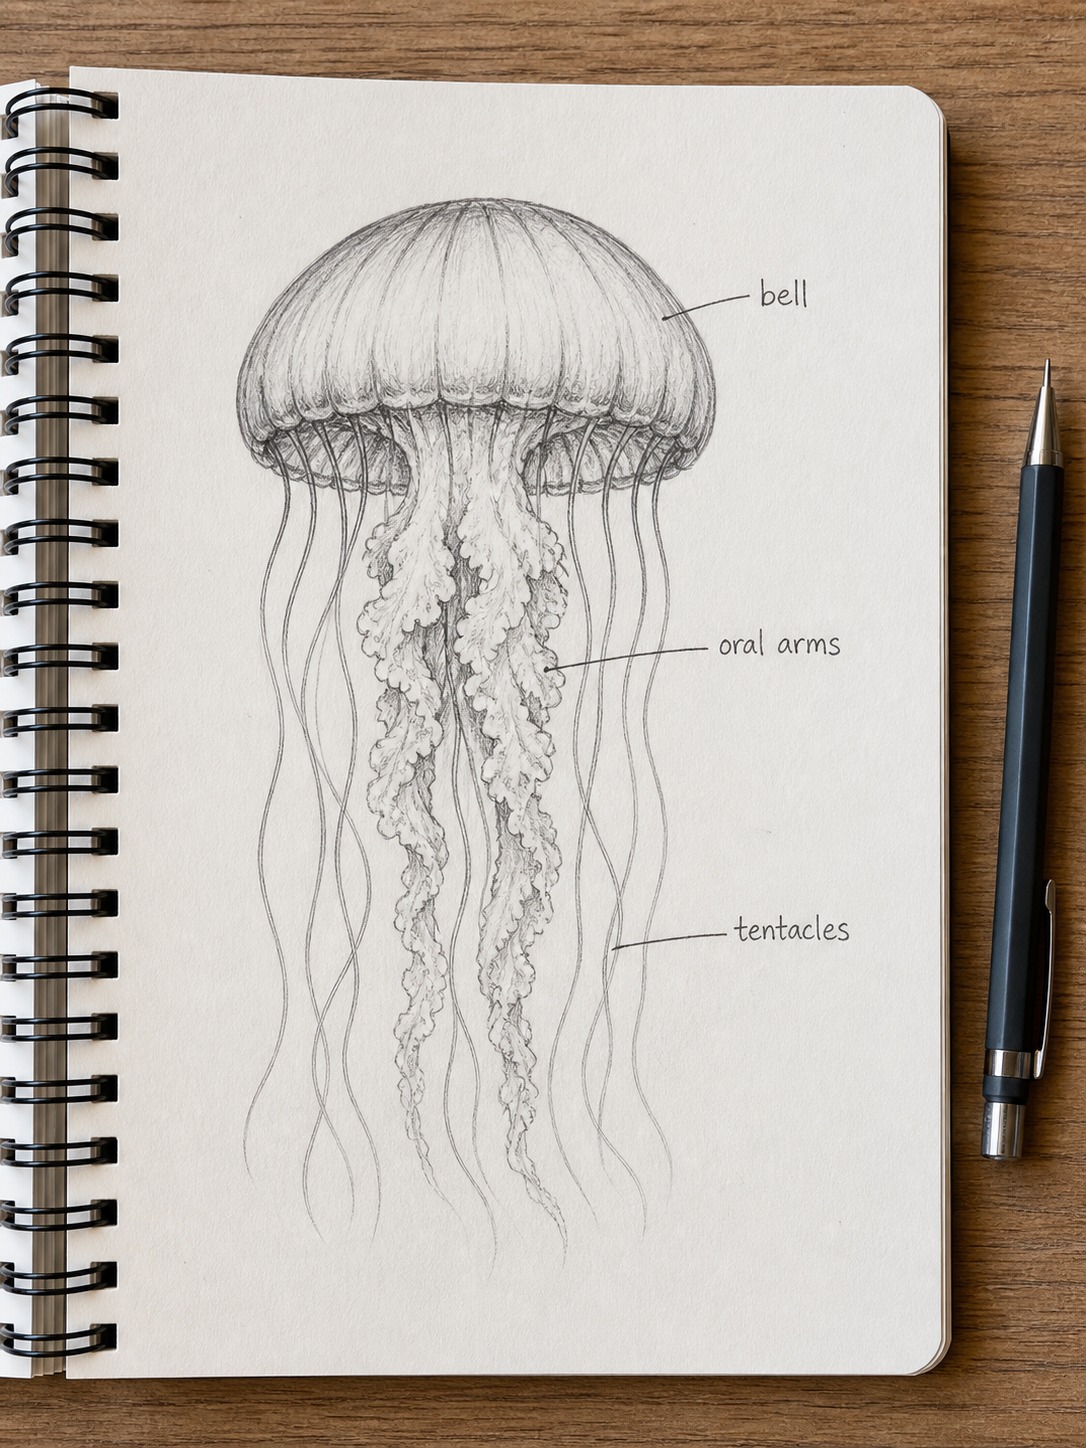
Get these two shapes right and you have got the entire skeleton of the drawing sorted before you have committed to a style. Next, the easy version — five steps, no shading required.
How to draw an easy jellyfish, step by step
This is the version you can teach a kid in five minutes or knock out yourself when you just want something quick in your sketchbook. No shading, no perspective headaches — just clean shapes in the right order.
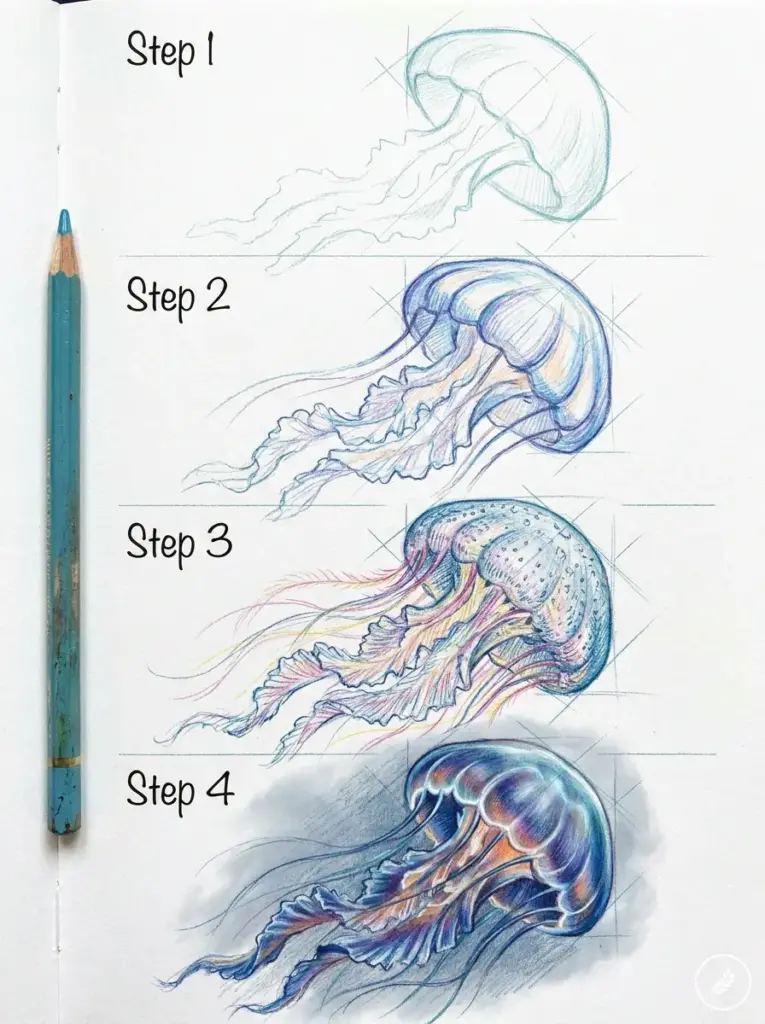
Step 1-2: the dome and the scalloped edge
Start with that wide oval from the anatomy section, sitting horizontally like a flattened egg. Do not worry about making it perfect; a slightly wobbly oval still reads as a bell once the rest of the drawing is in place.
Now add the bottom edge. Instead of closing the oval into a clean shape, break the lower curve into three or four soft scallops, like the bottom of a scalloped picture frame. This one detail is doing more to sell “jellyfish” than almost anything else in the drawing — a jellyfish with a flat, straight bottom edge reads as a mushroom or a lightbulb instead.
Step 3-4: oral arms and simple tentacles
From the center-bottom of the bell, draw two or three short, slightly wavy ribbons hanging down — these are your oral arms. Keep them close together and give them a gentle curve, almost like ribbon caught in a light current.
Around the outer edge of the scalloped bottom, add four to six longer, thinner lines for tentacles. Space them unevenly rather than perfectly symmetrical; real jellyfish never trail their tentacles in a neat, matching row, and neither should your drawing. I will cover exactly how to make these lines flow instead of look stiff in the next section, since it is worth its own explanation.
Optional cute face or kawaii styling
If you are going for the cute, kawaii-style version that shows up constantly in search results, add two simple dot eyes and a small curved mouth just above where the oral arms begin. A pink or light blush oval on each side of the face sells the “cute” read instantly — it is a trick borrowed straight from character design, where a blush mark does more emotional work than almost any other single detail.
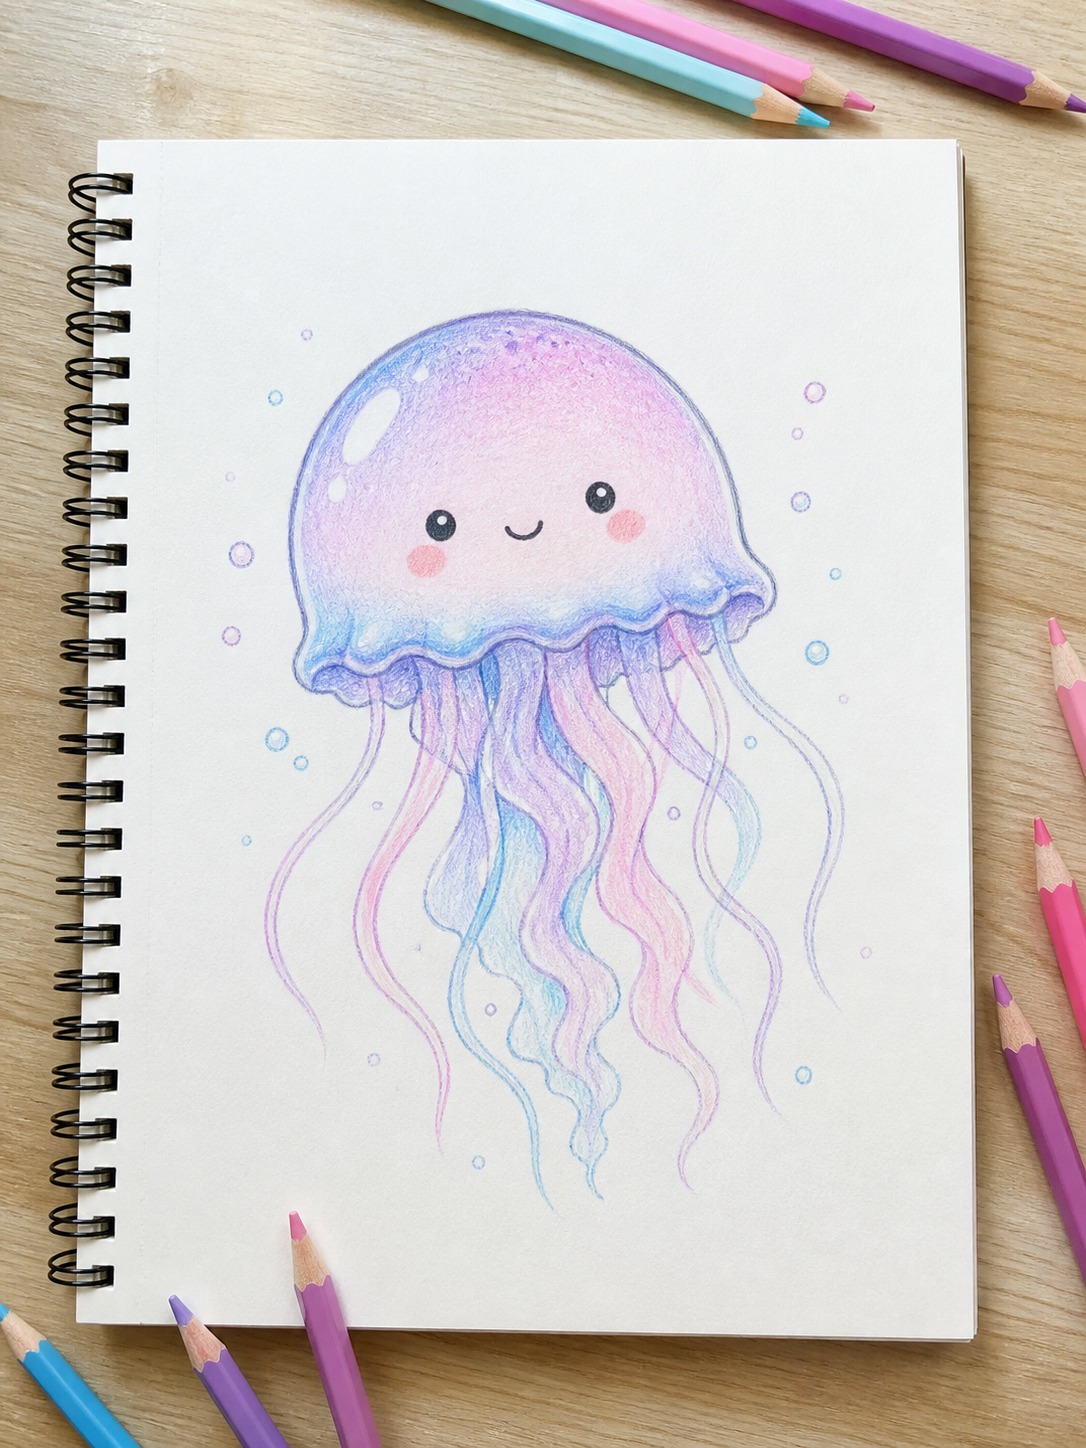
For a slightly more playful version, you can add a few small circles or bubbles trailing off one tentacle, as if the jellyfish just released a puff of water. It is a small addition, but it adds motion to what is otherwise a static pose.
That is the whole easy version, start to finish, in under ten lines. If you want something with more presence on the page — actual shading, actual translucency — that is where the realistic approach comes in, and it starts with the same bell shape you just drew.
How to draw a realistic jellyfish
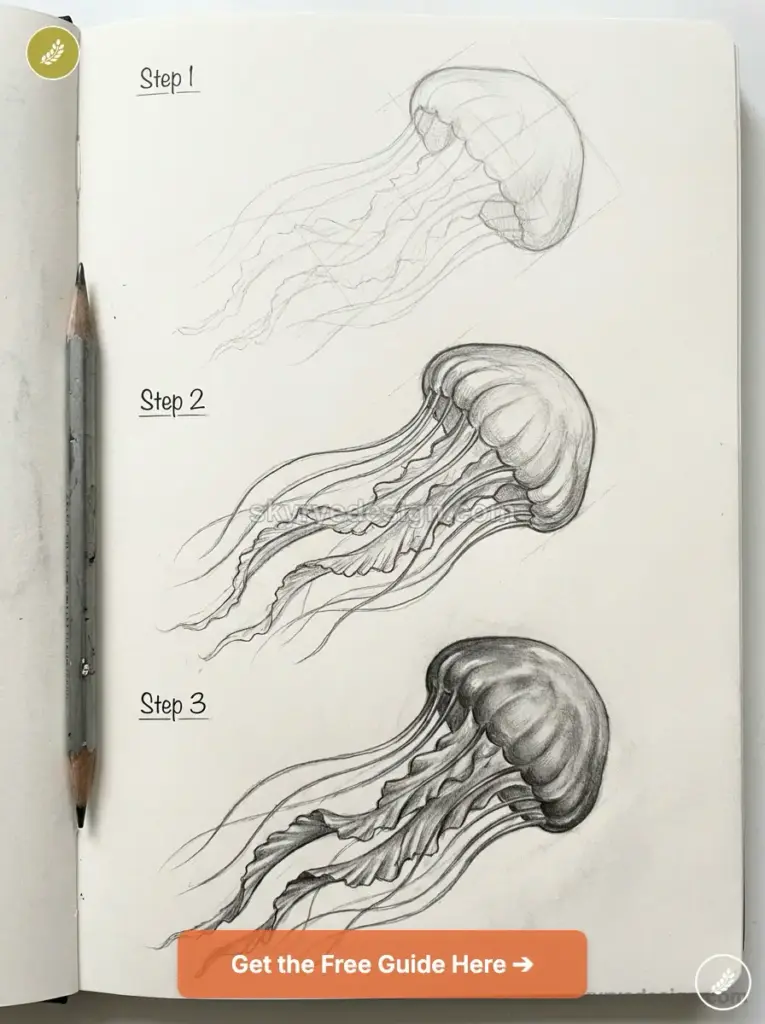
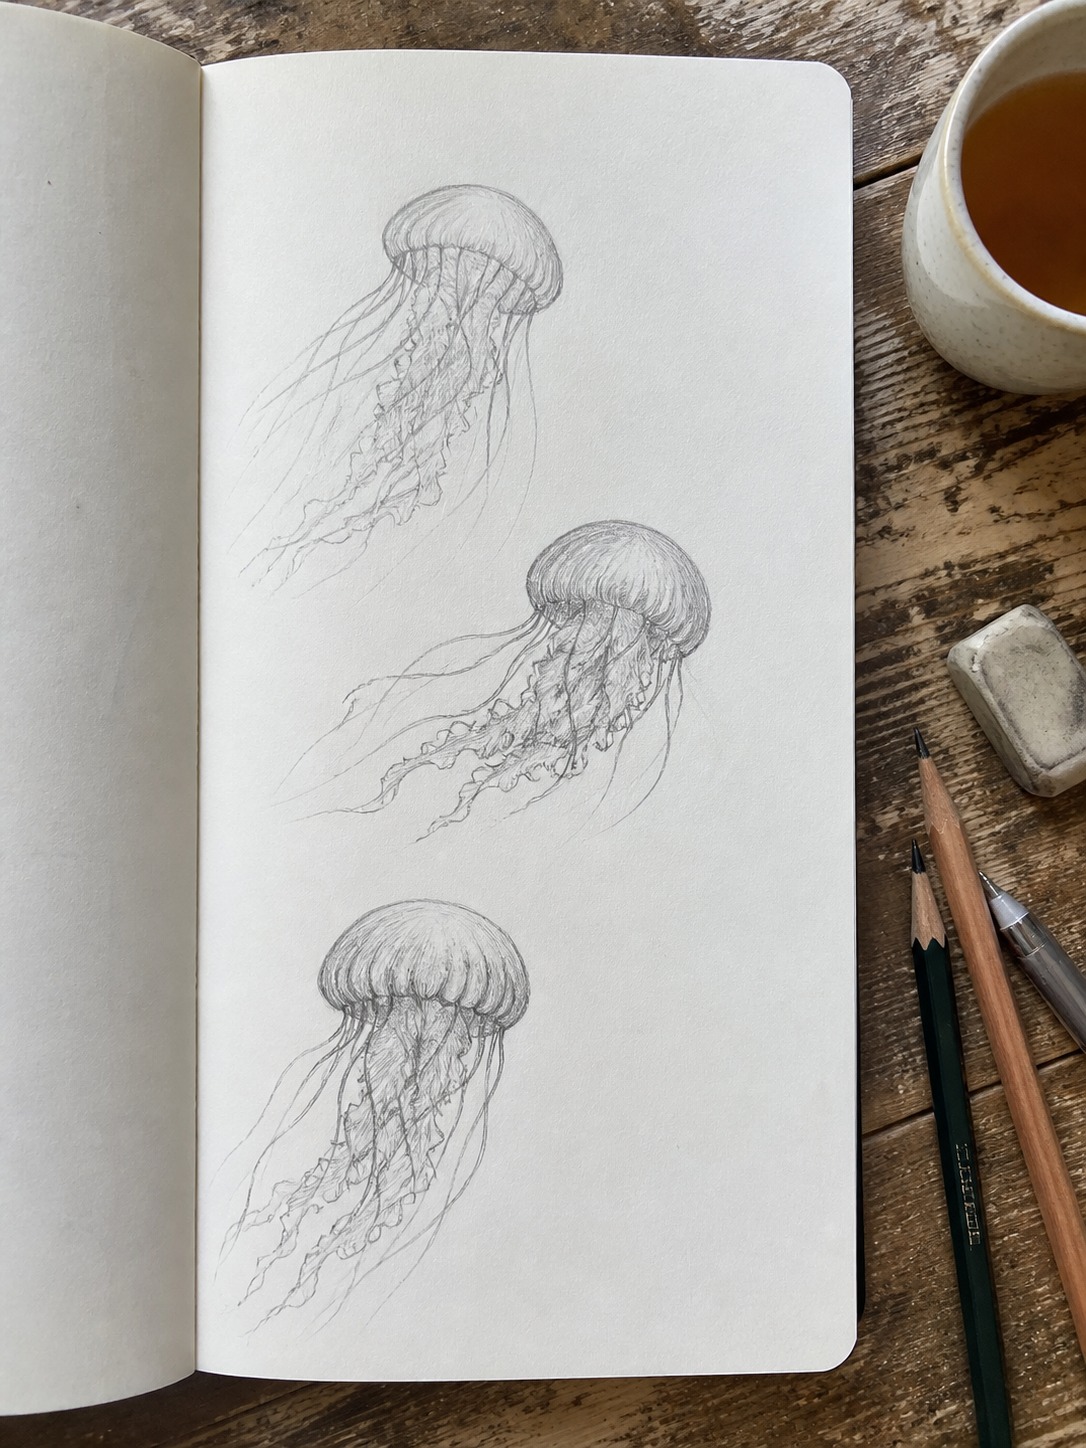
Same starting shape as before — the wide oval bell — but from here the realistic version splits off entirely. This is where shading does almost all the work, and where most tutorials online simply stop trying.
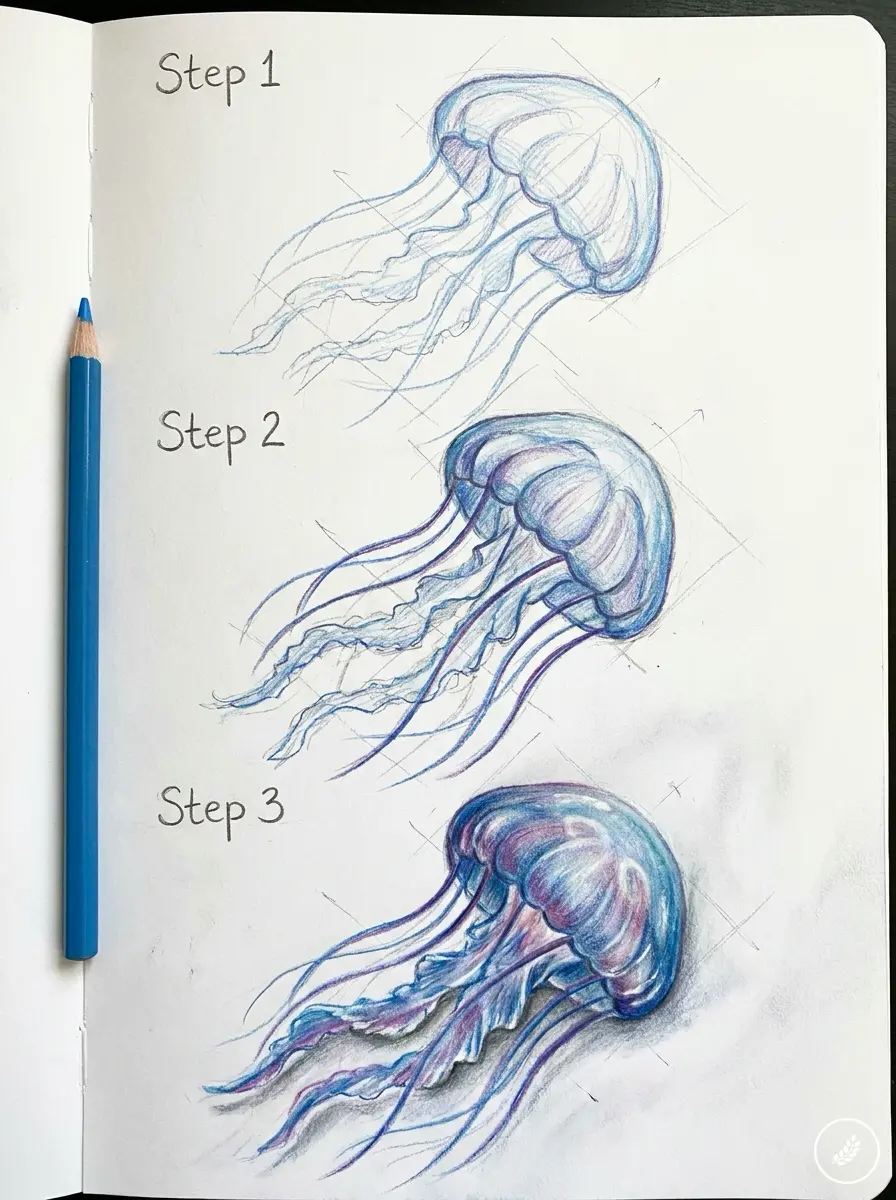
Building the bell with light construction lines
Start the same way: a wide oval, lightly sketched, with your scalloped bottom edge roughed in. But this time, add a few faint guide lines running from the top of the bell down toward the scalloped edge, like the ribs of an umbrella. You will not necessarily ink or fully render every one of these lines, but they help you track how the surface curves as you shade it later — the same way a car designer sketches surface section lines before rendering a fender’s highlight.
Keep this whole stage loose. Tight, committed lines at this point just mean more erasing once you start shading.
Shading for translucency: value over outline
This is the section that actually separates a realistic jellyfish from a cartoon one, and it comes down to one idea: a jellyfish is not defined by its outline. It is defined by how light passes through it.
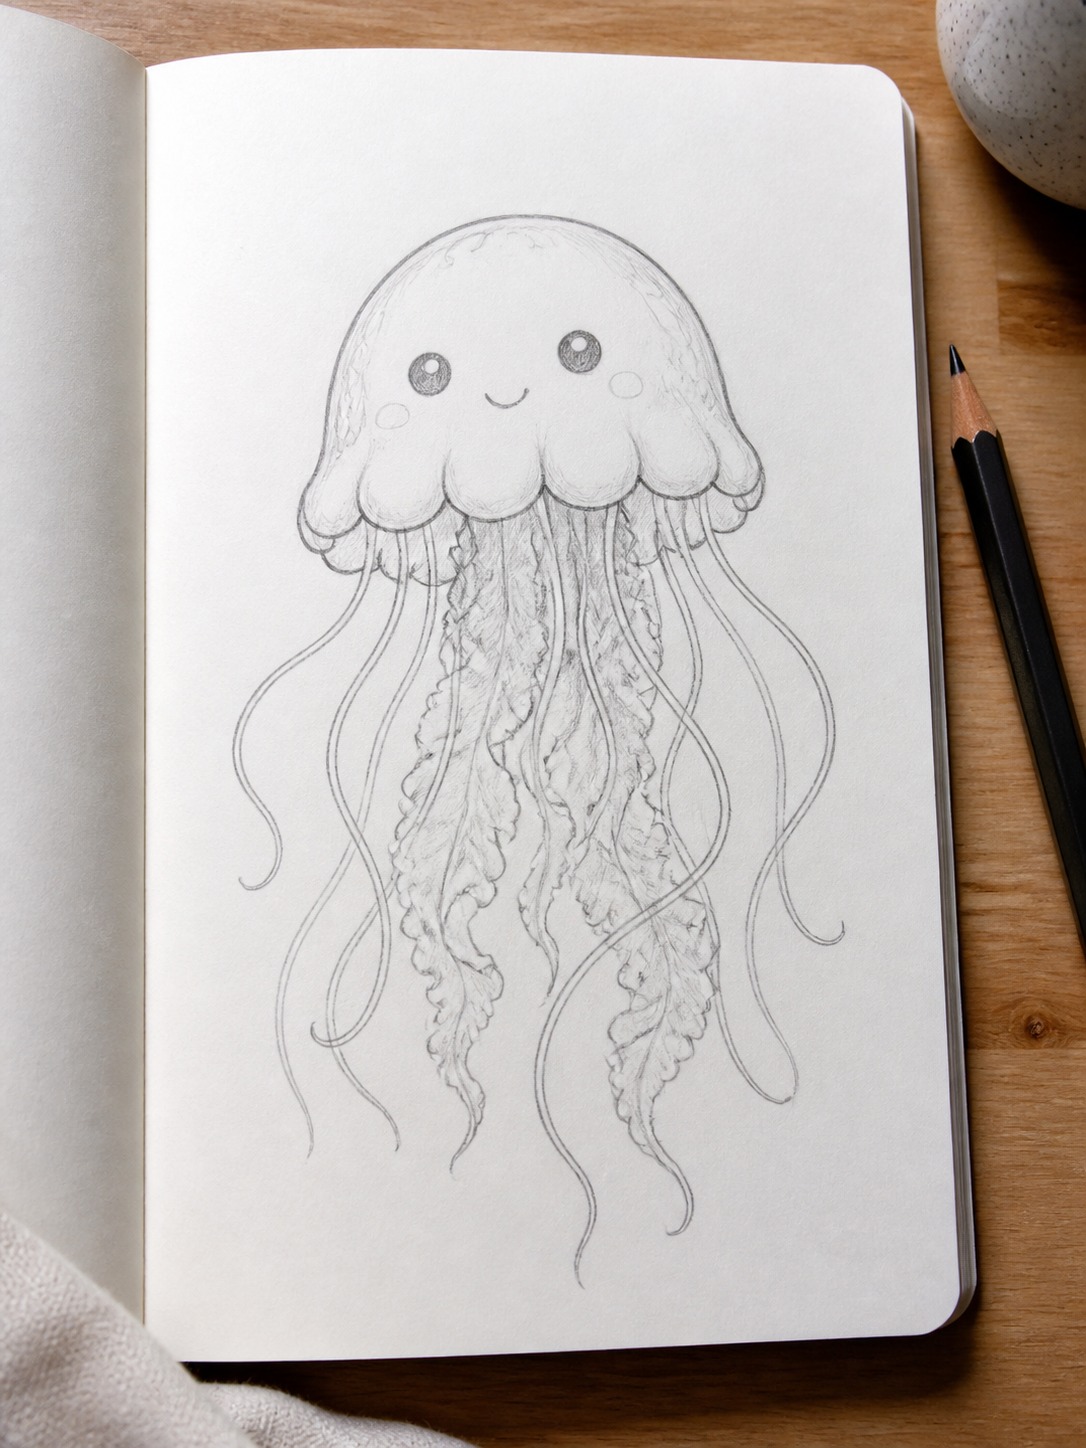
Instead of a hard, continuous outline around the bell, use soft, broken shading along the edges — slightly darker where the bell curves away from you, almost disappearing where light passes straight through the thinnest parts near the rim.
In my experience, this is the single hardest habit to build for anyone trained on outline-first cartooning, and it is also the one change that does the most visual work. A graphite pencil in the 2B-4B range, blended lightly with a tortillon or your finger, gets you most of the way there without needing a full rendering toolkit.
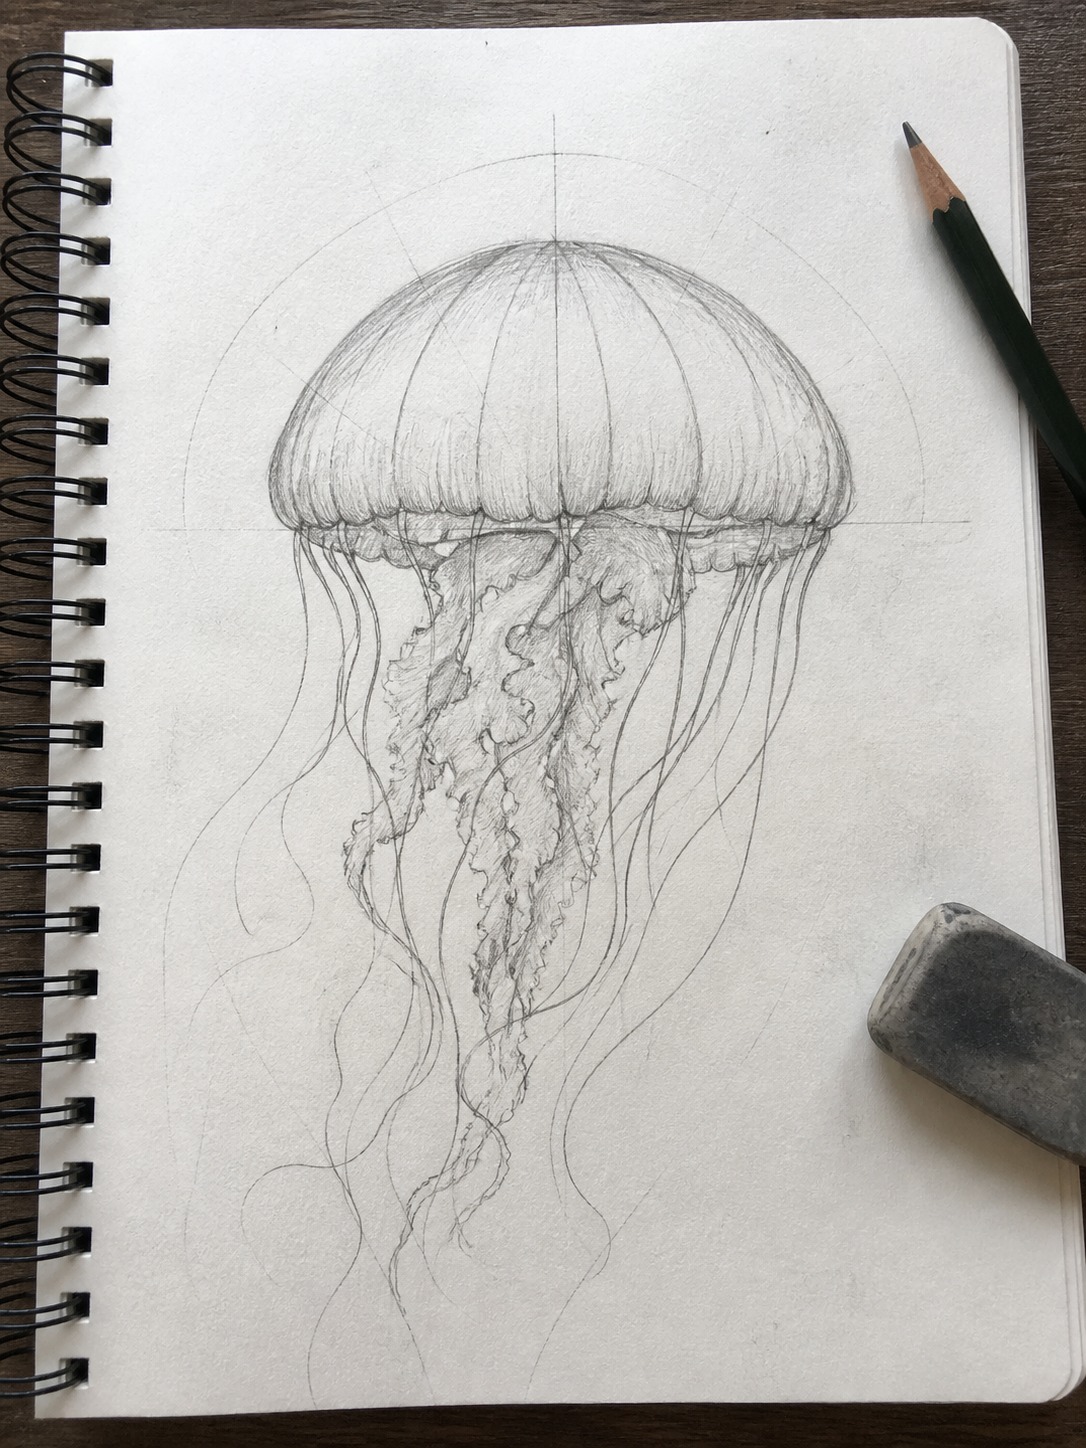
Where the highlight and core shadow actually sit on a dome
Because the bell is a dome, it follows the same light logic as any curved, glossy surface: a highlight near the top where light hits most directly, a core shadow band roughly a third of the way down where the surface curves away from the light source, and reflected light bouncing back up along the very bottom edge.
This is straight out of basic form-shading practice, but almost nobody applies it to a jellyfish specifically, and it is the fastest way to make the bell feel like it has actual volume rather than being a flat, shaded circle.
Add the oral arms and tentacles last, with slightly heavier line weight near the bell (where they are thicker and closer to you) that tapers to almost nothing by the tips.
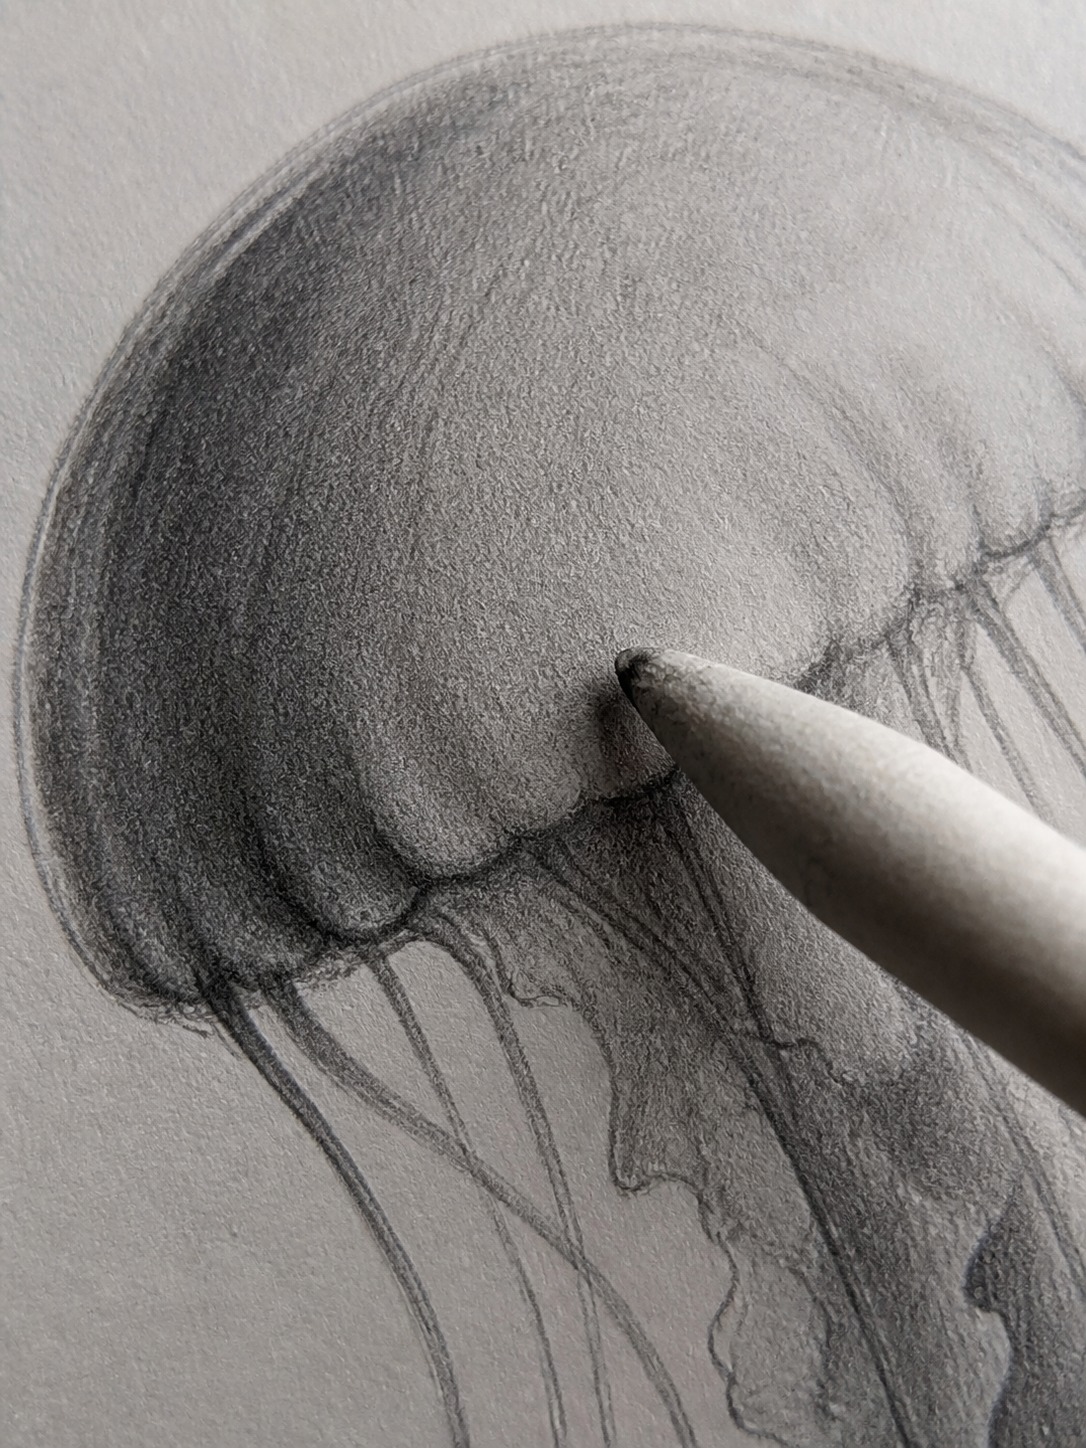
Whichever version you are working on, the tentacles are where most drawings quietly fall apart. Here is exactly how to fix that.
Getting the tentacles right (the most common mistake)
If there is one section in this whole guide worth reading twice, it is this one. Tentacle quality is the single biggest tell between a drawing that looks intentional and one that looks rushed, regardless of which style you are working in.
Why straight lines kill the drawing
Draw a tentacle as one continuous, evenly-weighted straight line, and your brain reads it as wire, not as something soft trailing through water. It is a small technical detail, but it is the difference most people cannot quite name when they say a drawing “looks off.”
Real tentacles never travel in a straight line for more than a short stretch. They curve, double back slightly, cross over each other, and drift at slightly different angles even when they started from the same point on the bell. A page of perfectly parallel, perfectly straight tentacles is the fastest way to make an otherwise solid jellyfish drawing look stiff.
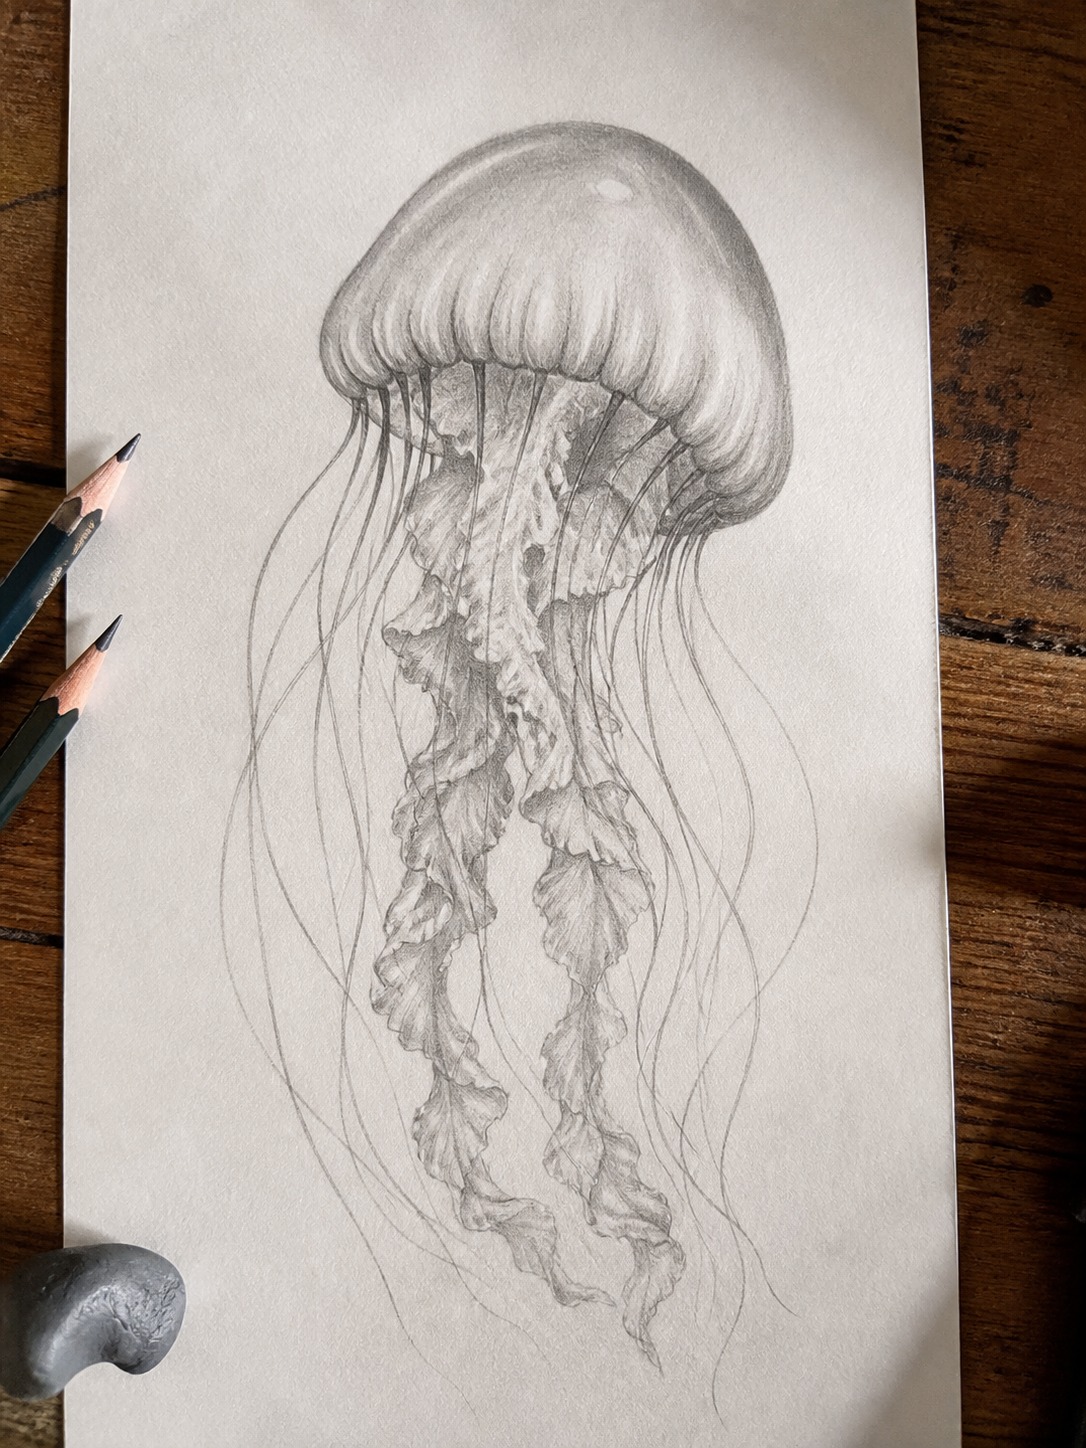
Taper, overlap, and implied movement
Three habits fix this almost immediately, and none of them require more drawing skill than you already have from the shapes above.
First, taper every tentacle line. Start slightly thicker where it meets the bell, and let it thin out gradually toward the tip. A line of uniform width along its whole length is what reads as “wire” in the first place.
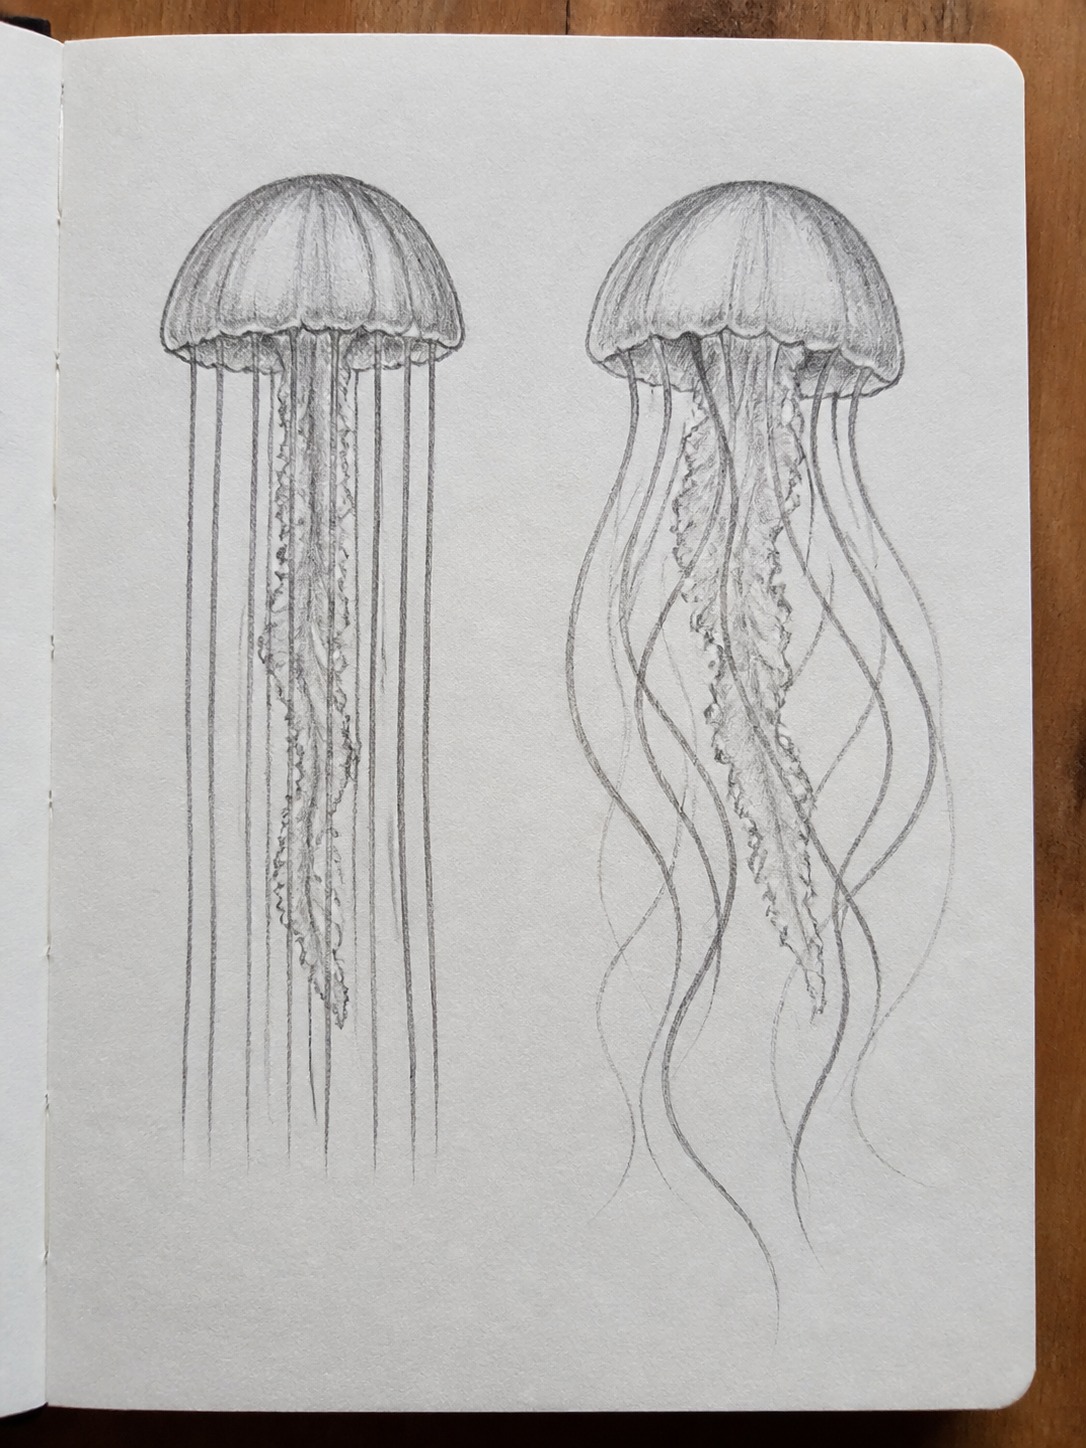
Second, let a few tentacles overlap or cross each other rather than keeping them all perfectly separated. In my experience, even just two crossing points across an entire drawing is enough to suggest depth and gentle current movement, without needing to render actual water.
Third, vary the curve direction. If every tentacle bends the same way, it reads as a pattern rather than something organic. Let two or three curve one direction, one or two curve the opposite way, and one hang almost straight down. That slight inconsistency is what real movement looks like.
Get the tentacles right, and even a rough sketch reads as intentional. Get the color right on top of that, and it starts to feel like it is actually glowing — which is exactly where we are headed next.
Coloring and glow effects
A well-built jellyfish drawing already reads as three-dimensional in pencil. Color is where you get to push it into something that actually looks like it is glowing from within, which is the effect most people are chasing when they search for jellyfish drawing ideas in the first place.
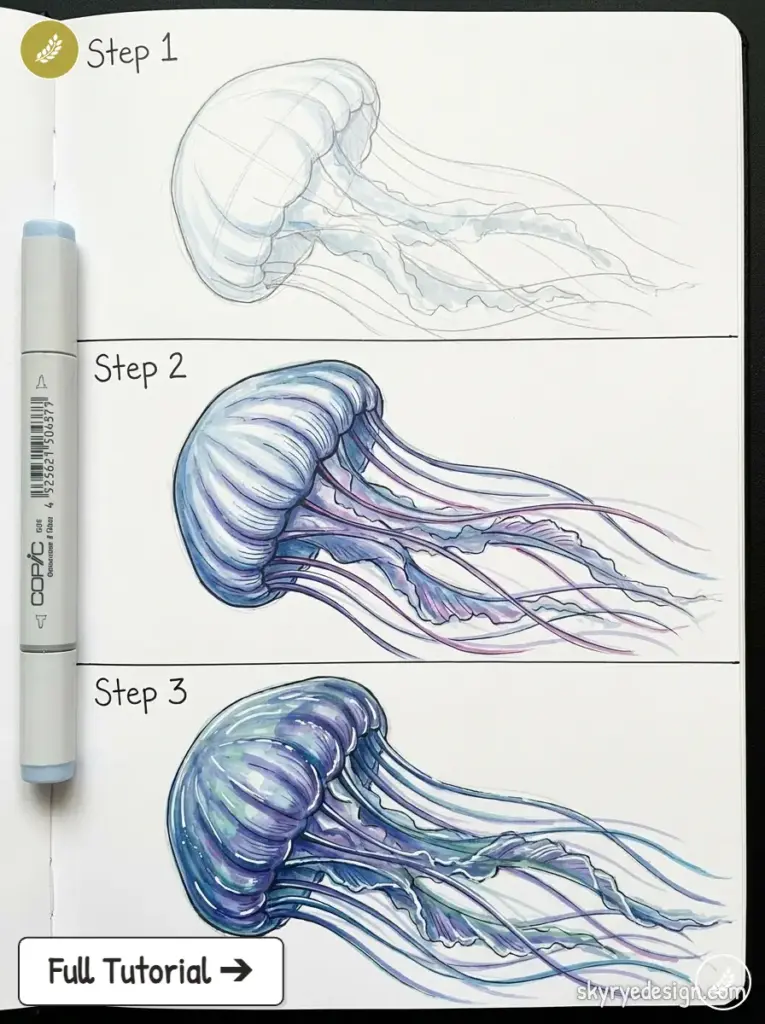
Base color and translucent layering
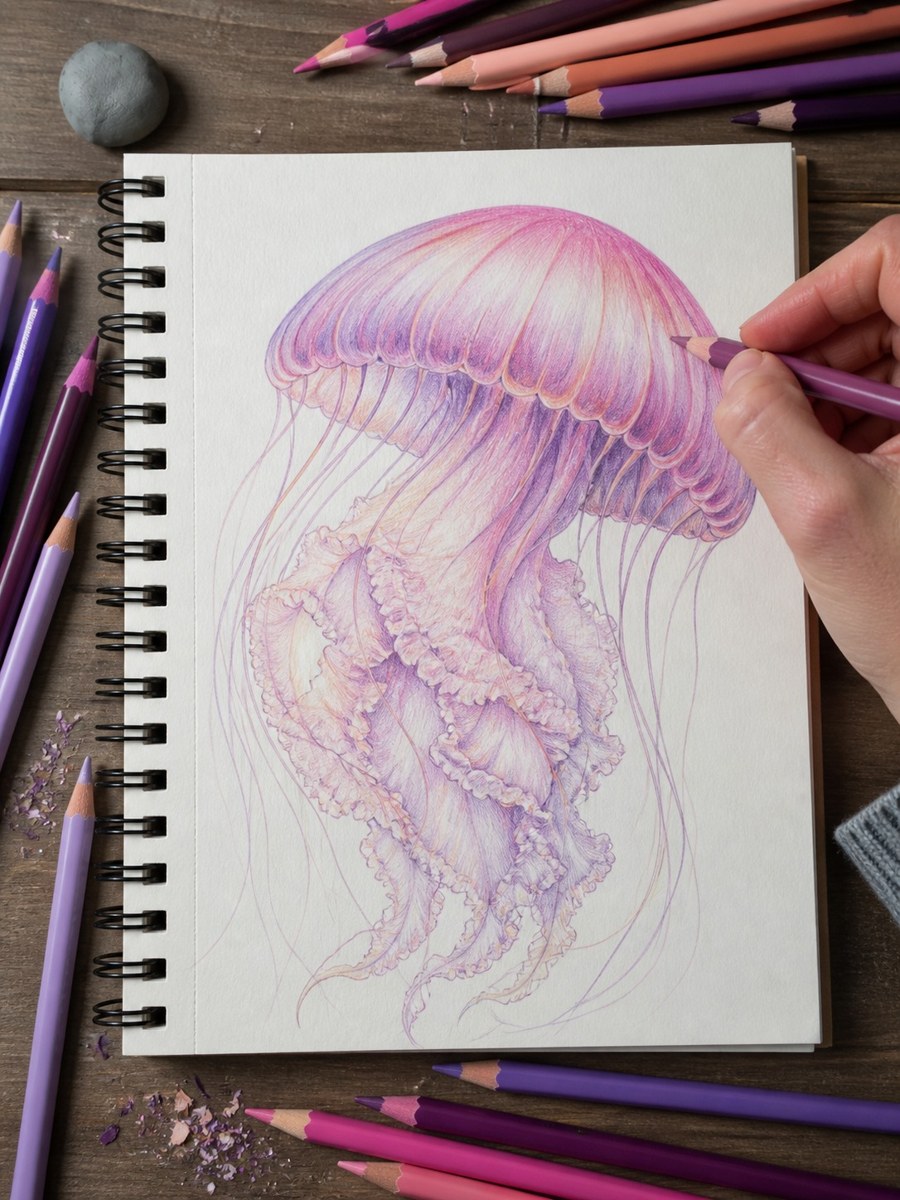
Skip the instinct to fill the bell with one flat, solid color. Real jellyfish translucency comes from layering: a very light base tone across the whole bell first, then a slightly deeper version of the same hue built up only in the areas you shaded darker in the pencil stage — the core shadow band and the edges where the bell curves away from you.
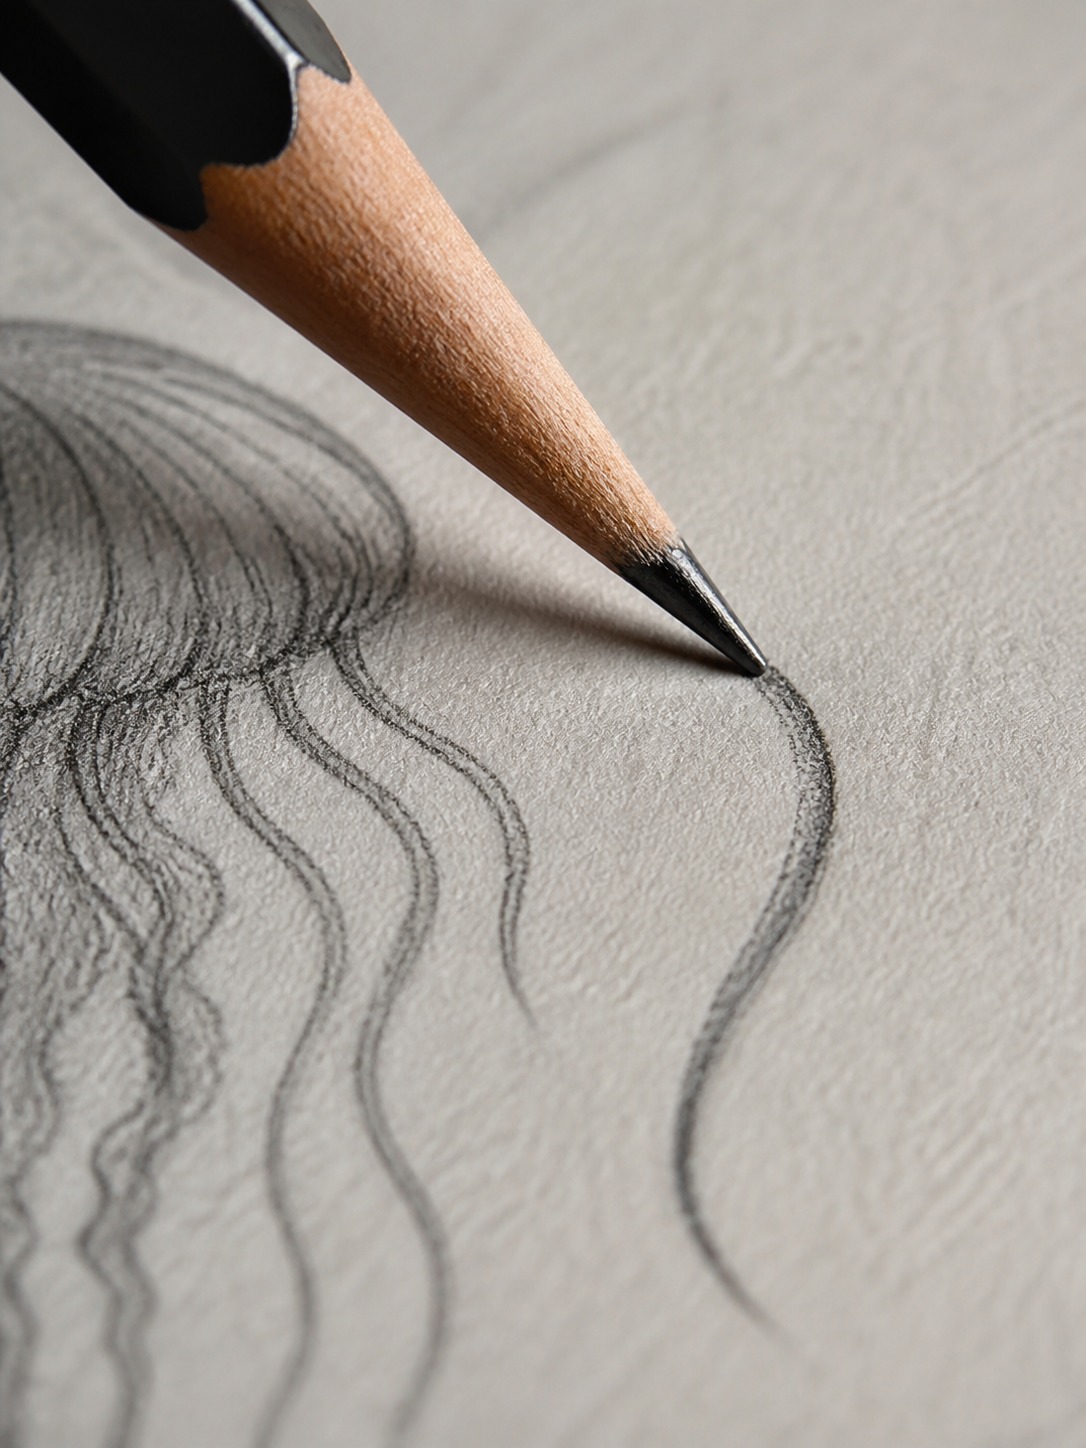
Soft pastels like pale pink, lavender, or aqua work well as a base, since they read as light passing through tissue rather than pigment sitting on top of it. If you are working in colored pencil, Prismacolor’s Verithin or a similar hard-lead line works well for keeping edges controlled while you build up soft layers underneath with a standard soft-core pencil. Leave the brightest highlight area from your pencil stage completely uncolored, or barely touched — that untouched white or paper tone is doing more to sell translucency than any color you could add there.
bio-luminescent glow technique
For the glow effect specifically, work from the outside in rather than the inside out. Lay a soft ring of color (cyan, teal, or violet, depending on the mood you are after) just outside the bell’s actual edge, fading to nothing a short distance out. This is the same principle as painting a light source: the glow lives around the object, not just on it.
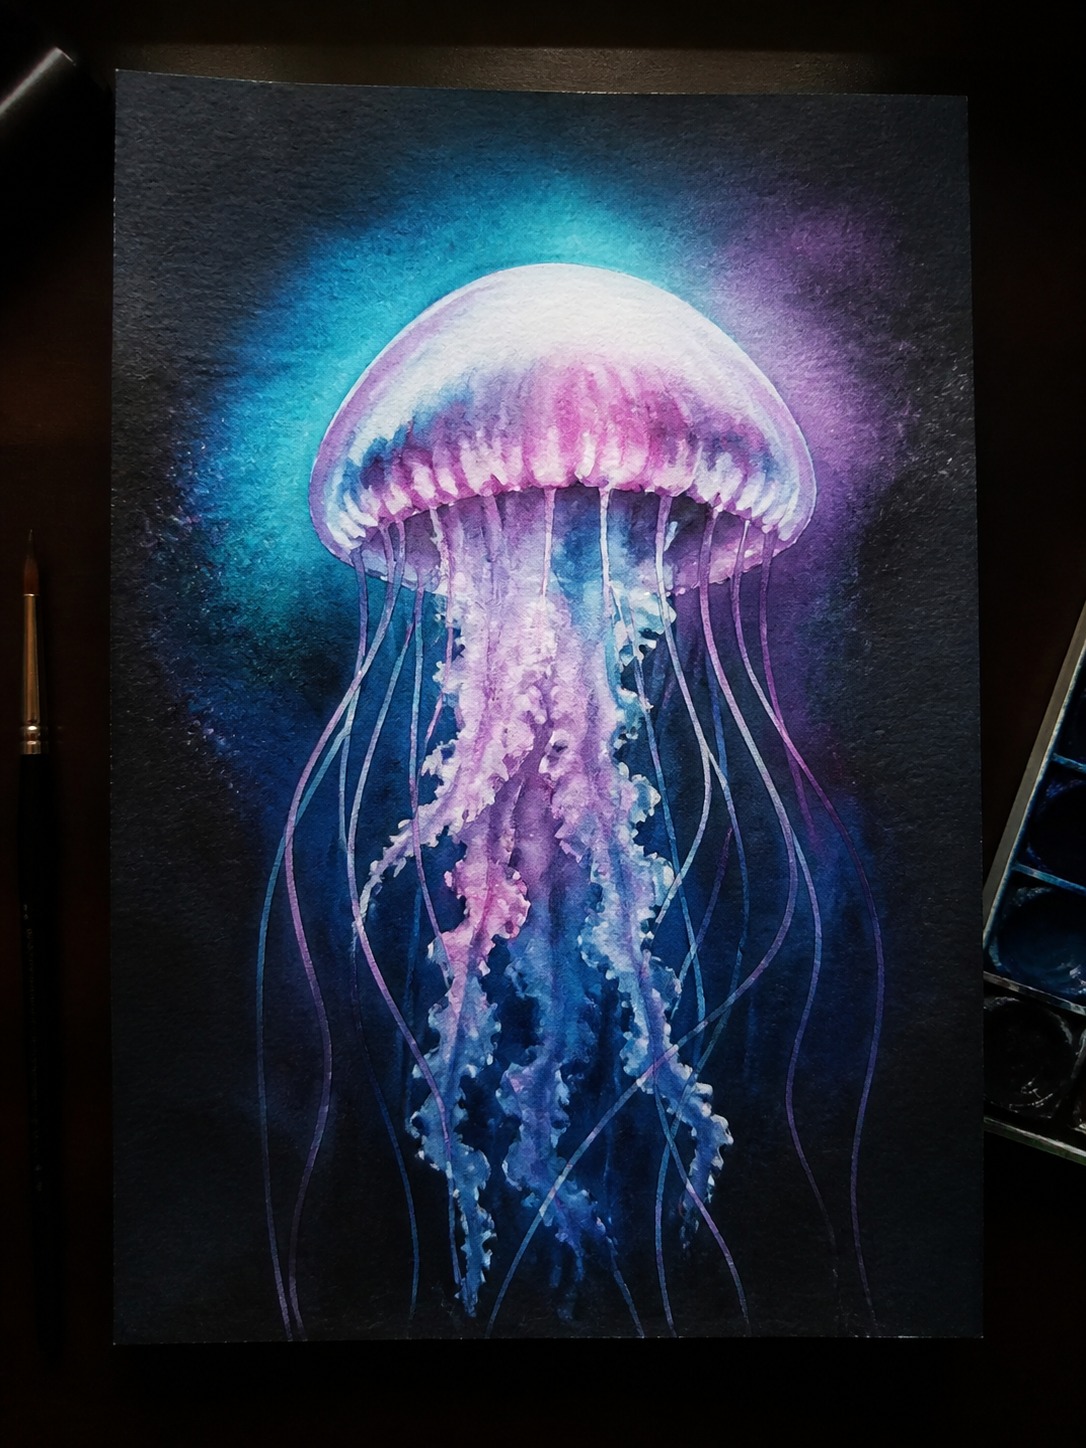
If you are working digitally, a soft round brush at low opacity, set to a “screen” or “glow” blend mode in Procreate or Photoshop, gets you there in two or three passes. If you are working traditionally, a slightly damp blending stump dragged just past the pencil or colored-pencil edge creates a similar soft falloff. Either way, resist the urge to make the glow too bright or too wide — a glow that overwhelms the actual subject reads as a lighting effect slapped on top, not something coming from the animal itself.
That covers both structure and color. Before you commit to a final piece, here is where almost every version of this drawing — easy or realistic — quietly goes wrong.
Common mistakes to avoid
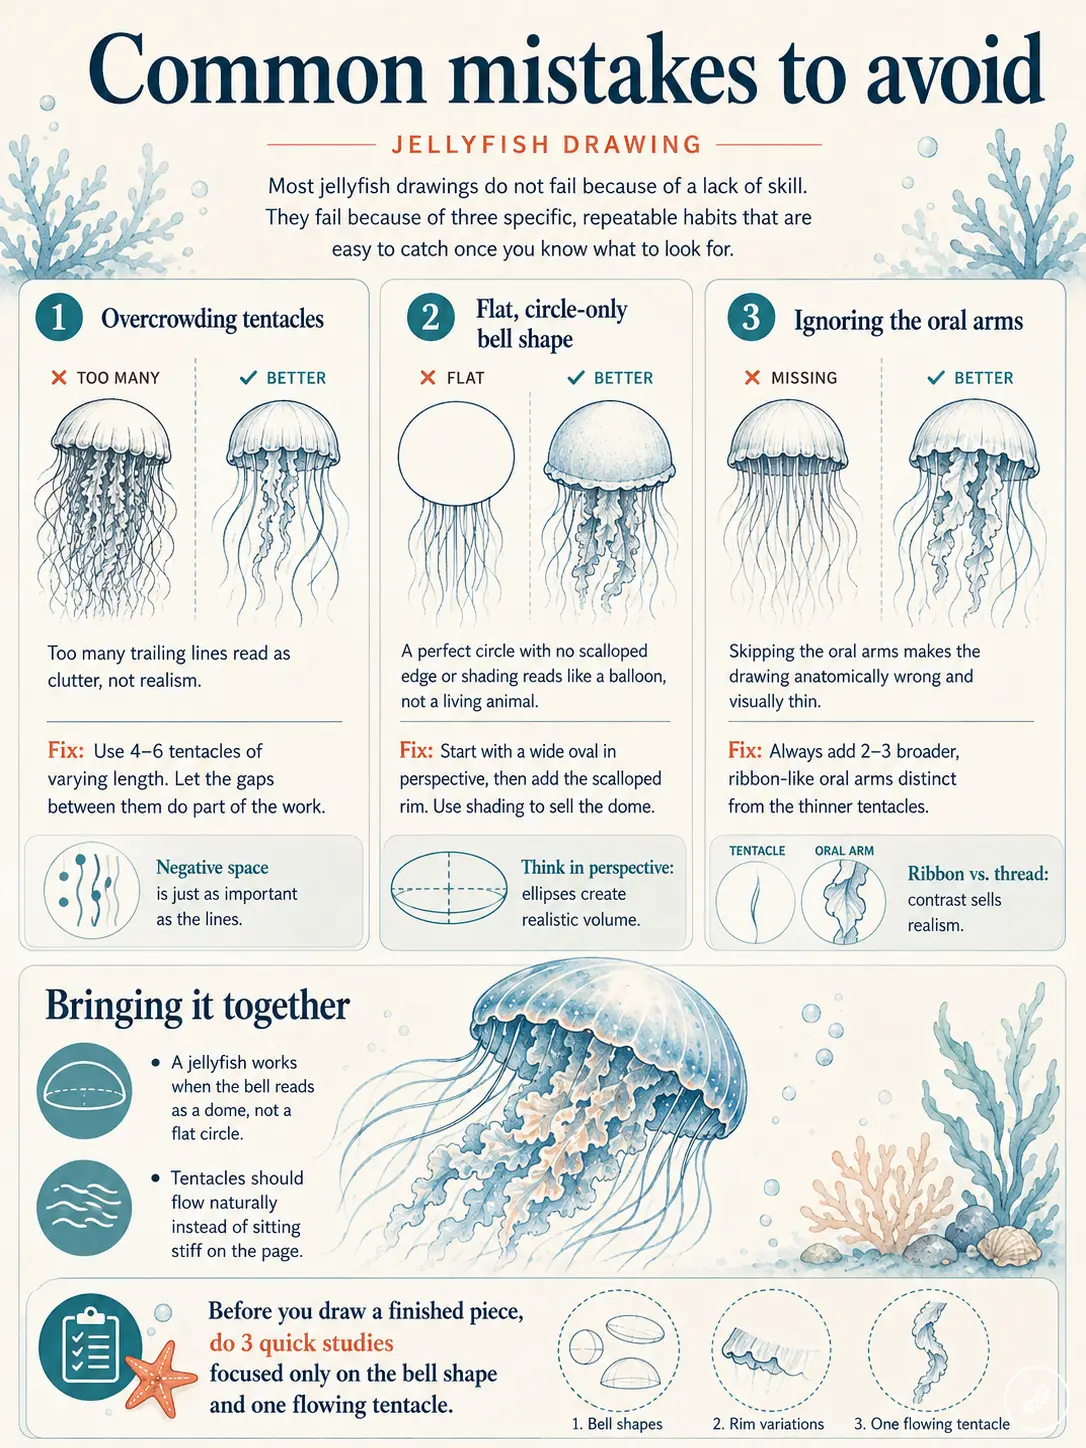
Most jellyfish drawings do not fail because of a lack of skill. They fail because of three specific, repeatable habits, all of which are easy to catch once you know to look for them.
Overcrowding tentacles
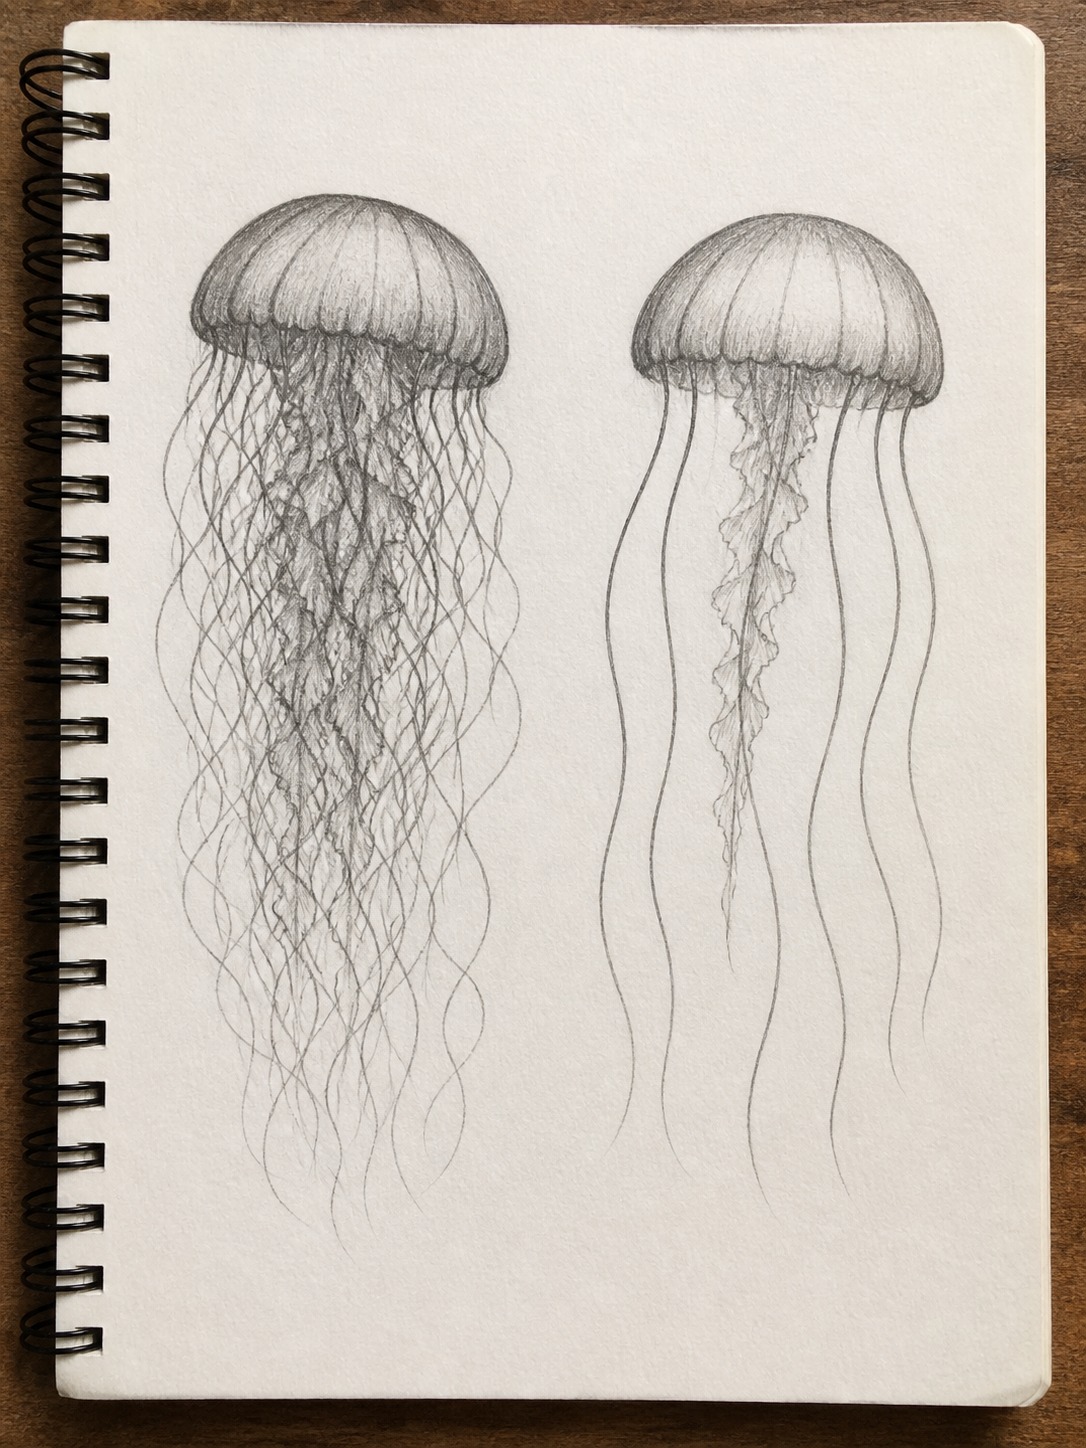
More tentacles does not read as more realistic. It reads as busy. Once you pass six or seven trailing lines, the eye stops tracking individual tentacles and starts seeing clutter instead, which actually undercuts the delicate, flowing quality you are going for.
Fix: Four to six tentacles of varying length is plenty for either the easy or realistic version. Let negative space do some of the work — the gaps between tentacles are part of the drawing too.
Flat, circle-only bell shape
This is the mistake covered back in the anatomy section, but it is worth repeating here because it is the single most common issue across every skill level, not just beginners. A perfectly round bell with no scalloped edge and no shading variation reads as a balloon, not a living animal.
Fix: Commit to the oval-in-perspective shape from the start, and if you are doing the realistic version, do not skip the shading step even if it feels like extra work. The shading is what actually sells the three-dimensional form.
Ignoring the oral arms entirely
A huge number of tutorials draw tentacles straight from the bell’s rim and skip the oral arms completely, which technically makes the drawing anatomically wrong and visually thinner than it needs to be. The oral arms add visual weight and variety right at the center of the piece, where the eye naturally goes first.
Fix: Always include two or three broader, ribbon-like oral arms distinct from the thinner tentacles, even in the simplest cute version. It is one extra shape that adds real visual interest for very little added difficulty.
Bringing it together
A jellyfish drawing comes down to two things: a bell that reads as a dome instead of a flat circle, and tentacles that flow instead of sitting stiff on the page. Everything else, whether you are going cute and simple or fully realistic, builds on those two decisions.
Do not try to nail the final piece on your first attempt. Do three quick studies first, focused only on getting the bell shape and one flowing tentacle right, before you commit to a finished drawing with color and detail.
Frequently Asked Questions
What shapes make up a jellyfish drawing?
Five basic shapes: a wide oval for the bell (not a circle — it needs to read as a dome), a scalloped bottom edge, two to three broader oral arms near the center, and four to six thinner tentacles around the rim. Getting the oval-in-perspective bell right does more for realism than any other single shape.
How do you draw a jellyfish easy for beginners?
Start with a wide oval bell, add a scalloped bottom edge instead of closing it into a flat shape, then add two or three wavy oral arms and four to six thin, unevenly spaced tentacles. No shading required. Add simple dot eyes and a curved mouth if you want a cute, kawaii-style version.
How do you draw a realistic jellyfish?
Build the same oval bell, but add faint construction lines like umbrella ribs to track the curve, then shade with soft, broken edges rather than a hard outline. Place a highlight near the top, a core shadow band about a third of the way down, and reflected light along the bottom edge, following basic dome-shading logic.
How many tentacles should a jellyfish drawing have?
Four to six is the sweet spot for either style. More than six or seven tends to read as cluttered rather than realistic, since the eye stops tracking individual tentacles once there are too many competing lines.
What is the best way to color a jellyfish drawing?
Layer a light base tone first, then build up a slightly deeper version of the same hue only in the areas you shaded darker in pencil. Leave the brightest highlight area untouched or barely colored. For a glow effect, add a soft ring of color just outside the bell’s edge rather than inside it.
What is the most common mistake people make drawing jellyfish?
Drawing tentacles as straight, evenly-weighted lines. Real tentacles taper, overlap, and curve in slightly different directions. That single fix, tapering the line and varying the curve, does more for a jellyfish drawing than almost any other technique in this guide.
- 1.0Kshares
- Facebook0
- Pinterest1.0K
- Twitter3
- Reddit0