Drawing hands can be a challenging task for artists of all levels. Hands are complex structures with intricate details and movements that can be difficult to capture accurately on paper. However, mastering the art of drawing hands is an essential skill for any artist who wants to create realistic and expressive figures.
One of the keys to drawing hands successfully is to understand their anatomy. Hands are made up of bones, muscles, tendons, and ligaments that work together to create a wide range of movements and gestures. By studying the structure of hands and how they move, artists can learn to draw them more realistically and convincingly.
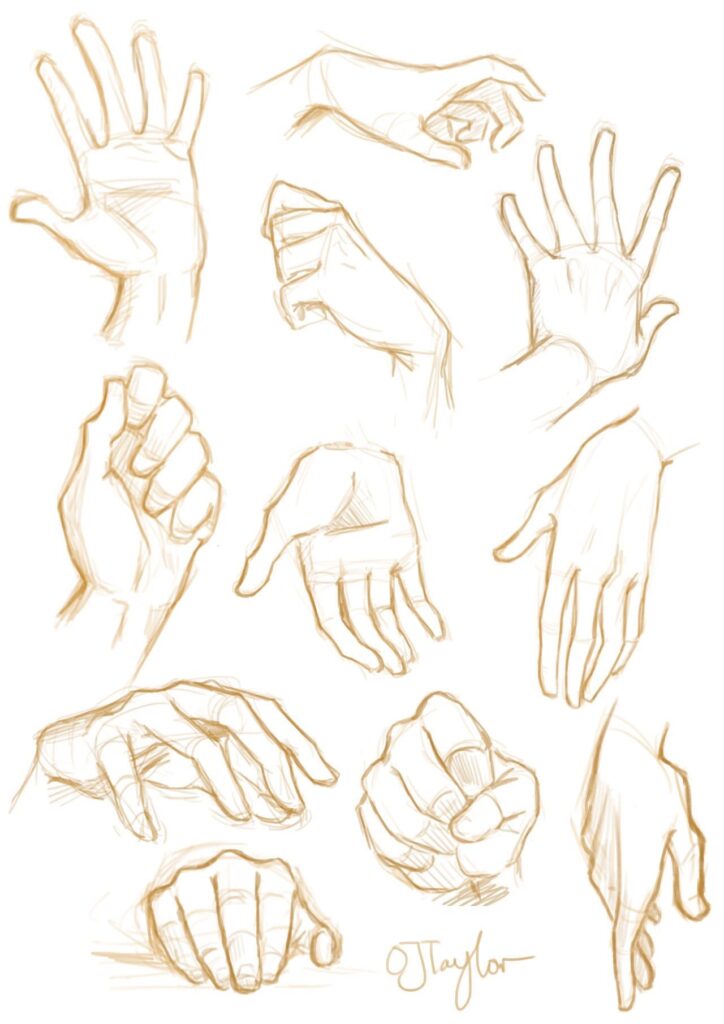
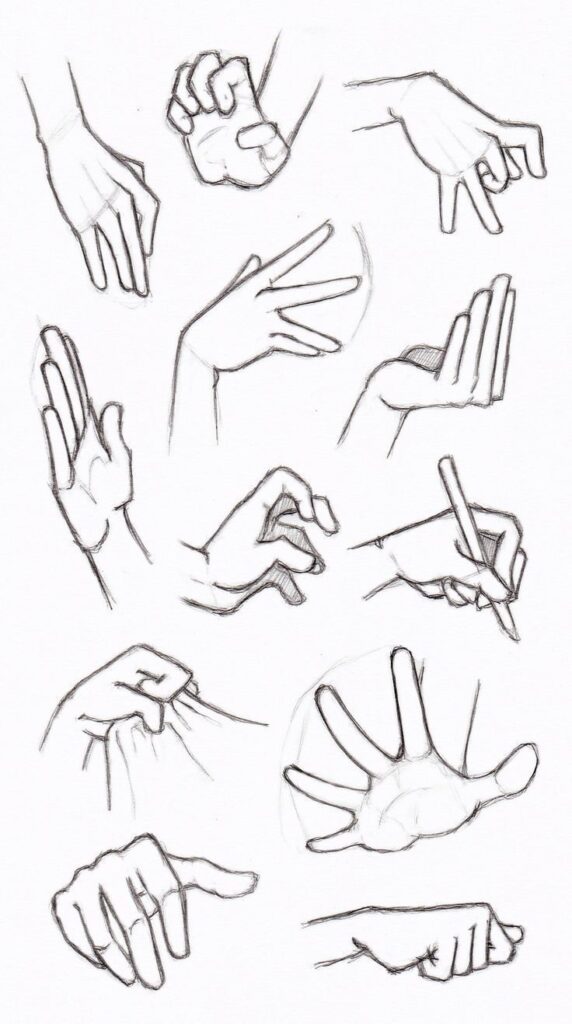
Another important aspect of drawing hands is paying attention to the details. Hands are full of subtle nuances, such as wrinkles, creases, and veins, that can add depth and texture to a drawing. By observing and replicating these details, artists can create more lifelike and dynamic hand drawings.
Fundamentals of Drawing Hands
When it comes to drawing hands, it is important to understand the basic fundamentals. This section will cover the anatomy of the hand, proportions and measurements, as well as basic shapes and forms.
Anatomy of the Hand
The hand consists of many complex structures, including bones, muscles, tendons, and ligaments. In order to draw hands realistically, it is important to have a basic understanding of the anatomy. The hand is made up of three main parts: the palm, the fingers, and the thumb. The palm is the flat part of the hand that rests on a surface, while the fingers and thumb are the digits that allow for grasping and manipulation. Each finger has three phalanges (bones), while the thumb has two.
Proportions and Measurements
To draw hands accurately, it is important to understand the proportions and measurements of the hand. The length of the hand is roughly equal to the length of the face, from the hairline to the chin. The width of the hand is roughly equal to the width of the face at the level of the eyes. The fingers are generally about the same length as the palm, and the thumb is about half the length of the palm.
Basic Shapes and Forms
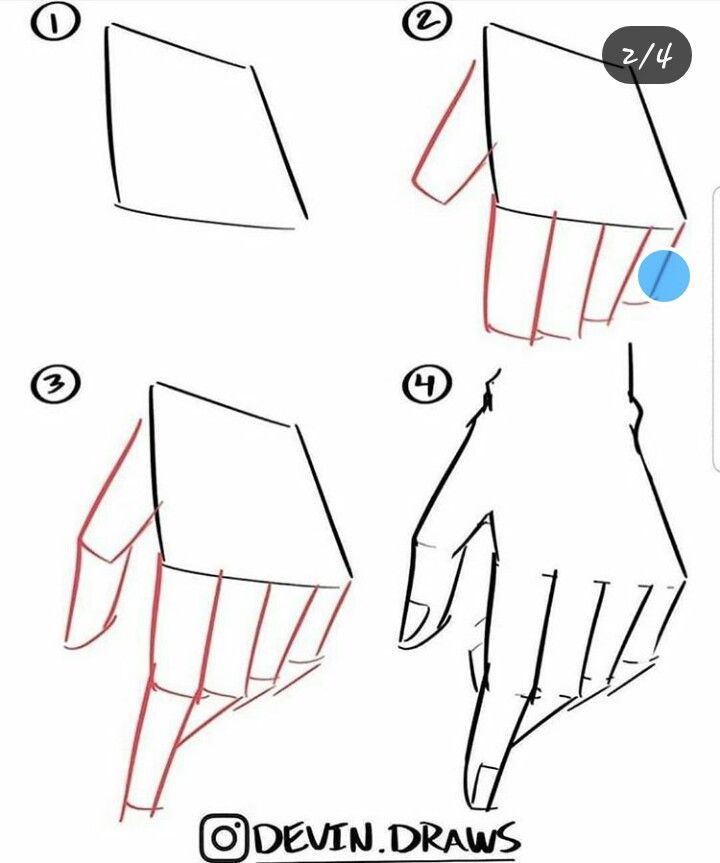
When drawing hands, it can be helpful to break them down into basic shapes and forms. The palm can be represented by a rectangle or oval shape, while the fingers and thumb can be represented by cylinders or cones. By breaking the hand down into these basic shapes, it can be easier to understand the overall structure and proportions.
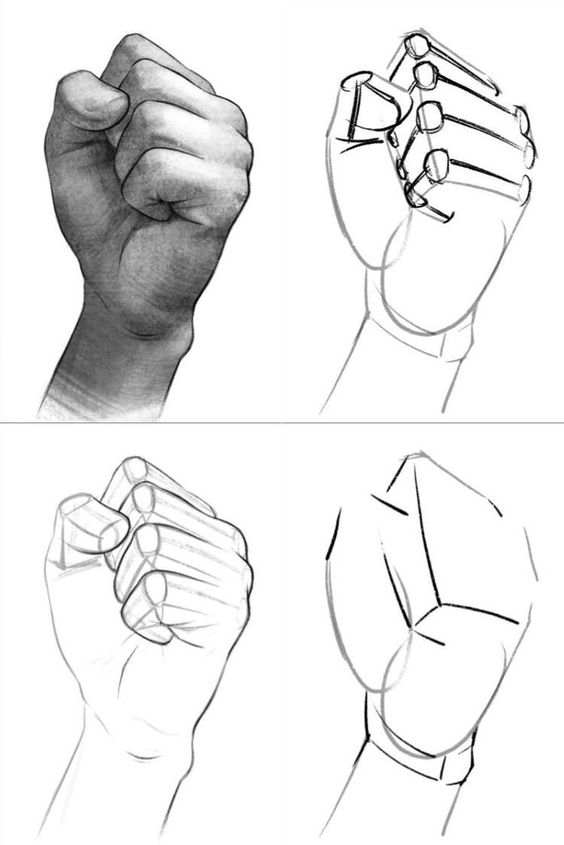
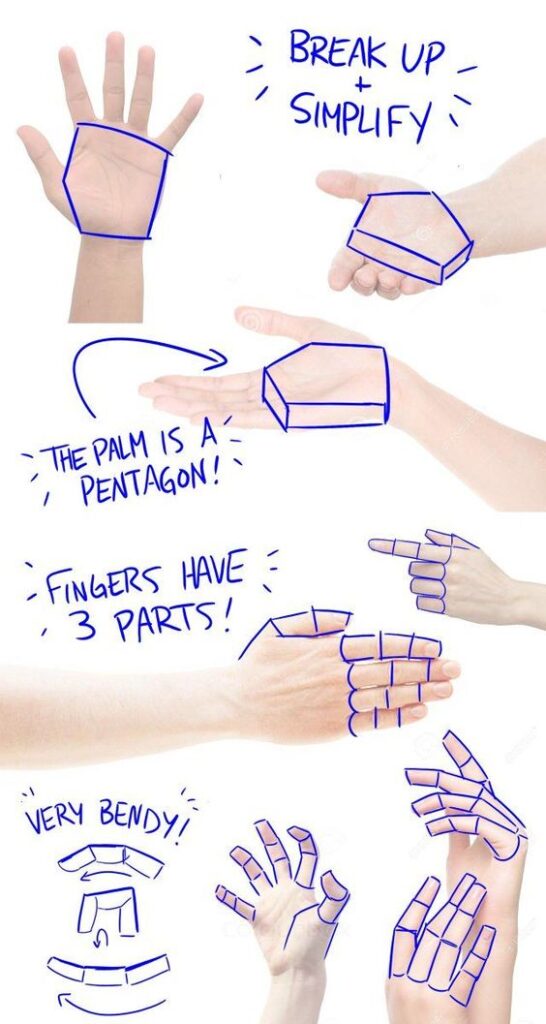
In conclusion, by understanding the anatomy of the hand, proportions and measurements, and basic shapes and forms, one can begin to draw hands more realistically. Practice and observation are also key factors in improving one’s ability to draw hands with accuracy and confidence.
Techniques and Approaches
Pencil Drawing Techniques
When it comes to drawing hands with a pencil, there are a few techniques that can help achieve realistic results. One approach is to start with basic shapes such as rectangles and triangles to block out the hand’s general shape and proportions. From there, the artist can refine the shapes and add details such as fingers, knuckles, and nails. Another technique is to use shading to create depth and texture, using a light touch for highlights and a heavier touch for shadows.
Inking Methods
Inking can be a great way to add bold lines and contrast to hand drawings. One approach is to use a dip pen or brush to create varied line weights, emphasizing the contours of the hand and adding texture to the skin. Another technique is to use cross-hatching to create shadows and depth, building up layers of lines to create a rich, textured effect.
Digital Drawing Approaches
Digital drawing tools offer a range of techniques for drawing hands. One approach is to use a pressure-sensitive stylus to create varied line weights and textures, simulating the effects of traditional drawing tools. Another technique is to use layers to build up the drawing, starting with a rough sketch and adding details on separate layers. Digital tools also offer the ability to easily adjust and refine the drawing, allowing the artist to experiment with different approaches and techniques.
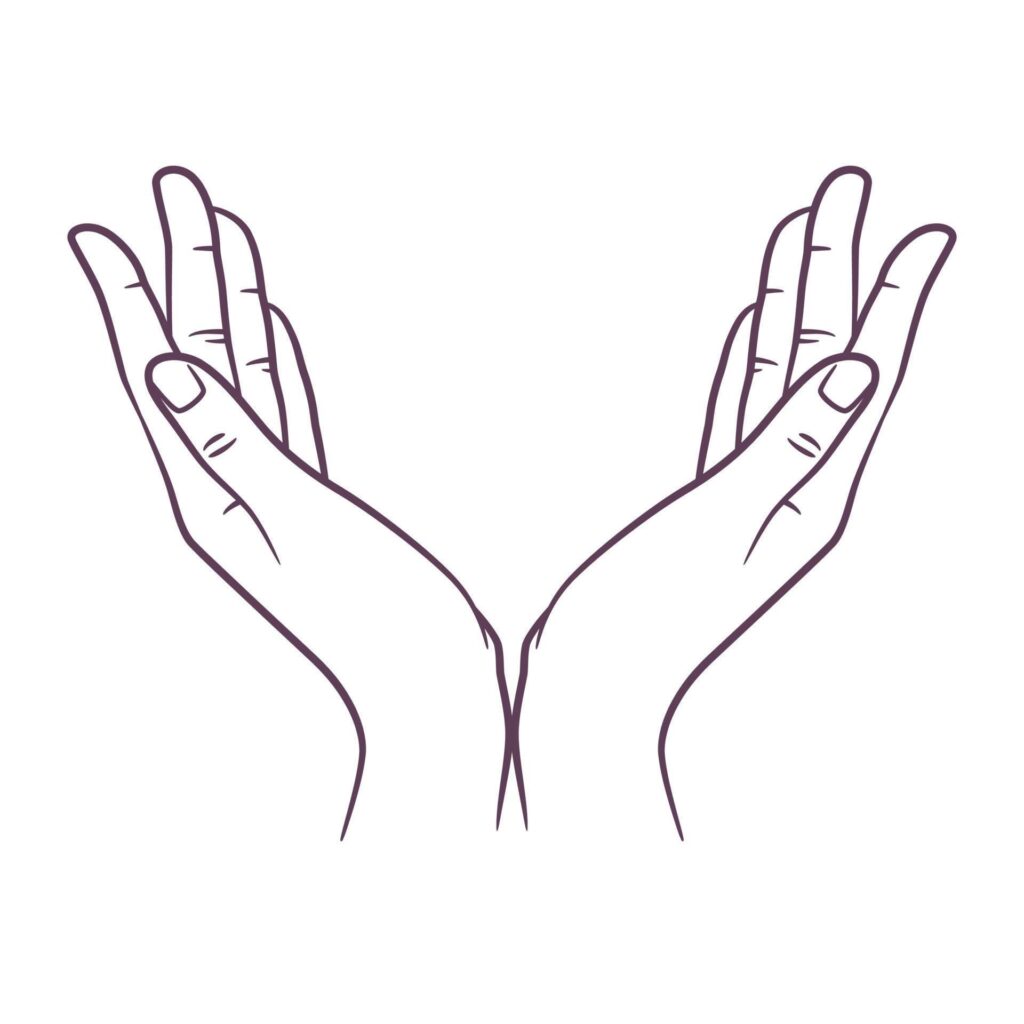
Overall, there are many techniques and approaches to drawing hands, each with its own strengths and challenges. With practice and experimentation, artists can develop their own style and approach to capturing the complexity and beauty of the human hand.
Hand Poses and Gestures
Static Poses
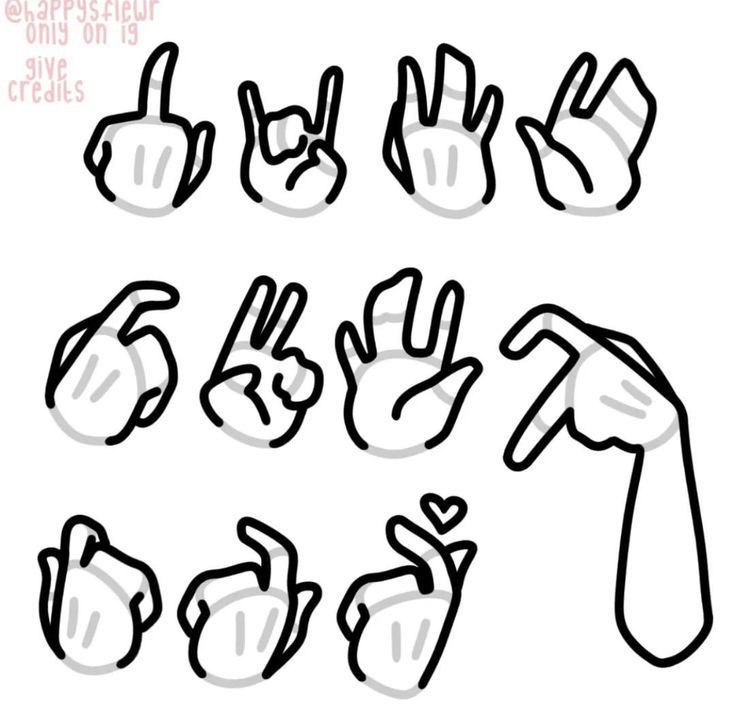
When drawing hands, it is important to understand the different static poses that hands can take. Static poses are those in which the hand is not in motion, but rather holding a certain position. Some common static poses include the open palm, closed fist, and pointing finger. It is important to observe the hand closely in order to capture the nuances of each pose accurately.

Dynamic Gestures
Dynamic gestures are those in which the hand is in motion, and they can add a lot of energy and movement to a drawing.
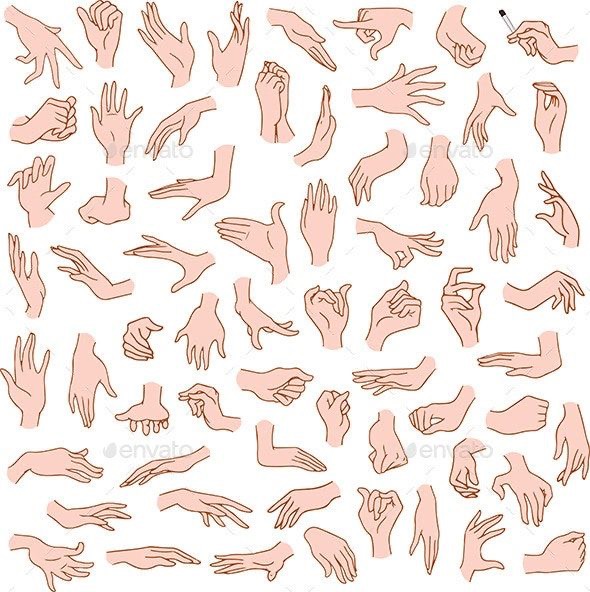
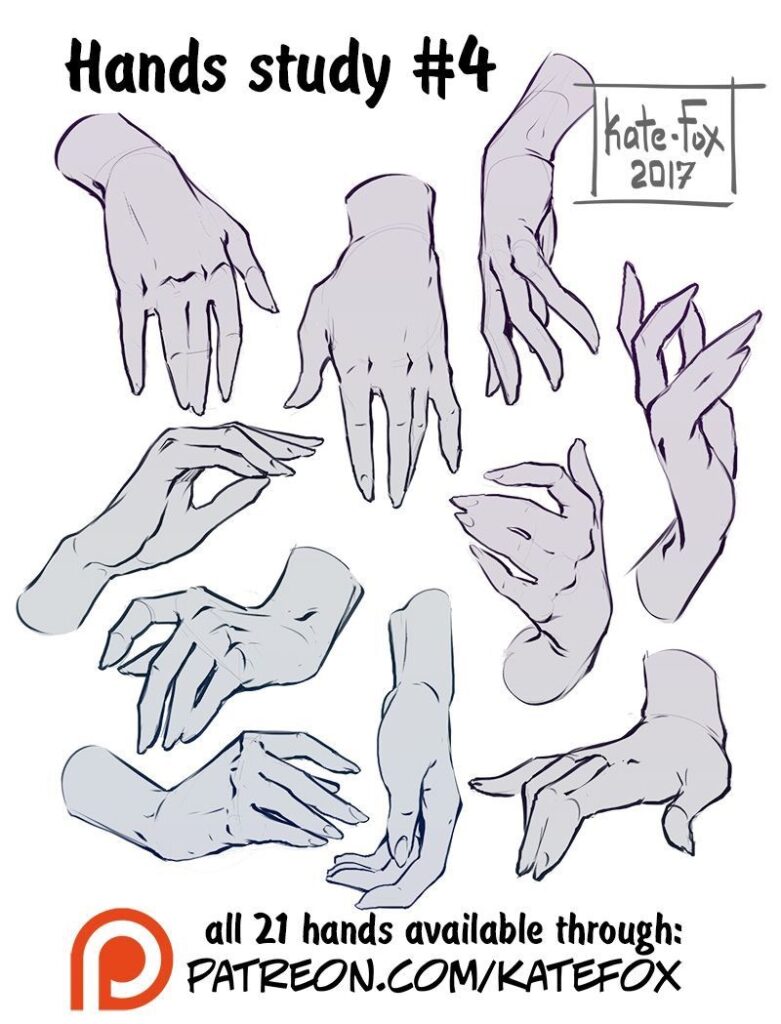
Some common dynamic gestures include waving, grabbing, and holding an object. It is important to pay attention to the direction and speed of the gesture in order to capture it accurately.
Expressive Hand Positions
Hand positions can also be used to convey emotion and expression in a drawing. For example, clenched fists can indicate anger or frustration, while open palms can indicate openness or vulnerability. It is important to consider the context of the drawing and the character’s personality when choosing expressive hand positions.
Overall, understanding the different hand poses and gestures is essential for creating realistic and expressive drawings. By observing and practicing these poses, artists can improve their ability to capture the complexity and beauty of the human hand.
Lighting and Shadows
Understanding Light Sources
When drawing hands, understanding the direction and intensity of light sources is crucial to creating realistic shadows and highlights.
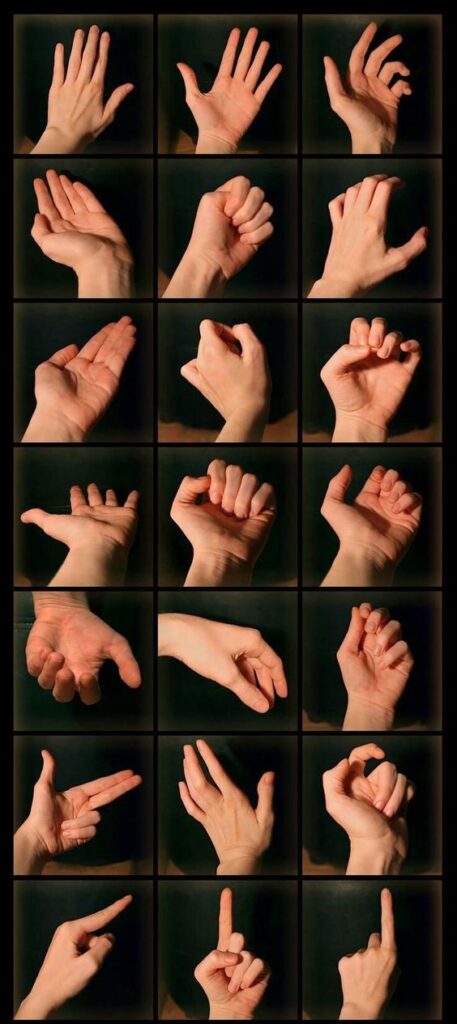
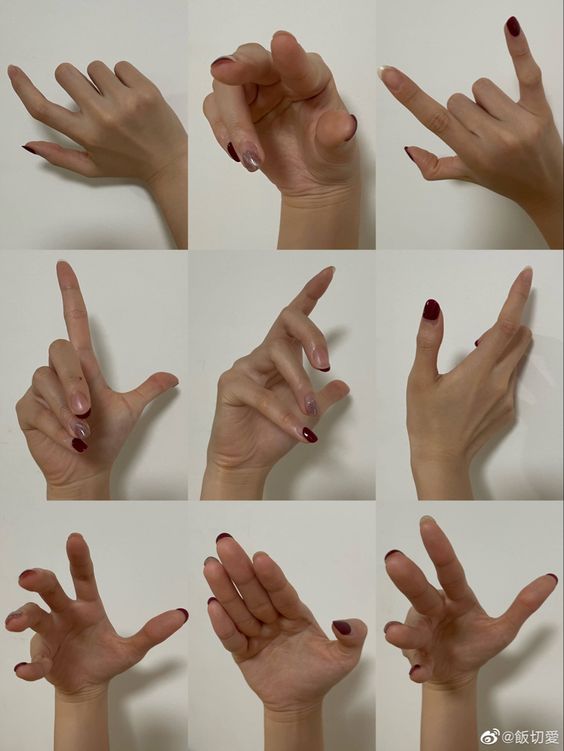
The position of the light source will determine where shadows fall and where highlights appear on the hand. For example, if the light source is coming from above, the tops of the fingers will be highlighted while the undersides will be in shadow.
Rendering Shadows
Shadows are an important part of creating depth and dimension in a drawing of a hand. When rendering shadows, it’s important to pay attention to the intensity and shape of the shadow. The intensity of the shadow will depend on the strength of the light source and the distance between the hand and the surface it’s resting on. Shadows can also be used to convey the texture of the surface the hand is resting on.
Depicting Depth and Volume
To create the illusion of depth and volume, it’s important to pay attention to how shadows and highlights interact with the contours of the hand. Shadows should follow the curves and contours of the hand, while highlights should be concentrated on the areas that are most prominent. By paying attention to the interplay of light and shadow, an artist can create a convincing sense of depth and volume in a drawing of a hand.
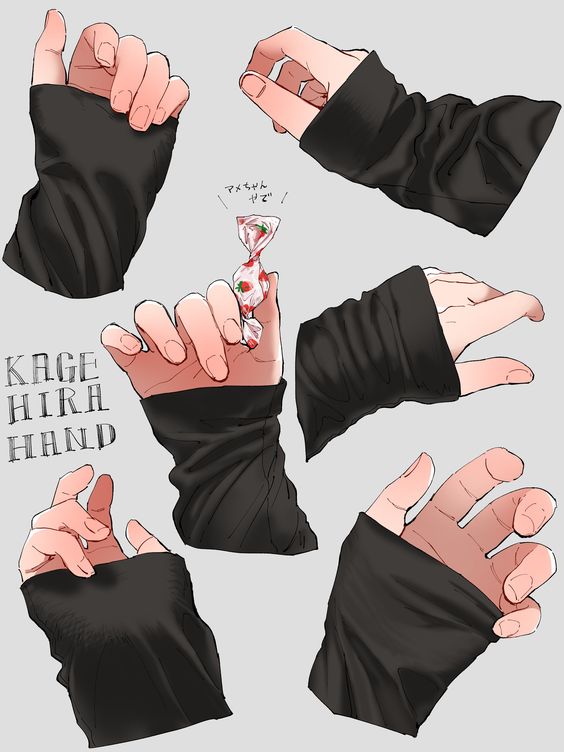
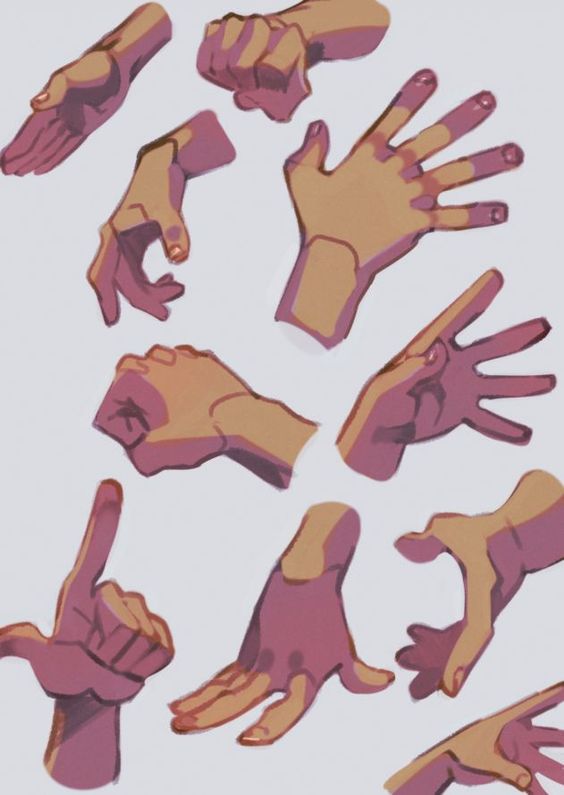
Overall, understanding how to use lighting and shadows is essential for creating realistic and dimensional drawings of hands. By paying attention to the direction and intensity of light sources, rendering shadows with care, and using highlights to create depth and volume, an artist can create convincing and engaging drawings of hands.
Details and Textures
When it comes to drawing hands, paying attention to the details and textures is crucial to make them look realistic. Here are some important aspects to consider:
Skin Texture
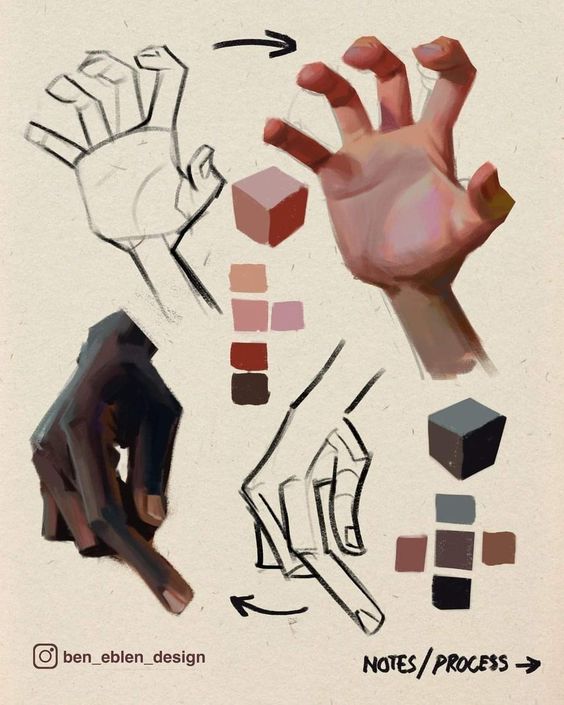
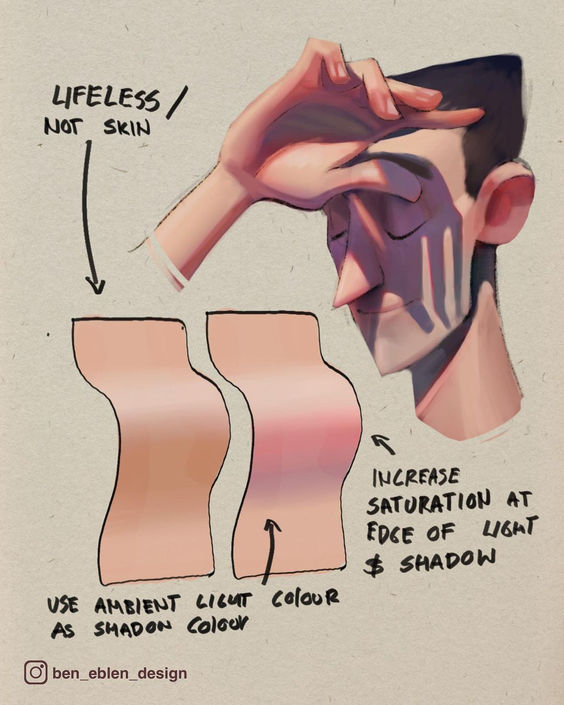
The skin on our hands is not smooth, but rather has a slightly bumpy texture. To convey this texture in your drawing, it can be helpful to use cross-hatching or stippling techniques. Additionally, the skin on the palms of our hands is thicker and has more creases than the skin on the backs of our hands, so keep this in mind when drawing.
Nails and Knuckles
The nails and knuckles are important details to include in your hand drawing. Nails have a distinct shape and texture, with ridges running vertically along the nail bed. Knuckles also have a unique shape and texture, with wrinkles and folds that indicate joint movement. Paying attention to these details will make your hand drawing look more realistic.
Veins and Wrinkles
Veins and wrinkles are also important details to consider when drawing hands. Veins are visible on the backs of our hands and fingers, and can be depicted with thin, curved lines. Wrinkles are most prominent on the palms of our hands and fingers, and can be depicted with short, curved lines. These details add depth and realism to your hand drawing.
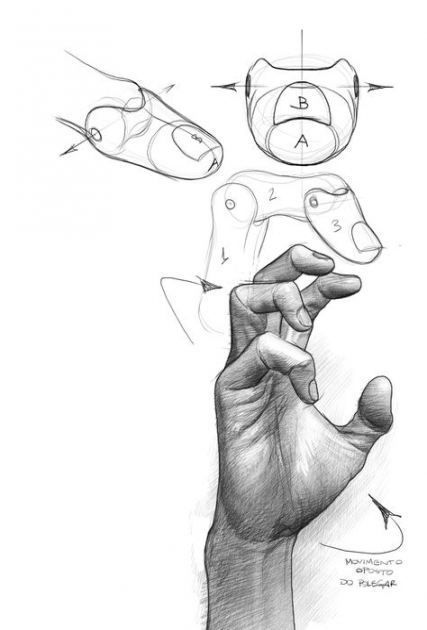
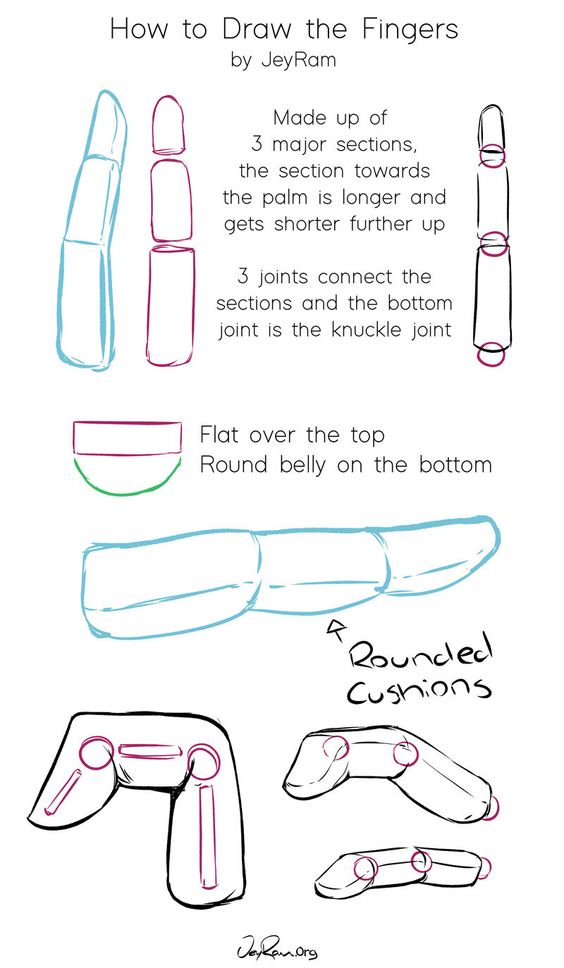
In summary, paying attention to the details and textures of hands is crucial in creating a realistic drawing. By using techniques such as cross-hatching and stippling, and including details such as nails, knuckles, veins, and wrinkles, you can elevate your hand drawing to the next level.
Common Challenges
Perspective Issues
One of the most common challenges when drawing hands is getting the perspective right. It’s important to remember that hands are not flat and have depth, so understanding how to convey that in a drawing is crucial. One way to approach this is to practice drawing hands from different angles and perspectives. This will help you develop a better sense of the hand’s structure and how it changes depending on the angle it’s viewed from.
Another helpful tip is to pay attention to the foreshortening of the fingers. When a finger is pointing towards the viewer, it will appear shorter than it actually is. This can be tricky to get right, but with practice, you’ll be able to accurately convey the foreshortening and perspective of the hand.
Symmetry and Balance
Another challenge when drawing hands is achieving symmetry and balance. It’s important to remember that hands are not perfectly symmetrical, and each hand has its own unique characteristics. However, it’s still important to strive for balance and symmetry in your drawings.
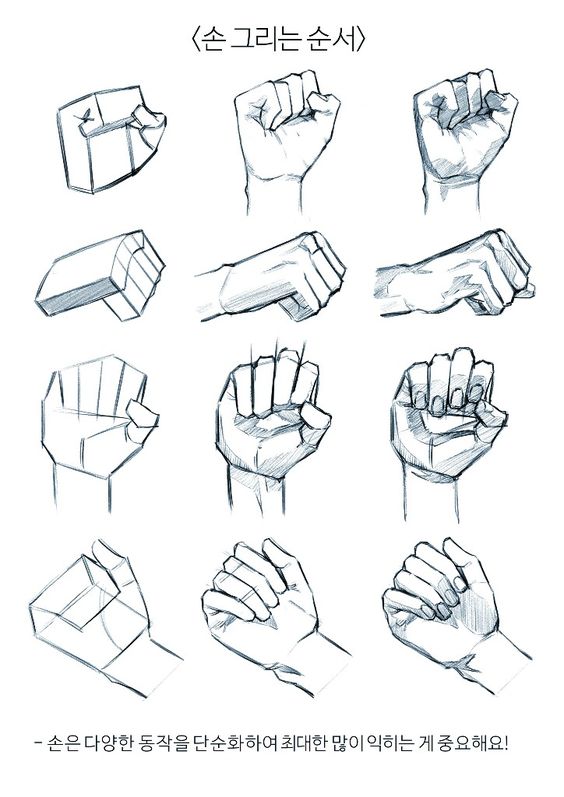
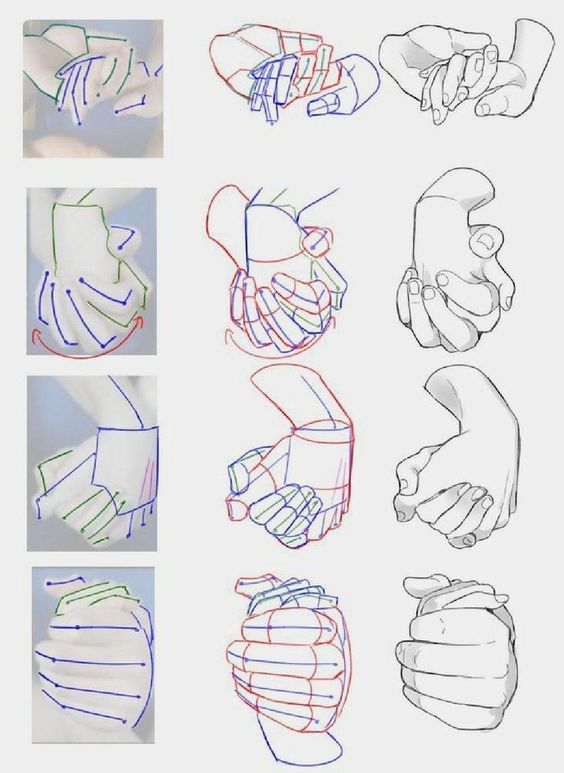
One way to achieve this is to pay attention to the placement of the fingers and the overall shape of the hand. Make sure that the fingers are evenly spaced and that the hand is not lopsided or uneven. It’s also important to pay attention to the proportions of the hand, making sure that it’s not too small or too large in relation to the rest of the body.
Complex Angles
Drawing hands from complex angles can be especially challenging. It’s important to remember that hands can contort into a variety of positions, and it’s up to the artist to accurately convey that in their drawing.
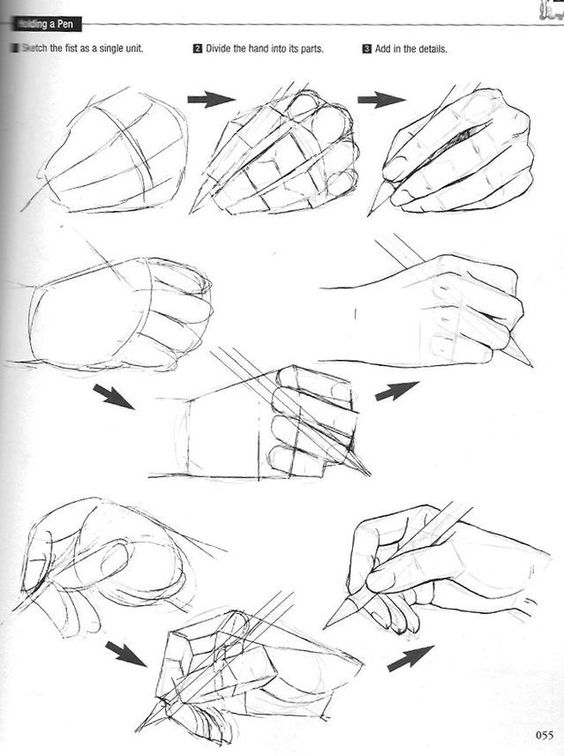
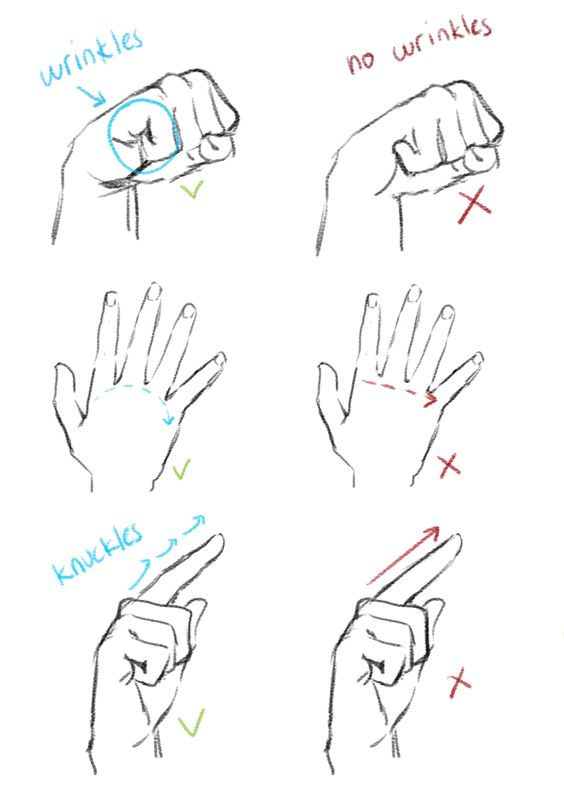
One way to approach this is to break down the hand into simpler shapes and then build it back up. For example, if you’re drawing a hand in a fist, you can start by drawing a simple rectangular shape for the palm and then add on the individual fingers. This can help you better understand the overall structure of the hand and how it changes depending on the angle it’s viewed from.
Overall, drawing hands can be a challenging but rewarding experience. By practicing and paying attention to the details, you can improve your skills and create more realistic and engaging drawings.
Practice and Improvement
Drawing hands can be a challenging task for many artists, but with practice, it can be mastered. Here are some tips to help improve your hand drawing skills.
Exercises and Drills
One of the best ways to improve your hand drawing skills is through regular practice. Start with simple exercises, such as drawing basic shapes and lines to get a feel for the movement of the hand. Gradually move on to more complex exercises, such as drawing hands in different positions and angles.
Another helpful drill is to draw hands from photographs or real-life models. This allows you to practice drawing hands in a more realistic and accurate way. You can also try drawing hands in different styles, such as cartoon or anime, to improve your versatility.
Reference Material Usage
Using reference materials can be incredibly helpful when practicing hand drawing. Look for photographs or images of hands in different positions and angles to help you understand the anatomy of the hand. You can also use books or online resources to learn more about the structure of the hand and how it moves.
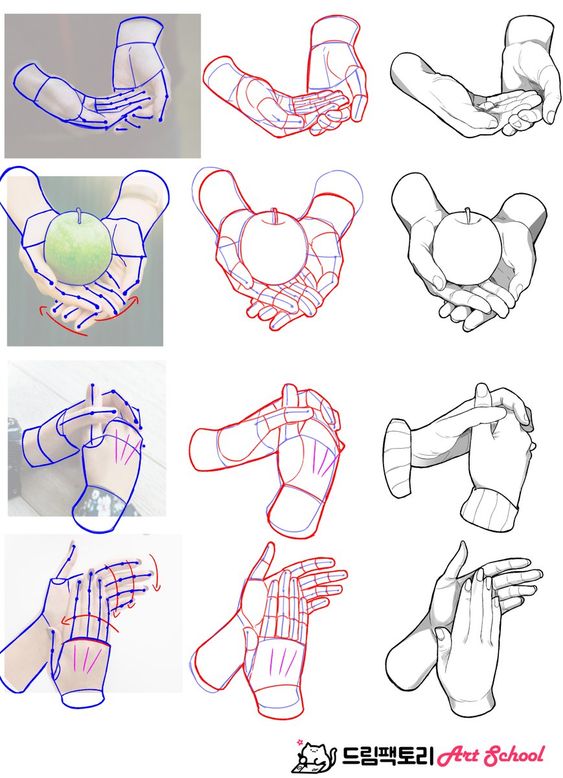
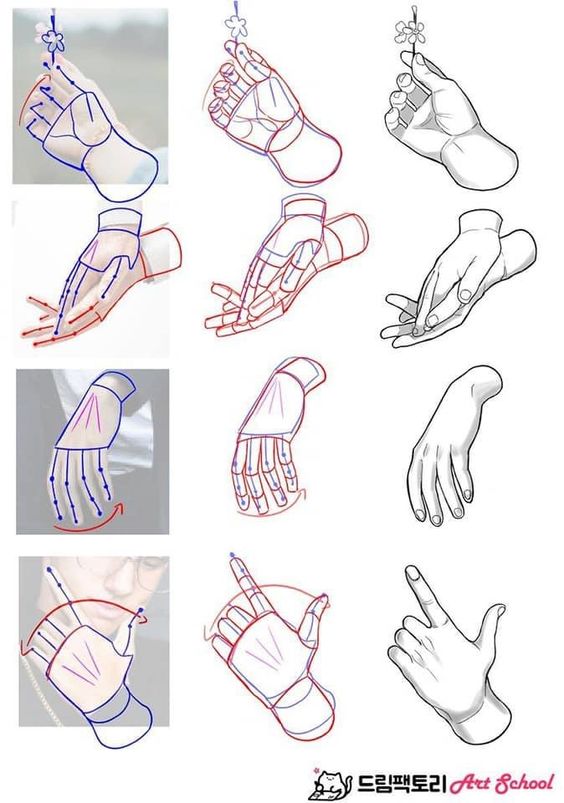
When using reference materials, it’s important to not simply copy the image. Instead, use it as a guide to help you draw the hand more accurately. Pay attention to the proportions and angles of the hand, as well as the position of the fingers and thumb.
Feedback and Critique
Getting feedback and critique from other artists can be a great way to improve your hand drawing skills. Join online communities or attend art classes to get feedback on your work. This can help you identify areas where you need to improve and provide you with helpful tips and techniques to help you get there.
When receiving feedback, it’s important to keep an open mind and be receptive to constructive criticism. Take the feedback as an opportunity to learn and grow, and use it to improve your skills.
By regularly practicing, using reference materials, and seeking feedback, you can improve your hand drawing skills and become a more versatile and skilled artist.
- 3.3Kshares
- Facebook0
- Pinterest3.3K
- Twitter0
