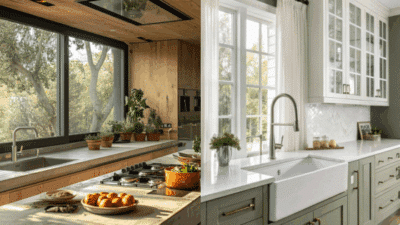
Integrated kitchen appliances can make an apartment kitchen feel like part of the living room. Matching fronts conceal the refrigerator and dishwasher, while cabinet lines continue across the room. The useful test is the view from the sofa: which finishes and handles interrupt the joinery?
- Why integrated kitchen appliances matter in apartments
- Built-in appliances and open-plan living
- Panel-ready appliances for visual continuity
- Kitchen appliance placement in small spaces
- Appliance garages for countertop clutter
- Designing access for future maintenance
- Where replacement parts fit into a repair-friendly kitchen plan
- Ten kitchen styles with integrated appliances
- Frequently asked questions
- What's the difference between built-in and integrated appliances?
- Are panel-ready appliances more expensive than standard ones?
- How much clearance do integrated appliances need for repairs?
- Can I retrofit panel-ready appliances into an existing kitchen?
- What's the point of an appliance garage if I have enough counter space?
- Do integrated appliances cost more to repair than standard ones?
A calm kitchen still needs to work well behind those panels. Plan for cleaning, ventilation, door movement and future repairs before ordering cabinetry. Ovens and microwaves need their specified installation openings and exposed operating fronts; matching panels belong on appliances designed to accept them.
Why integrated kitchen appliances matter in apartments
A stainless fridge, black oven and white dishwasher introduce several different finishes into a small room. Panel-ready refrigeration and dishwashers reduce those interruptions. A built-in oven can sit neatly within the cabinet run, but built-in alone does not mean hidden.
This matters most when the kitchen shares a room with the sofa or dining table. Matching the cabinet fronts can make those areas feel more connected, even though the floor area stays the same. In a separate kitchen, that visual continuity may matter less.

Built-in appliances and open-plan living
Open-plan living keeps the kitchen in view throughout the day. Integrating the fridge and dishwasher gives the largest appliance fronts the same finish as the surrounding cabinets. Keep the oven’s glass and controls visible, and choose a position that fits both the cooking routine and the room’s main sightlines.
Start with a simple elevation sketch viewed from the living area. Align panel edges with adjacent cupboards, then check what happens when each door opens. A tidy closed elevation is only useful if the fridge, drawers and dishwasher can open without colliding.

Panel-ready appliances for visual continuity
Panel-ready appliances are designed to accept a compatible decorative cabinet front. Your cabinetmaker supplies a panel that matches the surrounding wood, paint and hardware. This is a feature of the appliance itself; attaching a wood panel to a standard refrigerator is not an equivalent retrofit.
Compare the complete installed price: appliance, custom panels, handles and fitting. That total can be higher than a conventional installation, although the appliance alone is not always more expensive. Spend where the matching finish makes a visible difference from the living room.
Panel dimensions, weight limits and hinge arrangements vary by model. Give the cabinetmaker the exact installation drawings before ordering the fronts. For example, Sub-Zero’s panel-ready installation specifications identify model-specific panel and utility requirements. Use the equivalent documents for the appliances you choose.

Kitchen appliance placement in small spaces
In a small kitchen, place food storage, preparation, cooking and cleaning close enough for an easy sequence. A work triangle can help in an L-shaped or U-shaped room. In a single-wall kitchen, concentrate on a usable stretch of preparation counter between tasks.

A built-in oven and microwave column can free counter space, while a slim dishwasher beside the sink keeps loading convenient. Check installation approvals, usable appliance heights, door swings and nearby landing space before committing to the stack. A counter-depth fridge still needs its specified door and ventilation clearances.
Keep the dishwasher close to the sink where the layout and plumbing allow. Draw its open door on the floor plan: it should not trap the person at the sink or block the only route through the kitchen.

Appliance garages for countertop clutter
An appliance garage is a cabinet that stores countertop appliances behind a tambour, hinged or pocket door. It can hide a coffee maker, toaster or blender while keeping them within reach. The cabinet still occupies counter space, so leave enough open worktop for food preparation.
For an apartment, the benefit is a simpler view from the living room and a regular home for small appliances. Plan the door so it clears the worktop and nearby cupboards, and check that each appliance can be lifted or moved out easily.
Treat the garage as storage for hot appliances. Move a toaster or coffee machine to a suitable open surface for use, following its manual, and let it cool before putting it away. A vented door or small rear gap is not a substitute for operating clearance: Breville’s espresso machine instructions, for example, prohibit operation inside a cupboard.

Designing access for future maintenance
A clean cabinet front should not make basic maintenance difficult. Keep a record of model and serial numbers, save the installation manuals, and ask how filters, service panels and utility connections will be reached after fitting.
Follow the appliance manufacturer’s specified opening, ventilation, anchoring and service requirements. Ask the installer to explain how the appliance can be removed without damaging the joinery. Space in front, removable trim and accessible connections can matter as much as the cabinet opening itself.
If a refrigerator stops cooling, having the model information ready helps you describe the fault and find the right documentation. Photograph the original identification label during installation; keep the label intact in its factory location.

Where replacement parts fit into a repair-friendly kitchen plan
When a part needs replacing, start with the exact model number and confirm the component against the manufacturer’s documentation. Repair Clinic provides a place to look up appliance parts using that information. Check compatibility before ordering; a similar-looking component may belong to a different model.
A repair-friendly kitchen keeps the same continuous fronts while giving the installer a practical route to the equipment behind them. Before signing off, check both drawings: the closed cabinet elevation and the plan with appliance doors fully open.
Ten kitchen styles with integrated appliances
These illustrated concepts show how panel finishes and layouts can work together. Use them for visual direction, then develop a measured plan around the exact appliances and the room’s clearances.
1. Scandinavian minimalist
Pale oak panels, fully integrated fridge and dishwasher, single-wall galley layout.

2. Industrial loft
Matte black panel-ready appliances against exposed brick, open one-wall kitchen.

3. Japandi small studio
Warm wood fronts, appliance garage for countertop tools, L-shaped compact layout.

4. Mid-century modern
Walnut veneer panels, a built-in wall-oven stack and a U-shaped layout with a peninsula. Keep refrigerator and dishwasher panels aligned with the adjoining doors.

5. Contemporary monochrome
Matte white fronts and a parallel galley layout. Specify compatible opening systems for panel-ready appliances; ordinary push latches are not suitable for every model.

6. Coastal apartment
Light cabinetry with integrated fridge, appliance garage tucked by the window, single-wall.

7. Urban compact one-bedroom
Stacked integrated oven and microwave, slim dishwasher, narrow L-shape.

8. Warm minimalism
Textured oak panels, concealed small-appliance storage and an open-plan island. Store appliances in the island cabinet, then move them to a suitable worktop for use.

9. Dark academia kitchen
Deep green panel fronts, integrated fridge and freezer columns, U-shaped with peninsula.

10. Micro-apartment efficiency
Fully panel-ready compact appliances, appliance garage over counter run, single-wall with fold-down extension.

Frequently asked questions
What’s the difference between built-in and integrated appliances?
Built-in means an appliance fits into cabinetry rather than standing separately. A fully integrated panel-ready refrigerator or dishwasher accepts a matching cabinet front. Built-in ovens and microwaves generally retain their own visible glass and metal fronts.
Are panel-ready appliances more expensive than standard ones?
The complete installation can cost more once you include custom panels, handles and fitting. The panel-ready appliance itself is not always dearer than a comparable finished model, so compare complete quotes rather than appliance prices alone.
How much clearance do integrated appliances need for repairs?
There is no universal clearance. Follow the exact model’s installation guide for the cabinet opening, ventilation, door swing and anchoring, and have the installer confirm a workable removal route and accessible connections.
Can I retrofit panel-ready appliances into an existing kitchen?
Sometimes. The opening, utilities, ventilation and door clearances must suit the new appliance, and the panel must meet its size and weight limits. A standard appliance cannot usually be made panel-ready simply by adding a decorative front.
What’s the point of an appliance garage if I have enough counter space?
Even with adequate space, an appliance garage reduces visual clutter, which matters more in open-plan apartments where the kitchen is always in view from the living area.
Do integrated appliances cost more to repair than standard ones?
Repair costs depend on the model, fault, parts and local labor. Restricted access or panel removal can add time to a job. Planning service access can reduce that difficulty, but it cannot guarantee the repair price.
- 63shares
- Facebook0
- Pinterest63
- Twitter0
- Reddit0