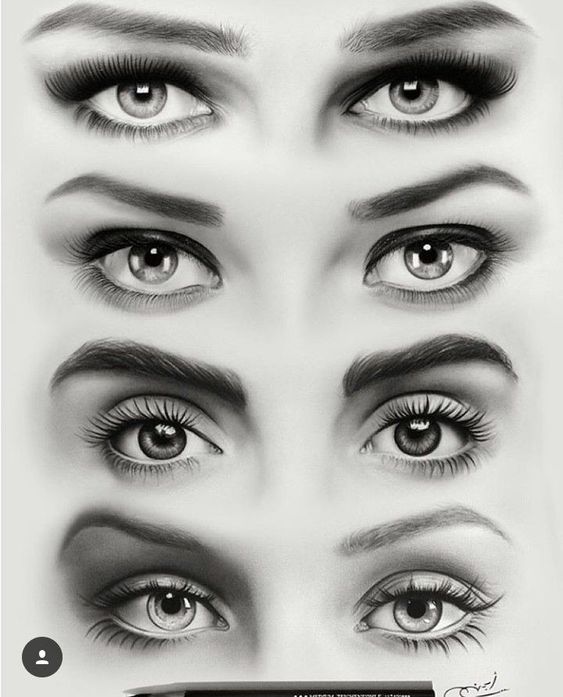
Eyeball drawing is a fun and rewarding art skill. Artists can bring characters to life by creating realistic and expressive eyes. Learning to draw eyes can greatly improve your portraits and figure drawings.
Drawing eyes takes practice, but anyone can learn with the right techniques. You’ll start with basic shapes and add details like the iris, pupil, and eyelashes. As you improve, you can capture emotions and personality through the eyes you draw.
Eye drawing isn’t just for serious artists. It’s a great hobby for anyone who likes to doodle or sketch. You can draw eyes in many styles, from cartoon to hyper-realistic.
Key Takeaways
- Eye drawing enhances portraits and figure art
- Basic shapes form the foundation for detailed eyes
- Regular practice leads to more expressive eye drawings
Getting Started with Eye Drawing
Eye drawing takes practice and the right approach. Learning eye anatomy and having proper materials are key first steps for beginners.
Understanding Eye Anatomy
The eye has several key parts to focus on when drawing. The iris is the colored part surrounding the pupil. The sclera is the white area. Eyelids frame the eye, with upper and lower lashes.
Light reflections in the eye add realism. The tear duct sits in the inner corner. Eyebrows help frame the overall eye area.
Study photos of eyes to see how shadows fall. Notice how the iris has depth and texture. Look at how eyelids curve and overlap. Paying attention to these details will improve your drawings.
Choosing the Right Drawing Materials
Pencils are great for eye drawings. A mechanical pencil works well for fine details. 6B and 4B pencils create darker shading.
Colored pencils add life to iris colors. A kneaded eraser helps lift graphite for highlights. Blending stumps smooth out shading.
Smooth paper works best for detailed eye drawings. Have a pencil sharpener handy to keep points fine. A small ruler can help with proportions.
Try different materials to see what you like best. Experiment with various pencil hardnesses. Test out blending techniques. Finding the right tools will make your eye drawings shine.
Basic Techniques
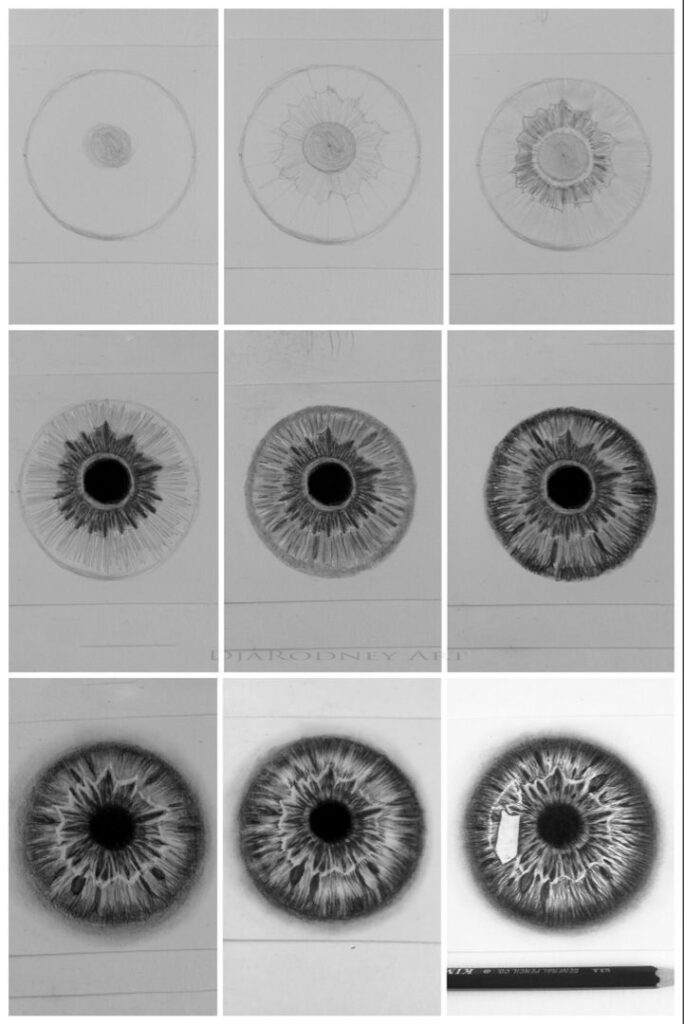
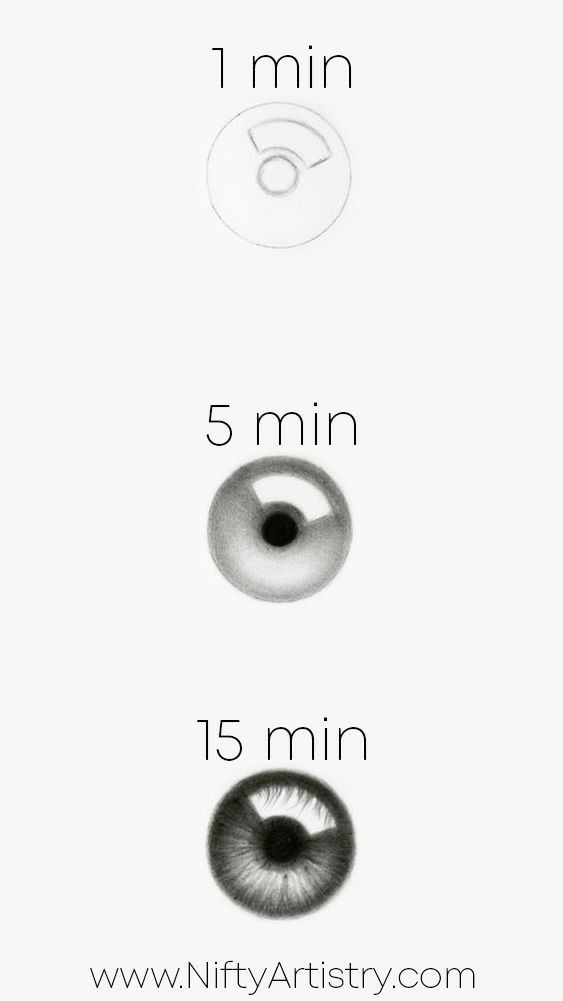
Drawing eyes takes practice and patience. These key techniques will help you create realistic and expressive eyeball drawings.
Sketching the Eye Shape
Start with light, loose lines to map out the eye shape. Draw an almond or oval form for the basic eye outline. Add curved lines for the upper and lower lids. Sketch the iris as a circle within the eye shape.
Make the pupil a smaller circle inside the iris. Don’t worry about perfect shapes yet. Focus on capturing the overall structure and proportions.
Use reference photos or a mirror to study real eyes. Notice how the upper lid often overlaps the iris slightly. The lower lid usually curves less dramatically than the upper lid.
Shading Fundamentals
Shading brings depth and dimension to eye drawings. Start with light, even shading across the entire eye area. Gradually build up darker tones in shadow areas.
The upper lid often casts a shadow on the eyeball. Darken this area to create depth. The iris has varying tones from light to dark. Shade it with circular strokes to match its round shape.
Leave bright spots for highlights on the iris and pupil. These white areas make the eye look moist and alive. Blend shading smoothly with a blending stump or soft pencil for realistic transitions.
Creating Textures and Highlights
Eyes have many subtle textures. Use fine lines to suggest eyelashes. Draw them curving outward from the lids. Add tiny lines in the iris to create its intricate pattern.
Highlights bring eyes to life. Leave small white spots on the iris and pupil. These bright points reflect light and make the eye look wet and shiny.
Use an eraser to lift out highlights after shading. Or leave white paper showing through as you shade around it. Blend the iris colors smoothly, but keep some texture visible.
Step-By-Step Guide
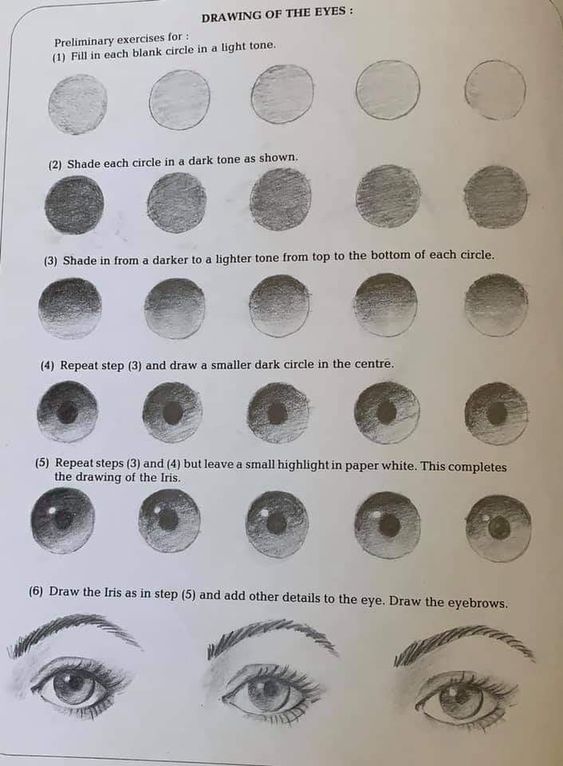
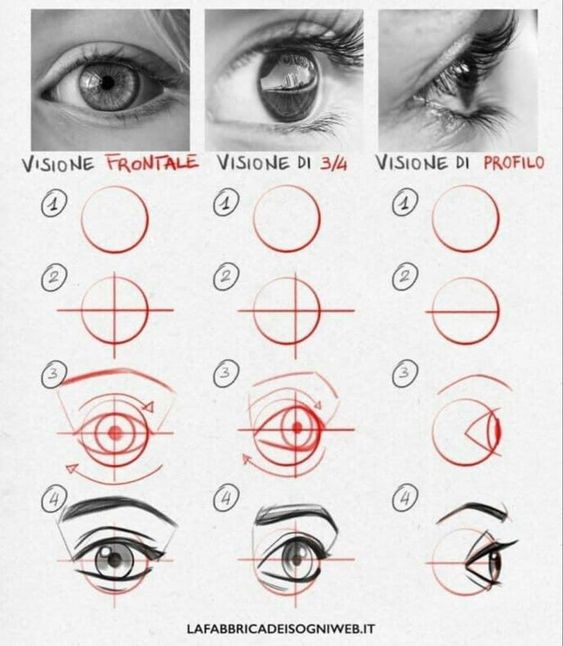
Drawing realistic eyeballs takes practice and attention to detail. This guide breaks down the process into manageable steps, helping artists create lifelike eyes in their artwork.
Drawing the Eye Outline
Start with a light pencil sketch of the eye shape. Draw an oval for the iris and a circle for the pupil inside. Add curved lines for the upper and lower eyelids. Make the upper lid slightly thicker than the lower one. Sketch in the tear duct at the inner corner. Draw light lines to show where the eyelashes will go.
Keep your lines soft and loose at first. You can darken and refine them later. Don’t worry about perfection – eyes come in many shapes and sizes.
Shading the Sclera and Iris
The sclera is the white part of the eye. It’s not pure white, so add soft shading to give it depth. Leave highlights where light hits the eye.
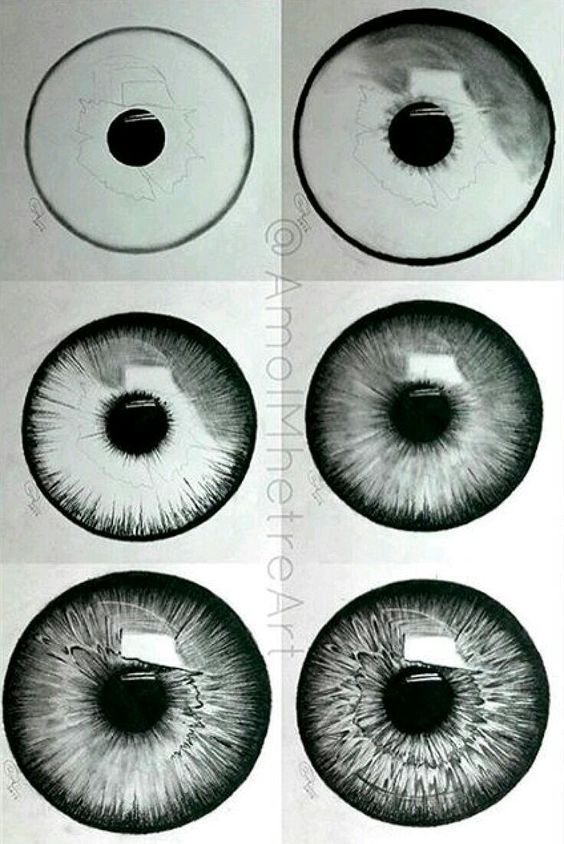
For the iris, start with a base color. Add darker shades around the edges and near the pupil. Use tiny strokes to create texture. Draw lines radiating from the pupil to mimic the iris pattern. Blend colors gently for a smooth look.
Shade the pupil darkly. Leave a tiny white spot for a catchlight to make the eye look alive.
Detailing the Eyelashes and Eyebrows
Eyelashes grow in small groups, not single hairs. Draw them in short, curved strokes. Make the upper lashes fuller and longer than the lower ones. Vary the length and direction for a natural look.
For eyebrows, use short, light strokes in the direction of hair growth. Start with the main shape, then add details. Make some hairs longer or shorter for texture. Don’t draw every hair – suggest the overall shape instead.
Adding Finishing Touches
Refine your initial lines, making them cleaner and more defined. Add shadows under the upper lid and in the corners of the eye. Darken the lash line to make the eye pop.
Draw fine blood vessels in the sclera for realism. Add a bit of shine to the lower lid. Blend all your shading for smooth transitions between light and dark areas.
Step back and look at your work. Make small tweaks until you’re happy with the result. Remember, practice makes perfect when drawing eyes!
Drawing Expressive Eyes
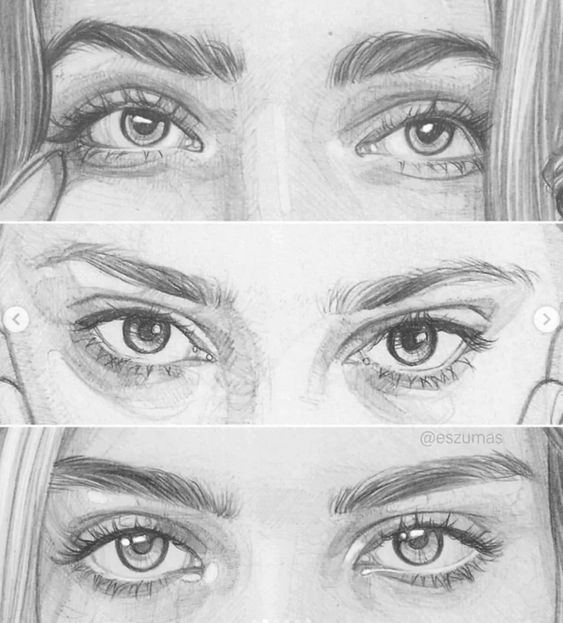
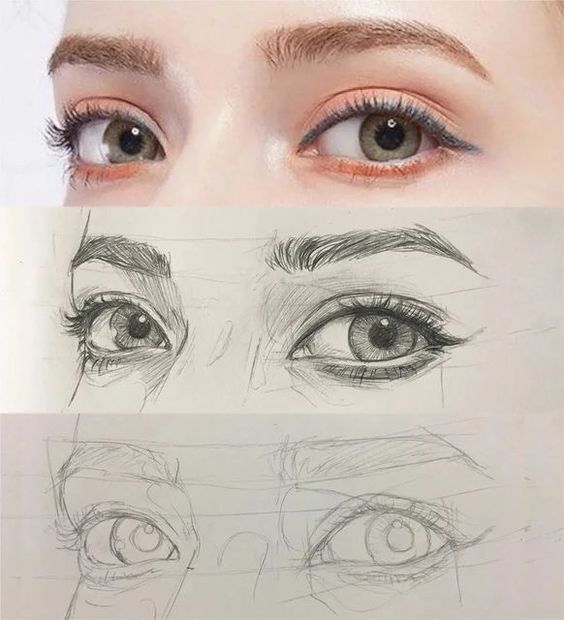
Eyes are a key feature for conveying emotion and bringing characters to life. Mastering eye drawing takes practice but can greatly improve your artwork.
Capturing Different Eye Shapes
Eye shapes vary widely. Almond eyes are common, with curved upper and lower lids. Round eyes have more visible white. Hooded eyes have extra skin on the upper lid.
To draw realistic eyes:
- Start with basic shapes
- Add details like the tear duct
- Draw the iris and pupil
- Shade to create depth
Practice different eye shapes to expand your skills. Study real eyes or photos to improve.
Conveying Emotion Through Eyes
Eyes show feelings through subtle changes. Widened eyes can mean surprise or fear. Narrowed eyes often show anger or suspicion.
The eyebrows play a big role too. Raised brows might mean shock, while furrowed brows show worry or confusion.
Shading around the eyes adds depth. Dark shadows under the eyes can make a character look tired or stressed.
Try drawing the same eye shape with different expressions. Small tweaks can create big changes in emotion.
Advanced Techniques
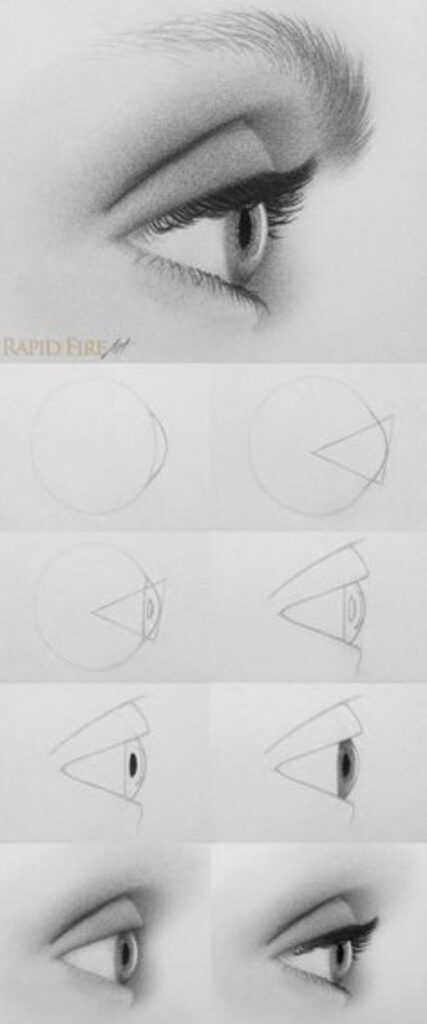
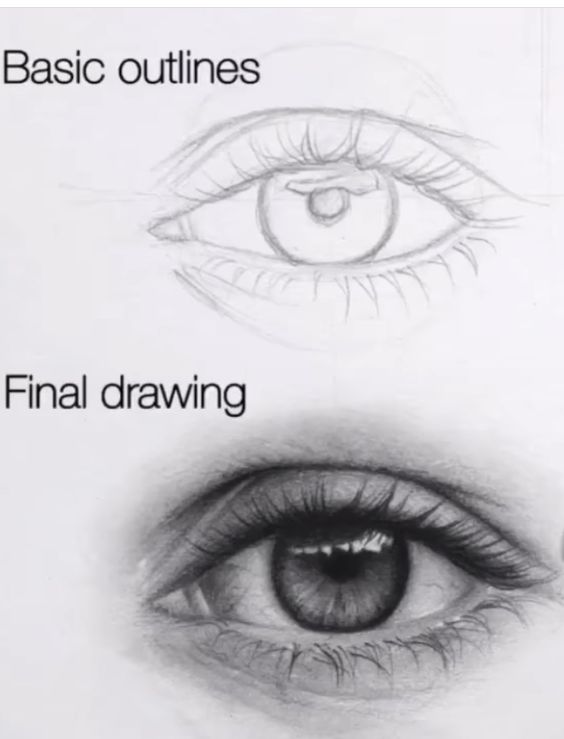
Drawing realistic eyes takes practice and attention to detail. These advanced methods can elevate your eye drawings to the next level.
Mastering the Play of Light and Shadow
Light and shadow bring eyes to life in drawings. Start by deciding where the light source is coming from. Add highlights to the iris and pupil where light hits directly. Create shadows under the upper eyelid and in the inner corner.
Use various pencil pressures to create depth. Lighter touches for highlights, harder presses for dark shadows. Blend shading gently with a blending stump or finger for smooth transitions.
Don’t forget the tiny reflection in the pupil – this “catchlight” makes eyes look alive and shiny.
Fine-Tuning Details for Realism
Small details make a big difference in eye drawings. Draw fine lines for eyelashes, starting thicker at the base and tapering to fine points. Add a few stray lashes for naturalness.
Include texture in the iris. Draw thin lines radiating from the pupil. Add tiny flecks or spots for more realism.
Show the wetness of eyes by leaving small white spaces along the lower lash line. This suggests light reflecting off tears.
Draw tiny blood vessels in the whites of the eyes for added realism. Use a very light touch with a red pencil.
Practice Exercises
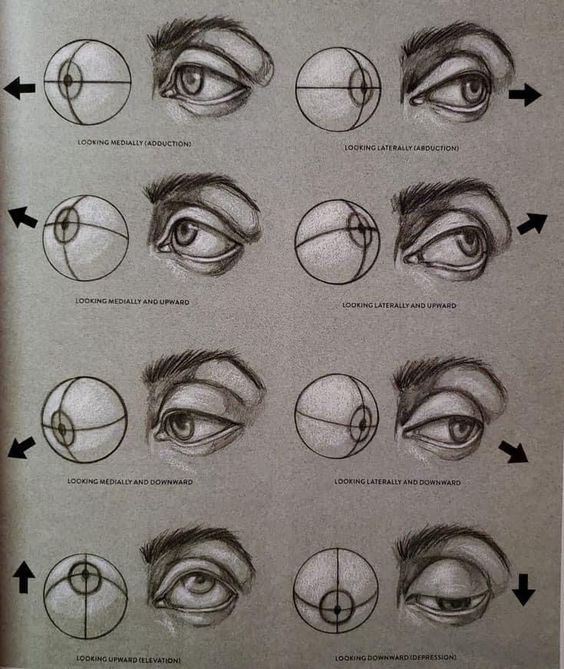
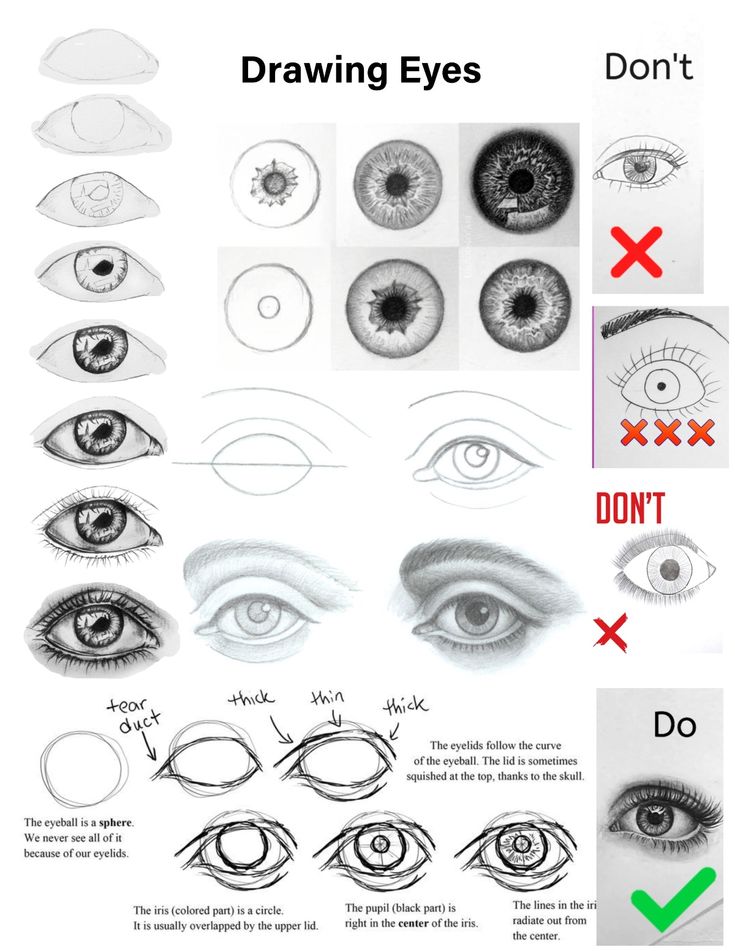
Ready to improve your eye drawing skills? These exercises will help you master the art of creating realistic eyes through practice and repetition.
From Simple to Complex Eyes
Start with basic shapes. Draw circles for the iris and pupils. Add curved lines for eyelids. Practice these simple forms many times.
Next, try shading. Use light and dark tones to give the eye depth. Focus on the iris first. Add shadows under the upper lid.
Move on to more details. Draw eyelashes, eyebrows, and skin texture. Look at photos or a mirror for reference. Pay attention to the small folds and wrinkles around the eye.
Experiment with different eye shapes and sizes. Draw cat eyes, anime eyes, or elderly eyes. Each type presents unique challenges.
Iterative Drawing for Improvement
Draw the same eye over and over. Make small changes each time. This helps you spot areas that need work.
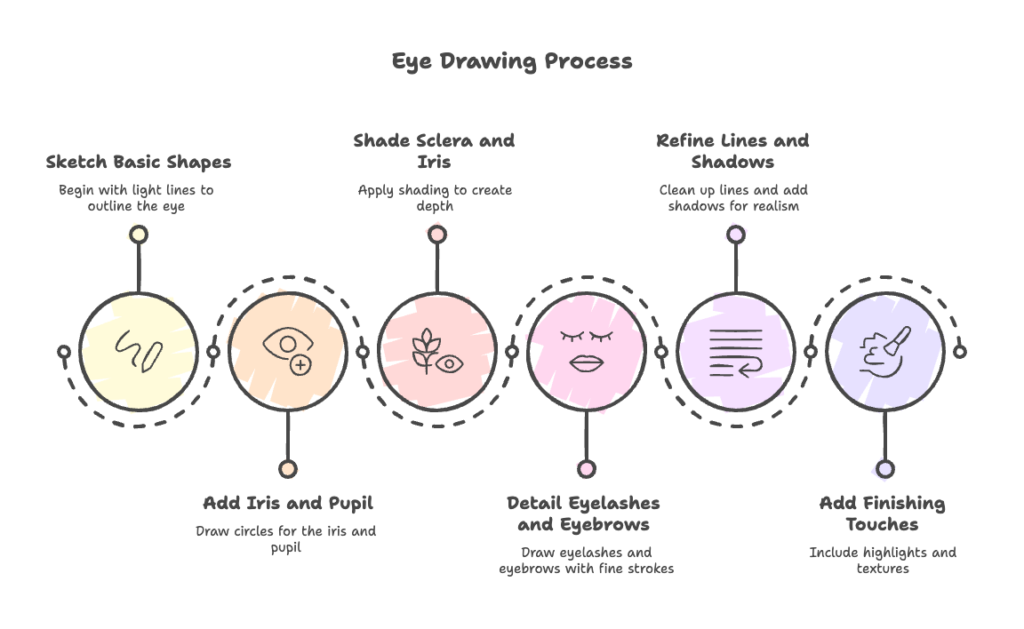
Try drawing eyes from memory. Then compare your work to a reference. Note what you missed or got wrong.
Set a timer for quick sketches. Do 5-minute eye drawings. This trains you to capture the key features fast.
Ask for feedback from other artists. Fresh eyes can spot issues you might miss. Be open to constructive criticism.
Keep an “eye journal.” Fill it with daily eye sketches. Over time, you’ll see your progress. This can be very motivating!
Frequently Asked Questions
Eye drawing can be tricky, but these tips will help artists of all levels create stunning eye illustrations. From basic sketches to realistic renderings, there are techniques to bring eyes to life on paper.
How can I make a simple eye drawing for beginners?
Start with basic shapes. Draw an oval for the eye, then add a circle inside for the iris. Put a smaller circle inside that for the pupil. Sketch curved lines above and below for eyelids. Add some shading and eyelashes. Keep it simple at first and build from there.
What are the best techniques for drawing a realistic eye?
Pay close attention to light and shadow. Use a range of pencils from hard to soft leads. Start with light outlines, then build up layers of shading. Add highlights in the iris and on the eye’s surface. Draw individual eyelashes rather than solid lines. Study reference photos to capture tiny details.
How do I add color to an eye illustration to make it look lifelike?
Layer colors gradually. Start with light washes, then build up intensity. Use various shades for the iris to create depth. Add tiny flecks of color to mimic the eye’s texture. Paint reflections and highlights with white or pale tones. Blend colors smoothly for a natural look.
What steps should I follow to draw an eye with correct anatomy?
Learn eye structure first. Sketch the eye socket and brow bone. Draw the eyeball shape. Add the iris and pupil in proper proportions. Include tear ducts and the pink inner corner. Draw upper and lower lids with correct thickness. Make sure the eye fits logically in the face.
Can you suggest some tips for creating a spooky or creepy eye for Halloween?
Exaggerate features for a spooky look. Make the pupil extra large or oddly shaped. Add cracks or veins in the sclera. Use an unnatural iris color. Draw the eye wide open with minimal lid showing. Create an intense, piercing gaze. Add dark shadows around the eye area.
What’s an easy way to draw a cartoon eye that’s kid-friendly?
Use simple shapes. Draw a big circle for the eye. Add a smaller circle inside for the iris. Make the pupil a dot or another tiny circle. Draw curved lines for upper and lower lids. Add eyelashes as small lines or triangles. Keep it cute with big, sparkly highlights.
- 896shares
- Facebook0
- Pinterest893
- Twitter3
- Reddit0
