A single accent wall can completely shift the mood of any room, turning bland spaces into eye-catching showcases. More than 60 percent of interior designers point to accent walls as a favorite way to add personality without a full renovation. Choosing and preparing your focus wall takes thought and the right know-how, but the payoff is immediate impact. This step-by-step guide shows you how to get professional results that spotlight your style and make your living space truly your own.
Table of Contents
- Step 1: Choose and Prepare Your Accent Wall
- Step 2: Select Colors and Gather Materials
- Step 3: Protect Surrounding Areas and Tape Edges
- Step 4: Apply Base Coat and Execute Paint Techniques
- Step 5: Inspect, Touch Up, and Reveal Your Accent Wall
Quick Summary
| Key Point | Explanation |
|---|---|
| 1. Choose a focal wall carefully | Identify a wall without interruptions to create a clean visual impact for your accent wall. |
| 2. Prepare the surface properly | Clean and fix any wall imperfections before painting to ensure a smooth, professional finish. |
| 3. Use high-quality materials | Invest in quality paint and tools to achieve better coverage and a polished final look. |
| 4. Protect surrounding areas meticulously | Clear furniture and use painter’s tape to mask off edges, avoiding paint bleeding on adjacent surfaces. |
| 5. Inspect and touch up your work | After painting, inspect for any flaws and use matching paint for touch-ups to ensure a flawless finish. |
Step 1: Choose and Prepare Your Accent Wall
Creating a stunning accent wall transforms your space from ordinary to extraordinary, giving you a powerful design statement with minimal effort. According to Sherwin Williams, selecting the right wall is your crucial first step in this creative journey.
Start by scanning your room and identifying the natural focal point. Look for walls that naturally draw attention such as those behind a fireplace, bed headboard, or spanning a prominent living area. Your chosen wall should have minimal windows or interruptions to maintain a clean visual impact. Consider architecture and furniture placement your strategic allies when making this selection.
Preparing the wall requires careful attention to detail. Begin by thoroughly cleaning the surface using a mild detergent solution and allowing it to dry completely. Inspect the wall for any imperfections like nail holes, dents, or rough patches. Use spackling compound to fill these areas, then sand smoothly once dry. A clean, smooth surface ensures your accent wall will look professional and polished.
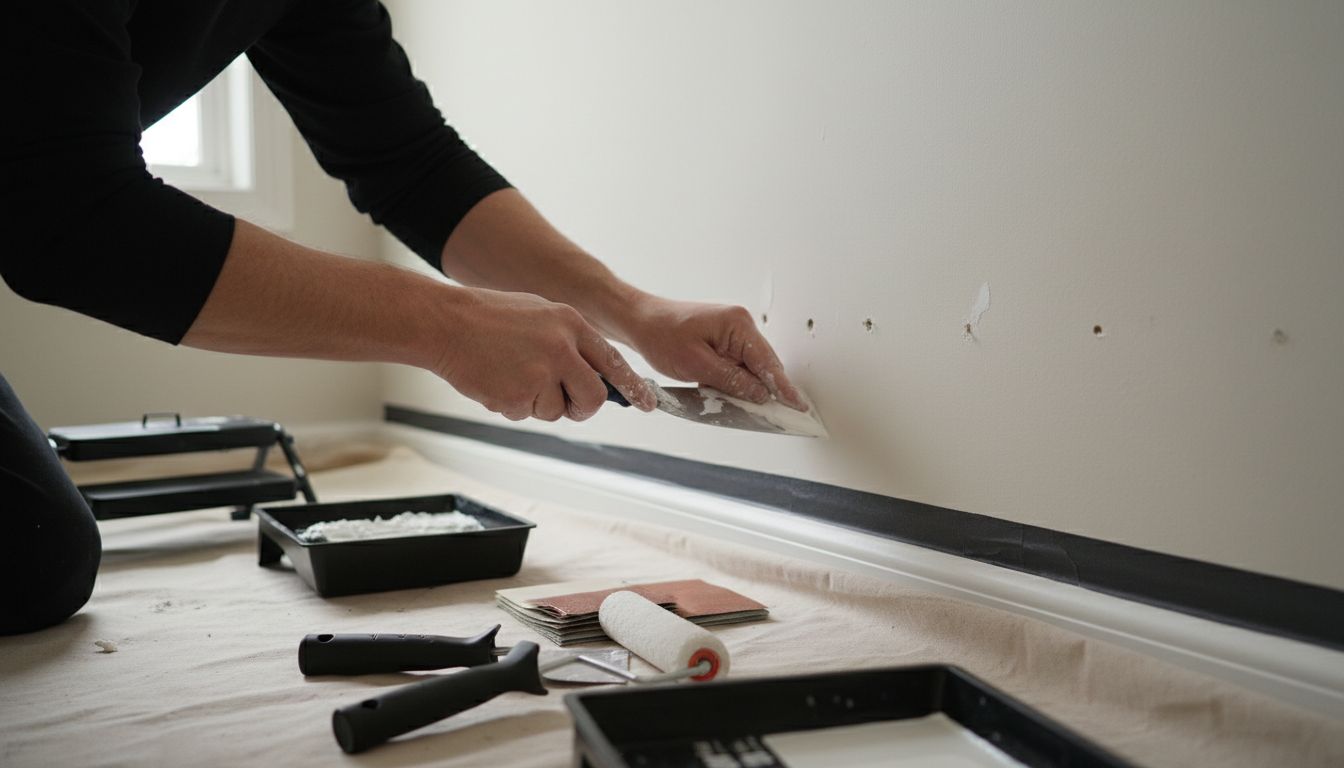 Grab some painter’s tape to protect baseboards and adjacent walls, creating crisp lines that showcase your artistic vision.
Pro tip: When choosing your accent wall, aim for a color that complements your existing room palette while providing enough contrast to make a statement. Test paint swatches in different lighting conditions before making your final selection to ensure the color looks perfect throughout the day.
Step 2: Select Colors and Gather Materials
Choosing the perfect color and assembling your painting supplies sets the stage for an incredible accent wall transformation. Your color selection will define the room’s mood and visual energy.
Start by exploring color palettes that complement your existing room decor. Grab paint swatches and create a mood board to visualize potential colors. Consider the emotional impact of different hues warm tones like terracotta or burnt orange create energy and intimacy while cool blues and greens promote calmness and serenity. Pro tip: Always test paint samples on your actual wall and observe them at different times of day to understand how natural and artificial lighting affects the color.
For your materials gather high quality supplies that will ensure a professional finish. You’ll need primer paint roller frames roller covers paint trays painters tape drop cloths sandpaper spackle putty knife paint stirrers and brushes. Select a premium interior paint with good coverage invest in quality roller covers with the right nap thickness for your wall texture. For smooth walls use a short nap 3/8 inch roller while textured surfaces require 1/2 inch or 3/4 inch rollers. A 2 inch angled brush will help you create clean edges and cut in around trim and corners.
As you assemble your materials prepare mentally for your painting adventure. Each tool represents a step closer to transforming your space into something extraordinary.
![]() In the next section youll learn how to prime and create those perfect crisp paint lines that will make your accent wall truly pop.
In the next section youll learn how to prime and create those perfect crisp paint lines that will make your accent wall truly pop.
Step 3: Protect Surrounding Areas and Tape Edges
Preparing your workspace is crucial for achieving a professional looking accent wall. According to Sherwin Williams, protecting surrounding areas is a critical step in creating a flawless paint job.
Start by clearing the room of furniture or moving everything to the center and covering it completely with drop cloths. Spread clean plastic sheeting or canvas drop cloths across the entire floor to catch any potential paint drips. Use high quality painters tape to carefully mask off all adjacent surfaces including baseboards ceiling edges window frames and electrical outlets. Apply the tape in smooth even strips pressing down firmly to create a tight seal that prevents paint bleed.
When applying painters tape focus on precision and patience. Begin at one corner and slowly unroll the tape at a 45 degree angle creating a clean line. Run your finger or a plastic putty knife along the edge to ensure maximum adhesion and prevent paint from seeping underneath. PureWow recommends using a credit card or specialized plastic smoothing tool to create an extra tight seal.
A pro tip that can save you hours of frustration is to remove any outlet covers or switch plates before taping. This allows you to tape directly around the electrical box for a cleaner more professional finish. Take your time with this step good preparation will make your painting process smoother and your final result more impressive.
Step 4: Apply Base Coat and Execute Paint Techniques
Now comes the transformative moment where your accent wall begins to take shape. According to Sherwin Williams, applying the base coat requires strategic technique and patience to achieve a professional finish.
Begin by using a high quality angled brush to cut in around the edges of your taped area. Work carefully along baseboards ceiling lines and corners creating a crisp border approximately 2 to 3 inches wide. Then switch to your roller for the main wall surface. PureWow recommends using a roller with smooth consistent strokes starting from the top of the wall and working downward. Use the classic W or M painting technique rolling the paint in overlapping sections to ensure even coverage and minimize streaking.
Apply your first coat of primer or base color using light even pressure. Allow the first coat to dry completely which typically takes about two to four hours depending on room temperature and humidity. Once dry inspect the wall for any uneven spots or missed areas. Sand down any minor imperfections with fine grit sandpaper before applying the second coat. The second coat will provide rich depth and ensure a truly professional looking finish.
A pro tip for achieving that picture perfect accent wall is to maintain a wet edge while painting. This means overlapping each roller stroke slightly while the paint is still wet to prevent visible lines or texture differences. Take your time and work methodically your patience will pay off with a stunning result that transforms your space.
Step 5: Inspect, Touch Up, and Reveal Your Accent Wall
The moment of truth has arrived where your creative vision transforms from concept to reality. According to Sherwin Williams, carefully inspecting and perfecting your accent wall is the final crucial step in achieving a professional finish.
PureWow recommends waiting at least four to six hours after painting before conducting your detailed inspection. Use natural daylight or bright indirect lighting to thoroughly examine the wall surface. Look for any thin spots uneven coverage subtle streaks or areas where the paint hasnt fully adhered. Keep a small brush and matching paint nearby for precision touch ups. Gently dab and blend small imperfections using light feathering strokes to create a seamless finish.
When removing painters tape work slowly and carefully pull the tape at a 45 degree angle away from the painted surface to prevent accidentally peeling off fresh paint. If you notice any minor bleeding or paint lift use a sharp utility knife to score the tape edge before removing. For an extra polished look run your finger along the tape edge before removal to ensure a crisp clean line.
A pro tip for revealing your accent wall is to stage the room strategically. Remove drop cloths and clean up your workspace to highlight your hard work. Consider adding complementary decor or artwork that will draw attention to your newly transformed wall. If you want to add an extra design element you might explore DIY wall art techniques to further personalize your space and enhance the visual impact of your accent wall.
Transform Your Space with Expert Accent Wall Inspiration
Struggling to create that perfect accent wall that truly elevates your room? This tutorial highlights key challenges such as choosing the right wall, prepping surfaces, and mastering paint techniques to avoid streaks or uneven coverage. If you want your space to stand out with a stunning focal point that reflects your style and passion for design, understanding those foundational steps is essential.
Take your creative journey further by exploring our Interior category where you will find rich ideas to complement your accent wall and build a cohesive look that flows throughout your home. Need additional artistic inspiration or want to personalize your space even more Explore our unique collections like Wallpapers to add texture and style.

Start transforming your home today with expert tips and creative guidance from Sky Rye Design Create a space that feels welcoming and inspiring every day. Visit our site now and discover how to bring your accent wall vision to life with confidence and style.
Frequently Asked Questions
How do I choose the best wall for an accent wall in my home?
Selecting the right wall is crucial. Look for natural focal points like walls behind furniture or features like fireplaces, and avoid walls with many interruptions to maintain a clean look. Consider architecture and furniture placement to guide your choice.
What preparation is needed before painting my accent wall?
Prepare your wall by cleaning it thoroughly, filling in any imperfections, and applying painter’s tape around edges. This ensures a smooth, professional finish, so take time to inspect and repair the wall before you start painting.
What colors work best for an accent wall to create a stunning focal point?
Choose colors that complement your existing decor while providing enough contrast. Explore color palettes and test paint samples on your wall to see how they look in different lighting setups before finalizing your choice.
What techniques should I use to achieve even paint coverage on my accent wall?
Apply the paint in a classic W or M pattern with your roller, which helps distribute paint evenly and reduces streaking. Use light pressure, and maintain a wet edge by overlapping strokes while the paint is still wet to ensure a smooth finish.
How do I inspect and touch up my accent wall after painting?
Wait four to six hours after painting before inspecting the wall in natural light. Look for thin spots or streaks, and use a small brush to make precision touch-ups, blending any imperfections for a seamless appearance.
How can I stage my room to highlight my new accent wall?
Once the painting is complete, remove drop cloths and clean your workspace. Arrange complementary decor, such as artwork or furniture, to draw attention to the accent wall and enhance its visual impact.
Recommended
- DIY Wall Art Tutorial: Create Stunning Custom Pieces | Sky Rye Design
- Transform Your Space with paintlab.ie | Sky Rye Design
- 7 Inspiring Art Project Ideas for Beginners to Try Now |
- Complete Guide to the Role of Artwork at Home |
- Wohnzimmer mit Kunst verschönern: Ihr einzigartiger Stil – Curiocanvas
- 7 Inspiring Art Display Ideas to Elevate Your Home Decor – Eman’s Gallery
- 3shares
- Facebook0
- Pinterest0
- Twitter3
- Reddit0


 Artistic sketches of two characters, showing various facial expressions and angles. the left side features a woman, the right side a man, both in a realistic sketch style. | Sky Rye Design")