Have you ever gazed at a master painting or sculpture and felt a jolt of inspiration, wondering how the artist captured such lifelike dynamism and profound emotion? The secret, more often than not, lies in a deep, intimate understanding of Anatomy for Artists. For artists, anatomy isn’t just a dry, academic subject; it’s the pulsating heart of realistic, expressive, and compelling art. It’s the ultimate roadmap to unlocking figures that breathe, move, and resonate with your audience.
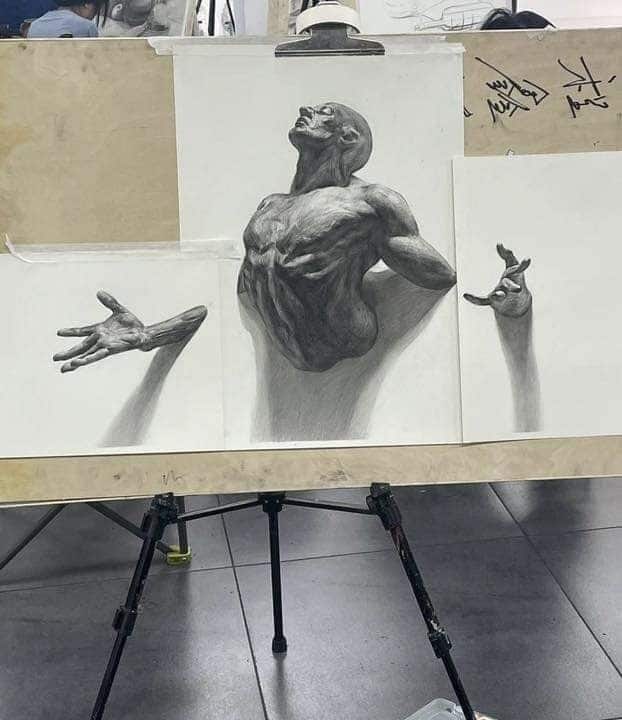
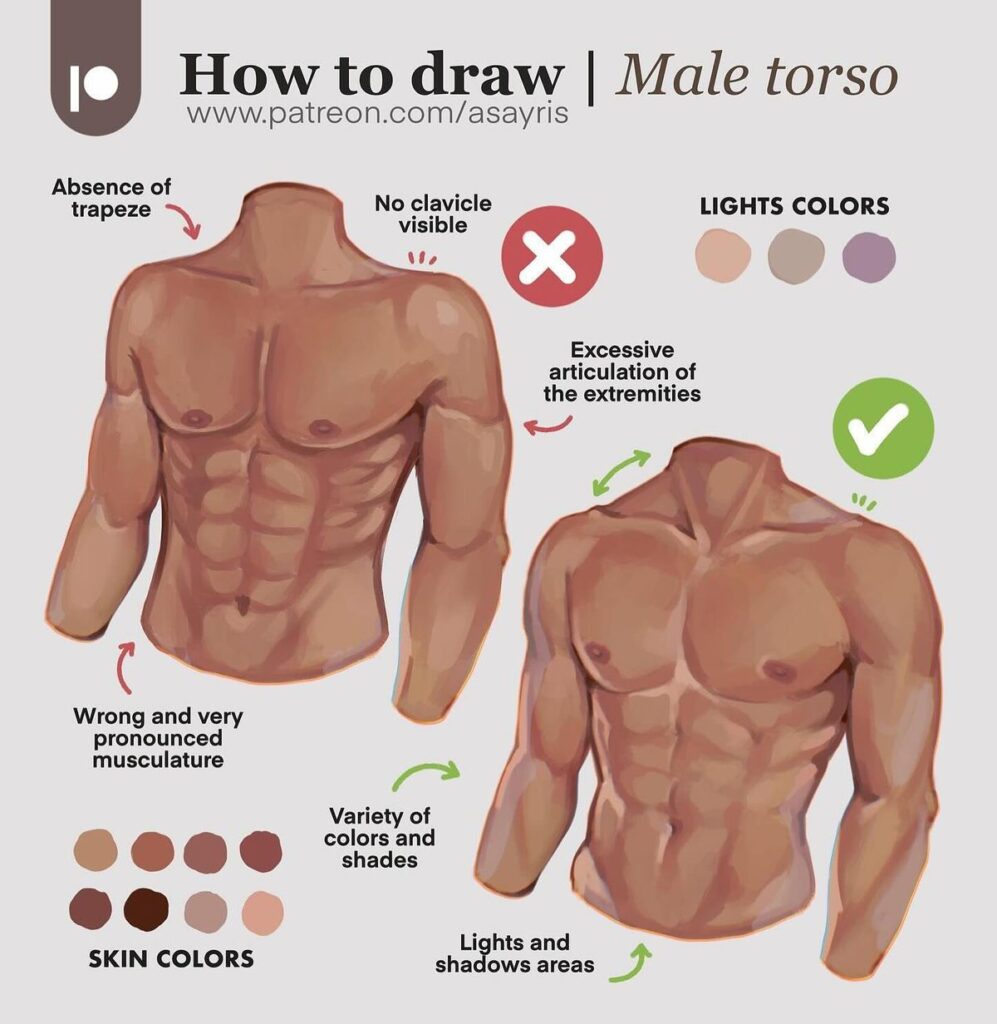
Imagine trying to build a magnificent cathedral without knowing the fundamentals of architecture, structural engineering, or even the properties of different materials. It would crumble! The human body is arguably the most complex and breathtaking structure you’ll ever attempt to render. Without understanding its inner workings – the bones that provide structure, the muscles that create form and movement, the tendons that connect them, and the fat and skin that drape over everything – your figures will forever remain stiff, flat, and unconvincing. This isn’t about memorizing every single bone and muscle, though that dedication certainly pays dividends! It’s about grasping the underlying logic, the beautiful mechanics, and the intricate relationships that give life to our forms. Get ready to embark on an exhilarating journey, because by the end of this guide, you’ll be equipped to unleash your artistic potential and draw the human form with unprecedented confidence and vitality!
Why Anatomy is Non-Negotiable for Artists
Learning anatomy might seem daunting at first, a mountain of information to climb. But trust us, the view from the top is absolutely breathtaking! This isn’t just about drawing “better”; it’s about fundamentally changing how you see and interpret the world, empowering you to create art that truly sings.
Beyond Surface-Level Drawing
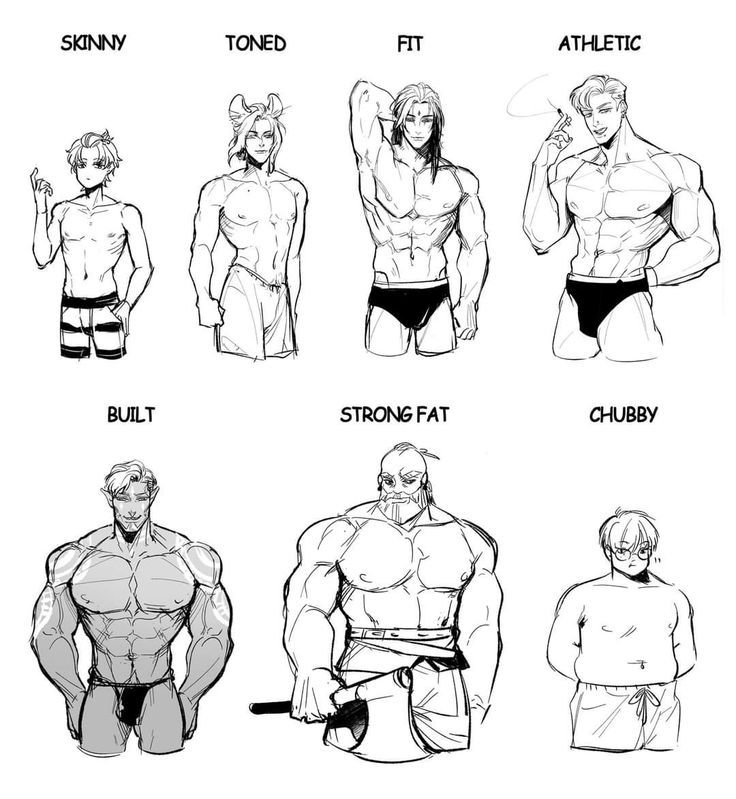
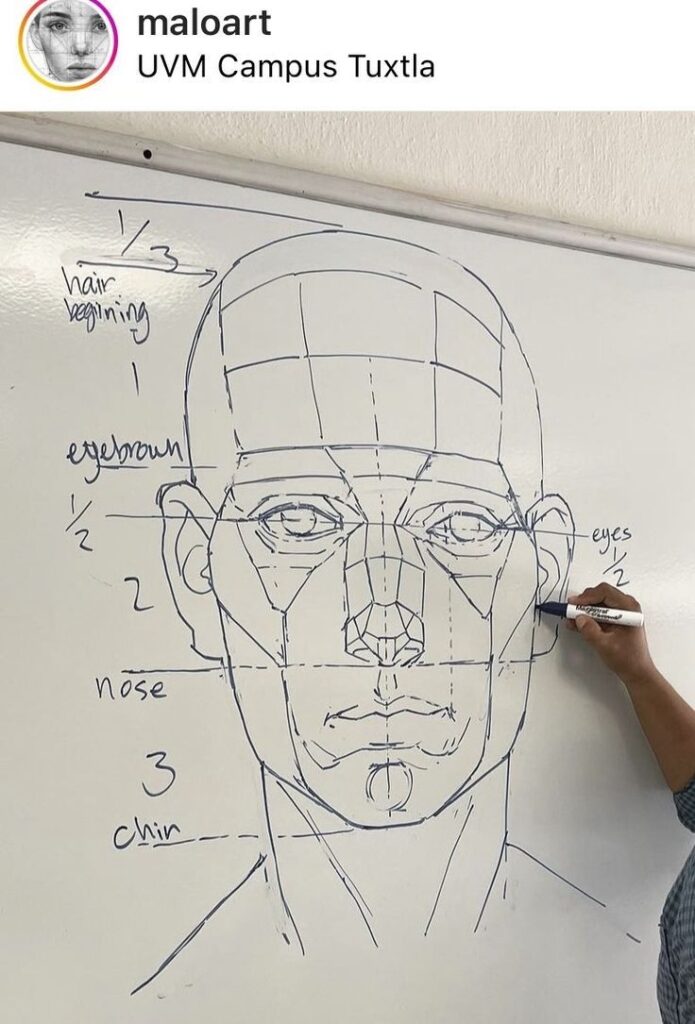
Many aspiring artists start by drawing what they see on the surface. While observation is crucial, it’s just one piece of the puzzle. The human body is incredibly complex, with a rich internal structure that dictates its external appearance. If you only copy what you see, you’re missing the “why” behind the form. Why does a bicep bulge here? Why does a shoulder rotate that way? Why does a knee have these distinct bumps? Anatomy answers these questions, providing the foundational knowledge to not just replicate but understand and recreate these forms accurately, even from imagination. It’s like knowing the lyrics to a song versus understanding the melody, harmony, and rhythm that make it a masterpiece.
Enhancing Realism and Believability
Think of the most captivating characters in comics, animation, or classical paintings. They feel real, don’t they? That believability comes from a keen anatomical understanding. When an artist knows how muscles stretch and compress, how joints pivot, and how gravity affects the body, their drawings gain an undeniable sense of weight, balance, and authenticity. Even in stylized art, a foundational anatomical knowledge ensures that exaggerated forms still feel grounded and plausible. You can break the rules far more effectively when you first master them!
Conveying Emotion and Movement
The human body is a canvas of expression. A slight tilt of the head, the curve of a spine, the tension in a hand – all communicate volumes. Without understanding the underlying structure and muscle function, capturing these subtle nuances of emotion and dynamic movement becomes incredibly difficult. Anatomy empowers you to depict believable gestures, powerful actions, and tender emotions because you comprehend the mechanics behind them. You’ll be able to portray a character’s internal state not just through their face, but through their entire body language. This depth is what truly connects with viewers.
Building a Visual Library
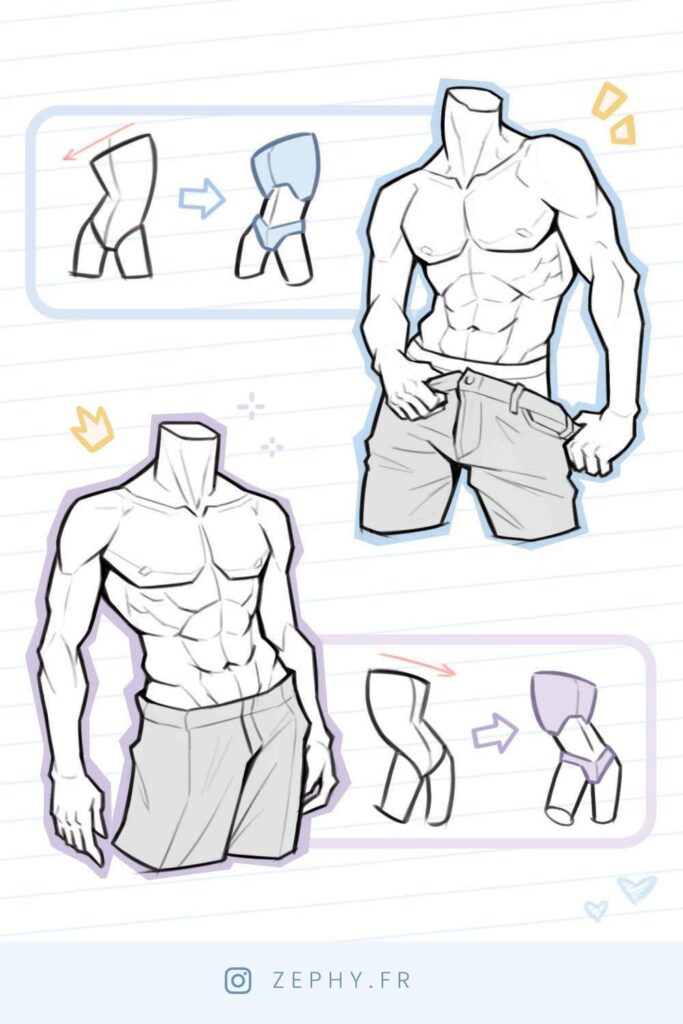
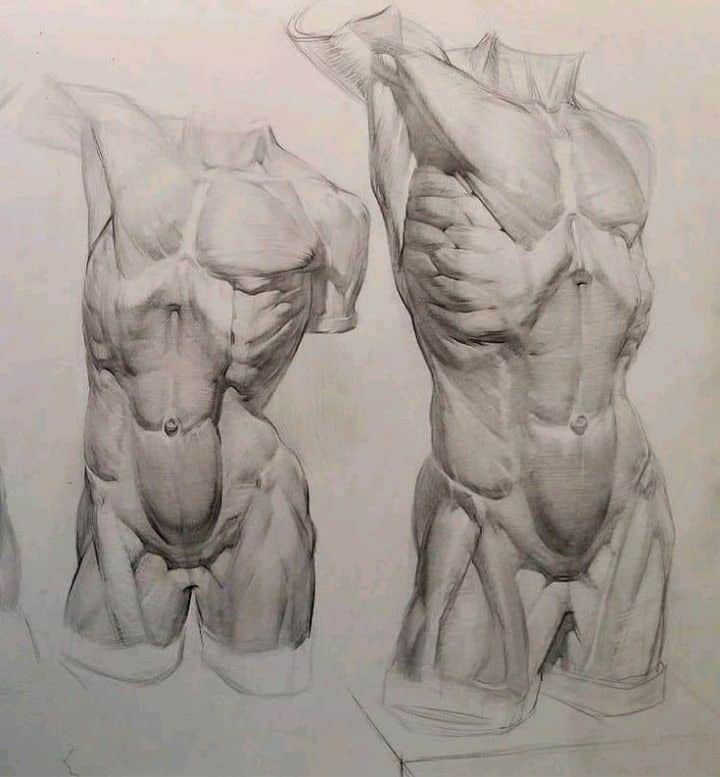
Every time you study anatomy, you’re adding invaluable data to your mental “visual library.” This library is what allows you to draw confidently from imagination, to pose characters in novel ways, and to solve complex artistic problems without constantly needing reference. The more detailed and comprehensive your anatomical library, the more freedom and versatility you’ll have in your artistic endeavors. It becomes an intuitive part of your creative process, transforming challenges into exciting opportunities.
The Foundational Building Blocks: Skeletal Structure
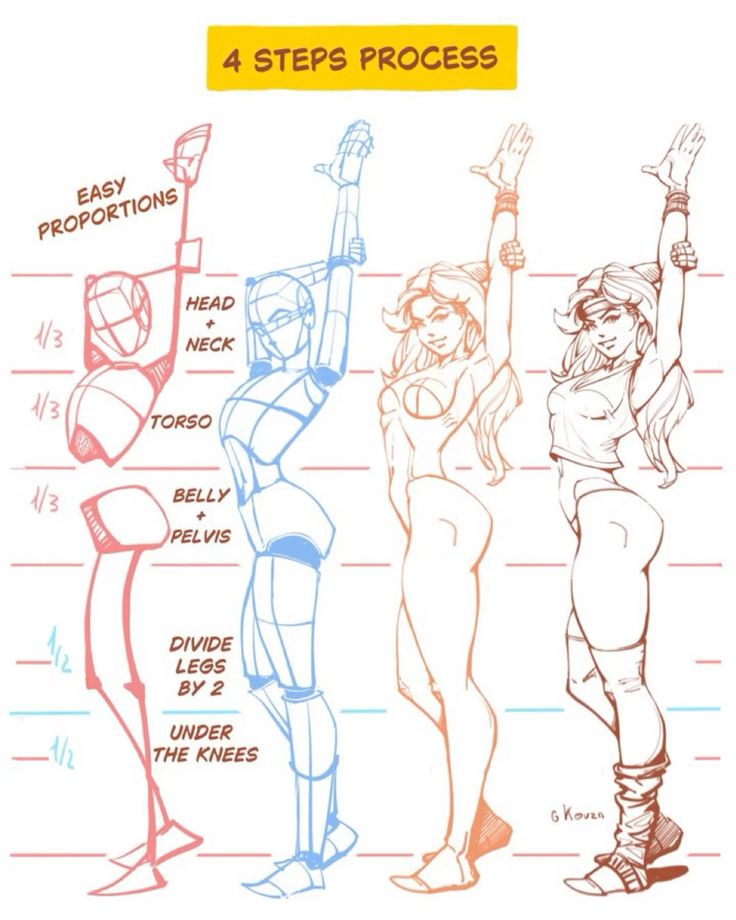
Before we talk about bulging muscles or graceful curves, we must talk about bones. The skeleton is the unsung hero, the internal architecture that supports everything else. Without a solid understanding of the skeletal framework, your figures will lack structure, balance, and credibility.
Understanding Bones as the Framework
Think of the skeleton as the steel frame of a skyscraper. It dictates the overall height, width, and proportion. It provides the attachment points for muscles, acts as levers for movement, and protects vital organs. When drawing a figure, even one heavily muscled or clothed, you should always be aware of the underlying bone structure. It’s the armature that prevents your forms from becoming floppy or arbitrary.
Key Bones to Master
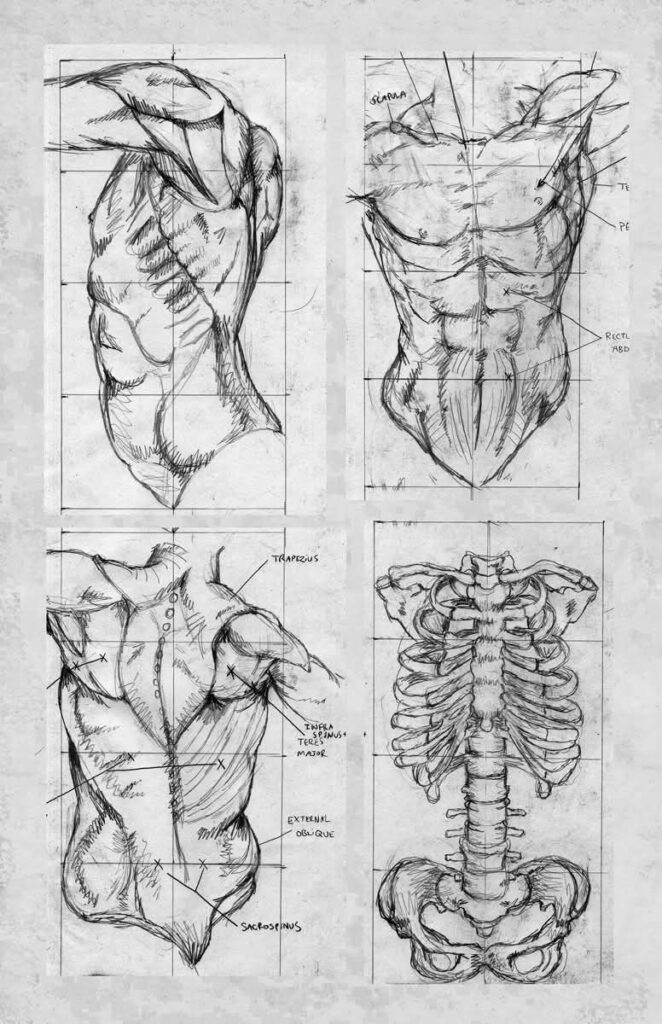
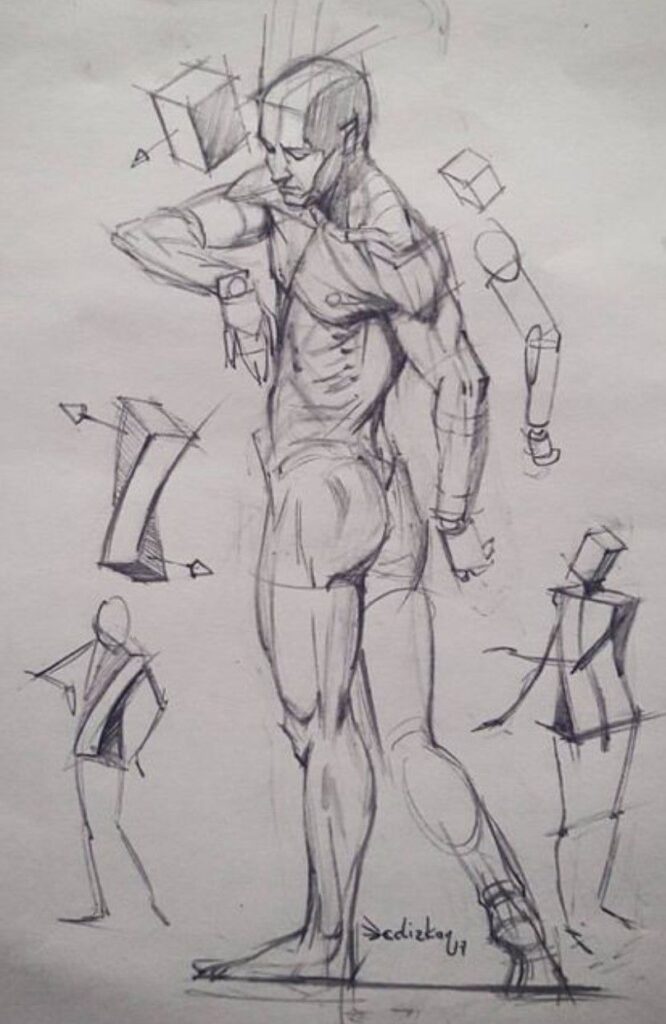
While there are 206 bones in the adult human body, you don’t need to memorize every single one right away. Focus on the major, load-bearing bones and those that significantly influence surface form:
- Skull: The cranial mass and facial bones dictate the shape of the head and the placement of facial features. Understanding its structure is vital for creating expressive faces and accurate portraits.
- Spine (Vertebral Column): This flexible column supports the head and torso, allowing for a vast range of movement – bending, twisting, and tilting. Its curves are crucial for depicting natural posture and balance.
- Rib Cage (Thorax): A protective cage for the heart and lungs, the rib cage dictates the width and depth of the upper torso. Its subtle form is often visible, particularly on leaner figures.
- Pelvis: The basin-like structure connecting the spine to the legs, the pelvis is a critical landmark. It’s a major anchor point for many muscles and defines the transition from torso to lower limbs, significantly influencing posture and gait.
- Shoulder Girdle (Clavicle and Scapula): These bones allow for the incredible range of motion in the arm. The clavicle (collarbone) is often prominently visible, while the scapula (shoulder blade) moves dynamically with the arm, creating fascinating forms at the back.
- Long Bones of the Limbs (Humerus, Radius, Ulna, Femur, Tibia, Fibula): These are the levers of movement. Understanding their lengths, how they connect at joints, and how they rotate is paramount for drawing dynamic poses and accurate foreshortening. For instance, knowing that the elbow joint is formed by the humerus, radius, and ulna helps you understand its limited hinge-like motion and rotational capacity.
Perspective and Bone Structure
Bones, like any three-dimensional object, are subject to the laws of perspective. As you rotate and foreshorten a figure, the underlying skeletal forms will also change in appearance. Practice drawing the major bones and bone groups from multiple angles to develop your spatial reasoning. Start with simple shapes – a box for the rib cage, a sphere for the skull, cylinders for the limbs – and then layer the anatomical details on top. This “thinking in 3D” approach, starting from the inside out, is a game-changer.
Bringing it to Life: The Muscular System
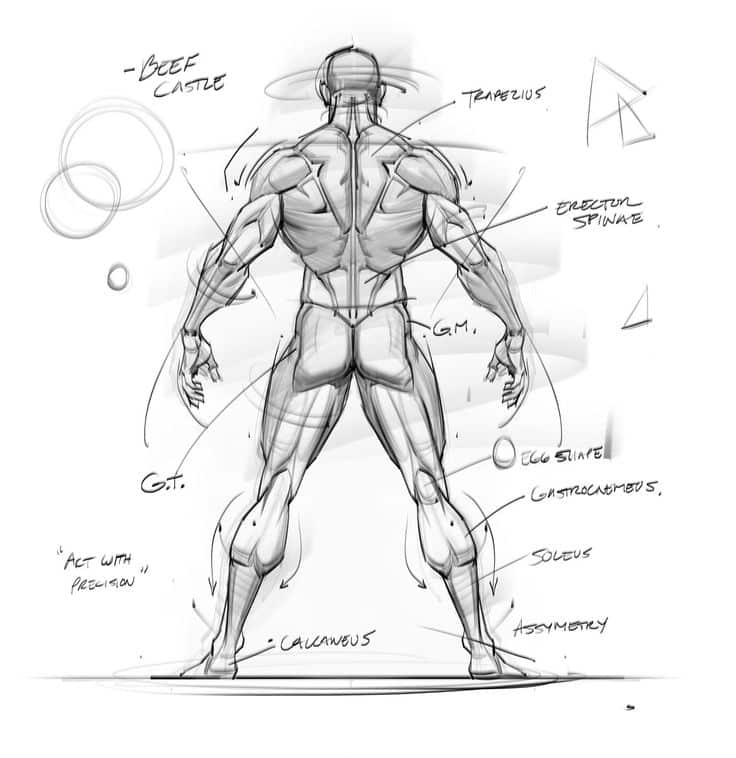
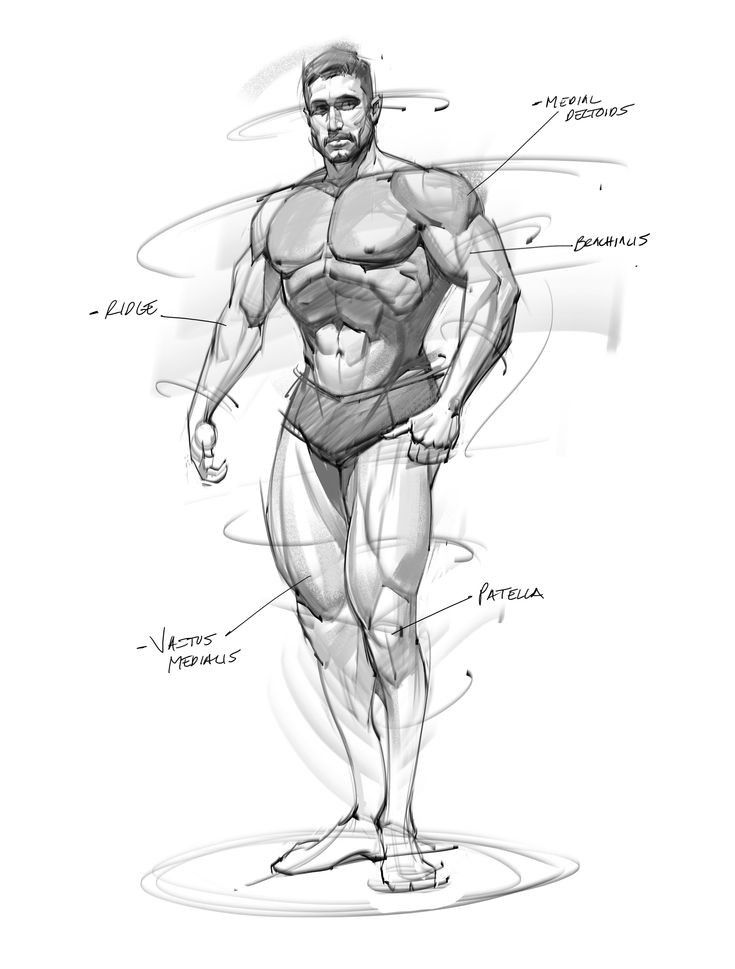
If the bones are the framework, the muscles are the engine, the shapers, and the movers. They cling to the bones, creating the beautiful contours and dynamic bulges that give the human form its undeniable vitality.
Muscles as the Movers and Shapers
Muscles are responsible for all movement in the body, from the blink of an eye to the powerful sprint of a runner. As they contract and relax, they pull on bones, causing them to move. More importantly for artists, muscles also dictate the surface form. Each muscle has a specific origin (where it begins), insertion (where it attaches), and action (what it does). Knowing these three aspects helps you understand why a muscle looks the way it does in different poses.
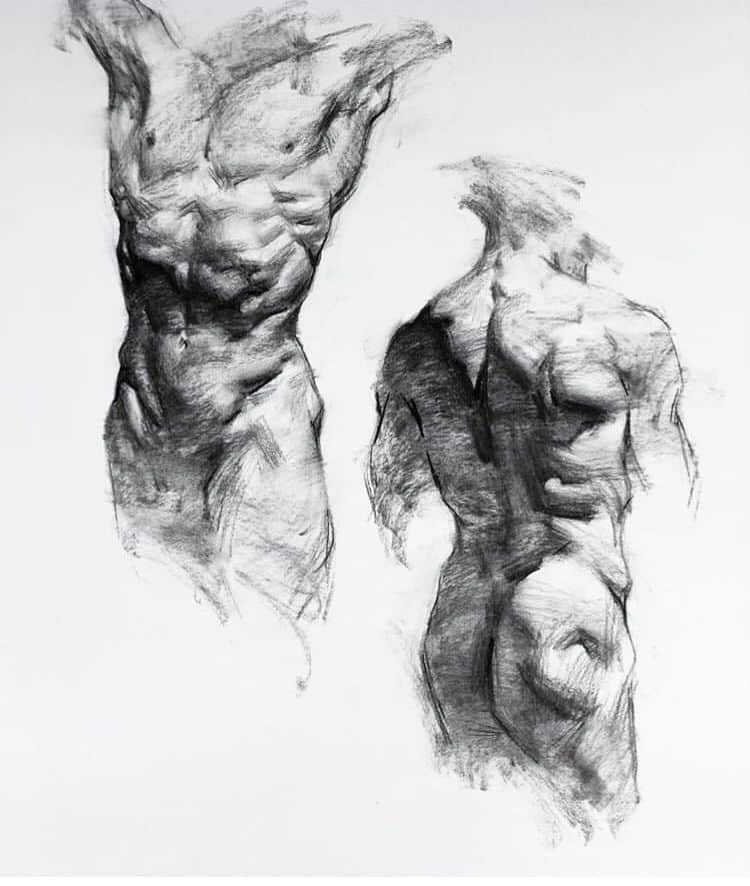
Major Muscle Groups and Their Functions
Again, you don’t need to know all 600+ muscles, but focus on the major muscle groups that significantly impact surface anatomy and movement:
- Torso:
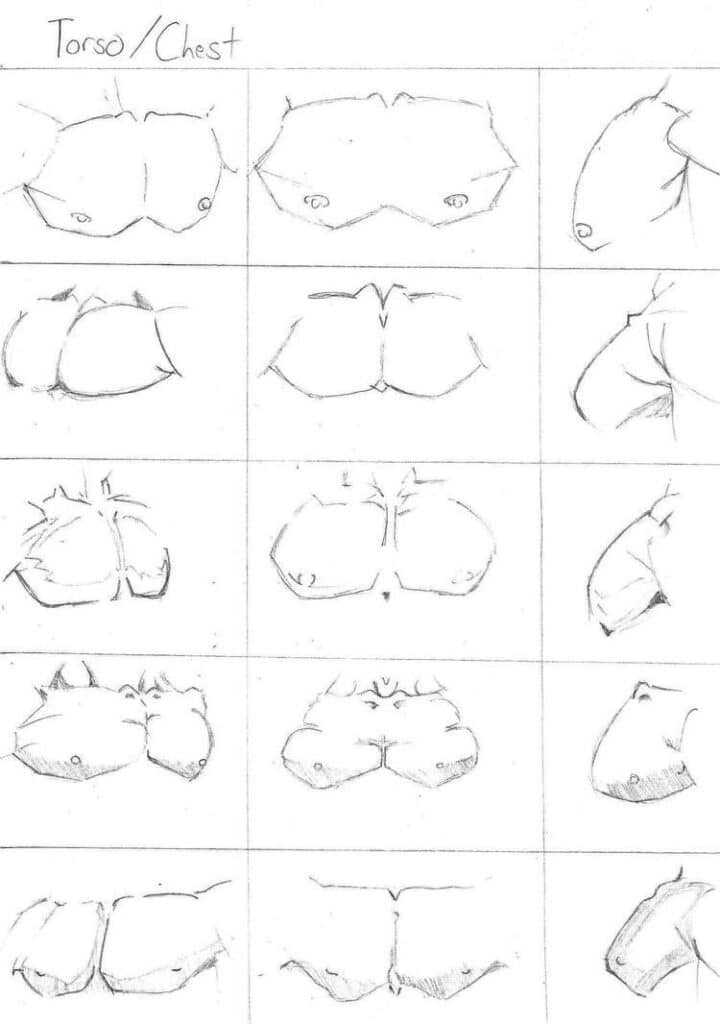
- Pectoralis Major (Pecs): Large fan-shaped muscles of the chest, responsible for pushing movements.
- Deltoids: The cap-like muscles of the shoulder, involved in lifting and rotating the arm.
- Latissimus Dorsi (Lats): Broad muscles of the back, responsible for pulling movements and extending the arm.
- Trapezius (Traps): A large, diamond-shaped muscle covering the upper back and neck, involved in shoulder and neck movements.
- Rectus Abdominis (Abs): The “six-pack” muscles, responsible for flexing the spine.
- Obliques: Side abdominal muscles, involved in twisting and bending the torso.
- Arms:
- Biceps: Front of the upper arm, flexes the elbow.
- Triceps: Back of the upper arm, extends the elbow.
- Forearm Muscles: A complex group responsible for wrist and finger movements, creating intricate forms.
- Legs:
- Quadriceps: Group of four muscles at the front of the thigh, extends the knee.
- Hamstrings: Group of three muscles at the back of the thigh, flexes the knee.
- Gluteus Maximus (Glutes): The large muscle of the buttocks, extends and externally rotates the hip.
- Calves (Gastrocnemius and Soleus): Muscles at the back of the lower leg, responsible for pointing the foot and pushing off.
How Muscles Influence Surface Forms
This is where anatomy truly comes alive for artists! When a muscle contracts, it shortens and bulges. When it stretches, it elongates and flattens. Understanding these changes allows you to depict tension, relaxation, and dynamic action. For example, a flexed bicep creates a distinct bulge, while a relaxed one appears softer. The interplay between contracting and stretching muscles creates the dynamic contours that define a living figure. Focus on how these major muscle groups overlap, intertwine, and create depressions and prominences on the surface.
Surface Anatomy and Form Language
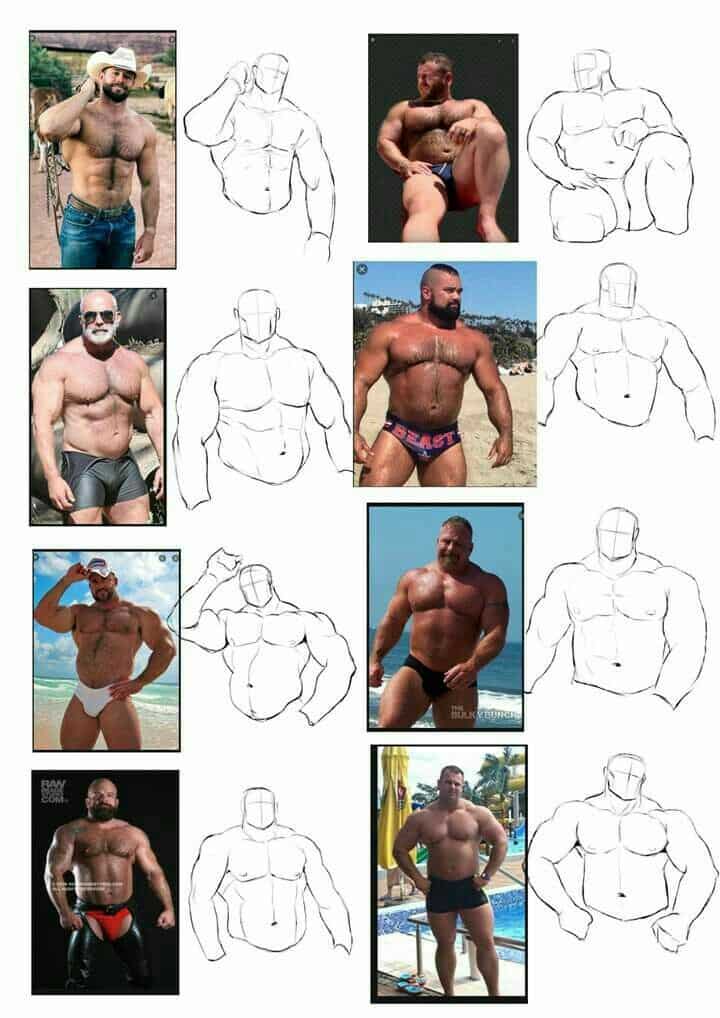
Surface anatomy is the study of the body’s forms as they appear externally, understanding how the underlying structures – bones, muscles, tendons, and fat – create those visible contours, landmarks, and subtle shifts in plane. It’s about translating your internal knowledge to the external world of your drawing.
Seeing Beyond the Skin
The goal isn’t just to draw the skin; it’s to draw the volume and structure beneath the skin. Think of the surface as a landscape, with hills (muscles), valleys (depressions between muscles), and prominent ridges (bones). Train your eye to see these underlying forms. For instance, the bony points of the pelvis or elbow are often visible, even through layers of muscle and fat. These are your crucial “landmarks.”
Landmarks and Bony Prominences
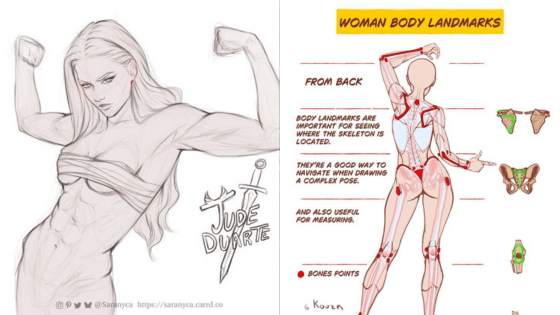
These are the superficial points on the body where bones are close to the surface, making them visible or palpable. They are invaluable guides for proportion, placement, and understanding position. Key landmarks include:
- Acromion Process (shoulder point)
- Sternum (breastbone)
- Iliac Crest (top of the pelvis)
- Greater Trochanter (bony bump on the outer thigh near the hip)
- Patella (kneecap)
- Medial and Lateral Malleoli (ankle bones)
- Olecranon Process (elbow point)
By identifying and using these landmarks, you can accurately construct a figure and ensure that all other forms are correctly aligned and proportioned. They act as your navigational beacons.
Fat Distribution and its Artistic Impact
While bones and muscles provide the core structure, fat and skin layer on top, softening or exaggerating forms. Fat distribution varies significantly between individuals, genders, and ages, contributing greatly to individual body types. For example, women tend to store more fat around the hips, thighs, and breasts, while men often store it around the abdomen. Understanding these patterns is essential for depicting diverse and believable figures. Fat can smooth out muscle definitions or create distinct rolls and curves, adding realism and character.
Understanding Folds and Creases

Skin folds and creases are dynamic elements that tell a story about movement, tension, and body type. They appear at joints when bent (e.g., inner elbow, knees, groin), where skin is compressed (e.g., neck folds, abdominal rolls), or where muscles bulge significantly. These aren’t arbitrary lines; they follow the contours and mechanics of the body. Observing how skin folds and stretches is crucial for conveying dynamic action and adding a nuanced quality to your figure drawings.
Movement and Kinesiology: The Dynamic Duo
Drawing static figures is one thing, but bringing them to life with dynamic motion is another entirely! Kinesiology is the study of human movement, and for artists, it’s about understanding how the body moves through space, maintains balance, and expresses action.
Drawing the Figure in Motion
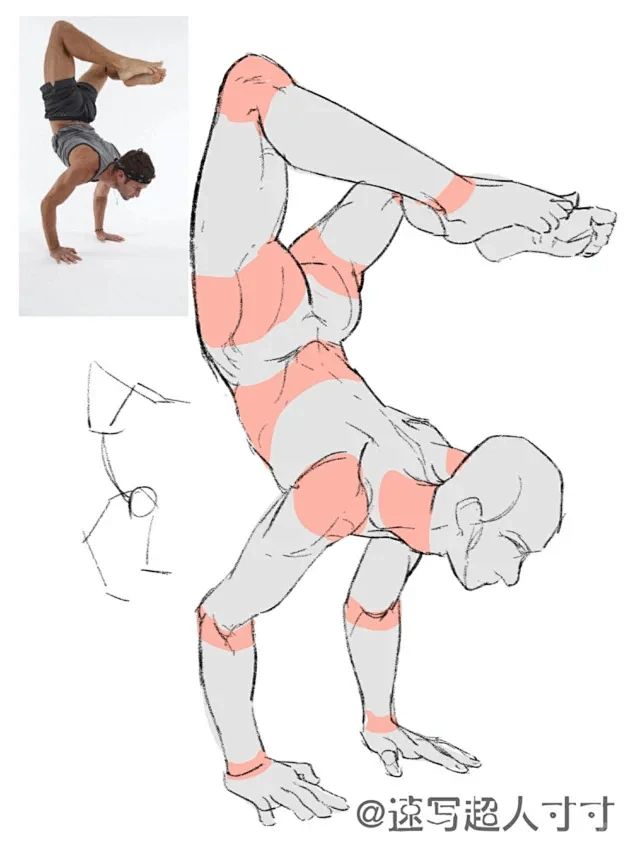
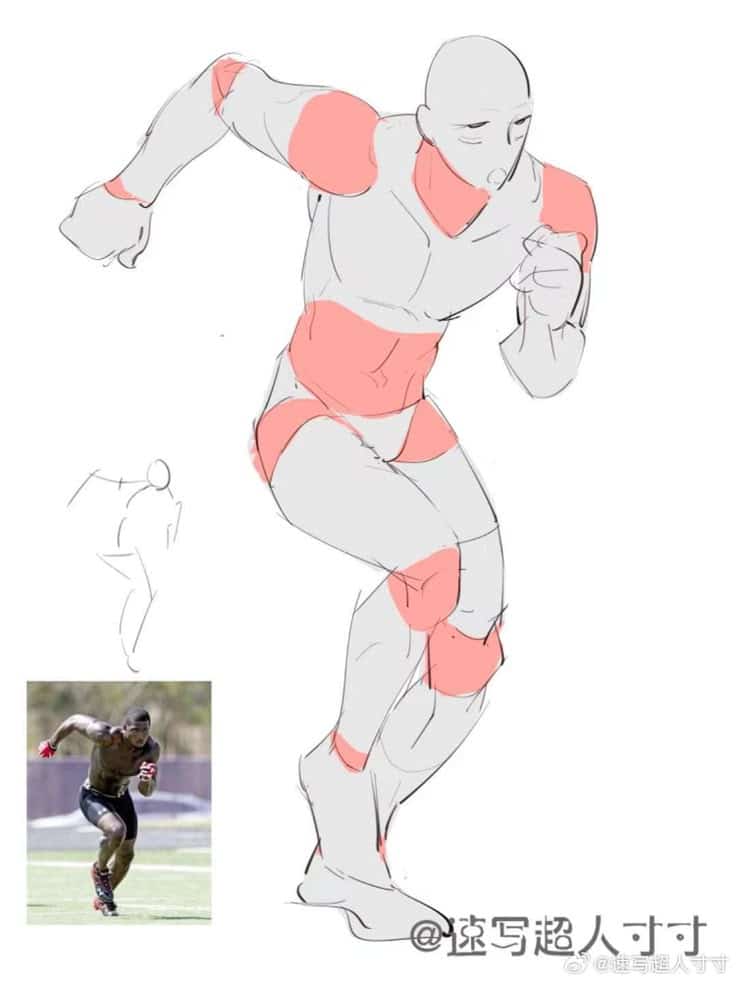
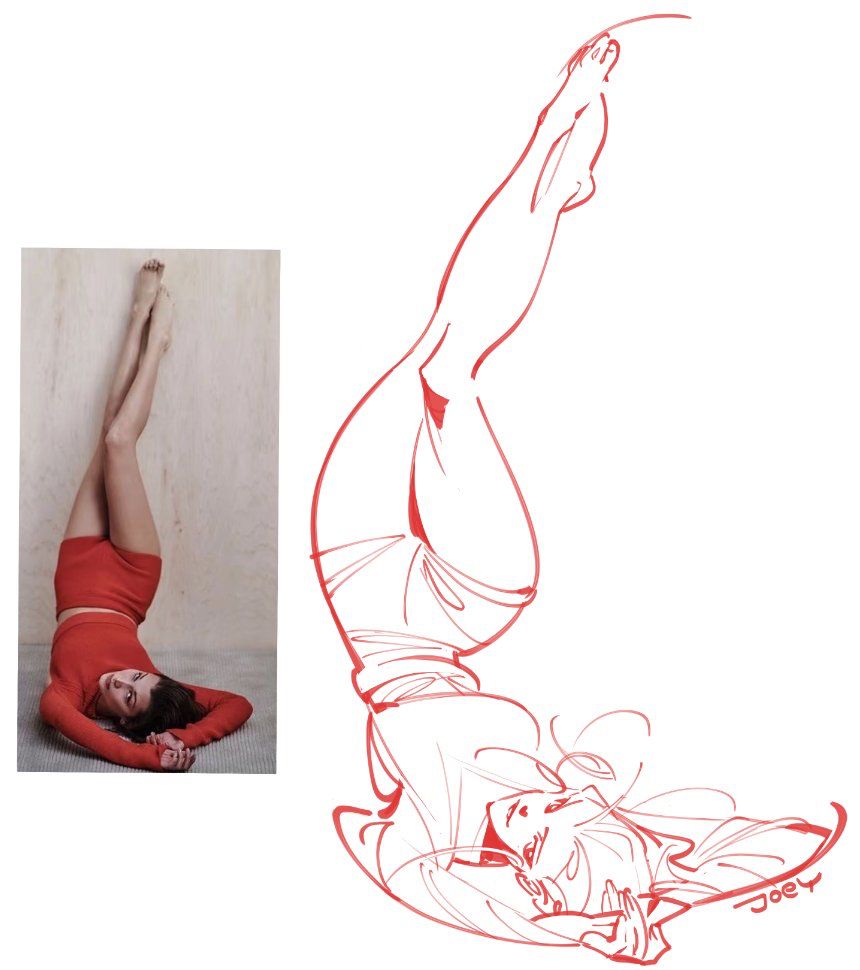
To draw believable movement, you need to understand the mechanics of the joints and the actions of the muscles. How does a person throw a ball? What happens to their spine when they leap? What muscles are engaged when they bend to pick something up? This isn’t just about drawing a pose; it’s about capturing the process of movement, the energy flowing through the figure. Think about the arcs and rhythms that the body creates as it moves.
Center of Gravity and Balance
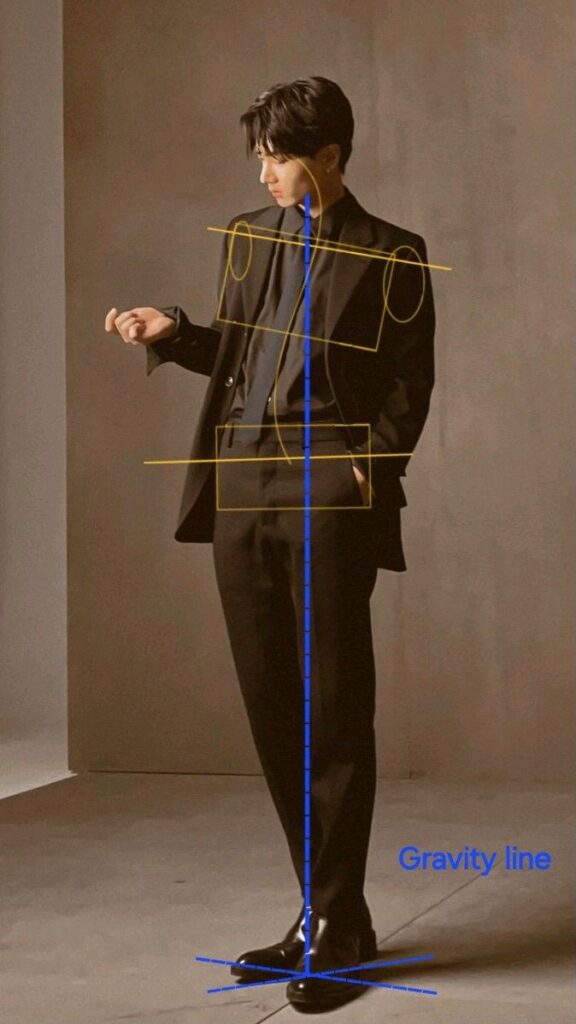
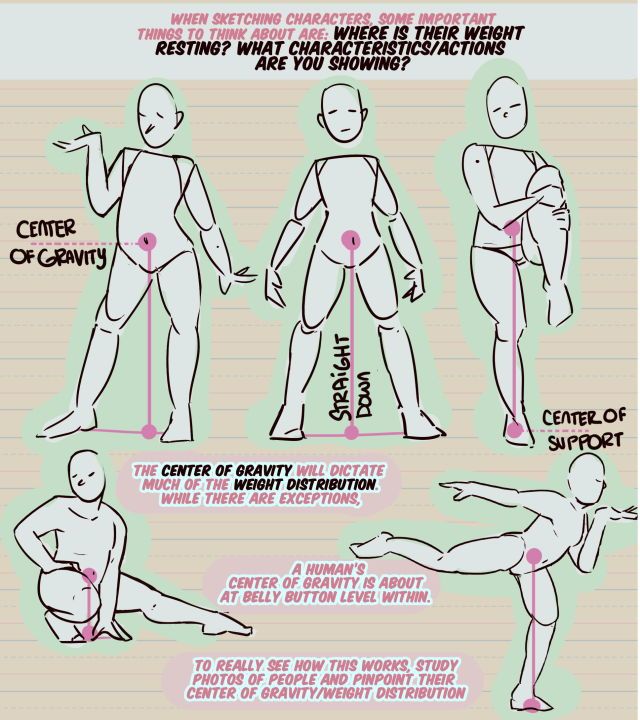
Every human figure has a center of gravity. For a standing figure, it typically falls within the pelvis. To maintain balance, the body constantly adjusts its posture to keep this center of gravity within its base of support (usually the feet). When a figure is leaning, jumping, or running, the center of gravity shifts dramatically, and the limbs will adjust to counterbalance this. Understanding this principle is fundamental to drawing figures that feel stable and grounded, rather than about to topple over. Observing real people and how they maintain balance is incredibly insightful – for more guidance on capturing dynamic poses, check out this excellent photography poses guide!
Action Lines and Gestures
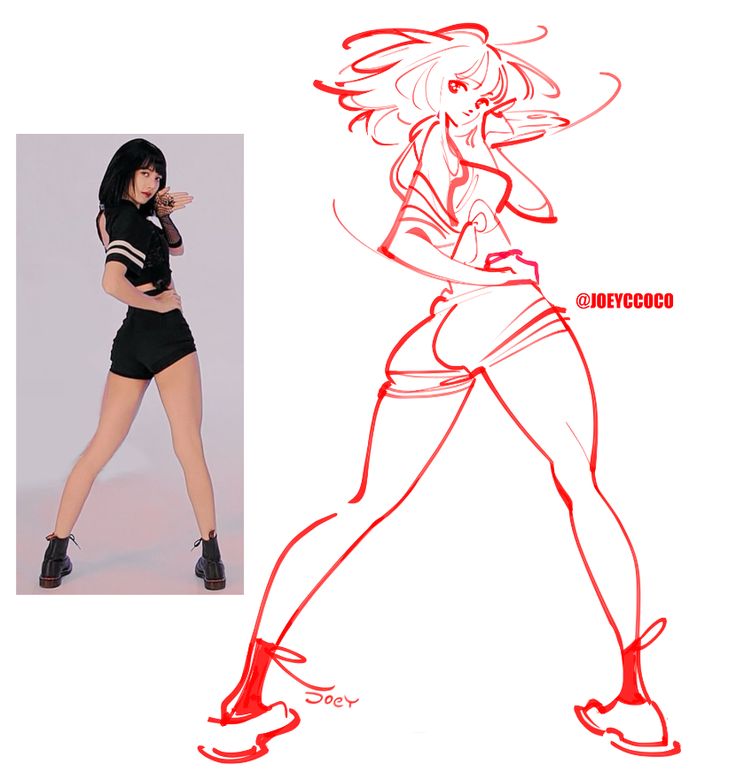
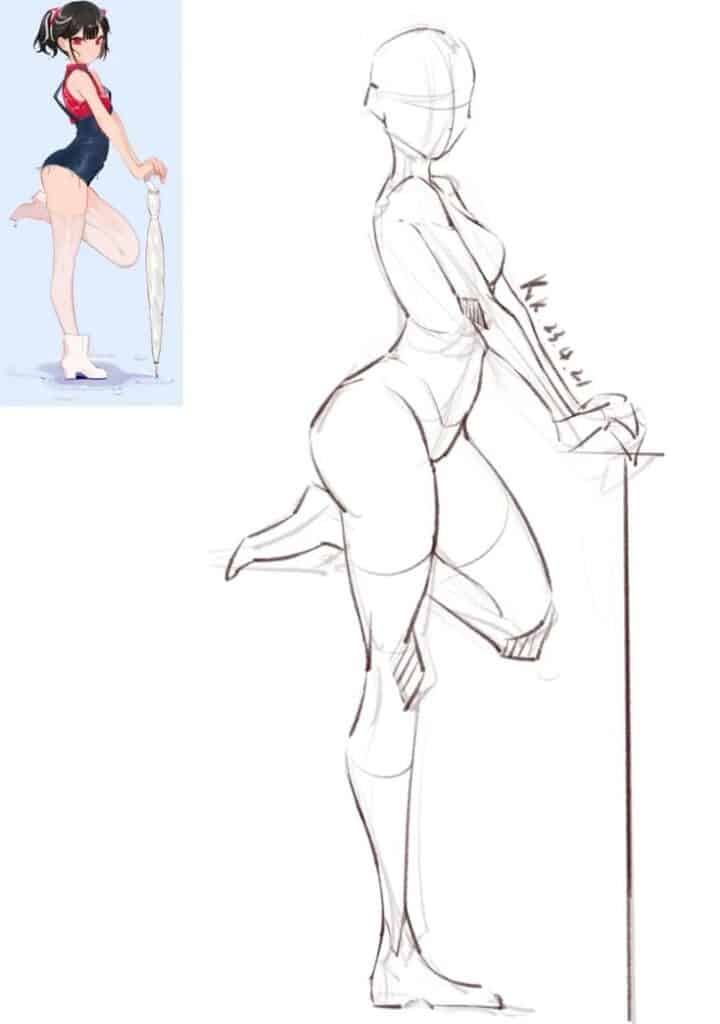
Before getting bogged down in anatomical details, start with the gesture. An action line is the invisible force line that flows through the figure, conveying its energy and direction. It’s the initial, expressive scribble that captures the essence of the pose. Think of it as the emotional core of your drawing. Gesture drawing, quick sketches focusing on movement and flow, is an incredibly powerful tool for developing your ability to capture the dynamic essence of the human form without getting lost in details. It helps you see the whole, before dissecting the parts.
Foreshortening Demystified
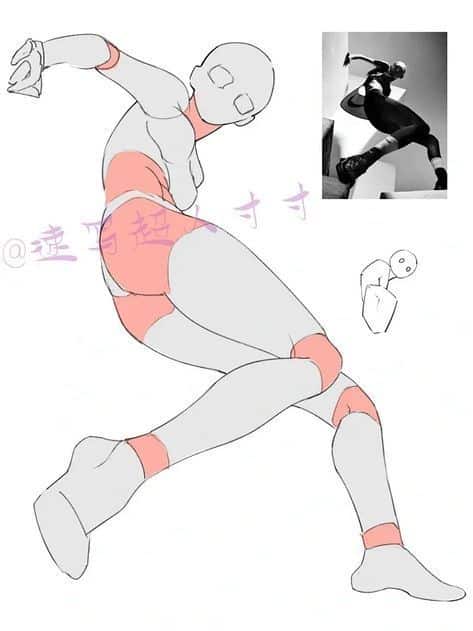
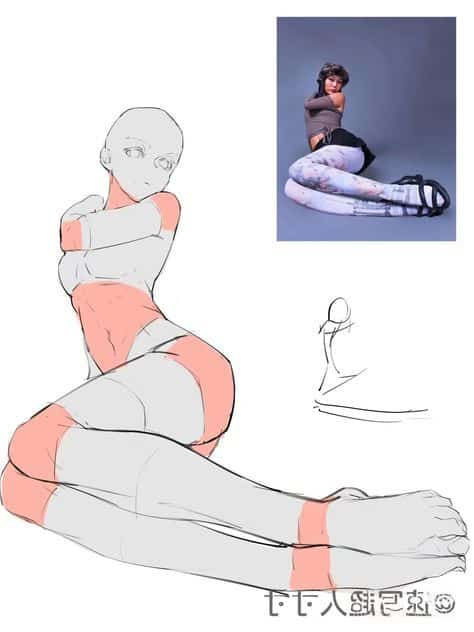
Foreshortening, the artistic effect of shortening lines to create the illusion of projection or extension in space, can be intimidating. However, with a solid anatomical understanding, it becomes far more manageable. When a limb extends towards or away from the viewer, its apparent length shrinks, and its forms overlap in unique ways. Knowing the underlying bone structure and muscle masses allows you to accurately compress and distort these forms in perspective, maintaining their volume and believability. Practice drawing cylinders and boxes in perspective, then apply that knowledge to the limbs.
Proportions and Measurements: The Golden Rules
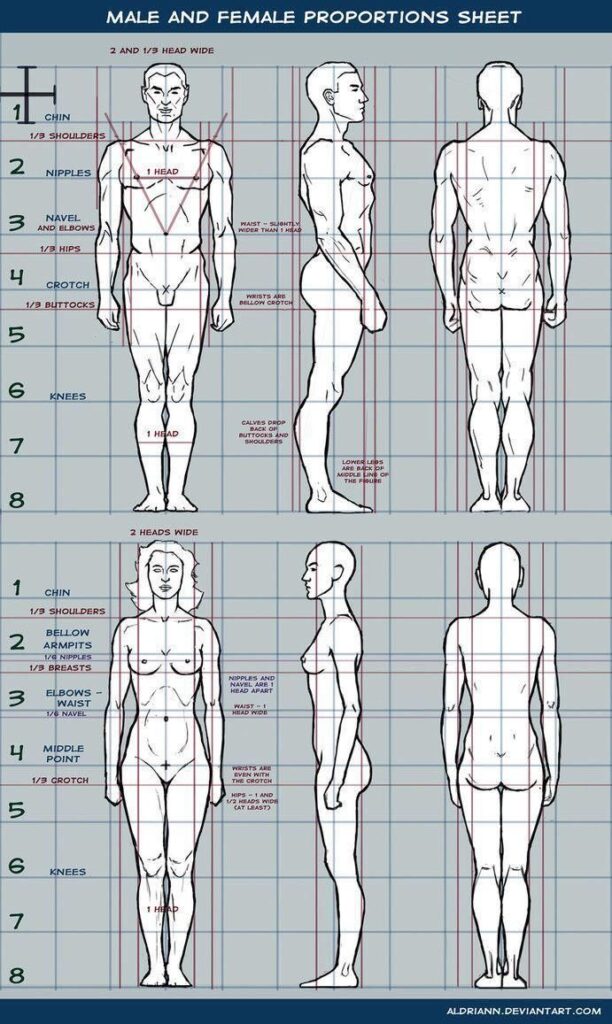
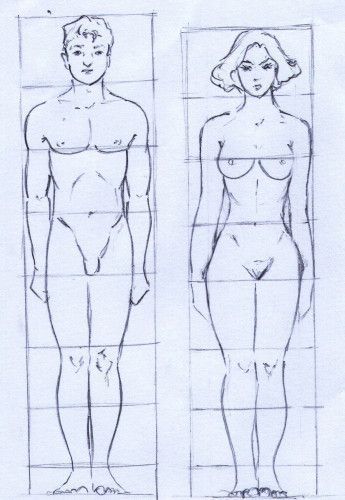
While every body is unique, there are generally accepted proportional guidelines that artists use to create harmonious and believable figures. These aren’t rigid rules but flexible frameworks.
Classical Proportions (e.g., 7.5 or 8 Heads Tall)
A common guideline divides the human figure into “heads.” The average adult figure is often depicted as 7.5 to 8 heads tall. Other proportional relationships include:
- The width of the shoulders is roughly 2 to 2.5 heads wide.
- The halfway point of the body falls around the pubic bone.
- The elbow generally aligns with the navel, and the wrist with the crotch.
- The fingertips reach about mid-thigh.
These are starting points, not absolute laws. They provide a general framework that you can then subtly adjust to give your characters personality and uniqueness. For mastering the art of depicting the human form, focusing on accurate proportions is key, especially when creating something like a drawing of a girl.
Comparative Measurement Techniques
Beyond fixed ratios, learn to measure by eye. Hold up your pencil to compare lengths and widths, or use your thumb as a unit of measurement. Compare the length of the head to the length of the torso, or the width of the hips to the width of the shoulders. This technique is invaluable whether you’re drawing from life, photos, or even imagination, helping you ensure consistency and accuracy.
Variations in Human Anatomy (Age, Gender, Body Type)
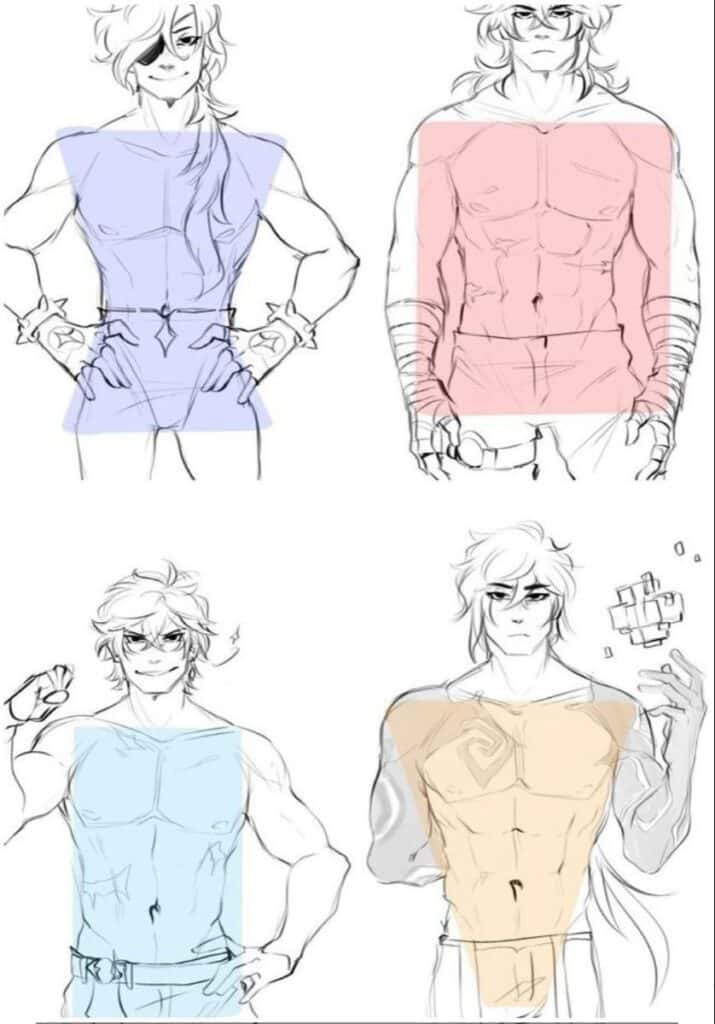
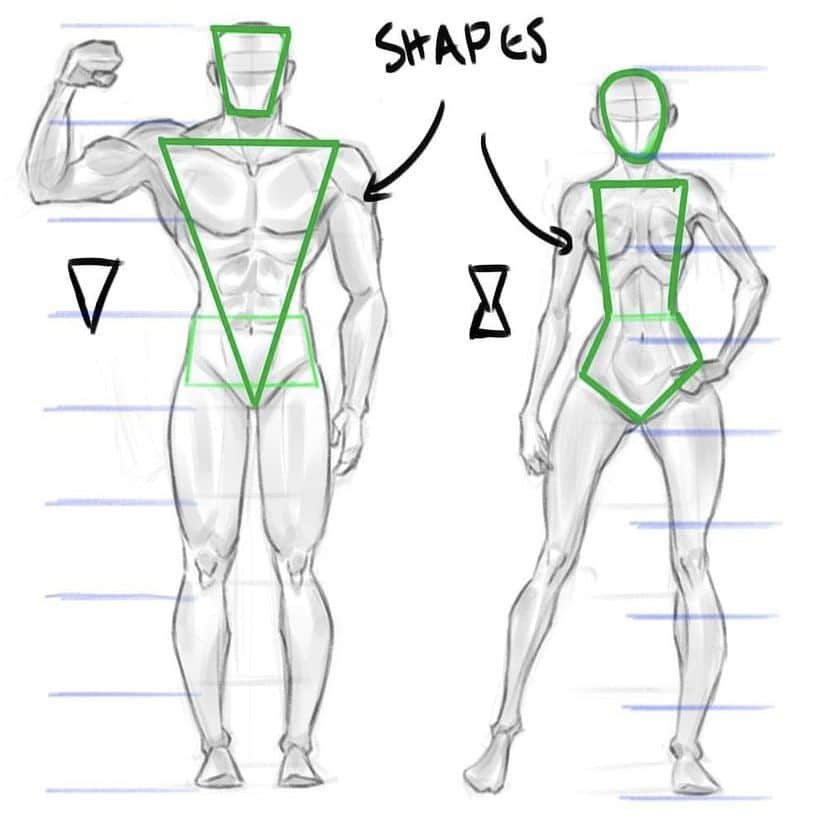
No two people are exactly alike! Anatomy manifests differently based on:
- Age: Children have larger heads in proportion to their bodies, shorter limbs, and softer, less defined musculature. As we age, proportions shift, and forms become more defined or, conversely, less taut.
- Gender: While the underlying skeletal structure is similar, there are key differences. Women generally have wider pelvises, narrower shoulders, and different fat distribution patterns. Men typically have broader shoulders, larger muscle mass, and more prominent bone structure.
- Body Type: People come in all shapes and sizes! Some are tall and slender, others short and robust. Understanding how fat and muscle mass vary allows you to draw a diverse range of figures that feel authentic. Celebrate these variations in your art!
The Head and Neck: A World of Expression
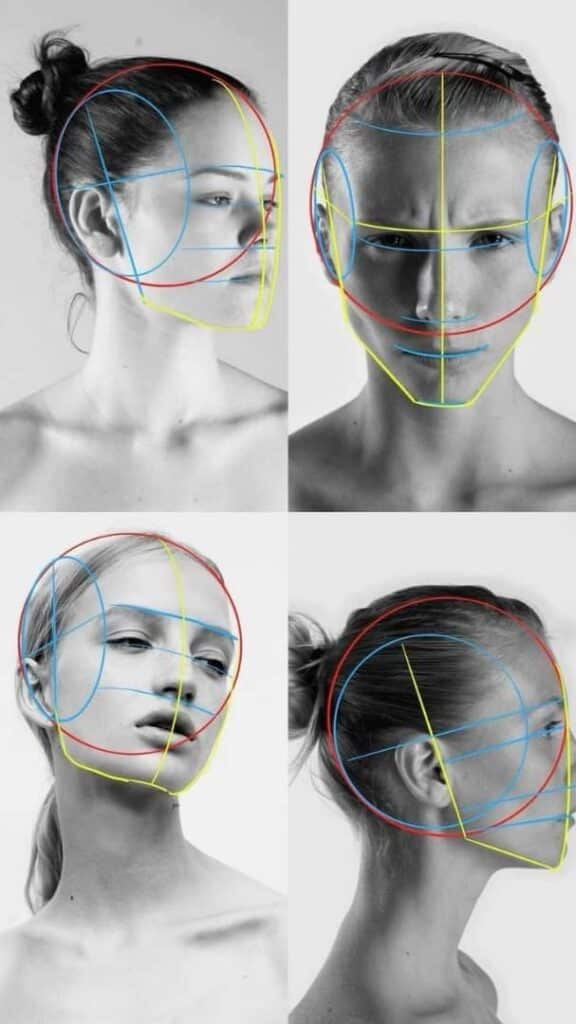
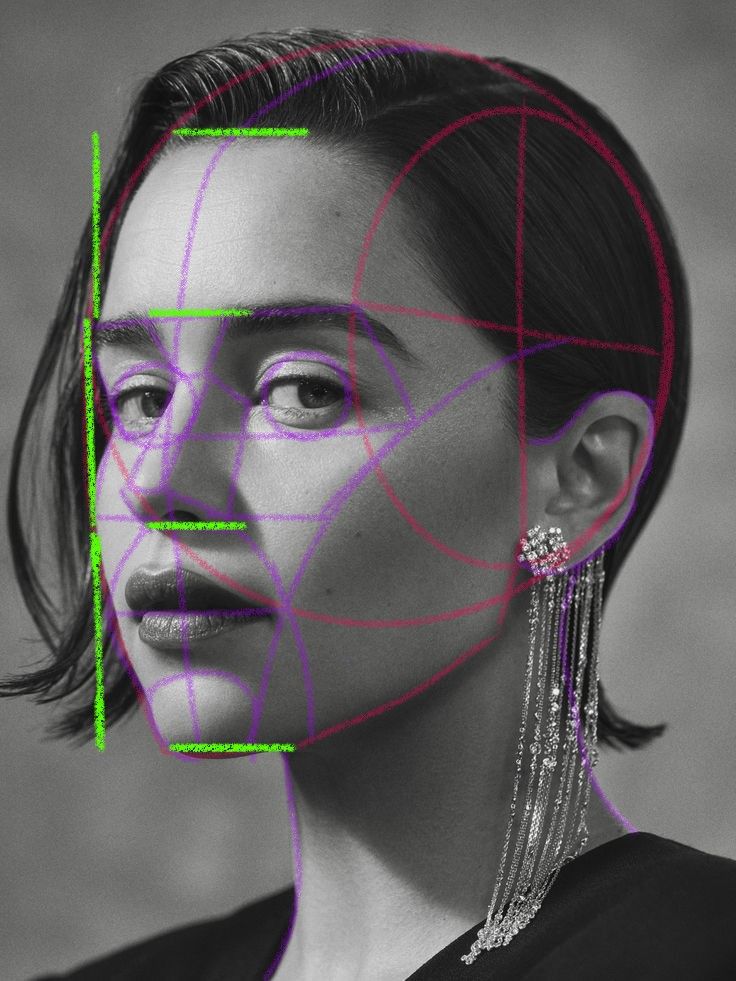
The head is often the focal point of a figure drawing, the window to a character’s soul. Understanding its intricate structure is paramount for conveying emotion and personality.
Skull Structure and Facial Features
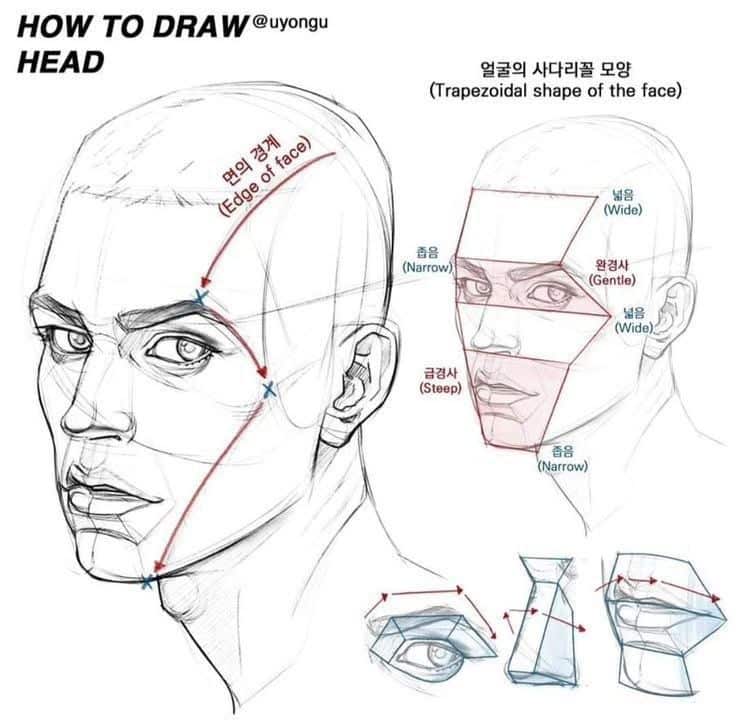
The skull is not just a single bone; it’s a complex collection of fused bones that provides the base for all facial features. Key aspects include:
- Cranium: The large, rounded part that houses the brain.
- Mandible: The lower jaw, a movable bone crucial for expression and articulation.
- Maxilla: The upper jaw, forming the base for the nose and upper teeth.
- Zygomatic Arch (Cheekbones): These bony arches contribute significantly to the width and contour of the face.
Understanding the underlying structure helps you correctly place the eyes, nose, mouth, and ears in perspective. For example, the eye sockets (orbits) define the position of the eyes, and the nasal cavity dictates the form of the nose.
Muscles of Expression
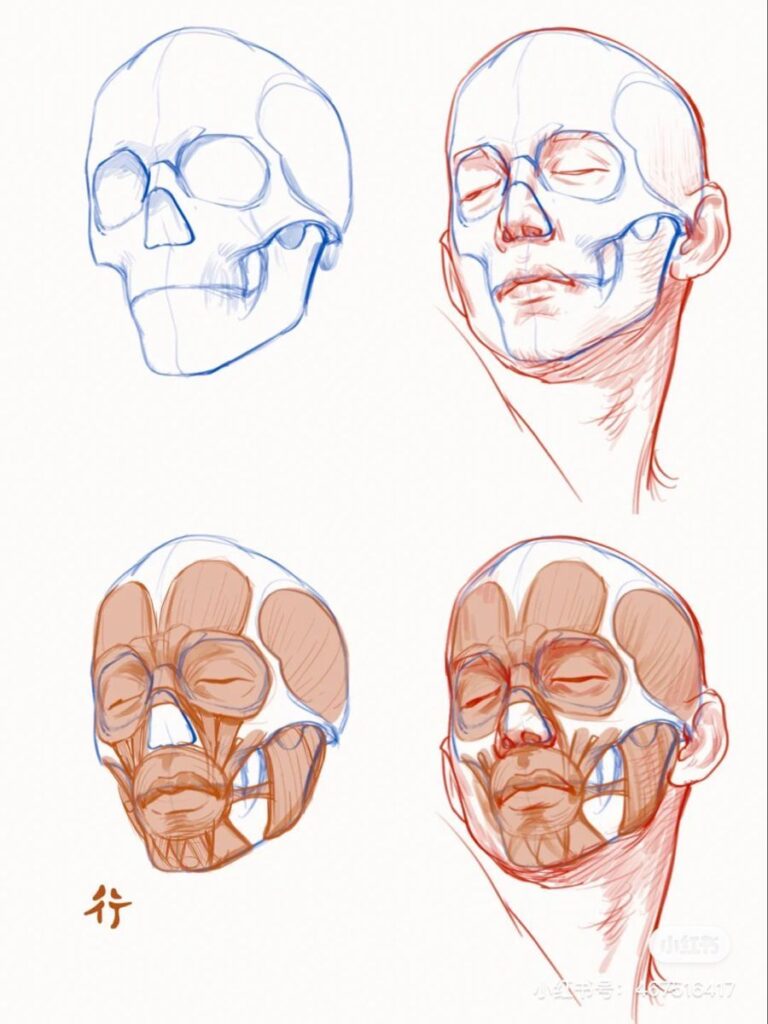
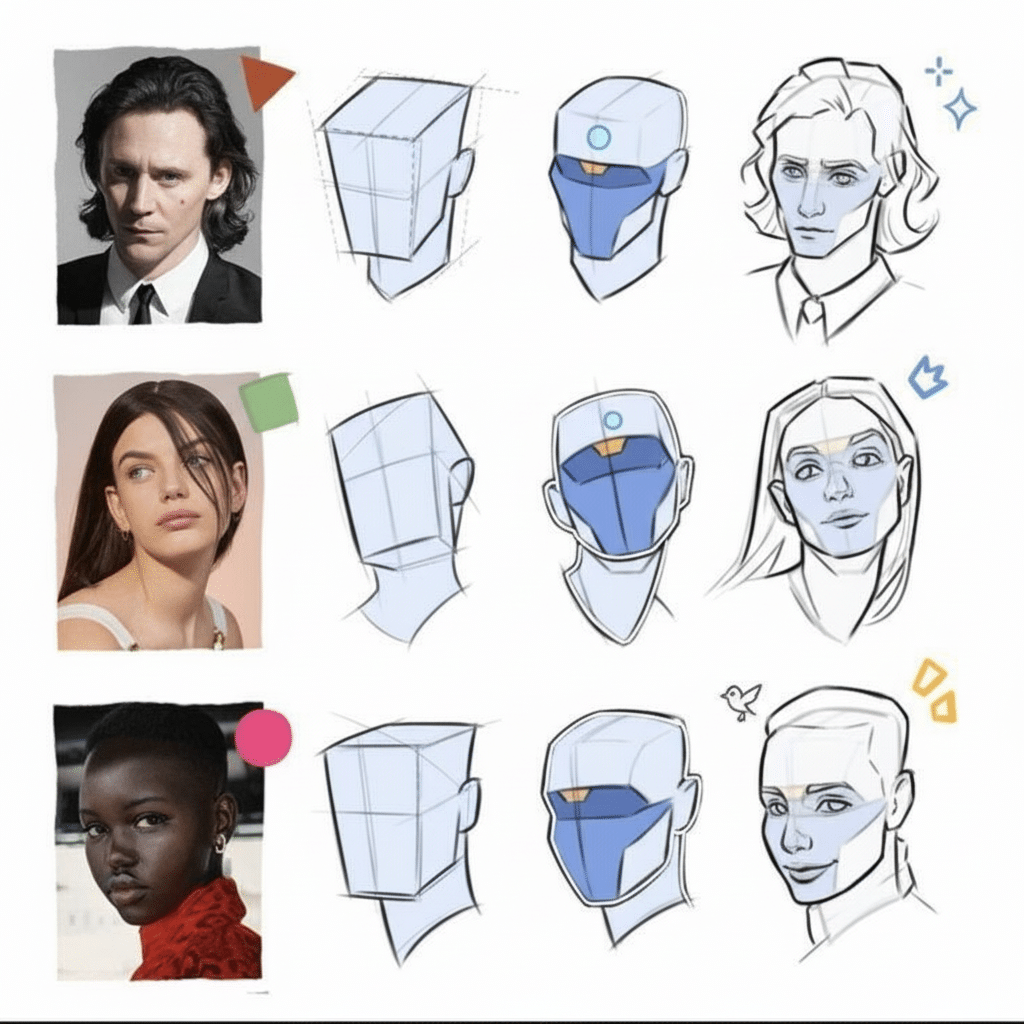
The face boasts an incredible array of small, intricate muscles that allow for a staggering range of expressions. These muscles don’t just move bones; many attach directly to the skin, pulling and pushing it to create smiles, frowns, scowls, and surprise. Key muscles include:
- Orbicularis Oculi: Encircles the eye, responsible for blinking and squinting.
- Orbicularis Oris: Encircles the mouth, used for puckering and pursing the lips.
- Zygomaticus Major: Pulls the corners of the mouth up and out, creating a smile.
- Frontalis: Lifts the eyebrows, causing forehead wrinkles and conveying surprise or concern.
Studying these muscles will unlock your ability to draw genuinely expressive faces that communicate a character’s inner world.
Neck Anatomy and its Connection to the Torso
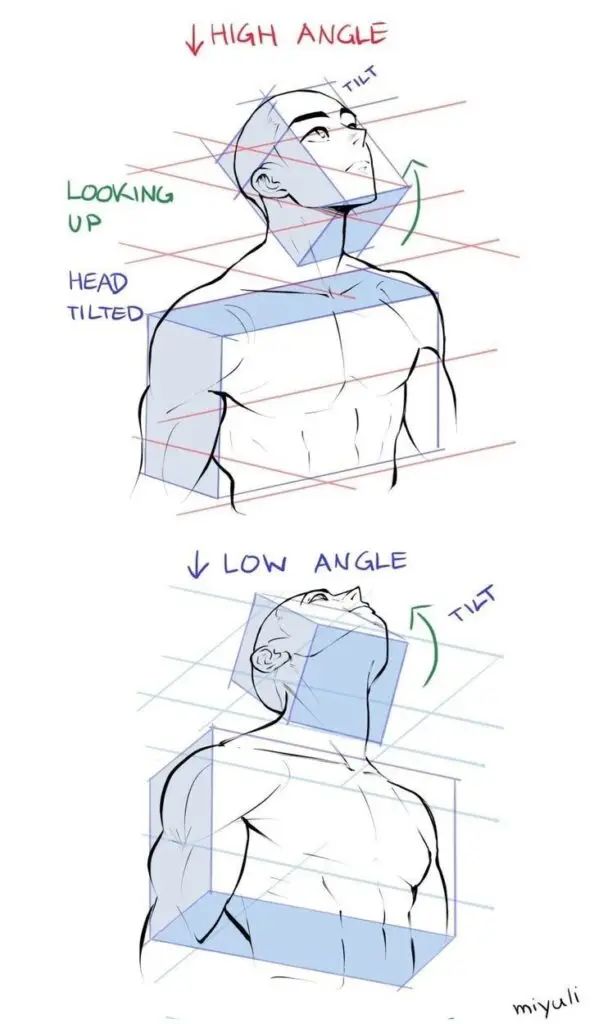
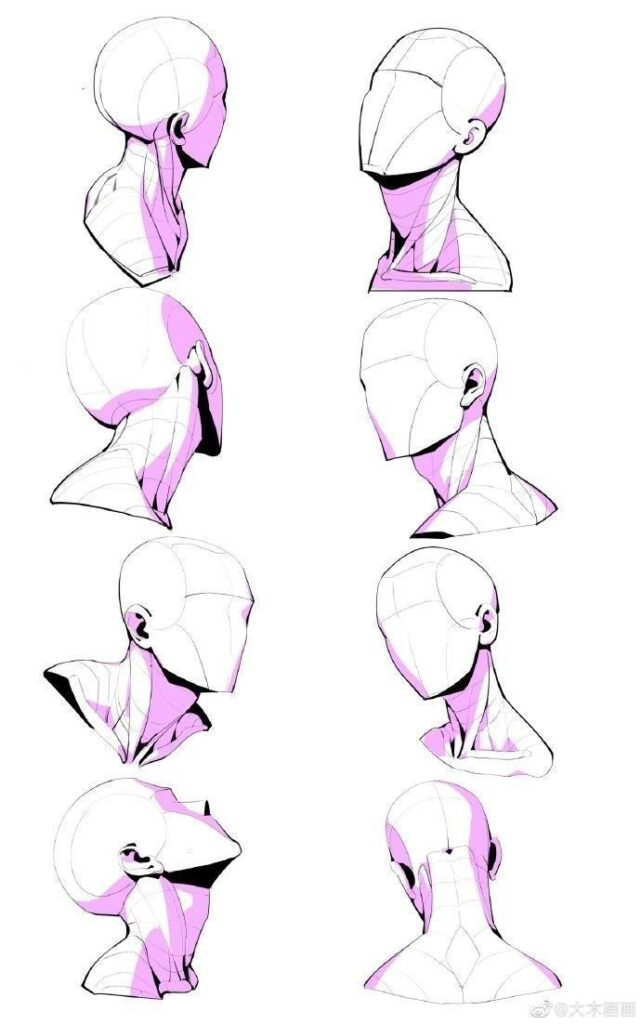
The neck is a crucial bridge between the head and the torso, providing support and facilitating a wide range of movements. Key structures include:
- Cervical Vertebrae: The seven bones of the upper spine, allowing for flexion, extension, and rotation of the head.
- Sternocleidomastoid (SCM): These prominent, rope-like muscles run from behind the ear to the sternum and clavicle. They are highly visible, especially when the head turns, creating a beautiful “V” shape at the base of the neck.
- Trapezius: As mentioned, this large muscle also extends up into the neck, influencing its bulk and connection to the shoulders.
Understanding how the head sits on the neck, and how the neck connects to the rib cage and shoulder girdle, is vital for drawing a cohesive and balanced figure.
Hands and Feet: Complex Mini-Masterpieces
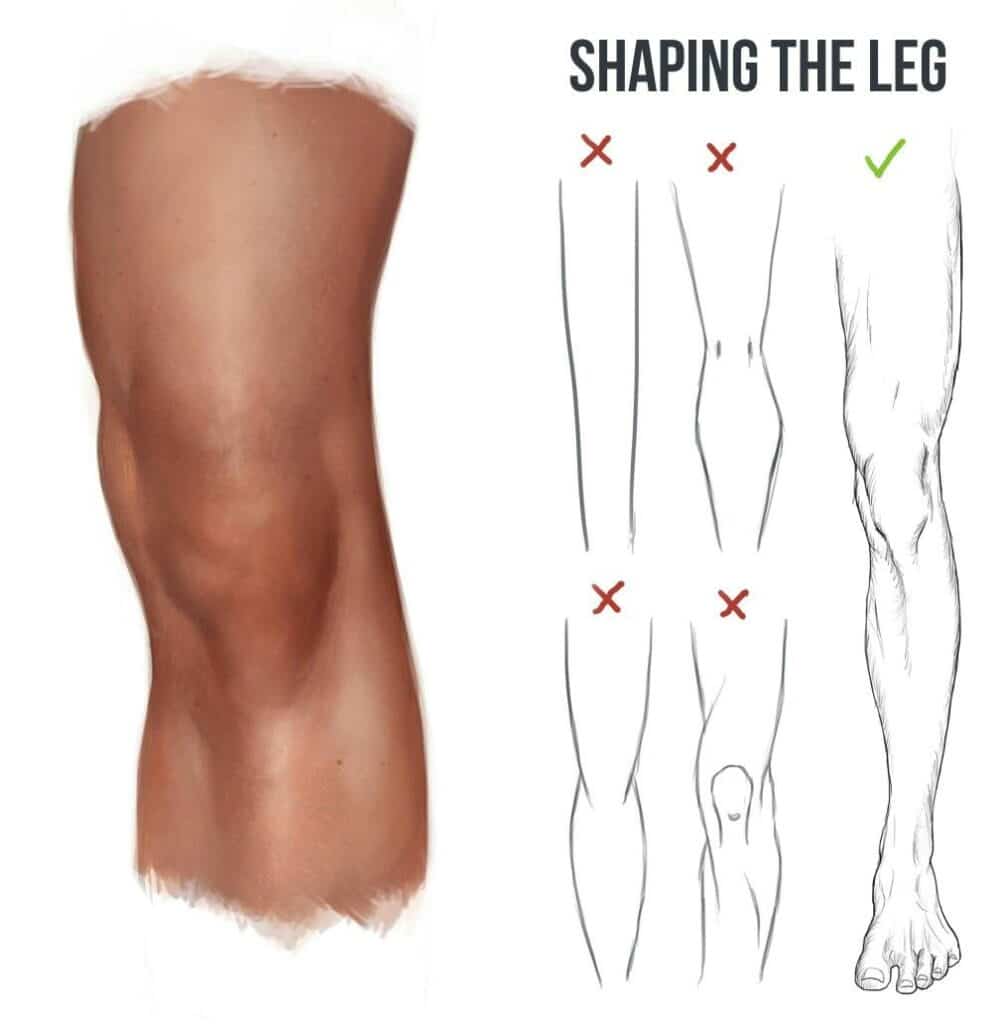
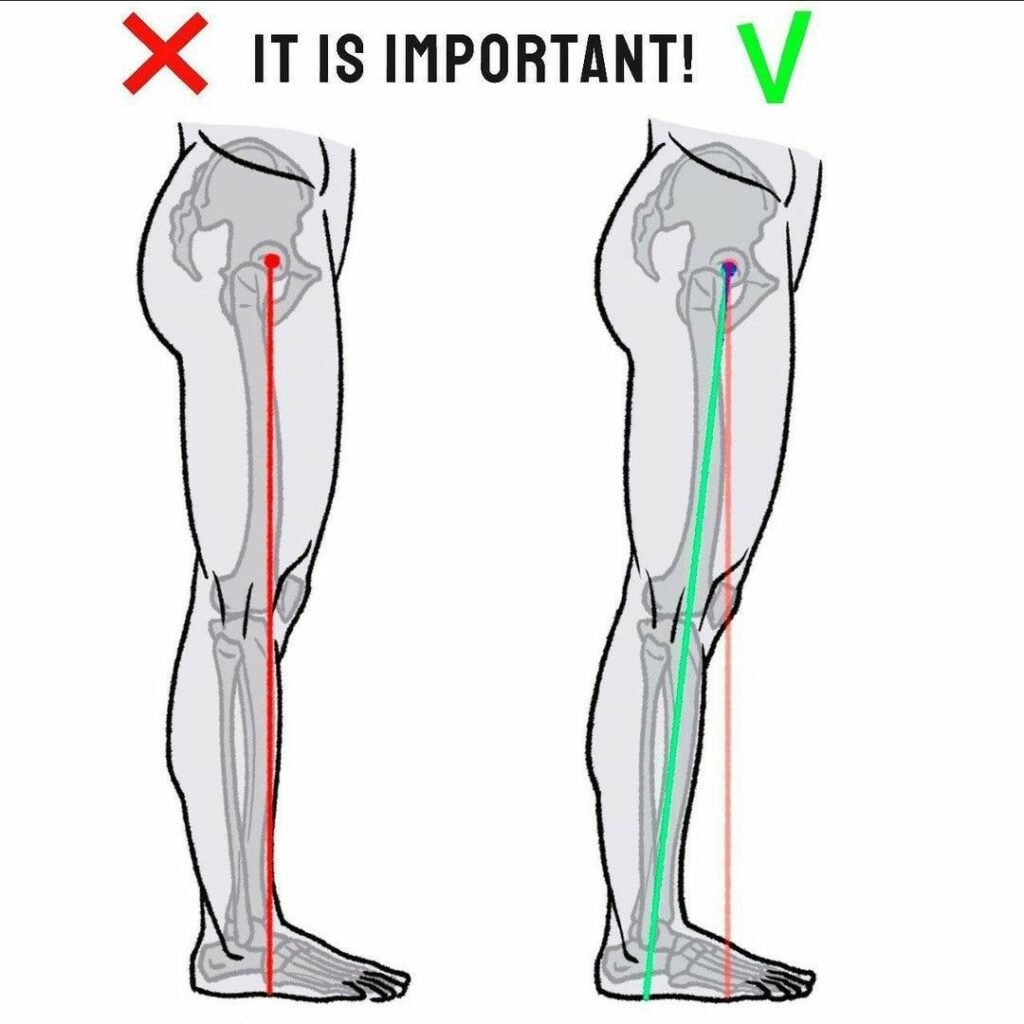
Often overlooked or simplified, hands and feet are incredibly complex and expressive parts of the human anatomy. Mastering them can elevate your figure drawings from good to outstanding.
Intricate Bone and Muscle Structures
Both hands and feet contain a remarkable number of small bones and intricate muscle groups, allowing for a vast range of delicate and powerful movements.
- Hands: Comprised of carpals (wrist), metacarpals (palm), and phalanges (fingers). The thumb, with its unique saddle joint, allows for opposition, making human hands incredibly versatile. The muscles of the hand are divided into intrinsic (within the hand) and extrinsic (forearm muscles that control the hand), creating subtle swells and depressions.
- Feet: Made up of tarsals (ankle/heel), metatarsals (mid-foot), and phalanges (toes). The foot is designed for weight bearing, propulsion, and absorbing shock. Its arches are crucial for these functions. Like the hand, it has a complex interplay of intrinsic and extrinsic muscles.
Don’t shy away from these challenges! Breaking them down into simpler forms first, then adding the anatomical details, will make them less intimidating.
Gesture and Expressiveness of Hands
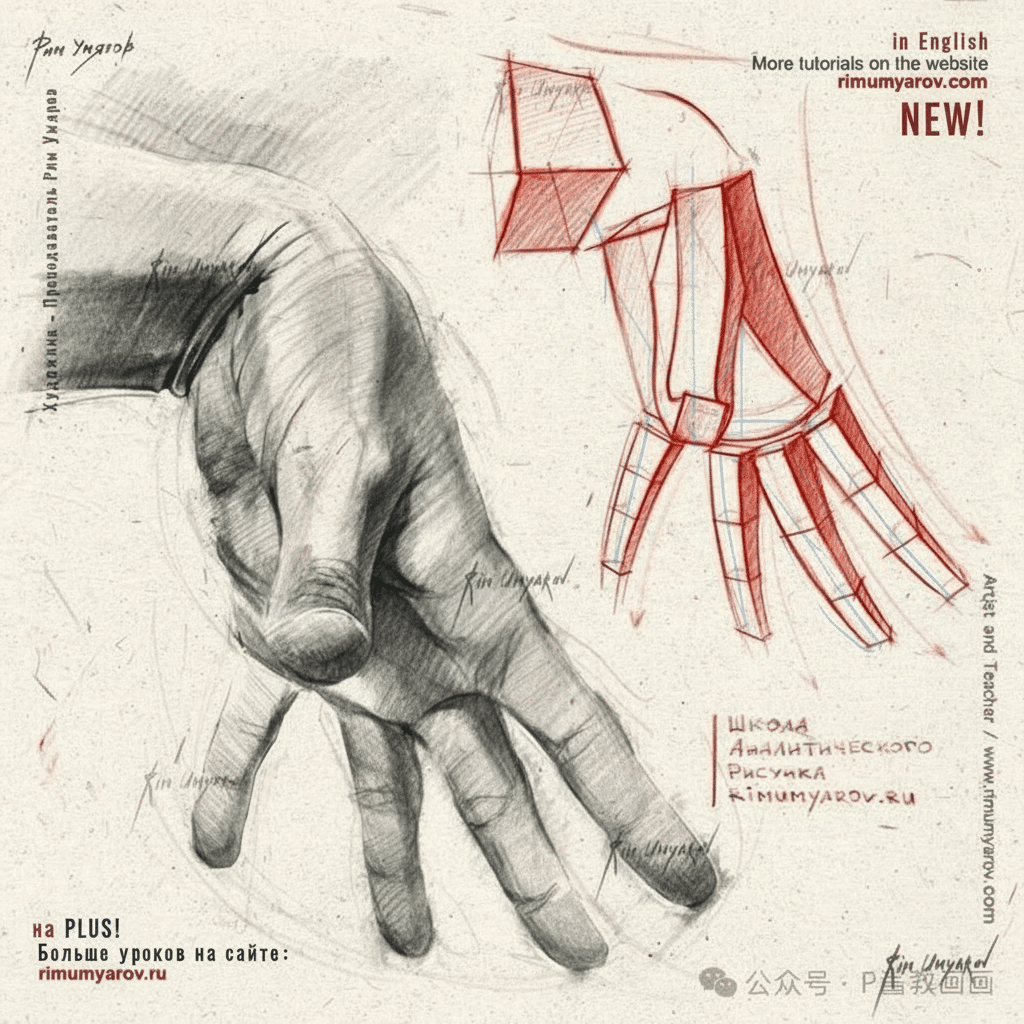
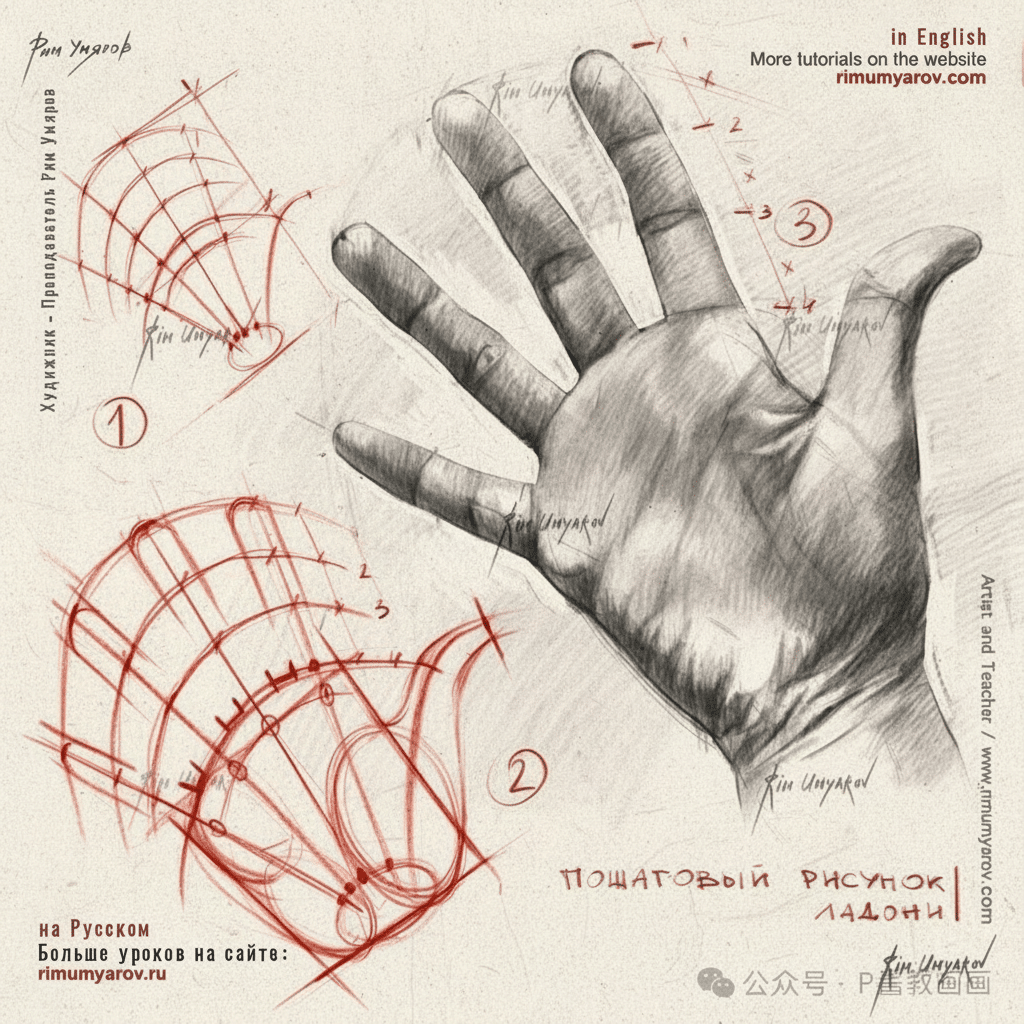
Hands are incredibly communicative. They can express tension, relaxation, anger, tenderness, and so much more. Pay attention to how the fingers curl, straighten, and spread, how the palm cups, and how the thumb interacts with the other digits. Practice drawing hands in various gestures – holding objects, pointing, resting, clenching. Every single fold and crease tells a story.
Weight Distribution and Movement in Feet
The foot is the foundation of the body. When a figure stands, the weight is distributed across the heel, the ball of the foot, and the outer edge. When moving, the foot rolls from heel to toe during a stride. Understanding these principles helps you draw feet that look like they belong to a grounded, moving figure, rather than disconnected blocks. The subtle shifting of weight on the ball of the foot or the slight curve of the arch can add tremendous realism.
Practical Approaches to Learning Anatomy for Artists


Learning Anatomy for Artists is a continuous journey, not a destination. Here are some effective strategies to integrate it into your artistic practice.
Drawing from Life and Photos

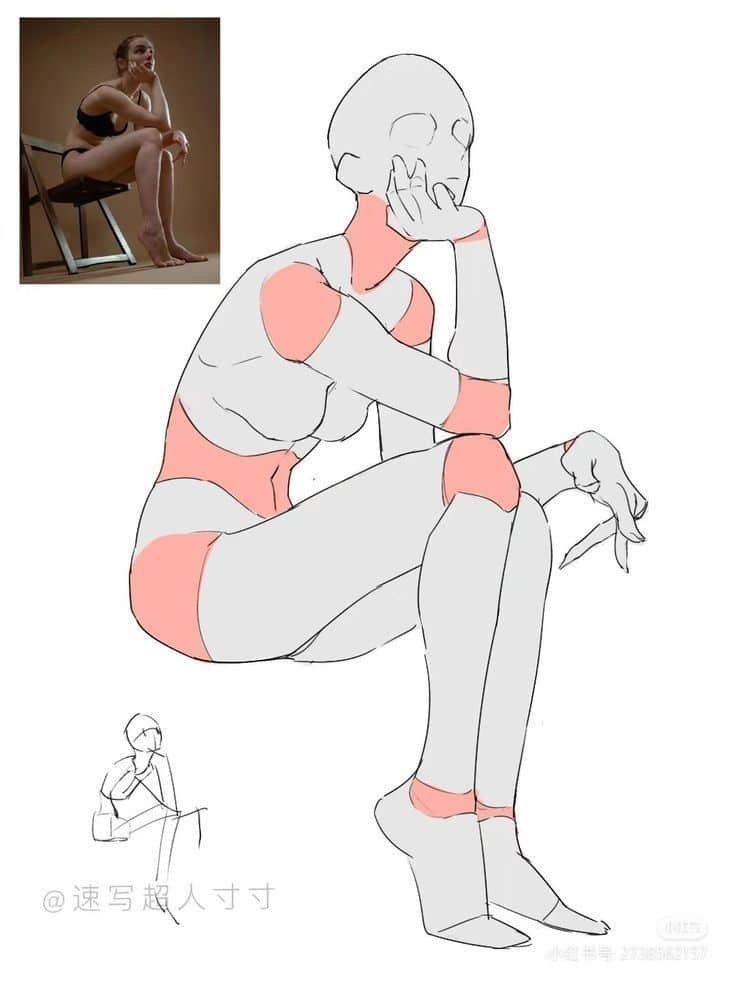
- Life Drawing Sessions: Nothing beats drawing from a live model. It teaches you to observe, to quickly capture gesture, and to understand three-dimensional forms in real space.
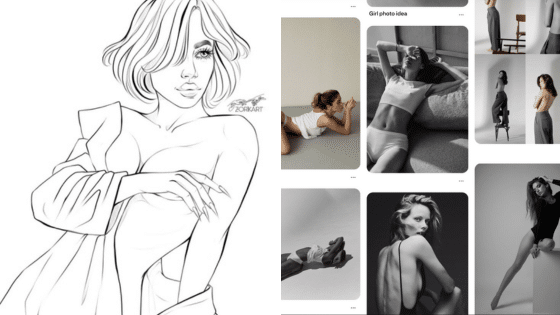
- Photo References: Build a vast library of high-quality photos. Look for diverse body types, dynamic poses, and clear lighting that highlights anatomical forms. Sites like this collection of alternatives to Pinterest for finding good photo references can be incredibly useful. Analyze how muscles contract and stretch, how light falls on the forms, and how proportions vary.
Anatomy Books and Resources
Invest in a good anatomical atlas for artists. Books by artists like George Bridgman, Andrew Loomis, and Michael Hampton are classics for a reason. Online resources, videos, and 3D anatomy apps are also fantastic tools for visualizing structures. Don’t just copy the diagrams; understand them.
Sculpting and 3D Modeling
Working in three dimensions is an unparalleled way to understand anatomy. Sculpting with clay, even simple forms, forces you to think about volume, mass, and how forms connect. If you’re digitally inclined, 3D modeling software allows you to rotate anatomical models, peel back layers, and see the relationships between bones and muscles from every angle. This kinesthetic learning makes abstract concepts tangible.
Dissection (Digital and Physical)
While physical dissection might not be accessible to everyone, digital anatomy programs offer incredibly detailed virtual dissections. These tools allow you to isolate individual muscles, trace their origins and insertions, and see exactly how they interact with bones and other soft tissues. It’s a powerful way to deepen your understanding.
Consistent Practice and Observation


The key to mastery is consistent, deliberate practice. Dedicate specific time each day or week to anatomical study. Don’t just draw; analyze. Ask “why” every time you draw a form. Why does that muscle bulge? Why does that crease appear? Keep a sketchbook dedicated to anatomy studies – for tips on making your sketchbook inviting, check out these aesthetic cover page ideas for your sketchbook. The more you observe and draw, the more intuitive anatomy will become.
Overcoming Common Anatomy Hurdles
It’s okay to feel overwhelmed sometimes. Every artist faces challenges with anatomy. Here’s how to navigate them.
Don’t Get Overwhelmed
The human body is complex! Trying to learn everything at once is a recipe for frustration. Break it down into manageable chunks. Focus on one area at a time: start with the skeleton, then major muscle groups, then specific regions like the head or hands. Build your knowledge incrementally.
Break it Down
When approaching a complex form, simplify it first. Start with basic geometric shapes (boxes, cylinders, spheres) to capture the overall mass and perspective. Then, layer in the major anatomical forms, and finally, add the intricate details. This “big to small” approach prevents you from getting lost in the minutiae too early.
Focus on Understanding, Not Just Memorizing
Rote memorization is useful, but true understanding comes from grasping the function and relationship of each part. Instead of just memorizing the name of a muscle, understand what it does, where it attaches, and how it affects the surface form. This functional understanding will allow you to apply your knowledge flexibly in your drawings.
Embrace Imperfection
Your first anatomical drawings won’t be perfect, and that’s absolutely fine! Every stroke, every simplified form, is a step in your learning journey. Embrace the process, learn from your mistakes, and celebrate your progress. The goal is continuous improvement, not instant perfection. Keep pushing, keep practicing, and you’ll see incredible growth!
Congratulations, aspiring artist! You’ve embarked on one of the most rewarding journeys in art: the study of human anatomy. This guide has laid out the essential pathways, from the unyielding framework of bones to the dynamic dance of muscles, the expressive language of the face, and the intricate poetry of hands and feet. Remember, Anatomy for Artists is not a creative cage; it’s a launchpad for your imagination. It grants you the power to create figures that resonate with truth, emotion, and unparalleled vitality, whether you’re working with pencils, paints, or even watercolor techniques.
The insights you gain from understanding the human form will deepen your observation skills, enrich your visual library, and provide you with an unshakable confidence in your artistic abilities. So, pick up your pencil, open your anatomy book, and start observing the world around you with new eyes. Every person you see, every movement you witness, is a living Anatomy for Artists lesson waiting to be absorbed. Dive in, practice diligently, and prepare to be amazed as you unleash the full potential of your art and bring your figures to life like never before! The human form is a masterpiece – now go forth and draw your own!
Why is anatomy considered essential for artists?
Anatomy for Artists is essential for artists because it provides a deep understanding of the inner structure of the human body, allowing for realistic, expressive, and believable figures that breathe and move convincingly.
How does knowledge of bones improve figure drawing?
Understanding bones helps artists accurately depict the framework and proportions of the body, ensuring that figures are balanced, structured, and true to life from multiple angles.
What are the key bones every artist should focus on?
Artists should focus on major bones such as the skull, spine, rib cage, pelvis, shoulder girdle, and the long bones of the limbs, as these significantly influence surface form and pose.
How do muscles impact surface anatomy?
Muscles are responsible for movement and the shaping of the human form; knowing their actions, origins, and insertions enables artists to depict tension, relaxation, and dynamic motion more convincingly.
What practical methods can artists use to learn anatomy effectively?
Artists can learn anatomy through life drawing, studying anatomy books, sculpting, digital dissection tools, and consistent practice with observation and analysis to deepen their understanding and intuitive grasp of form.
- 13.8Kshares
- Facebook0
- Pinterest13.8K
- Twitter3
- Reddit0


