A penguin is basically a bean with a beak. That’s the good news. The tricky part is the cuteness: shrink the head a little or nudge the eyes a few millimeters too high, and your sweet penguin turns into a suspicious bowling pin with a grudge.
I trained as an industrial designer, and the first thing my academic drawing teachers drilled into us was that proportion does the emotional work long before line quality gets a vote. Car designers know this too. The same few ratios that make a Smart look friendly and a Jaguar F-Pace look like it wants your lunch will decide whether your penguin reads as adorable or awkward.
- What you need for a cute penguin drawing
- How to draw a penguin in 5 steps
- Why this penguin looks cute: the proportion rules
- Common penguin drawing mistakes and quick fixes
- Penguin drawing variations from the same base
- Coloring a penguin so it doesn't look flat
- Penguin drawing FAQ
- How do you draw a penguin step by step for beginners?
- What shapes do you use to draw a penguin?
- How do you make a penguin drawing look cute?
- What colors do you need to draw a penguin?
- How do you draw a realistic penguin?
- How do you draw a Christmas penguin?
- How long does it take to draw a penguin?
- Can kids follow this penguin drawing tutorial?
- Start with the head, then the rest follows
So this tutorial does two jobs. First, you’ll learn how to draw a penguin in 5 steps, starting from one peanut shape instead of the usual snowman stack. Then I’ll show you the proportion rules behind the cuteness, the mistakes that ruin most beginner penguins, and how to turn your base drawing into a fluffy chick, an emperor or a Christmas penguin in a scarf. You need a pencil, an eraser and about 15 minutes.
What you need for a cute penguin drawing
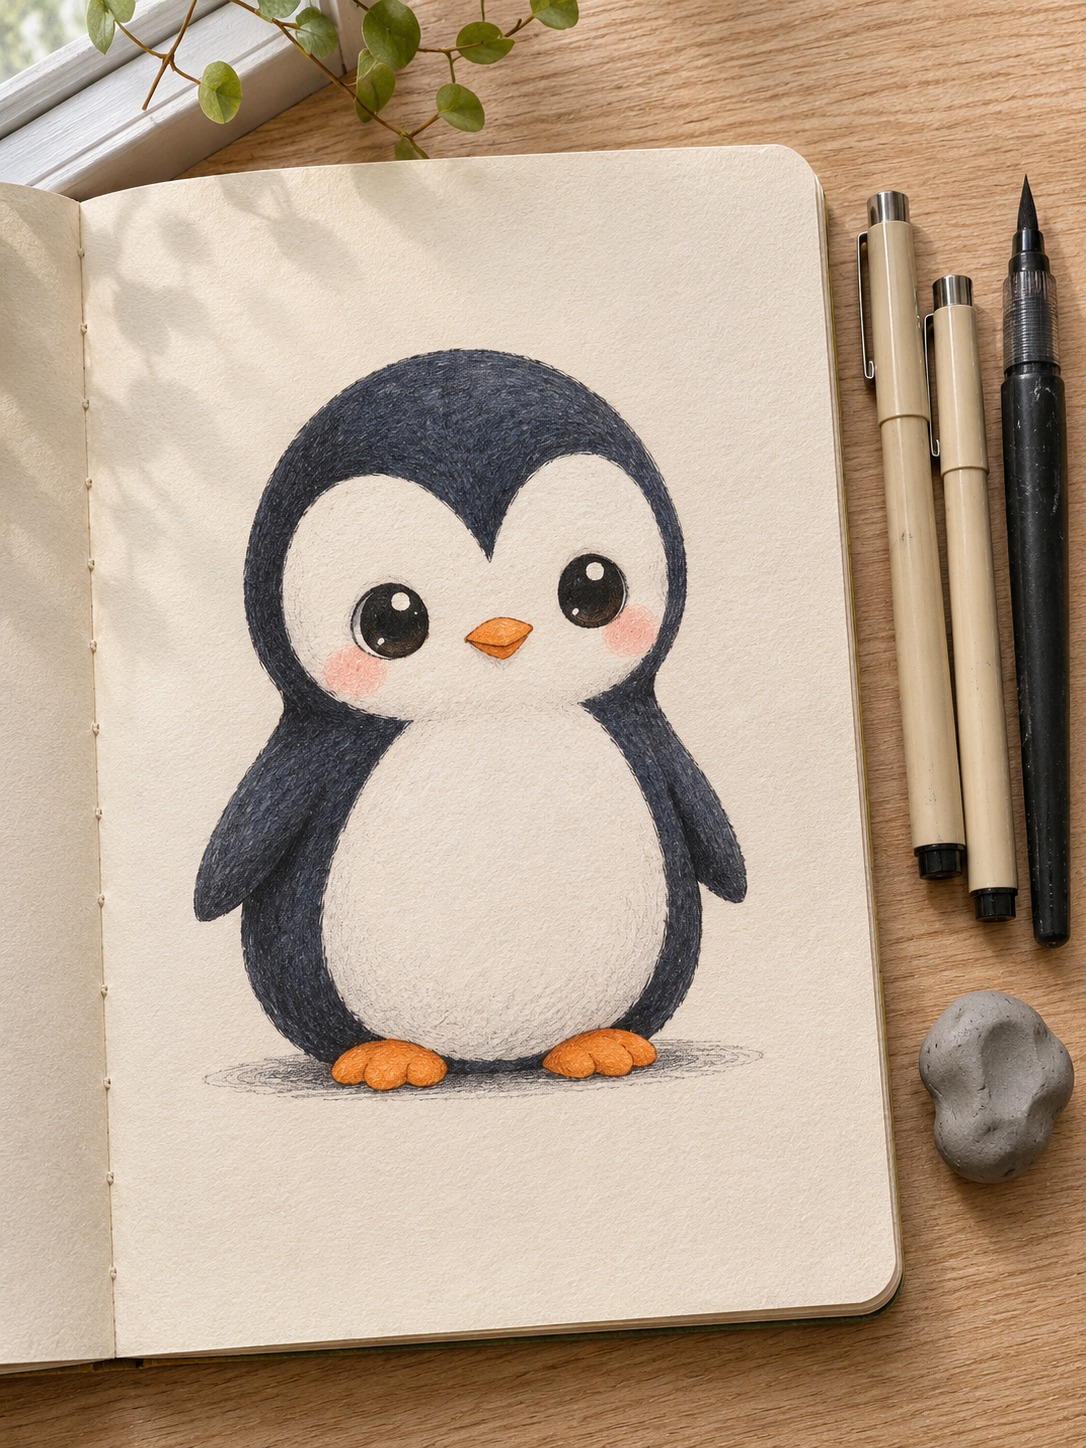
Nothing fancy. A regular HB pencil for the sketch and a 2B for firmer lines will do. I like Faber-Castell 9000 pencils because the graphite erases cleanly, and that matters when half your early lines are construction marks. Any kneaded eraser works.
For clean line art, a Sakura Pigma Micron 05 (0.45 mm) handles outlines and an 01 (0.25 mm) handles small details like toes and the belly edge. If you want that solid, glossy back, a Tombow Fudenosuke brush pen fills big areas without the streaks a felt-tip marker leaves. A white Gelly Roll 08 adds highlights on top of black ink.
Color is optional. Colored pencils, alcohol markers or watercolor all work, and you only need four colors (I’ll get to why one of them should be blue-grey rather than black). Drawing digitally? On iPad, Procreate’s StreamLine brush setting smooths shaky curves, which helps a lot with round shapes like this one.
How to draw a penguin in 5 steps
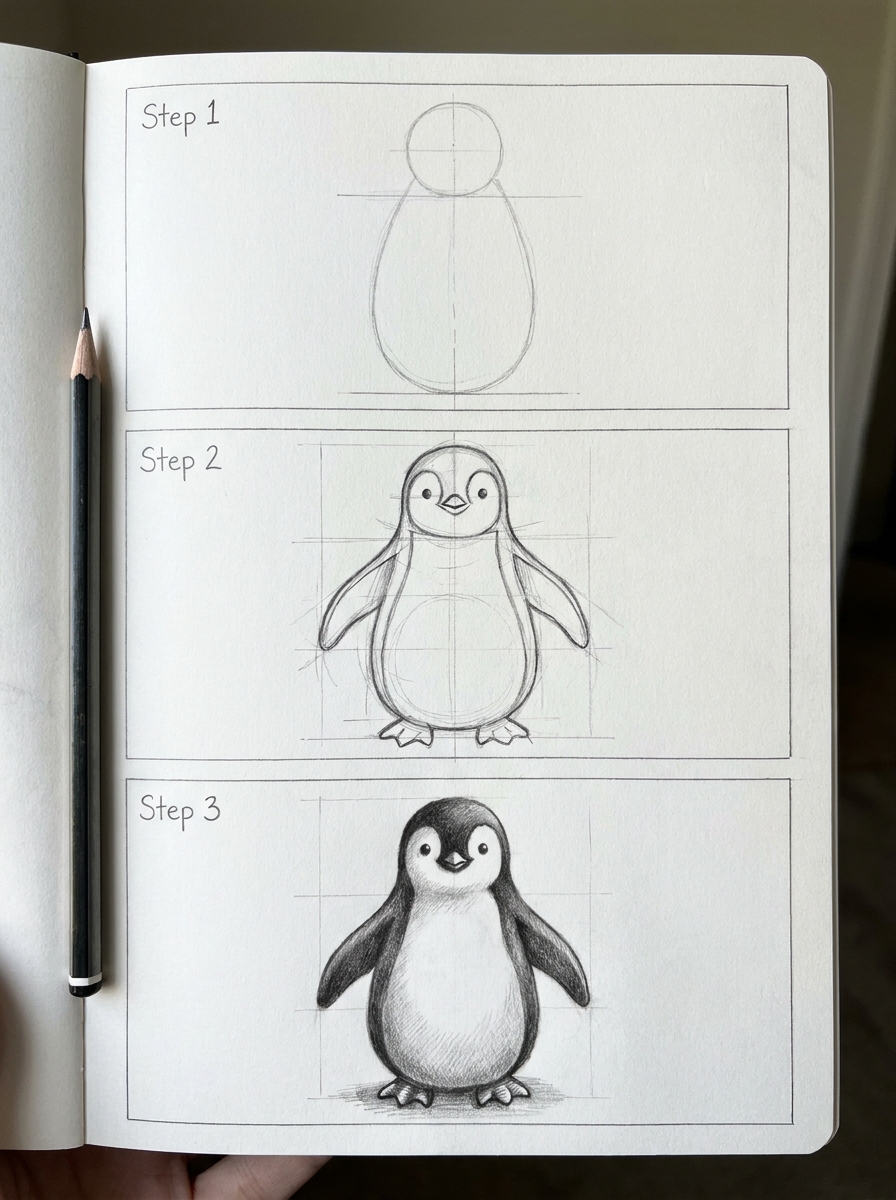
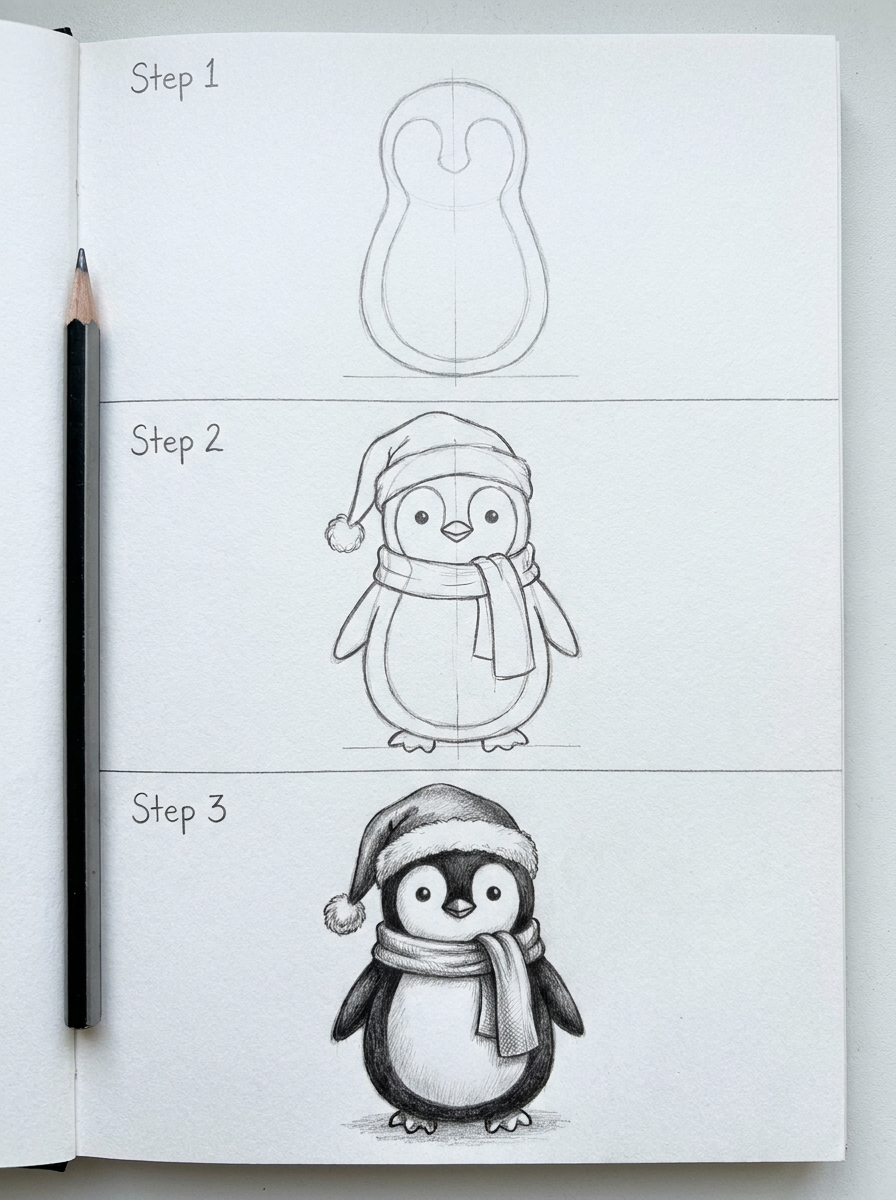
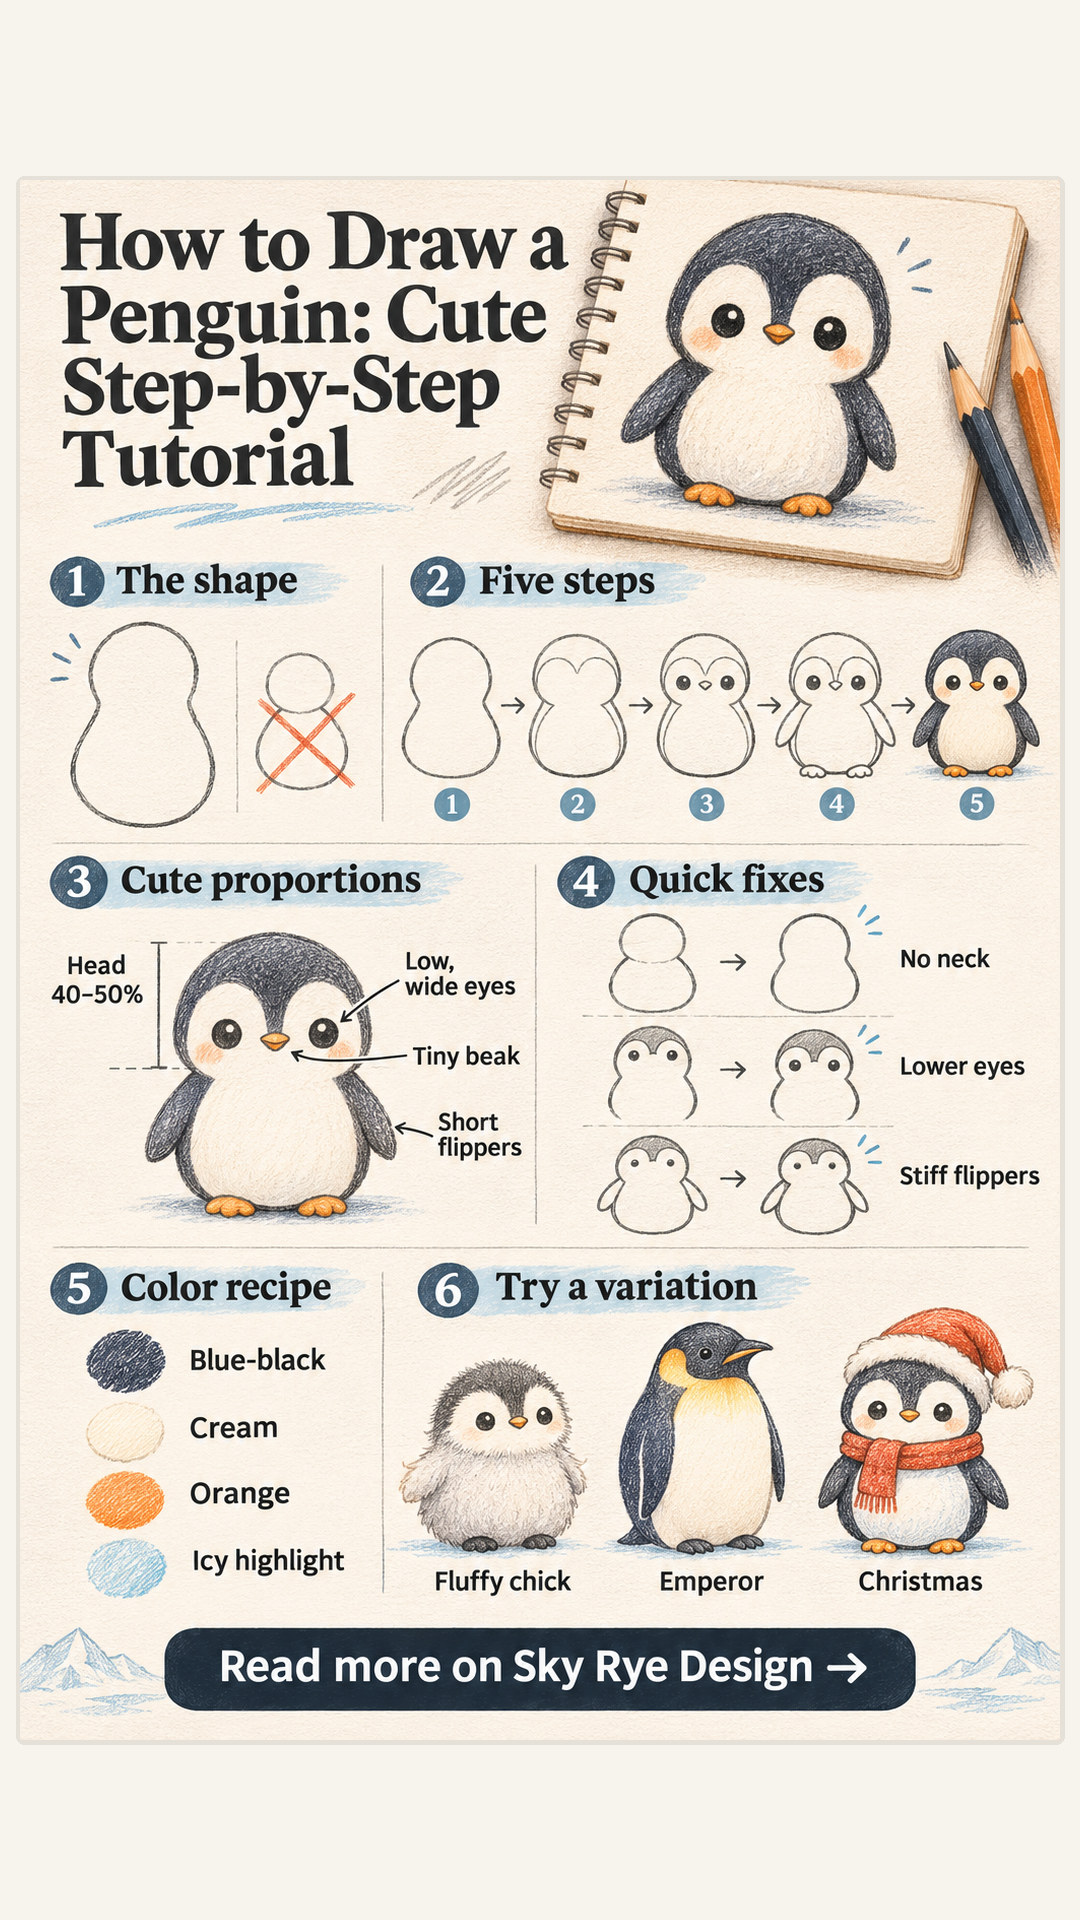
Here’s the whole process at a glance. Draw one peanut-shaped body, carve out the white face and belly, place big eyes and a tiny beak low on the head, attach the flippers and feet, then ink and color. Each step takes two to four minutes, so this is an easy penguin drawing even if you haven’t picked up a pencil in years.
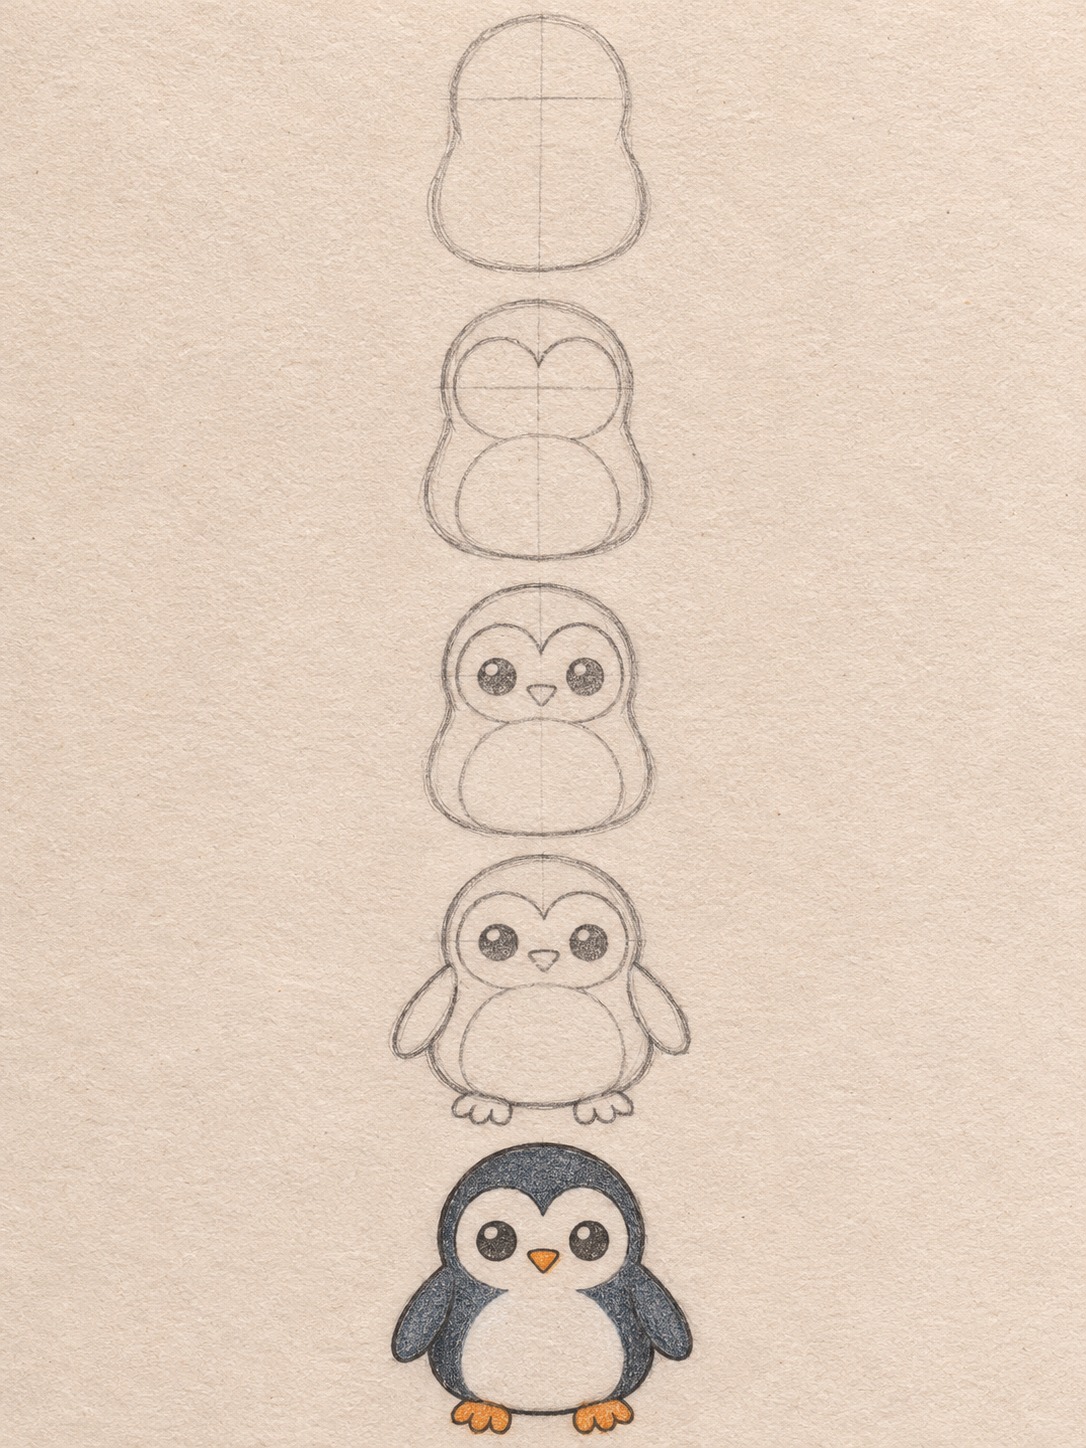
Step 1: Draw one peanut shape for the head and body
Forget the circle-on-an-oval method most tutorials teach. It works, but the joint between the two shapes almost always pinches in like a snowman’s neck, and penguins don’t have a neck you can see.
Instead, draw one tall rounded shape: narrower at the top, wider at the bottom, gently pinched about 40% of the way down. Think peanut shell, or a bowling pin that ate well. For a cute penguin, make the top bulge (the head) almost as wide as the bottom one. That big-head ratio is the most important decision in the whole drawing.
Then lightly draw a vertical center line and a horizontal line across the head where the eyes will sit. Want the penguin turned slightly? Curve the center line around the form, like the seam on a beach ball. Keep everything light, because you’ll erase most of it.
Step 2: Carve out the white face and belly
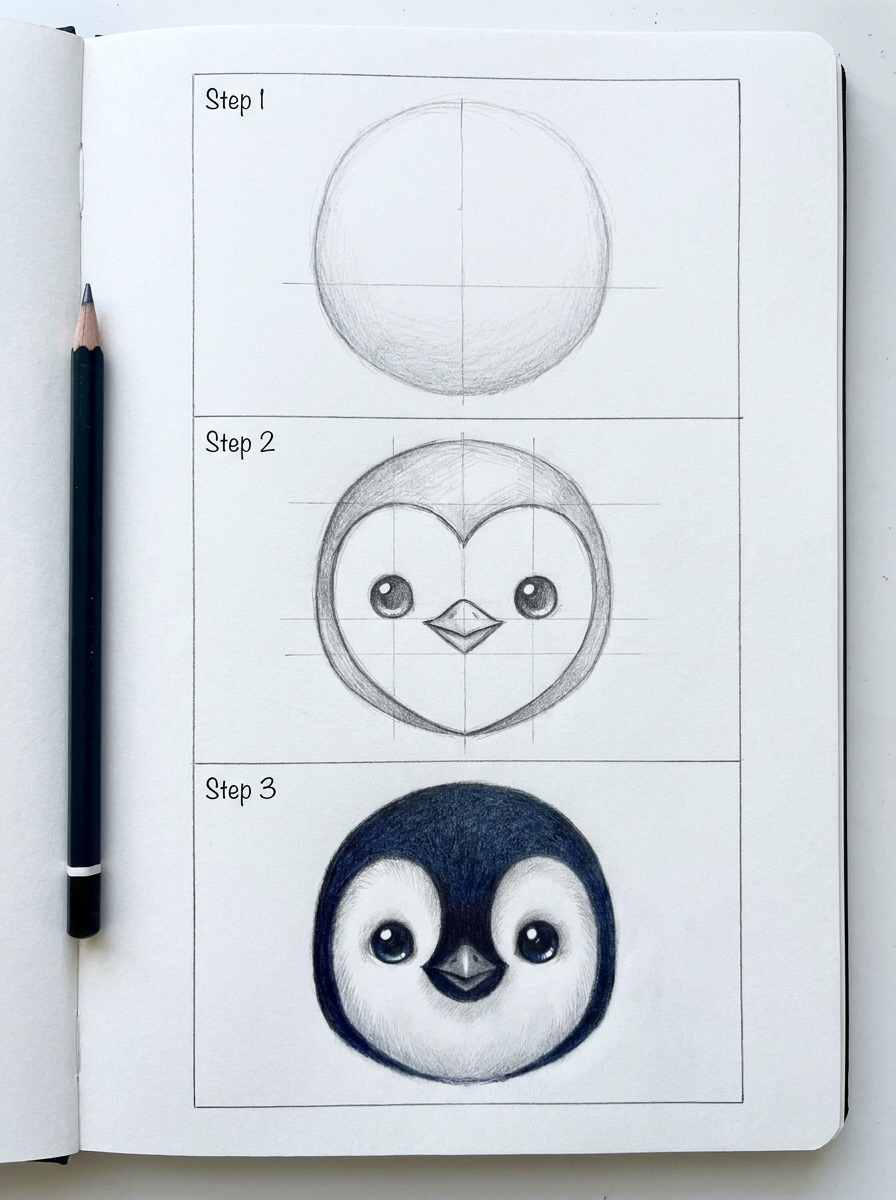
Penguins wear their white like a bib that runs all the way down. Inside your peanut, draw a heart shape on the face, with the two lobes around the eye area and the point dipping toward the chest. Let it flow into a big egg shape for the belly.
Leave a band of dark body visible around the edges, wider on top of the head and thinner along the sides. That dark rim is what makes the belly read as the front of a round body instead of a sticker slapped on top.
This mask is also where species differences live. A heart-shaped face gives you the classic cartoon penguin. Drop the mask completely, keep only a thin white ring around each eye, and you’re halfway to an Adélie penguin.
Step 3: Place big eyes and a tiny beak low on the head
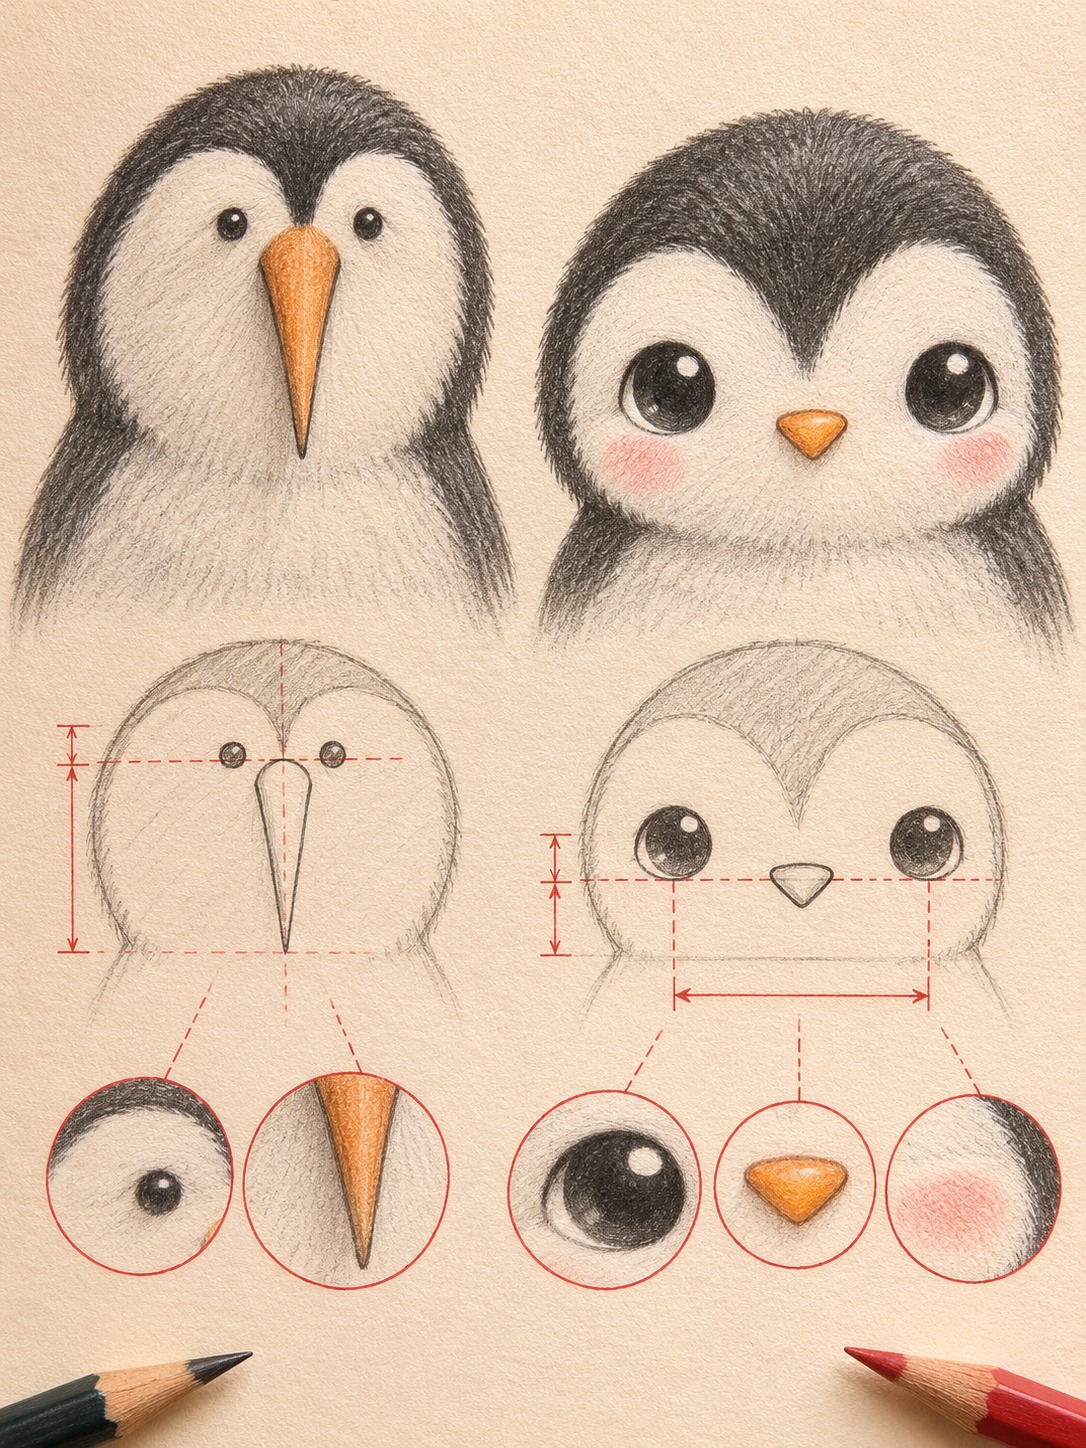
Here’s where most penguins live or die. Put the eyes on or just below your horizontal guideline, and keep them far enough apart that a third eye could fit between them. Make them big. On a cute penguin, each eye can be about a quarter of the head’s width.
Draw each eye as a solid dark oval with one or two small white highlights, and put those highlights in the same spot in both eyes (upper right, say). Matching highlights tell the viewer both eyes catch the same light, and the penguin suddenly looks alive.
The beak goes between the eyes and slightly below them. Keep it small: a short rounded triangle or a little diamond. A long, pointed beak pushes the drawing toward realism, which is fine if that’s your goal, but it costs you cuteness fast. Going full kawaii? Add two soft pink ovals on the cheeks.
Step 4: Attach the flippers and feet
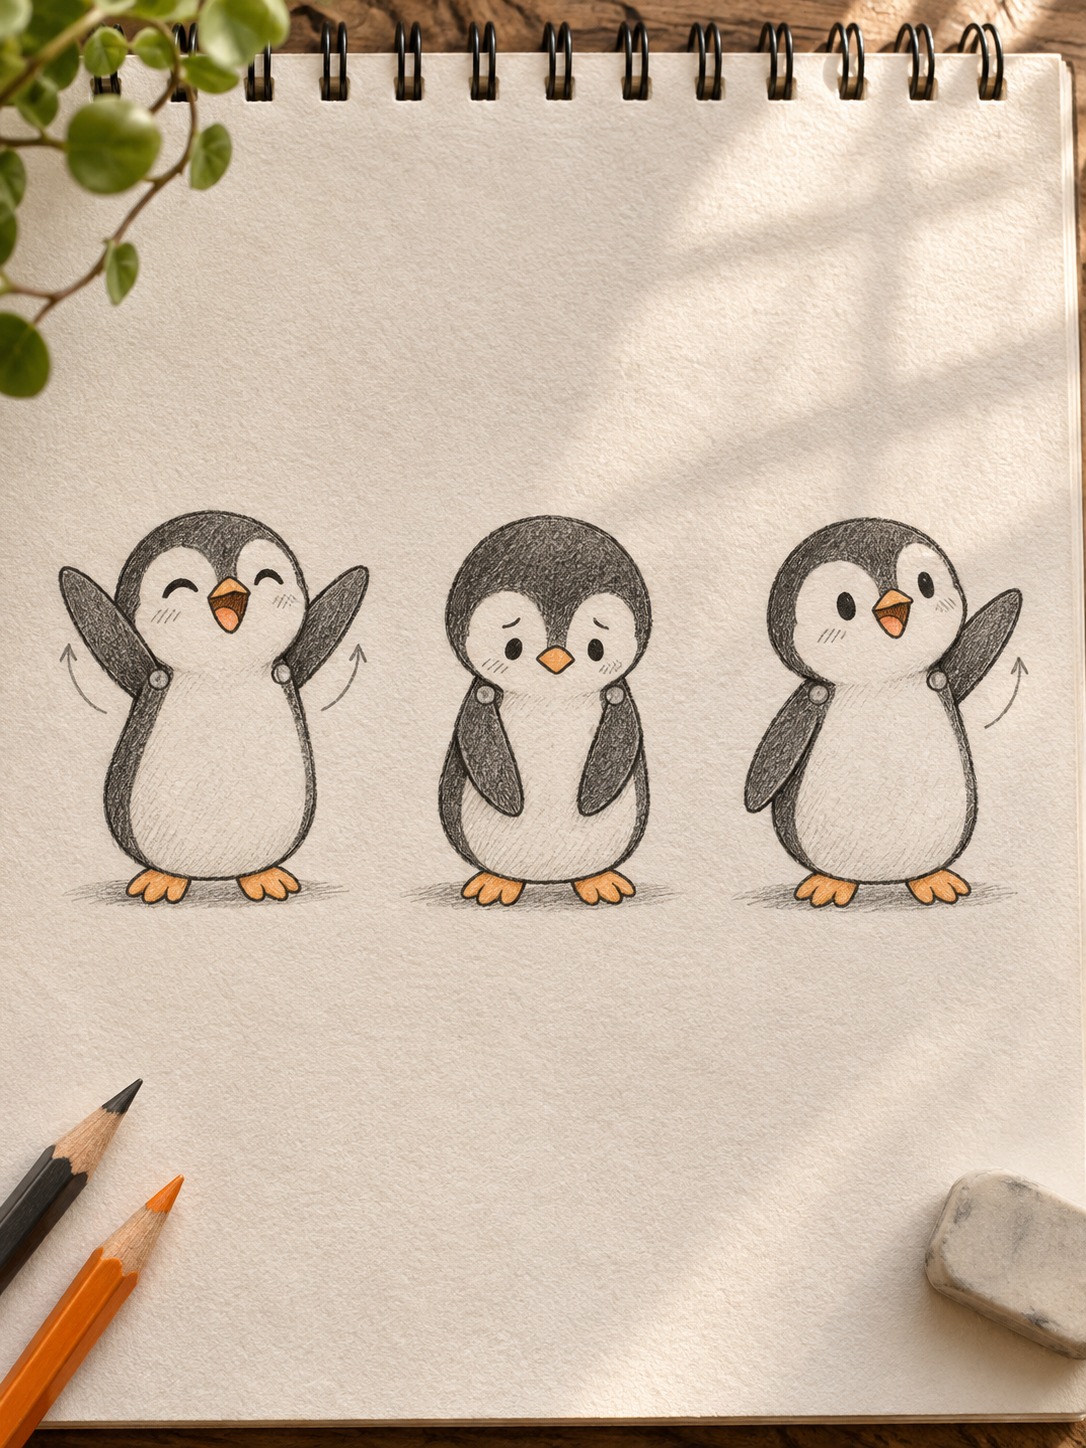
Flippers grow out of the sides of the body just below the head, roughly where a shoulder would be. Draw them as long, slightly curved teardrops, wide at the top and tapering to a rounded tip. No elbows. A penguin flipper is stiff, more paddle than arm, so it pivots at the shoulder and nowhere else.
Use the angle to tell a story. Both flippers out and slightly raised reads as excited. Both pressed tight to the body reads as shy or cold. One lifted high reads as a wave.
Feet go at the very bottom, partly tucked under the belly. Draw two short, wide shapes with three rounded toes each, pointing slightly outward. Keep them small. A real penguin’s legs are mostly hidden inside its body, so all you see are stubby feet, and that waddle-ready stance is half the charm.
Step 5: Ink, clean up and color
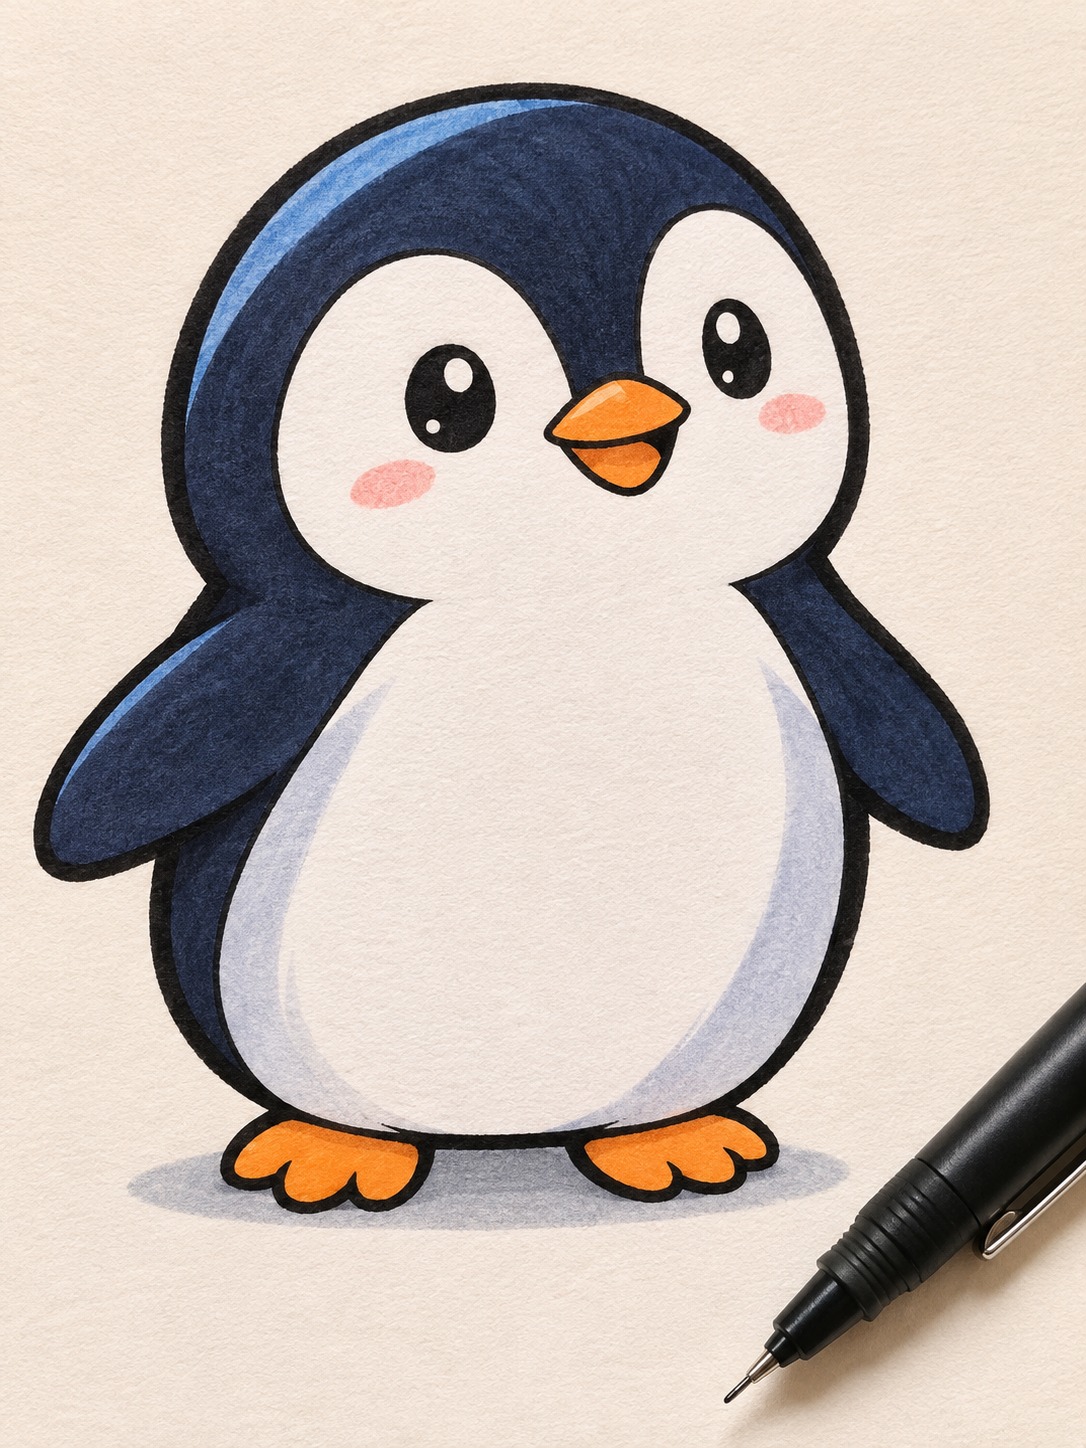
Go over your final lines with a fineliner. Use the heavier pen (that Micron 05) for the outer silhouette and the lighter 01 for the belly edge and inner details. It’s an old illustration trick: the heavy outline separates the character from the page, and the lighter inner lines keep it from looking like a coloring book.
Give the ink a minute to dry, then erase every pencil guide.
For color, fill the back, head and flippers with a dark blue-grey or blue-black instead of flat black. Leave the face and belly white (or the palest cream) and make the beak and feet orange. Add one curved stroke of lighter blue along the top of the head and back as a highlight, plus a soft grey shadow on the belly under each flipper. If you filled the back with a black brush pen, add that highlight with the white gel pen instead. That’s it. You’ve drawn a penguin.
Tip: Draw the same penguin three times in a row before you try variations. By the third one your hand knows the peanut shape, and the whole drawing drops to under 10 minutes.
Why this penguin looks cute: the proportion rules
In 1943, Austrian zoologist Konrad Lorenz described what he called the Kindchenschema, or baby schema: a set of features that makes adults instinctively want to protect something. A big head compared with the body. Large eyes set low on the face. Round cheeks, a short nose, short and chubby limbs. Our brains react to these cues whether they show up on a human baby, a puppy or a cute penguin drawing.
The numbers I actually use
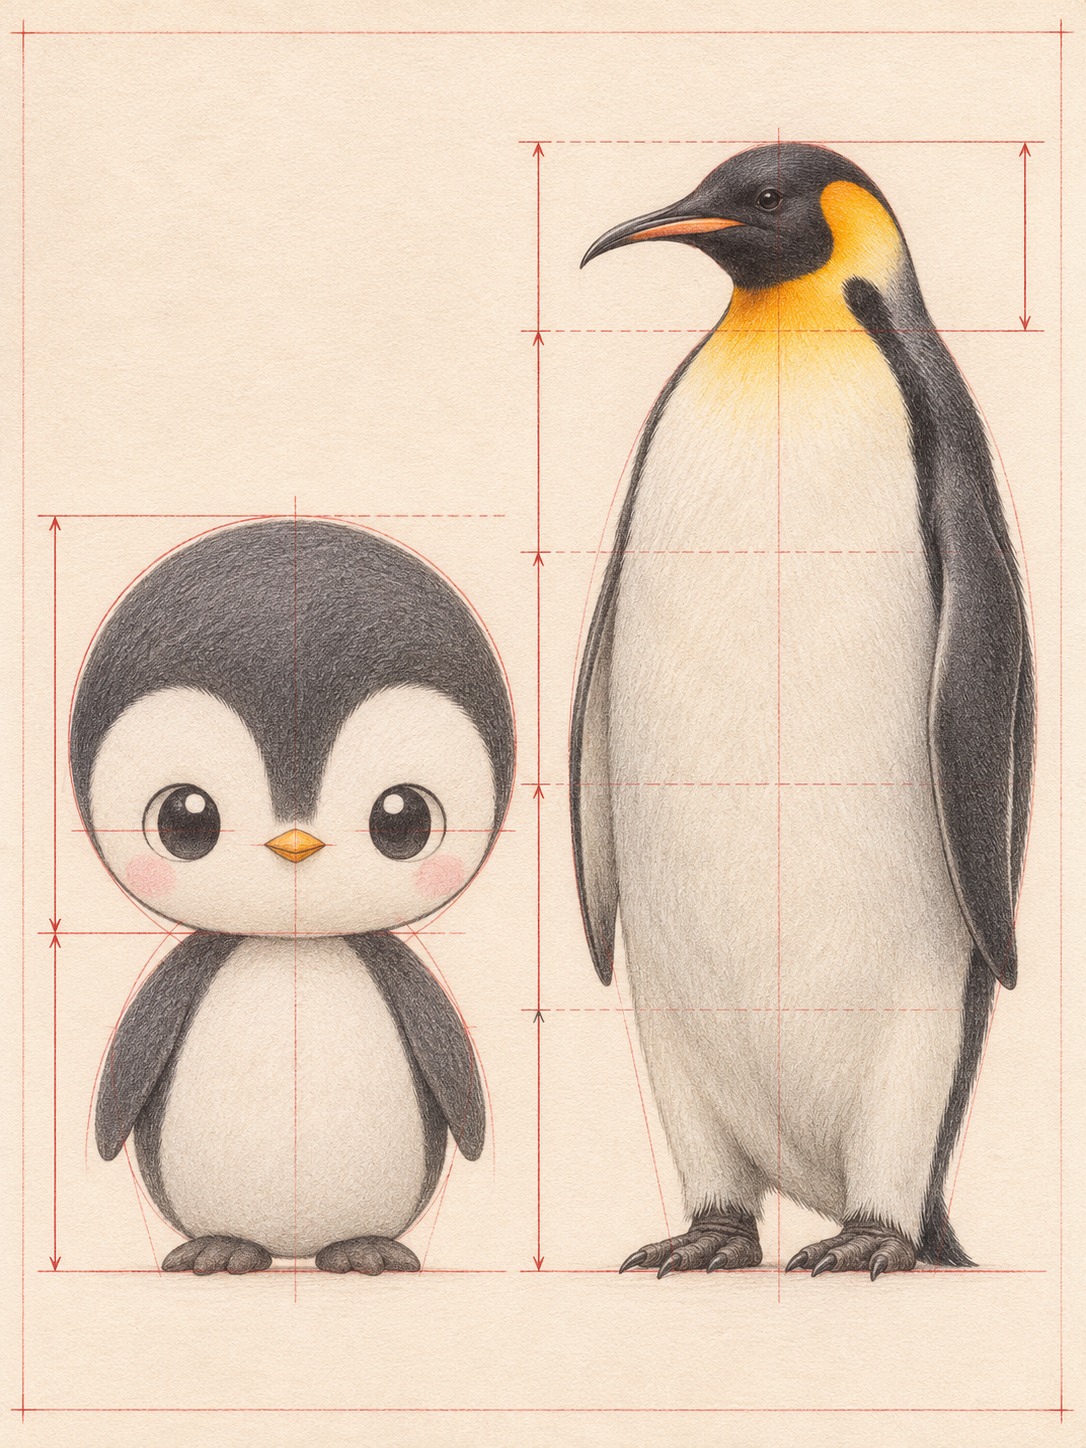
For a cartoon penguin, I keep the head at roughly 40 to 50% of the total height. A realistic emperor’s head is closer to a fifth. The eyes sit below the head’s midline, the beak takes up no more than about a tenth of the head’s width, and the flippers stay shorter than the body is wide.
These aren’t laws. They’re the checks I run when something feels off. If your penguin looks creepy, measure the head first. Often it is too small, or the eyes are too high.
What car design taught me about cute faces
Automotive designers pull the same levers. I’ve owned a Smart and driven a Jaguar F-Pace, and their faces couldn’t be more different. The Smart has big headlights relative to its short, tall body and almost no overhang at either end. It looks like it wants a hug. The F-Pace has narrow, swept-back lights set into a long, low hood. It looks like it wants your lunch.
Your penguin works the same way. Make the eyes bigger and rounder, push them lower, shorten everything that sticks out, and you move toward the Smart. Narrow the eyes, stretch the beak and the body, and you’re drawing the F-Pace. Neither is wrong. You just need to know which levers you’re pulling.
Common penguin drawing mistakes and quick fixes
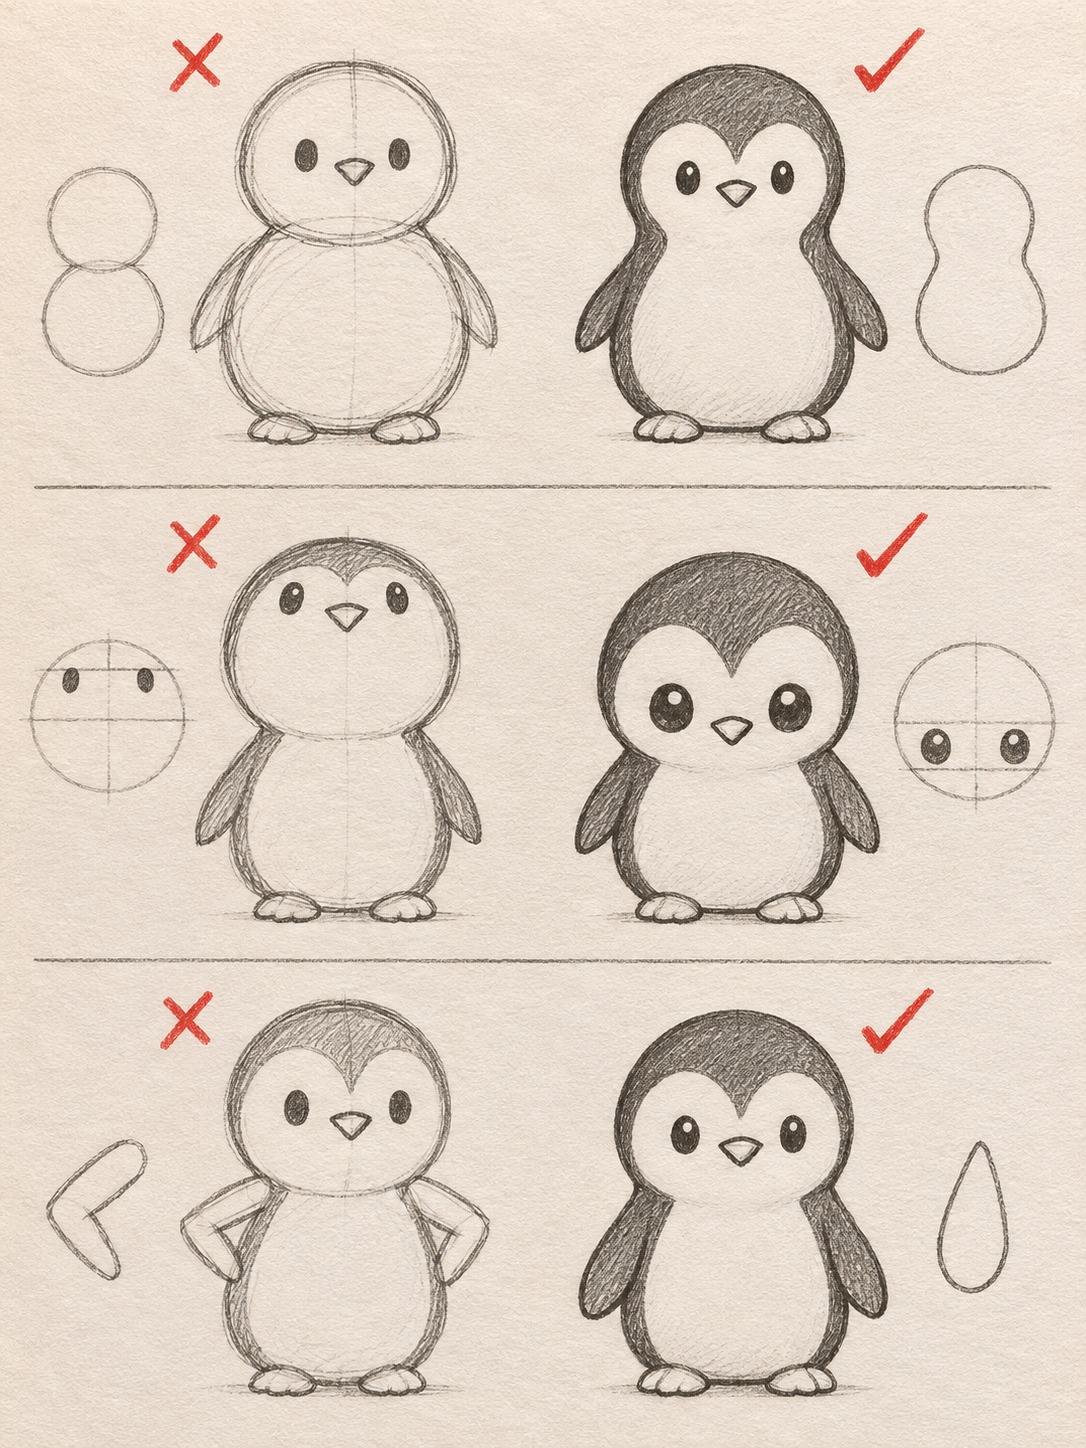
The same handful of problems shows up in almost every beginner penguin I see. Here they are with the fix for each.
| Mistake | Quick fix |
|---|---|
| Snowman neck: a circle stacked on an oval leaves a pinched joint | Draw one continuous peanut silhouette. Penguins have no visible neck. |
| Head too small | Make the head 40 to 50% of the total height for a cute style. |
| Eyes placed high, in the middle of the head | Drop them to or below the head’s midline and space them wide. |
| Belly drawn as a flat oval sticker | Leave a dark rim around the white and curve the belly edge with the body. |
| Flippers bent like arms, with elbows | Draw stiff teardrop paddles that pivot only at the shoulder. |
| Huge, splayed feet | Keep the feet short, tucked under the belly, toes angled slightly out. |
| Flat black fill | Use blue-black and add one lighter highlight along the back. |
If I had to pick the worst one, it’s the eyes. I’ve noticed people almost always put them where an adult face would have them, around the middle of the head. On a baby-shaped body that reads as an adult face, and the result feels a little uncanny. On a 10 cm drawing, lowering the eyes by 2 or 3 mm softens the whole expression.
Penguin drawing variations from the same base
Once the base penguin feels easy, you can turn it into almost anything with a few changes. Here are the three versions people ask about most, plus a cheat sheet for drawing specific species.
Baby penguin chick
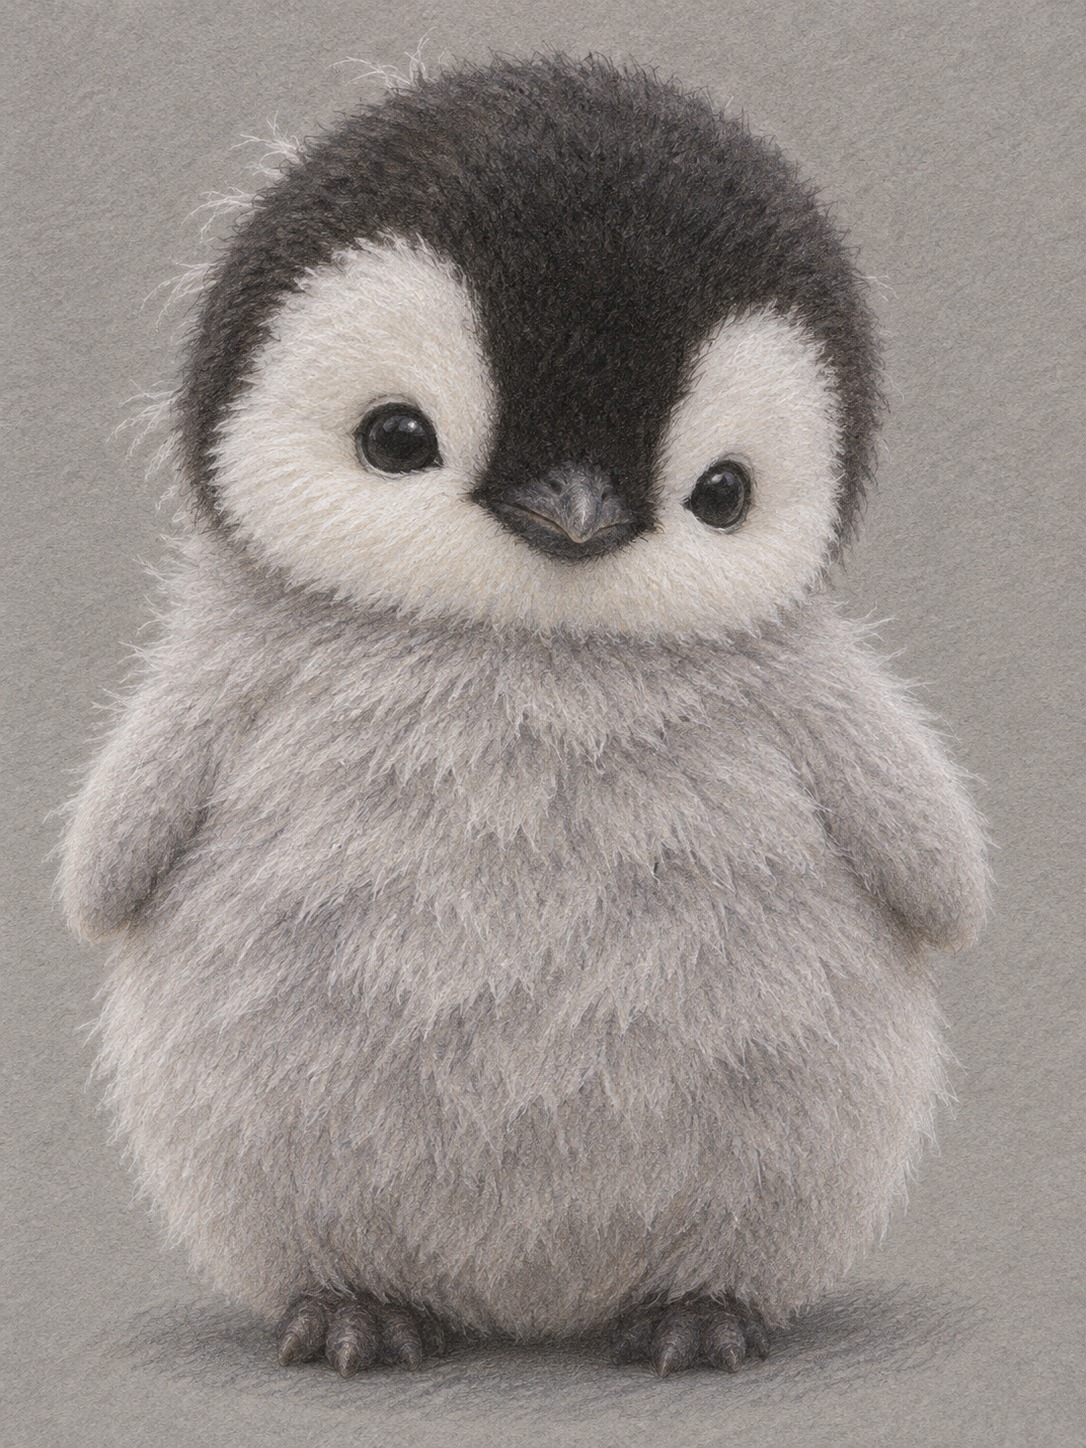
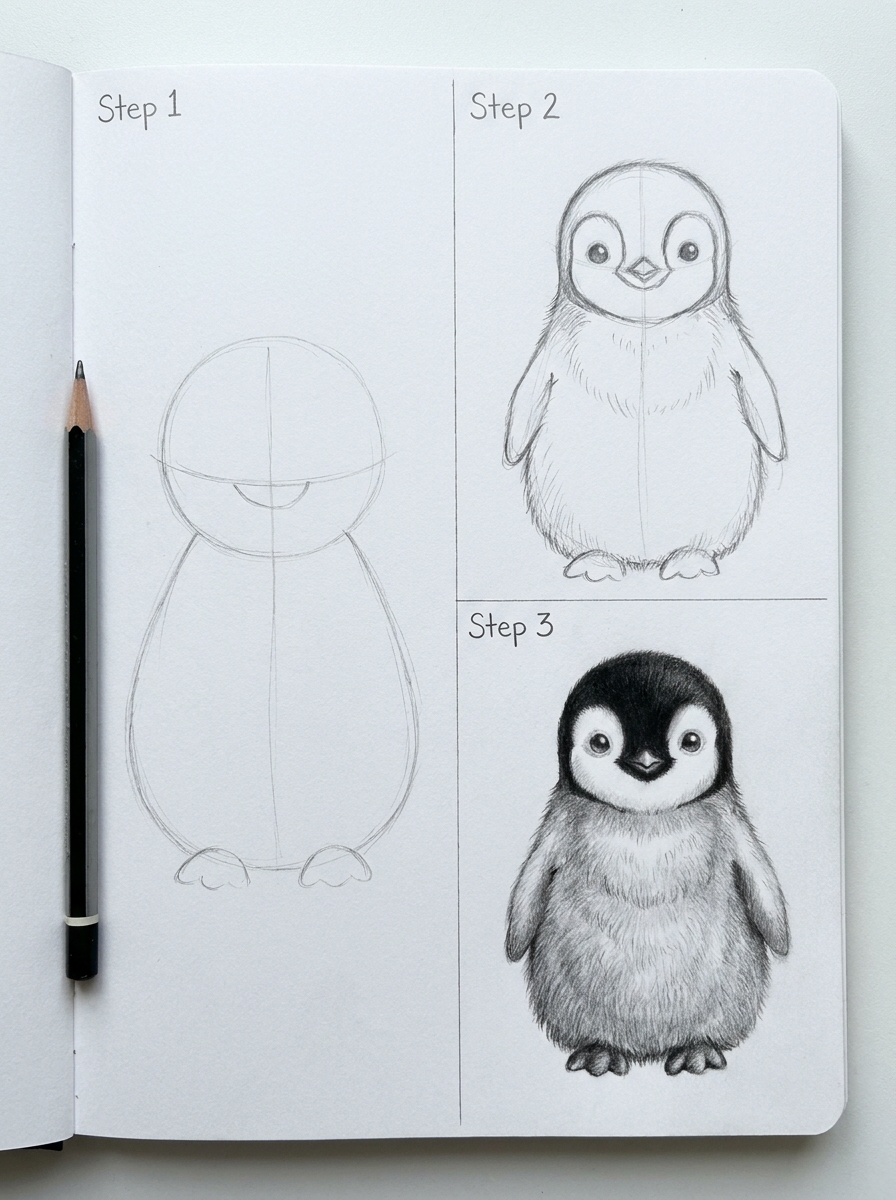
Make the head even bigger (half the total height or more), shrink the flippers to little nubs, and swap the smooth outline for short, fuzzy zigzag strokes. Emperor chicks wear silver-grey down with a black head and a white face mask. King penguin chicks are fluffy and brown all over. The most famous one, Pesto at SEA LIFE Melbourne, weighed 22 kg at nine months old in 2024, more than both his parents combined. Draw him as a brown fuzzy pear with tiny feet and you’ve got an instant crowd-pleaser.
Emperor penguin
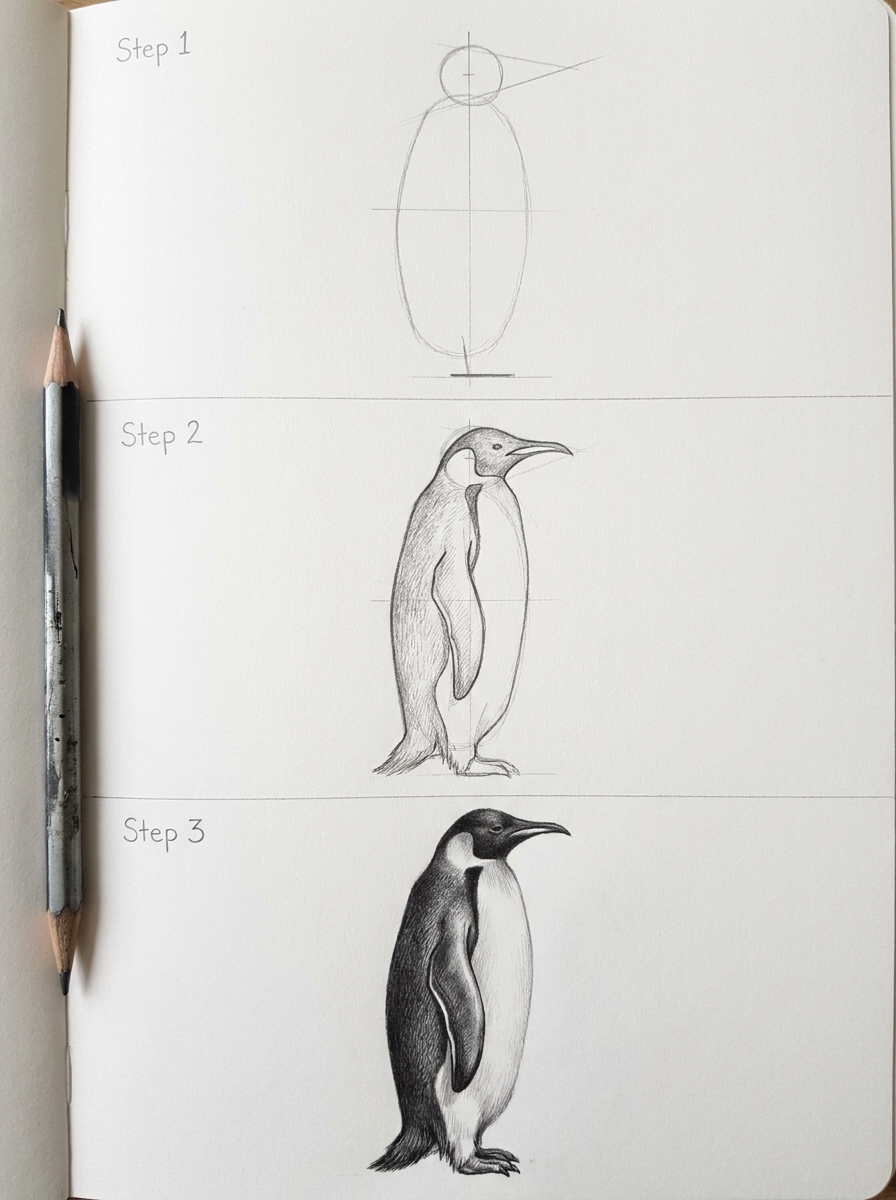
For an emperor penguin drawing, stretch the peanut taller. Emperors are the largest penguins, standing about 1.1 m, so give yours a smaller head and a longer, slightly down-curved beak with a pink-orange stripe along the lower bill. The signature detail is the yellow-orange patch on each side of the neck, fading into pale yellow on the upper chest. Get that one marking right and even a simplified emperor is unmistakable.
Species markings cheat sheet
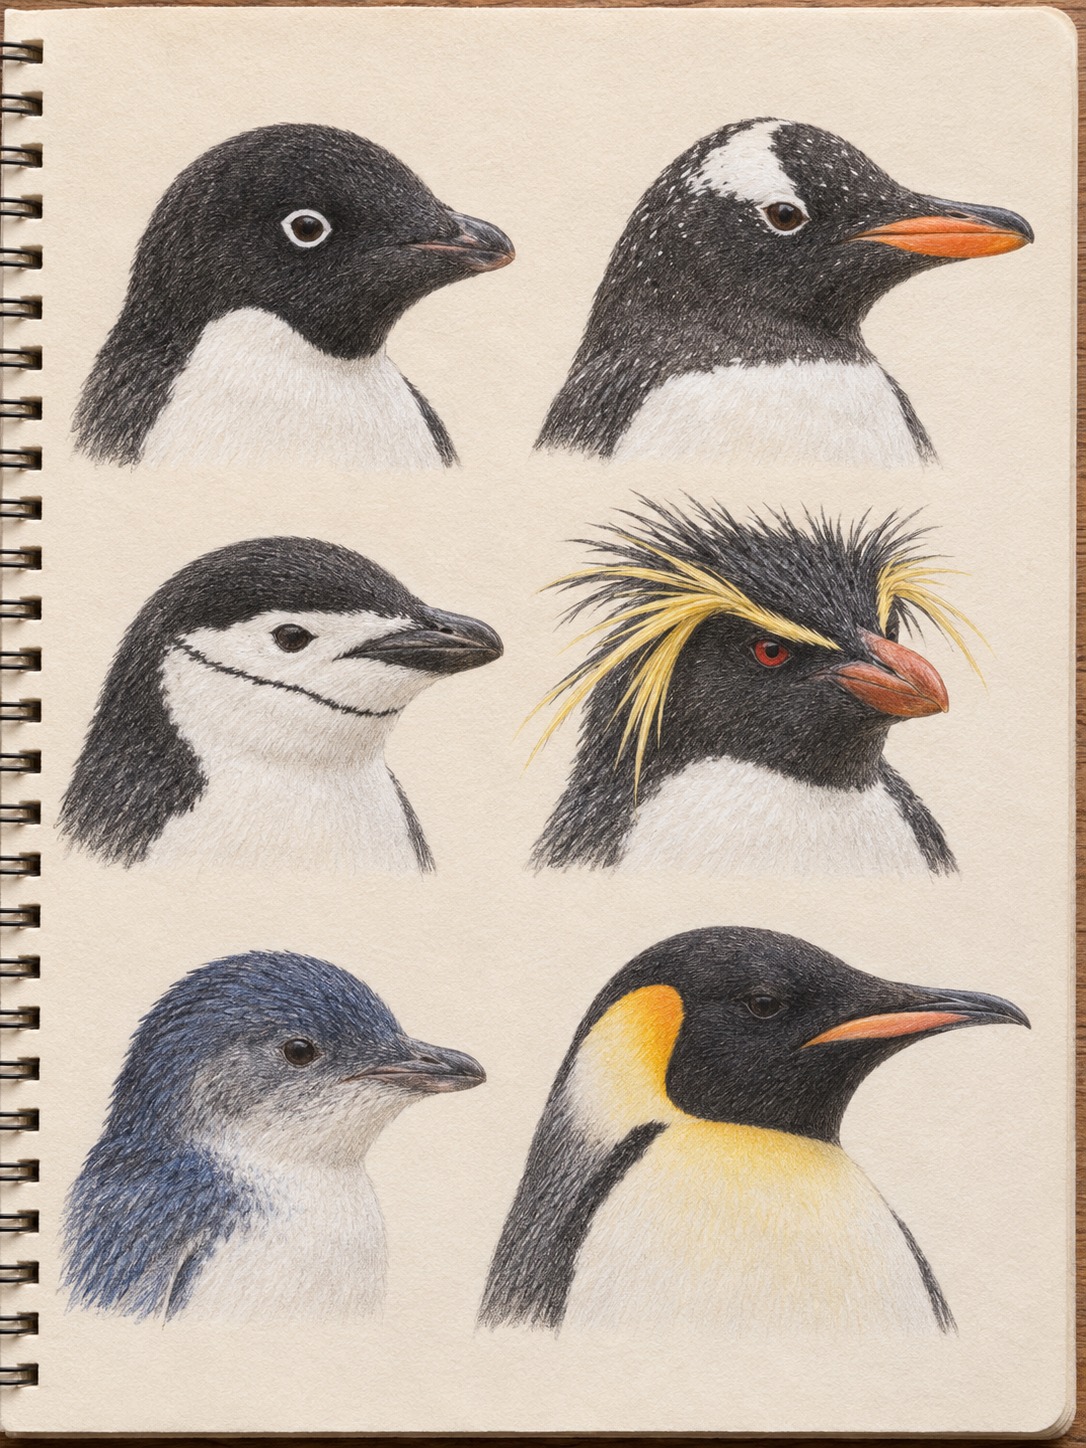
The Australian Antarctic Division counts 18 penguin species, all in the Southern Hemisphere. You don’t need to know them all. Add one marking from the table to your base penguin and it becomes a specific bird.
| Species | The one marking to add |
|---|---|
| Adélie | All-black head with a white ring around each eye |
| Gentoo | White band across the top of the head, bright orange-red beak |
| Chinstrap | Thin black line under the chin, like a helmet strap |
| Rockhopper | Spiky yellow crests above the eyes, red eyes |
| Little penguin | Tiny (about 30 cm) with a slate-blue back |
| Emperor | Yellow-orange patches on the sides of the neck |
Christmas penguin
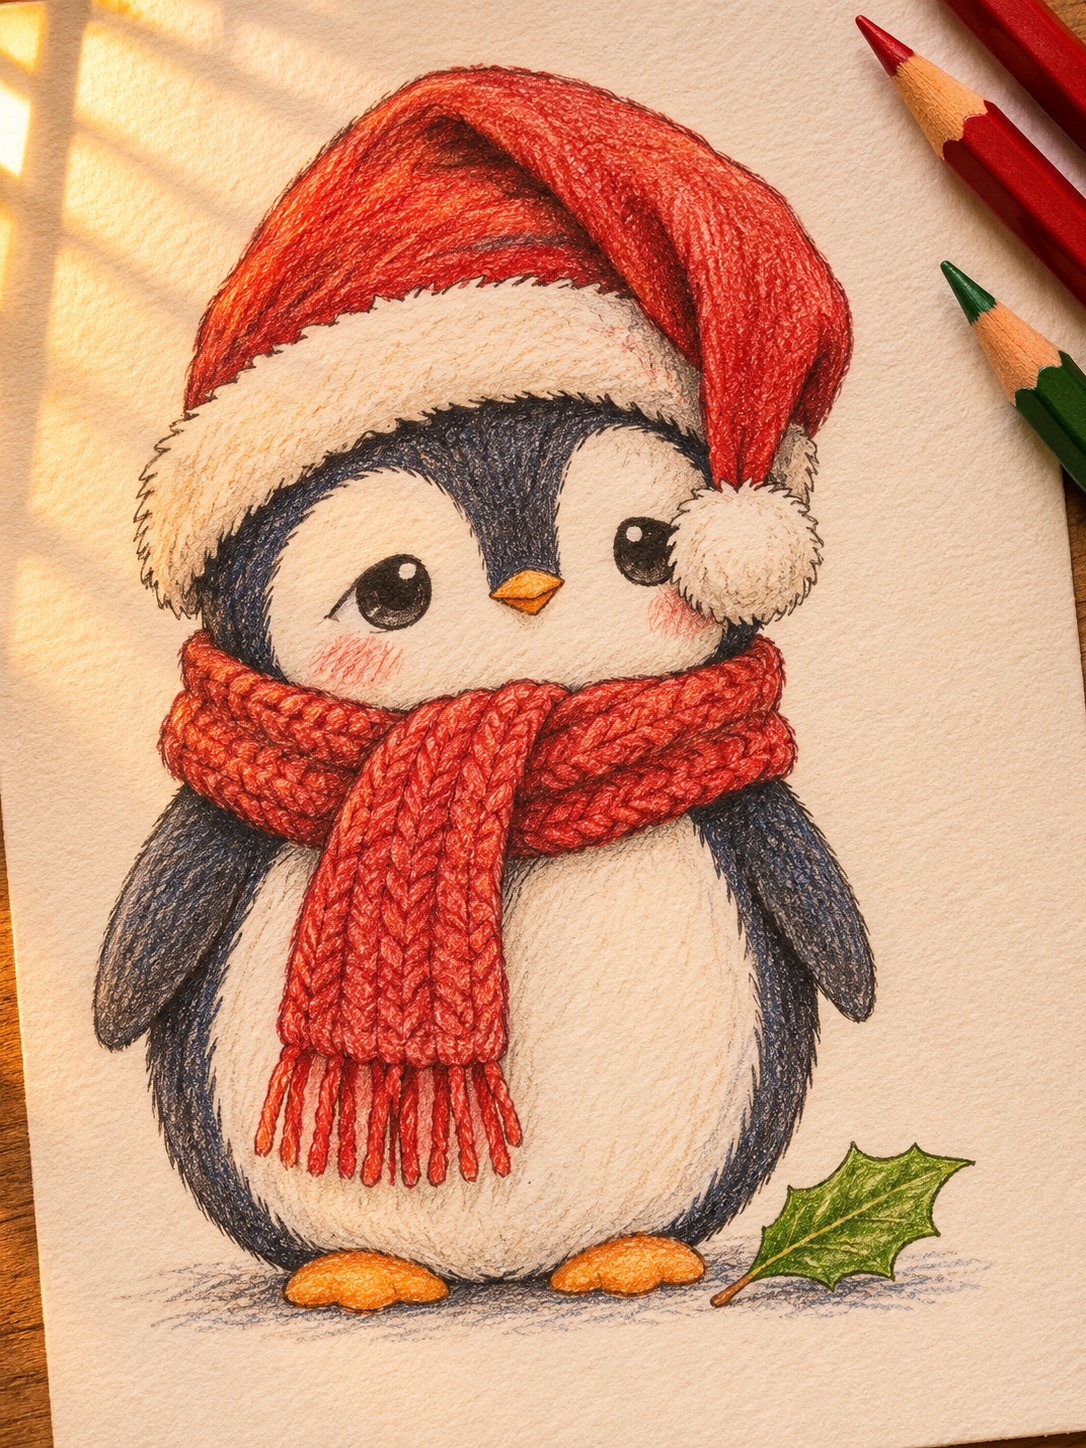
For a festive version, start from your base and wrap a scarf around the narrow point of the peanut (where a neck would be) and let one end hang over the belly with a few fringe lines. Add a Santa hat that slumps to one side so the pompom hangs near one eye. Keep the extras to red, white and maybe one green holly leaf.
For more seasonal subjects, my holiday drawing ideas list includes a penguin in a winter hat, and the winter drawing ideas post has a whole set of cold-weather characters. Need something printable for kids? The Christmas lights coloring pages include a penguin decorating a tree.
Coloring a penguin so it doesn’t look flat
Life-painting classes taught me that no black is ever just black. Penguin feathers are glossy, so the back reflects the sky. Field guides describe the upper plumage as blue-black to grey-blue, and you’ll see it in any good photo: the top of the head and shoulders pick up a cool blue sheen.
So build the dark areas in two tones. Lay down a dark blue-grey first, then go darker only where the form turns away from the light (the lower back and the underside of the flippers). Leave a lighter strip along the top of the head. With markers, a cool grey range works better than pure black. With watercolor, mix ultramarine and burnt sienna for a rich dark that still reads as blue.
Shadows on the white belly should be cool too: a light blue-grey under the flippers and along the bottom curve where the belly turns away. Snow and sky bounce cool light back into the white feathers, so a warm brown shadow looks dirty. Give the beak and feet a darker orange on the underside, and add a pale blue background wash or a simple ice-floe horizon line to set the scene. If you like painting these, my watercolor Christmas drawings guide covers the washes in more detail.
Penguin drawing FAQ
How do you draw a penguin step by step for beginners?
Start with one peanut-shaped outline for the head and body, then draw a heart-shaped white face and an egg-shaped belly inside it. Add two big eyes low on the head and a small triangle beak between them. Attach stiff, teardrop-shaped flippers just below the head and two short three-toed feet at the bottom. Finish by inking the outline, erasing the pencil guides, and coloring the back blue-black and the beak and feet orange. The whole thing takes about 15 minutes.
What shapes do you use to draw a penguin?
Most tutorials use a circle for the head and an oval for the body. I prefer a single peanut or bean shape because it avoids the pinched “snowman neck.” Inside that, a heart shape forms the white face and an egg shape forms the belly. Flippers are long teardrops, the feet are short rounded shapes with three toes, and the beak is a small triangle or diamond. That’s five basic shapes in total.
How do you make a penguin drawing look cute?
Make the head big (roughly 40 to 50% of the total height), set large eyes low on the face and far apart, and keep the beak tiny. Shorten the flippers and feet so the body looks soft and round. These cues come from the baby schema Konrad Lorenz described in 1943: big head, low eyes, small features. Matching white highlights in both eyes and a little pink blush on the cheeks push the cuteness further.
What colors do you need to draw a penguin?
Four is enough: a dark blue-black or blue-grey for the back, head and flippers, white (or bare paper) for the face and belly, orange for the beak and feet, and a light cool grey for shadows on the belly. Skip flat black if you can. Real penguin feathers have a blue sheen, and a slightly blue dark tone makes the drawing look rounder.
How do you draw a realistic penguin?
Use the same construction but change the proportions. Make the body taller and the head much smaller (about a fifth of the height or less), shrink the eyes to small dark dots, and lengthen the beak. Add the species markings, like the emperor’s yellow-orange ear patches, and shade the feathers with soft gradients instead of flat fills. Draw from a photo reference, because a realistic penguin depends on getting the head pattern right.
How do you draw a Christmas penguin?
Draw the basic cute penguin first, then wrap a red scarf around the narrowest part of the body, where the head meets the belly, with one end hanging down. Add a floppy Santa hat tilted to one side so the pompom sits near one eye. A sprig of holly, a candy cane under one flipper, or a tiny wrapped gift completes it. Keep the extra colors to red, white and green so the penguin’s own colors stay readable.
How long does it take to draw a penguin?
A simple cartoon penguin takes 10 to 15 minutes: about five for the pencil sketch, five for inking and cleanup, and a few more for color. A detailed, realistic emperor penguin with shaded feathers can take one to three hours depending on your medium. If you’re practicing, draw the simple version three times in a row instead of one slow drawing. Repetition locks in the proportions faster.
Can kids follow this penguin drawing tutorial?
Yes. The five steps use simple shapes, and most kids from about age five can follow them with a little help on the flippers. For younger children, skip the guidelines and let them trace the peanut shape first. Teachers often pair this drawing with a winter or Antarctic lesson, and a scarf or hat gives every kid room to make the penguin their own.
Start with the head, then the rest follows
If you remember one thing, make it the head. A big head, low eyes, a tiny beak and one continuous peanut silhouette get you most of the way to a cute penguin drawing before you add a single detail.
Draw the base penguin three times today, each one in under 10 minutes. On the third, try one variation: a chick, an emperor or the scarf. If penguins got you hooked on birds, my bird drawing guide uses the same shape-first approach for sparrows, owls and herons, and the 40+ bird drawing ideas list gives you plenty to try next. Short on time? Pick something from my cute drawing ideas or the mini things to draw list and warm up there first.
- 0shares
- Facebook0
- Pinterest0
- Twitter0
- Reddit0