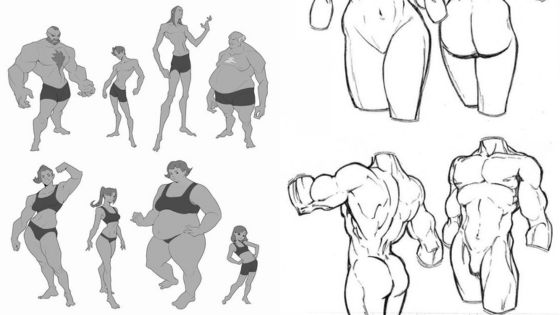
Drawing a hand can be a challenging task for many artists, especially beginners. The hand is a complex structure with many intricate details that can be difficult to capture accurately on paper. However, with some practice and patience, anyone can learn how to draw a hand.
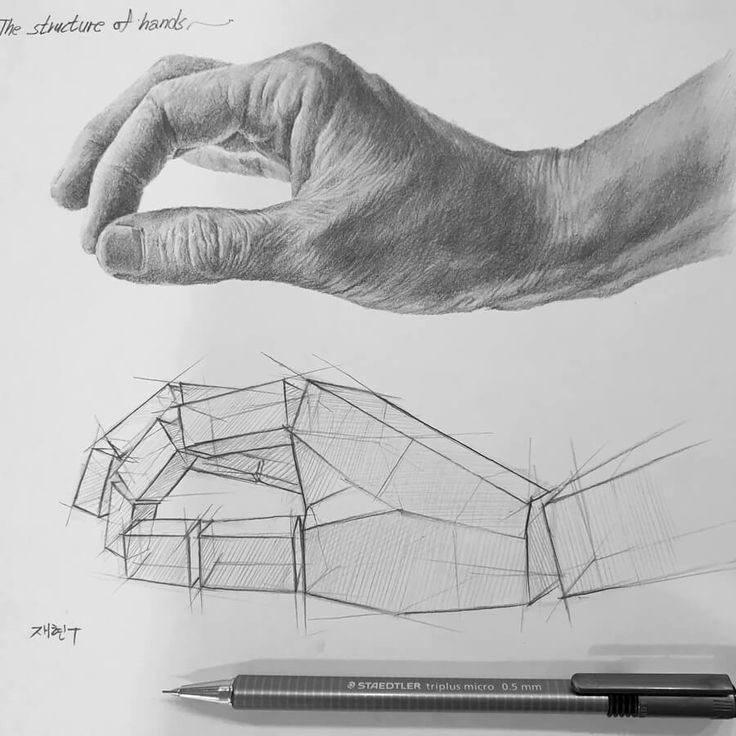
Understanding the basics of hand anatomy is crucial when it comes to drawing hands. Knowing the proportions and bone structure of the hand can help artists create more realistic and believable hand drawings. Additionally, using the right tools and materials, such as pencils, erasers, and paper, can make the process of drawing a hand much easier.
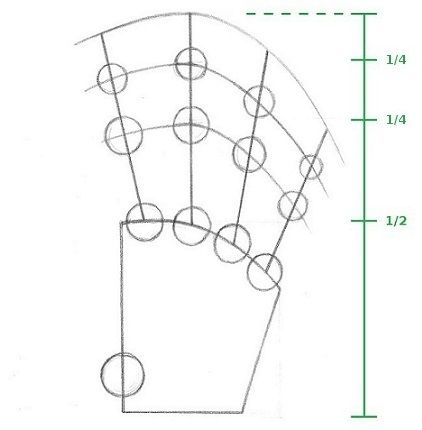
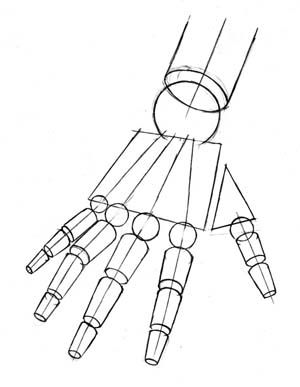
Observing and sketching hands in different positions is another important aspect of learning how to draw a hand. This allows artists to understand the different angles and perspectives of the hand and how it moves. Adding details and proportions, shading and tone, and practicing and correcting mistakes are also essential steps in the process of drawing a hand.
Key Takeaways
- Understanding the basics of hand anatomy is crucial when drawing hands.
- Observing and sketching hands in different positions can help artists create more realistic hand drawings.
- Practicing and correcting mistakes is important for improving your hand-drawing skills.
Understanding the Basics

When it comes to drawing a hand, understanding the basics is essential. This section will cover two important aspects of drawing hands: Human Anatomy and Basic Shapes.
Human Anatomy
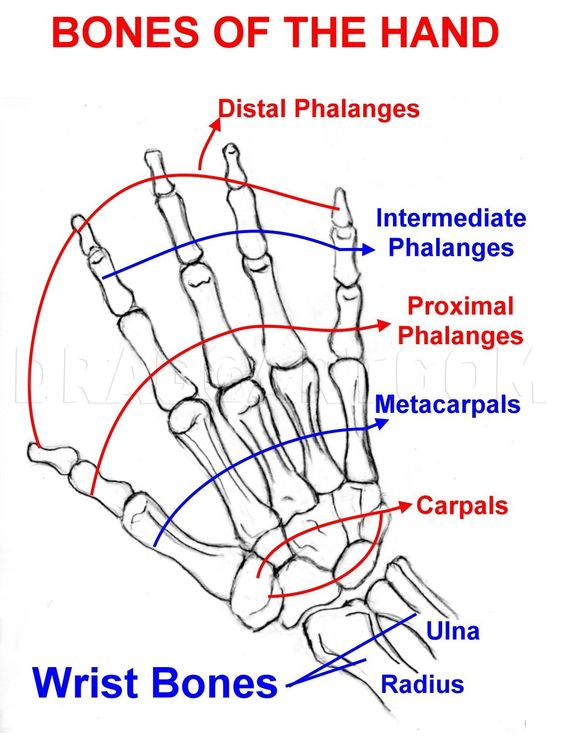
To draw a hand realistically, it is crucial to have a basic understanding of the anatomy of the hand. The hand consists of bones, joints, muscles, skin, and nails. Familiarizing oneself with these elements provides a solid foundation for creating realistic hand drawings. Nail characteristics can vary from person to person.


The bone structure of the hand includes eight carpal bones, five metacarpal bones, and 14 phalanges. While many of these bones cannot move at all, simplifying the basic structure of the hand can help in creating accurate drawings.
Basic Shapes
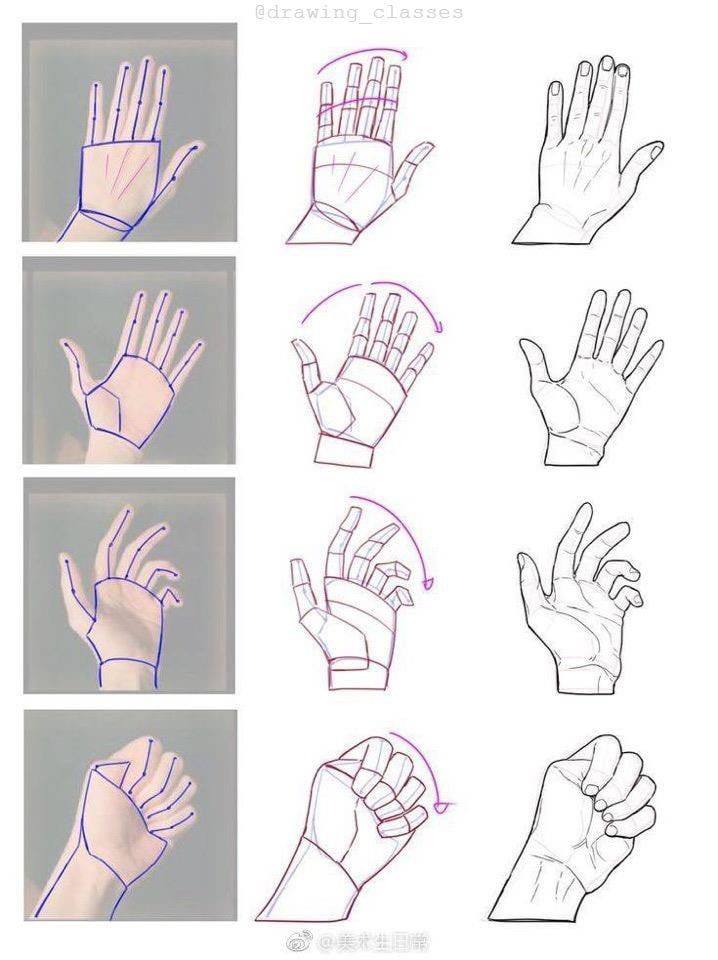
Drawing the basic shapes of the hand is the first step in creating a realistic hand drawing. The hand can be broken down into simple shapes, such as rectangles and triangles, which can be used as a guide to draw the hand accurately.
It is important to understand the joints of the hand, including the knuckles and the joints in the fingers, as these play a significant role in the movement and position of the hand.
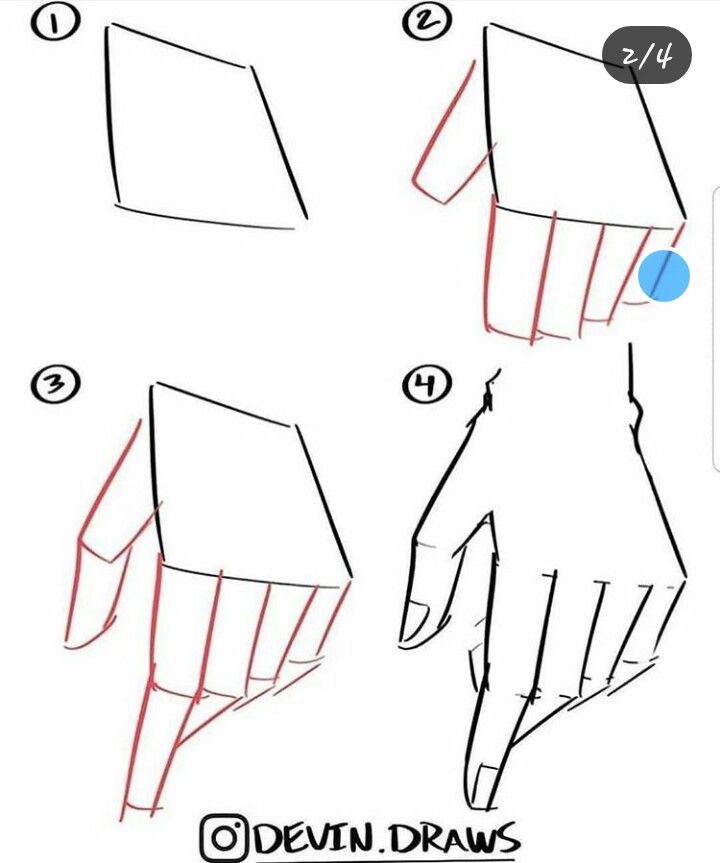

In summary, understanding the anatomy of the hand and the basic shapes is essential to draw a hand realistically. By breaking down the hand into simple shapes and understanding the bone structure and joints, one can create accurate and realistic hand drawings.
Tools and Materials

To draw a hand, you will need a few essential tools and materials. Here are the most important ones:
Pencils
Pencils are the most crucial tool for drawing hands. You will need a set of good-quality pencils with different grades of hardness, such as HB, 2B, 4B, and 6B.

The harder the pencil, the lighter the lines it produces, while the softer the pencil, the darker the lines. You can use harder pencils for sketching and lighter shading, while softer pencils are better for darker shading.
Eraser
An eraser is another essential tool for drawing hands. You will need a high-quality eraser that can remove mistakes without smudging or damaging the paper. You can use a kneaded eraser for lightening or removing pencil marks or a plastic eraser for more precise erasing.
Paper
Choosing the right paper is crucial for drawing hands. You will need high-quality drawing paper that can withstand erasing and shading without tearing or smudging. You can use paper with a weight of 200 g/m² to 250 g/m², which is thick enough to handle pencils and erasers.
Other Tools
Apart from pencils, erasers, and paper, you may also need other tools and materials for drawing hands. These include:
-
Sketchbooks: A sketchbook is a great way to practice drawing hands and other subjects. You can use it to experiment with different techniques and styles.
-
Smudging tools: Smudging tools such as blending stumps or tortillons are useful for creating smooth shading and blending different tones.
-
Reference materials: You can use reference materials such as photographs, prints, or 3D models to study the anatomy and structure of hands. This will help you draw hands more accurately and realistically.
By using the right tools and materials, you can draw hands that are realistic, detailed, and expressive.
Observing and Sketching

To draw a hand, one must first observe it carefully. The best way to do this is by looking at their own hand and studying its structure. Observing the hand’s shape, the way the fingers and thumb bend, and the creases on the palm is crucial to creating an accurate hand drawing.
Realistic Hand
When it comes to drawing a realistic hand, the artist must pay attention to the details. The hand’s proportions, the shape of the fingers, and the way the thumb is positioned are all important factors to consider.

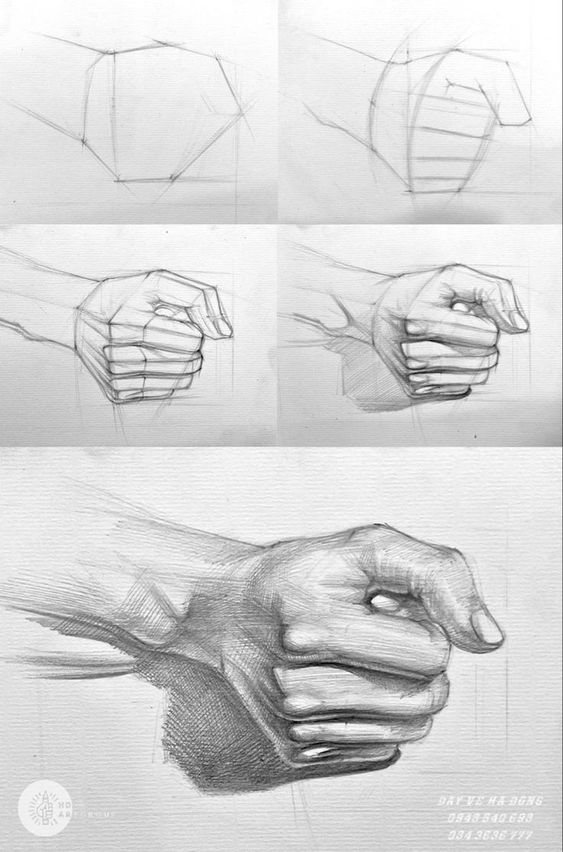
One can start by sketching the basic shape of the hand and then refining it by adding more details. Indicating the visible creases and refining the contour lines of the palm and thumb can help create a more realistic hand drawing.
Cartoon Hands
Drawing cartoon hands is a bit different from drawing realistic hands. Cartoon hands are often exaggerated and simplified, with larger fingers and more rounded shapes. The artist has more freedom to play with the shape and size of the hand to create a unique character. However, even in cartoon hands, it’s important to maintain the basic structure of the hand and the way the fingers and thumb bend.
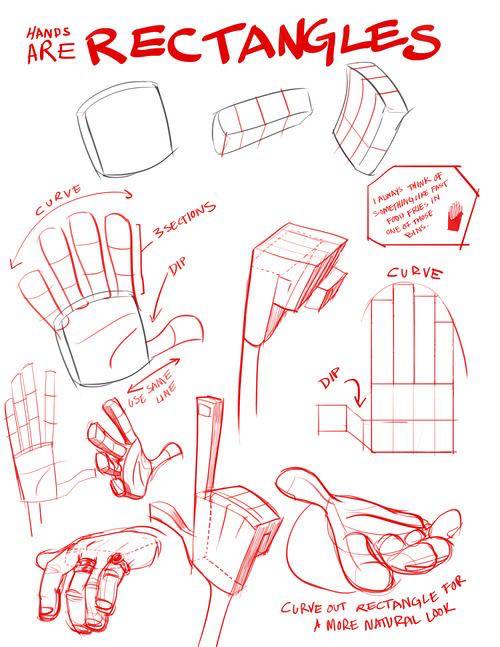
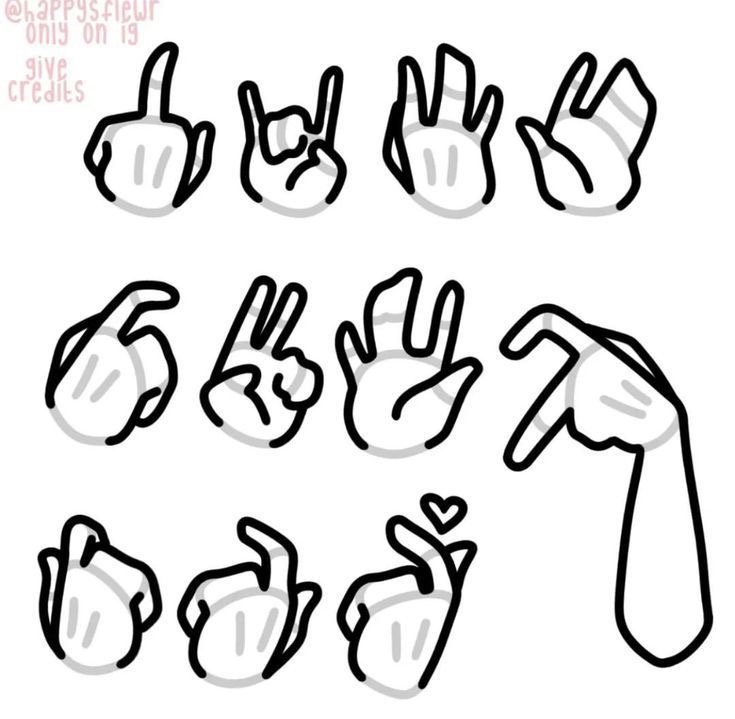
Sketching is an essential part of drawing hands. Starting with rough sketches and gradually refining them can help create a more accurate and detailed hand drawing. The artist can use different techniques such as shading, cross-hatching, and highlighting to add depth and dimension to the drawing.
In conclusion, observing and sketching are key to drawing a hand accurately. Whether it’s a realistic hand or a cartoon hand, paying attention to the details and practicing regularly can help improve one’s hand drawing skills.
Drawing Hands in Different Positions
Drawing hands in different positions is an essential skill for any artist. It allows you to create dynamic and expressive characters that convey emotion and movement. In this section, we will explore two sub-sections that will help you master the art of drawing hands in different positions: “Hand Gestures” and “Different Angles.”
Hand Gestures
Hand gestures are a vital part of drawing hands in different positions. They can convey a wide range of emotions and add depth to your characters. Some common hand gestures include pointing, holding, and making a fist.
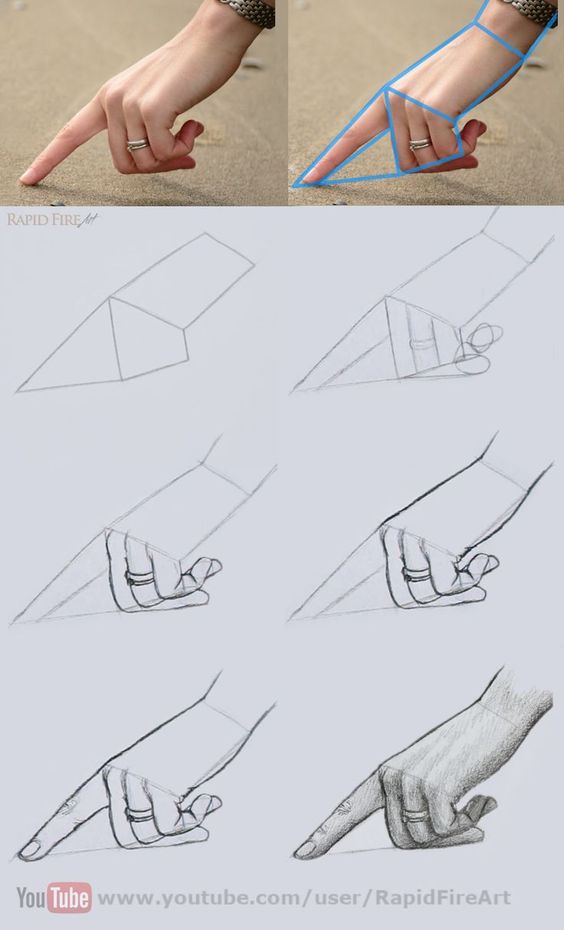
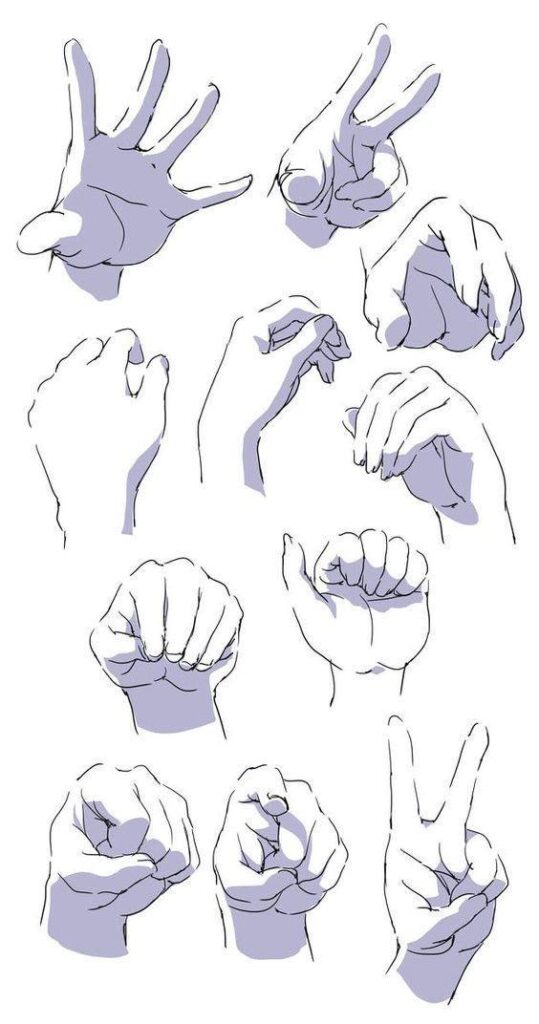
When drawing hand gestures, it’s essential to pay attention to the position of the fingers and the angle of the wrist. For example, when making a fist, the fingers should be curled tightly around the thumb, and the wrist should be at a slight angle to the forearm.
To create a natural-looking hand gesture, it’s helpful to observe people around you and take note of how they use their hands to express themselves. You can also use reference images to study different hand gestures and practice drawing them from different angles.
Different Angles
Drawing hands from different angles can be challenging, but it’s essential to create dynamic and engaging characters. Some common angles include a front view, a side view, and an angled view.

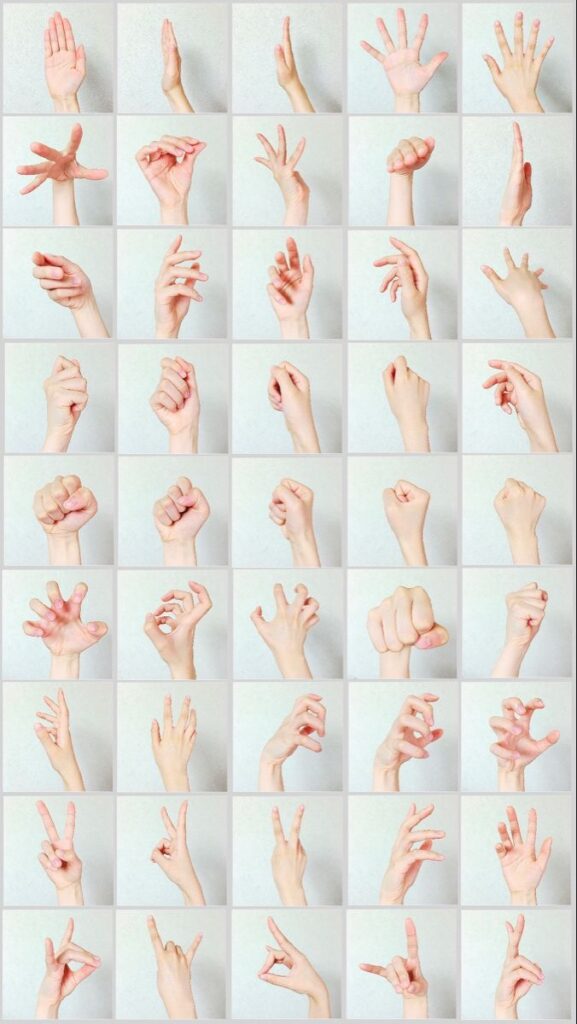
When drawing hands from different angles, it’s important to pay attention to the position of the fingers and the shape of the hand. For example, when drawing a hand from a side view, the fingers will appear shorter than when drawing a hand from a front view.
To create a natural-looking hand from different angles, it’s helpful to use reference images and practice drawing hands from different positions. You can also use basic shapes to create a rough sketch of the hand and then add details such as fingers and nails.
In conclusion, drawing hands in different positions is an essential skill for any artist. By mastering hand gestures and different angles, you can create dynamic and expressive characters that convey emotion and movement.
Adding Details and Proportions
When it comes to drawing hands, adding details and getting the proportions right can be a challenge. However, with practice and patience, it is possible to master this skill. In this section, we will discuss some tips and techniques for adding details and proportions to your hand drawings.
Nails and Knuckles
Nails and knuckles are important details that can add realism to your hand drawings. When drawing nails, it is important to remember that they are not flat but have a slight curve to them.


To achieve this, you can use light shading to create the illusion of a curve. Knuckles should also be drawn with care, as they are a prominent feature of the hand. To make them stand out, you can use shading to create depth and texture.
Palm and Fingers
The palm of the hand is an area that can be difficult to draw due to its complex shape. To make it easier, you can break it down into simple shapes such as ovals and rectangles. This will help you to get the proportions right and create a more realistic drawing. When it comes to drawing fingers, it is important to remember that they are not all the same length. The index finger is usually the longest, followed by the middle finger, ring finger, and pinky finger. To create a natural-looking hand, you should also pay attention to the spacing between the fingers.


In conclusion, adding details and proportions to your hand drawings can be challenging, but with practice and patience, it is possible to master this skill. By paying attention to the details such as nails and knuckles, and breaking down the palm and fingers into simple shapes, you can create realistic and accurate hand drawings.
Shading and Tone
When it comes to drawing a hand, shading and tone play a crucial role in creating a realistic and three-dimensional effect. Shading can help to define the shape and texture of the hand, as well as create depth and contrast. Here are some tips and techniques to help you master shading and tone in your hand drawings:
Light and Shadows
Understanding how light falls on the hand is key to creating realistic shading. The direction and intensity of the light source will determine where the shadows fall and how dark they are. For example, if the light is coming from above, the underside of the hand will be in shadow, while the top of the hand will be in light. It’s important to observe and study the way light behaves in real life in order to create convincing shading in your drawings.
Tonal Values
Tonal values refer to the range of lightness and darkness in a drawing. By using a range of pencils with different grades of lead, you can create a variety of tones and textures in your hand drawing. For example, a harder pencil (such as an HB) will create lighter tones, while a softer pencil (such as a 6B) will create darker tones. Experimenting with different pencils and blending techniques can help you create a range of textures and effects.
Blending
Blending is the process of smoothing out the lines and marks in your drawing to create a more realistic and seamless effect. There are a variety of blending tools you can use, including your fingers, blending stumps, and tortillons. By blending the different tones and textures together, you can create a more cohesive and polished look in your hand drawing.
In summary, shading and tone are essential elements in creating a realistic and convincing hand drawing. By understanding how light and shadows work, using a range of tonal values, and experimenting with blending techniques, you can create a professional-looking drawing that captures the beauty and complexity of the human hand.
Practicing and Correcting Mistakes

Drawing hands can be challenging, so it’s important to practice regularly to improve your skills. One helpful technique is to draw from reference photos or videos, focusing on different hand poses and angles. This will help you develop a better understanding of hand anatomy and proportions.
It’s also important to be patient with yourself and not get discouraged by mistakes. If you make a mistake, don’t be afraid to erase and start over. It’s better to take the time to get it right than to rush and end up with a drawing that doesn’t look quite right.
When correcting mistakes, it’s important to use the right eraser for the job. A kneaded eraser is great for lifting off light pencil marks, while a vinyl eraser can be used for more heavy-duty erasing. If you need to erase a small area, a pencil eraser can be useful.


Another helpful technique for correcting mistakes is to use a blending tool, such as a blending stump or tortillon, to smooth out any rough areas or smudges. This can help to create a more polished and realistic look to your drawing.
Overall, practicing regularly and being patient with yourself when correcting mistakes is key to improving your ability to draw hands. With time and effort, you can master this challenging skill and create beautiful, lifelike hand drawings.
References and Guides

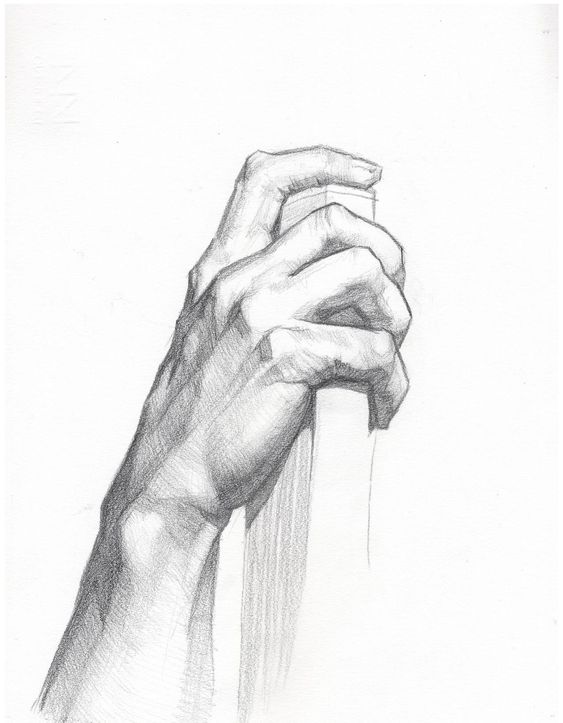
Reference Images
When it comes to drawing hands, having good reference images is crucial. There are many online resources available that provide high-quality images of hands in different poses and angles. One such resource is Pinterest, where you can find a wide variety of hand reference images. You can also search for hand reference images on Google or other search engines. However, it’s important to make sure that the images you use are copyright-free and that you credit the original source if necessary.
Step-by-Step Instructions
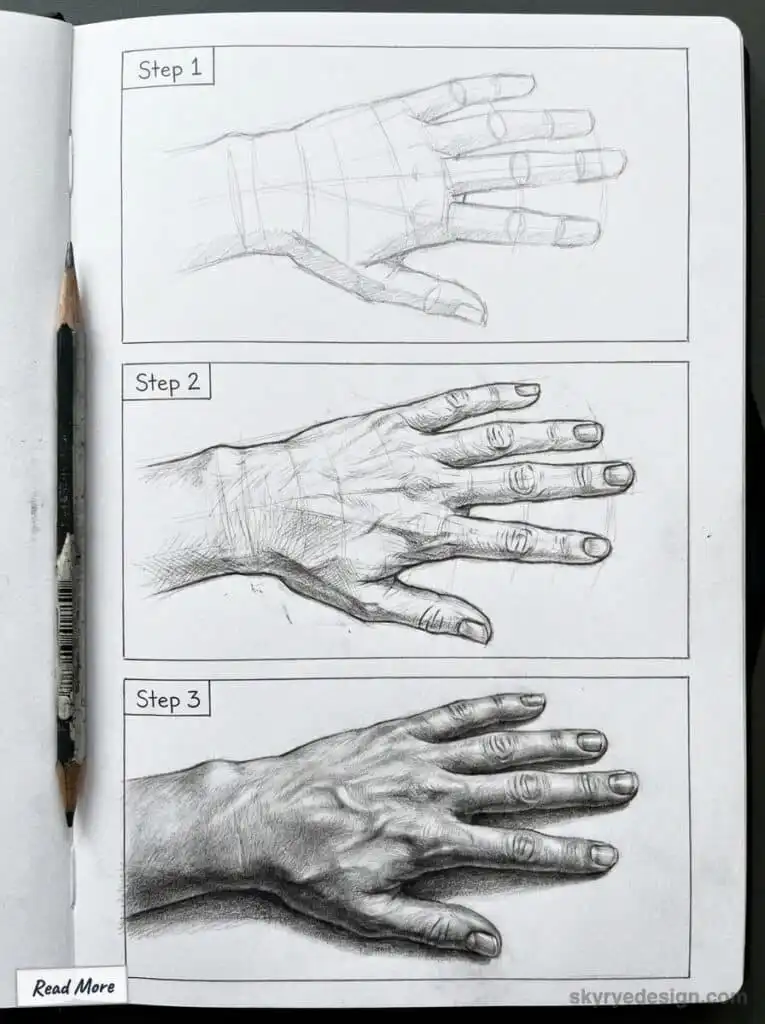
Step-by-step instructions can be a helpful guide for those who are just starting to learn how to draw hands. There are many online tutorials available that provide clear and concise instructions on how to draw hands. Skillshare, for example, offers a beginner’s guide to drawing hands that covers basic hand anatomy, hand gestures, and shading techniques. Other resources include Daisie Blog and Adobe, which provide step-by-step instructions on drawing different hand poses and expressions.
Teacher
If you’re serious about improving your hand drawing skills, working with a teacher can be a great way to get personalized feedback and guidance. Many art schools and studios offer classes and workshops on drawing hands, and there are also online courses available. One such course is offered by Proko, which provides in-depth lessons on hand anatomy, proportion, and gesture drawing. Working with a teacher can help you identify areas where you need improvement and provide you with expert advice on how to improve.
Exploring Styles
When it comes to drawing hands, there are different styles that an artist can explore. It is important to understand the basics of drawing hands before delving into different styles. However, once an artist has a good grasp on the fundamentals, they can start experimenting with different styles to create unique and interesting hand drawings.
Realistic Hands
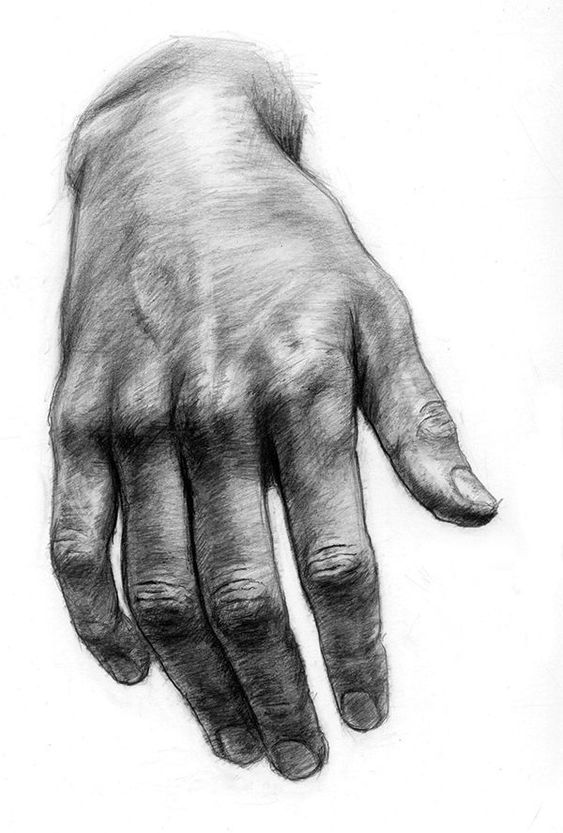

Realistic hands are drawn to look as close to the real thing as possible. This style requires a lot of attention to detail and understanding of the anatomy of the hand. Artists who want to draw realistic hands should study the structure of the hand, including the bones, muscles, and tendons. They should also pay attention to the lighting and shading to create a three-dimensional effect.
Manga Hands
Manga is a popular style of Japanese comics and cartoons. Manga hands are usually drawn in a simplified style with exaggerated features.


They are often drawn to look more expressive and dynamic than realistic hands. Artists who want to draw manga hands should study the style and pay attention to the proportions and shapes of the hand.
Female Hands
Drawing female hands can be a bit more challenging than drawing male hands because they are usually more delicate and slender. Female hands are often drawn with longer fingers and more graceful curves. Artists who want to draw female hands should pay attention to the proportions and shapes of the hand, as well as the details like the nails and jewelry.

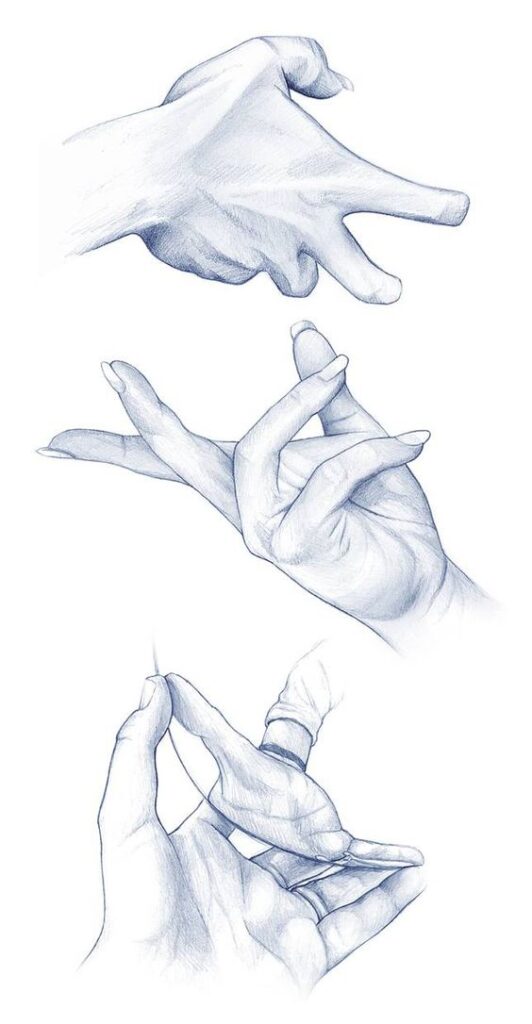
Overall, exploring different styles of hand drawing can be a great way for artists to develop their skills and create unique and interesting artwork. Whether an artist is drawing realistic hands, manga hands, or female hands, they should always strive to understand the basics of hand anatomy and pay attention to the details that make each style unique.
Improving Your Skills

To become a skilled hand drawer, practice is key. Here are some tips to help you improve your hand drawing skills:
1. Recognize the Basic Shapes
Identifying basic shapes is essential for drawing hands. Start by breaking down the hand into simple shapes such as rectangles, triangles, and circles. This will help you understand the basic structure of the hand and make it easier to draw.
2. Practice Drawing Different Hand Poses
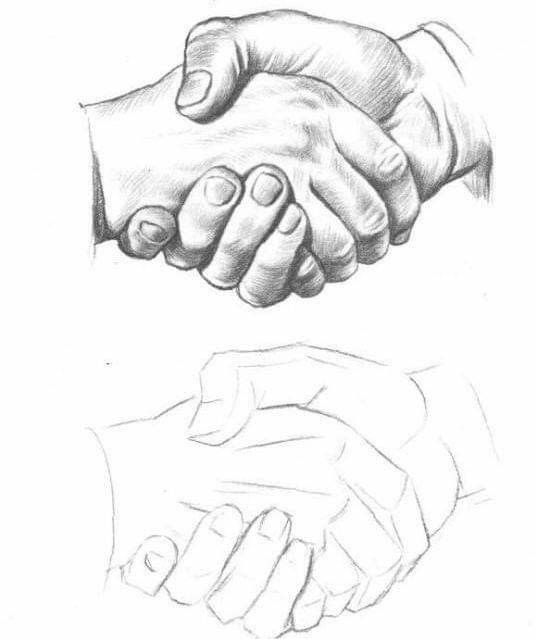
Drawing different hand poses will help you become familiar with the different shapes and angles of the hand. Try drawing hands in different positions such as fists, open palms, and gripping objects. This will help you develop your hand-drawing skills and improve your ability to draw hands in different positions.
3. Study the Anatomy of the Hand
Understanding the anatomy of the hand is crucial for drawing hands accurately. Study the bones, muscles, and tendons of the hand to gain a better understanding of how the hand moves and functions. This will help you draw hands with more accuracy and detail.
4. Use Reference Images
Using reference images can be helpful when practicing hand drawing. Look for images of hands in different positions and angles to use as a reference when drawing. This will help you understand the different shapes and angles of the hand and improve your hand-drawing skills.
5. Practice Consistently
Consistent practice is key to improving your hand-drawing skills. Set aside time each day to practice drawing hands. This will help you develop your skills and improve your ability to draw hands accurately and with more detail.
By following these tips and practicing consistently, you can improve your hand drawing skills and become a skilled hand drawer.
Frequently Asked Questions

What are some tips for drawing realistic hands?
When drawing hands, it is important to pay attention to the proportions of the fingers and palm. The fingers should be drawn in proportion to each other, and the palm should be drawn in proportion to the fingers. It is also important to observe the details of the hand, such as the wrinkles and creases. Additionally, practicing drawing hands from different angles and positions can help improve your skills.
What are some common mistakes to avoid when drawing hands?
One common mistake is drawing the fingers too long or too short. Another mistake is not paying attention to the angles of the fingers and palm. It is also important to avoid drawing hands too flat or two-dimensional. Lastly, it is important to avoid making the fingers too thin or too thick.
How can I practice drawing hands?
One way to practice drawing hands is to use reference photos or models. You can also practice drawing your own hands in different positions. Additionally, you can try drawing hands from memory to improve your skills.
What are some techniques for shading hands?
When shading hands, it is important to pay attention to the light source and the shadows that it creates. One technique is to use hatching and cross-hatching to create the illusion of depth and texture. Another technique is to use smudging to blend the shading and create a smoother appearance.
What are some ways to draw hands in different positions?
To draw hands in different positions, it is important to observe the angles and proportions of the fingers and palm. You can also use reference photos or models to help with the positioning. Additionally, practicing drawing hands in different positions can help improve your skills.
How can I add texture and detail to my hand drawings?
To add texture and detail to your hand drawings, you can observe the details of the hand, such as the wrinkles and creases. You can also use shading techniques, such as hatching and cross-hatching, to create the illusion of texture. Additionally, you can use different drawing tools, such as pencils or pens, to create different textures and details.
- 23.0Kshares
- Facebook0
- Pinterest23.0K
- Twitter3
- Reddit0

