Christmas is just around the corner, and what better way to deck the halls than with decorations you’ve crafted yourself? There’s something truly special about handmade ornaments, imbuing your home with a personal touch and a whole lot of festive cheer. If you’re looking for a delightful, budget-friendly, and surprisingly meditative way to get into the holiday spirit, then origami is your answer! Forget complicated patterns and expensive supplies; we’re diving into the world of 8 origami Christmas decorations that are not only easy to fold but also incredibly rewarding.
Origami, the ancient Japanese art of paper folding, offers a unique charm. It transforms a simple sheet of paper into intricate shapes, demanding nothing more than your hands and a little patience. For Christmas, this means you can create a stunning array of ornaments, garlands, and table toppers that will impress your guests and bring a smile to your face every time you see them. Plus, it’s a fantastic activity for all ages, making it perfect for family craft sessions. Imagine tiny hands carefully creasing paper, creating memories as beautiful as the decorations themselves.
Beyond the aesthetics, engaging in paper crafts like origami can be incredibly therapeutic. It allows you to slow down, focus on the present moment, and experience the satisfaction of creating something tangible from scratch. It’s a wonderful antidote to the hustle and bustle of the holiday season, offering a moment of quiet creativity. So, grab some festive paper – reds, greens, golds, silvers, or even patterned sheets – and let’s get ready to fold our way to a truly unique Christmas wonderland. These projects require minimal supplies, mostly just paper, and perhaps some string or glue for hanging. Ready to transform flat sheets into fantastic festive art? Let’s get folding!
Why Choose Origami for Your Christmas Decor?
Before we dive into the specific projects, let’s quickly touch upon why origami is a brilliant choice for your holiday decorations:
- Cost-Effective: All you really need is paper! You can use anything from colored craft paper to old magazines or newspaper for a rustic look.
- Eco-Friendly: Using paper is a sustainable choice, especially if you opt for recycled or responsibly sourced paper. It reduces the demand for plastic ornaments.
- Personal Touch: Each folded piece carries a bit of your effort and personality, making your decor truly unique.
- Family Fun: Origami is a wonderful activity to do with kids, fostering creativity, fine motor skills, and patience.
- Versatile: Once folded, these creations can be hung on the tree, used as gift toppers, strung into garlands, or even adorn your Christmas dinner table.
- Easy to Store: Paper creations are lightweight and can often be flattened or packed away easily for next year.

1. The Classic Origami Star
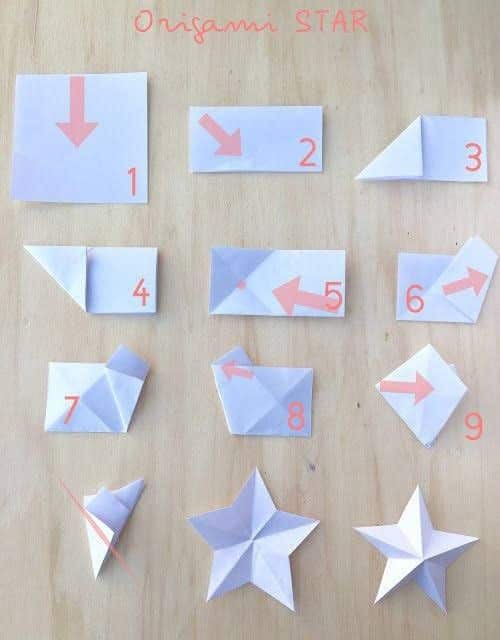
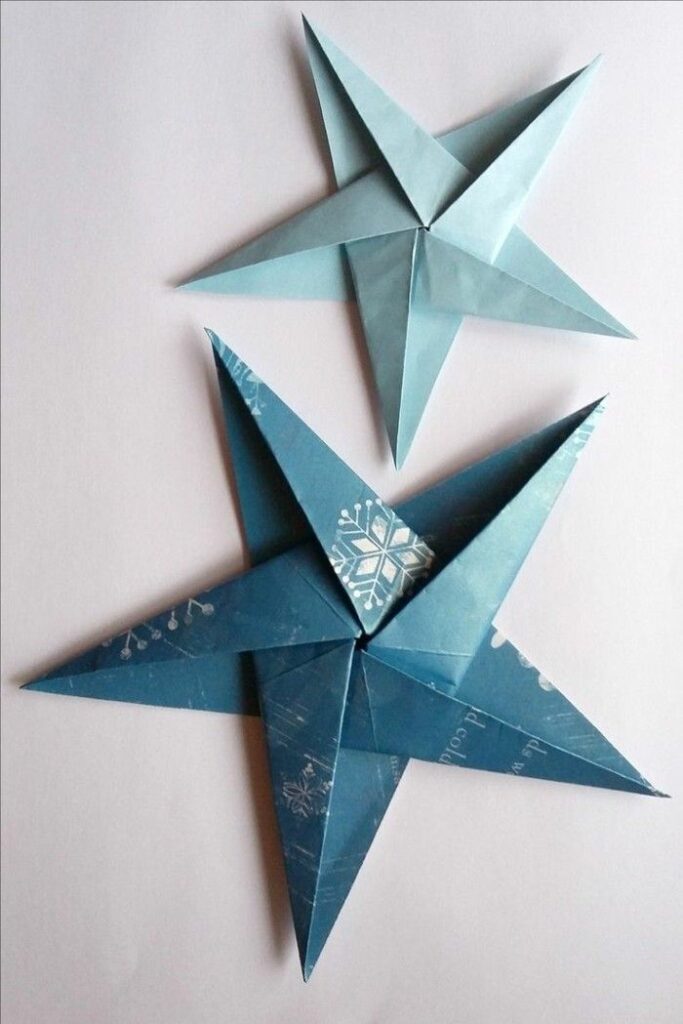
A star is perhaps the most iconic symbol of Christmas, and an origami version can add a beautiful, handcrafted sparkle to your tree or windows. There are many ways to fold an origami star, but we’ll focus on a simple yet effective five-pointed star that looks fantastic whether made from plain or patterned paper. This isn’t the super puffy 3D star, but a lovely flat or slightly dimensional one that’s perfect for beginners.
Why it’s great: Stars are versatile. You can make them in various sizes and colors to create a constellation on your tree or string them together for a celestial garland. They also make excellent gift tags!
Materials Needed:
- Square sheets of paper (e.g., 6×6 inches or 4×4 inches for smaller stars)
- Optional: Glitter glue or stickers for embellishment
- Optional: String or thread for hanging
How to Fold (Simplified): 1. Start with your square paper, colored side up. Fold it in half horizontally and then vertically, creasing well and unfolding each time. This creates a central cross. 2. Fold one corner to the center of the paper, aligning the tip with the vertical crease. Crease and unfold. Do the same with the opposite corner. 3. Take one of the non-folded corners and bring it towards the center, meeting the crease lines you just made. This will form a smaller triangle. 4. Flip the paper over. Take one of the side edges and fold it towards the central vertical crease. 5. Now, find the point that will be the top of your star. Fold the two side flaps inwards, aligning their edges to create a pointed tip. 6. Fold the entire top section down, creating the top point of the star. 7. Make small cuts on the diagonal edges to define the points more sharply, then unfold carefully. 8. Refine the creases and gently push the central area inward or outward to give it a slight 3D effect.
Tips for Customization:
- Use metallic paper for extra shine.
- Draw small patterns or messages on them.
- Punch a hole and add a ribbon for hanging.
- Make a bunch of small ones and glue them onto a larger card to create a unique Christmas card design.
- Experiment with different paper textures, like vellum for a translucent glow if backlit.
2. The Simple Origami Christmas Tree
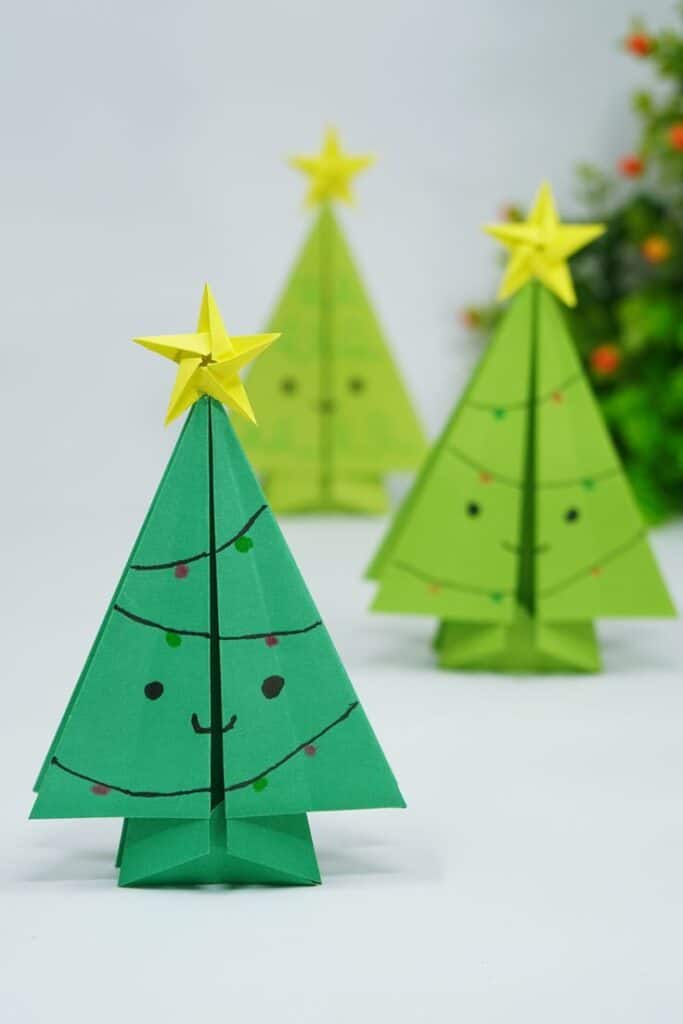
A Christmas tree is the centerpiece of holiday decor, and a paper version can be a delightful addition, either as an ornament or a tabletop decoration. We’ll focus on a simple, layered flat tree or a basic conical design that even kids can master.
Why it’s great: These trees can stand on their own if folded correctly or be hung. They look charming in groups, creating a miniature forest effect.
Materials Needed:
- Square sheets of green paper (various shades look great)
- Optional: Brown paper for a trunk base
- Optional: Small star sticker for the top
- Optional: Glitter, sequins, or small beads for decoration
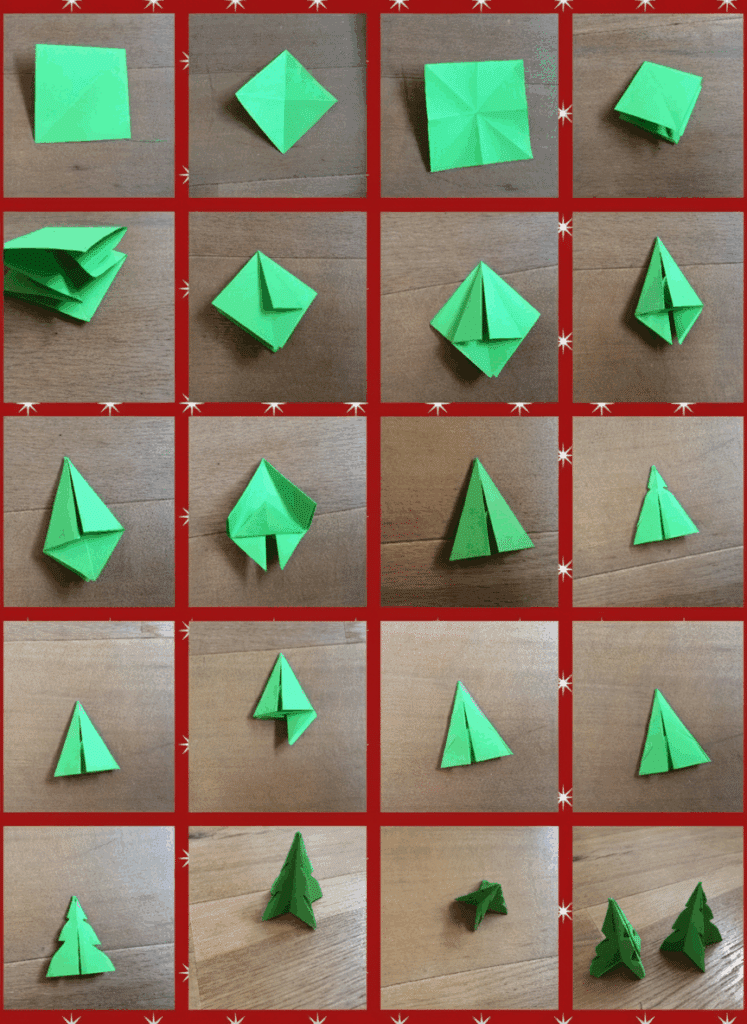
How to Fold (Simplified – Layered Tree): 1. Start with a square piece of green paper, white side up. Fold in half horizontally and vertically, unfolding each time to create creases. 2. Flip the paper over (colored side up). Fold it diagonally in both directions, unfolding each time. 3. Now, push the horizontal and vertical folds inwards, bringing the diagonal folds together to form a triangular “water bomb base.” 4. Take one of the flaps of the triangle and fold the outer edge towards the center crease, making a narrower triangle. Repeat on all four sides. 5. You should now have a narrower triangle with flaps. Take the top layer on one side and fold the bottom point up to meet the top point, creasing well. Repeat on the other side. 6. Carefully cut the bottom straight across or in small inverted V shapes to create the ‘layers’ of the tree branches. 7. Fold the very tip of the top point down to create a flat top for a star. 8. Gently open the layers and stand your tree upright.
Tips for Customization:
- Stack several different-sized trees for a fuller look.
- Decorate with tiny punched paper shapes (circles for baubles, a star for the top).
- Add a small brown paper rectangle glued to the bottom for a trunk.
- Use textured paper for a more rustic feel.
- You can also find instructions for simple 3D conical trees which involve less complex folding and more rolling and gluing. These are great for adding to a mantelpiece.
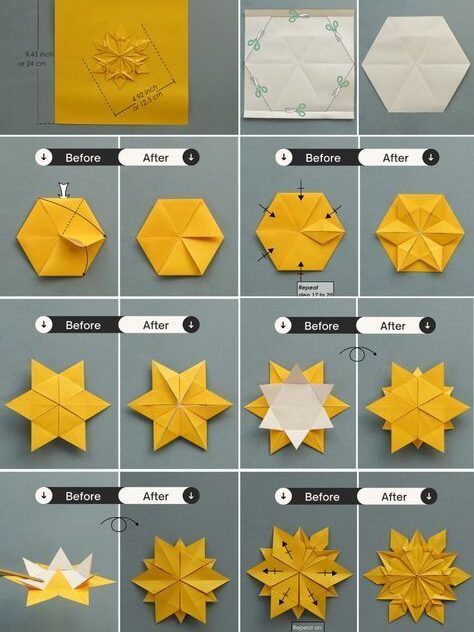
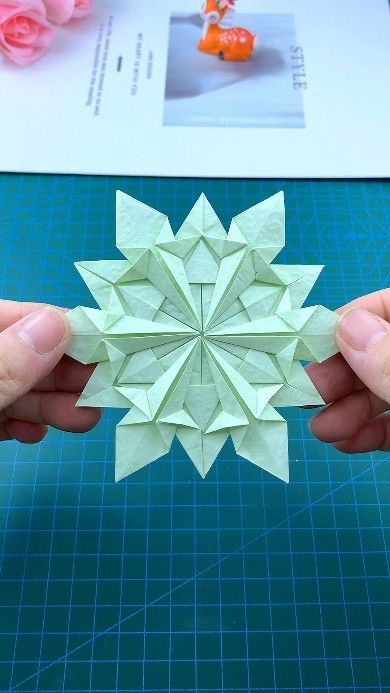
3. Modular Origami Snowflake
Snowflakes are intricate and beautiful, and an origami snowflake can capture that delicate beauty in paper. While some modular origami can be complex, there are surprisingly easy versions that use multiple identical units, or “modules,” locked together to form a stunning result. This specific type is often simpler than it looks, as you’re just repeating one basic fold.
Why it’s great: These snowflakes look incredibly sophisticated but are surprisingly accessible. They’re fantastic for hanging in windows, on the tree, or as part of a winter garland. Plus, each one can be unique, just like real snowflakes!
Materials Needed:
- 6-8 square sheets of white, light blue, or silver paper (same size, e.g., 3×3 inches)
- Glue (optional, for extra stability)
- String or fishing line for hanging
How to Fold (Simplified – Example of a basic module): 1. Start with one square of paper, white side up. Fold it diagonally in half to form a triangle. 2. Fold it in half again to form a smaller triangle. 3. Take one of the points of this small triangle and fold it upwards to align with the top point, creating a diamond shape on one side. Repeat on the other side. 4. Now, open up the paper and cut along some of the creases you just made to create an interesting “arm” shape. 5. Repeat this process for all 6-8 squares of paper. 6. Once you have all your modules, carefully interlock them. This usually involves sliding one flap into a pocket of another, forming a circular pattern. You might need a tiny dab of glue to secure them if they feel wobbly.
Tips for Customization:
- Use iridescent or glitter paper for extra sparkle.
- Combine different shades of blue or white paper for a layered effect.
- Punch small holes in the tips of the snowflake arms for even more delicate details.
- Attach a small bell to the bottom for a subtle chime.
- For more complex but still approachable designs, look up “Sonobe unit snowflake” or “six-pointed star snowflake” tutorials, which often involve repeating a single simple module. These also look fantastic when made from recycled paper, tying into a sustainable home aesthetic. Find inspiration for easy ways to refresh your home for spring by incorporating such handmade elements year-round.
4. The Origami Angel
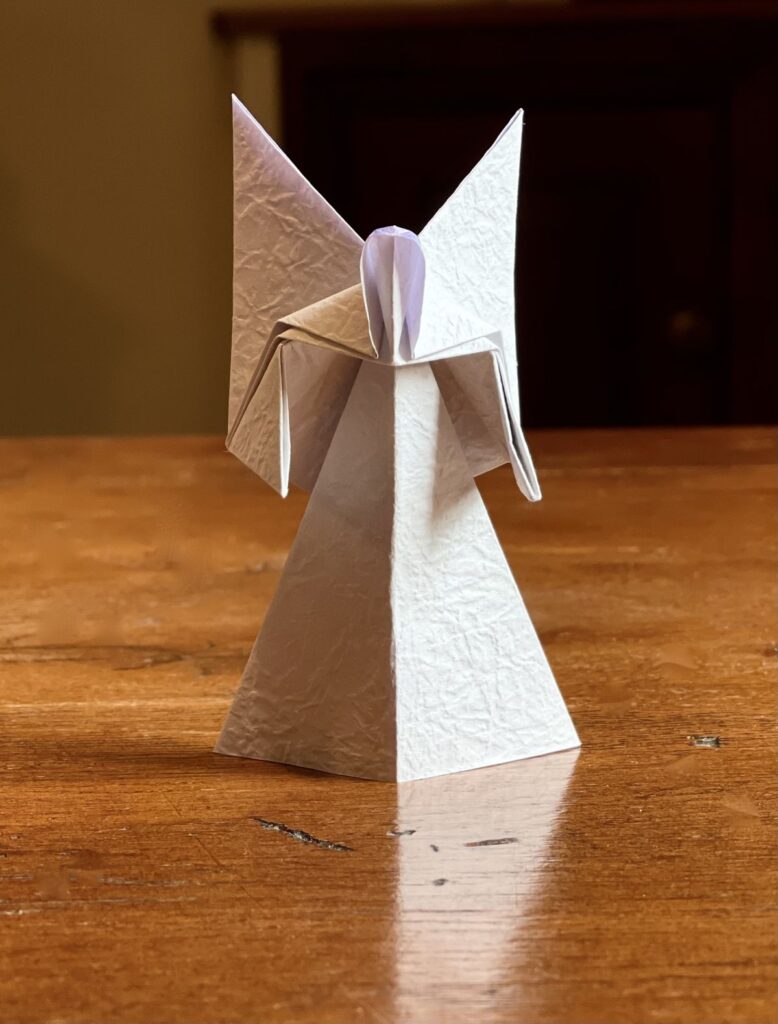
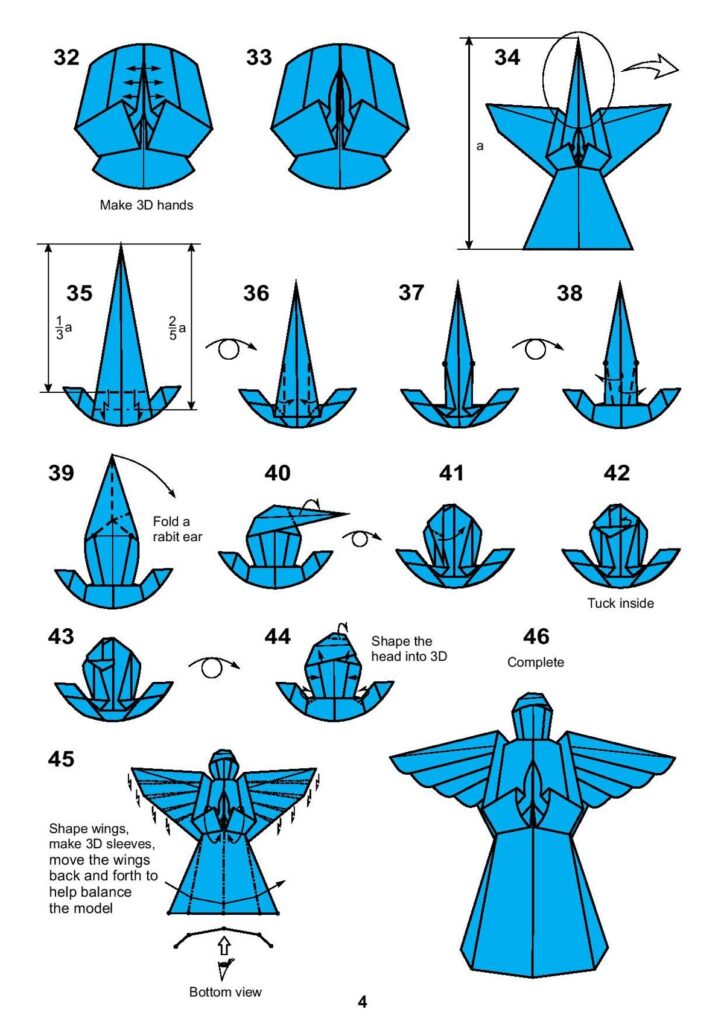
Angels are a symbol of peace and hope, making them a beautiful and meaningful addition to your Christmas decor. An origami angel can be a lovely tree topper, an ornament, or even a charming figure on your mantelpiece. There are simple designs that focus on the basic shape of an angel, complete with wings and a body.
Why it’s great: Angels bring a sense of serenity and tradition to your festive display. They’re also relatively easy to personalize.
Materials Needed:
- Square sheets of paper (white, gold, or silver are traditional, but any color works!)
- Optional: Small bead or a drawn face for the head
- Optional: Thin ribbon or thread for a halo
How to Fold (Simplified): 1. Start with a square of paper, white side up. Fold diagonally in half twice, unfolding to make an ‘X’ crease. 2. Flip the paper over (colored side up). Fold in half horizontally and vertically, unfolding each time to make a ‘+’ crease. 3. Bring two opposite corners together, pushing the sides in to form a ‘square base’ (a flat square with four flaps). 4. Fold the bottom edge of one flap up to meet the central crease. Repeat on all four flaps. 5. Now, carefully unfold the last step. Open up the layers of paper and squash fold the top point down, creating a wider, flatter diamond shape. Repeat on the other side. 6. Take the top layer on one side and fold the outside edge towards the center. This will be an arm/wing. Repeat on the other side. 7. Fold the top tip down to create the head. You might need to make small cuts to separate the ‘legs’ if you want a standing angel or gently round the head shape. 8. Gently open out the wings.
Tips for Customization:
- Use paper with a subtle pattern for the wings.
- Glue a small wooden bead for the head and draw a face.
- Add a small loop of gold thread for a halo.
- Make a small flock of angels in different sizes to hang together.
- Consider using paper with a slightly heavier weight for a more durable and substantial angel.
5. Origami Gift Box / Cube
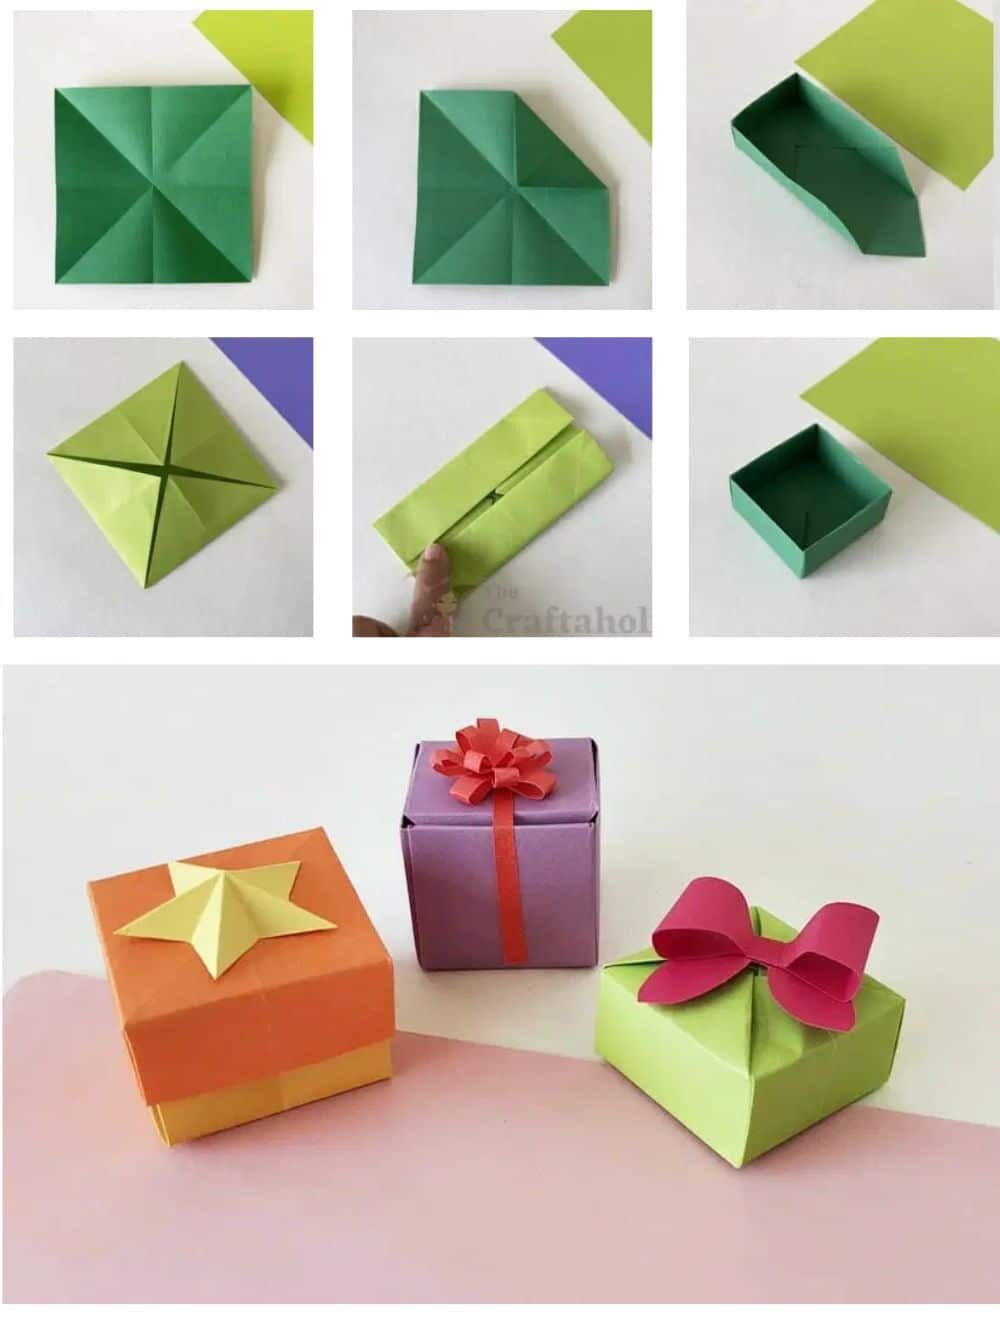
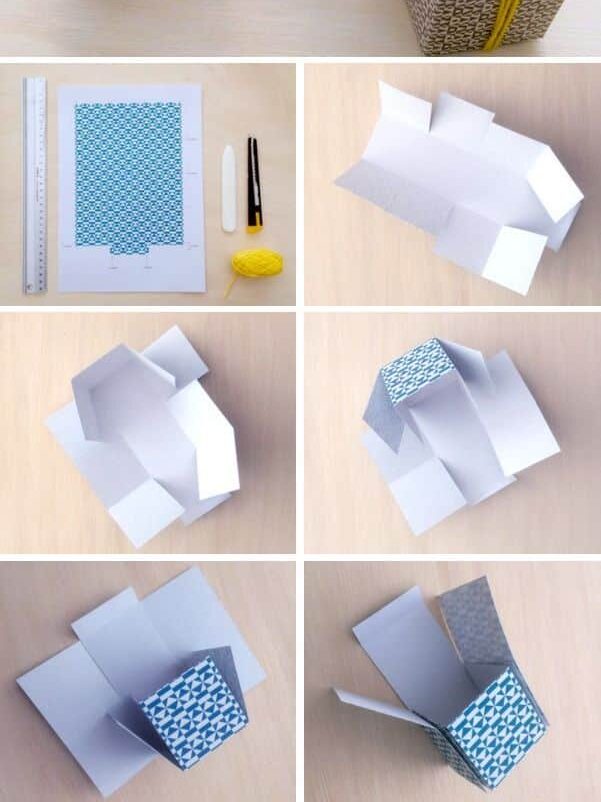
While not strictly a decoration, a tiny origami gift box or cube can serve multiple festive purposes. Imagine a tree adorned with miniature paper boxes, each holding a secret message or a tiny piece of candy! These are surprisingly sturdy and don’t require any glue.
Why it’s great: These are functional and decorative. They’re perfect for small surprises, advent calendar fillers, or just adding a charming, geometric element to your decor.
Materials Needed:
- Square sheets of paper (any festive color or pattern)
- Optional: Small treats, messages, or trinkets to put inside
- Optional: Ribbon or string for hanging
How to Fold (Simplified – Masu Box): 1. Start with a square of paper, colored side up. Fold in half horizontally and vertically, unfolding each time. 2. Fold all four corners towards the center point. You now have a smaller square. 3. Take the top and bottom edges of this new square and fold them towards the center, creasing well. Unfold these. 4. Do the same with the left and right edges. Unfold. You now have many creases. 5. Unfold the top and bottom corners that you folded in step 2. You should have two flaps folded inward and the top/bottom edges extended. 6. Lift the top and bottom edges upwards, forming the sides of the box. The small corner flaps will fold in automatically. 7. Fold the remaining side flaps over to lock the box together. Repeat on the other side to secure it. 8. You’ll need to make a lid (slightly larger paper, or same paper, just folded slightly differently) if you want to close it securely. For a simple open cube, this is often enough.
Tips for Customization:
- Use different colored papers for the box and the lid.
- Decorate with glitter, stamps, or festive stickers.
- Fill with small candies, a tiny written wish, or a personalized note.
- Punch a hole in one corner before assembling and thread a ribbon through to hang it like an ornament.
- These also make wonderful placeholders at a Christmas dinner table, each holding a small treat for your guests. They could be a fun addition to your dining room decor.
6. The Origami Bauble / Ornament Ball
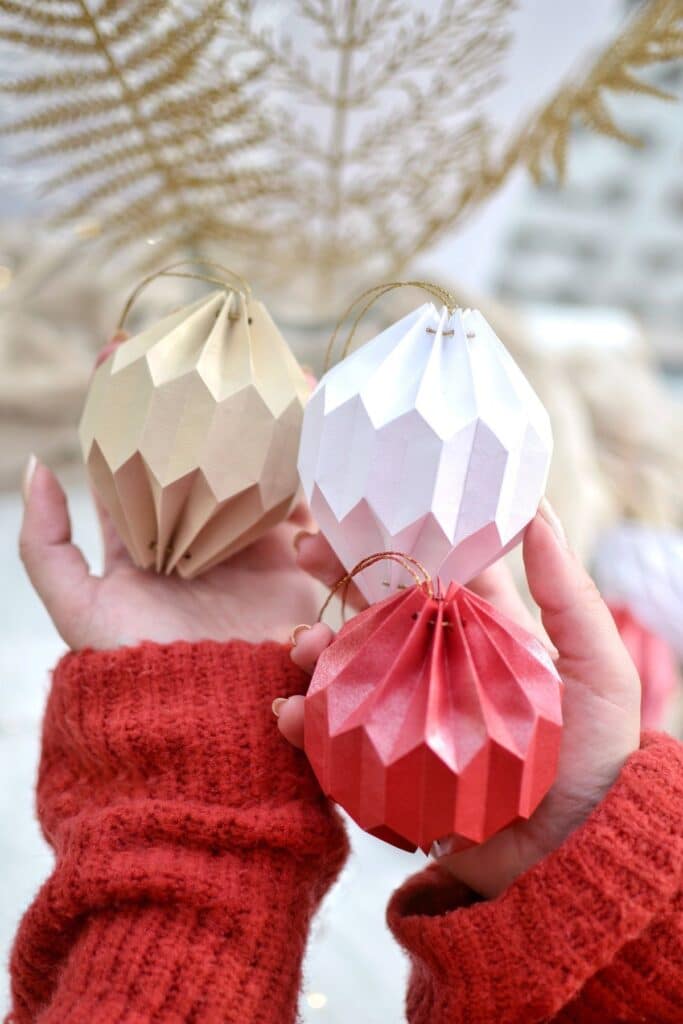
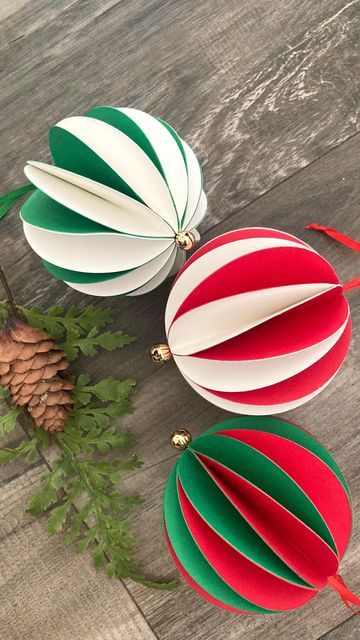
While classic round baubles are often glass or plastic, an origami bauble offers a unique, geometric alternative. Many designs create a multi-faceted sphere or a striking flat design that mimics a traditional ornament. Some involve simple pleating and folding to create a dimensional, almost quilted look.
Why it’s great: These add a modern, artistic touch to your tree while retaining the classic ‘bauble’ shape. They’re lightweight and virtually unbreakable.
Materials Needed:
- Square sheets of paper (various festive colors, metallic, or patterned)
- Optional: Glue for securing folds (for some designs)
- String or thread for hanging
How to Fold (Simplified – Flat Layered Bauble): 1. Start with a square sheet of paper, colored side up. Fold it in half horizontally and vertically, unfolding to create creases. 2. Fold all four corners into the center. 3. Flip the paper over. Fold all four corners into the center again. 4. Flip the paper over once more. You’ll see a smaller square with some flaps. 5. Take each of the four small square sections and carefully pull them outwards from the center, flattening them into triangular points. This creates a star-like shape with four points. 6. Now, working with one point, fold the side edges inward to the center line of that point. Repeat for all four points. 7. This design creates a lovely layered, somewhat star-like bauble. You can then gently push the center in or out for more dimension.
Tips for Customization:
- Use double-sided paper for interesting color contrasts as you fold.
- Add a decorative bead or a small pom-pom to the bottom point.
- String several together to create a festive garland.
- Experiment with different sizes of paper to create a varied collection of ornaments.
- For a more traditional round look, explore “origami kusudama” ball instructions, which involve gluing multiple identical modules together, creating a beautiful spherical flower ball.
7. The Origami Santa Hat
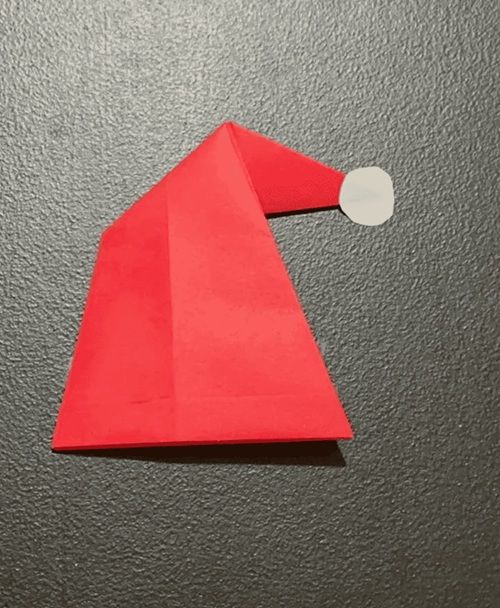
Bring a touch of playful whimsy to your holiday decor with an origami Santa hat! These are surprisingly simple to fold and instantly recognizable, making them a fun craft for all ages. They can be hung as small ornaments or even used as festive toppers for small bottles or figures.
Why it’s great: It’s an instantly cheerful and recognizable symbol of Christmas. Easy to fold, these hats are perfect for decorating your tree, adorning gifts, or even using as quirky place settings.
Materials Needed:
- Square sheets of red paper
- Small amount of white paper or cotton ball for the pom-pom and trim
- Glue
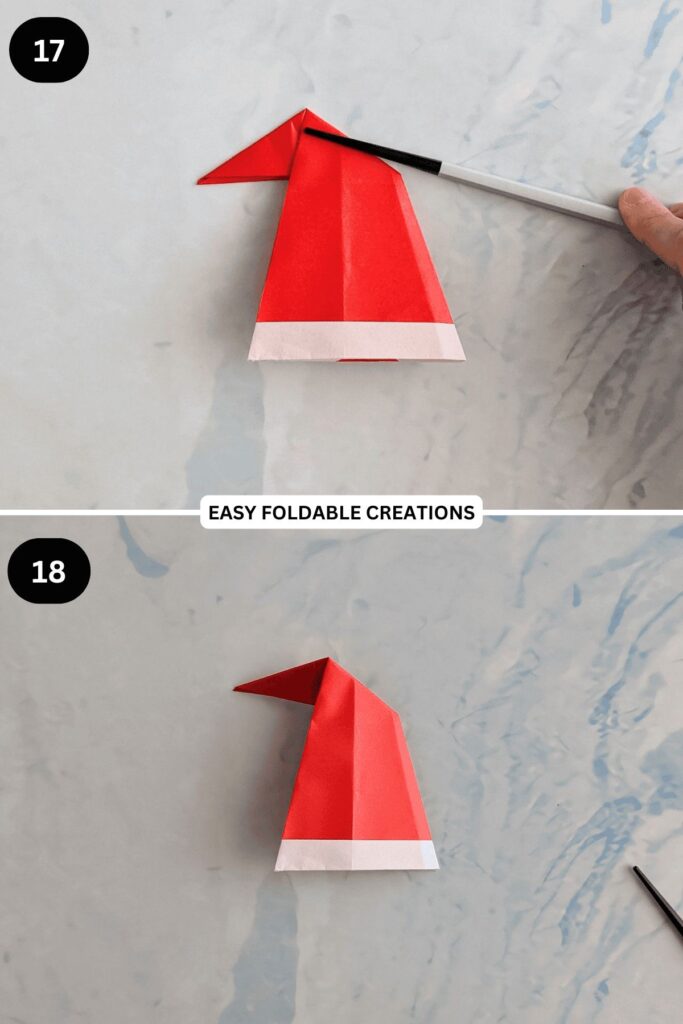
How to Fold (Simplified): 1. Start with a square piece of red paper, white side up. Fold it in half diagonally to form a triangle. 2. Orient the triangle so the long edge is at the bottom and the right angle is at the top left. 3. Take the bottom right corner and fold it up towards the top point, but don’t align it perfectly; offset it slightly to the left, creating the beginning of the hat’s curve. Crease well. 4. Now, take the bottom left corner and fold it up and over the first folded flap, aligning its edge to create the other side of the hat. This will form the basic conical shape. 5. Adjust the folds to create the desired hat shape. The top point can be gently curved. 6. Flip it over. The backside will be slightly different but also hat-like. 7. For the white trim, cut a thin strip of white paper and glue it along the bottom edge of the hat. 8. For the pom-pom, crumple a small piece of white paper or use a tiny cotton ball and glue it to the tip of the hat.
Tips for Customization:
- Use patterned red paper for a unique look.
- Add glitter to the white trim for sparkle.
- Attach a tiny jingle bell to the tip of the hat.
- Make several small hats and string them together to create a festive garland.
- These hats can also be slipped onto small figurines or even your fingers for a bit of playful fun during holiday gatherings. They pair wonderfully with other festive elements and can complement a cozy, inviting atmosphere. You might find inspiration for other textiles and cozy decor elements in The secrets of a cozy and harmonious decor.
8. Simple Origami Wreath
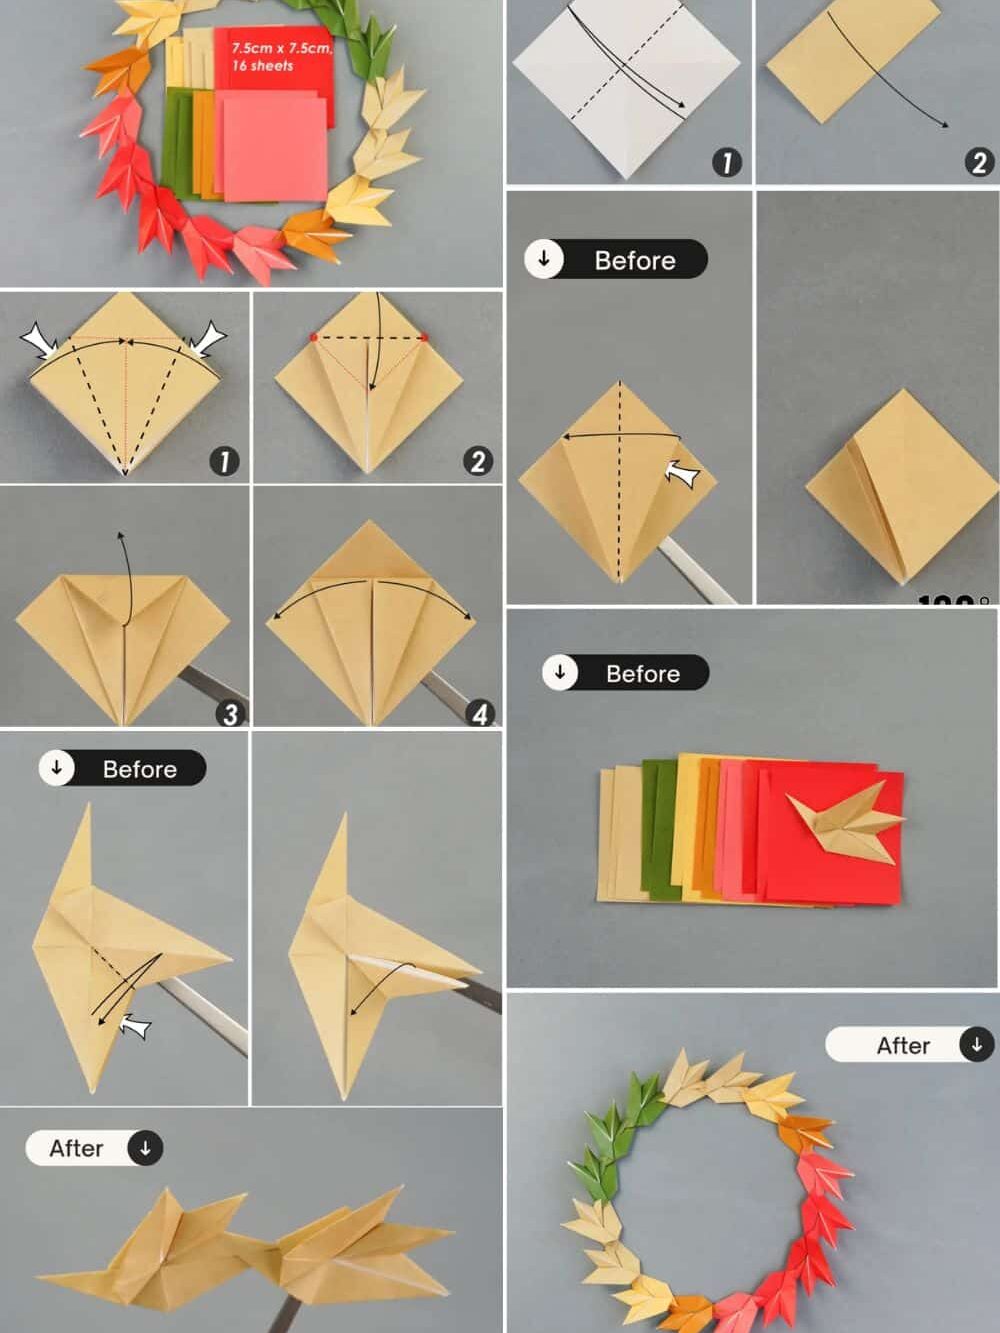
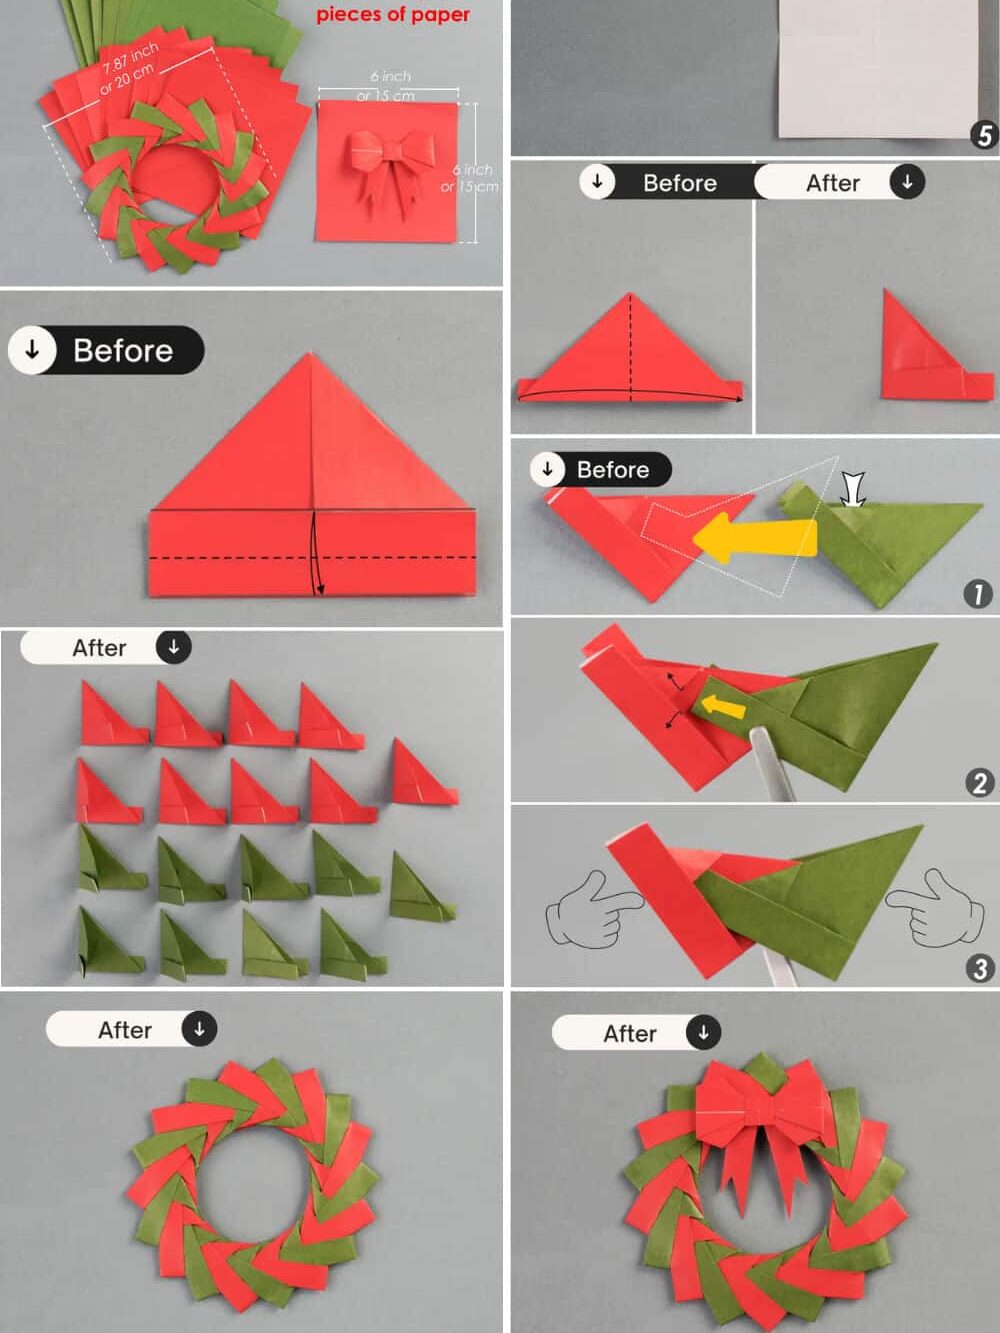
A wreath symbolizes welcome and celebration, and a DIY origami wreath can be a charming miniature version for your tree, a gift topper, or part of a larger festive display. Many simple origami wreaths are created by folding multiple identical units and then linking them together to form a circle.
Why it’s great: These wreaths are visually striking, yet often surprisingly simple to construct from repeated units. They offer a lovely alternative to traditional wreaths.
Materials Needed:
- 6-12 square sheets of green, red, or multi-colored paper (same size)
- Optional: Small bow, berries, or glitter for embellishment
- Optional: Glue for extra stability
How to Fold (Simplified – Sonobe Unit Wreath Variation): 1. Start with a square of paper, colored side up. Fold it diagonally in half to form a triangle. 2. Fold this triangle in half again, then unfold to create a center crease. 3. Take the bottom left corner and fold it up to meet the top right corner, aligning it with the center crease. Repeat with the bottom right corner to meet the top left. You’ll have a small diamond shape. 4. Now, fold the bottom right and bottom left points of this diamond towards the center line, creating a small “mountain” fold in the middle. 5. Flip the unit over. You should see a rectangular shape with two triangular flaps. Fold these flaps downwards along the existing creases. 6. This is one module. Repeat steps 1-5 to create 5-11 more identical modules. 7. To assemble: Take two modules. One module will have a “pocket” and a “tab.” Slide the tab of one module into the pocket of the next. Continue linking them in a circle until you form your wreath. A tiny dab of glue can secure the connections.
Tips for Customization:
- Use different shades of green for a natural look, or alternate red and green paper for a classic Christmas feel.
- Add a small red ribbon bow to the bottom of the wreath.
- Glue tiny craft berries or glitter onto the paper.
- Make miniature wreaths to use as napkin rings for your Christmas dinner.
- Consider using paper with a slight texture or pattern to add depth to your wreath. For more DIY inspiration and creative ideas throughout the year, especially for celebrations, check out articles like Love’s Creations: Unique Craft Ideas for a Personalized Valentine’s Day.
Bringing Your Origami Creations to Life
Once you’ve mastered these 8 easy origami Christmas decorations, the real fun begins: integrating them into your holiday home. Don’t limit yourself to just the Christmas tree!
- Garlands: String together multiple stars, snowflakes, or mini Santa hats with fishing line or festive ribbon to create stunning garlands for your mantel, doorways, or windows.
- Gift Toppers: A small origami star, tree, or angel makes a beautiful, personalized alternative to traditional bows.
- Table Decor: Scatter origami stars, trees, or tiny gift boxes on your dining table as charming centerpieces. Use the Santa hats as whimsical placeholders.
- Window Displays: Hang snowflakes and stars at varying heights in your windows for an enchanting winter wonderland effect.
- Advent Calendar: Fill the tiny origami gift boxes with notes or small candies for a DIY advent calendar.
- Wall Art: Arrange a collection of different origami elements on a wall, perhaps in the shape of a larger Christmas tree or star, for a unique festive display.
- Christmas Cards: Glue a small, flat origami piece onto homemade cards for an extra special touch.

The Magic of Handmade Holidays
There’s an undeniable magic that comes with a handmade Christmas. Each fold, each cut, each carefully placed embellishment contributes to a story, a memory, and a unique expression of your festive spirit. Origami provides an accessible and rewarding way to infuse your home with this personal touch. It’s a craft that encourages patience, creativity, and a connection to the simple joy of making.
As you fold these 8 origami Christmas decorations, you’re not just creating ornaments; you’re crafting moments, building traditions, and adding layers of warmth and personality to your holiday celebration. From sparkling stars to serene angels, each paper creation holds the potential to become a cherished part of your festive decor for years to come. So, gather your paper, call your loved ones, and immerse yourselves in the delightful art of origami this Christmas.
Ready to transform your home with these charming paper creations? Pick your favorite, grab some festive paper, and start folding today! Let your creativity unfold and make this Christmas truly unforgettable with decorations crafted straight from the heart.
- 68shares
- Facebook0
- Pinterest65
- Twitter3
- Reddit0


