Did you know that nearly half of DIY paint jobs fall short of expectations due to missing steps or improper tools? Painting your home promises transformation but even a simple project can go off track without the right preparation. This guide brings expert tips that help you gather smart supplies, prepare surfaces effectively, and achieve a finish that looks fresh and professional every time.
Table of Contents
- Step 1: Gather Essential Painting Supplies
- Step 2: Prepare Your Surface Thoroughly
- Step 3: Apply Primer For Lasting Results
- Step 4: Paint With Smooth, Even Strokes
- Step 5: Inspect And Perfect Your Final Finish
Quick Summary
| Key Point | Explanation |
|---|---|
| 1. Assemble quality painting tools | High-quality brushes, rollers, and other materials are essential for a professional finish. Invest in the right tools for the best results. |
| 2. Thoroughly prepare surfaces before painting | Inspect, clean, and repair walls to ensure paint adhesion and durability. A clean, smooth surface sets the foundation for success. |
| 3. Apply primer before the paint | Use a suitable primer to enhance paint adhesion and longevity. Priming helps achieve vibrant colors and a seamless finish. |
| 4. Use smooth, even strokes while painting | Maintain consistent pressure and direction, working wet edges to prevent lines and achieve complete coverage. Technique is crucial for a professional look. |
| 5. Inspect and perfect your final coat | Conduct a thorough inspection under good lighting to identify imperfections and touch up as needed. Final checks ensure a polished, professional appearance. |

Step 1: Gather Essential Painting Supplies

Before diving into your creative home painting project, you need to assemble the right tools and materials. According to WorldSkills, selecting appropriate equipment is crucial for achieving professional results.
Start by collecting your core painting supplies. You will want high quality brushes in multiple sizes (2 inch angled brush, 1 inch detail brush), a sturdy paint roller with extension pole, roller tray, painter’s tape, drop cloths, paint stirrers, and a ladder for reaching higher surfaces. Choose brushes with synthetic bristles for latex paints and natural bristle brushes for oil based paints. The General Services Administration recommends investing in quality tools to ensure smooth application and professional finish.
Before purchasing your paint, grab some sample swatches to test colors in your actual space. Pro tip: always purchase slightly more paint than you think you will need to account for multiple coats and unexpected touch ups. Paint stores can help you calculate exact quantities based on your room’s square footage.
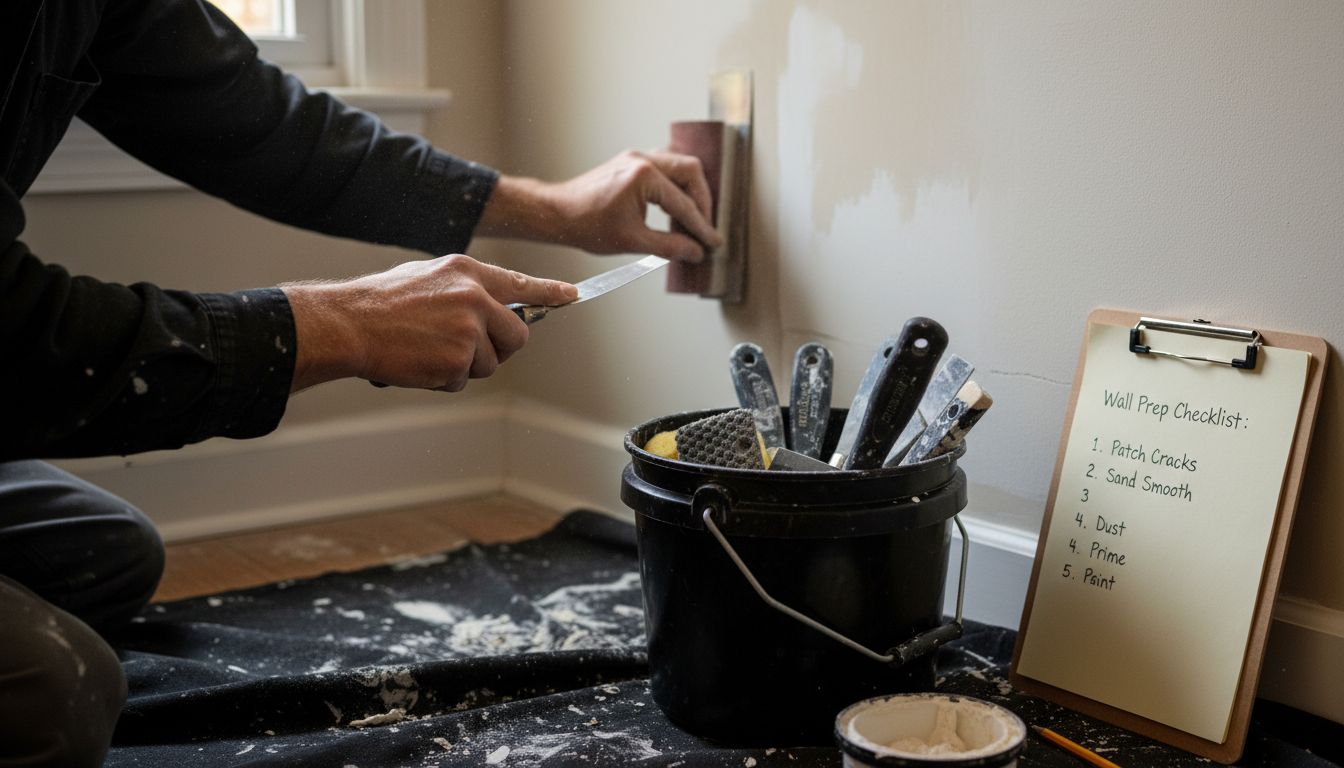
Step 2: Prepare Your Surface Thoroughly
Before applying a fresh coat of paint, thorough surface preparation is your foundation for a stunning result. Purdue University Extension emphasizes that proper surface preparation prevents future paint failures and ensures long lasting coverage.
Begin by carefully inspecting your walls for imperfections such as cracks, holes, or uneven textures. Remove any loose paint using a paint scraper or sandpaper. For wooden surfaces, GSA recommends cleaning the surface thoroughly and then sanding to create a smooth base that allows paint to adhere effectively. Fill small holes and cracks with spackling compound, letting it dry completely before sanding the repaired areas until they are smooth and level with the surrounding surface.
Moisture can be a silent enemy of your painting project. Check walls for any signs of dampness or water damage before painting. If you discover moisture issues, address them first by identifying and fixing the source of the problem. A clean dry surface is critical for paint to bond properly and look professional.
 Once your surface is smooth clean and dry you are ready to move on to the exciting part of choosing and applying your paint color.
Step 3: Apply Primer for Lasting Results
Priming is the secret weapon that transforms an ordinary paint job into an exceptional finish. According to Purdue University Extension, applying a suitable primer is crucial for enhancing paint adhesion and ensuring the longevity of your painting project.
GSA guidelines recommend selecting a primer that matches your specific surface type. For bare or unfinished walls, use a high quality water based primer. If you are painting over a darker color or covering stains, choose a stain blocking primer that provides complete coverage. Apply the primer using a roller for large surfaces and an angled brush for edges and corners. Ensure even application with smooth strokes moving in a single direction to create a uniform base.
Allow the primer to dry completely according to the manufacturer’s instructions typically 2 to 4 hours before painting. Pro tip: check the primer color closely. A tinted primer that matches your final paint color can help achieve more vibrant and true color results with fewer paint coats. Your carefully primed surface is now ready for the exciting transformation of color application.
Step 4: Paint with Smooth, Even Strokes
The moment has arrived to transform your space with a fresh coat of color. WorldSkills emphasizes the critical importance of mastering painting techniques to achieve a professional looking finish that will make your walls shine.

GSA guidelines recommend starting with a high quality roller and maintaining consistent pressure and direction. Begin at the top of the wall and work your way down in smooth vertical strokes that slightly overlap each previous stroke. This technique ensures complete coverage and prevents visible lines or uneven patches. Use an angled brush for cutting in around edges window frames and baseboards creating clean precise lines that separate different surface areas.
Work in small sections about 3 to 4 feet wide to maintain a wet edge and prevent visible seams between paint applications. Pro tip: keep a wet edge by always painting toward the area you have just painted which helps blend the paint seamlessly. Allow each coat to dry completely typically 2 to 4 hours before applying the next layer. Your patience will reward you with a stunning professional grade paint job that looks like it was done by an expert.
Step 5: Inspect and Perfect Your Final Finish
Your painting project is almost complete but the final inspection is where true craftsmanship shines. WorldSkills emphasizes the critical importance of thoroughly examining your painted surface to ensure professional quality results.
GSA guidelines recommend conducting a systematic review under good lighting conditions. Start by examining the wall from different angles and distances. Look for subtle imperfections such as thin spots uneven coverage drips or brush marks. Use a bright light held at an angle to highlight any inconsistencies in the paint surface. If you spot small areas that need touch up use a small detail brush to carefully correct these spots matching the original paint color and technique.
Pro tip: Allow your final coat to cure completely before hanging artwork or moving furniture back into place. This typically takes about 24 hours but can vary depending on humidity and temperature. Step back and admire your work your patience and attention to detail have transformed your space with a professional quality paint finish that reflects your creative vision.
Transform Your Creative Home Painting Journey Today
Embarking on a home painting project can feel overwhelming with so many tools, techniques, and preparation steps to master. This step-by-step painting guide highlights the challenges of selecting the right brushes, preparing surfaces, and applying primer to achieve a flawless finish. Your goal is not just to paint but to create a lasting transformation that reflects your style and passion.

Discover expert tips and creative inspiration to perfect your painting skills and unlock your full artistic potential by exploring our extensive Art collection. Whether you want to deepen your skills with detailed tutorials on Watercolor Art & Step-by-Step Techniques or expand your creative vision with other artistic disciplines, Sky Rye Design offers the guidance you need. Start your journey now and visit Sky Rye Design for more ideas, expert advice, and fresh motivation to elevate your home projects into true works of art.
Frequently Asked Questions
What essential painting supplies should I gather before starting my home project?
To kick off your painting project, assemble high-quality brushes in various sizes, a sturdy paint roller with an extension pole, painter’s tape, drop cloths, and a ladder. Ensure you also have a roller tray and paint stirrers for proper application.
How do I prepare my walls before painting?
Start by inspecting your walls for any imperfections like cracks or holes, and scrape off loose paint. Clean the surface thoroughly and sand it down to create a smooth base, then fill small holes with spackling compound and sand after drying.
Why is applying primer important before painting?
Using a primer is crucial because it enhances paint adhesion and ensures a longer-lasting finish. Apply a suitable primer matching your surface type to create an even base for your paint color.
What painting techniques can I use to achieve a smooth finish?
Use a high-quality roller for large areas and maintain consistent pressure while painting in smooth vertical strokes. Work in small sections of 3 to 4 feet to keep a wet edge, preventing unsightly seams.
How can I check for imperfections after painting?
Conduct a thorough inspection of your painted walls under good lighting, looking for any thin spots or drips. Use a bright light held at an angle to spot inconsistencies, and make touch-ups with a small brush as needed.
How long should I wait before moving furniture back into the painted area?
Allow your final coat to cure completely before placing furniture back in the room, which typically takes about 24 hours. This ensures the paint sets properly and maintains its quality.
Recommended
- Master the Art of Draw a Simple House: Step-by-Step Guide
- 7 Inspiring DIY Home Decor Ideas for Creative Spaces |
- Transform Your Space with paintlab.ie | Sky Rye Design
- 8 Easy DIY Ideas to Brighten Up Your Home Quickly | Sky
- 3shares
- Facebook0
- Pinterest0
- Twitter3
- Reddit0
 Artistic sketches of two characters, showing various facial expressions and angles. the left side features a woman, the right side a man, both in a realistic sketch style. | Sky Rye Design")
 with pencil on paper | Sky Rye Design")
