Whether you own a single-family home or manage a sprawling commercial property, the roof above your head is doing more work than you probably realize. A rooftop inspection is the systematic process of evaluating that critical barrier between your building and the elements—and understanding how it works can save you thousands in unexpected repairs.
This guide walks you through everything you need to know: the limitations of DIY checks, what professional inspectors actually do, the tools they use, optimal scheduling, realistic costs, and what to do when the report lands in your inbox.

What Is a Rooftop Inspection and Why It’s Essential
A rooftop inspection is a comprehensive, documented assessment of your roof’s surface, structure, and all related components. Whether we’re talking about a residential house or a commercial building, the goal remains the same: identify potential issues before they become expensive emergencies.
- A proper roof inspection covers the roof’s surface materials, structural framework, gutters, flashing, penetrations (vents, skylights, chimneys), drainage systems, and interior signs of leaks or moisture damage.
- The importance of these inspections centers on prevention—catching small problems early protects structural integrity, prevents interior water damage to drywall, flooring, and equipment, and validates insurance and warranty coverage.
- In regions with heavy rain, hail, or snow—think Midwest hail seasons, Gulf Coast hurricanes, or Northeast winters—annual or biannual rooftop inspections are considered essential maintenance, not optional.
- Modern rooftop inspections combine traditional on-foot visual checks with advanced technology: drones for steep or fragile roofs, moisture meters for hidden leaks, and thermal imaging cameras for detecting trapped water.
- Building owners who skip regular inspections often discover problems only after they’ve escalated—when water stains appear on ceilings or mold has already taken hold behind walls.
- This article covers DIY limitations, professional methods, what inspectors examine, timing recommendations, costs, and exactly what happens after the inspection is complete.

Can You Do Your Own Rooftop Inspection?
The short answer is: partially. Ground-level checks have real value, but they don’t replace what a trained professional roof inspector brings to the table. Here’s how the two approaches compare.
- Basic ground-level checks using binoculars can help you spot obvious visible signs of trouble—missing shingles, sagging areas, or clogged gutters—but these observations catch only the most apparent problems.
- Safety risks of climbing onto a roof without training are significant: steep pitches over 6/12, slick surfaces after rain or frost, and fragile materials like clay tile or aging single-ply membranes create real hazards for untrained individuals.
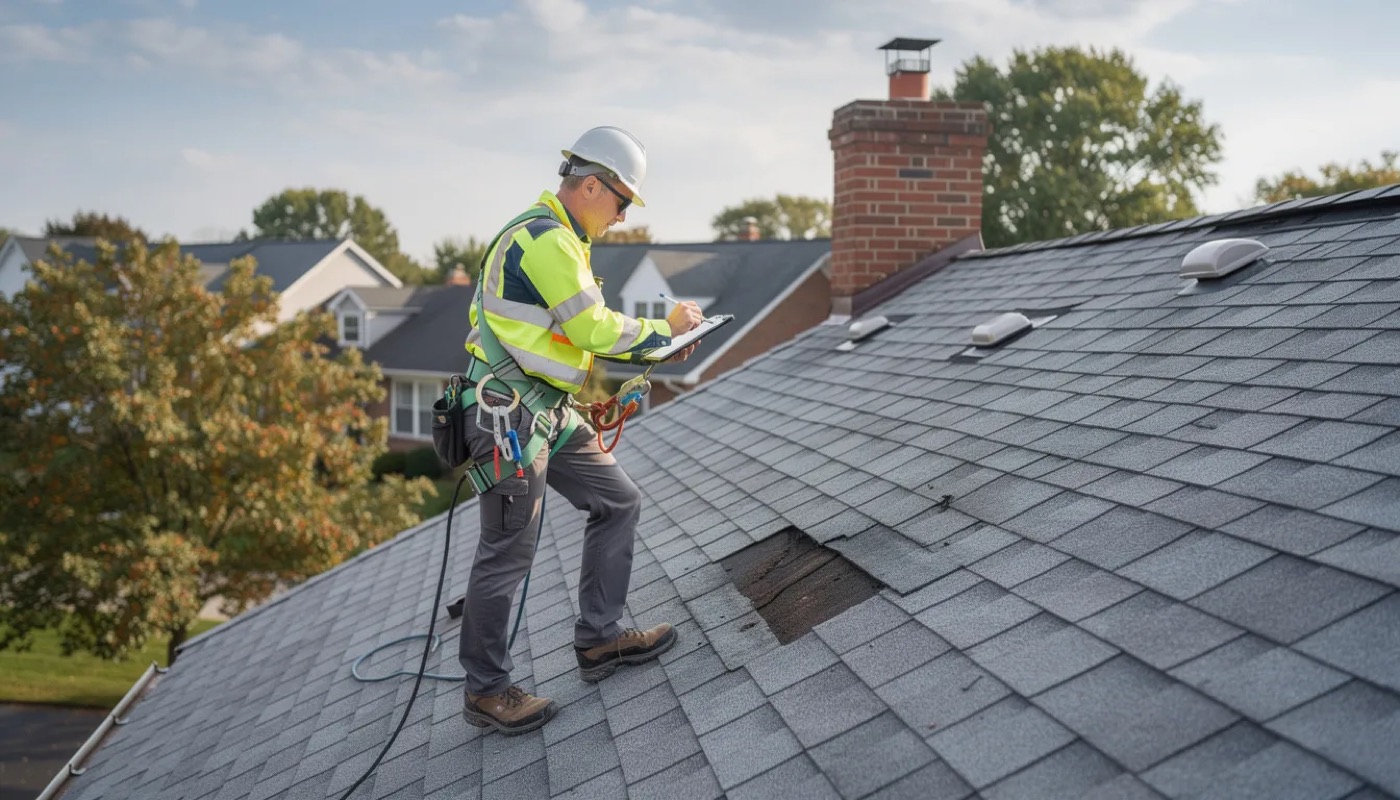
- A professional roof inspector is trained to walk roofs safely, use harness systems where building codes require them, and recognize subtle signs of damage that homeowners and facility managers routinely miss.
- For insurance claims, manufacturer warranties, and most real estate transactions, documentation from a licensed roofing contractor or certified inspector is typically required—DIY observations won’t satisfy these requirements.
- Professionals provide a detailed report outlining conditions with photos, condition grades, and prioritized recommendations that you can use for budgeting, negotiations, and planning future maintenance.
- The expertise gap is real: inspectors know to check rubber boots at pipe penetrations for dry rot, assess whether granule loss on asphalt shingles indicates end-of-life conditions, and identify areas where flashing sealant has failed.
How a Rooftop Inspection Is Performed
The roof inspection process follows a methodical sequence designed to ensure nothing gets overlooked—from initial research to final documentation.
- Pre-inspection research: Before arriving on site, inspectors review roof age, type (asphalt shingle, metal, TPO, EPDM, built-up, tile), history of previous leaks, and any prior reports or warranty requirements that dictate specific assessment criteria.
- Ground-level perimeter walk: Inspectors typically begin by walking the property’s perimeter, examining overhangs, soffits, fascia, siding above the roof line, and signs of runoff issues or staining on exterior walls.
- Rooftop walk-through: Moving systematically across the roof’s surface, inspectors check membranes, shingles, seams, joints, and all penetrations—vents, skylights, HVAC curbs, satellite mounts, and chimneys.
- Grid documentation for large roofs: For commercial roofs exceeding 20,000 square feet, inspectors often divide the roof into numbered grids or sections, ensuring every area is photographed and documented in an organized, traceable manner.
- Interior and attic assessment: Interior checks typically include attics, top-floor ceilings, and mechanical rooms, where inspectors look for water stains, mold growth, musty odors, peeling paint, and moisture in insulation.
- Report compilation: The final step involves assembling findings into a digital report (usually PDF format) with date-stamped photos, annotated diagrams of the roof layout, and a clear summary separating urgent items from routine maintenance needs.
Tools and Technologies Used in Modern Rooftop Inspections
Today’s rooftop inspections go well beyond a ladder and a clipboard. Here’s what modern inspectors bring to the job.
- Basic equipment: Ladders rated for at least 300 pounds, roof shoes or boots with high-traction soles, tape measures, chalk for marking problem areas, and hand tools for gently lifting shingles or checking fastener conditions.
- Moisture meters: Used primarily on flat and low-slope roofs, these devices detect trapped moisture within insulation layers without requiring large, destructive test cuts—critical for assessing the overall health of commercial roofing systems.
- Infrared thermal imaging cameras: Used at dusk or during evening hours when temperature differentials are most pronounced, these cameras identify anomalies that often indicate wet insulation or hidden leaks invisible to the naked eye.
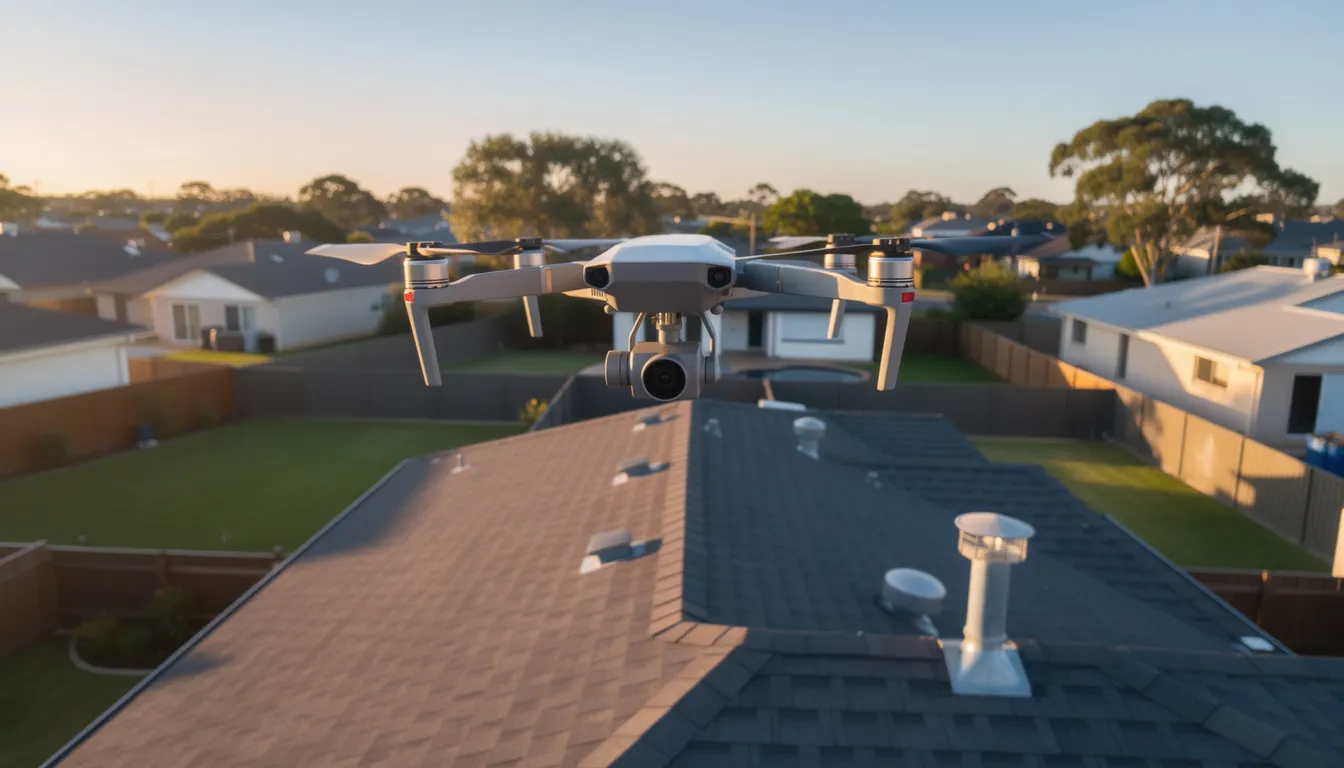
- Drones with high-resolution cameras: Increasingly common for steep or fragile roofs, drones equipped with 4K cameras (and sometimes thermal payloads) capture full-roof overviews safely and quickly, reducing time spent on hazardous surfaces.
- Satellite and aerial imagery services: Before even visiting a site, inspectors can measure roof area, pitch, and complexity using satellite data—particularly useful for large commercial or multi-building properties where pre-visit planning saves time.
- Digital inspection software: Mobile apps allow inspectors to mark photos in real-time, log specific conditions (e.g., “20 linear feet of failed flashing at south parapet”), and generate standardized reports the same day as the inspection.
What Inspectors Look For During a Rooftop Inspection
A thorough assessment covers five major categories: structure, surface materials, details and penetrations, drainage, and interior indicators. Here’s what inspectors examine in each area.
- Structural condition: Sagging ridgelines, soft or “spongy” spots indicating compromised decking, and deflected joists or trusses visible from the attic or the underside of the deck. These findings often require immediate attention.
- Roofing materials: Cracked, curled, or missing shingles; bruised shingles from hail impact; punctures and seam failures on TPO, EPDM, or PVC membranes; blisters or alligatoring on built-up roofs; rust or loose fasteners on metal panels. Granule loss on asphalt shingles is a common sign that replacement may be approaching.
- Flashing and terminations: Deteriorated step flashing at walls, gaps around chimneys, poorly sealed penetrations at vent stacks, skylight curbs, and HVAC units. Missing flashing or failed sealant at parapet walls creates direct pathways for water intrusion.
- Drainage components: Clogged gutters, blocked downspouts, obstructed internal drains, and non-functional scuppers. Ponding water on flat roofs that persists more than 48 hours after rain indicates drainage problems requiring correction.
- Accessories and details: Condition of vents, chimney caps, expansion joints, snow guards, rooftop walk pads, and any mounted equipment (solar arrays, antennas, satellite dishes) including their attachment points and surrounding sealants.
- Interior and attic spaces: Water stains on ceilings, rusted metal framing, wet or compressed insulation, mold growth, and inadequate ventilation leading to condensation. Inspectors assess whether attic intake vents provide proper airflow and confirm insulation coverage meets requirements.
- Workmanship and code compliance: Improper nailing patterns, inadequate shingle overlaps, incompatible materials, missing edge metal, and deviations from manufacturer installation guidelines that may void warranties—all get documented in the inspection.

Special Considerations: Residential vs. Commercial Rooftop Inspections
The inspection process differs meaningfully between a house and a commercial building.
- Residential focus: Home inspections typically emphasize steep-slope materials (asphalt shingles, tile, slate, metal panels), attic ventilation adequacy, and visible interior damage in living spaces. The goal is often assessing remaining service life and identifying near-term repair needs.
- Commercial focus: Commercial roof inspection work typically addresses low-slope systems (TPO, EPDM, modified bitumen, built-up roofing), large rooftop HVAC equipment, walkway systems for maintenance access, and complex drainage networks with multiple drains or scuppers.
- Reporting differences: Commercial reports frequently include budget forecasts spanning 3–10 years—repairs needed now, partial replacements in coming years, and eventual full replacement timelines. Residential reports usually emphasize near-term repairs and estimate remaining useful life.
- Access methods: Residential inspections may rely more on ladders and small drones, while commercial projects often involve roof hatches, fixed ladders with safety cages, and fall-protection anchor systems that require specific training to use properly.
- Stakeholder needs: A home inspection report serves a single owner or buyer, while commercial reports may need to satisfy property managers, building owners, lenders, and insurance carriers—each with different concerns.
When and How Often to Schedule a Rooftop Inspection

Timing matters. Both seasonal patterns and specific triggering events should drive your inspection schedule.
- Annual baseline: At minimum, schedule one professional rooftop inspection per year. For properties in harsh climates or with aging roofs over 15–20 years old, two inspections annually (spring and fall) provide better protection.
- Pre-storm season scheduling: Schedule inspections 2–4 weeks before your local storm season—late April to early May in Tornado Alley, August in Gulf Coast regions—so identified issues can be addressed in a timely manner before severe weather arrives.
- Post-event inspections: After hailstorms, high-wind events exceeding 60 mph, heavy snowfall, or ice dams, arrange immediate inspections to document damage for insurance purposes and prevent minor issues from worsening.
- Real estate transactions: Buyers and sellers should arrange rooftop inspections during the due-diligence or home inspection period—typically 7–10 days after a purchase contract is signed in many states.
- Warranty compliance: Some manufacturers and warranty providers explicitly require documented regular inspections—often annually or after major storms—to keep long-term warranties in force. Review your warranty terms to understand these requirements.
- New home considerations: Even a new home should receive a roof inspection before the builder’s warranty expires, as workmanship issues caught early can be corrected at no cost to you.
How Long a Rooftop Inspection Takes

Duration varies based on property size and complexity.
- Single-family homes: A standard residential roof (1,500–3,000 square feet) usually takes 45–90 minutes on site, plus additional time afterward for report writing and photo organization.
- Small commercial buildings: Properties with 5,000–15,000 square feet of roof may require 2–4 hours on the roof, especially when multiple HVAC units, penetrations, and drainage points need detailed documentation.
- Large commercial facilities: Buildings with 50,000+ square feet, multiple roof sections, or several buildings can require most of a workday or longer—particularly when thermal imaging, core sampling, or drone mapping is involved.
- Variables affecting time: Complexity of the roof design, number of levels, safety setup requirements (harnesses, warning lines, flags), current weather conditions, and the need for interior access all influence total inspection duration.
The Risks of Skipping Regular Rooftop Inspections
Neglecting your roof isn’t a neutral decision—it’s a bet that nothing will go wrong. Here’s what’s at stake.
- Escalating damage: Undetected minor issues—slipped shingles, small punctures, tiny flashing gaps—can escalate into full leaks, saturated insulation, and structural wood rot within a single wet season. What costs hundreds to fix today may cost thousands next year.
- Interior damage cascade: Water damage from roof leaks quickly extends beyond the roof itself: ruined drywall, damaged floor coverings, destroyed furniture, failed electronics, and in commercial spaces, damaged inventory or critical equipment.
- Insurance complications: Many insurers require evidence of regular maintenance. Lack of documented rooftop inspections can weaken or complicate claims after storms or when long-term leaks are discovered.
- Warranty voidance: If a manufacturer’s roofing warranty requires annual inspections and maintenance logs, skipping them may void coverage on warranties designed to last 20–30 years. That protection disappears if you don’t maintain it.
- Financial impact: Small repairs caught early might cost a few hundred to a few thousand dollars. Neglected roofs often require replacements running $8–$15 per square foot or more, plus interior restoration costs that can double or triple the total expense.
- Health hazards: Persistent unnoticed moisture promotes mold growth, creating potential health risks for occupants and triggering extensive remediation requirements that can disrupt building occupancy for weeks.
Waiting until you see water stains on your ceiling means the problem has already progressed far beyond the roof itself. Regular inspections are the only reliable way to catch problems early.
What Happens After a Rooftop Inspection?
The inspection itself is just the beginning. Here’s what follows.
- Report delivery: The inspector compiles a written report summarizing the roof’s condition, including date of inspection, roof type, approximate age (if known), and a general estimate of remaining service life.
- Photo documentation: The report contains labeled photos, marked roof plans or diagrams, and a list of specific deficiencies—each noting location (e.g., “northwest corner near drain #3”), type of problem, and probable cause.
- Prioritized recommendations: Findings are typically organized into tiers: immediate safety or leak issues requiring urgent attention, short-term maintenance needed within 12 months, and long-term planning items for the future (3–5+ years out).
- Maintenance planning: For commercial clients, inspectors often propose a maintenance plan with scheduled cleanings, regular inspections after major storms, and routine repairs designed to extend the roof’s useful life.
- Budgeting and planning: Property owners should use the report for planning—obtaining repair estimates from a reputable roofing contractor, timing projects to avoid peak storm season, and budgeting for eventual replacement rather than reacting to emergencies.
- Documentation retention: Keep all rooftop inspection reports, invoices, and photos together as a maintenance record. This documentation supports future insurance claims, warranty service requests, and real estate transactions.

If the Rooftop Inspection Finds Major Problems
When a report reveals serious identified issues, you have decisions to make.
- End-of-life options: When a roof is near the end of its service life, options include targeted repairs to extend function by 1–3 years, partial sectional replacement, or full replacement—the right choice depends on budget, risk tolerance, and building plans.
- Homebuyer negotiations: For buyers, a bad inspection report creates negotiation opportunities during the contract period: seller-paid roof repairs, price reductions, or repair credits at closing based on contractor estimates.
- Commercial capital planning: Major findings may prompt phased capital planning, with larger projects scheduled during off-peak business periods to minimize disruptions to operations.
- Specialist consultation: In cases of structural compromise or extensive trapped moisture, a structural engineer or building envelope specialist may need to assess the situation alongside the roofing contractor to determine the full scope of work required.
- Insurance documentation: If storm damage is involved, the inspection report becomes critical documentation for your claim. Provide recommendations from the inspector to your insurance adjuster promptly.
Cost of Rooftop Inspections and How to Choose an Inspector

Understanding typical costs helps you budget appropriately and evaluate quotes.
| Property Type | Typical Cost Range | Notes |
|---|---|---|
| Residential (basic) | $150–$300 | Visual inspection, report with photos |
| Residential (with drone/thermal) | $300–$500 | Includes advanced technology |
| Small commercial | $300–$600 | 5,000–15,000 sq ft |
| Large commercial | $1,000–$2,000+ | Detailed assessment, thermal imaging |
- Free inspections: Some roofing contractors offer basic inspections at low or no upfront cost when they expect to provide repair or replacement services afterward. Comprehensive stand-alone reports from independent inspectors are typically fee-based.
- Quality indicators: Look for licensing in your state, insurance coverage (general liability and workers’ compensation), experience with your specific roof type, and familiarity with local codes and weather patterns.
- Certification value: Ask about manufacturer certifications, industry association memberships, and request sample reports before committing. A contractor with expertise in your roofing system will provide more actionable findings.
- Scope clarity: Obtain written scopes before scheduling, specifying whether the service includes interior checks, drone or thermal imaging, roof measurements, and a digital report with photos. Don’t assume—ask.
- Multiple quotes: For significant properties, consider getting assessments from more than one inspector or contractor to compare findings, recommendations, and pricing.
Key Takeaways

- A rooftop inspection is a structured assessment covering surface materials, structure, flashing, penetrations, drainage, and interior moisture indicators.
- Ground-level DIY checks help spot obvious problems but don’t replace professional inspections for thorough assessment, insurance documentation, or warranty compliance.
- Modern inspections combine traditional walk-throughs with drones, thermal cameras, and moisture meters for a closer look at conditions invisible to the naked eye.
- Schedule at least one annual inspection, with additional checks before storm season and after major weather events.
- The cost of regular inspections—typically a few hundred dollars—is minimal compared to the expense of water damage, mold remediation, or premature roof replacement.
- Use inspection reports for planning: prioritize repairs, budget for replacement, and maintain documentation for insurance and warranty purposes.
Your building’s roof works constantly to protect everything beneath it. Don’t wait for leaks to announce themselves—by then, the damage extends well beyond the roof itself. Schedule your next professional rooftop inspection before your region’s storm season arrives, and use the findings to maintain your property in good condition for years to come.
References
- T. Scott Roofing. (n.d.). Inside the Roof Inspection Process. Retrieved from https://tscottroofing.com/blog/inside-the-roof-inspection-process
- GAF. (n.d.). The Importance of a Roof Inspection. Retrieved from https://www.gaf.com/en-us/blog/commercial-roofing/the-importance-of-a-roof-inspection-281474980086957
For any inspection or site documentation flight, review drone flight planning basics before you rely on aerial imagery for design decisions.
- 0shares
- Facebook0
- Pinterest0
- Twitter0
- Reddit0


