Over 80 percent of homeowners say hanging wall art is one of the trickiest finishing touches when decorating a room. Getting it right means more than just hammering in a nail and hoping for the best. The process calls for careful planning, the right tools, and a few expert tricks to avoid crooked frames or damaged walls. This guide shows you how to achieve a flawless, gallery-worthy display at home with confidence and ease.
Table of Contents
- Step 1: Gather Essential Tools And Materials
- Step 2: Choose The Ideal Placement And Layout
- Step 3: Mark And Measure For Accurate Positioning
- Step 4: Install Appropriate Wall Hardware
- Step 5: Hang And Adjust Artwork For Best Effect
- Step 6: Verify Stability And Final Presentation
Quick Summary
| Key Point | Explanation |
|---|---|
| 1. Gather essential tools for installation | Collect specialized tools such as hanging hooks, levels, and wall anchors tailored to your wall type for a secure setup. |
| 2. Determine ideal art placement | Center artwork at 58 inches from the floor, ensuring an appealing arrangement that complements room aesthetics. |
| 3. Measure accurately before marking | Use a systematic approach for precise placement, measuring artwork height and adjusting placements with a level for a clean look. |
| 4. Use appropriate hardware for security | Select strong wall hardware, like D rings, that match your artwork’s weight, and test for stability before hanging. |
| 5. Regularly check installation stability | Conduct routine inspections of hooks and hardware to ensure they remain secure and prevent accidents over time. |
Step 1: Gather Essential Tools and Materials
Preparing to hang wall art starts with collecting the right tools and materials. According to the California College of the Arts, you will need several specialized items to ensure a professional and secure art installation.
Your core toolkit should include picture hanging hooks designed for different wall surfaces, picture hanging wire, measuring tape, a sturdy level, pencil, hammer, electric drill, wall anchors, and appropriate screws. From the Library of Congress recommendations, consider adding specialized tools like a cutting mat, ruler, and scalpel if you plan to customize framing or matting.
Before starting your project, take a moment to assess your specific wall type and artwork weight. Plaster walls require different hardware than drywall or brick surfaces. Pro tip pick anchors and hooks rated for at least 1.5 times the weight of your art piece to ensure maximum safety and stability. Your preparation now will prevent potential mishaps and guarantee a stunning wall art display that looks professionally installed.
Step 2: Choose the Ideal Placement and Layout
Selecting the perfect wall art placement transforms an ordinary room into a captivating visual experience. According to Purdue University’s Rueff Galleries, the standard professional approach is to center artwork at 58 inches from the floor, which creates a harmonious viewing height that works for most spaces.
When creating art groupings, East Carolina University’s School of Art and Design recommends treating multiple pieces as a single visual unit. This means measuring the total height of your arrangement including spaces between pieces. Consider creating visual balance by varying artwork sizes and maintaining consistent spacing between pieces roughly 2 to 3 inches apart. Your goal is to craft an arrangement that guides the viewer’s eye smoothly across the wall.
Think about the room’s overall composition and furniture placement when positioning your art. Large pieces work well above sofas or consoles, while smaller artworks can fill empty vertical spaces or create interesting visual breaks. A good rule of thumb is to ensure your art takes up approximately two thirds to three quarters of the wall space width to maintain proportional visual harmony.
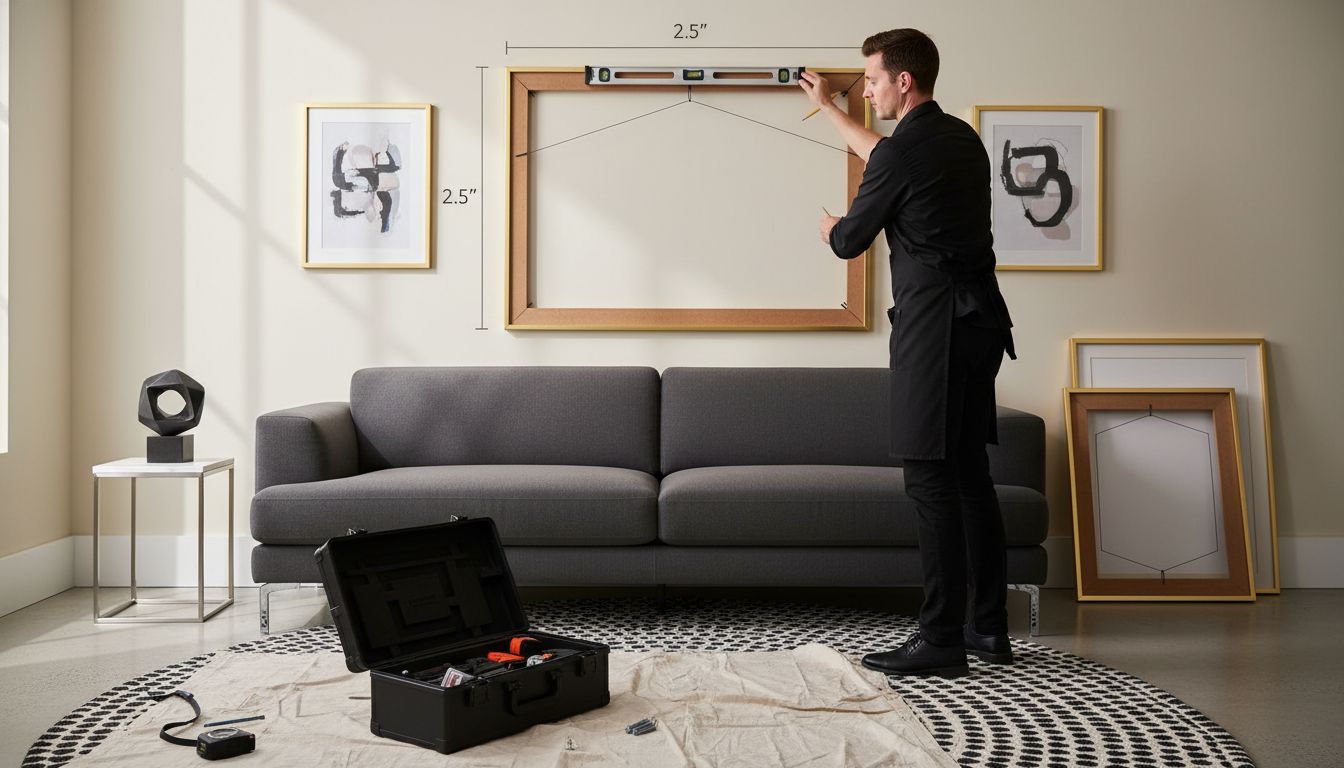
Step 3: Mark and Measure for Accurate Positioning
Precision is the key to a professional wall art installation. Purdue University’s Rueff Galleries provides a systematic approach to ensuring your artwork hangs perfectly. Their recommended method involves a simple calculation: measure the height of your artwork, divide it by two, then add 58 inches to your calculation, subtracting the distance from the top of the artwork to its hanging hardware.
To begin marking your wall, start by using a sharp pencil and a reliable level. East Carolina University’s School of Art and Design suggests creating light, erasable pencil marks that can be easily corrected. Measure twice and mark once to avoid unnecessary holes in your wall. Pro tip use painter’s tape to create a temporary guide that shows exactly where your artwork will hang, allowing you to visually preview the placement before making any permanent marks.
Remember that walls are not always perfectly flat or straight. Take a moment to check the surface with your level and make small adjustments as needed. Your goal is to create a clean, professional look that makes your artwork the star of the room. With careful measurement and patient positioning, you are set to transform your wall into a stunning gallery display.
Step 4: Install Appropriate Wall Hardware
Choosing the right wall hardware is crucial for a secure and professional art installation. The Smithsonian Institution emphasizes the importance of selecting sturdy hardware that matches your artwork’s specific weight and size. For heavier pieces, they recommend securing wall hooks directly into wall studs to provide maximum stability and prevent potential accidents.
The University of North Georgia suggests using specialized hanging hardware like D rings or French cleats instead of traditional sawtooth hangers. These more robust options distribute weight more evenly and provide a more secure mounting solution. When installing, ensure your screws or anchors are appropriate for your wall type whether you are working with drywall, plaster, or brick surfaces.
Pro tip always test your hardware’s weight capacity before hanging valuable artwork. Consider using wall anchors that can support at least 1.5 times the weight of your piece to create an extra margin of safety. By taking these careful preparatory steps, you will protect your artwork and create a display that looks professionally installed and feels completely secure.
Step 5: Hang and Adjust Artwork for Best Effect
Purdue University’s Rueff Galleries recommends a strategic approach to hanging artwork that transforms your space into a professional gallery display. Before making permanent marks, they suggest laying out your pieces on the floor to visualize the final arrangement, allowing you to experiment with different groupings and spacing without risking unnecessary wall damage.
East Carolina University’s School of Art and Design emphasizes treating multiple pieces as a unified visual unit. When hanging multiple artworks, maintain consistent spacing between pieces roughly 2 to 3 inches apart. Use your level to ensure each piece is perfectly straight, making small adjustments as needed to create a balanced and harmonious display.
Pro tip for complex arrangements use painter’s tape to create a temporary layout on your wall. This allows you to step back and assess the overall composition before committing to any permanent installations. Take your time with the positioning your patience will result in a stunning wall art display that looks like it was curated by a professional. With the DIY wall art tutorial from Sky Rye Design, you have all the tools to create a truly remarkable visual statement in your space.
Step 6: Verify Stability and Final Presentation
The Smithsonian Institution emphasizes the critical importance of regularly checking all mechanical components that support your artwork. This means carefully examining picture hooks, wire attachments, and hanging hardware to ensure everything remains secure and stable over time. A visual and physical inspection can help prevent potential accidents and protect your valuable art pieces.
The University of North Georgia recommends conducting a comprehensive final review before considering your installation complete. Verify that your artwork is completely level, the mounting hardware feels rock solid, and there are no visible gaps or uneven surfaces. Pay special attention to the hanging mechanism ensuring you have used robust options like D rings or French cleats rather than less reliable sawtooth hangers.
Pro tip step back and view your artwork from multiple angles and distances. Natural lighting can reveal subtle imperfections you might have missed during initial installation. Take photographs if needed to help you assess the overall presentation objectively. Your meticulous attention to detail will transform your wall art from a simple decoration to a professional display that captures attention and reflects your creative vision.
Master the Art of Wall Hanging with Confidence and Style
Hanging your wall art perfectly can feel overwhelming when aiming for professional placement and stability. This guide addresses common challenges like finding the right height, ensuring secure hardware, and creating visual balance in your space. If you want to elevate your home’s aesthetic while avoiding trial and error, understanding these techniques is key. Whether you are tackling a single standout piece or crafting a gallery wall, mastering placement and technique will transform any room.
Explore inspiring ideas and helpful tips for your home improvement journey on our Home | Sky Rye Design page. Looking to add colorful textures or patterns to complement your art? Check out our curated collection of Wallpapers | Sky Rye Design for striking design options. Ready to bring your vision to life? Visit Sky Rye Design now to discover creative solutions that help your space feel uniquely yours. Start perfecting your wall art display today for a home that truly reflects your style.
Frequently Asked Questions
How do I choose the right wall hardware for hanging my art?
Choosing the right wall hardware depends on the weight and size of your artwork. For heavier pieces, use wall hooks secured directly into wall studs and avoid traditional sawtooth hangers. Assess the weight, then select anchors that can hold at least 1.5 times that weight to ensure safety.
What is the best way to mark my wall for accurate art placement?
To mark your wall accurately, measure the height of your artwork, divide it by two, and then add 58 inches for the ideal center point. Use a sharp pencil to make light, erasable marks, and consider using painter’s tape to set a temporary layout before drilling any holes.
How far apart should I space multiple pieces of wall art?
When grouping multiple pieces, aim for consistent spacing of approximately 2 to 3 inches between them. This spacing creates a cohesive visual unit that guides the viewer’s eye smoothly across the arrangement.
What height is recommended for hanging wall art?
For optimal viewing, hang your artwork with the center at about 58 inches from the floor. This standard height provides a pleasing line of sight for most spaces, ensuring your art is easily appreciated.
How can I ensure my artwork hangs straight and stable?
To ensure your artwork hangs straight, use a level as you hang each piece. After installation, step back and check the alignment, making any small adjustments so the artwork is perfectly level before securing it firmly in place.
Recommended
- DIY Wall Art Tutorial: Create Stunning Custom Pieces | Sky Rye Design
- Complete Guide to the Role of Artwork at Home |
- 7 Inspiring Art Project Ideas for Beginners to Try Now |
- 7 Inspiring Art Display Ideas to Elevate Your Home Decor – Eman’s Gallery
- 1share
- Facebook0
- Pinterest1
- Twitter0
- Reddit0


