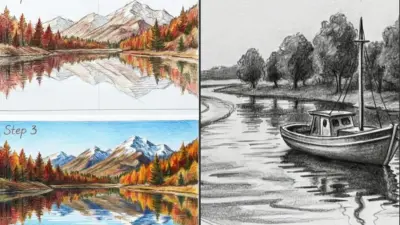
Your mountains look flat. They sit on the page like paper cutouts stacked behind each other—same value, same detail, same intensity from foreground to horizon. There’s no air between them, no sense that one peak is miles behind another.
I see this constantly in beginner mountain drawings. The artist captures the silhouette correctly—jagged peaks, sloping ridges, maybe some snow caps. But the drawing has no depth. Everything feels compressed onto a single plane.
Here’s what’s missing: atmospheric perspective. Leonardo da Vinci documented this phenomenon in his Treatise on Painting, noting that colors weaken with distance due to the atmosphere between viewer and subject. Distant mountains appear bluer, lighter, and less detailed than nearby terrain. This isn’t artistic choice—it’s physics. Blue light wavelengths scatter most in the atmosphere, which is why far-off peaks have that characteristic bluish cast.
- Understanding Mountain Anatomy
- Materials and Tools
- Drawing Basics and Techniques
- Constructing Your Mountain Drawing
- Step-by-Step Instructions
- Step 1: Establish the horizon and composition (2 minutes)
- Step 2: Block in the three layers (5 minutes)
- Step 3: Refine silhouettes (5 minutes)
- Step 4: Establish values for each layer (10 minutes)
- Step 5: Add form shading (10 minutes)
- Step 6: Develop texture (10 minutes)
- Step 7: Refine edges and details (5 minutes)
- Capturing Perspective and Dimension
- Foreground and Background Details
- Step-by-Step Instructions
- Adding Environmental Elements
- Finishing Touches
- Tips for Effective Practice
- FAQ
- Why do my mountain drawings look flat even when I add shading?
- What's the easiest mountain style for beginners?
- How do I make snow look realistic on mountains?
- Should I draw mountains from imagination or reference?
- How long does it take to get good at mountain drawing?
- What's the most common mistake in mountain drawings?
- Bringing Mountains to Life
Mountains drawing becomes dramatically more convincing once you understand this principle. The technique transforms flat landscapes into scenes with genuine depth—the kind where viewers feel they could walk into the image.
This guide covers the fundamentals: how mountains actually form (which affects how you draw them), the three-layer system for creating depth, atmospheric perspective techniques, and step-by-step methods for different mountain styles. We’ll also address the common mistakes that keep landscapes looking two-dimensional.
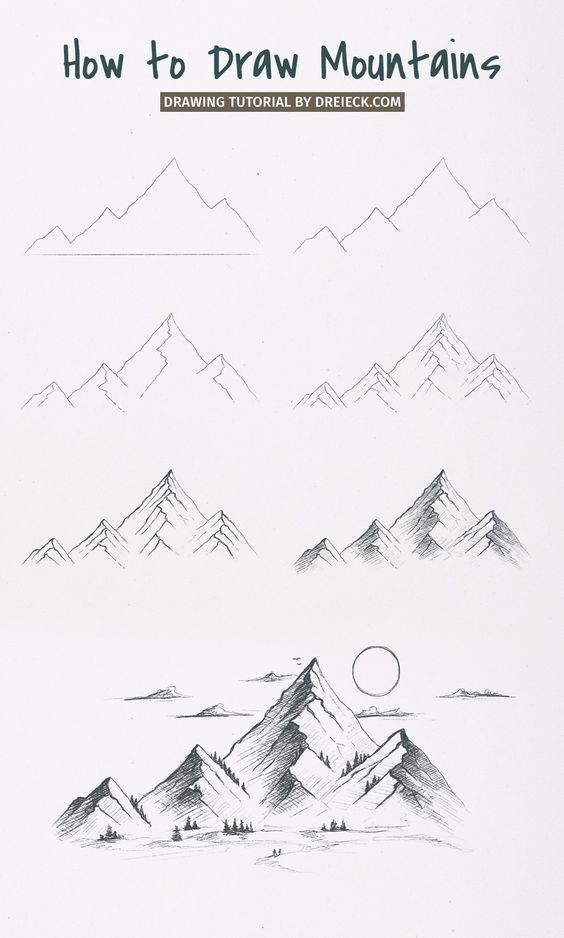
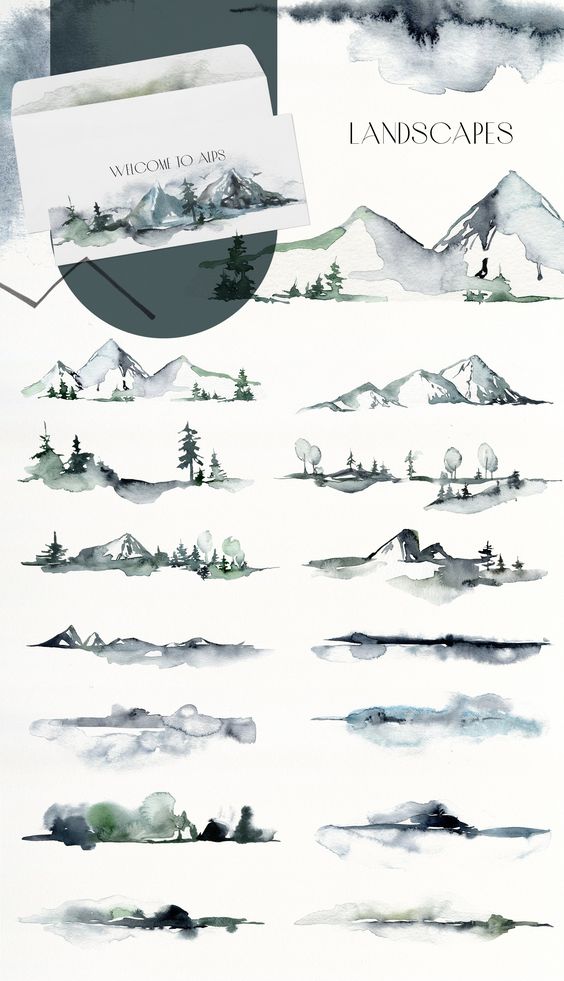
Whether you’re working in pencil, ink, or preparing for paint, these principles apply universally. Mountains are among the most rewarding landscape subjects—once you understand what makes them look real.
Understanding Mountain Anatomy
Before drawing mountains convincingly, you need to understand why they look the way they do. Mountain shapes aren’t random—they’re products of geological forces and erosion patterns.
Mountain Fundamentals
Mountains form through three primary geological processes, each producing distinct visual characteristics:
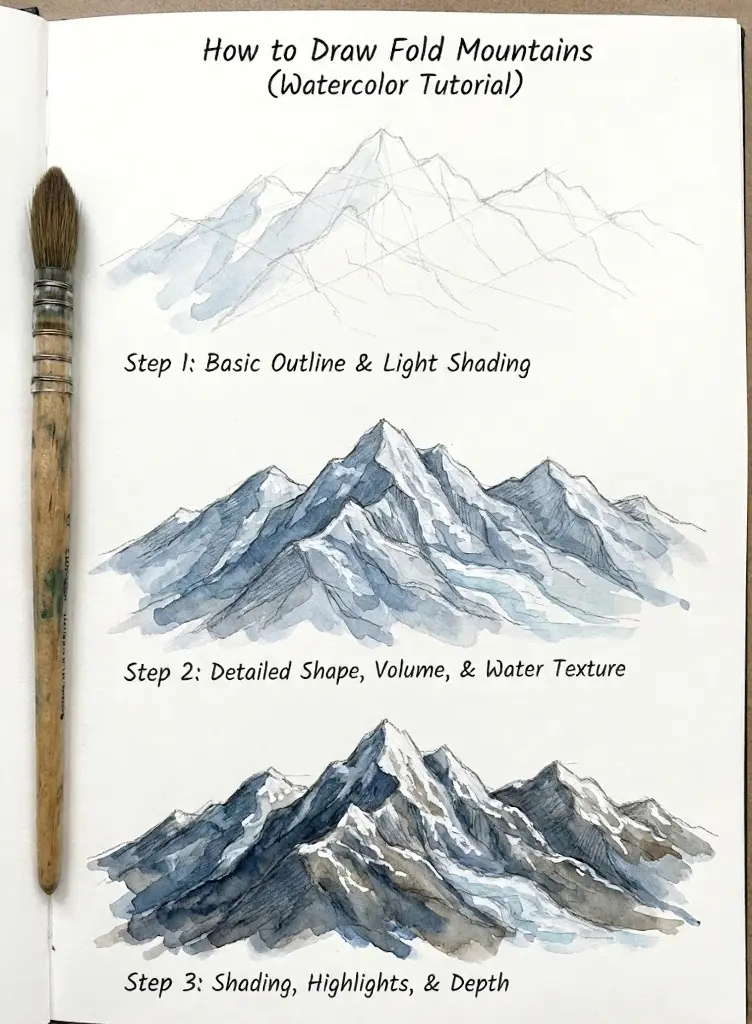
Fold mountains (like the Himalayas and Alps) result from tectonic plates colliding and buckling the earth’s crust. They feature smooth, flowing ridgelines with relatively consistent slopes. When drawing fold mountains, emphasize long, sweeping curves rather than sharp angles.
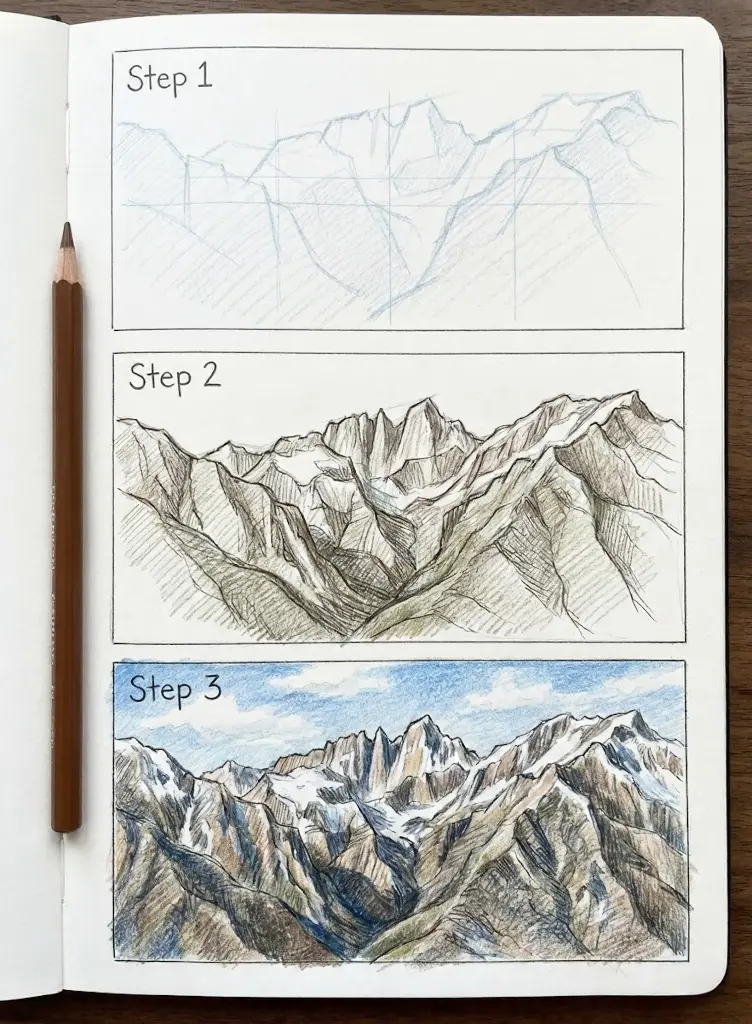
Fault-block mountains (like the Sierra Nevada) form when sections of crust crack and tilt along fault lines. One side rises sharply while the other slopes gradually. These mountains have dramatic, asymmetrical profiles—steep escarpments on one face, gentle slopes on the other.
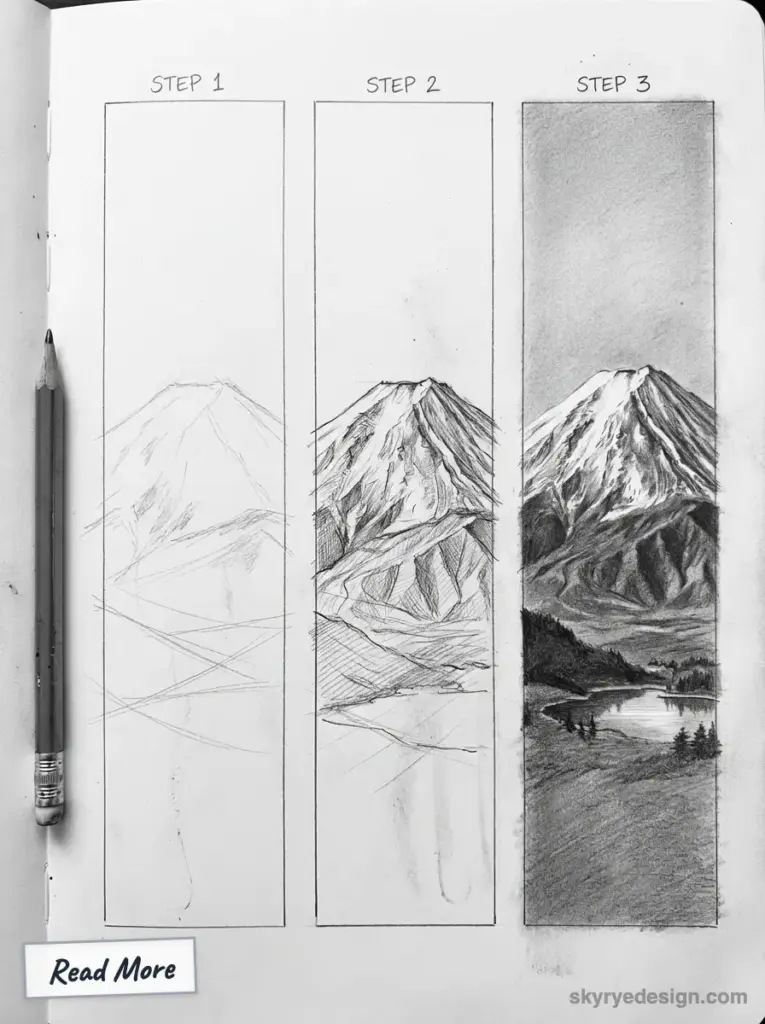
Volcanic mountains (like Mount Fuji or Mount Rainier) build from accumulated lava and ash. They typically display the classic conical shape with steep, consistent slopes radiating from a central peak. The symmetry makes them iconic but also challenging to draw without looking artificial.
Understanding these differences helps you draw mountains that look geologically plausible rather than generic triangles stacked on a horizon.
Different Styles of Mountain Ranges
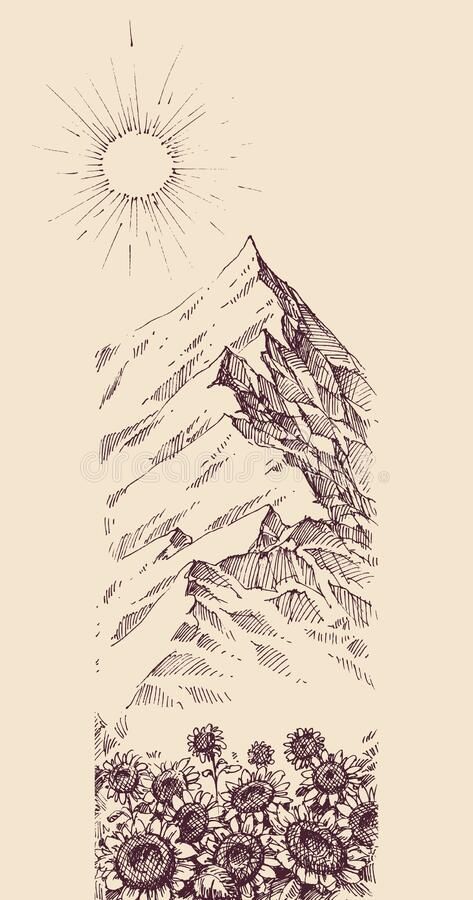
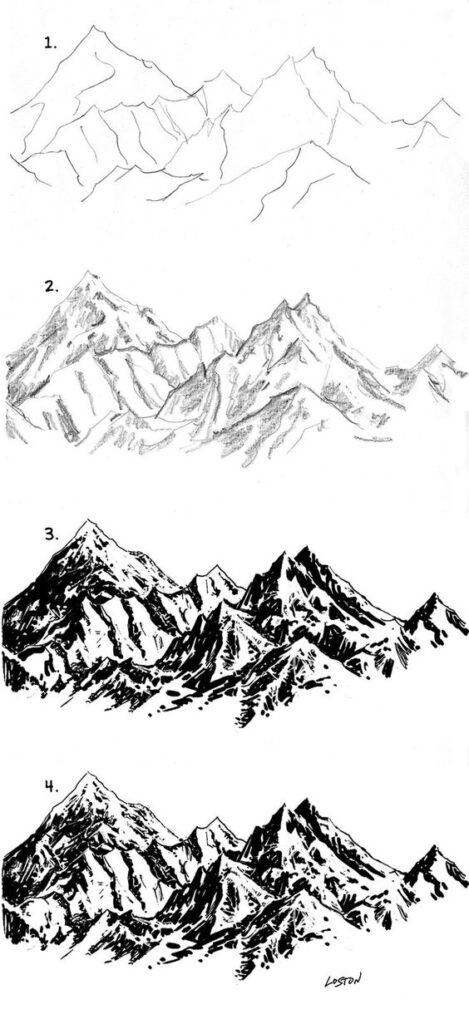
Mountain ranges have distinct personalities based on their geology, age, and climate:
Young mountains (geologically speaking) like the Rockies and Himalayas are tall, jagged, and dramatic. Erosion hasn’t had time to smooth their peaks. Draw these with sharp angles, exposed rock faces, and irregular ridgelines.
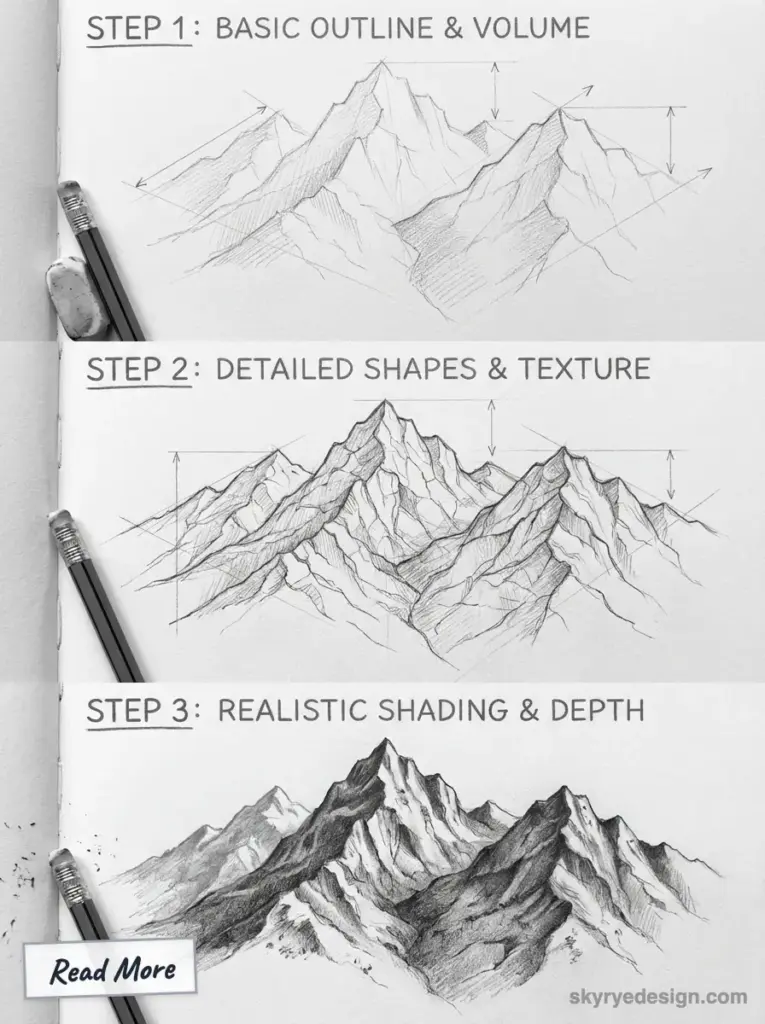
Ancient mountains like the Appalachians have been worn down over hundreds of millions of years. Their peaks are rounded, their slopes gentle. Draw these with softer curves and more vegetation coverage—less exposed rock, more forested slopes.
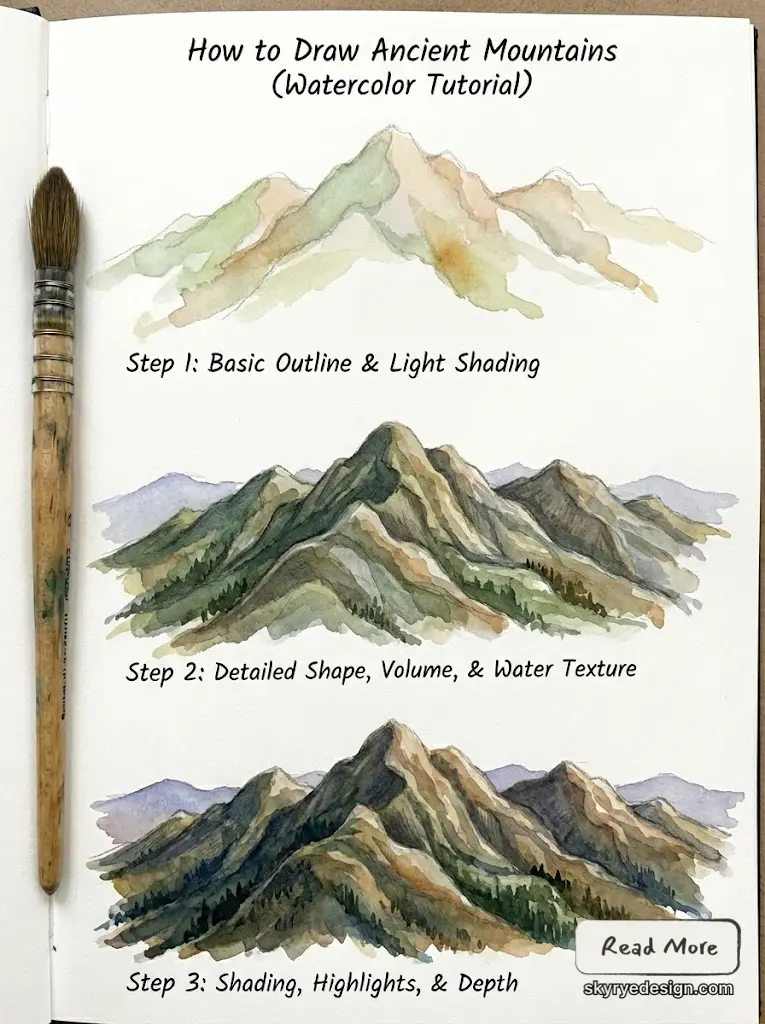
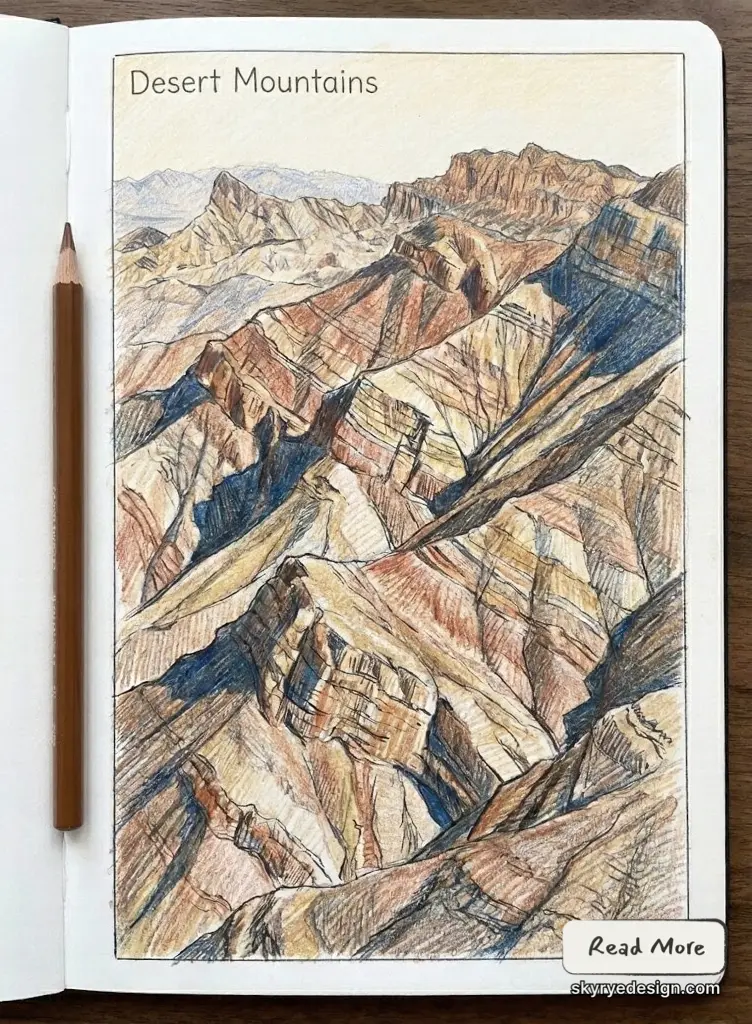
Desert mountains show their bones. Without vegetation to soften their forms, every ridge and ravine is visible. Draw these with high contrast, clear rock stratification, and minimal organic softening.
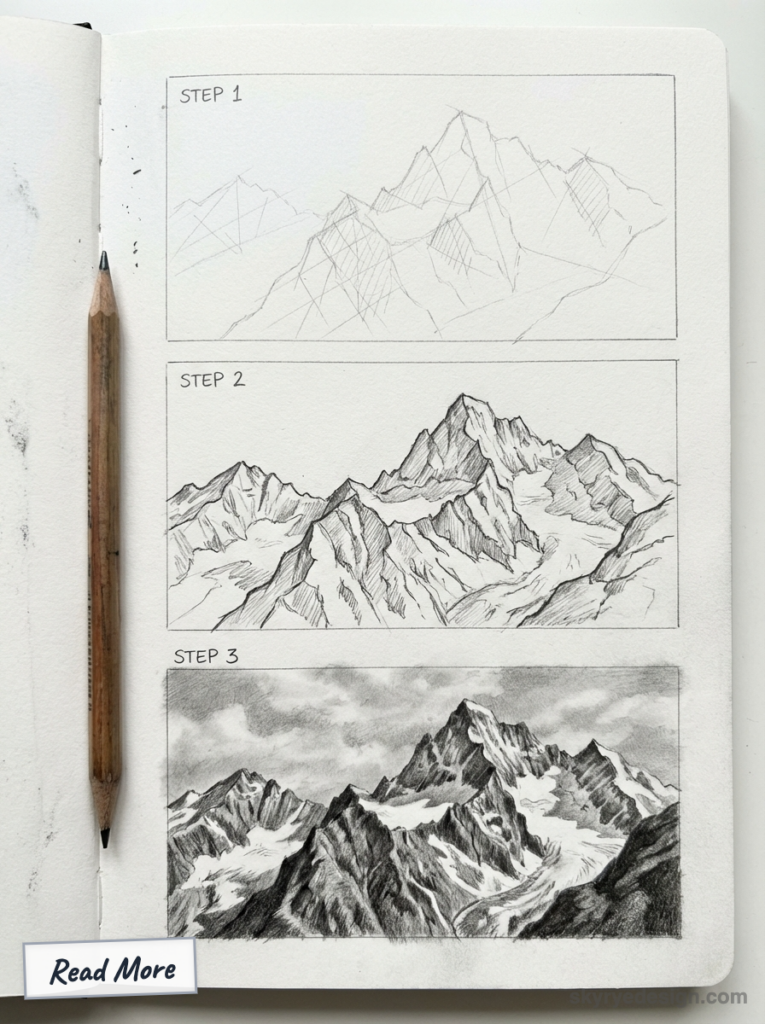
Alpine mountains above treeline display bare rock and permanent snow. The snowline creates a natural visual break that helps establish scale and altitude.
Rock Formations and Structures
The rocks within mountains affect their appearance significantly:
Granite (igneous) produces massive, rounded formations with visible crack patterns. Think Yosemite’s Half Dome—smooth curves interrupted by sharp fractures.
Sedimentary layers create horizontal banding visible on cliff faces. The Grand Canyon and many desert mesas show this stratification clearly. When drawing sedimentary mountains, include subtle horizontal lines suggesting these layers.
Metamorphic rock often produces folded, twisted patterns where the original sedimentary layers have been deformed by heat and pressure.
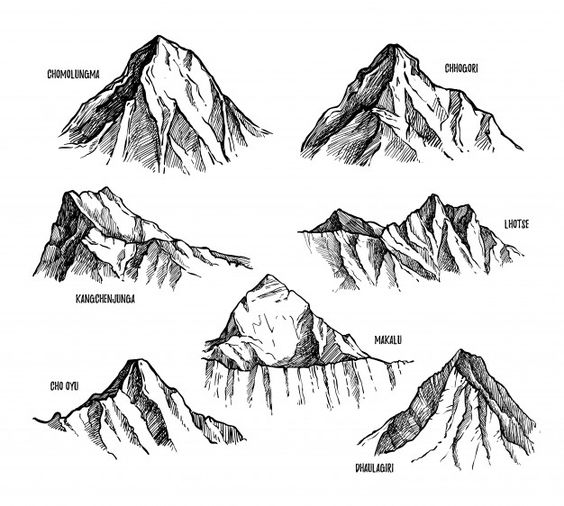

I’ve noticed that including even subtle rock texture dramatically increases a mountain drawing’s believability. Generic smooth surfaces read as artificial.
Materials and Tools
The right materials make mountain drawing significantly easier. Here’s what actually works.
Picking the Right Paper
When it comes to paper weight and texture, there are subjects where it matters way more than others, and mountains are a good example of that:
For Pencil Work: Medium-tooth drawing paper that’s 90-110 lb is great for pencil work – it holds the graphite really well for shading, but still lets you get in the fine details of rock textures. If however, you want to do a super detailed technical drawing, then smooth Bristol is the way to go. Problem is, it can feel a bit too slick for any kind of atmospheric shading you might want to do.
For Ink: If you’re doing ink work, then either smooth Bristol or a good marker paper is a must – it stops the ink from feathering and lets you get sharp clean lines. If you’re planning to add some washes later on down the line, then hot-press watercolor paper is a decent choice.
For Mixed Media: If you want to do a bit of everything – that is, you’re planning to mix and match different dry and wet media – then cold-press watercolor paper (minimum 140 lb) is your best bet. The texture actually works really well for creating rock-like effects.
On the other hand, stay away from cheap printer paper at all costs – it tears when you try to erase anything, it doesn’t handle shading gradients that well, and before you know it, it’s turning a lovely shade of yellow.
Choosing Pencils and Pens
A range of graphite gradations is what gives value variation in the mountains the oomph it needs:
Hard pencils (2H to 4H): You can use these for mountains that are a long way off, where the details are faint and the values are light. A light touch is what you need to get that atmospheric effect looking natural.
Medium pencils (HB to 2B): these are your workhorses for middle-ground mountains – they offer a good balance of precision and the ability to put some decent shading on the page.
Soft pencils (4B to 6B): save these for the foreground darks – like deep shadows, dark rocks, and where you want strong contrasts to make the foreground leap out from the page. These create the darkest values that give the foreground some real punch.
For ink, I reckon starting off with a 0.5mm fineliner for your outlines and a brush pen for varied line weights will do the trick. Mountains get a big benefit from having some line variation – thick lines for near edges, and thin lines for distant ridges.
Additional Drawing Materials
Kneaded eraser: Essential for lifting highlights and creating soft cloud effects around peaks. You can shape it to erase precise areas.
Blending stumps: Useful for smoothing gradients in sky and distant mountains. Don’t over-blend—mountains have texture.
White gel pen or white charcoal: For adding snow highlights on toned paper or correcting small areas.
Fixative spray: Prevents smudging on finished pencil work, especially important for drawings with extensive soft shading.
Drawing Basics and Techniques
These fundamental techniques form the foundation for all mountain drawing.
Creating Basic Shapes and Outlines
Every mountain begins with simplified geometric shapes:
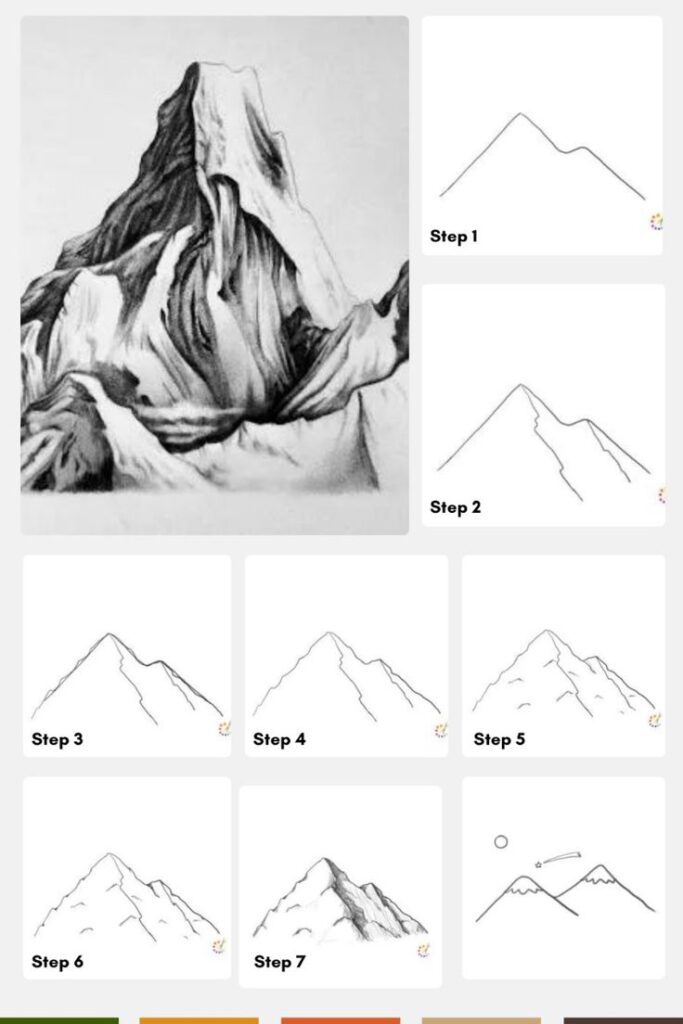
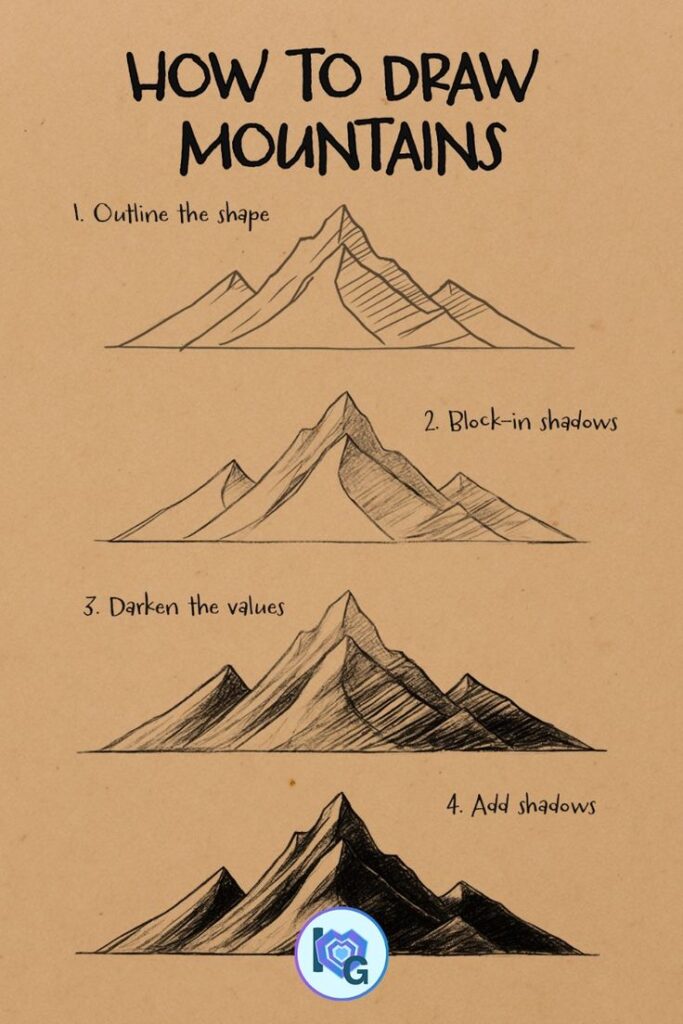
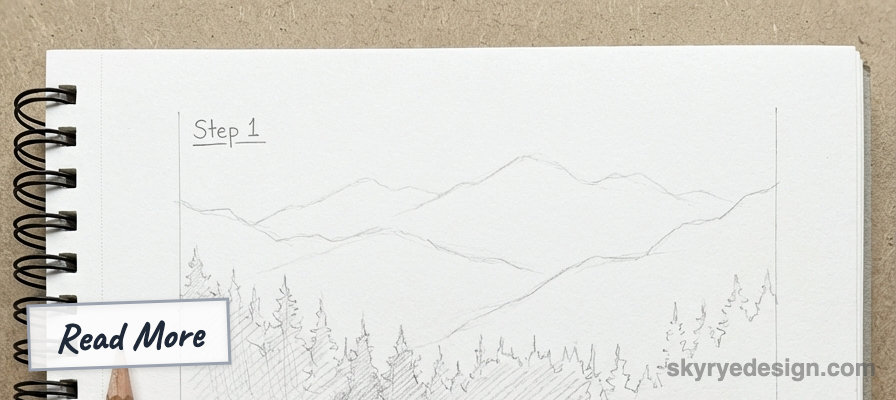
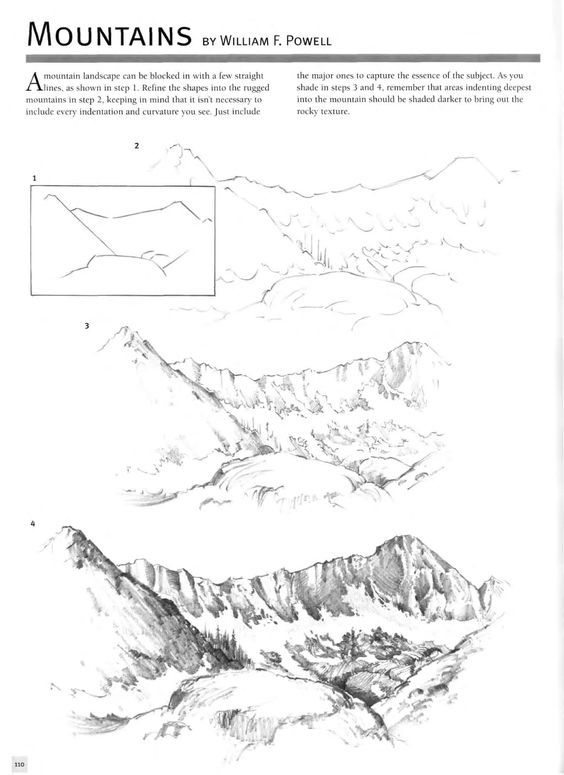
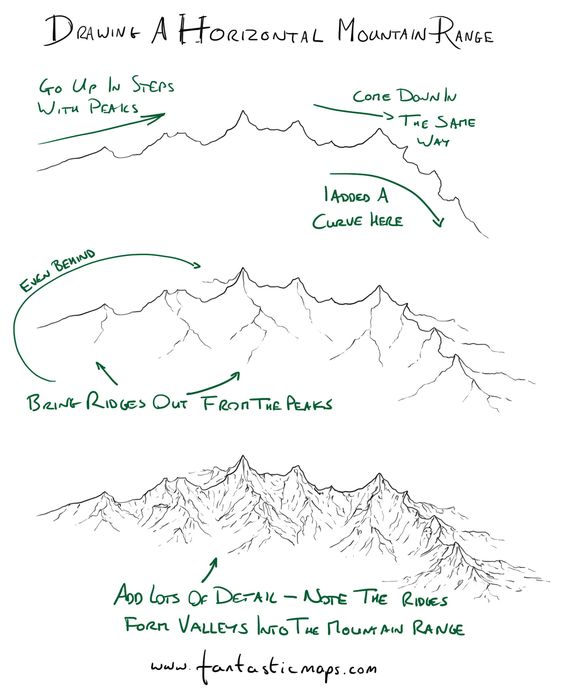
The basic triangle remains your starting point, but vary it immediately. No real mountain is an equilateral triangle. Adjust the peak position (off-center looks more natural), vary the slope angles (one side steeper than the other), and interrupt the silhouette with secondary peaks and ridges.
Build complexity gradually. Start with the main peak, add major ridges extending outward, then add secondary peaks. Think of mountain ranges as overlapping triangles at different scales and depths.
Vary your ridgelines. Real mountain silhouettes have irregularities—small bumps, notches, and variations. A perfectly smooth ridgeline reads as artificial.
When sketching, keep initial lines light. You’ll refine and darken selectively as you develop values.
Shading and Texture Techniques
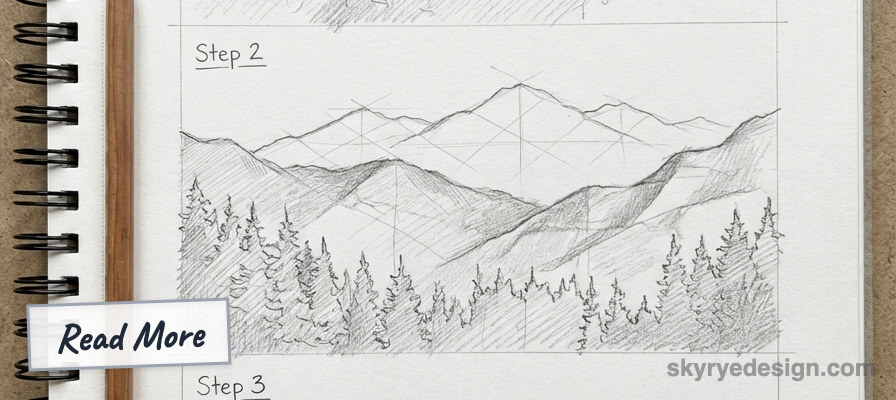
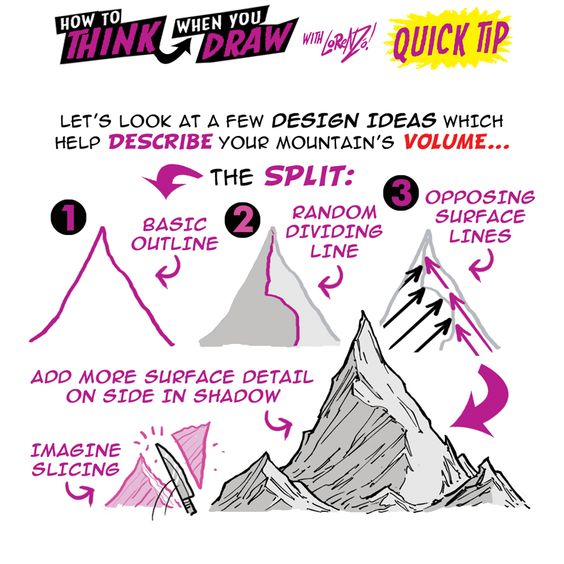
Mountains require two types of shading: form shading (showing 3D volume) and texture shading (suggesting rock surfaces).
Form shading: Identify your light source direction (typically upper left or upper right works best). The face of the mountain receiving direct light stays relatively light; the opposite face falls into shadow. The transition between light and shadow defines the mountain’s three-dimensional form.
Texture shading: Use directional strokes that follow the mountain’s surface. For rocky faces, short angular strokes suggest fractured surfaces. For snow-covered slopes, longer smooth strokes indicate gentler surfaces. For forested areas, clustered organic marks suggest tree coverage.
Hatching and cross-hatching work well for mountains. Vary the density and angle of your hatching to create different values and textures. Tighter hatching = darker values; looser hatching = lighter values.
Highlight and Shadow Fundamentals
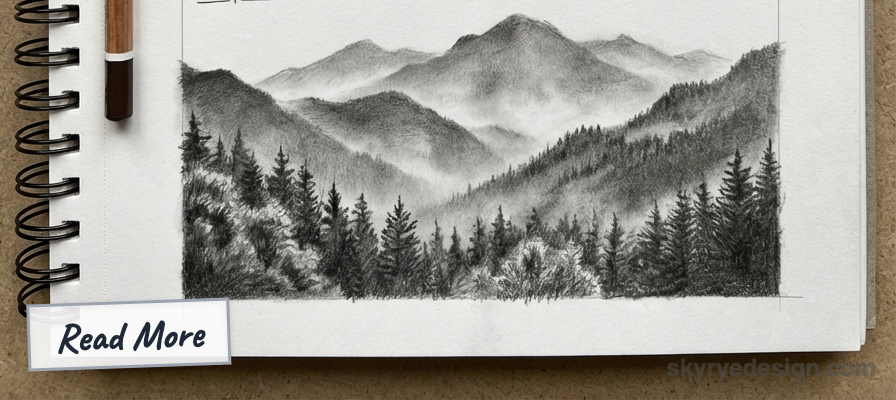
The interplay of light and shadow makes mountains appear three-dimensional:
Identify the light source before shading. In most landscape drawings, the sun is positioned high and to one side. This creates predictable shadow patterns on mountain faces.
Leave highlights as untouched paper (or near-untouched). On snow-capped peaks, these highlights can be quite bright. On rocky surfaces, highlights appear on edges and protruding rocks.
Deepest shadows occur in crevices, on shaded faces, and where forms overlap (the base of one ridge meeting another). These dark accents create the sense of depth and form.
Cast shadows are crucial for realism. A foreground mountain casts a shadow onto the slopes behind it. Include these shadows to show the spatial relationship between mountain layers.
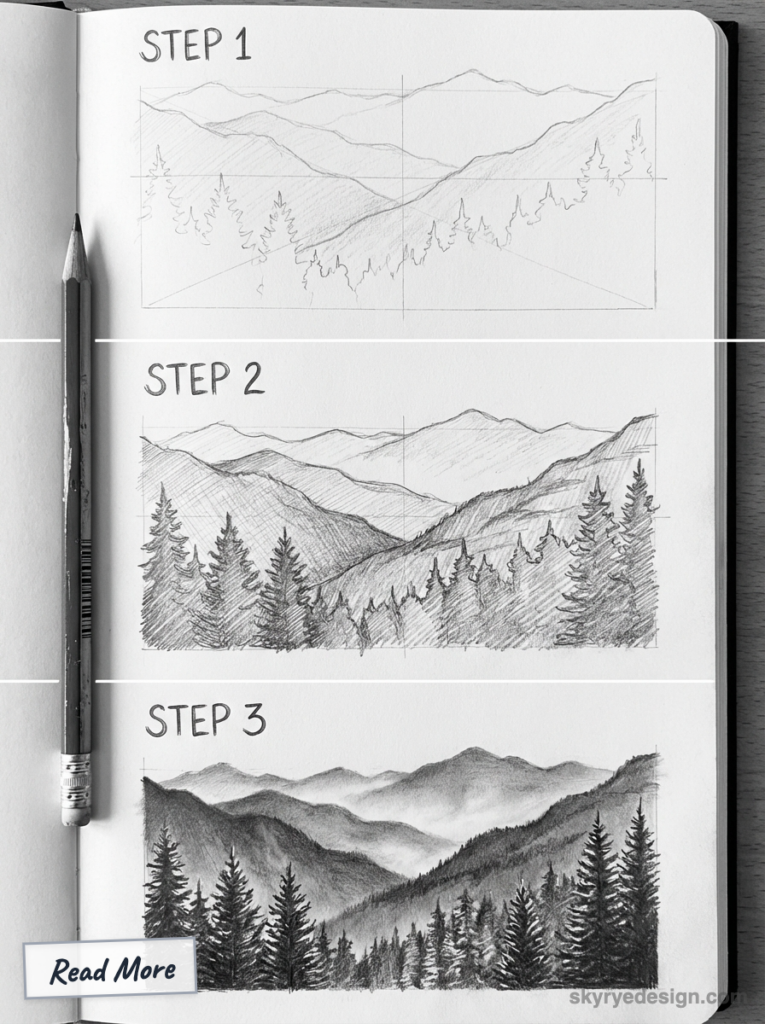
Constructing Your Mountain Drawing
Here’s the systematic approach I use for mountain drawings.
Step-by-Step Instructions
Step 1: Establish the horizon and composition (2 minutes)
Place your horizon line—high horizons emphasize the land; low horizons emphasize sky. For dramatic mountain scenes, a high horizon often works better, allowing you to show the full sweep of peaks.
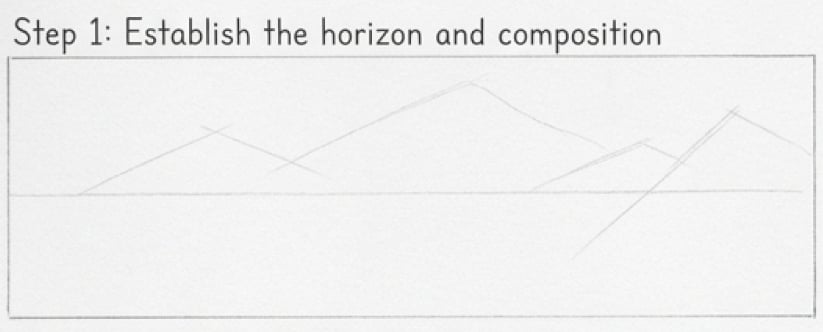
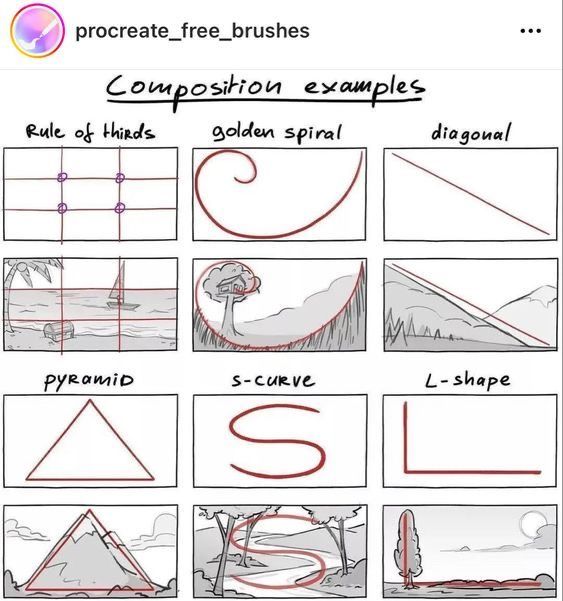
Sketch a simple compositional guide: where will the main mountain mass sit? What foreground elements will anchor the scene?
Step 2: Block in the three layers (5 minutes)
Divide your landscape into foreground, middle ground, and background. Lightly sketch the silhouettes of each layer:
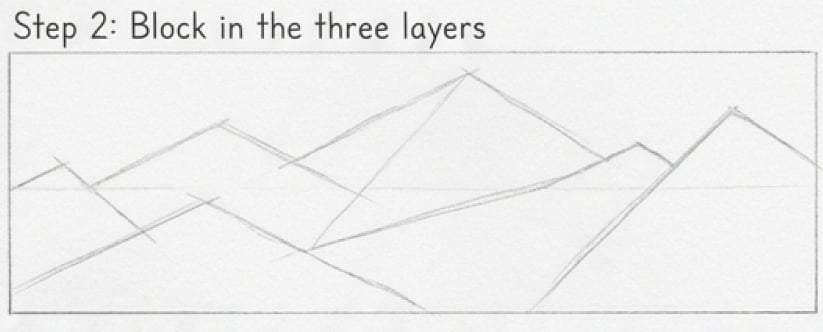
- Background: the most distant peaks
- Middle ground: closer mountains
- Foreground: nearest terrain, trees, rocks
Ensure each layer overlaps the one behind it—this overlapping is crucial for establishing depth.
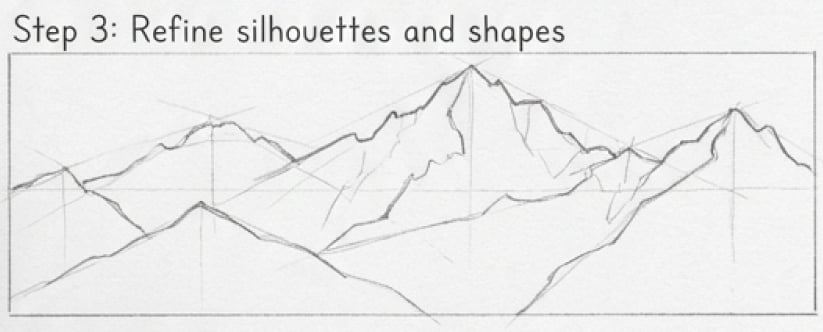
Step 3: Refine silhouettes (5 minutes)
Add irregularities and secondary peaks to your basic shapes. Vary the ridgeline rhythm. Include visible snow lines if appropriate. Keep background silhouettes simpler than foreground ones.
Step 4: Establish values for each layer (10 minutes)
This is where atmospheric perspective happens.
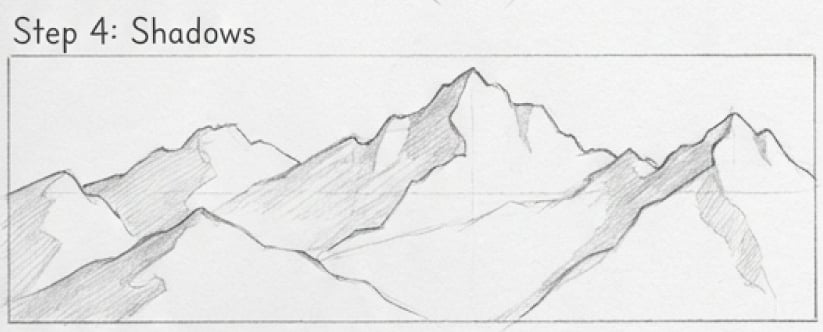
Apply a light, even tone to background mountains—keep them high value (light) with minimal contrast. Middle-ground mountains get medium values with moderate contrast. Foreground elements receive the full value range—darkest darks and brightest lights.
Step 5: Add form shading (10 minutes)
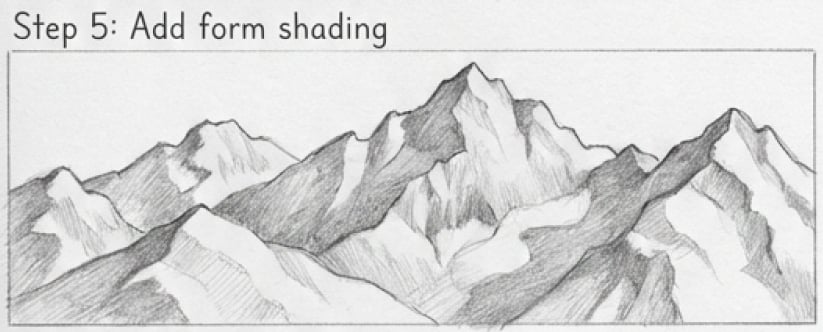
Working from background to foreground, shade each mountain to show its three-dimensional form. Remember: less contrast in background, more contrast in foreground.
Step 6: Develop texture (10 minutes)
Add rock textures, snow patterns, and surface details.
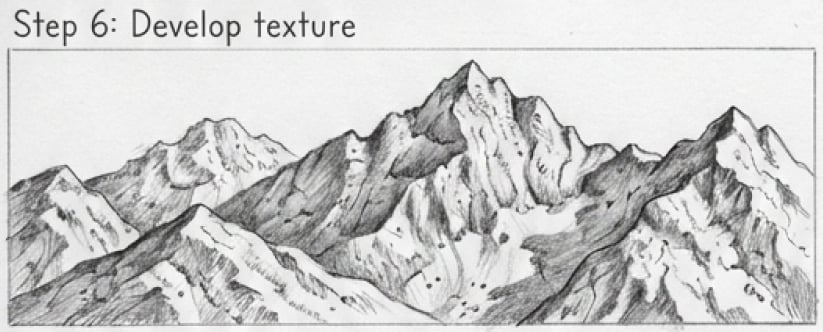
Again, background mountains get minimal texture (the atmosphere obscures detail). Foreground mountains can have extensive texture—individual rocks, cracks, vegetation patterns.
Step 7: Refine edges and details (5 minutes)
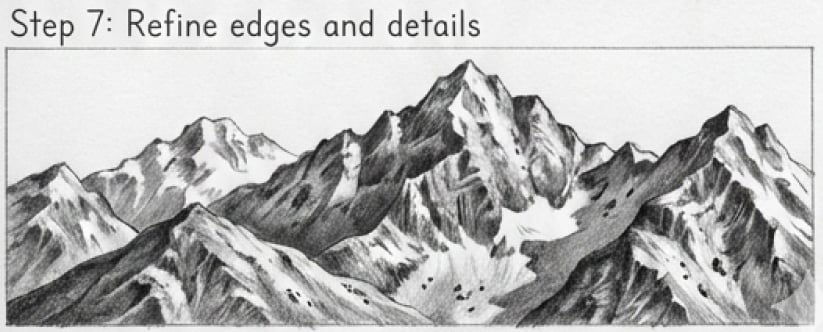
Sharpen foreground edges; soften background edges. Add any final details: birds, clouds, trees, small atmospheric touches.
Capturing Perspective and Dimension
Three techniques create convincing depth:

Overlapping forms: Each mountain layer should overlap the one behind it. This alone establishes which elements are closer.
Size variation: Mountains in the foreground occupy more space on the page and appear larger. Background peaks are smaller by comparison.
Atmospheric perspective: The key technique. As distance increases:
- Values lighten (darks become less dark, overall tone raises)
- Contrast decreases (less difference between light and shadow)
- Colors cool (shift toward blue—relevant for color work, but also affects value in grayscale)
- Detail diminishes (less texture, simpler shapes)
- Edges soften (transitions become more gradual)
Apply all five aspects consistently, and your mountains will recede convincingly into distance.
Foreground and Background Details
Foreground elements anchor your composition and establish scale. Include:
- Trees (with visible individual branches and trunks)
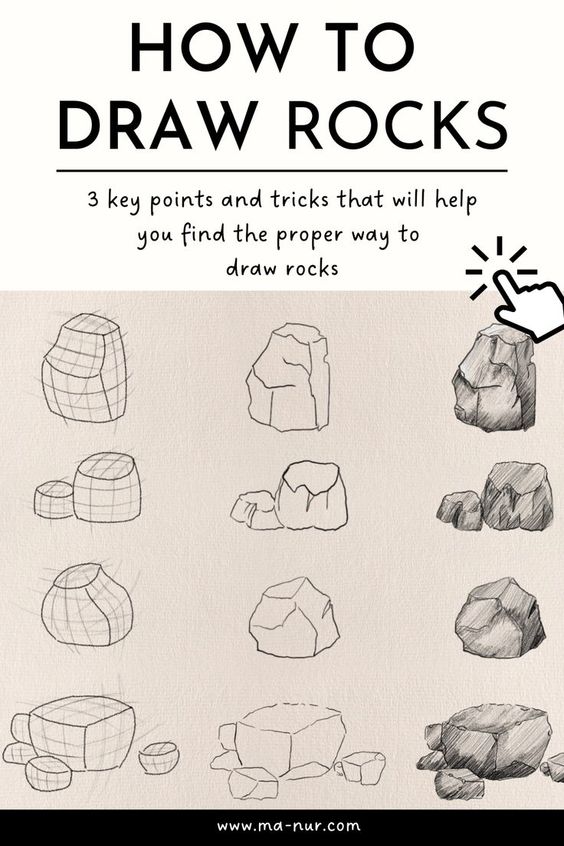
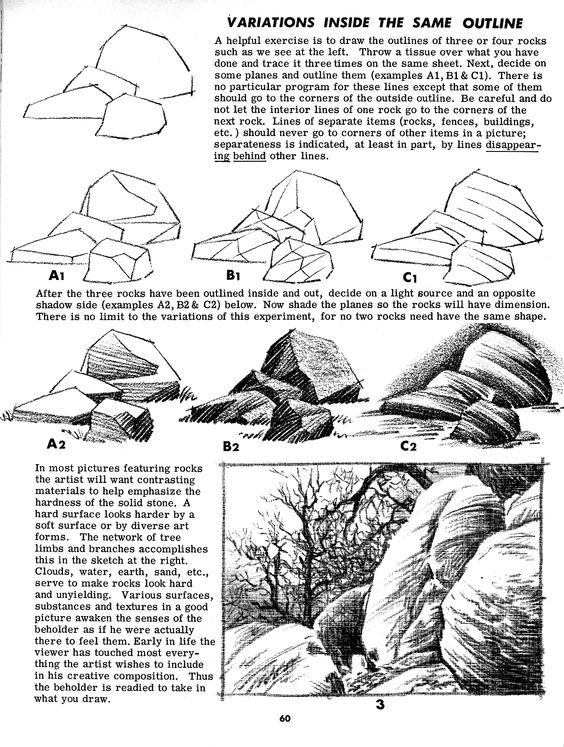
- Rocks (with texture and shadow)
- Grass, shrubs, or flowers
- Paths, streams, or structures
These detailed foreground elements contrast with the simplified background, reinforcing the sense of depth.
Background elements should be minimal:
- Simple silhouettes
- Soft edges
- High values (light tones)
- No fine detail
- Possible merging with sky at the horizon
The contrast between busy foreground and quiet background is what creates depth.
Adding Environmental Elements
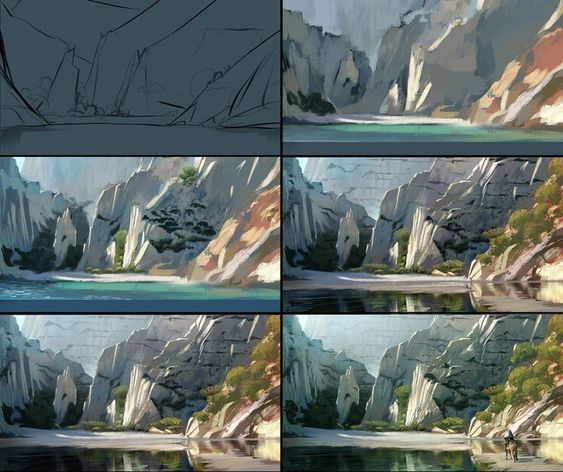
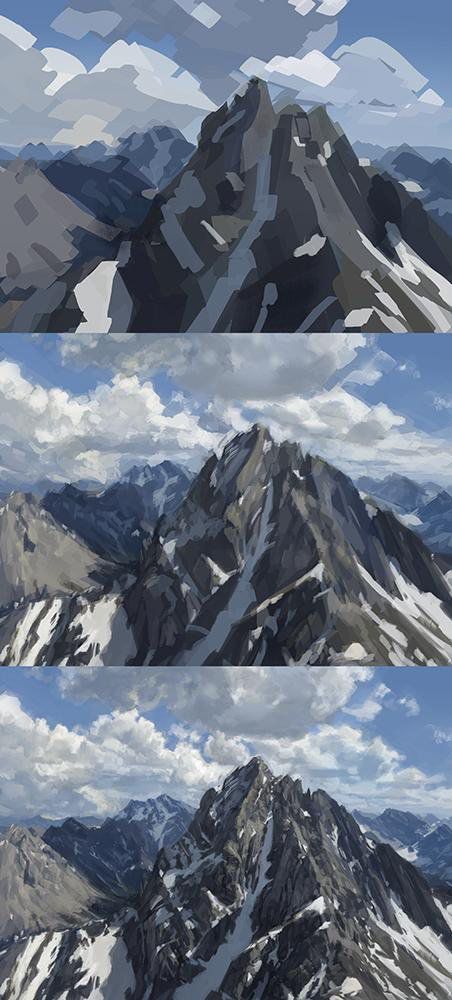
Mountains don’t exist in isolation. Environmental elements complete the scene.
Incorporating Trees and Vegetation
Trees establish scale and add visual interest:
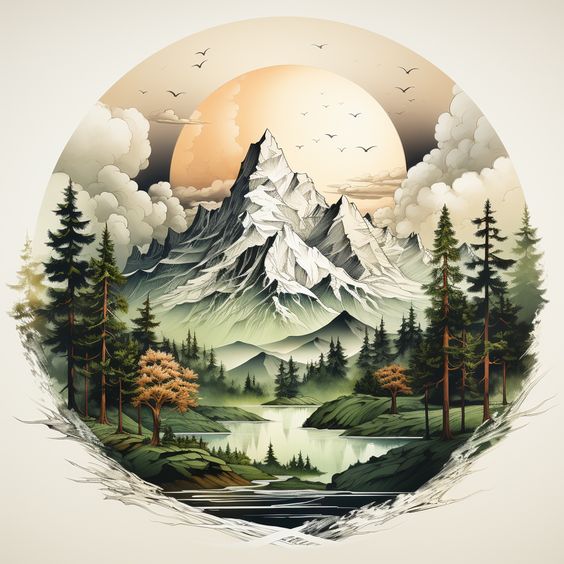
At distance: Suggest forests with textured masses—no individual trees visible, just the collective canopy shape against the mountainside. Use value to distinguish forest areas from bare rock.
In middle ground: Individual tree shapes become visible, but without fine detail. Triangular shapes for conifers, rounded masses for deciduous trees.
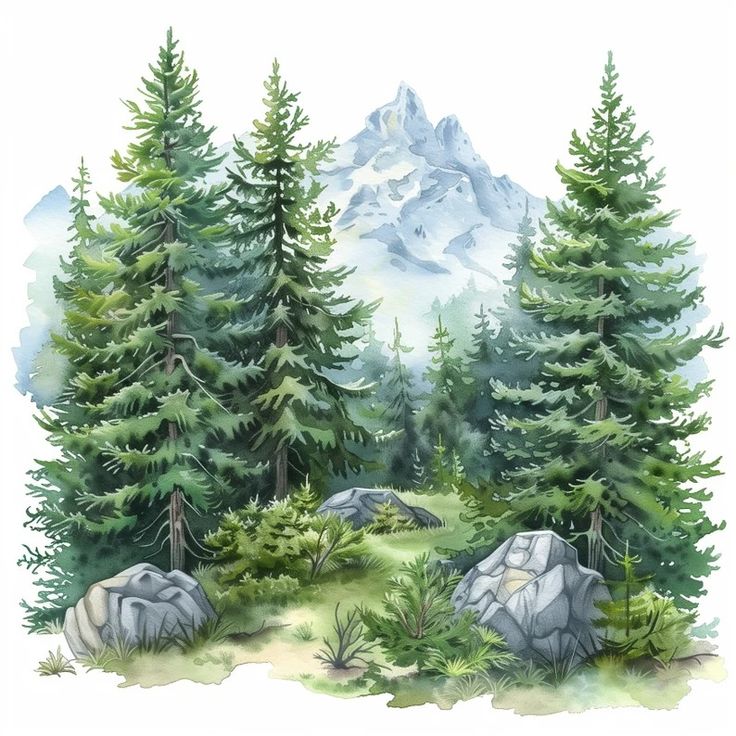
In foreground: Full detail—trunk structure, branch patterns, individual needle or leaf clusters. These detailed trees frame the composition and provide scale reference.
Treeline matters: Mountains above treeline (roughly 10,000-12,000 feet depending on latitude) show bare rock or alpine meadows. Below treeline, forests dominate. Including this natural boundary adds realism.
Drawing Bodies of Water
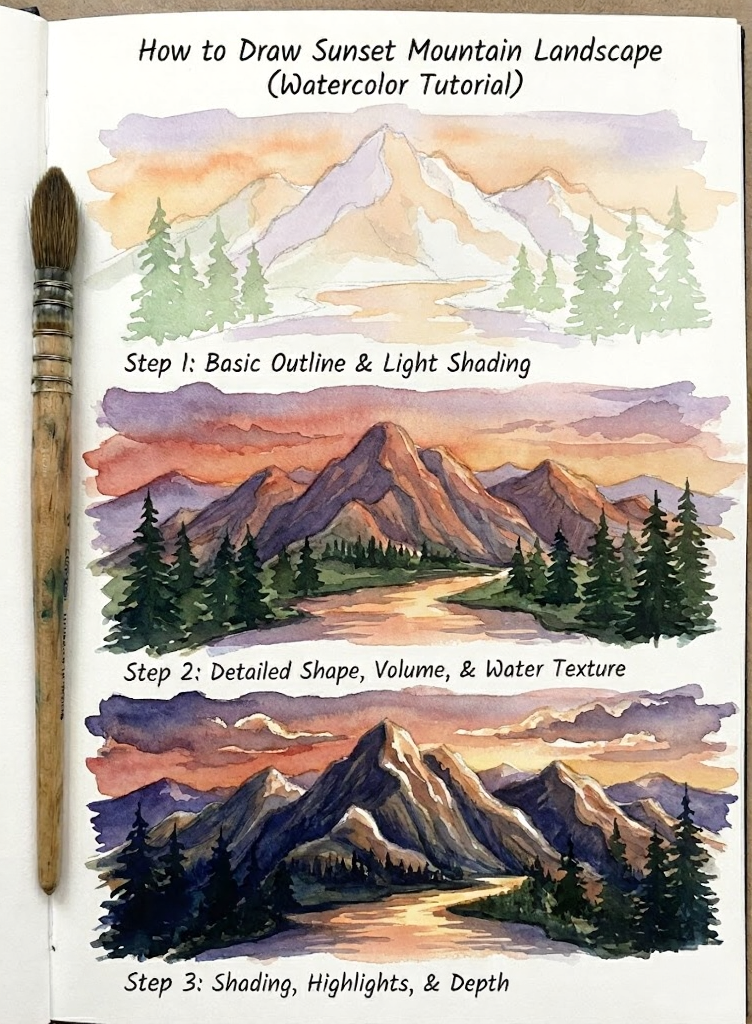
Water adds drama and reflection opportunities:
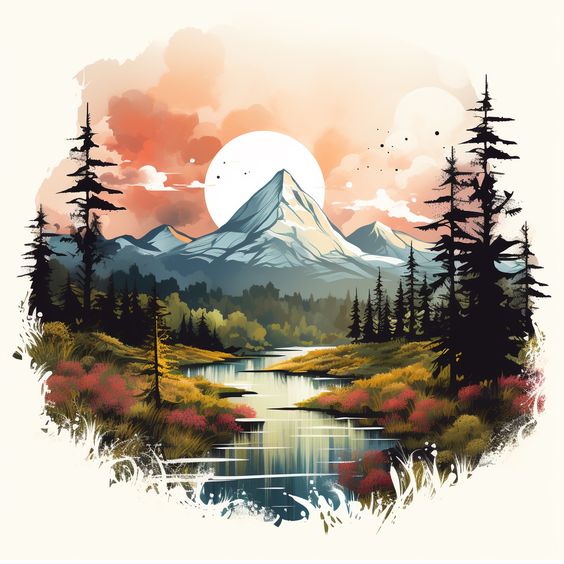
Lakes at mountain bases create mirror effects. The reflection should show the mountain inverted, slightly softened, and interrupted by surface ripples.
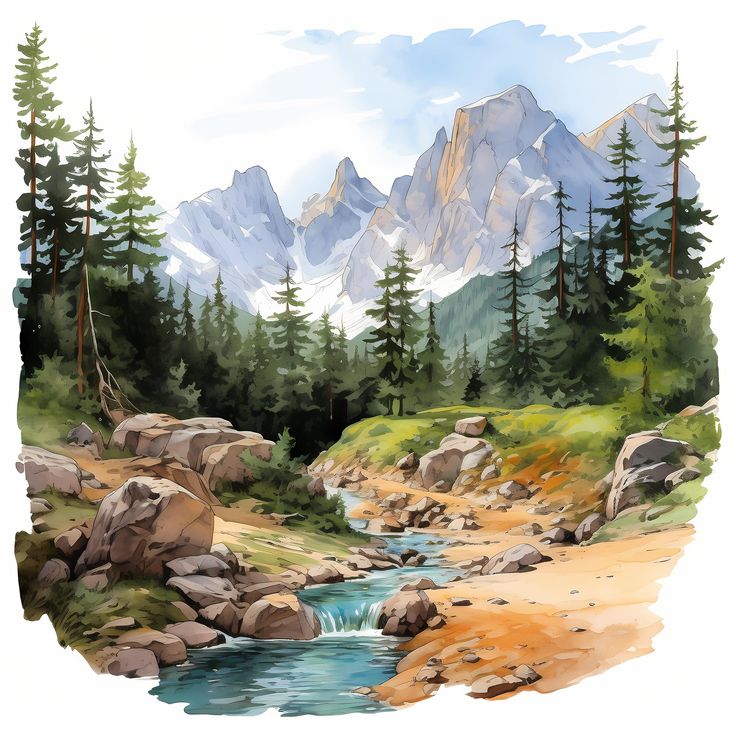
Rivers and streams lead the eye through the composition. Draw them narrower as they recede into distance—another application of linear perspective.
Waterfalls provide focal points on steep terrain. Show the white water contrasting against dark rock, with mist softening edges at the base.
Introducing Weather Elements
Weather transforms mountain mood entirely:
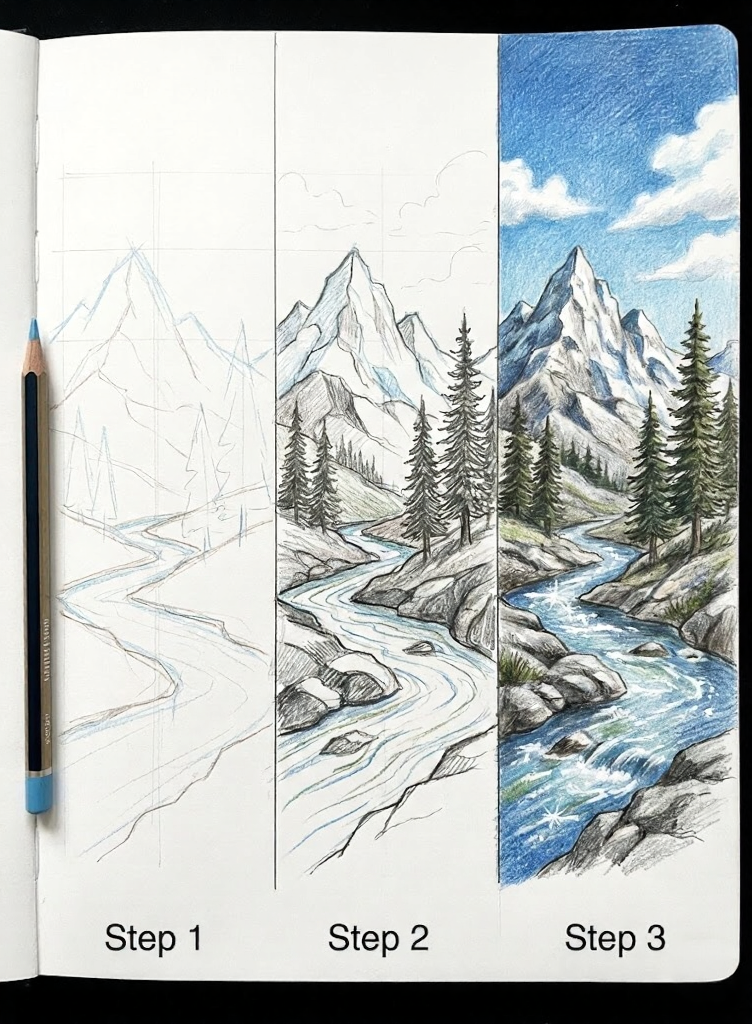
Clouds interact with peaks—wrapping around them, obscuring portions, or sitting dramatically behind. Low clouds can hide middle sections of mountains, creating mystery and emphasizing height.
Mist and fog provide natural atmospheric perspective enhancement. Mountains emerging from mist appear especially distant and ethereal.
Dramatic lighting (sunrise, sunset, storm light) creates strong shadows and mood. Side-lighting reveals mountain texture; backlighting creates silhouettes.
For clouds, use soft edges and lighter values. Clouds shouldn’t compete with mountains for attention—they support the scene.
Finishing Touches
The final refinement stage separates good drawings from excellent ones.
Layering and Detailing
Review your drawing with fresh eyes (take a break if needed). Check that:
- Each layer reads at a different distance
- Values progress consistently from light (background) to full range (foreground)
- Detail increases progressively from simple (background) to complex (foreground)
- No layer jumps unnaturally in value or detail
Add final texture passes where needed. Often the foreground needs more development than you initially provided.
Assessing Proportions and Balance
Step back (physically or by viewing on a screen) to assess the overall composition:
- Does the eye travel naturally through the scene?
- Is there a clear focal area?
- Do the mountains feel properly massive, or cramped?
- Is the foreground/middle ground/background balance working?
Adjust proportions if needed. Sometimes a mountain needs to extend higher or a foreground element needs reduction.
Final Review and Adjustments
The last pass focuses on:
Edge quality: Foreground edges should be crisp and defined. Background edges should be soft, potentially blending into atmosphere.
Value accuracy: Squint at your drawing. The background should appear noticeably lighter than the foreground. If values are too similar across layers, the depth illusion fails.
Atmospheric consistency: Everything in the background should share the same atmospheric treatment. A single sharp-edged element in the background disrupts the illusion.
Make small corrections with eraser for lightening, additional graphite for darkening.
Tips for Effective Practice
Building Skills Progressively
Week 1-2: Practice basic mountain silhouettes. Draw 20+ simple mountain shapes, varying the peak positions, slope angles, and ridgeline irregularities.
Week 3-4: Focus on value layers. Draw simple three-layer mountain scenes, concentrating solely on getting the atmospheric perspective values correct.
Week 5-6: Add texture and detail. Take your value-correct drawings and develop surface textures appropriate to each distance.
Week 7-8: Complete scenes with environmental elements—trees, water, clouds, foreground anchors.
Study from Reference
Photographs teach you how light actually behaves on mountains. Study:
- How shadows fall across ridges
- How atmospheric perspective affects distant peaks
- How snow accumulates and melts
- How vegetation patterns change with altitude
Don’t copy photographs line-for-line—study them for principles, then apply those principles to your own compositions.
Keep a Dedicated Sketchbook
A mountains-specific sketchbook lets you track progress and experiment freely. Date your drawings. Return to early attempts after a few months—you’ll see improvement that’s invisible day-to-day.
FAQ
Why do my mountain drawings look flat even when I add shading?
Usually the issue is consistent values across all layers. Your background mountains are the same darkness as your foreground elements. Fix this by forcing yourself to keep distant mountains light—lighter than feels natural at first. The contrast between light backgrounds and dark foregrounds creates depth. Also check that your background has less detail and softer edges than your foreground.
What’s the easiest mountain style for beginners?
Start with simple layered ridges—three overlapping mountain silhouettes with no complex details. Focus entirely on getting the values correct: background lightest, middle ground medium, foreground full range. Once you master the atmospheric perspective with simple shapes, add complexity gradually. Trying detailed alpine scenes before understanding values leads to frustration.
How do I make snow look realistic on mountains?
Snow collects on horizontal and gently sloped surfaces, not on steep faces. Follow the terrain logic: flat areas hold snow, steep rock faces shed it. Leave the brightest whites for snow in direct sunlight. Shaded snow is actually quite dark (middle values, not white). The snow line should follow a consistent altitude across your mountain range, adjusting for which faces receive more sun.
Should I draw mountains from imagination or reference?
Both, deliberately. Use reference photos to understand how real mountains behave—light, shadow, snow patterns, vegetation zones. Then draw from imagination to develop your own compositions and style. The knowledge from reference study informs your imaginative work. Artists who only copy photos often can’t compose original scenes; artists who only imagine often miss realistic details.
How long does it take to get good at mountain drawing?
With focused practice (not just casual sketching), most artists see significant improvement in 8-12 weeks. The key breakthrough is usually understanding atmospheric perspective—once that clicks, everything else follows more easily. I’d suggest completing 30-40 mountain drawings before expecting consistent quality. Early drawings teach you what doesn’t work, which is equally valuable.
What’s the most common mistake in mountain drawings?
Equal treatment across all distances. Same level of detail in background and foreground. Same value range. Same edge quality. This flattens the entire scene onto one plane. The fix is simple but requires discipline: background gets less of everything (less detail, less contrast, less sharp edges). Foreground gets more. The difference between them creates depth.
Bringing Mountains to Life
When it comes to adding mountains to your drawings, it all comes down to one pretty simple, yet often overlooked idea: things change as you move away from them. The details get lost, the contrast gets less stark, the values start to fade, and the edges soften up. If you can get your head around this ‘atmospheric perspective’, your mountains are going to start to look like you’re actually looking out at real space, rather than some flat piece of art.
Now, I know what you’re thinking – this is actually really simple, it’s just the opposite of how your brain wants to do things. Your instinct is to go for detail, go for a lot of work doing every single thing with equal care – but the truth is, that’s what makes things look flat. Mastering the art of carefully leaving things out when they’re too far away to see is what will give your mountains some real depth.
So – here’s your starting point:
This week: Get drawing – draw a five simple mountain scenes. No trees, no water, no fancy details – just some basic shapes and the right values. Give the background a light value, the middle ground a medium one and the foreground a full range value. Just get those values running around in the back of your mind.
Next week: Now it’s time to add some texture to your scene. Keep the background looking pretty plain, and get some real detail in the foreground. Watch how the combination of values and texture really starts to bring some depth to the scene.
Week three: Time to add something new to the mix – a lake, some trees or some clouds. And just remember to keep those distance principles in mind.
The thing is, a lot of artists struggle with drawing mountains because they try to rush ahead to the hard stuff, before they’ve even mastered the basics. They get caught up in drawing these elaborate, complex scenes before they can even get the basic principle working. But the people who make the fastest progress are the ones who can drill the fundamentals into their heads until it becomes second nature.
Mountains are some of the most rewarding scenes to draw out there – they’re dramatic, varied and just plain appealing to most people. And once you’ve learned what makes them read as being far away, and how to draw them to look massive – you’ll be able to bring that knowledge to just about any other landscape scene you draw.
Time to get your sketchbook out and start working on the basic peaks.
- 17.7Kshares
- Facebook0
- Pinterest17.7K
- Twitter0
- Reddit0
