Drawing shoes can be a fun and creative way to express personal style. This article will explore over ten unique shoe drawing ideas that anyone can try. Whether for a school project, a passion for fashion, or just for fun, there are plenty of options to inspire creativity.
Readers can find a variety of concepts that range from realistic to whimsical designs. Each idea offers a chance to practice drawing skills while exploring different shoe types and styles. This collection aims to spark imagination and encourage artists to experiment with their art.
1. Sketching Classic Sneakers
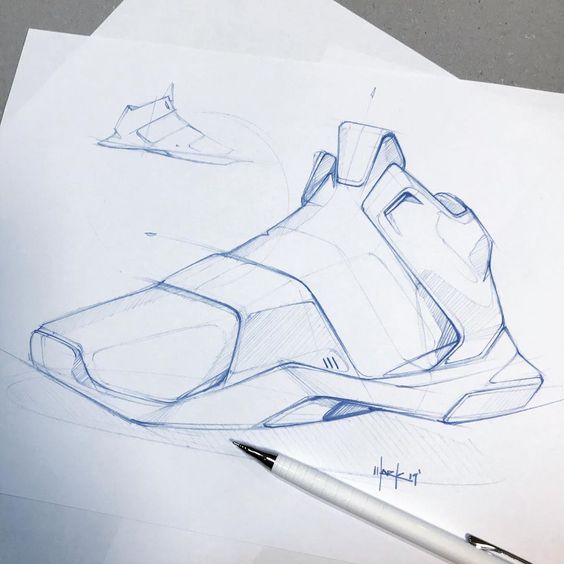
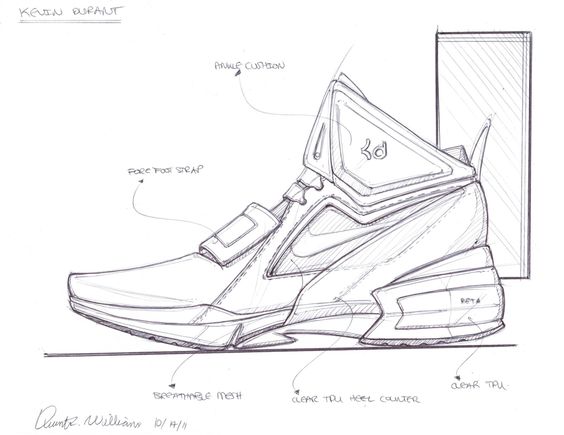
Classic sneakers are a great choice for artists. They have a simple shape that is easy to capture. This makes them perfect for beginners and advanced sketchers alike.
To start, choose a reference sneaker. Look for a popular style, such as high-tops or low-tops. Pay attention to the details like laces, logos, and stitching.
Begin with light pencil lines to outline the basic shape. Focus on the sole and the overall profile. Once satisfied, add details like eyelets and rubber toes.
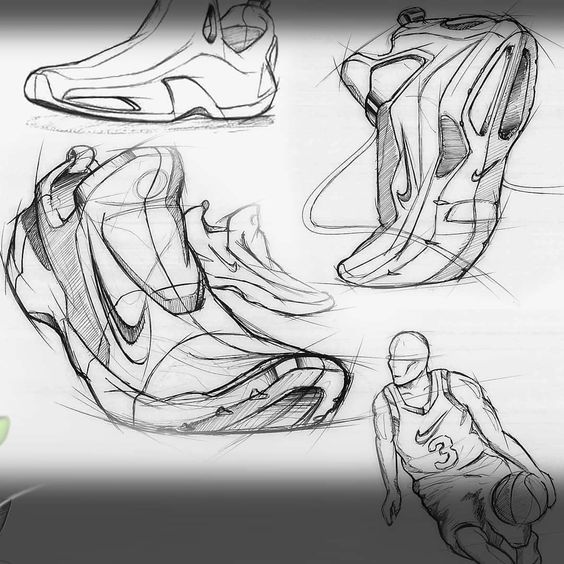
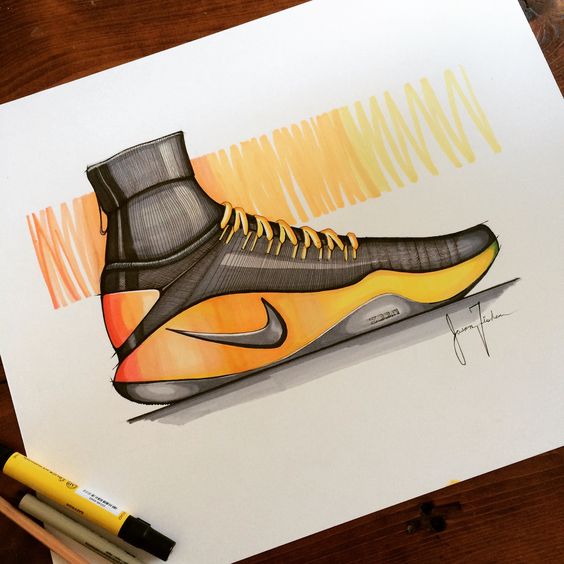
Next, add shading to give depth. Use darker lines for areas in shadow and lighter lines for highlights. This will help the sneaker look three-dimensional.
Experiment with different angles. Sketching from the side, top, or even an angled view can create interest. Each angle shows unique features.
Use colors if desired. Classic sneakers often come in various colors. Adding color can make the sketch pop and feel more lively.
Regular practice will improve skills. Drawing sneakers frequently helps to understand their structure better. Classic sneakers offer endless inspiration for sketching.
2. Drawing Lace-up Boots
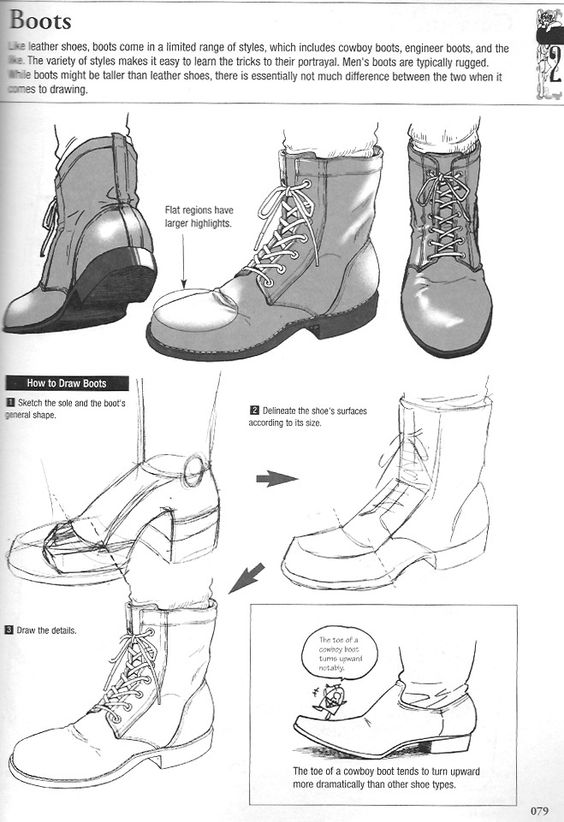
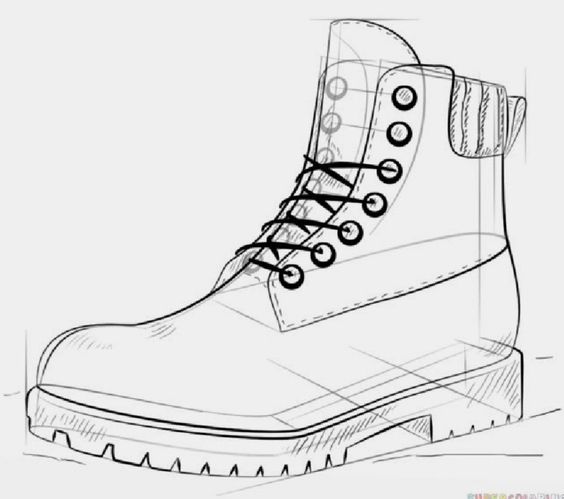
Lace-up boots are stylish and fun to draw. They have a unique shape that adds character to any art piece. Start with basic shapes to outline the boot’s structure.
First, draw a rectangle for the boot’s body. Then, add a curved line at the top to represent the ankle. Use simple shapes to sketch the toe and heel.
Next, mark where the laces will go. Draw small oval shapes for the eyelets. These are the holes where the laces pass through. Keep the laces loose to show how they hang.
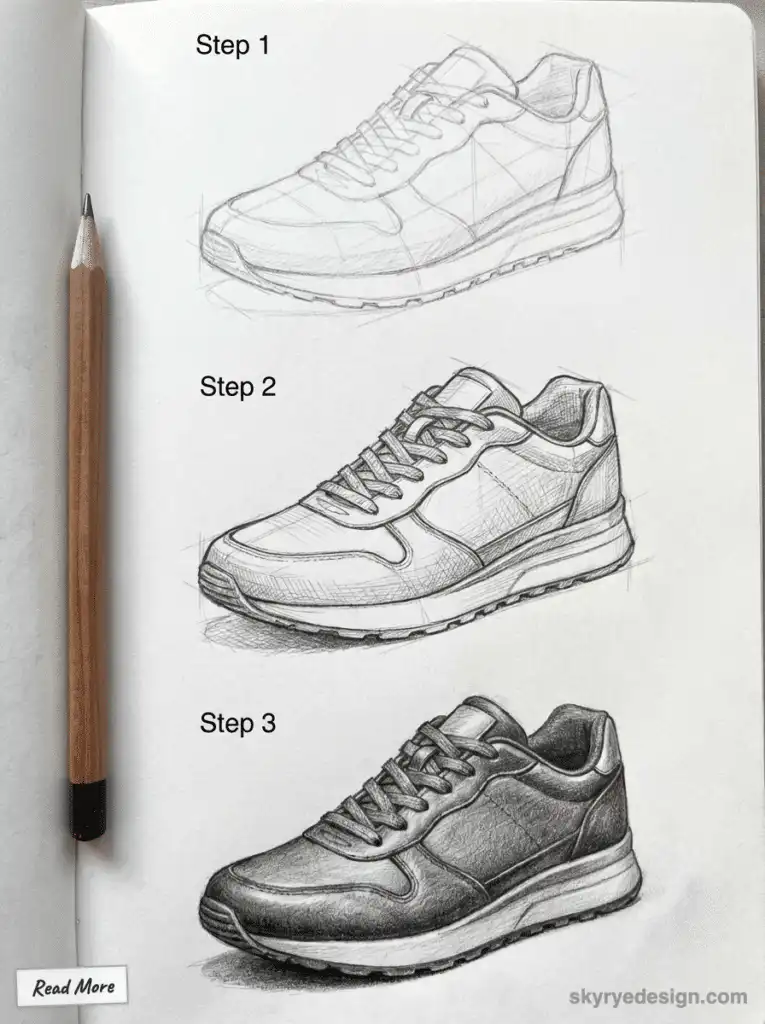
Add details like stitching, straps, or buckles. These features give the boots more depth and make them look realistic. Remember to pay attention to light and shadow to create dimension.
For texture, add lines to show the material. Leather, canvas, and suede each have different appearances. This can enhance the overall look of the boots.
Finish by darkening lines and adding any desired color. Lace-up boots can be any shade, so feel free to be creative. The process is enjoyable and allows for personal expression.
3. Illustrating Ballet Flats
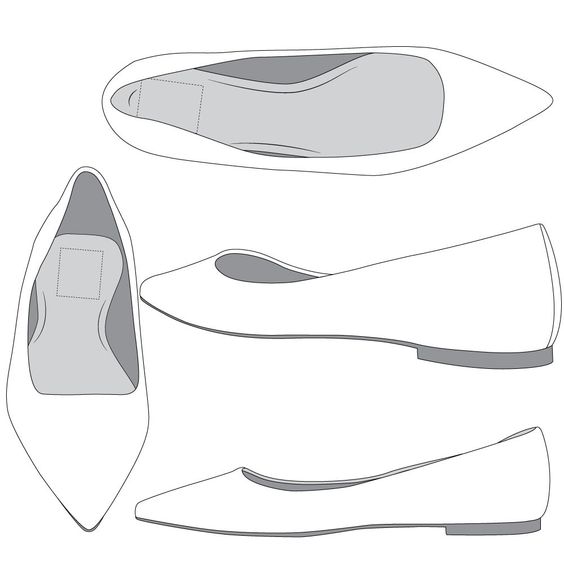

Ballet flats are simple yet elegant shoes. They have a low profile and a soft, flexible design. These shoes often feature a rounded toe and minimal embellishments.
To start illustrating ballet flats, it helps to focus on their shape. The overall outline is usually sleek and smooth. Artists should capture the graceful curves of the shoe.
Textures add interest. A smooth surface looks different from fabric with patterns. Artists can experiment with various materials like leather, canvas, or suede.
Details like bows, straps, or stitching enhance the design. A small bow at the toe can make the illustration more appealing. Simple accents can show the shoe’s style and character.
Adding color can bring the illustration to life. Ballet flats come in many colors, from classic black to bright shades. Artists can choose colors that reflect the intended style or mood.
Lastly, consider the shoe’s placement. It can be drawn standing on a surface or in motion. Showing the flats in different positions can add depth to the artwork.
4. Creating High Heels
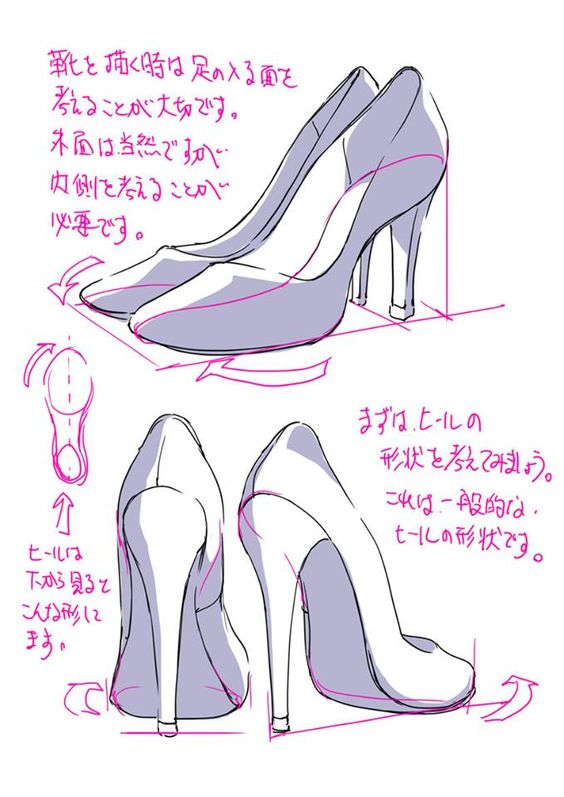
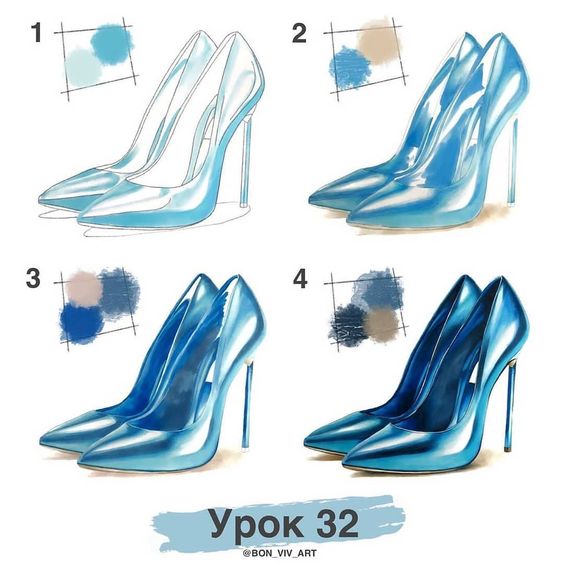
Creating high heels can be a fun and creative process. Start by sketching the basic shape of the shoe. This includes the front, heel, and sole.
Next, choose the heel height and style. High heels come in various styles, such as stilettos or wedges. Each style has a different look and feel.
When drawing the shoe, focus on the details. Add the toe shape, strap design, and any embellishments. This can include buckles or patterns.
Shading can bring the drawing to life. Use light and shadow to show depth. This helps the shoe look more realistic and three-dimensional.
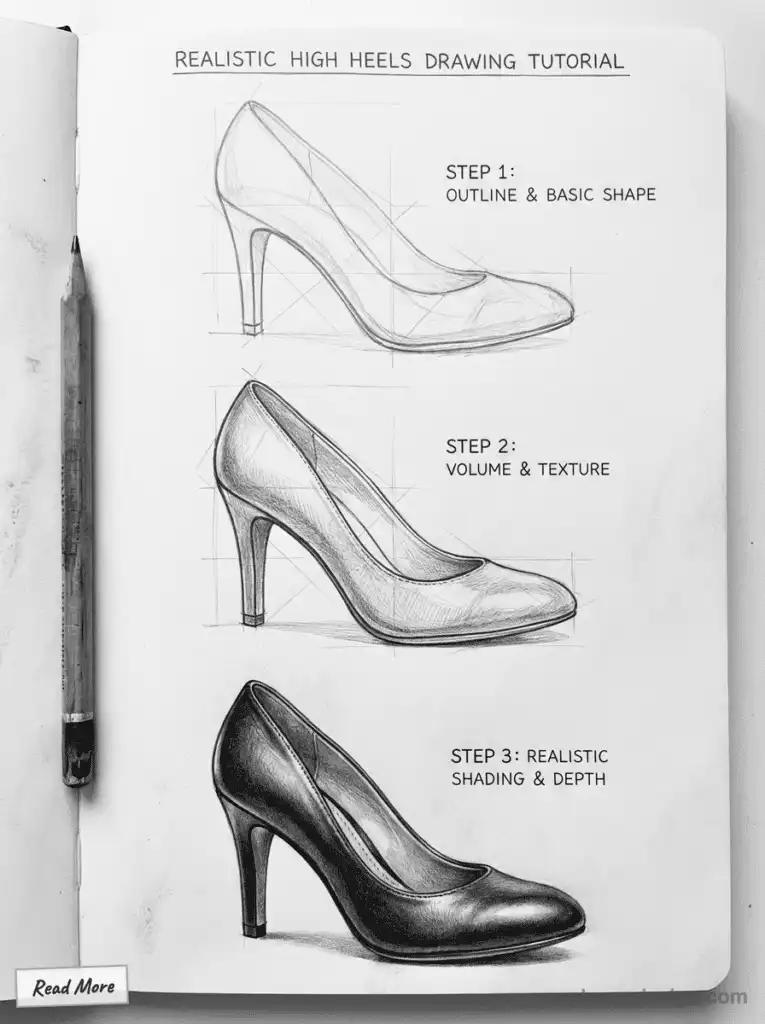
Coloring is the last step. Choose colors that fit the style of the high heels. Bright colors can make the shoes stand out, while softer tones can give a more elegant look.
Overall, creating high heels involves careful planning and attention to detail. With practice, anyone can improve their shoe-drawing skills.
5. Depicting Running Shoes
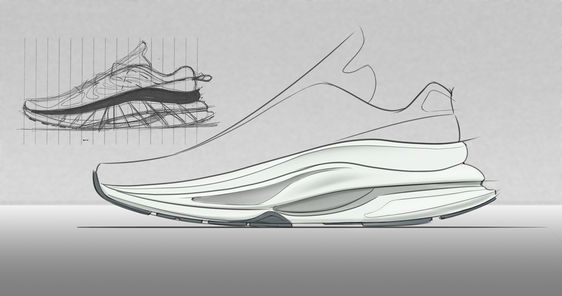
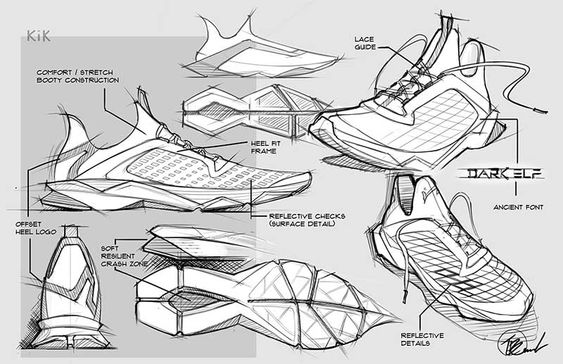
Running shoes are designed for comfort and speed. To draw them, one can start with the basic shape. This includes the rounded toe, curved sides, and a slightly elevated heel.
Next, pay attention to the details. Many running shoes have mesh sections for breathability. These can be shown with thin lines or shading.
The soles are also important. They often have treads for grip. Drawing tread patterns can add realism to the shoes.
Colors and patterns matter too. Bright colors and designs are common in running shoes. Choosing bold hues can make the drawing stand out.
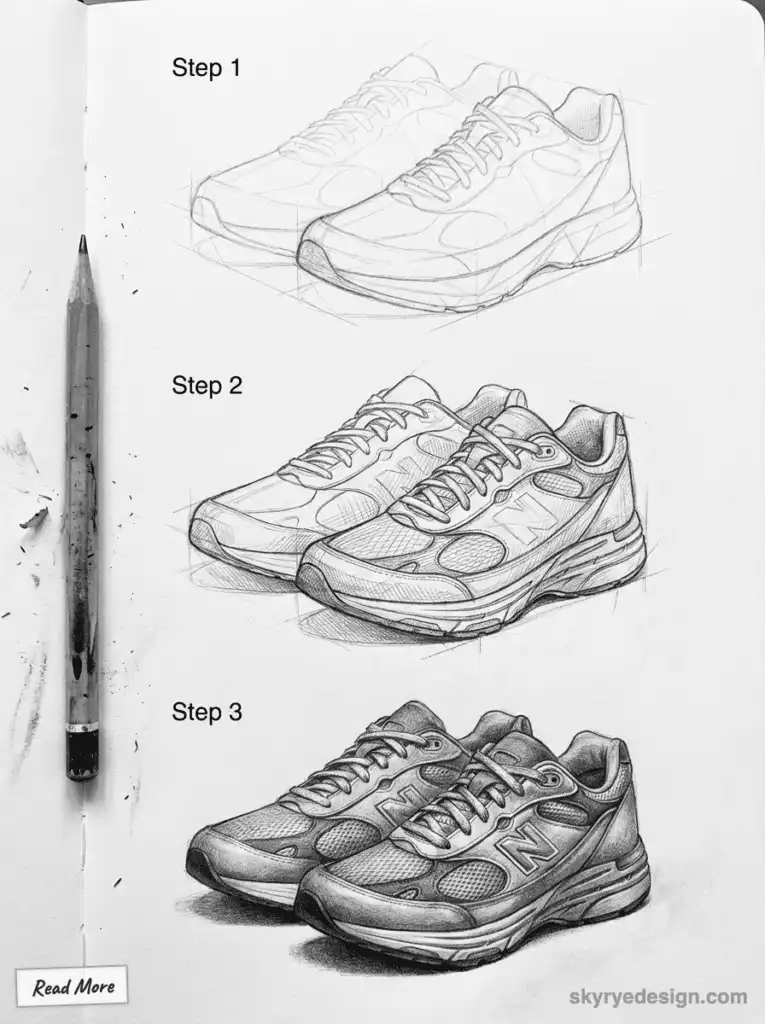
Lastly, think about different styles. Some running shoes are minimalist, while others are cushioned. Capturing the specific features of each type enhances the drawing.
6. Designing Cowboy Boots
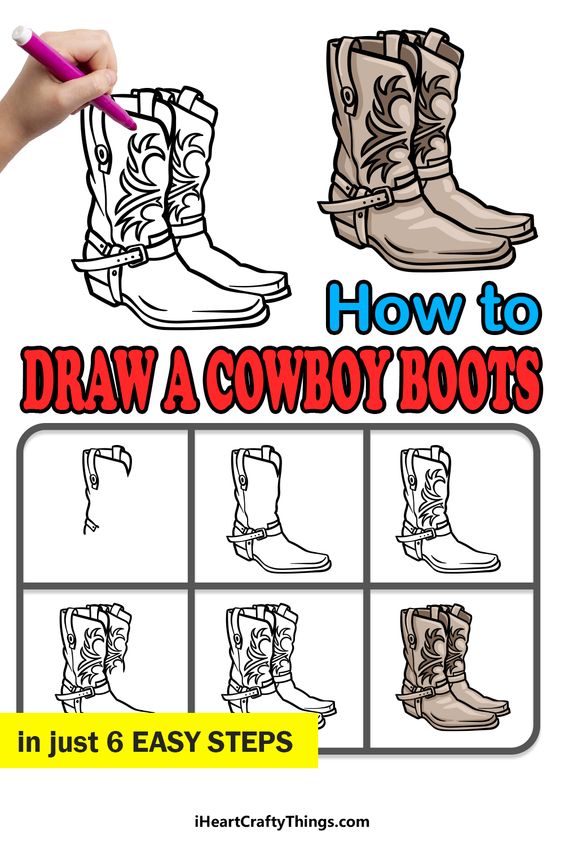
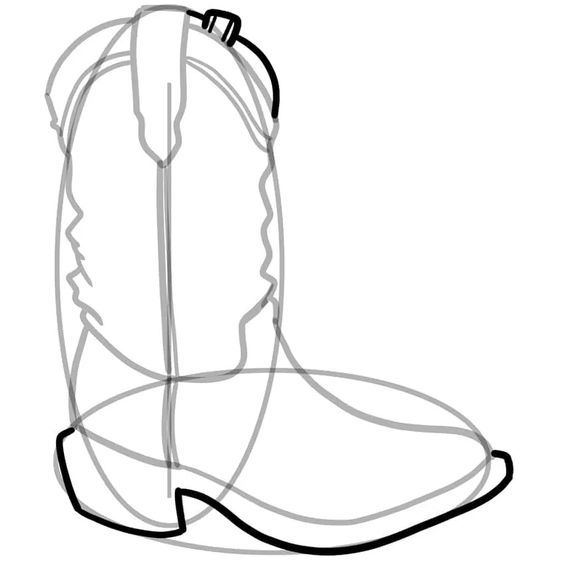
Designing cowboy boots involves a mix of creativity and tradition. These boots have a distinct shape with a high shaft and a pointed toe.
The upper part of the boot is typically made from leather. This material can have different textures and colors, allowing for unique designs. People often add decorative stitching or tooling patterns to give the boots a personal touch.
The sole is important for both style and function. Many cowboy boots have a leather sole, but rubber soles are also common for better grip.
Height and width can vary to fit different needs. A tall shaft may suit some designs, while others may be shorter for comfort. An important feature is the heel, which is often higher and angled to help with riding.
When drawing cowboy boots, details matter. Artists should focus on the stitching, patterns, and the curvature of the boot. This attention to detail can bring the design to life.
Cowboy boots are not just footwear; they are a symbol of culture and style. With these elements in mind, designing cowboy boots can be an enjoyable and fulfilling process.
7. Conceptualizing Sandals
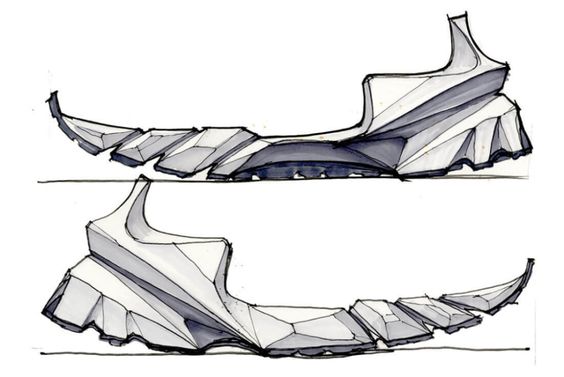
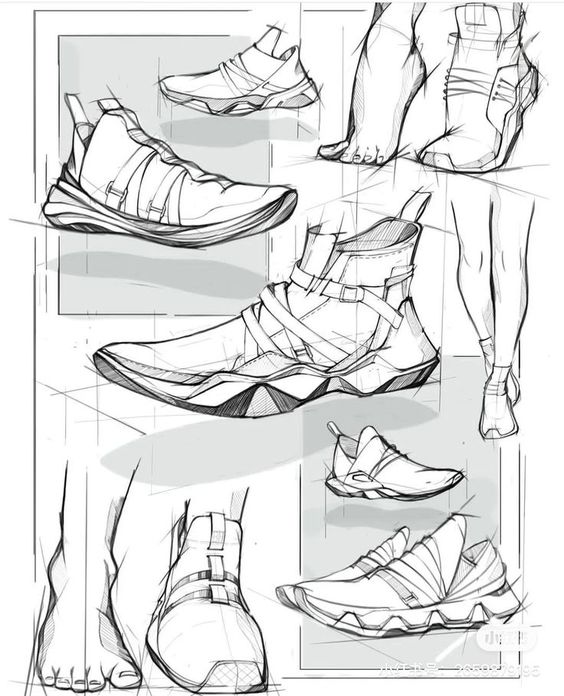
When conceptualizing sandals, it is important to consider different styles and purposes. Sandals can range from casual flip-flops to elegant designs for special occasions.
A designer might think about the materials used, such as leather, fabric, or rubber. Each material offers unique qualities. Leather can provide durability, while fabric might offer more comfort.
The shape of the sandal is also key. Understanding arch support and strap placement can improve both style and function. Different designs, like gladiators or slides, can attract various customers.
Colors and patterns play a large role too. Bright colors can make a fun statement, while neutral tones can be classic. Seasonal trends can guide these choices.
Finally, think about how the sandals will be worn. Will they be used for beach outings, daily errands, or formal events? Knowing the target audience helps shape the design. Sandals should blend comfort with style to meet these needs.
8. Detailing Loafers
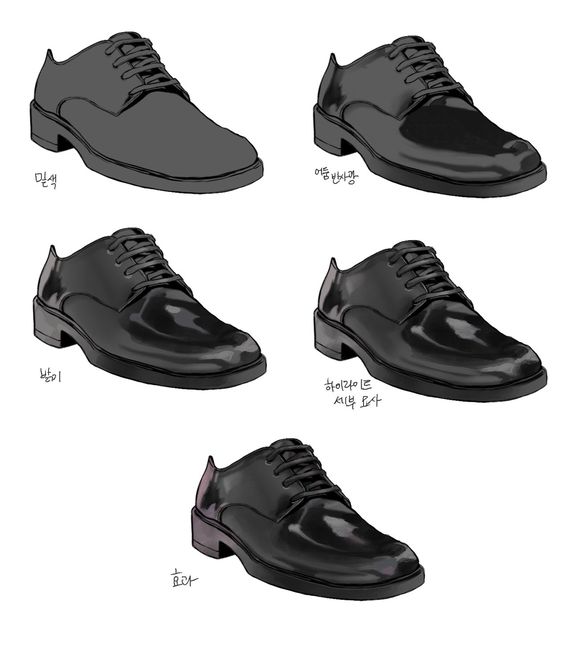
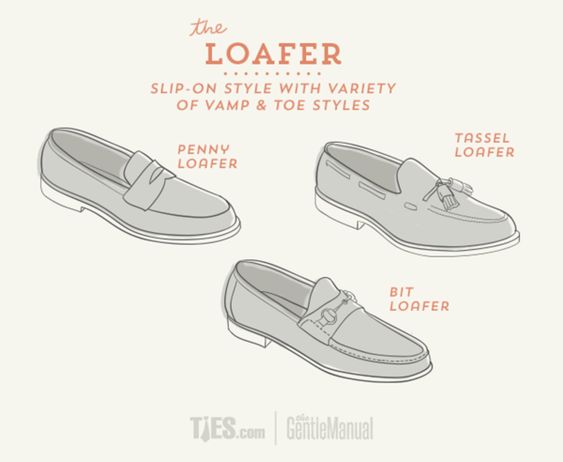
When detailing loafers, focus on shapes and lines. Loafers have a sleek design that can be highlighted in drawings. Start with the basic outline, capturing the smooth curves of the shoe.
Next, emphasize the stitching. This adds texture and depth. Draw accents like the penny slot or tassels to show different styles of loafers.
Adding shadows helps create a three-dimensional look. Use light shading near the sole and around the edges. This technique separates the shoe from the background.
Colors play a significant role too. Traditional loafers often have earthy tones, but bright colors can make them pop. Focus on the finishes, like glossy or matte, to give more life to the drawing.
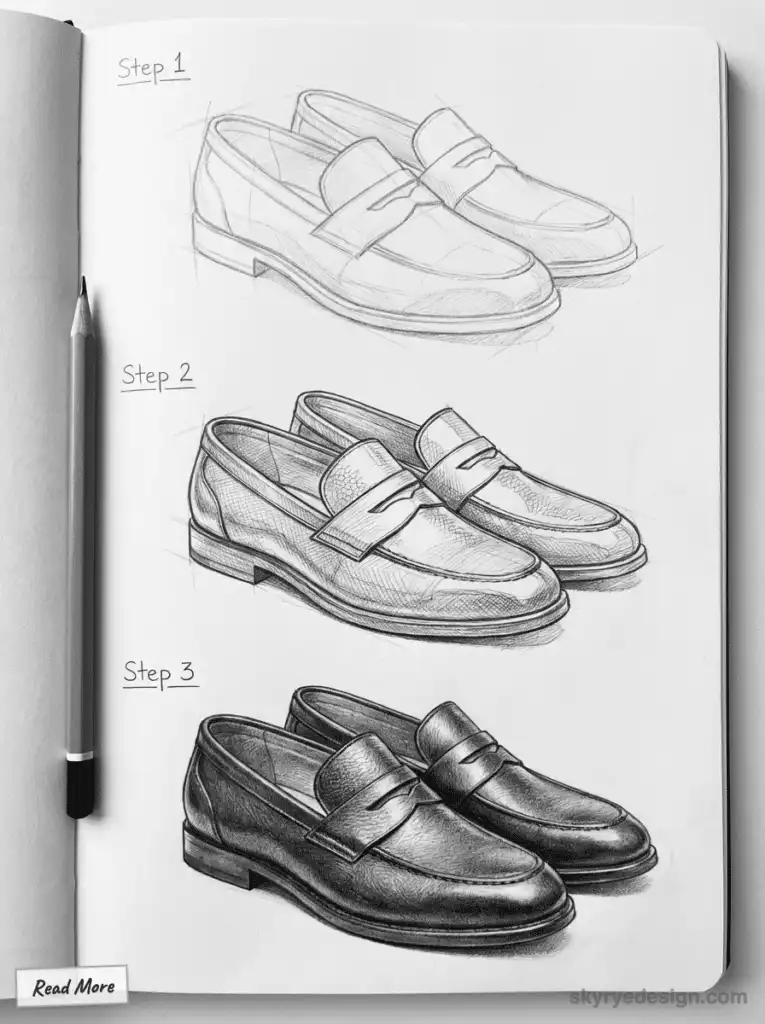
Don’t forget about the sole. Loafers usually have a thin, flat bottom. Drawing the sole accurately shows the shoe’s style and functionality. Capture the small details, like grooves or patterns, for realism.
With practice, detailing loafers can become an enjoyable part of shoe drawing. Each detail adds character and helps showcase the shoe’s unique features.
9. Rendering Slip-ons
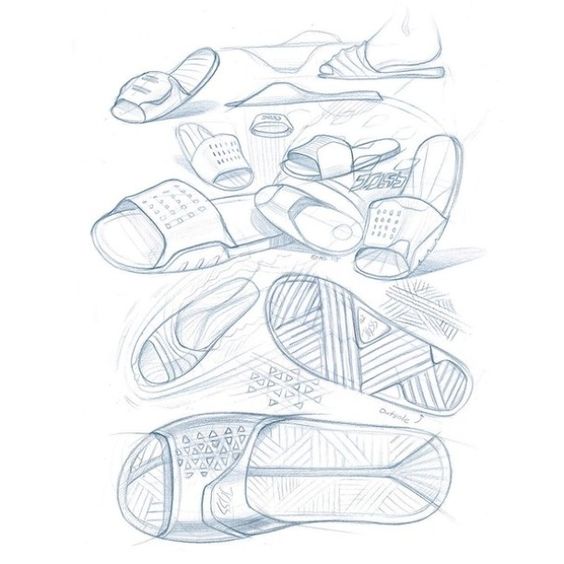
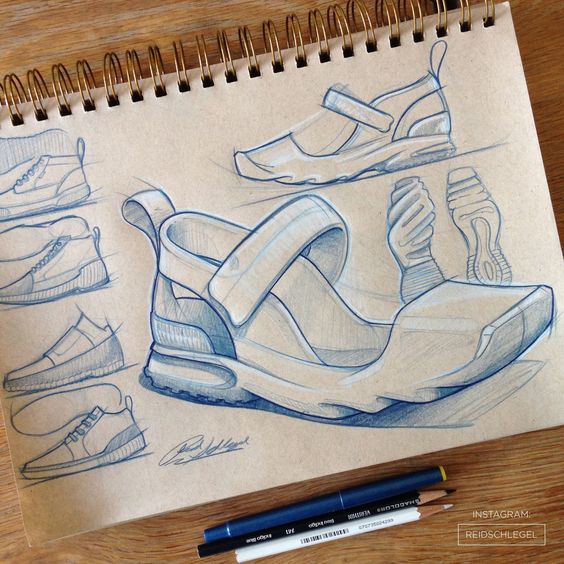
Rendering slip-ons requires attention to shape and detail. Slip-on shoes have a unique design without laces or fasteners. This makes them easier to draw compared to other styles.
Start with the basic shape. Use simple lines to outline the shoe’s body. Pay attention to the curve of the toe and the heel. This creates a solid foundation for the drawing.
Next, add details like stitching and panels. These elements enhance the design and provide depth. Be mindful of how the materials fold and fit together.
Shading is important for slip-ons. Consider where the light hits the shoe. Use darker shades on the sides and lighter tones on the top to give it dimension.
Finishing touches can include patterns or textures. Adding details, like a logo or unique design, can help personalize the slip-on. Finally, review the drawing for any adjustments needed to improve the overall look.
10. Outlining Hiking Boots
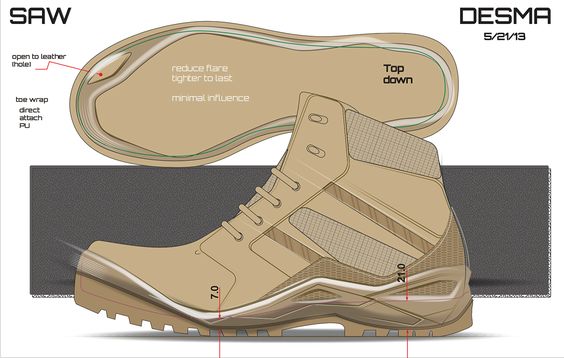
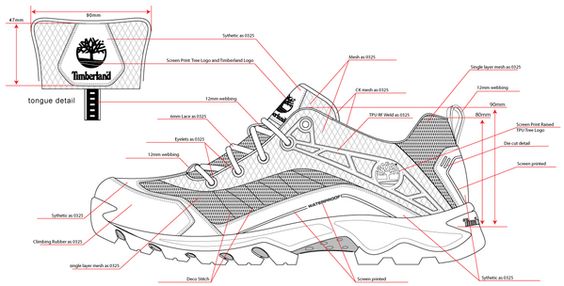
Outlining hiking boots can be an exciting challenge. These boots have unique shapes and features that make them stand out.
Start by sketching the basic outline. Hiking boots often have a high top, which provides ankle support. This structure should be clear in the outline.
Next, add details like laces, eyelets, and the sole. Laces can create texture and depth. The sole is usually thick and rugged to represent durability.
Focus on the stitches and seams. These elements contribute to the boot’s character. Including them can enhance the final look.
It can be helpful to use reference images. Observing different styles can inspire creativity. Heavier boots for rocky trails may look different from lighter boots.
Shading can also improve the look. It helps show the boot’s shape and material. Blend darker shades for shadows and lighter ones for highlights.
When finished, the outline should reflect a sturdy and functional design. Hiking boots are not just practical; they can be visually appealing too.
Basic Techniques for Drawing Shoes
Drawing shoes well requires a good grasp of their structure, the right tools, and understanding proportions. Focusing on these aspects will help anyone improve their shoe-drawing skills.
Understanding Shoe Anatomy
To draw shoes accurately, knowledge of their anatomy is essential. Shoes have distinct parts like the toe box, midsole, and heel. By breaking down these components, an artist can create a realistic shoe.
- The toe box is the front part that protects the toes.
- The midsole provides cushioning and support.
- The heel adds height and stability.
Studying different types of shoes helps to see how these parts vary. Observing real shoes can provide insights into their shapes and features. This understanding lays a strong foundation for drawing.
Choosing Drawing Tools
Selecting the right tools makes a big difference in shoe drawing. Various options are available, and each tool can produce different results. Artists commonly use pencils, pens, and markers.
- Pencils offer flexibility, allowing for easy corrections.
- Inking pens add bold lines for a clean finish.
- Markers can provide vibrant colors and shading.
Paper type is also essential. Smooth paper works well for ink, while textured paper is better for pencil drawings. Investing time in choosing the right tools can enhance the overall quality of shoe art.
Establishing Proportions
Proportions are crucial when drawing shoes to ensure accuracy. A common method involves using guidelines to achieve the right size and angles. First, draw a basic outline of the shoe shape.
- Use light lines to sketch the basic forms.
- Pay attention to the length and width ratios.
- Compare sizes of different shoe parts for balance.
Measuring with a reference shoe can help maintain proper proportions. Consistent practice with proportions leads to more convincing and appealing shoe designs.
Advanced Shoe Drawing Techniques
Artists can elevate their shoe drawings by focusing on specific techniques. Understanding how to render textures, capture movement, and add realistic details can greatly enhance their work.
Rendering Different Textures
To show different textures, an artist should start by observing real shoes. For example, leather has a smooth and shiny look, while canvas appears more matte and soft. Using various pencil pressures can help replicate these feelings.
Techniques to consider:
- Hatching: Lightly draw parallel lines for a fabric look.
- Cross-hatching: Overlay intersecting lines for depth in leather.
- Blending: Use a blending stump to smooth out pencil marks, especially for smoother textures like rubber.
Adding small touches like highlights and shadows is also crucial. They add depth and make textures pop.
Capturing Footwear Movement
To portray movement in shoes, an artist should focus on angles and positions. Positioning the shoe at a slight tilt or with motion lines can suggest action.
Key points:
- Dynamic Angles: Draw the shoe from below or above to show height or speed.
- Motion Lines: Add lines around the shoe to indicate where it is moving.
- Foot Position: Illustrate the shoe on a foot in a stride or jump for realism.
These techniques can help convey the energy of movement. Avoid static or flat representations to keep the drawing lively.
Adding Realistic Details
Details can make a shoe design feel more authentic. Shoe laces, stitching, and logos give personality and context to the drawing.
Important details to include:
- Laces: Show them untied or in unique patterns. This adds character.
- Stitching: Thin lines can imitate stitching that holds the shoe together.
- Shadows and Highlights: Create shadows on the sole and highlight the toe to suggest light direction.
Spending time on these details can transform a basic shoe drawing into a striking piece of art. Attention to realism can greatly enhance visual interest.
Conclusion
Shoe drawing is an excellent way to improve your understanding of form, perspective, and detail. Because shoes combine structured shapes with flexible materials, they challenge artists to observe carefully and think in three dimensions. By breaking a shoe into simple forms, studying its angles, and building up details gradually, drawing shoes becomes much more manageable.
As with any subject, practice is key. Drawing different types of shoes—such as sneakers, boots, or heels—helps you recognize common structures while also learning how design, material, and function affect shape. Mistakes are part of the process and often lead to better observation and stronger drawings.
Whether you’re sketching casually or aiming for realism, shoe drawing strengthens overall drawing skills and builds confidence. With patience, consistent practice, and attention to proportion and perspective, you can create shoe drawings that feel solid, realistic, and full of character.
- 1.4Kshares
- Facebook0
- Pinterest1.4K
- Twitter0
- Reddit0

