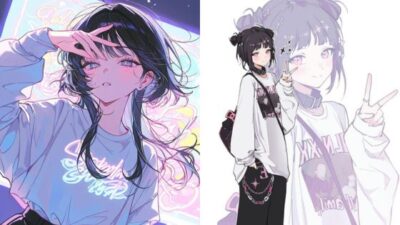
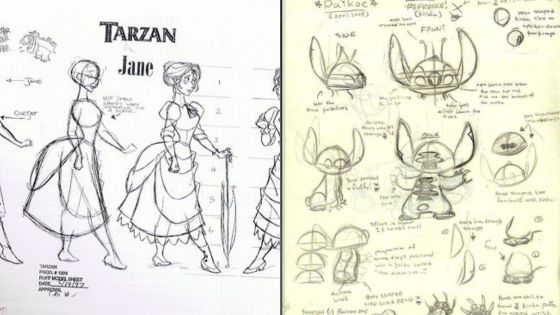
Ever looked at your favorite anime characters and wished you could bring them to life on paper? There’s something undeniably captivating about the expressive eyes, dynamic hair, and unique proportions of anime heads. Whether you’re a complete beginner or looking to refine your skills, learning the art of drawing anime heads is a journey filled with creativity and fun. It’s not just about replicating what you see; it’s about understanding the underlying structure, mastering those key features, and ultimately, infusing your own characters with personality.
This guide will take you step-by-step through the process, from the fundamental shapes to the nuanced details that make each character unique. We’ll demystify the techniques, help you avoid common beginner mistakes, and unlock the secrets to creating heads that pop with emotion and style. So grab your pencil, clear some space, and let’s dive into the exciting world of anime head drawing!
Why Anime Heads? Understanding the Appeal
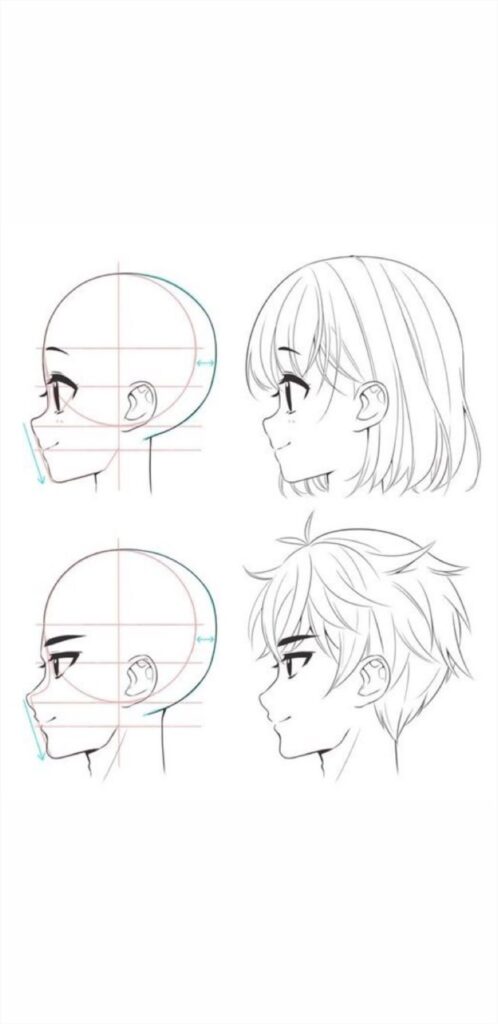
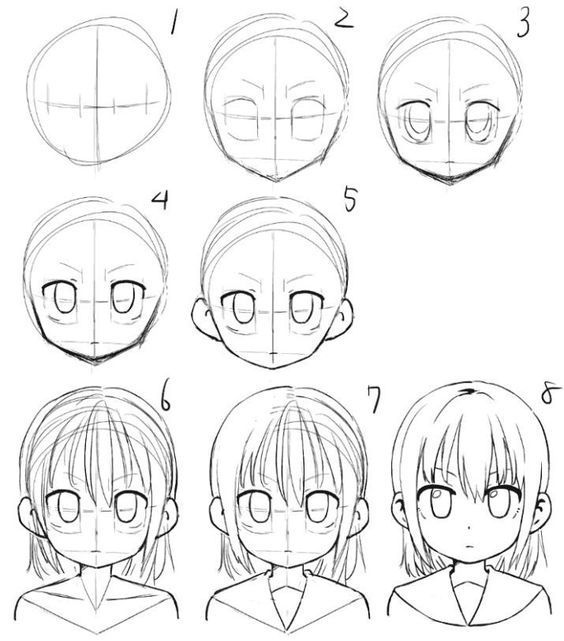
Anime heads possess a distinct charm that sets them apart from other art styles. They often feature larger-than-life eyes, simplified yet expressive noses and mouths, and diverse hairstyles that instantly convey personality. This stylized approach allows for a vast range of emotions, from subtle contemplative looks to exaggerated comedic reactions, making them incredibly versatile for storytelling.
The appeal lies in their ability to communicate so much with relatively few lines. Artists can create instantly recognizable characters with unique quirks and emotional depth. From the fierce gaze of a shonen hero to the gentle smile of a shoujo protagonist, the head is the primary canvas for a character’s soul. For aspiring artists, mastering anime heads is a fantastic entry point into character design, as it teaches fundamental principles of proportion, perspective, and expression in an engaging way.
Gather Your Tools: The Essentials

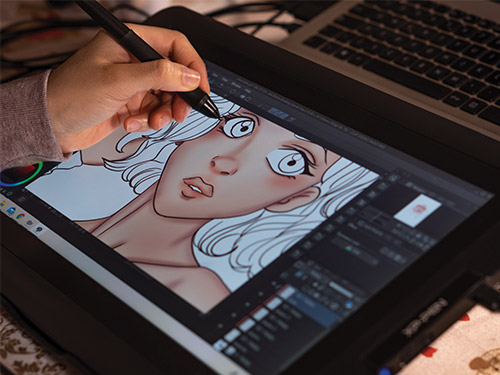
Before you start sketching, it’s a good idea to gather a few basic supplies. You don’t need anything fancy to begin; in fact, sometimes simpler is better!
For Traditional Drawing:
- Pencils: A good set of graphite pencils is crucial. Start with an HB pencil for initial light sketches, a 2B or 4B for darker lines and shading, and perhaps an H or 2H for very light construction lines.
- Erasers: A kneaded eraser is fantastic for lifting graphite without damaging the paper, and a regular plastic eraser is good for sharper clean-ups.
- Paper: Standard printer paper works fine for practice, but sketchpads designed for drawing are better. Look for paper with a bit of tooth (texture) that holds graphite well.
- Optional: A ruler for straight lines (though freehand is encouraged for practice), blending stumps for smooth shading.
For Digital Drawing:
- Drawing Tablet: Wacom, Huion, XP-Pen are popular brands. Even an iPad with an Apple Pencil or a Samsung tablet with an S Pen can be excellent digital sketchpads.
- Software: Programs like Clip Studio Paint, Procreate, Adobe Photoshop, Krita (free), or Autodesk Sketchbook (free) are all great options.
- Optional: Custom brushes for line art, shading, and hair textures.
Regardless of your chosen medium, make sure you set up a comfortable drawing space. Good lighting and a stable surface will make a world of difference. Think about creating an environment that feels like a warm hug, perfect for long creative sessions. For more ideas on how to make your drawing space cozy and inspiring, you might find some useful tips in articles about home comforts that feel like a warm hug.
The Foundation: Basic Head Structure (The Loomis Method Simplified)
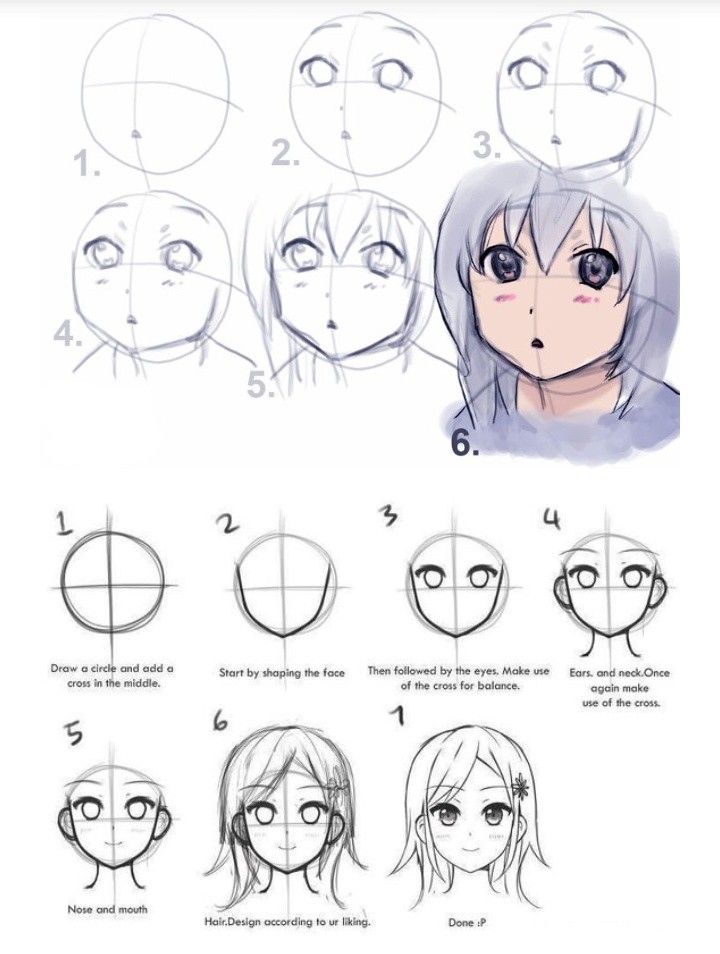
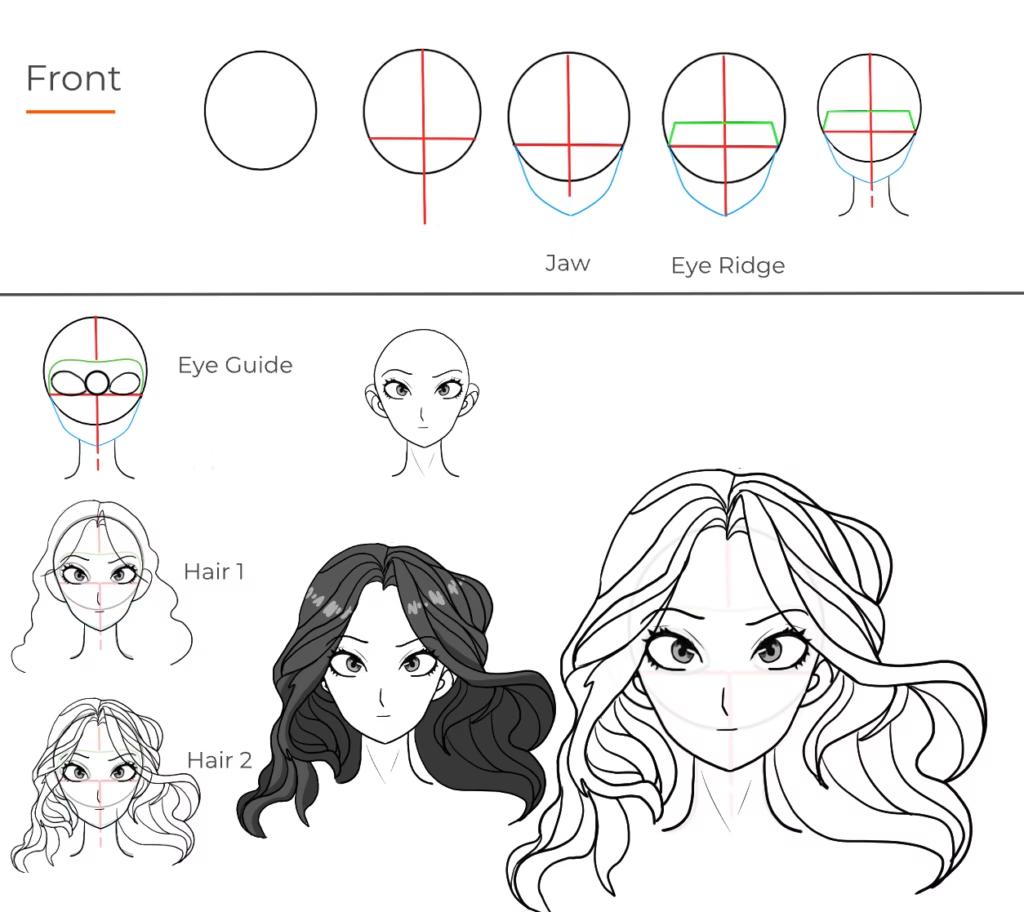
Every great anime head starts with a solid foundation. We’ll use a simplified version of the Loomis method, a widely acclaimed technique for head construction. This method breaks down the complex shape of the head into simple, manageable forms.
Starting with the Sphere
- Draw a Circle: Begin by sketching a perfect circle. Don’t worry if it’s not absolutely perfect; this is just a guide. This circle represents the cranium or the main part of the skull.
- Add the Center Line: Draw a vertical line down the middle of the circle. This is your center line, which helps establish symmetry and the direction the head is facing.
- Add the Eye Line: Draw a horizontal line across the middle of the circle, intersecting the center line. This is your eye line. For many anime styles, the eyes are often placed a little lower than the true halfway point, so you might adjust this slightly below the circle’s horizontal midpoint.
Defining the Jaw and Chin
- Mark the Bottom: Extend the vertical center line downwards from the bottom of the circle. The length you extend it will determine the character’s age and overall head shape. For a younger, more “chibi” look, it will be shorter. For an adult, it will be longer.
- Mark the Cheekbones: On either side of the circle, slightly below the eye line, draw two small marks. These indicate where the cheekbones will be and where the jawline will begin to angle inwards.
- Connect the Jaw: From these cheekbone marks, draw two curved lines down towards the bottom of your extended center line, forming the jaw. Bring these lines together at a point to form the chin. The sharpness or roundness of the chin will significantly impact the character’s appearance. A sharper chin often suggests a more mature or masculine character, while a rounder chin might be more youthful or feminine.
- Refine the Head Shape: Now, lightly erase the parts of the original circle that are covered by the jawline. You should now have a basic, egg-like head shape.
Adding Facial Guidelines
With your basic head shape in place, it’s time to add more guidelines to help with feature placement:
- Nose Line: Draw a horizontal line roughly halfway between the eye line and the chin.
- Mouth Line: Draw a horizontal line halfway between the nose line and the chin.
These guidelines are crucial for consistent placement of features, especially when drawing the head from different angles. Remember, these are guidelines, so they can be adjusted based on the specific character or style you’re aiming for.
Eyes: The Windows to the Anime Soul
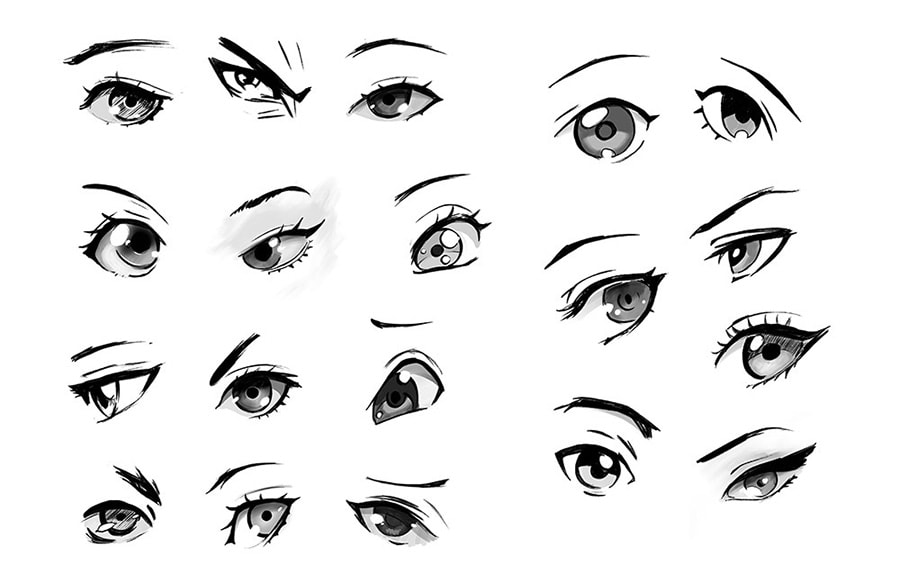
Anime eyes are perhaps the most iconic feature, capable of conveying a vast spectrum of emotions. They are often larger and more expressive than realistic eyes, and their design can instantly tell you a lot about a character’s personality.
Basic Eye Shapes
- Female Eyes: Tend to be larger, rounder, and often have prominent upper and lower lashes. The highlights (reflections of light) are usually more pronounced and complex.
- Male Eyes: Are generally narrower, with sharper angles and thicker brows. They might have fewer, or less prominent, lashes.
- Simple Eyes: For younger or more comedic characters, eyes can be very simplified, sometimes just dots or small ovals.
Elements of an Anime Eye
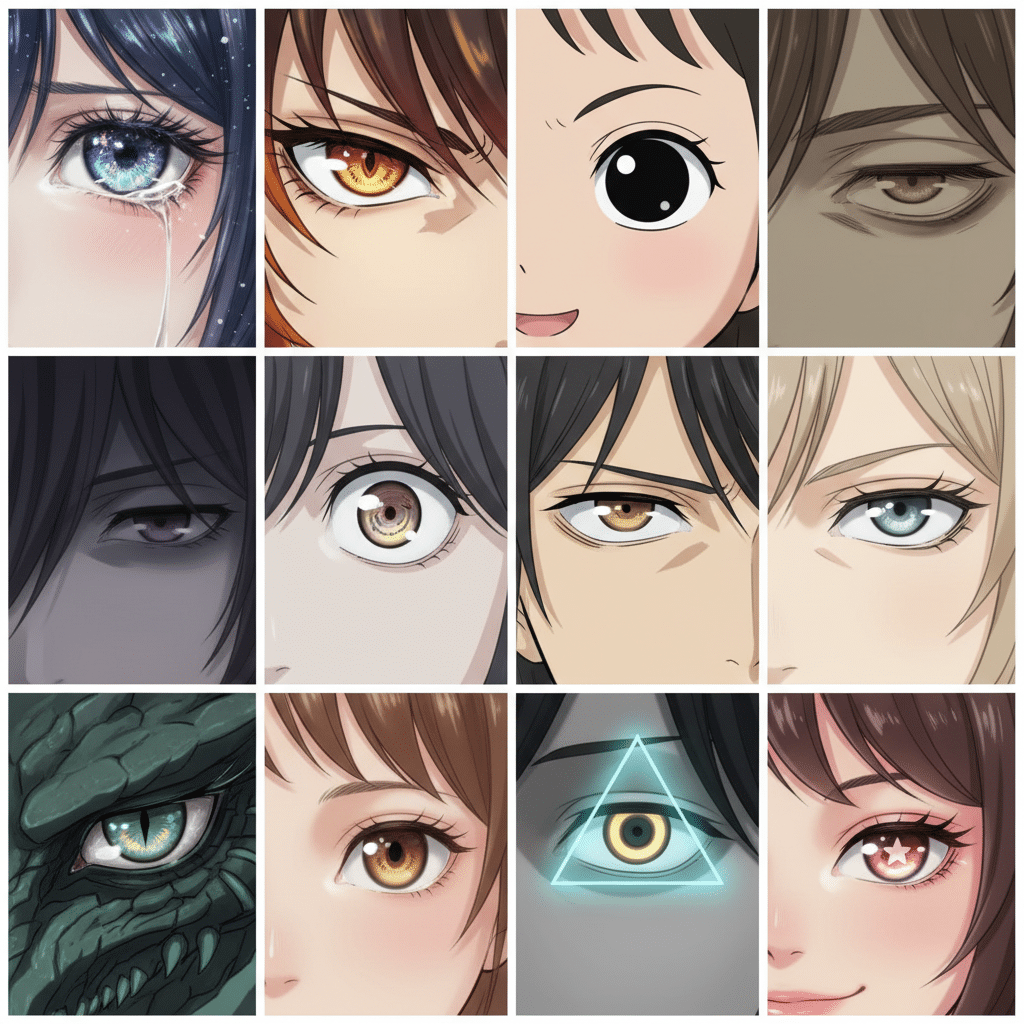
- The Eyelids: The upper eyelid is usually the most prominent line, often thicker at the outer corner. The lower eyelid can be a single thin line, or slightly curved.
- Iris and Pupil: The iris is the colored part of the eye. In anime, it’s often enlarged and can have detailed shading. The pupil is the black dot in the center, which can also change size with emotion.
- Highlights: These are crucial! Highlights are small white shapes that represent light reflecting off the eye. They add sparkle and life. Often, there’s one large main highlight and one or two smaller secondary highlights. The placement of highlights can indicate the light source and even the character’s emotional state.
- Eyelashes: For female characters, lashes are often thick and fanned out. For males, they might be suggested by a few short, sharp lines or omitted entirely.
- Eyebrows: Eyebrows sit above the eye and are incredibly important for expression. A raised brow indicates surprise, a furrowed brow signals anger or concern, and a relaxed brow suggests neutrality.
Experiment with different eye shapes, sizes, and highlight placements. A slight change can dramatically alter a character’s mood.
Noses and Mouths: Subtle yet Crucial
While anime eyes get a lot of attention, noses and mouths play a vital supporting role in defining expressions and character. In anime, these features are often simplified, allowing the eyes to dominate, but their placement and subtle variations are key.
Noses
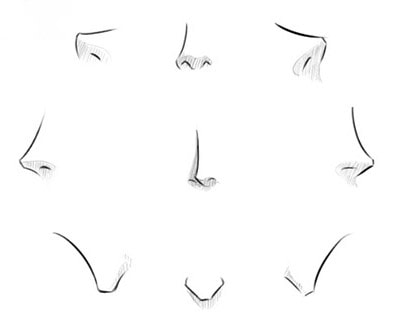
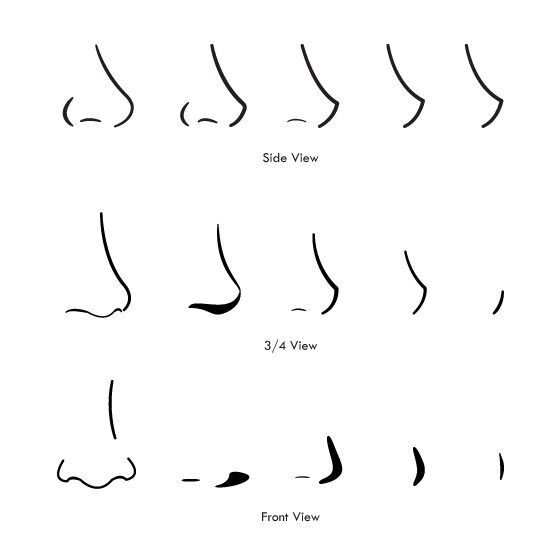
Anime noses are typically minimal.
- Simple Dot/Line: For many female or younger characters, the nose can be represented by a small dot, a tiny triangle, or just a short vertical line indicating the bridge.
- Slightly More Defined: For older or more masculine characters, you might see a more defined bridge or a slight curve for the nostril, but rarely are they as detailed as realistic noses.
- Placement: The bottom of the nose usually sits on your pre-drawn nose line. When drawing from a side profile, the nose will project outward more clearly.
Mouths
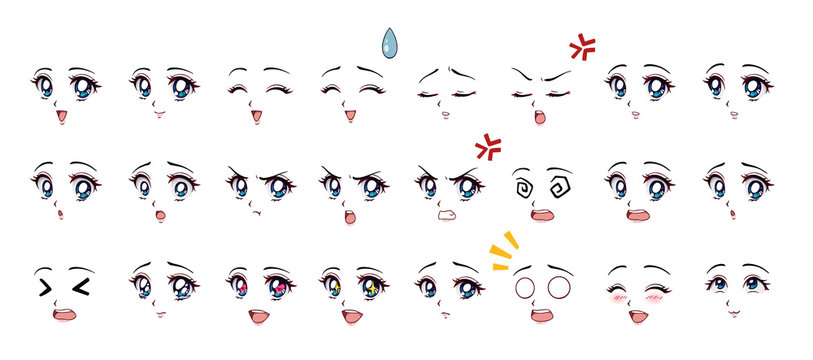
Anime mouths are incredibly versatile for conveying emotion, even with their simplified forms.
- Basic Shapes: A simple curved line for a smile or a frown, a straight line for a neutral expression.
- Open Mouths: For talking, shouting, or surprise, the mouth will open, often showing a small, dark interior and sometimes a tongue.
- Exaggeration: Anime mouths can be highly exaggerated for comedic effect, stretching wide or contorting to show extreme emotion.
- Lips: While full lips aren’t common in many anime styles, a subtle suggestion of a Cupid’s bow or a slightly thicker lower lip can add a touch of femininity or maturity.
- Placement: The mouth line serves as your guide, with the mouth usually resting directly on or slightly above it.
Remember that the relationship between the nose and mouth, and how they react to the movement of the eyes and eyebrows, creates a coherent expression.
Hair: Framing the Face with Style
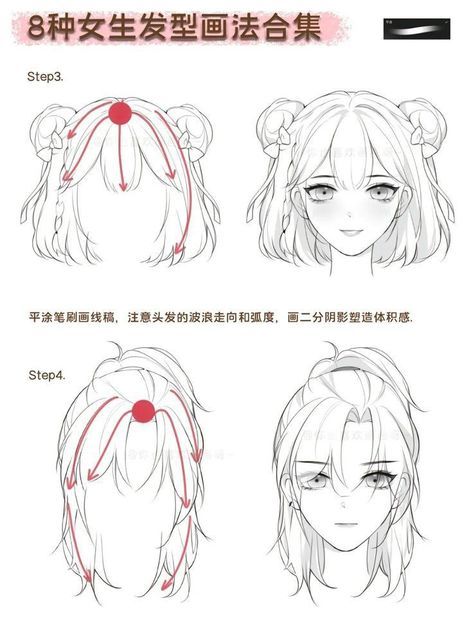
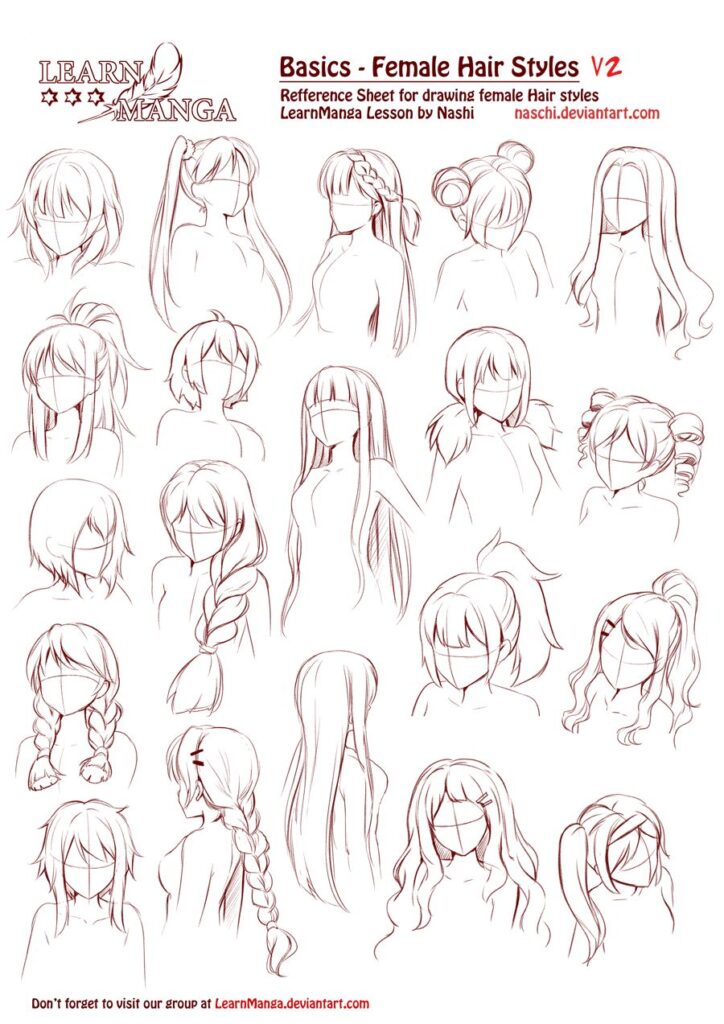
Hair in anime is often a character’s crowning glory – literally! It’s a dynamic element that can express personality, movement, and even mood. Forget drawing individual strands; anime hair is all about drawing it in stylized, flowing clumps or “chunks.”
Basic Principles of Anime Hair

- Start with the Hairline: Don’t draw the hair directly on the skull. Instead, consider the hairline. Hair starts above the scalp and flows outwards, adding volume.
- Think in Shapes and Flow: Instead of drawing strand by strand, visualize hair as large, dynamic shapes or clumps. Think about the overall direction and flow. Does it sweep back? Hang forward? Spike up?
- Bangs: Bangs are crucial for framing the face. They can be straight, swept to the side, spiky, or curly. Experiment with different arrangements.
- Volume and Gravity: Anime hair often defies gravity, especially for spiky or voluminous styles. However, still consider a natural fall, with hair generally flowing downwards. Add subtle curves and overlaps to give it depth.
- Character Personality: Hair is a powerful tool for characterization.
- Spiky hair: Often for energetic or strong characters.
- Long, flowing hair: Can suggest elegance, mystery, or romance.
- Messy hair: Might indicate a carefree, wild, or sleepy personality.
- Short, neat hair: Often for disciplined or practical characters.
When drawing hair, consider the overall silhouette. Does it add to the character’s appeal? Does it help tell their story? Drawing hair can be a lot of fun, allowing for immense creativity. If you’re looking for inspiration on different styles, even real-world examples can spark ideas for your anime characters, like browsing through various men hairstyles.
Ears: Often Overlooked, Never Unimportant
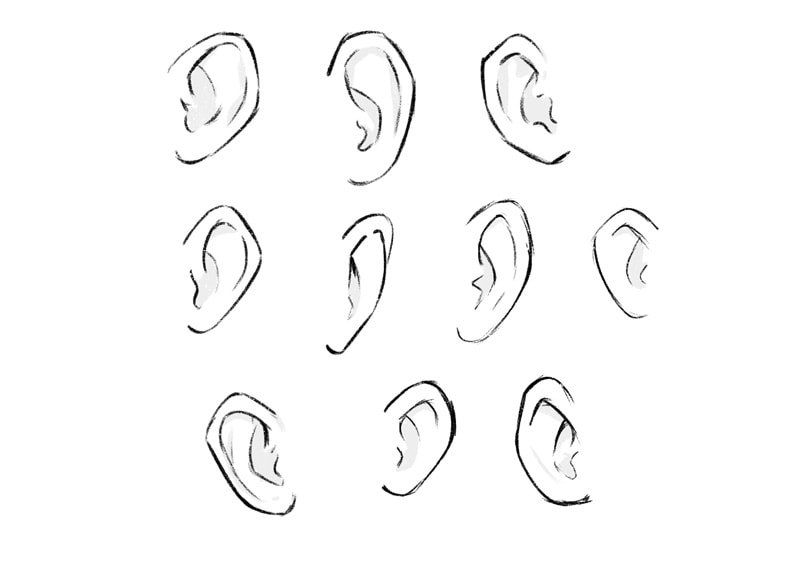
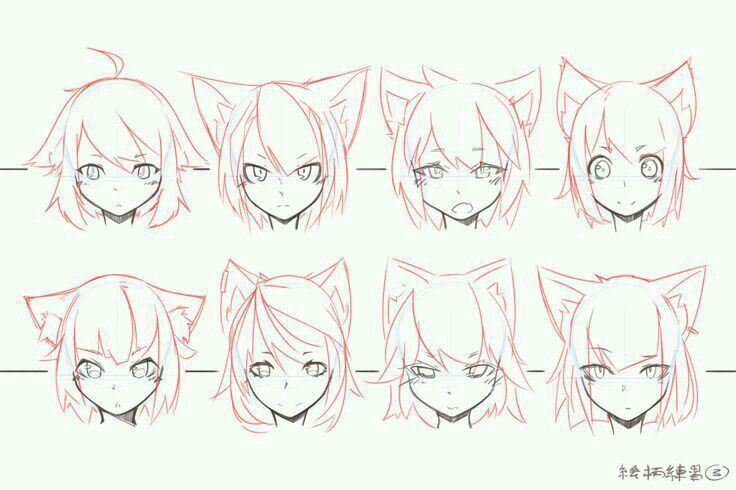
Ears are often partially or fully obscured by hair in anime, but understanding their basic placement and structure is still important, especially for characters with shorter hairstyles or when drawing side profiles.
Placement and Shape
- Guidelines: Generally, the top of the ear aligns with the eye line, and the bottom aligns with the nose line. This can vary slightly, but it’s a good starting point.
- Basic Shape: Anime ears are usually simplified. They can be a basic C-shape or a slightly more detailed oval with a simple inner curve for the helix and antihelix.
- Integration with Hair: When hair covers the ears, you might only see a small part of the lobe or the upper curve. Pay attention to how the hair flows around and over them.
Even if only a sliver of an ear is visible, its correct placement contributes to the overall believability and proportion of the head. Don’t just skip them entirely unless the style explicitly dictates it.
Understanding Angles: Dynamic Poses and Perspectives
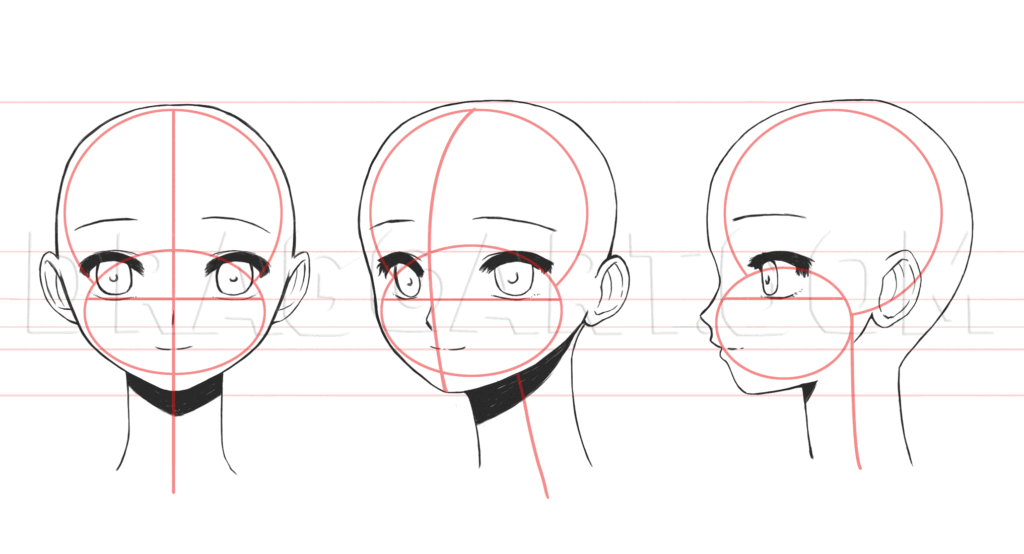
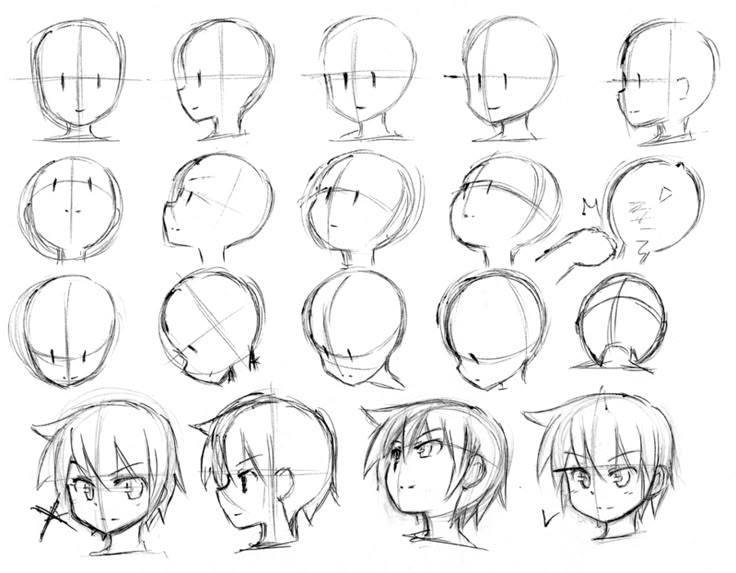
Drawing an anime head facing directly forward is a great start, but to truly bring your characters to life, you need to be able to draw them from various angles. This adds dynamism and realism to your art.
The Power of the Center Line
The key to drawing heads at different angles is manipulating your initial sphere and guidelines.
- 3/4 View:
- Start with your sphere.
- Instead of drawing the center line straight down the middle, curve it around the sphere to indicate the direction the head is turning. The line will be closer to one side of the circle.
- Similarly, the eye, nose, and mouth lines will also curve around the sphere, following the perspective. The features on the side closer to the viewer will appear slightly larger or more stretched, while those further away will be foreshortened.
- The jawline will connect differently, creating a more visible cheek on one side.
- Side Profile:
- Draw your sphere. The vertical center line will now be at the very front of the face, defining the profile.
- The eye line, nose line, and mouth line will still be horizontal, but they’ll extend from the center line backward into the head.
- The nose will project clearly from the face, and the chin will recede. The ear will be fully visible, placed according to the eye and nose lines.
- Looking Up/Down:
- When the head looks up, the horizontal guidelines (eye, nose, mouth) will curve upwards on the sphere. The jawline will appear shorter, and the neck will become more visible.
- When the head looks down, the horizontal guidelines will curve downwards. The top of the head will appear larger, the jawline longer, and the chin might slightly obscure the neck.
Practice rotating the simple sphere and guidelines in your mind or on paper. This mental exercise will help you understand how the 3D form translates onto a 2D surface. Don’t be afraid to use a physical sphere (like a ball) and draw lines on it with a marker to observe how they warp with rotation.
Express Yourself: Conveying Emotion
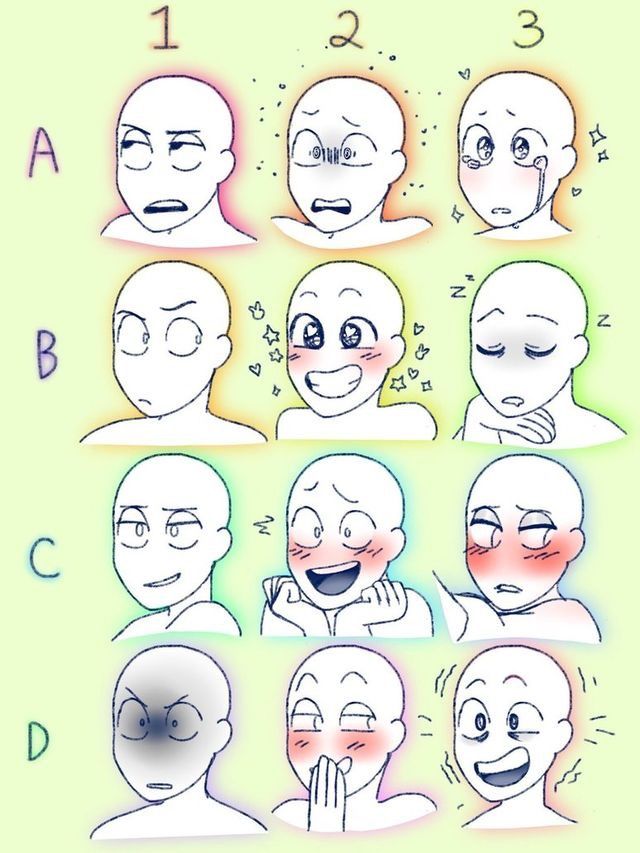
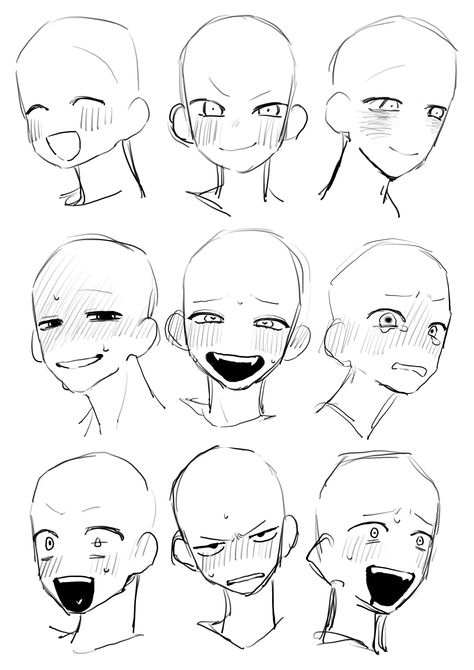
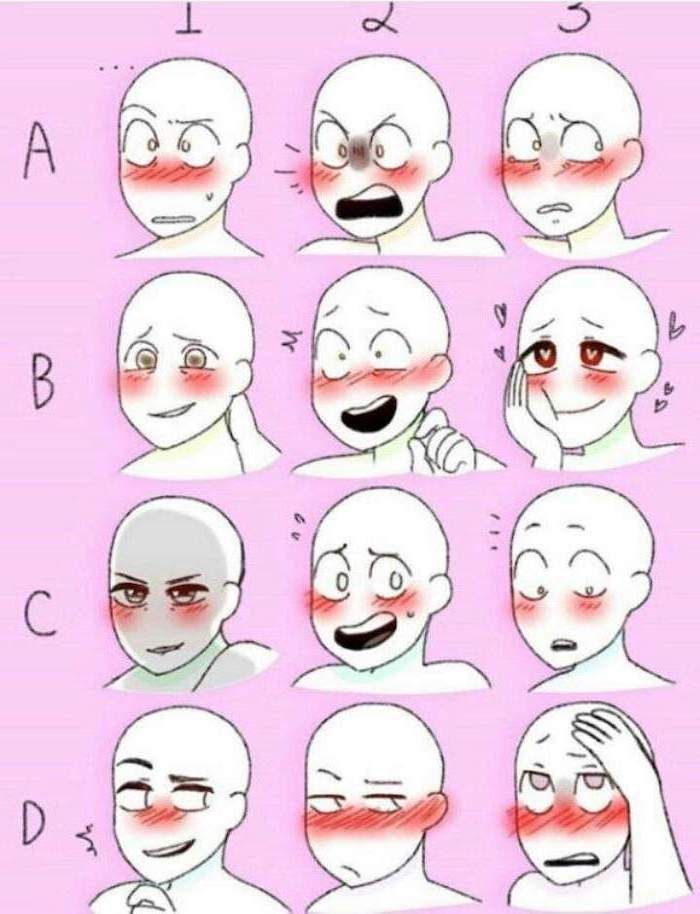
One of the most appealing aspects of anime is its incredible range of emotional expression. A character’s face can shift from subtle sadness to explosive joy with just a few line adjustments. Mastering this is key to bringing your characters to life.
The Trifecta of Emotion: Eyes, Eyebrows, and Mouth
These three features work together to create an expression. Changing one without considering the others will often look unnatural.
- Happiness:
- Eyes: Often squinted or curved upwards, sometimes with a sparkle or “crows feet” lines at the corners.
- Eyebrows: Relaxed, or slightly raised.
- Mouth: A wide, upturned curve, sometimes revealing teeth or a tongue.
- Sadness:
- Eyes: Downturned, sometimes with tears. Pupils might appear smaller.
- Eyebrows: Lowered and angled inwards, forming a V-shape.
- Mouth: Downturned curve, or a tight, straight line.
- Anger:
- Eyes: Narrowed, often with sharp angles.
- Eyebrows: Furrowed deeply, angled downwards and inwards.
- Mouth: A straight, tight line; clenched teeth; or an open yell with sharp corners.
- Surprise:
- Eyes: Wide open, sometimes with large, round pupils.
- Eyebrows: Highly arched and raised.
- Mouth: Wide open, forming an “O” shape.
Exaggeration is Your Friend
Anime embraces exaggeration. Don’t be afraid to push the limits of expression to convey strong emotions. A character might have sweat drops for nervousness, giant veins for anger, or a blush for embarrassment. These visual cues are part of the style’s charm.
Practice drawing a single head and then try to make it express different emotions by only altering the eyes, eyebrows, and mouth. It’s a fantastic exercise for developing your expressive range. To further hone your ability to capture various sentiments, exploring resources on drawing 10 emotions: convey mood through art can provide deeper insights and techniques.
Different Anime Head Styles: A World of Variety
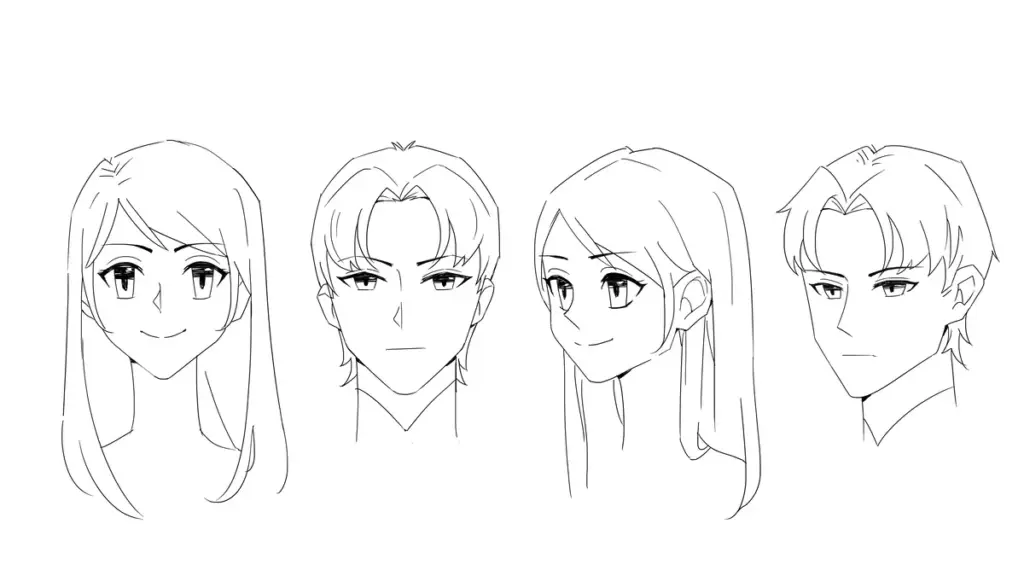
Anime isn’t a monolithic style; it’s a vast umbrella covering numerous sub-genres, each with its own aesthetic. While the core principles of head construction remain, the specific proportions and detailing can vary wildly.
- Shoujo (Girl’s Manga/Anime): Often characterized by large, sparkling eyes; delicate features; slender faces; and soft, flowing hair. Proportions tend to be more idealized and graceful.
- Shonen (Boy’s Manga/Anime): Heads tend to be more angular and varied. Eyes can still be large but are often sharper, more intense. Features might be more defined, and hair can be incredibly spiky or wild. Expressions are often more exaggerated for action and humor.
- Seinen/Josei (Adult Male/Female Manga/Anime): These styles often lean towards more realistic proportions. Eyes are typically smaller than in shoujo/shonen, and facial features are more detailed and subtle, aiming for a grounded, mature look.
- Chibi (Super Deformed): Characterized by extremely large heads, tiny bodies, and exaggerated, simplistic features. Chibi characters are designed to be cute and are often used for comedic relief or merchandise.
- Gekiga (Dramatic Pictures): A more realistic and graphic style, often found in older or more serious manga, focusing on gritty realism and less on idealized aesthetics.
Experiment with these different styles. Try drawing the same character in a shoujo style, then a shonen style, and then chibi. This will help you understand the flexibility of the anime aesthetic and develop your preferred approach.
Common Pitfalls and How to Avoid Them
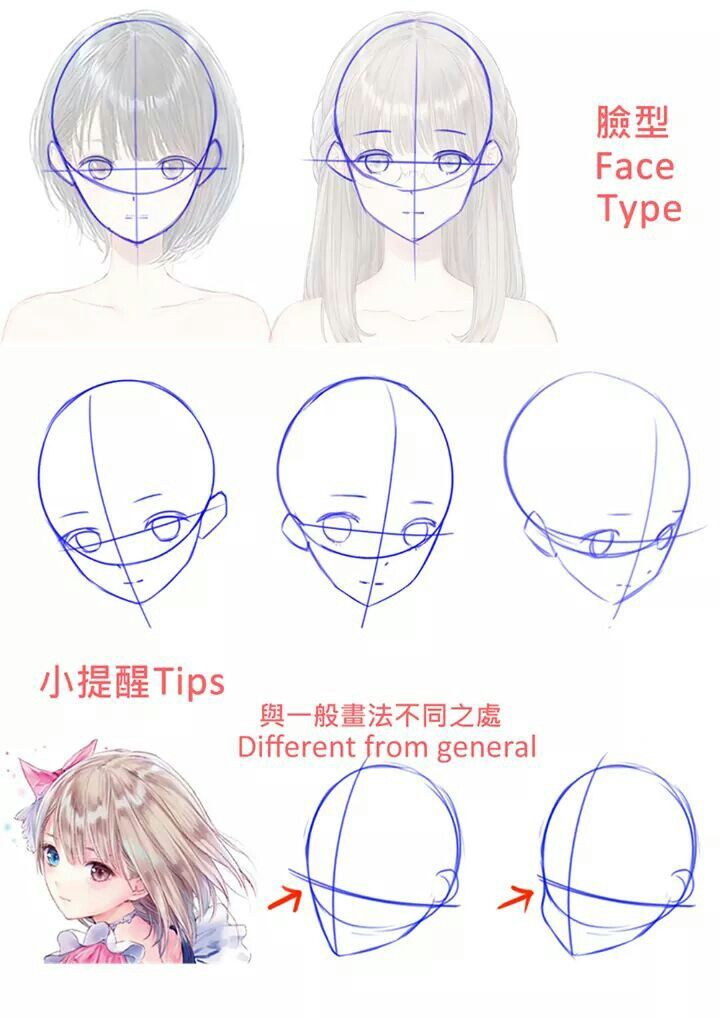
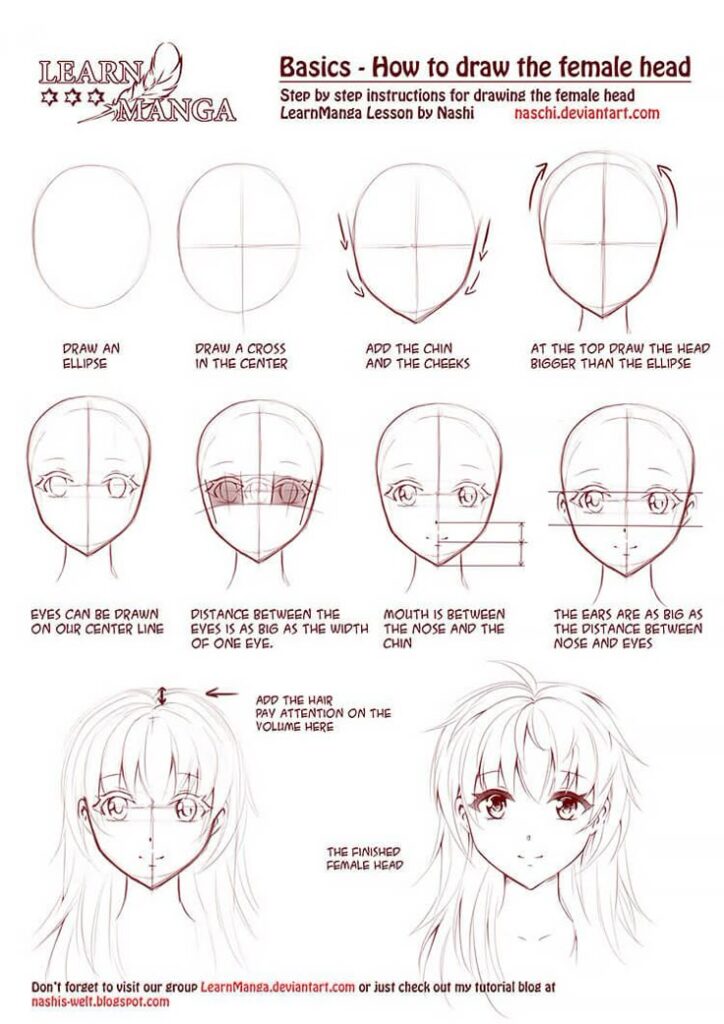
Even experienced artists encounter challenges. Here are some common mistakes beginners make when drawing anime heads and how to sidestep them:
- Symmetry Issues: One eye bigger than the other, one side of the jaw wider.
- Fix: Use your center line rigorously. Flip your canvas (if digital) or hold your paper up to a light source and trace the other side to spot inconsistencies. Practice drawing symmetrical shapes.
- Floating Features: Eyes, nose, or mouth appear to be hovering on the face rather than being integrated.
- Fix: Always start with your construction lines (eye, nose, mouth lines) before placing features. These lines act as anchors.
- Stiff Poses: Heads always facing perfectly forward or perfectly to the side, lacking natural movement.
- Fix: Embrace dynamic angles! Rotate your initial sphere and curve your guidelines. Imagine your character actually moving and interacting with their environment.
- “Same Face” Syndrome: All your characters look identical, regardless of gender, age, or personality.
- Fix: Experiment with varying eye shapes, jawlines, nose types, and especially hairstyles. Give male characters slightly wider jaws, female characters rounder chins. Research different anime series to see how they differentiate characters.
- Flat Hair: Hair looking like a helmet, lacking volume and flow.
- Fix: Remember that hair starts above the scalp. Think about clumps and curves, not individual strands. Imagine gravity and movement.
- Lack of Expression: Faces look blank or robotic.
- Fix: Focus on the “trifecta” (eyes, eyebrows, mouth). Practice drawing emotions specifically. Use references from real life or anime/manga panels.
Consistent practice and self-critique are your best tools for overcoming these common hurdles. Don’t be discouraged; every artist faces them!
Practice Makes Perfect: Exercises for Improvement
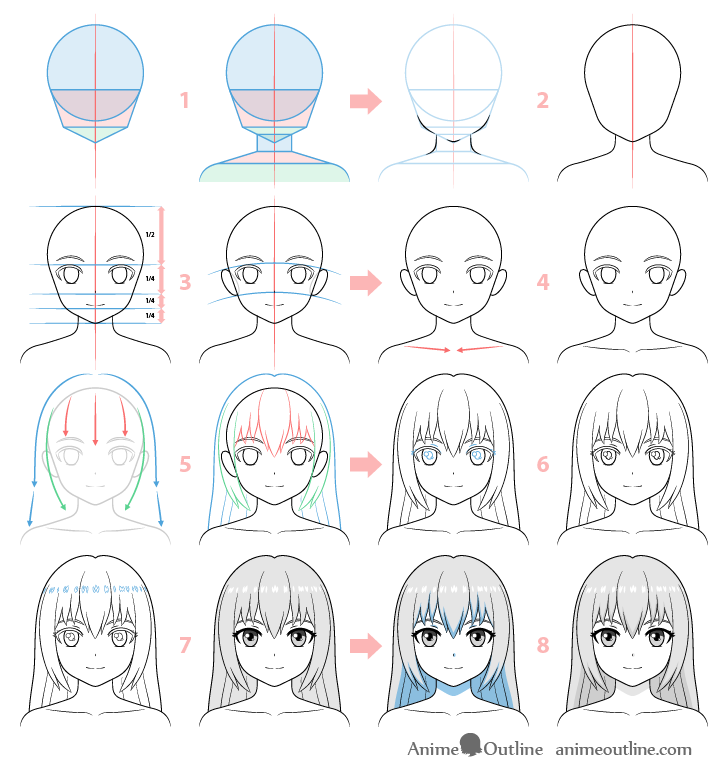
Drawing, like any skill, thrives on practice. The more you put in, the more you’ll see improvement. Here are some exercises to help you level up your anime head drawing:
- Daily Doodles: Dedicate 10-15 minutes each day to drawing heads. Don’t worry about perfection; just get lines on paper. This builds muscle memory and confidence.
- Circle Practice: Fill a page with circles. Try to make them as round as possible. This seems simple, but it’s fundamental for head construction.
- Guideline Drills: Draw a page full of heads using only the sphere and all the guidelines (center, eye, nose, mouth, jaw). Focus solely on accurate construction from different angles.
- Feature Focus: Dedicate sessions to drawing only eyes, then only noses and mouths, then only hair. Master each component before integrating them.
- Reference Drawing: Find anime screenshots, manga panels, or official art you admire. Try to replicate the heads, paying close attention to their construction and proportions. Don’t just trace; try to understand why they look that way.
- Expression Sheet: Pick a character and draw their head expressing 5-7 different emotions (happy, sad, angry, surprised, confused, mischievous).
- Style Experimentation: Try drawing a head in the style of a different anime series than you usually prefer. This expands your visual library.
- Timed Sketches: Set a timer for 1 or 2 minutes and try to sketch as many heads as possible. This forces you to focus on the essentials and work quickly.
- Digital Practice: If you have a tablet, programs like Procreate or Clip Studio Paint make it easy to undo mistakes, experiment with layers, and even flip your canvas for symmetry checks. If you’re exploring digital art, there are many resources out there, including tutorials on iPad drawing that can enhance your digital workflow.
Conclusion
You’ve just taken a deep dive into the fascinating world of drawing anime heads! We’ve covered everything from the foundational sphere and guidelines to the expressive eyes, dynamic hair, and subtle nuances that bring characters to life. Remember, art is a journey, not a destination. Each line you draw, each sketch you make, is a step forward in refining your skills and developing your unique artistic voice.
Don’t be afraid to make mistakes; they are crucial learning opportunities. Keep practicing, keep experimenting with different styles and emotions, and most importantly, keep having fun! The joy of seeing your favorite characters, or even brand new ones from your imagination, take shape on your canvas is truly rewarding. So, grab your pencil, fire up your tablet, and let your creativity flow. The next iconic anime head could be yours!
- 0shares
- Facebook0
- Pinterest0
- Twitter0
