Struggling with proportions? In this guide, you will learn how to draw the human body from scratch using simple geometric shapes.
Learning how to draw human figures is one of the most important skills for any artist. The human body may seem complex at first, but when broken down into simple shapes and proportions, it becomes much easier to understand and draw. Whether you’re sketching for fun, practicing anatomy, or improving your illustration skills, mastering the basics of human drawing builds a strong foundation for all types of art.
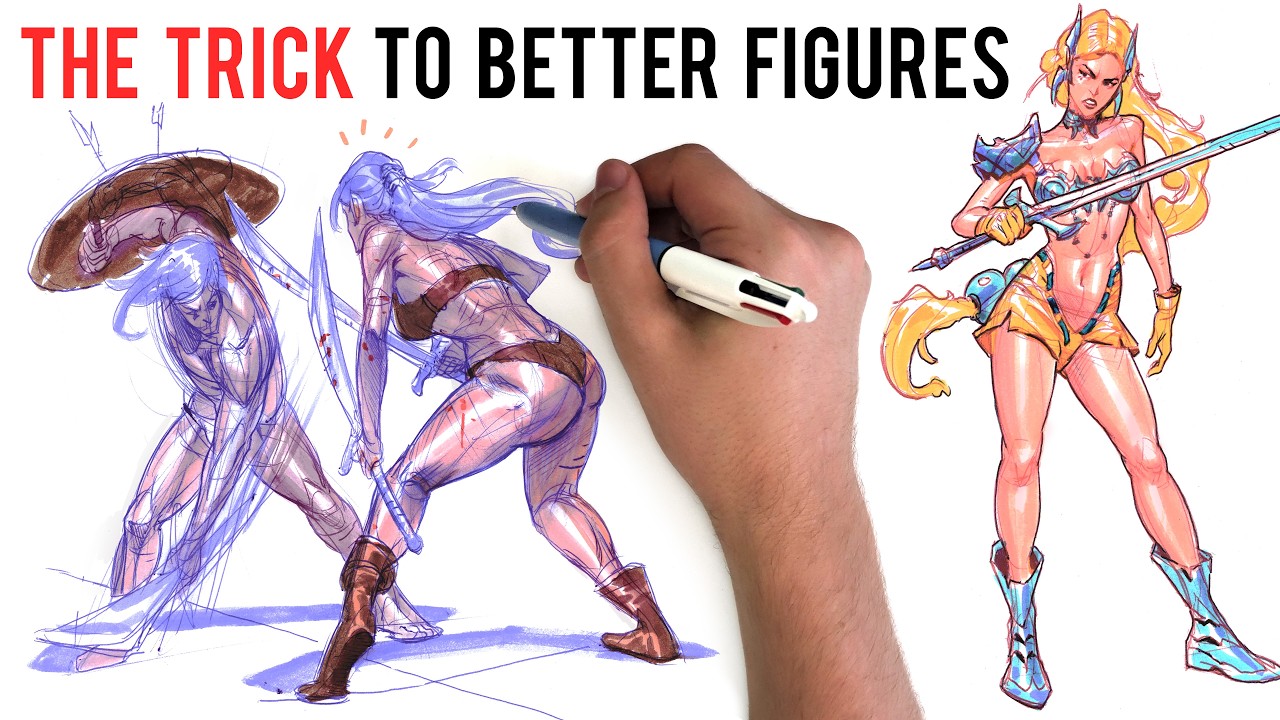
Drawing humans can be improved by practicing gesture drawing and starting with stick figures, which help beginners quickly capture the essence and movement of the figure.

This tutorial on how to draw human figures focuses on simple techniques that beginners can follow step by step. You’ll learn how to construct the human body using basic shapes, understand proportions, and place key features like the head, torso, arms, and legs correctly. Instead of jumping straight into details, the process starts with structure—helping you draw humans that look balanced and natural.
Many drawing tutorials and online courses, such as ‘Sketch from Scratch’, are available to help beginners learn to draw human figures.
Introduction to Human Body Drawing
Drawing the human body is a foundational skill for any artist, whether you’re interested in realistic figure drawing, character design, or illustration. The human form is both complex and fascinating, but by breaking it down into basic shapes and understanding the underlying anatomy, beginners can start to create accurate and expressive drawings.
Mastering human body drawing means learning how to see the body as a collection of simple forms—like circles, ovals, and rectangles—that come together to build the overall anatomy. By focusing on proportions and movement, you’ll be able to create dynamic and lifelike figures. Developing these skills not only helps you draw the human body more confidently, but also lays the groundwork for more advanced anatomy and creative work in the future.

By practicing these fundamentals regularly, you’ll gain confidence in drawing human poses, gestures, and movements. Whether your goal is realistic drawing, cartoons, or character design, understanding how to draw human figures is a skill that improves every other aspect of your artwork.

Life drawing classes and drawing from a live model are especially valuable for improving observation skills and capturing natural poses, as they allow you to study real-time anatomy and movement.
For more resources, you can find drawing tutorials and demonstrations on human anatomy and figure drawing on platforms like YouTube.
Draw human – easy tips
As you practice drawing humans, experiment with different techniques and linework to develop your own style. Finding what works best for you will help make your artwork unique.

Try using reference images of athletes or dancers to observe how anatomy changes in dynamic poses and under tension.


Understanding Human Anatomy
A solid grasp of human anatomy is essential for anyone who wants to draw the human body convincingly. Human anatomy involves understanding how bones, muscles, and joints work together to create the structure and movement of the body. By studying anatomy, artists can learn how to draw the human figure with correct proportions and believable poses. Using reference images, anatomy books, and drawing tutorials can help you observe how different parts of the body connect and move.

Practicing anatomy drawing—such as sketching the skeleton or mapping out major muscle groups—will make a big difference in the realism and accuracy of your artwork. The more you understand about the body’s structure, the easier it becomes to create natural and dynamic human figures.
Simple Guide: Human Body Drawing
Learning how to draw human figures is easier when you follow a clear, step-by-step process. To draw the human figure, start by simplifying the body into basic shapes and stick figures, which serve as the foundation for more detailed sketches. You don’t need advanced anatomy knowledge—just basic shapes, proportions, and practice.

Before adding specific muscles or details like facial features, it’s important to establish the pose and major masses such as the rib cage, pelvis, and head.
Step 1: Start With Simple Shapes

Begin by drawing a circle for the head, then draw a vertical line down from the head to establish the central axis of the figure. Use a straight line to align the waist and limbs, which helps capture realistic human proportions and positioning.
Use rectangles or ovals for the chest and hips; specifically, use a box or egg shape for the rib cage and a wider, flatter box for the pelvis. Use straight lines for the arms and legs to indicate alignment and structure. Connect the joints using cylinders or elongated ovals for the arms and legs. This creates a basic structure for the human body.
Step 2: Set the Proportions

A simple human figure is about 7–8 heads tall, with the ideal human body often considered to be eight heads tall—a standard established during the Renaissance. Understanding human anatomy is essential for achieving accurate proportions in figure drawing.
The shoulder width is determined by the shoulder joints and typically ranges from two to three head-widths. The pelvis is the most important part for body stability and proportion, serving as the center of gravity, while the ribcage is another key volume that influences both proportions and movement. Make sure the arms are proportionate to the shoulders and body, with the wrists generally aligning with the hip joints.
The hands are roughly the same size as the face, and the feet are approximately as long as the forearm. The legs should taper from the hips to the ankles for realistic proportions. This helps the body look balanced.
Step 3: Add Body Form

Turn the stick figure into a body by adding simple shapes over the lines, focusing on the human form and its overall structure. Use cylinders for arms and legs and connect them smoothly to the torso, making sure to accurately place the knee joint at the bending point of the leg. Identify points where bone is visible through the skin, such as collarbones, elbows, and knees, to help with muscle placement.
Step 4: Draw Basic Features

Lightly sketch the face, hands, and feet without focusing on specific details at this stage. Keep everything simple at first.
To improve your understanding of anatomy, practice by drawing skeletal and muscular structures over a reference photo.
Drawing Facial Features and Hair
Drawing facial features and hair is a key part of bringing your human body drawings to life. The placement and proportion of the eyes, nose, mouth, and ears are crucial for capturing a realistic head and expression. Start by lightly sketching guidelines to help position each feature accurately on the face. Use reference images to study the subtle differences in facial features and practice drawing them from different angles.

When you draw hair, think about its flow and volume—use soft, directional strokes to suggest movement and texture. Experiment with different hairstyles and pay attention to how hair interacts with the shape of the head. By focusing on these details and practicing regularly, you’ll be able to create expressive and believable faces in your human body drawings.

Drawing Hands and Feet
Drawing hands and feet is often considered one of the most challenging parts of human body drawing, but mastering these extremities is essential for creating realistic and expressive human figures. Both hands and feet have unique shapes and structures that can make a big difference in the overall look of your artwork. By breaking them down into basic shapes and understanding their anatomy, you can start drawing them with greater confidence.

When you start drawing hands, think of the palm as a rounded box or oval, and use straight lines or gentle curves to map out the fingers. Each finger is made up of three segments, and the thumb is set at an angle, opposing the other fingers. Pay close attention to the proportions and how the fingers spread or bend depending on the pose. Using reference photos or observing your own hands in real life can help you understand the subtle variations in shape and movement. Don’t forget to study the upper arm and how the wrist connects to the hand, as this will help your drawings look more natural.

Feet can be just as tricky, but breaking them into simple forms makes the process easier. Start with a wedge or triangular shape for the main part of the foot, add a rounded heel, and sketch in the toes as smaller ovals or rectangles. The big toe is usually more prominent and set apart from the others, which are often grouped together.
Pay attention to the arch of the foot and how it curves, as well as the way the ankle connects to the leg. Reference images and anatomy drawing guides are invaluable for understanding these details.
The legs taper from the hips to the ankles, which is important for achieving realistic proportions in figure drawing.
Capturing Dynamic Poses
One of the most exciting aspects of human body drawing is capturing dynamic poses that convey movement and energy. Observing real life and using reference images of people in action—such as athletes, dancers, or everyday gestures—can help you understand how the body moves. Practice sketching quick poses to get a feel for the flow and balance of the human form.

Focus on the overall gesture and weight distribution before adding details. Drawing dynamic poses not only makes your artwork more engaging, but also helps you develop a deeper understanding of anatomy and how the figure moves. The more you practice, the more confident you’ll become in creating lively and realistic human body drawings.
Step 5: Refine and Practice

Darken your final lines, erase extra guides, and gradually add details to refine your drawing. Study light and shadow to create realistic, three-dimensional figures—practice observing how light interacts with the human form and incorporate shading techniques to enhance depth and accuracy. Practice drawing different poses, especially dynamic poses, to improve your ability to capture movement and expression.
Try setting a time limit for gesture drawing exercises—this encourages quick, instinctive sketches without overthinking. Practicing with quick sketches helps capture the essence of human poses. Repetition is the key to improving when learning how to draw human figures.

From large parts to detail
Lips can be drawn by using simple curves to form the upper and lower lip, focusing on symmetry and proportion rather than details. Beginners should start lightly, define the center line of the mouth, and then add volume with soft shading to create a natural look. With practice, drawing lips becomes easier and helps improve overall facial drawing skills.
The most important thing in the figure of a person is the construction and proportions


Learning how to draw head starts with understanding basic proportions and simple shapes. Beginners can begin by drawing a circle for the skull and adding a jawline to form the head structure.


Placing guidelines for the eyes, nose, and mouth helps keep facial features balanced. Practicing different angles improves accuracy and confidence when drawing heads.


Beginners should begin with a box or oval for the palm and simple lines for the fingers.
Focusing on finger length, joint placement, and light shading helps create natural-looking hands without overcomplicating details. Practicing different hand positions improves accuracy and confidence over time.

Hair should be drawn in sections using soft, directional strokes to show movement and volume.


Skin is best drawn with light shading and smooth transitions instead of hard lines, helping the face or body look realistic. Practicing light pressure and layering tones makes hair and skin appear more natural and lifelike.


Learning how to draw a nose begins with understanding its basic shape and placement on the face. Beginners can start by using simple shapes, such as a small triangle or oval, to mark the nose structure.

By adding light shading instead of heavy outlines, the nose appears more natural and realistic. Practicing different angles helps improve accuracy and confidence when drawing noses.
Using Reference Images and Tutorials
Reference images and drawing tutorials are invaluable tools for anyone learning to draw the human body. By studying reference images, you can observe real-life anatomy, proportions, and poses, which will help you draw the human figure more accurately.

Tutorials—whether found online, in books, or on platforms like YouTube—offer step-by-step guidance and tips for tackling specific challenges, such as drawing hands, feet, or complex poses. Make it a habit to use reference images when practicing, and don’t hesitate to follow along with drawing tutorials to build your skills. Over time, this approach will help you create more realistic and dynamic human body drawings, and give you the confidence to experiment with your own style.
Common Mistakes to Avoid
When learning to draw the human body, it’s easy to fall into a few common traps. One frequent mistake is getting the proportions wrong, such as making the head too large or the limbs too short, which can throw off the balance of your figure. Another is neglecting the underlying anatomy—remember to consider how bones and muscles shape the body, even if you’re drawing in a simplified style.

Avoid stiff, unnatural poses by studying real-life movement and practicing gesture drawing to capture the flow of the body. Finally, don’t rush into details before establishing the basic structure and proportions. By being mindful of these pitfalls and focusing on anatomy, proportion, and movement, you’ll be able to create more realistic and engaging drawings of the human body.
Conclusion
Learning how to draw human figures becomes easier when you focus on simple shapes, proper proportions, consistent practice, and studying light and shadow to enhance realism. By starting with basic structure and gradually adding detail, beginners can improve quickly and confidently. Mastering human drawing fundamentals, including learning to draw bodies in different poses and lighting conditions, helps artists create more dynamic and realistic artwork over time.
Frequently Asked Questions (FAQ)
How to draw a human very easily?
Drawing a human very easily starts with breaking down the figure into simple shapes such as circles, ovals, rectangles, and lines. Begin with a basic stick figure to establish the pose and proportions, then add volume by fleshing out the shapes for the head, torso, arms, and legs. Focus on the overall structure before adding details. Using reference images and practicing gesture drawing can also help capture the essence and movement of the human form quickly and effectively.
What can a 7 year old draw realistic?
A 7-year-old can begin drawing realistic figures by focusing on simple shapes and basic proportions. They can start with stick figures or simple block shapes to represent the human body and gradually add features like the head, limbs, and facial characteristics. Encouraging practice with reference photos and easy step-by-step tutorials helps children develop observational skills and improve their ability to draw more lifelike figures over time.
What are the 7 steps of sketching?
The 7 steps of sketching generally include:
- Observation: Carefully look at your subject to understand its shape, proportions, and details.
- Basic Shapes: Start by drawing simple shapes to represent the main parts of the subject.
- Outline: Connect the shapes with lines to form the basic outline of the figure.
- Proportions: Check and adjust the proportions to ensure accuracy.
- Details: Add important features such as facial features, fingers, or clothing folds.
- Shading: Use light and shadow to create depth and volume.
- Refinement: Clean up the sketch by erasing guidelines and enhancing key lines for clarity and emphasis.
These steps help create structured and realistic sketches, especially when drawing complex subjects like the human body.
- 428.9Kshares
- Facebook0
- Pinterest428.9K
- Twitter3
- Reddit0


